
yolov26改进 | 细节创新篇 | 最新动态特征融合模块DFF二次创新C3k2助力yolov26有效涨点(附独家网络结构图)

开始讲解之前推荐一下我的专栏,本专栏的内容支持(分类、检测、分割、追踪、关键点检测),专栏目前为限时折扣,欢迎大家订阅本专栏,本专栏每周更新5-7篇最新机制,更有包含我所有改进的文件和交流群提供给大家,本人定期在群内分享发表论文方法和经验。
一、本文介绍
本文给大家带来的最新改进机制是D-Net: Dynamic Large Kernel with Dynamic Feature Fusion for Volumetric Medical Image Segmentation文章提出的动态特征融合(DFF)模块,我将其用于二次创新C3k2机制,利用其能够解决不同尺度的局部特征在融合时的信息丢失的能力, DFF基于全局信息自适应地融合不同尺度的局部特征图,使得网络能够在更大的感受野下有效结合多尺度信息,通过动态融合,DFF能够更好地保留局部特征的细节,同时增强全局信息的有效利用,本文内容主要适用于分割网络,下图为DFF网络结构图,本文附二次创新C3k2机制并提供多个使用方法.
欢迎大家订阅我的专栏一起学习YOLO,购买专栏读者联系读者入群获取进阶项目文件!
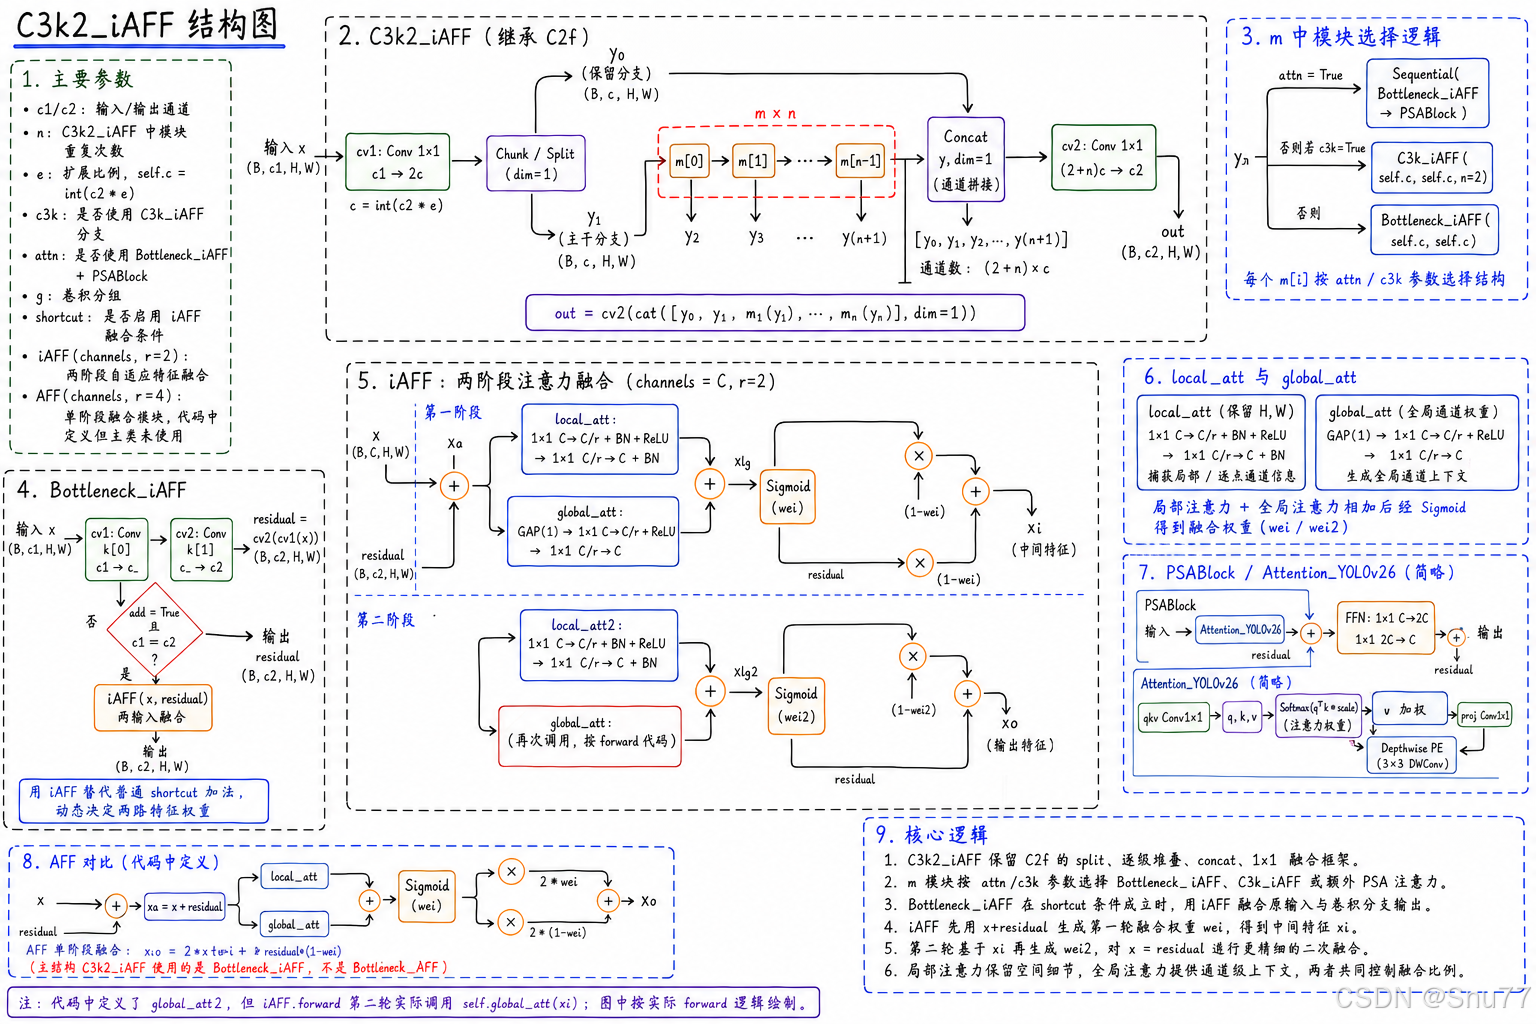
专栏链接:YOLOv26有效涨点专栏包含:Conv、注意力机制、主干/Backbone、损失函数、优化器、后处理等改进机制
目录
二、原理介绍
官方论文地址:官方论文地址点击此处即可跳转
官方代码地址:
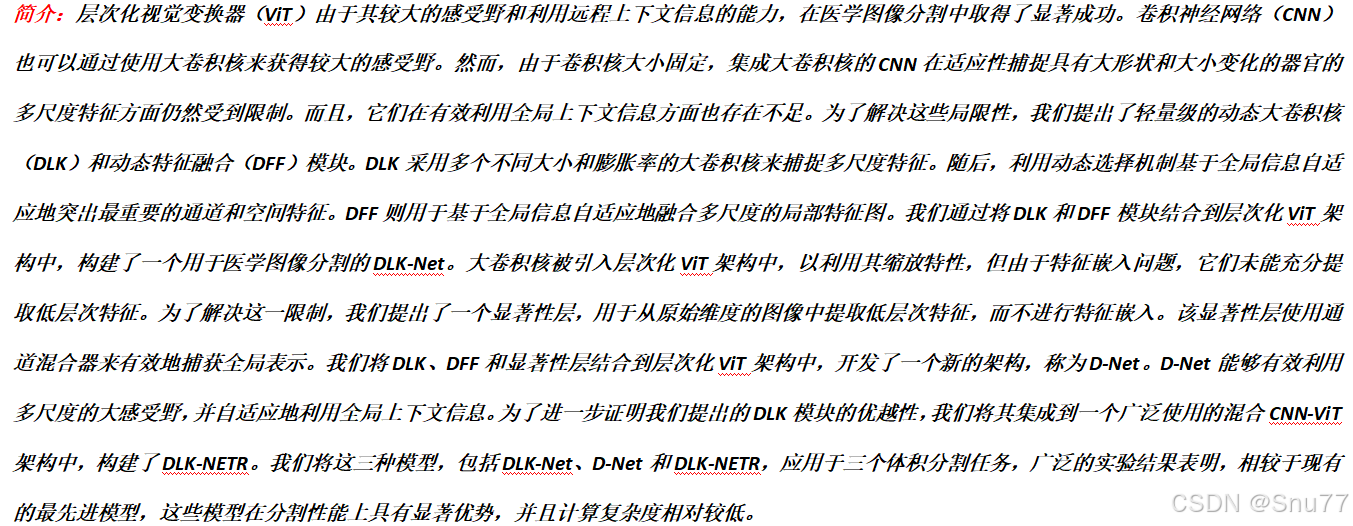
这篇论文的核心思想是通过引入 动态大卷积核(DLK) 和 动态特征融合(DFF) 模块,结合 层次化视觉变换器(ViT) 架构,来克服卷积神经网络(CNN)和传统视觉变换器在医学图像分割中的一些局限性。传统的CNN在处理大范围和复杂形态的医学图像时,由于固定卷积核的局限,无法充分捕捉多尺度特征或有效利用全局上下文信息。而ViT尽管能处理远程上下文信息,但由于特征嵌入过程,未能有效提取低层次特征。为了解决这些问题,作者提出了多个创新模块,最终构建了一个新的医学图像分割架构,称为 D-Net,并进一步提出了 DLK-NETR 来进一步验证这些模块的有效性。
分点介绍:
动态大卷积核(DLK)模块:
- 目的:解决CNN使用固定大小卷积核时无法适应大形态和大小变化的器官问题。
- 机制:DLK采用多个大卷积核,并通过不同的大小和膨胀率来捕捉多尺度特征。通过这种方式,网络可以更好地适应医学图像中器官的大小和形状变化。
- 动态选择机制:DLK利用全局信息自适应地选择最重要的通道和空间特征,从而提高网络的灵活性和准确性。
动态特征融合(DFF)模块(本文引用的模块):
- 目的:解决不同尺度的局部特征在融合时的信息丢失问题。
- 机制:DFF基于全局信息自适应地融合不同尺度的局部特征图,使得网络能够在更大的感受野下有效结合多尺度信息。
- 优势:通过动态融合,DFF能够更好地保留局部特征的细节,同时增强全局信息的有效利用,提升分割精度。
显著性层(Salience Layer):
- 目的:解决ViT架构中低层次特征提取不充分的问题。
- 机制:显著性层直接从原始图像中提取低层次特征,避免了ViT特征嵌入过程中可能丢失的重要信息。显著性层还使用通道混合器来有效地捕捉全局表示。
- 作用:它帮助网络更好地获取低级别的空间信息和细节,提高分割任务的表现。
D-Net架构:
- 构建:D-Net结合了DLK、DFF和显著性层模块,构建了一个新的医学图像分割架构。该网络通过多尺度感受野和全局上下文信息的自适应利用,能够有效分割医学图像。
- 优势:通过层次化ViT架构,D-Net可以更好地处理医学图像的复杂性和多样性,特别是那些具有明显形态变化的器官或结构。
DLK-NETR架构:
- 构建:为了进一步验证DLK模块的有效性,作者将其集成到了一个混合CNN-ViT架构中,创建了DLK-NETR。这个架构融合了卷积神经网络和视觉变换器的优点,既能有效提取局部特征,又能利用全局上下文信息。
- 验证:通过对多个医学图像分割任务进行实验,DLK-NETR展示了比现有的最先进模型更高的分割性能,并且具有较低的计算复杂度。
总结:本文通过引入 动态大卷积核(DLK)、动态特征融合(DFF) 和 显著性层,有效地解决了传统CNN和ViT在医学图像分割中的不足。DLK模块通过多尺度特征的捕捉和动态选择机制提高了分割的精度,DFF模块通过自适应地融合多尺度局部特征增强了全局信息的有效利用,而显著性层则确保低层次特征的提取不被忽略。最终,这些创新模块被集成到层次化的ViT架构中,构建了D-Net,并通过实验验证了其在医学图像分割任务中的优越性。此外,通过将DLK模块结合到混合CNN-ViT架构中,进一步验证了这些方法的有效性。
这些创新不仅提升了医学图像分割的精度,而且在计算复杂度上也具有优势,展示了其在实际应用中的巨大潜力。
三、核心代码
核心代码的使用方式看章节四!
import torch
import torch.nn as nn

__all__ = ['C3k2_DFF']


class DFF(nn.Module):
    def __init__(self, dim):
        super().__init__()

        self.avg_pool = nn.AdaptiveAvgPool2d(1)
        self.conv_atten = nn.Sequential(
            nn.Conv2d(dim * 2, dim * 2, kernel_size=1, bias=False),
            nn.Sigmoid()
        )
        self.conv_redu = nn.Conv2d(dim * 2, dim, kernel_size=1, bias=False)

        self.conv1 = nn.Conv2d(dim, 1, kernel_size=1, stride=1, bias=True)
        self.conv2 = nn.Conv2d(dim, 1, kernel_size=1, stride=1, bias=True)
        self.nonlin = nn.Sigmoid()

    def forward(self, x, skip):
        output = torch.cat([x, skip], dim=1)

        att = self.conv_atten(self.avg_pool(output))
        output = output * att
        output = self.conv_redu(output)

        att = self.conv1(x) + self.conv2(skip)
        att = self.nonlin(att)
        output = output * att
        return output


class Bottleneck_DFF(nn.Module):
    """Standard bottleneck."""

    def __init__(self, c1, c2, shortcut=True, g=1, k=(3, 3), e=0.5):
        """Initializes a bottleneck module with given input/output channels, shortcut option, group, kernels, and
        expansion.
        """
        super().__init__()
        c_ = int(c2 * e)  # hidden channels
        self.cv1 = Conv(c1, c_, k[0], 1)
        self.cv2 = Conv(c_, c2, k[1], 1, g=g)
        self.add = shortcut and c1 == c2
        self.DFF = DFF(c2)

    def forward(self, x):
        """'forward()' applies the YOLO FPN to input data."""
        if self.add:
            results = self.DFF(x, self.cv2(self.cv1(x)))
        else:
            results = self.cv2(self.cv1(x))
        return results


class Bottleneck(nn.Module):
    """Standard bottleneck."""

    def __init__(self, c1, c2, shortcut=True, g=1, k=(3, 3), e=0.5):
        """Initializes a standard bottleneck module with optional shortcut connection and configurable parameters."""
        super().__init__()
        c_ = int(c2 * e)  # hidden channels
        self.cv1 = Conv(c1, c_, k[0], 1)
        self.cv2 = Conv(c_, c2, k[1], 1, g=g)
        self.add = shortcut and c1 == c2

    def forward(self, x):
        """Applies the YOLO FPN to input data."""
        return x + self.cv2(self.cv1(x)) if self.add else self.cv2(self.cv1(x))


class C2f(nn.Module):
    """Faster Implementation of CSP Bottleneck with 2 convolutions."""

    def __init__(self, c1, c2, n=1, shortcut=False, g=1, e=0.5):
        """Initializes a CSP bottleneck with 2 convolutions and n Bottleneck blocks for faster processing."""
        super().__init__()
        self.c = int(c2 * e)  # hidden channels
        self.cv1 = Conv(c1, 2 * self.c, 1, 1)
        self.cv2 = Conv((2 + n) * self.c, c2, 1)  # optional act=FReLU(c2)
        self.m = nn.ModuleList(Bottleneck(self.c, self.c, shortcut, g, k=((3, 3), (3, 3)), e=1.0) for _ in range(n))

    def forward(self, x):
        """Forward pass through C2f layer."""
        y = list(self.cv1(x).chunk(2, 1))
        y.extend(m(y[-1]) for m in self.m)
        return self.cv2(torch.cat(y, 1))

    def forward_split(self, x):
        """Forward pass using split() instead of chunk()."""
        y = list(self.cv1(x).split((self.c, self.c), 1))
        y.extend(m(y[-1]) for m in self.m)
        return self.cv2(torch.cat(y, 1))

def autopad(k, p=None, d=1):  # kernel, padding, dilation
    """Pad to 'same' shape outputs."""
    if d > 1:
        k = d * (k - 1) + 1 if isinstance(k, int) else [d * (x - 1) + 1 for x in k]  # actual kernel-size
    if p is None:
        p = k // 2 if isinstance(k, int) else [x // 2 for x in k]  # auto-pad
    return p


class Conv(nn.Module):
    """Standard convolution with args(ch_in, ch_out, kernel, stride, padding, groups, dilation, activation)."""
    default_act = nn.SiLU()  # default activation

    def __init__(self, c1, c2, k=1, s=1, p=None, g=1, d=1, act=True):
        """Initialize Conv layer with given arguments including activation."""
        super().__init__()
        self.conv = nn.Conv2d(c1, c2, k, s, autopad(k, p, d), groups=g, dilation=d, bias=False)
        self.bn = nn.BatchNorm2d(c2)
        self.act = self.default_act if act is True else act if isinstance(act, nn.Module) else nn.Identity()

    def forward(self, x):
        """Apply convolution, batch normalization and activation to input tensor."""
        return self.act(self.bn(self.conv(x)))

    def forward_fuse(self, x):
        """Perform transposed convolution of 2D data."""
        return self.act(self.conv(x))


class C3(nn.Module):
    """CSP Bottleneck with 3 convolutions."""

    def __init__(self, c1, c2, n=1, shortcut=True, g=1, e=0.5):
        """Initialize the CSP Bottleneck with given channels, number, shortcut, groups, and expansion values."""
        super().__init__()
        c_ = int(c2 * e)  # hidden channels
        self.cv1 = Conv(c1, c_, 1, 1)
        self.cv2 = Conv(c1, c_, 1, 1)
        self.cv3 = Conv(2 * c_, c2, 1)  # optional act=FReLU(c2)
        self.m = nn.Sequential(*(Bottleneck(c_, c_, shortcut, g, k=((1, 1), (3, 3)), e=1.0) for _ in range(n)))

    def forward(self, x):
        """Forward pass through the CSP bottleneck with 2 convolutions."""
        return self.cv3(torch.cat((self.m(self.cv1(x)), self.cv2(x)), 1))


class C3k(C3):
    """C3k is a CSP bottleneck module with customizable kernel sizes for feature extraction in neural networks."""

    def __init__(self, c1, c2, n=1, shortcut=True, g=1, e=0.5, k=3):
        """Initializes the C3k module with specified channels, number of layers, and configurations."""
        super().__init__(c1, c2, n, shortcut, g, e)
        c_ = int(c2 * e)  # hidden channels
        # self.m = nn.Sequential(*(RepBottleneck(c_, c_, shortcut, g, k=(k, k), e=1.0) for _ in range(n)))
        self.m = nn.Sequential(*(Bottleneck(c_, c_, shortcut, g, k=(k, k), e=1.0) for _ in range(n)))

class Attention_YOLOv26(nn.Module):
    """Attention module that performs self-attention on the input tensor.

    Args:
        dim (int): The input tensor dimension.
        num_heads (int): The number of attention heads.
        attn_ratio (float): The ratio of the attention key dimension to the head dimension.

    Attributes:
        num_heads (int): The number of attention heads.
        head_dim (int): The dimension of each attention head.
        key_dim (int): The dimension of the attention key.
        scale (float): The scaling factor for the attention scores.
        qkv (Conv): Convolutional layer for computing the query, key, and value.
        proj (Conv): Convolutional layer for projecting the attended values.
        pe (Conv): Convolutional layer for positional encoding.
    """

    def __init__(self, dim: int, num_heads: int = 8, attn_ratio: float = 0.5):
        """Initialize multi-head attention module.

        Args:
            dim (int): Input dimension.
            num_heads (int): Number of attention heads.
            attn_ratio (float): Attention ratio for key dimension.
        """
        super().__init__()
        self.num_heads = num_heads
        self.head_dim = dim // num_heads
        self.key_dim = int(self.head_dim * attn_ratio)
        self.scale = self.key_dim**-0.5
        nh_kd = self.key_dim * num_heads
        h = dim + nh_kd * 2
        self.qkv = Conv(dim, h, 1, act=False)
        self.proj = Conv(dim, dim, 1, act=False)
        self.pe = Conv(dim, dim, 3, 1, g=dim, act=False)

    def forward(self, x: torch.Tensor) -> torch.Tensor:
        """Forward pass of the Attention module.

        Args:
            x (torch.Tensor): The input tensor.

        Returns:
            (torch.Tensor): The output tensor after self-attention.
        """
        B, C, H, W = x.shape
        N = H * W
        qkv = self.qkv(x)
        q, k, v = qkv.view(B, self.num_heads, self.key_dim * 2 + self.head_dim, N).split(
            [self.key_dim, self.key_dim, self.head_dim], dim=2
        )

        attn = (q.transpose(-2, -1) @ k) * self.scale
        attn = attn.softmax(dim=-1)
        x = (v @ attn.transpose(-2, -1)).view(B, C, H, W) + self.pe(v.reshape(B, C, H, W))
        x = self.proj(x)
        return x


class PSABlock(nn.Module):
    """PSABlock class implementing a Position-Sensitive Attention block for neural networks.

    This class encapsulates the functionality for applying multi-head attention and feed-forward neural network layers
    with optional shortcut connections.

    Attributes:
        attn (Attention): Multi-head attention module.
        ffn (nn.Sequential): Feed-forward neural network module.
        add (bool): Flag indicating whether to add shortcut connections.

    Methods:
        forward: Performs a forward pass through the PSABlock, applying attention and feed-forward layers.

    """

    def __init__(self, c: int, attn_ratio: float = 0.5, num_heads: int = 4, shortcut: bool = True) -> None:
        """Initialize the PSABlock.

        Args:
            c (int): Input and output channels.
            attn_ratio (float): Attention ratio for key dimension.
            num_heads (int): Number of attention heads.
            shortcut (bool): Whether to use shortcut connections.
        """
        super().__init__()

        self.attn = Attention_YOLOv26(c, attn_ratio=attn_ratio, num_heads=num_heads)
        self.ffn = nn.Sequential(Conv(c, c * 2, 1), Conv(c * 2, c, 1, act=False))
        self.add = shortcut

    def forward(self, x: torch.Tensor) -> torch.Tensor:
        """Execute a forward pass through PSABlock.

        Args:
            x (torch.Tensor): Input tensor.

        Returns:
            (torch.Tensor): Output tensor after attention and feed-forward processing.
        """
        x = x + self.attn(x) if self.add else self.attn(x)
        x = x + self.ffn(x) if self.add else self.ffn(x)
        return x

class C3k(C3):
    """C3k is a CSP bottleneck module with customizable kernel sizes for feature extraction in neural networks."""

    def __init__(self, c1: int, c2: int, n: int = 1, shortcut: bool = True, g: int = 1, e: float = 0.5, k: int = 3):
        """Initialize C3k module.

        Args:
            c1 (int): Input channels.
            c2 (int): Output channels.
            n (int): Number of Bottleneck blocks.
            shortcut (bool): Whether to use shortcut connections.
            g (int): Groups for convolutions.
            e (float): Expansion ratio.
            k (int): Kernel size.
        """
        super().__init__(c1, c2, n, shortcut, g, e)
        c_ = int(c2 * e)  # hidden channels
        # self.m = nn.Sequential(*(RepBottleneck(c_, c_, shortcut, g, k=(k, k), e=1.0) for _ in range(n)))
        self.m = nn.Sequential(*(Bottleneck(c_, c_, shortcut, g, k=(k, k), e=1.0) for _ in range(n)))


class C3k_DFF(C3):
    """C3k is a CSP bottleneck module with customizable kernel sizes for feature extraction in neural networks."""

    def __init__(self, c1, c2, n=1, shortcut=True, g=1, e=0.5, k=3):
        """Initializes the C3k module with specified channels, number of layers, and configurations."""
        super().__init__(c1, c2, n, shortcut, g, e)
        c_ = int(c2 * e)  # hidden channels
        # self.m = nn.Sequential(*(RepBottleneck(c_, c_, shortcut, g, k=(k, k), e=1.0) for _ in range(n)))
        self.m = nn.Sequential(*(Bottleneck_DFF(c_, c_, shortcut, g, k=(k, k), e=1.0) for _ in range(n)))


class C3k2_DFF(C2f):
    """Faster Implementation of CSP Bottleneck with 2 convolutions."""

    def __init__(
        self,
        c1: int,
        c2: int,
        n: int = 1,
        c3k: bool = False,
        e: float = 0.5,
        attn: bool = False,
        g: int = 1,
        shortcut: bool = True,
    ):
        """Initialize C3k2 modu
        Args:
            c1 (int): Input channels.
            c2 (int): Output channels.
            n (int): Number of blocks.
            c3k (bool): Whether to use C3k blocks.
            e (float): Expansion ratio.
            attn (bool): Whether to use attention blocks.
            g (int): Groups for convolutions.
            shortcut (bool): Whether to use shortcut connections.
        """
        super().__init__(c1, c2, n, shortcut, g, e)
        self.m = nn.ModuleList(
            nn.Sequential(
                Bottleneck_DFF(self.c, self.c, shortcut, g),
                PSABlock(self.c, attn_ratio=0.5, num_heads=max(self.c // 64, 1)),
            )
            if attn
            else C3k_DFF(self.c, self.c, 2, shortcut, g)
            if c3k
            else Bottleneck_DFF(self.c, self.c, shortcut, g)
            for _ in range(n)
        )


if __name__ == '__main__':
    from thop import profile, clever_format
    inp1= torch.rand(1,48,256,256)
    model = C3k2_DFF(48,48)
    out = model(inp1)
    print(out.shape)
四、添加教程
下面的步骤如果你不会或者不想麻烦操作,可以联系作者获得本专栏添加所有项目文件的源代码,可直接训练.
4.1 修改一
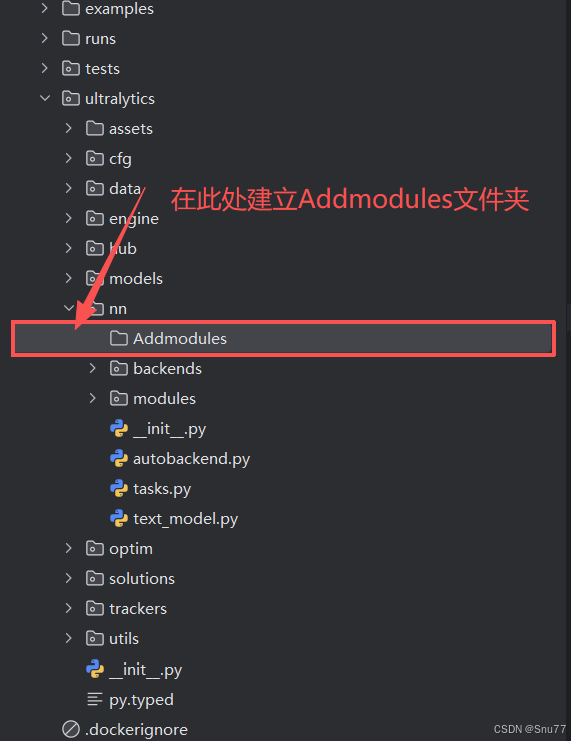
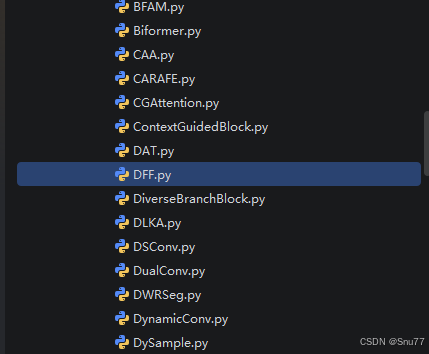
第一还是建立文件,我们找到如下ultralytics/nn文件夹下建立一个目录名字呢就是'Addmodules'文件夹!
4.2 修改二
然后在Addmodules文件夹内建立一个新的py文件,将本文章节三中的“核心代码"复制粘贴进去。
4.3 修改三
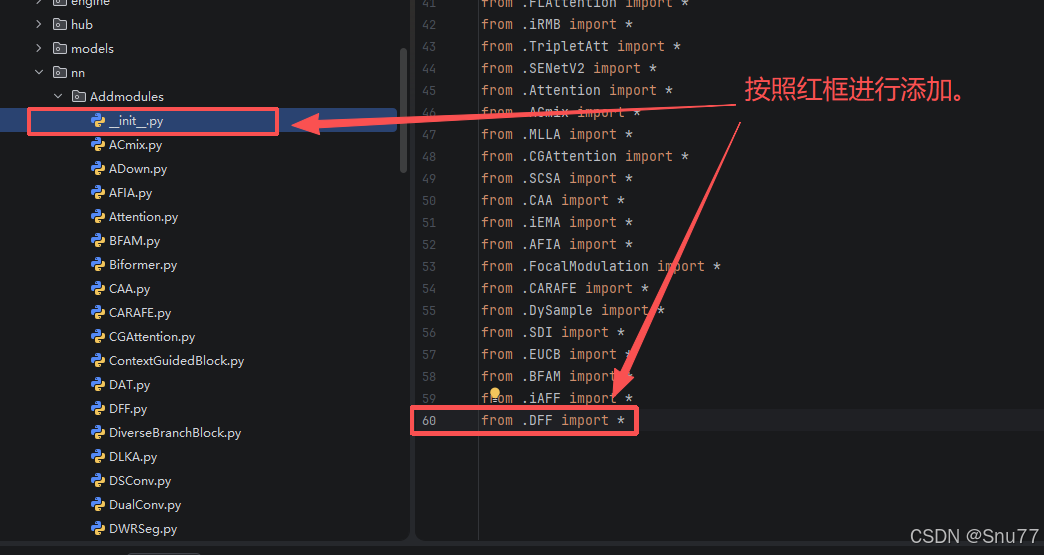
第二步我们在该目录下创建一个新的py文件名字为'__init__.py',然后在其内部导入我们的文件,如下图所示。
4.4 修改四
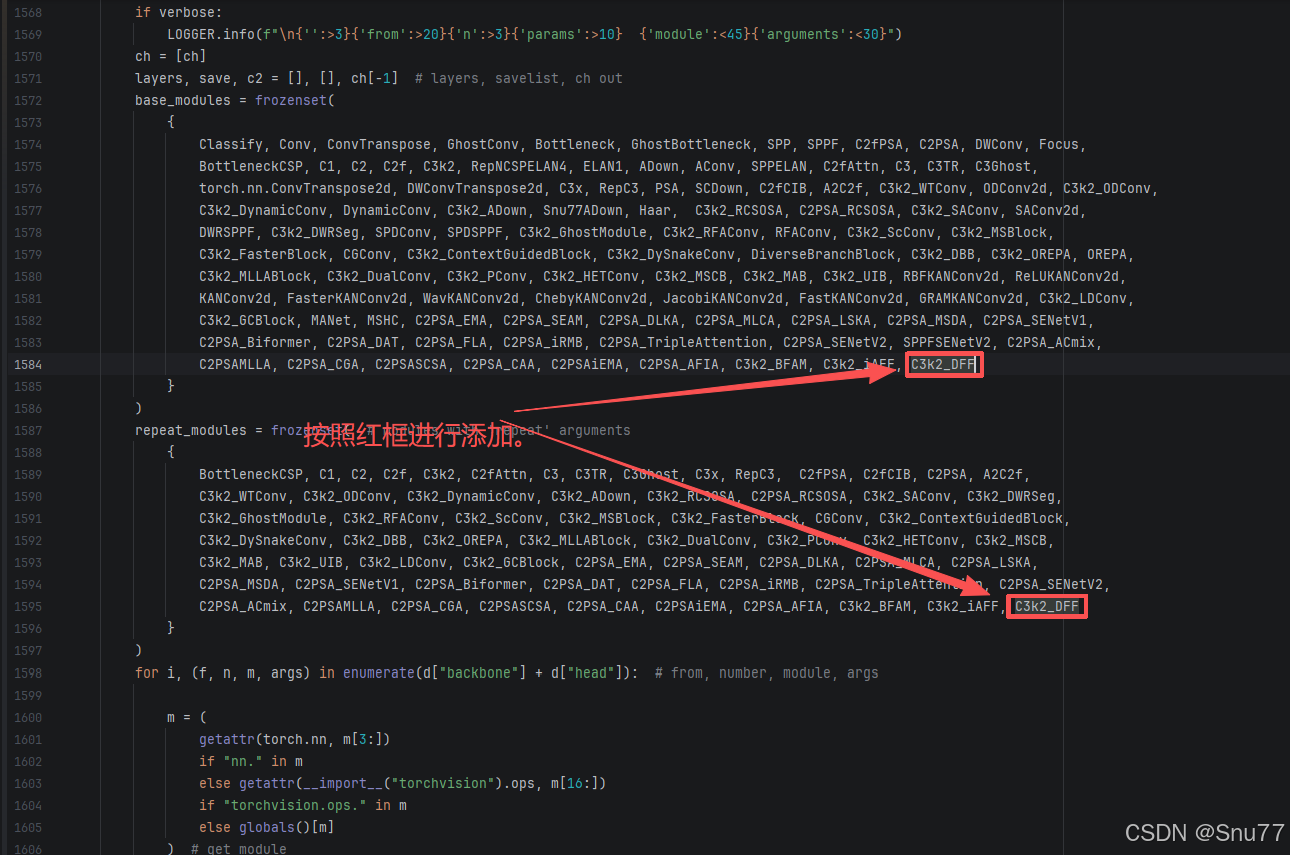
第三步我门中到如下文件'ultralytics/nn/tasks.py'进行导入和注册我们的模块(此处只需要添加一次即可,如果你用我其它的改进机制这里的步骤只需要添加一次)!

4.5 修改五
在'ultralytics/nn/tasks.py'文件内的parse_model方法函数内(位置大概在1500+行左右),按照图示位置添加即可(此处需要自己有一定的判别能力,如果不会可联系作者获得视频教程)。
4.6 修改六
在'ultralytics/nn/tasks.py'文件内的parse_model方法函数内(位置大概在1600+行左右),按照图示位置进行代码的替换即可(此处不改如果你yaml文件中的所有C3k2都被改名了,则检测头会使用老版本的v8检测头参数量会大幅度增加,但不影响运行很多人都忽略了这一步)。
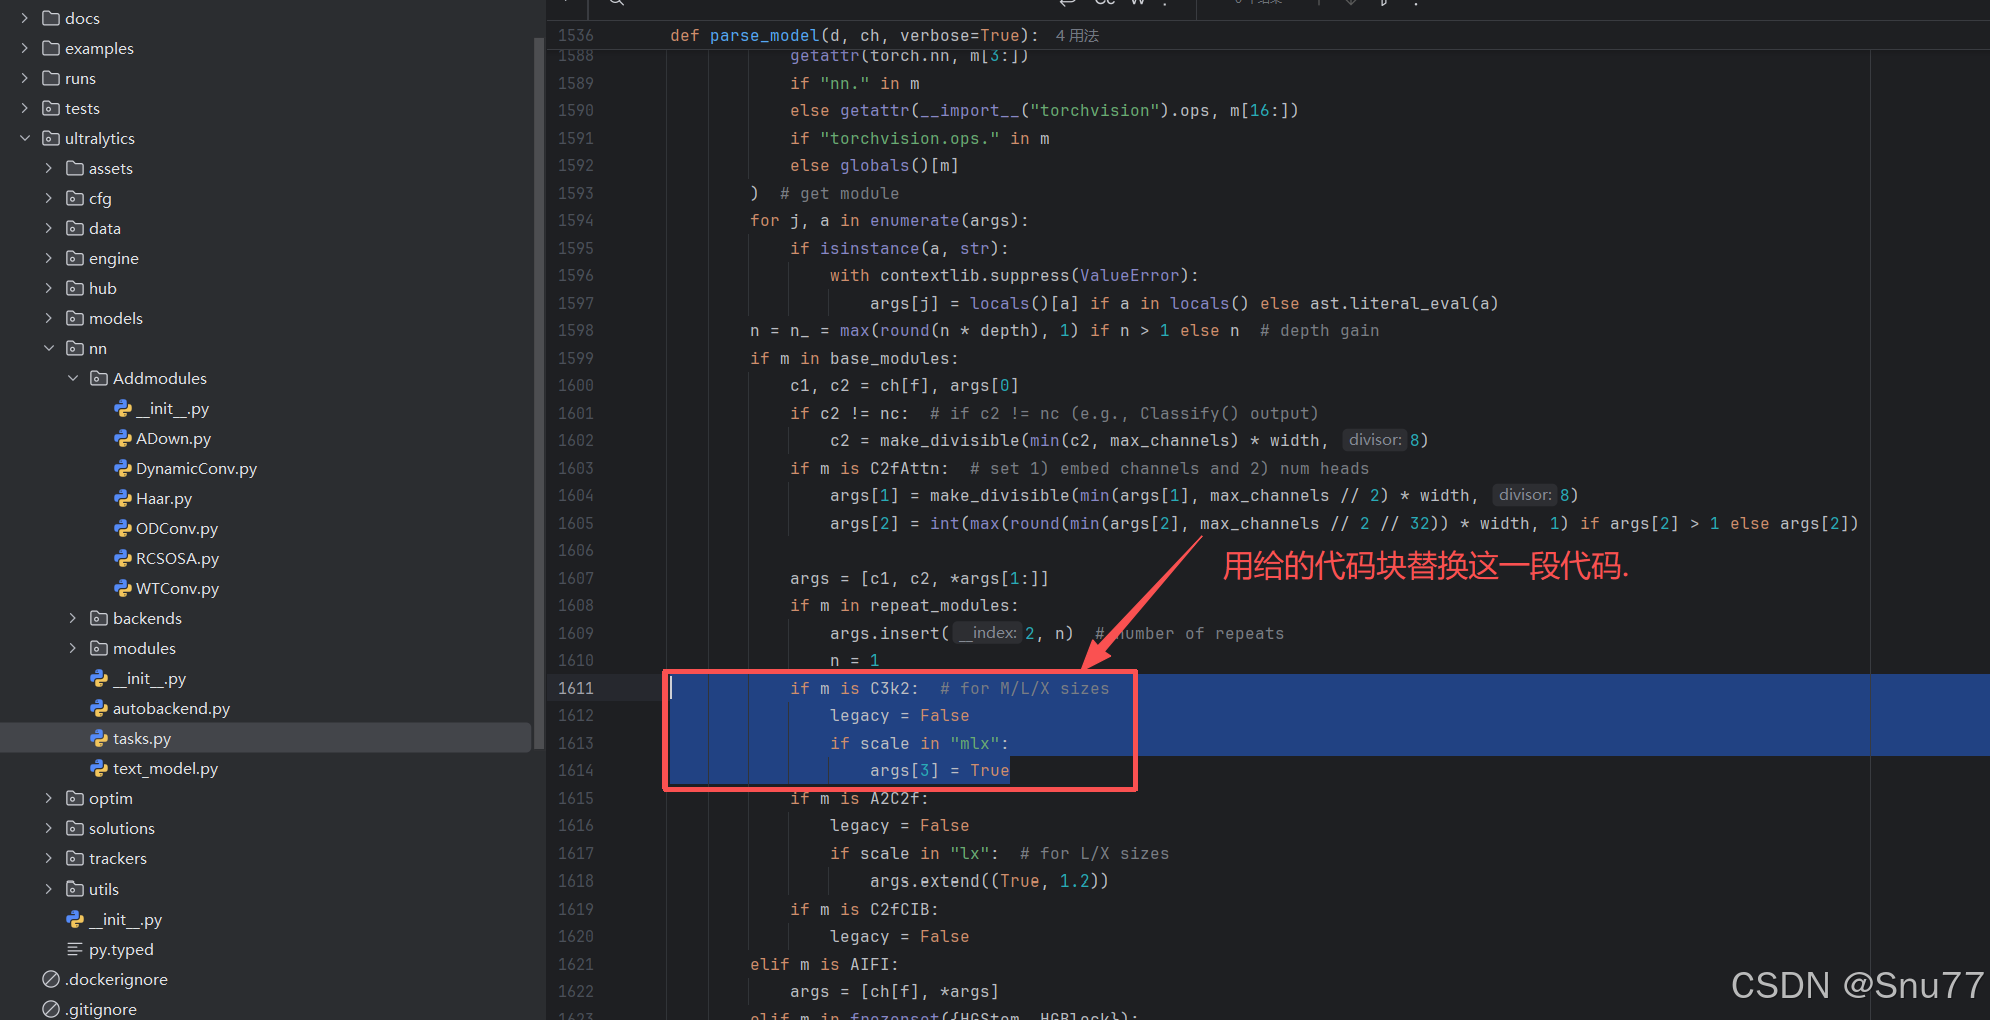
            if "C3k2" in getattr(m, "__name__", str(m)):
                legacy = False
                if scale in "mlx":
                    args[3] = True
到此就修改完成了,大家可以复制下面的yaml文件运行,更多使用方式可以联系作者获得使用视频,本文仅列出常见的使用方式。
五、正式训练
5.1 yaml文件
5.1.1 yaml文件1
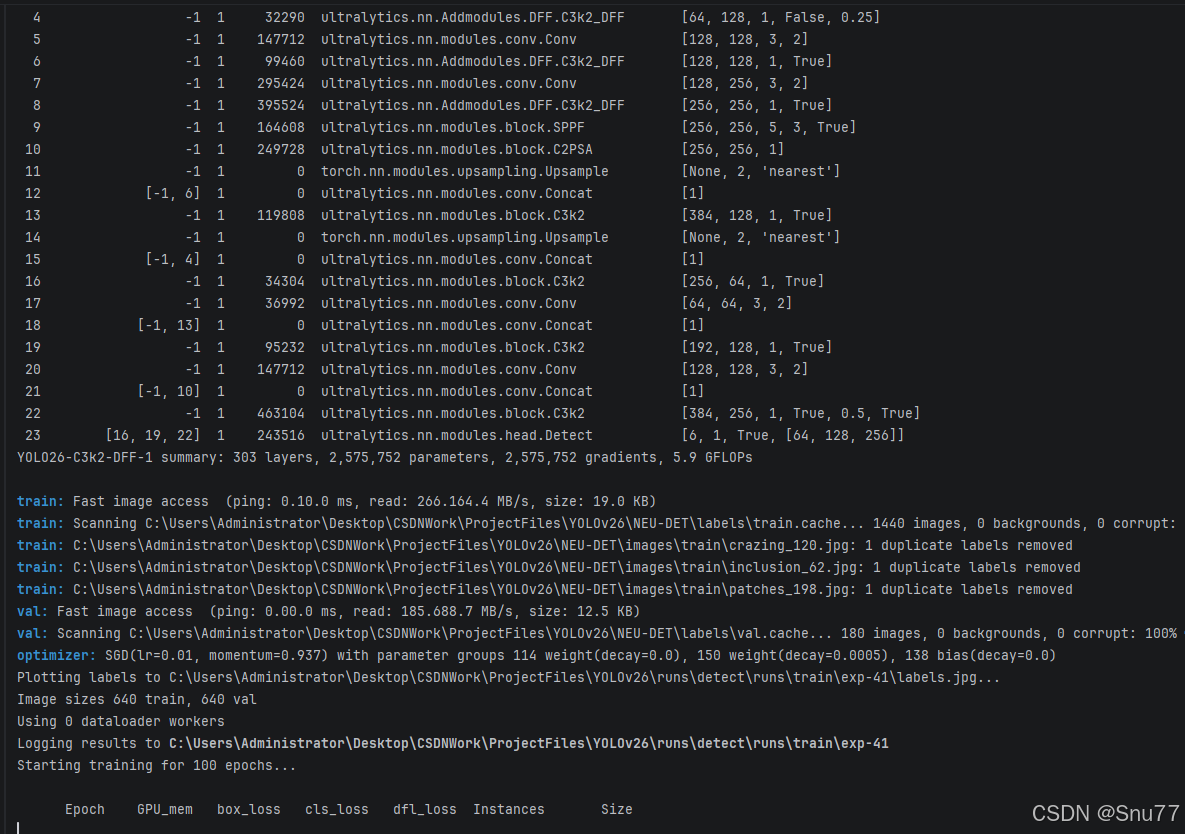
训练信息:YOLO26-C3k2-DFF-1 summary: 303 layers, 2,575,752 parameters, 2,575,752 gradients, 5.9 GFLOPs
# Ultralytics 🚀 AGPL-3.0 License - https://ultralytics.com/license

# Ultralytics YOLO26 object detection model with P3/8 - P5/32 outputs
# Model docs: https://docs.ultralytics.com/models/yolo26
# Task docs: https://docs.ultralytics.com/tasks/detect

# Parameters
nc: 80 # number of classes
end2end: True # whether to use end-to-end mode
reg_max: 1 # DFL bins
scales: # model compound scaling constants, i.e. 'model=yolo26n.yaml' will call yolo26.yaml with scale 'n'
  # [depth, width, max_channels]
  n: [0.50, 0.25, 1024] # summary: 260 layers, 2,572,280 parameters, 2,572,280 gradients, 6.1 GFLOPs
  s: [0.50, 0.50, 1024] # summary: 260 layers, 10,009,784 parameters, 10,009,784 gradients, 22.8 GFLOPs
  m: [0.50, 1.00, 512] # summary: 280 layers, 21,896,248 parameters, 21,896,248 gradients, 75.4 GFLOPs
  l: [1.00, 1.00, 512] # summary: 392 layers, 26,299,704 parameters, 26,299,704 gradients, 93.8 GFLOPs
  x: [1.00, 1.50, 512] # summary: 392 layers, 58,993,368 parameters, 58,993,368 gradients, 209.5 GFLOPs

# YOLO26n backbone
backbone:
  # [from, repeats, module, args]
  - [-1, 1, Conv, [64, 3, 2]] # 0-P1/2
  - [-1, 1, Conv, [128, 3, 2]] # 1-P2/4
  - [-1, 2, C3k2_DFF, [256, False, 0.25]]
  - [-1, 1, Conv, [256, 3, 2]] # 3-P3/8
  - [-1, 2, C3k2_DFF, [512, False, 0.25]]
  - [-1, 1, Conv, [512, 3, 2]] # 5-P4/16
  - [-1, 2, C3k2_DFF, [512, True]]
  - [-1, 1, Conv, [1024, 3, 2]] # 7-P5/32
  - [-1, 2, C3k2_DFF, [1024, True]]
  - [-1, 1, SPPF, [1024, 5, 3, True]] # 9
  - [-1, 2, C2PSA, [1024]] # 10

# YOLO26n head
head:
  - [-1, 1, nn.Upsample, [None, 2, "nearest"]]
  - [[-1, 6], 1, Concat, [1]] # cat backbone P4
  - [-1, 2, C3k2, [512, True]] # 13

  - [-1, 1, nn.Upsample, [None, 2, "nearest"]]
  - [[-1, 4], 1, Concat, [1]] # cat backbone P3
  - [-1, 2, C3k2, [256, True]] # 16 (P3/8-small)

  - [-1, 1, Conv, [256, 3, 2]]
  - [[-1, 13], 1, Concat, [1]] # cat head P4
  - [-1, 2, C3k2, [512, True]] # 19 (P4/16-medium)

  - [-1, 1, Conv, [512, 3, 2]]
  - [[-1, 10], 1, Concat, [1]] # cat head P5
  - [-1, 1, C3k2, [1024, True, 0.5, True]] # 22 (P5/32-large)

  - [[16, 19, 22], 1, Detect, [nc]] # Detect(P3, P4, P5)
5.1.2 yaml文件2
训练信息:YOLO26-C3k2-DFF-2 summary: 296 layers, 2,620,262 parameters, 2,620,262 gradients, 5.8 GFLOPs
# Ultralytics 🚀 AGPL-3.0 License - https://ultralytics.com/license

# Ultralytics YOLO26 object detection model with P3/8 - P5/32 outputs
# Model docs: https://docs.ultralytics.com/models/yolo26
# Task docs: https://docs.ultralytics.com/tasks/detect

# Parameters
nc: 80 # number of classes
end2end: True # whether to use end-to-end mode
reg_max: 1 # DFL bins
scales: # model compound scaling constants, i.e. 'model=yolo26n.yaml' will call yolo26.yaml with scale 'n'
  # [depth, width, max_channels]
  n: [0.50, 0.25, 1024] # summary: 260 layers, 2,572,280 parameters, 2,572,280 gradients, 6.1 GFLOPs
  s: [0.50, 0.50, 1024] # summary: 260 layers, 10,009,784 parameters, 10,009,784 gradients, 22.8 GFLOPs
  m: [0.50, 1.00, 512] # summary: 280 layers, 21,896,248 parameters, 21,896,248 gradients, 75.4 GFLOPs
  l: [1.00, 1.00, 512] # summary: 392 layers, 26,299,704 parameters, 26,299,704 gradients, 93.8 GFLOPs
  x: [1.00, 1.50, 512] # summary: 392 layers, 58,993,368 parameters, 58,993,368 gradients, 209.5 GFLOPs

# YOLO26n backbone
backbone:
  # [from, repeats, module, args]
  - [-1, 1, Conv, [64, 3, 2]] # 0-P1/2
  - [-1, 1, Conv, [128, 3, 2]] # 1-P2/4
  - [-1, 2, C3k2, [256, False, 0.25]]
  - [-1, 1, Conv, [256, 3, 2]] # 3-P3/8
  - [-1, 2, C3k2, [512, False, 0.25]]
  - [-1, 1, Conv, [512, 3, 2]] # 5-P4/16
  - [-1, 2, C3k2, [512, True]]
  - [-1, 1, Conv, [1024, 3, 2]] # 7-P5/32
  - [-1, 2, C3k2, [1024, True]]
  - [-1, 1, SPPF, [1024, 5, 3, True]] # 9
  - [-1, 2, C2PSA, [1024]] # 10

# YOLO26n head
head:
  - [-1, 1, nn.Upsample, [None, 2, "nearest"]]
  - [[-1, 6], 1, Concat, [1]] # cat backbone P4
  - [-1, 2, C3k2, [512, True]] # 13

  - [-1, 1, nn.Upsample, [None, 2, "nearest"]]
  - [[-1, 4], 1, Concat, [1]] # cat backbone P3
  - [-1, 2, C3k2_DFF, [256, True]] # 16 (P3/8-small)

  - [-1, 1, Conv, [256, 3, 2]]
  - [[-1, 13], 1, Concat, [1]] # cat head P4
  - [-1, 2, C3k2_DFF, [512, True]] # 19 (P4/16-medium)

  - [-1, 1, Conv, [512, 3, 2]]
  - [[-1, 10], 1, Concat, [1]] # cat head P5
  - [-1, 1, C3k2_DFF, [1024, True, 0.5, True]] # 22 (P5/32-large)

  - [[16, 19, 22], 1, Detect, [nc]] # Detect(P3, P4, P5)
5.1.3 yaml文件3
训练信息:YOLO26-C3k2-DFF-3 summary: 352 layers, 2,702,294 parameters, 2,702,294 gradients, 5.9 GFLOPs
# Ultralytics 🚀 AGPL-3.0 License - https://ultralytics.com/license

# Ultralytics YOLO26 object detection model with P3/8 - P5/32 outputs
# Model docs: https://docs.ultralytics.com/models/yolo26
# Task docs: https://docs.ultralytics.com/tasks/detect

# Parameters
nc: 80 # number of classes
end2end: True # whether to use end-to-end mode
reg_max: 1 # DFL bins
scales: # model compound scaling constants, i.e. 'model=yolo26n.yaml' will call yolo26.yaml with scale 'n'
  # [depth, width, max_channels]
  n: [0.50, 0.25, 1024] # summary: 260 layers, 2,572,280 parameters, 2,572,280 gradients, 6.1 GFLOPs
  s: [0.50, 0.50, 1024] # summary: 260 layers, 10,009,784 parameters, 10,009,784 gradients, 22.8 GFLOPs
  m: [0.50, 1.00, 512] # summary: 280 layers, 21,896,248 parameters, 21,896,248 gradients, 75.4 GFLOPs
  l: [1.00, 1.00, 512] # summary: 392 layers, 26,299,704 parameters, 26,299,704 gradients, 93.8 GFLOPs
  x: [1.00, 1.50, 512] # summary: 392 layers, 58,993,368 parameters, 58,993,368 gradients, 209.5 GFLOPs

# YOLO26n backbone
backbone:
  # [from, repeats, module, args]
  - [-1, 1, Conv, [64, 3, 2]] # 0-P1/2
  - [-1, 1, Conv, [128, 3, 2]] # 1-P2/4
  - [-1, 2, C3k2_DFF, [256, False, 0.25]]
  - [-1, 1, Conv, [256, 3, 2]] # 3-P3/8
  - [-1, 2, C3k2_DFF, [512, False, 0.25]]
  - [-1, 1, Conv, [512, 3, 2]] # 5-P4/16
  - [-1, 2, C3k2_DFF, [512, True]]
  - [-1, 1, Conv, [1024, 3, 2]] # 7-P5/32
  - [-1, 2, C3k2_DFF, [1024, True]]
  - [-1, 1, SPPF, [1024, 5, 3, True]] # 9
  - [-1, 2, C2PSA, [1024]] # 10

# YOLO26n head
head:
  - [-1, 1, nn.Upsample, [None, 2, "nearest"]]
  - [[-1, 6], 1, Concat, [1]] # cat backbone P4
  - [-1, 2, C3k2_DFF, [512, True]] # 13

  - [-1, 1, nn.Upsample, [None, 2, "nearest"]]
  - [[-1, 4], 1, Concat, [1]] # cat backbone P3
  - [-1, 2, C3k2_DFF, [256, True]] # 16 (P3/8-small)

  - [-1, 1, Conv, [256, 3, 2]]
  - [[-1, 13], 1, Concat, [1]] # cat head P4
  - [-1, 2, C3k2_DFF, [512, True]] # 19 (P4/16-medium)

  - [-1, 1, Conv, [512, 3, 2]]
  - [[-1, 10], 1, Concat, [1]] # cat head P5
  - [-1, 1, C3k2_DFF, [1024, True, 0.5, True]] # 22 (P5/32-large)

  - [[16, 19, 22], 1, Detect, [nc]] # Detect(P3, P4, P5)
5.2 训练代码
大家可以创建一个py文件将我给的代码复制粘贴进去,配置好自己的文件路径即可运行。
import warnings
warnings.filterwarnings('ignore')
from ultralytics import YOLO

if __name__ == '__main__':
    model = YOLO('模型配置文件地址,也就是5.1你保存到本地文件的地址')
    # 如何切换模型版本, 上面的ymal文件可以改为 yolo26s.yaml就是使用的26s,
    # 类似某个改进的yaml文件名称为yolo26-XXX.yaml那么如果想使用其它版本就把上面的名称改为yolo26l-XXX.yaml即可(改的是上面YOLO中间的名字不是配置文件的)!
    # model.load('yolo26n.pt') # 是否加载预训练权重,科研不建议大家加载否则很难提升精度
    model.train(
        data=r"数据集文件地址",
                # 如果大家任务是其它的'ultralytics/cfg/default.yaml'找到这里修改task可以改成detect, segment, classify, pose
                cache=False,
                imgsz=640,
                epochs=20,
                single_cls=False,  # 是否是单类别检测
                batch=16,
                close_mosaic=0,
                workers=0,
                device='0',
                optimizer='MuSGD', # using SGD/MuSGD
                # resume=, # 这里是填写last.pt地址
                amp=True,  # 如果出现训练损失为Nan可以关闭amp
                project='runs/train',
                name='exp',
                )
5.3 训练过程截图
五、本文总结
到此本文的正式分享内容就结束了,在这里给大家推荐我的YOLOv26改进有效涨点专栏,本专栏目前为新开的平均质量分98分,后期我会根据各种最新的前沿顶会进行论文复现,也会对一些老的改进机制进行补充,如果大家觉得本文帮助到你了,订阅本专栏,关注后续更多的更新~
专栏链接: