【万字超全指南+踩坑】NVIDIA580& CUDA13& cuDNN9.13 一次全部安装最新版 Win11& Ubuntu& WSL2
英伟达全家桶一次全部安装最新版+验证安装(连不上官网可抄指令/下载安装包)
概括和提醒
-
本次内容为博主自己配置机器学习服务器驱动和相关工具的记录,总计3万多字,涵盖3个不同平台,请按需阅读
-
Linux 使用发行版为Ubuntu-24.04,安装NVIDIA驱动版本为nvidia-headless-no-dkms-580-server-open,CUDA版本为cuda-toolkit-13-0,cuDNN库为libcudnn9-dev-cuda-13(9.13.1)
-
Windows为win11, NVIDIA Studio 581.29,CUDA Version: 13.0.1,cuDNN库为9.13.1。安装包见资源绑定。
-
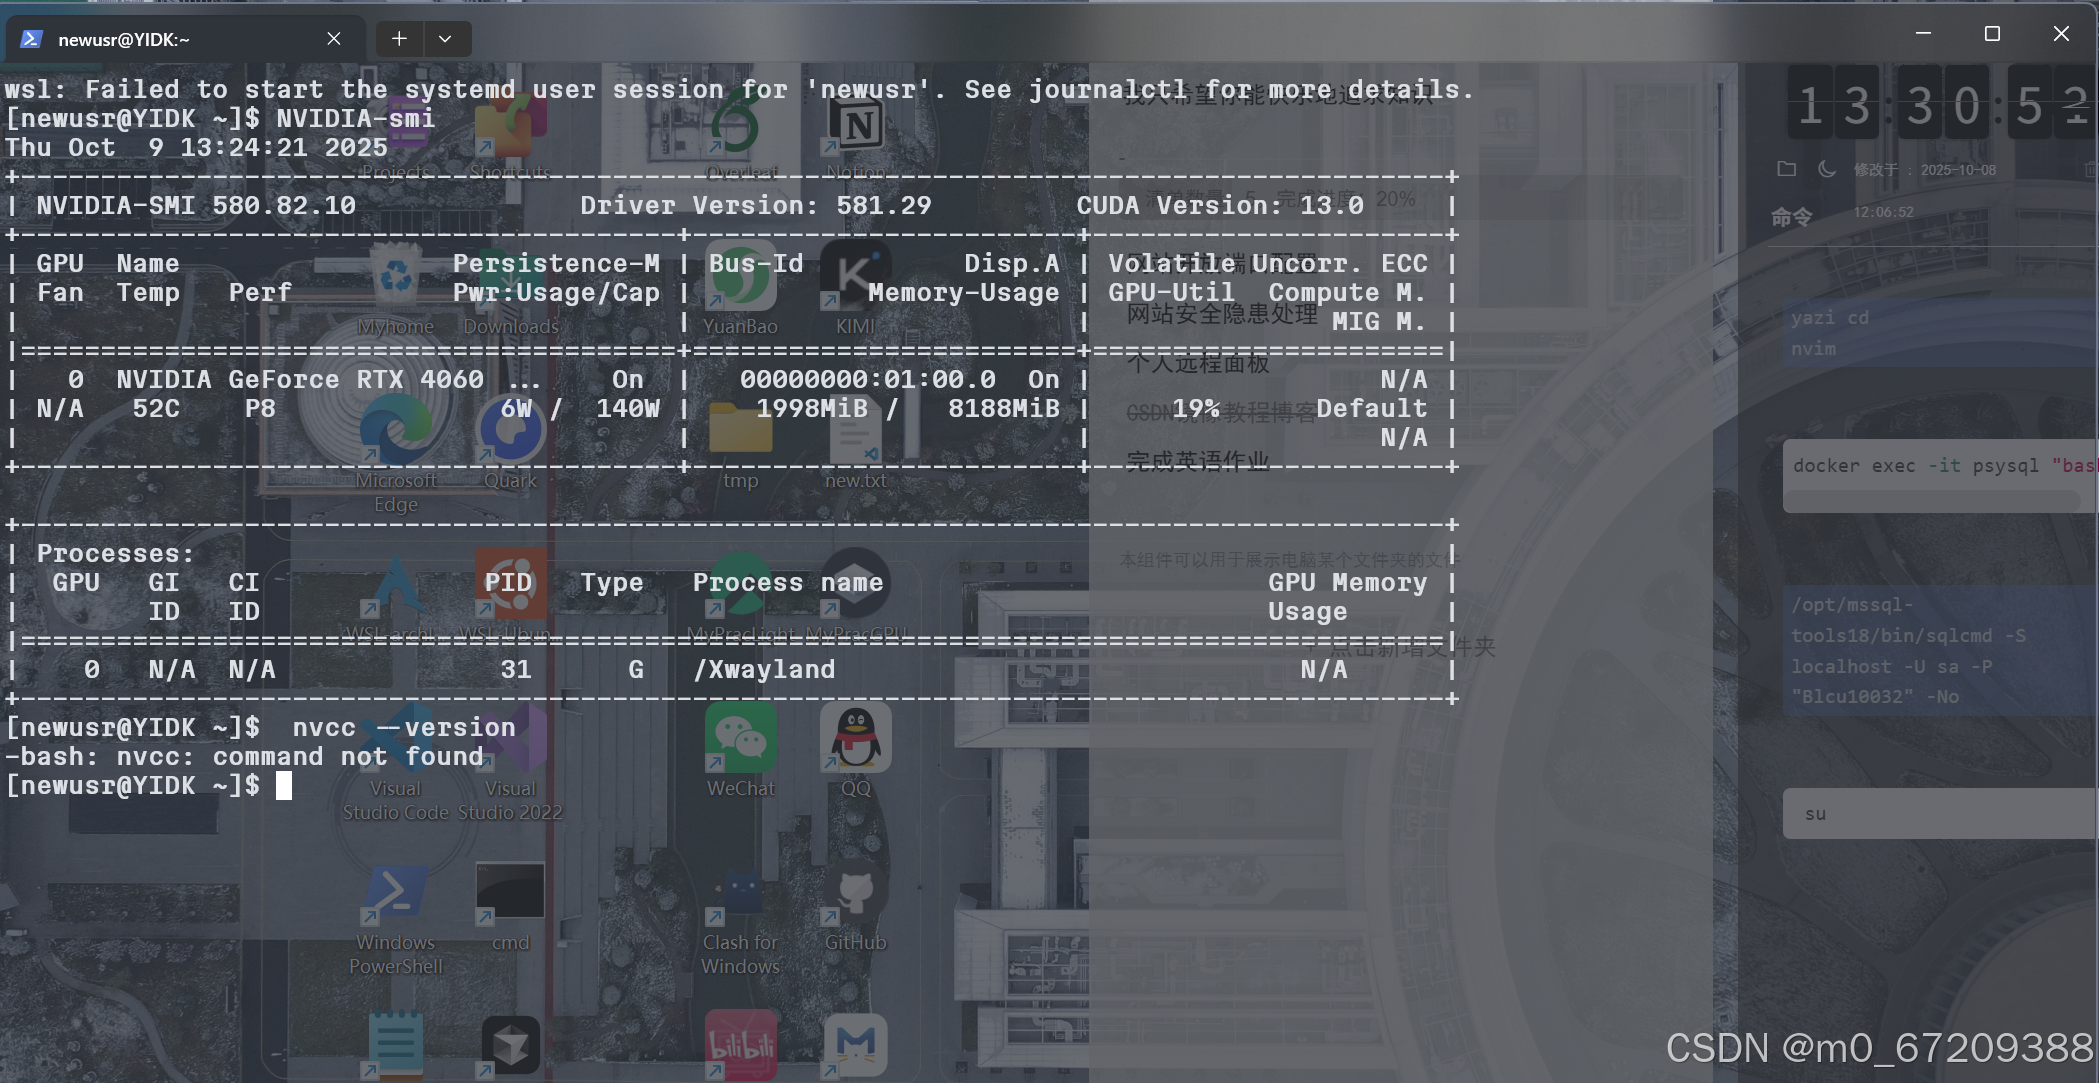
WSL2为Ubuntu24.04和Archlinux,与宿主Windows共用NVIDIA驱动,WSL只有Ubuntu有CUDA13,而且WSL目前只有支持CUDA12的cuDNN 8.9.2
-
验证安装包括版本验证,C++编译,pytroch,tensorflow功能的验证,以及常见问题解决方案
-
请给作者点鼓励,谢谢 ❤
一、安装前准备
之前没有安装过英伟达驱动的可以跳过这一步
对于Linux,安装前请确保原版本已删除(一定要先删除,否则会冲突)
最简单的,运行:
sudo apt-get purge nvidia*
或者已知版本具体名称可以运行
sudo apt remove nvidia-v #改成自己的版本具体名称
不知道版本可以运行以下代码来查看:
dpkg -l | grep nvidia
然而我这里并没有找到原版本,并且是新服务器,所以采取了最彻底的办法:
# 彻底清除所有 NVIDIA 相关包
sudo apt purge *nvidia* *cuda* *cudnn* *nsight*
# 清除这些包的依赖项
sudo apt autoremove
# 卸载工具也要清除(如果存在的话)
sudo /usr/bin/nvidia-uninstall

这里直接No Enter
对于Windows,如果有 NVIDIA APP ,可以直接打开进行升级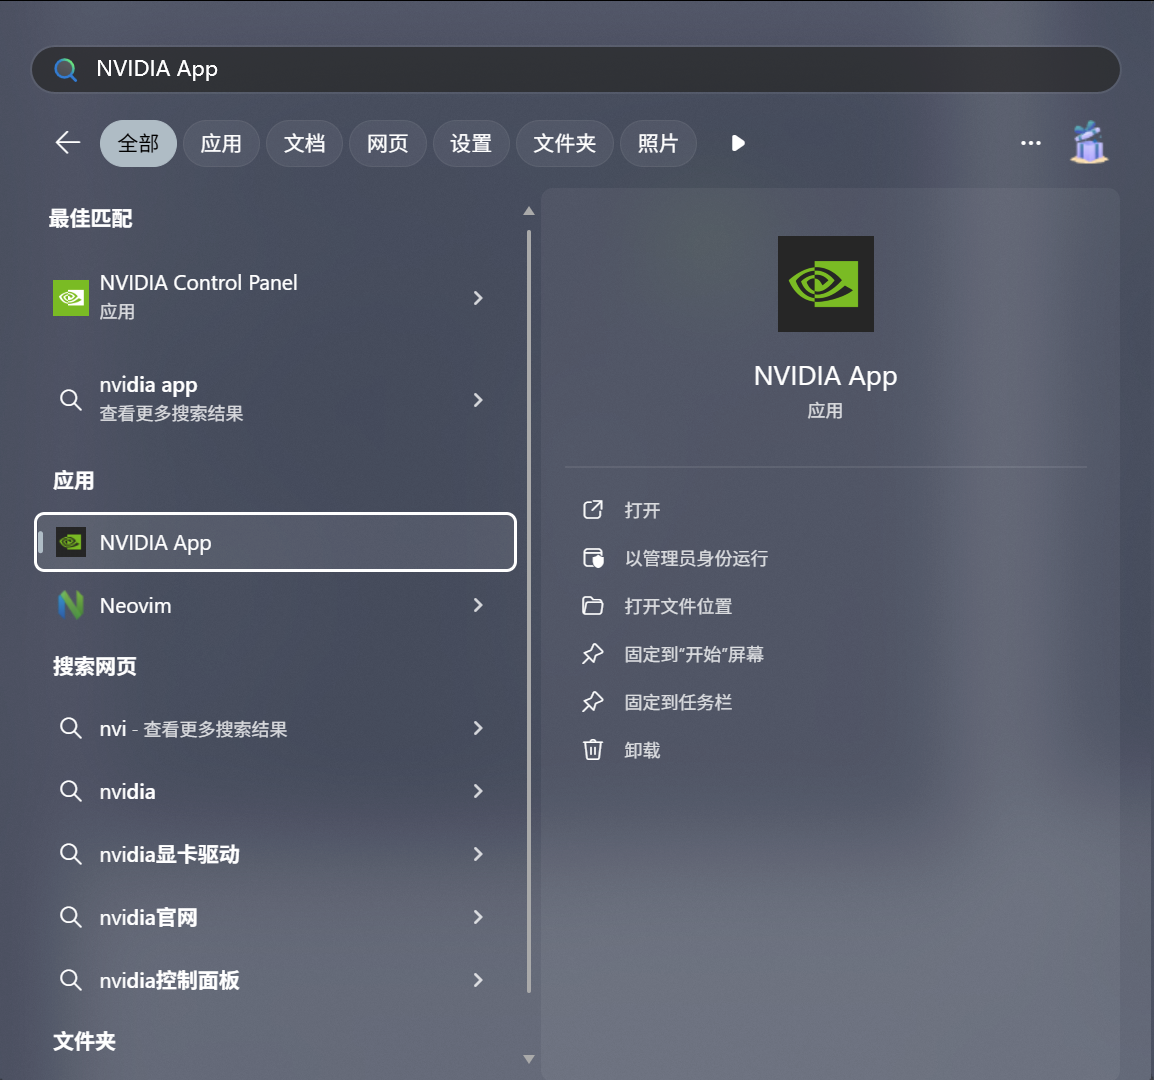
我是已经升级完了,没升级的话点这个地方:

二、安装新驱动
1.linux(Ubuntu)
先更新apt:
sudo apt update
再获取可以下载的列表
apt search nvidia-driver
输出
nvidia-driver-580/unknown 580.95.05-0ubuntu1 amd64
  NVIDIA driver metapackage

nvidia-driver-580-open/unknown 580.95.05-0ubuntu1 amd64
  NVIDIA driver (open kernel) metapackage

nvidia-driver-580-server/noble-updates,noble-security 580.65.06-0ubuntu0.24.04.1 amd64
  NVIDIA Server Driver metapackage

nvidia-driver-580-server-open/noble-updates,noble-security 580.65.06-0ubuntu0.24.04.1 amd64
  NVIDIA driver (open kernel) metapackage
nvidia-headless-580/unknown 580.95.05-0ubuntu1 amd64
  NVIDIA headless metapackage

nvidia-headless-580-open/unknown 580.95.05-0ubuntu1 amd64
  NVIDIA headless metapackage (open kernel module)

nvidia-headless-580-server/noble-updates,noble-security 580.65.06-0ubuntu0.24.04.1 amd64
  NVIDIA headless metapackage

nvidia-headless-580-server-open/noble-updates,noble-security 580.65.06-0ubuntu0.24.04.1 amd64
  NVIDIA headless metapackage (open kernel module)
有显示器的选driver,没有的选headless(什么无头骑士异闻录),服务器最好选server,open是开源
我是给云计算服务器装所以是:
sudo apt install nvidia-headless-580-server-open
没啥特别需求的话装这个吧:
sudo apt install nvidia-driver-580-open
安装结束后,使用nvidia-smi会提示你还没有安装nvidia-utils:
Command 'nvidia-smi' not found, but can be installed with:
sudo apt install nvidia-utils-470         # version 470.256.02-0ubuntu0.24.04.1, or
sudo apt install nvidia-utils-470-server  # version 470.256.02-0ubuntu0.24.04.1
sudo apt install nvidia-utils-535-server  # version 535.261.03-0ubuntu0.24.04.1
sudo apt install nvidia-utils-570         # version 570.172.08-0ubuntu0.24.04.1
sudo apt install nvidia-utils-570-server  # version 570.172.08-0ubuntu0.24.04.1
sudo apt install nvidia-utils-580         # version 580.65.06-0ubuntu0.24.04.4
sudo apt install nvidia-utils-580-server  # version 580.65.06-0ubuntu0.24.04.1
sudo apt install nvidia-utils-535         # version 535.247.01-0ubuntu0.24.04.1
sudo apt install nvidia-utils-550         # version 550.163.01-0ubuntu0.24.04.1
sudo apt install nvidia-utils-565-server  # version 565.57.01-0ubuntu0.24.04.3
sudo apt install nvidia-utils-525         # version 525.147.05-0ubuntu1
sudo apt install nvidia-utils-525-server  # version 525.147.05-0ubuntu1
sudo apt install nvidia-utils-550-server  # version 550.163.01-0ubuntu0.24.04.1
于是再执行(服务器用删除#号)
sudo apt install nvidia-utils-580#-server
重启
sudo reboot
之后就能看到正常的结果了
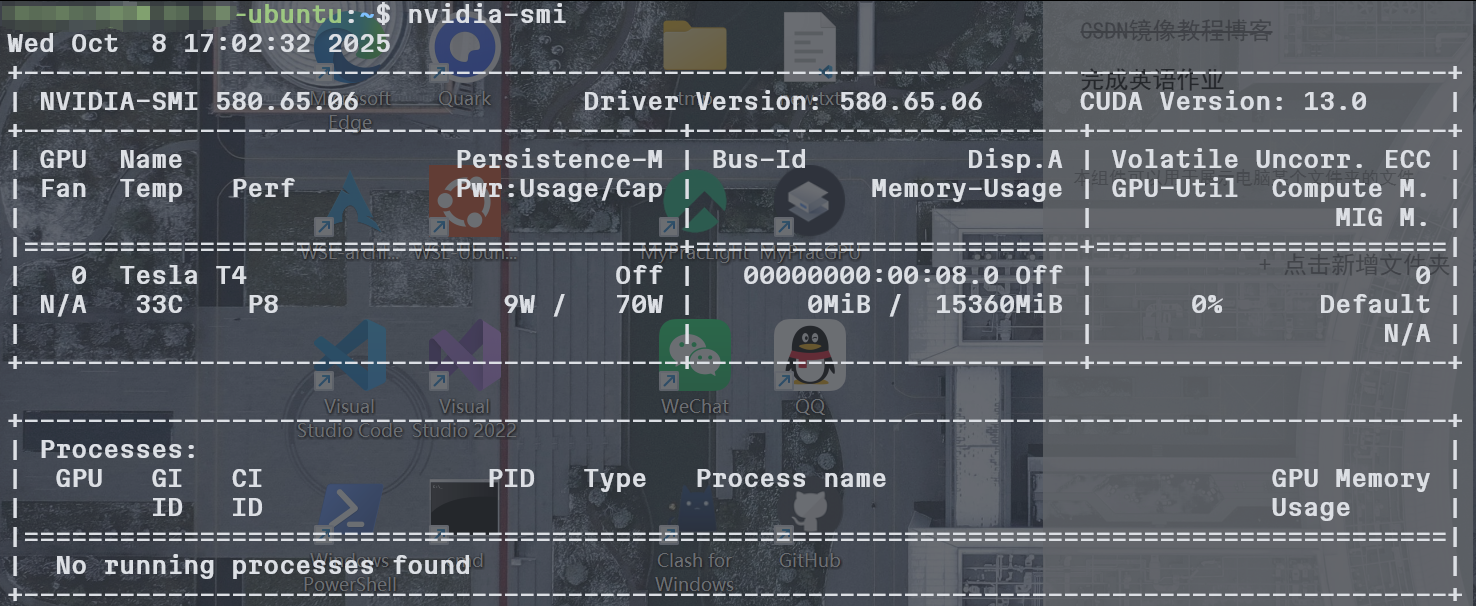
注意最好不要装no-dkms的,我第一次装的nvidia-headless-no-dkms-580-server-open,使用nvidia-smi输出:
NVIDIA-SMI has failed because it couldn't communicate with the NVIDIA driver. Make sure that the latest NVIDIA driver is installed and running.
后面重新装了nvidia-headless-580-server-open就正常了
还是不行的话运行:
sudo apt-get install dkms #先安装
ls -l /usr/src/ #不知道版本可以用这个查看
sudo dkms install -m nvidia -v 580.65.06 #这里换成你自己的版本
2.Windows
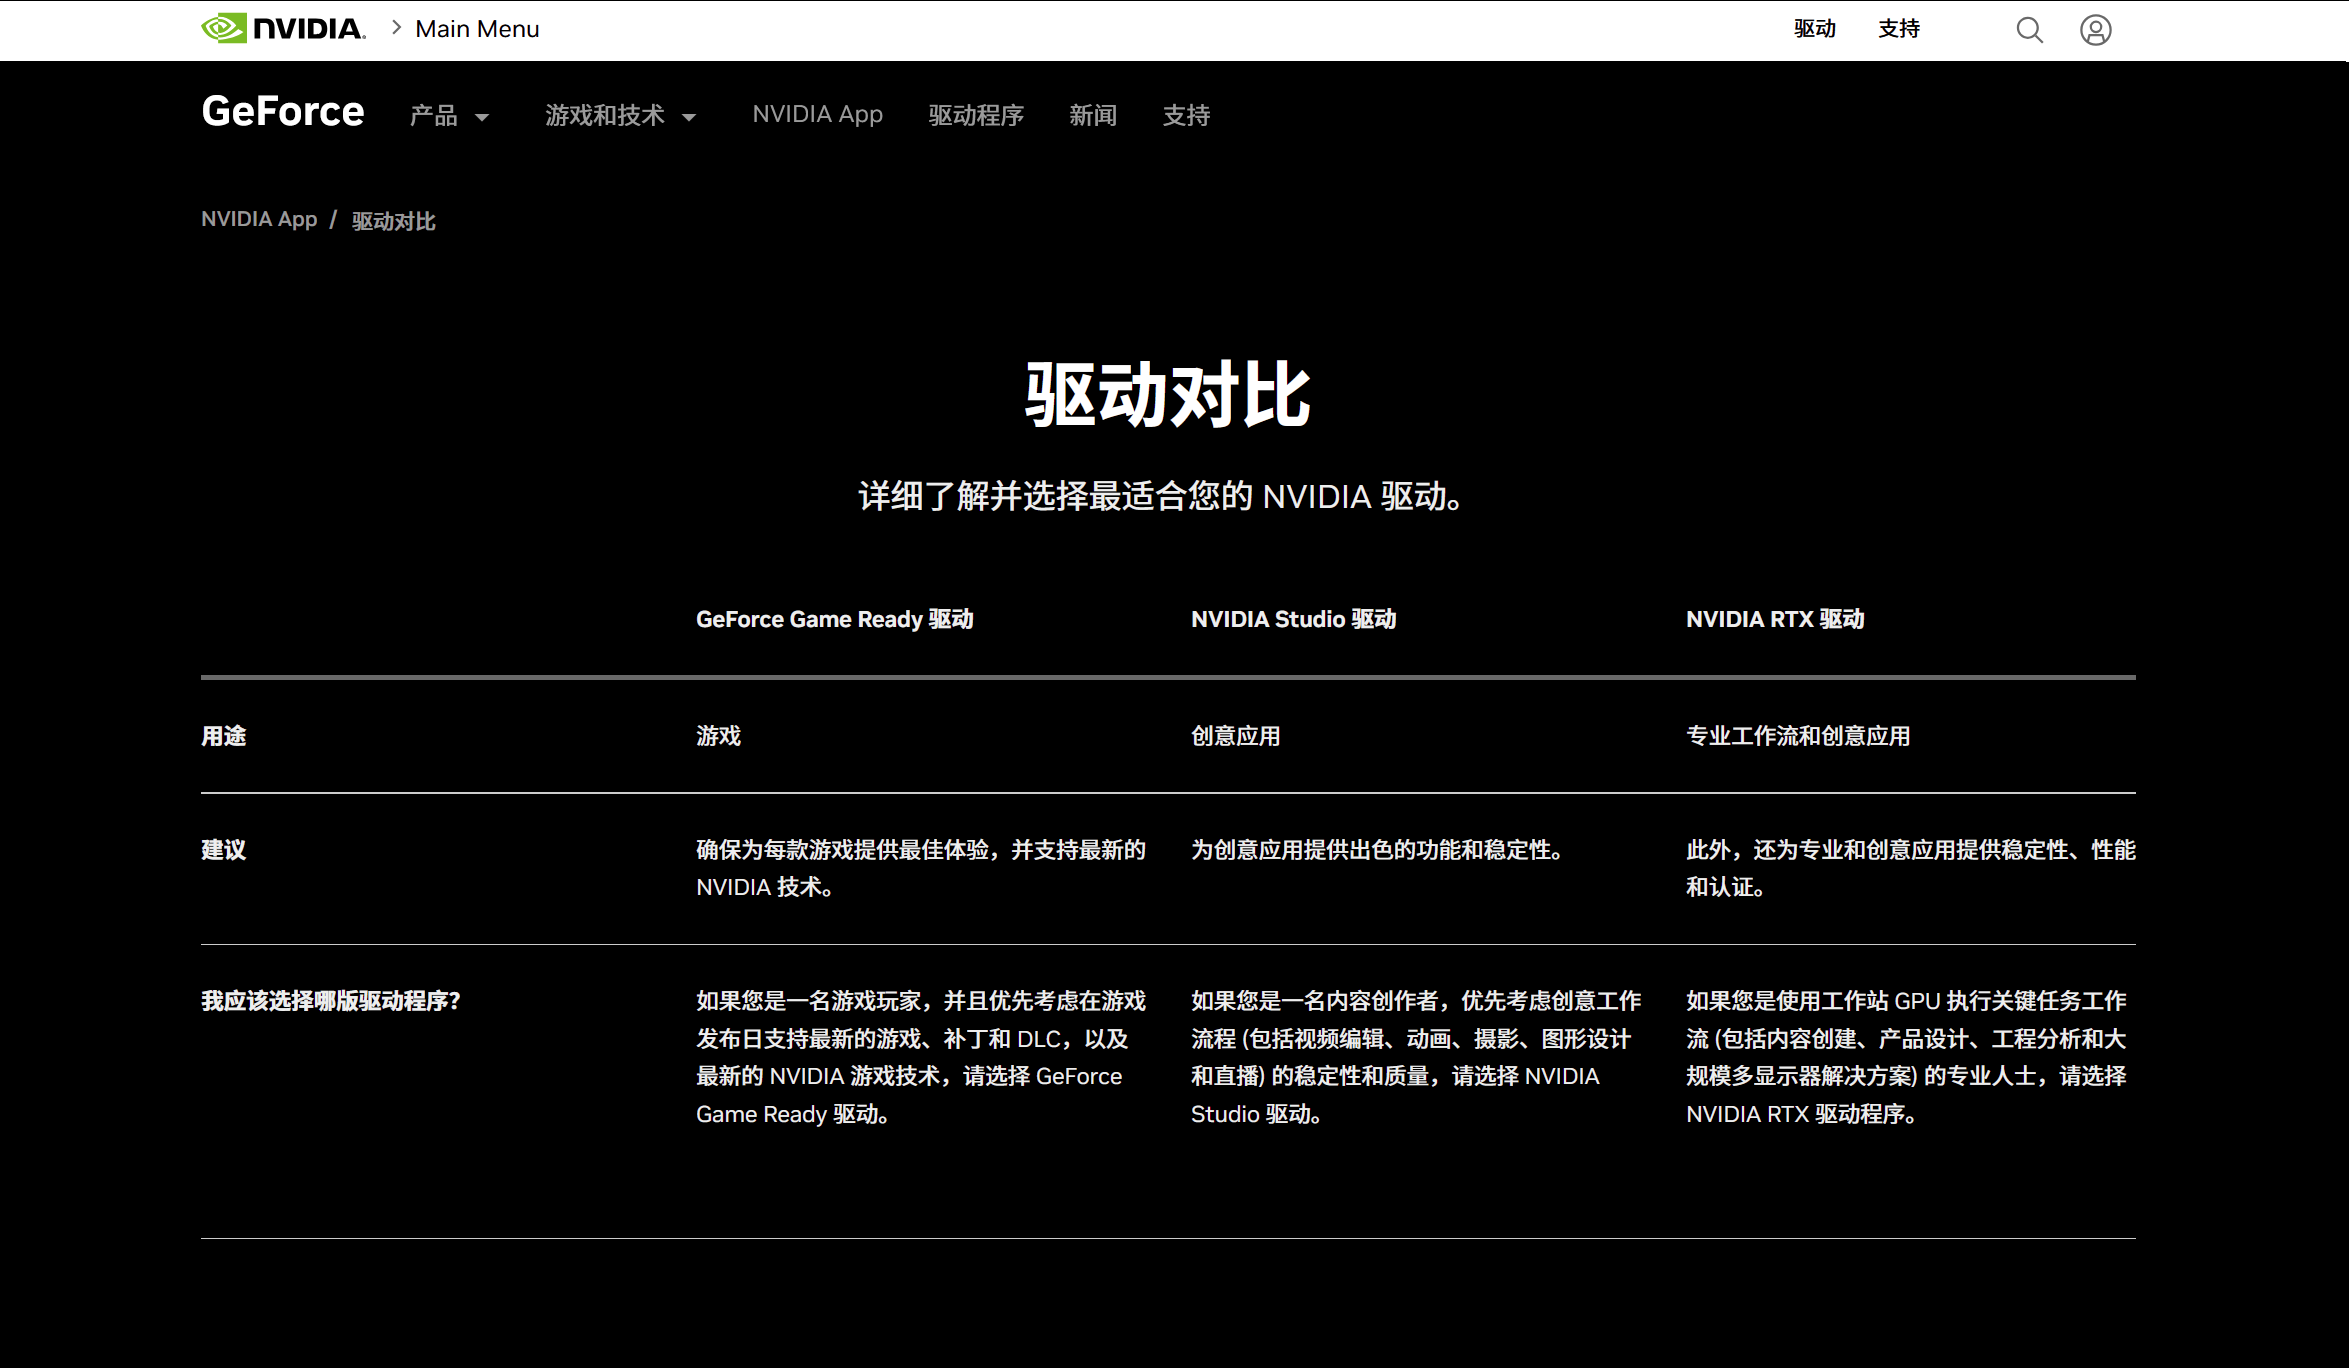
直接更新了的就跳过,完全没有的到英伟达官方网站:英伟达驱动下载 点击下载
可以参考不同驱动的对比来选择,我的是Studio
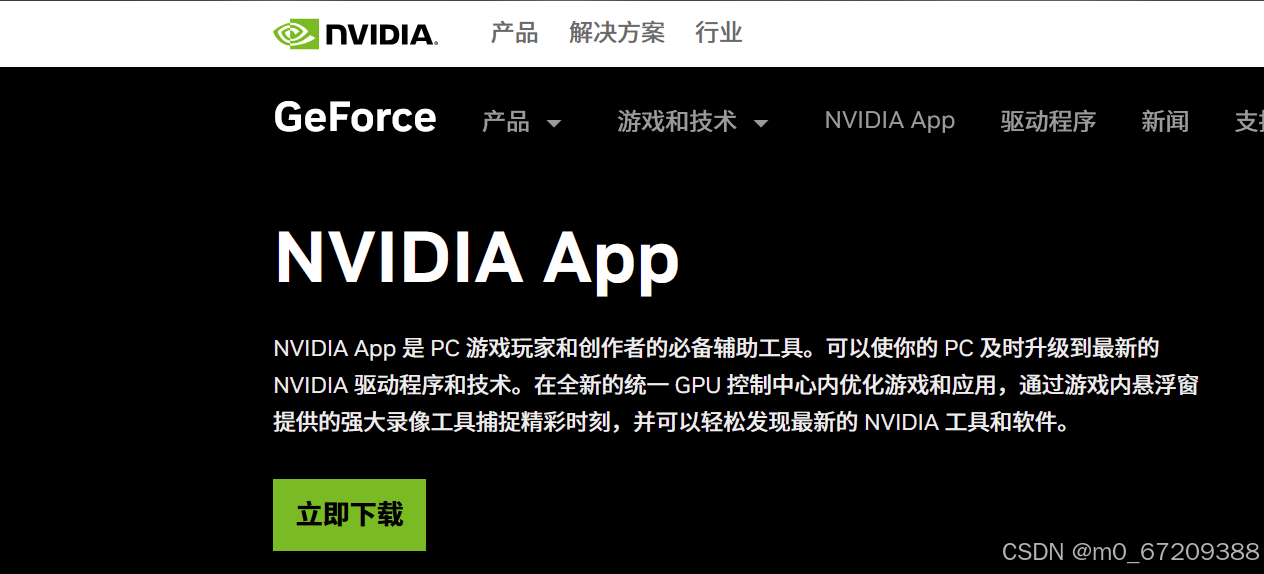
也可以下载NVIDIA APP,这样更新方便些:
3.WSL2
WSL2中的Linux系统和宿主Windows共用同一个NVIDIA驱动,所以只要宿主Windows安装好了,所有WSL系统也都不用再装了。但其他部分要另外装,方法和Linux物理机一样。
我的WSL-Ubuntu24.04(目前WSL中只有Ubuntu有CUDA13可以下载):
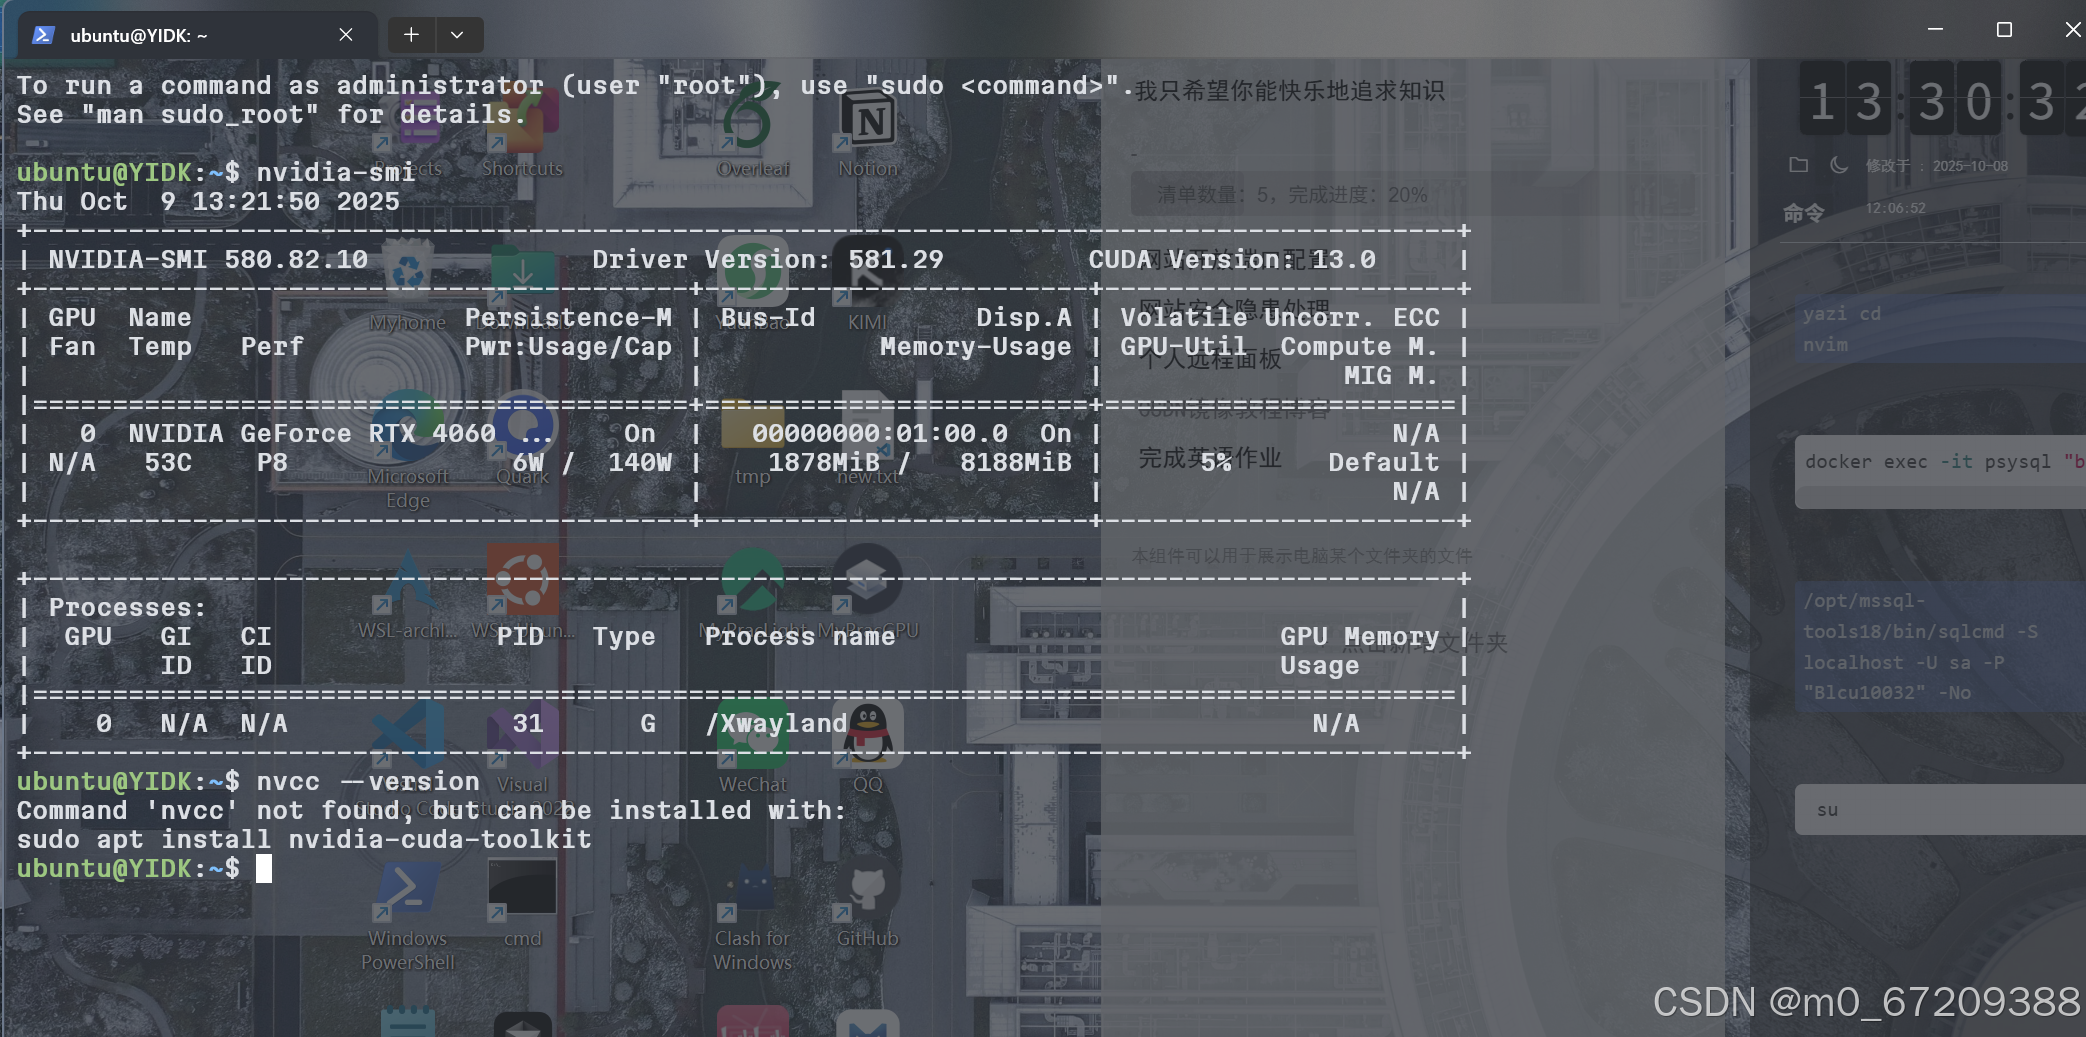
我的WSL-Archlinux(没有CUDA和cuDNN支持可安装):
三、安装CUDA Tookit
官网:英伟达CUDA13下载
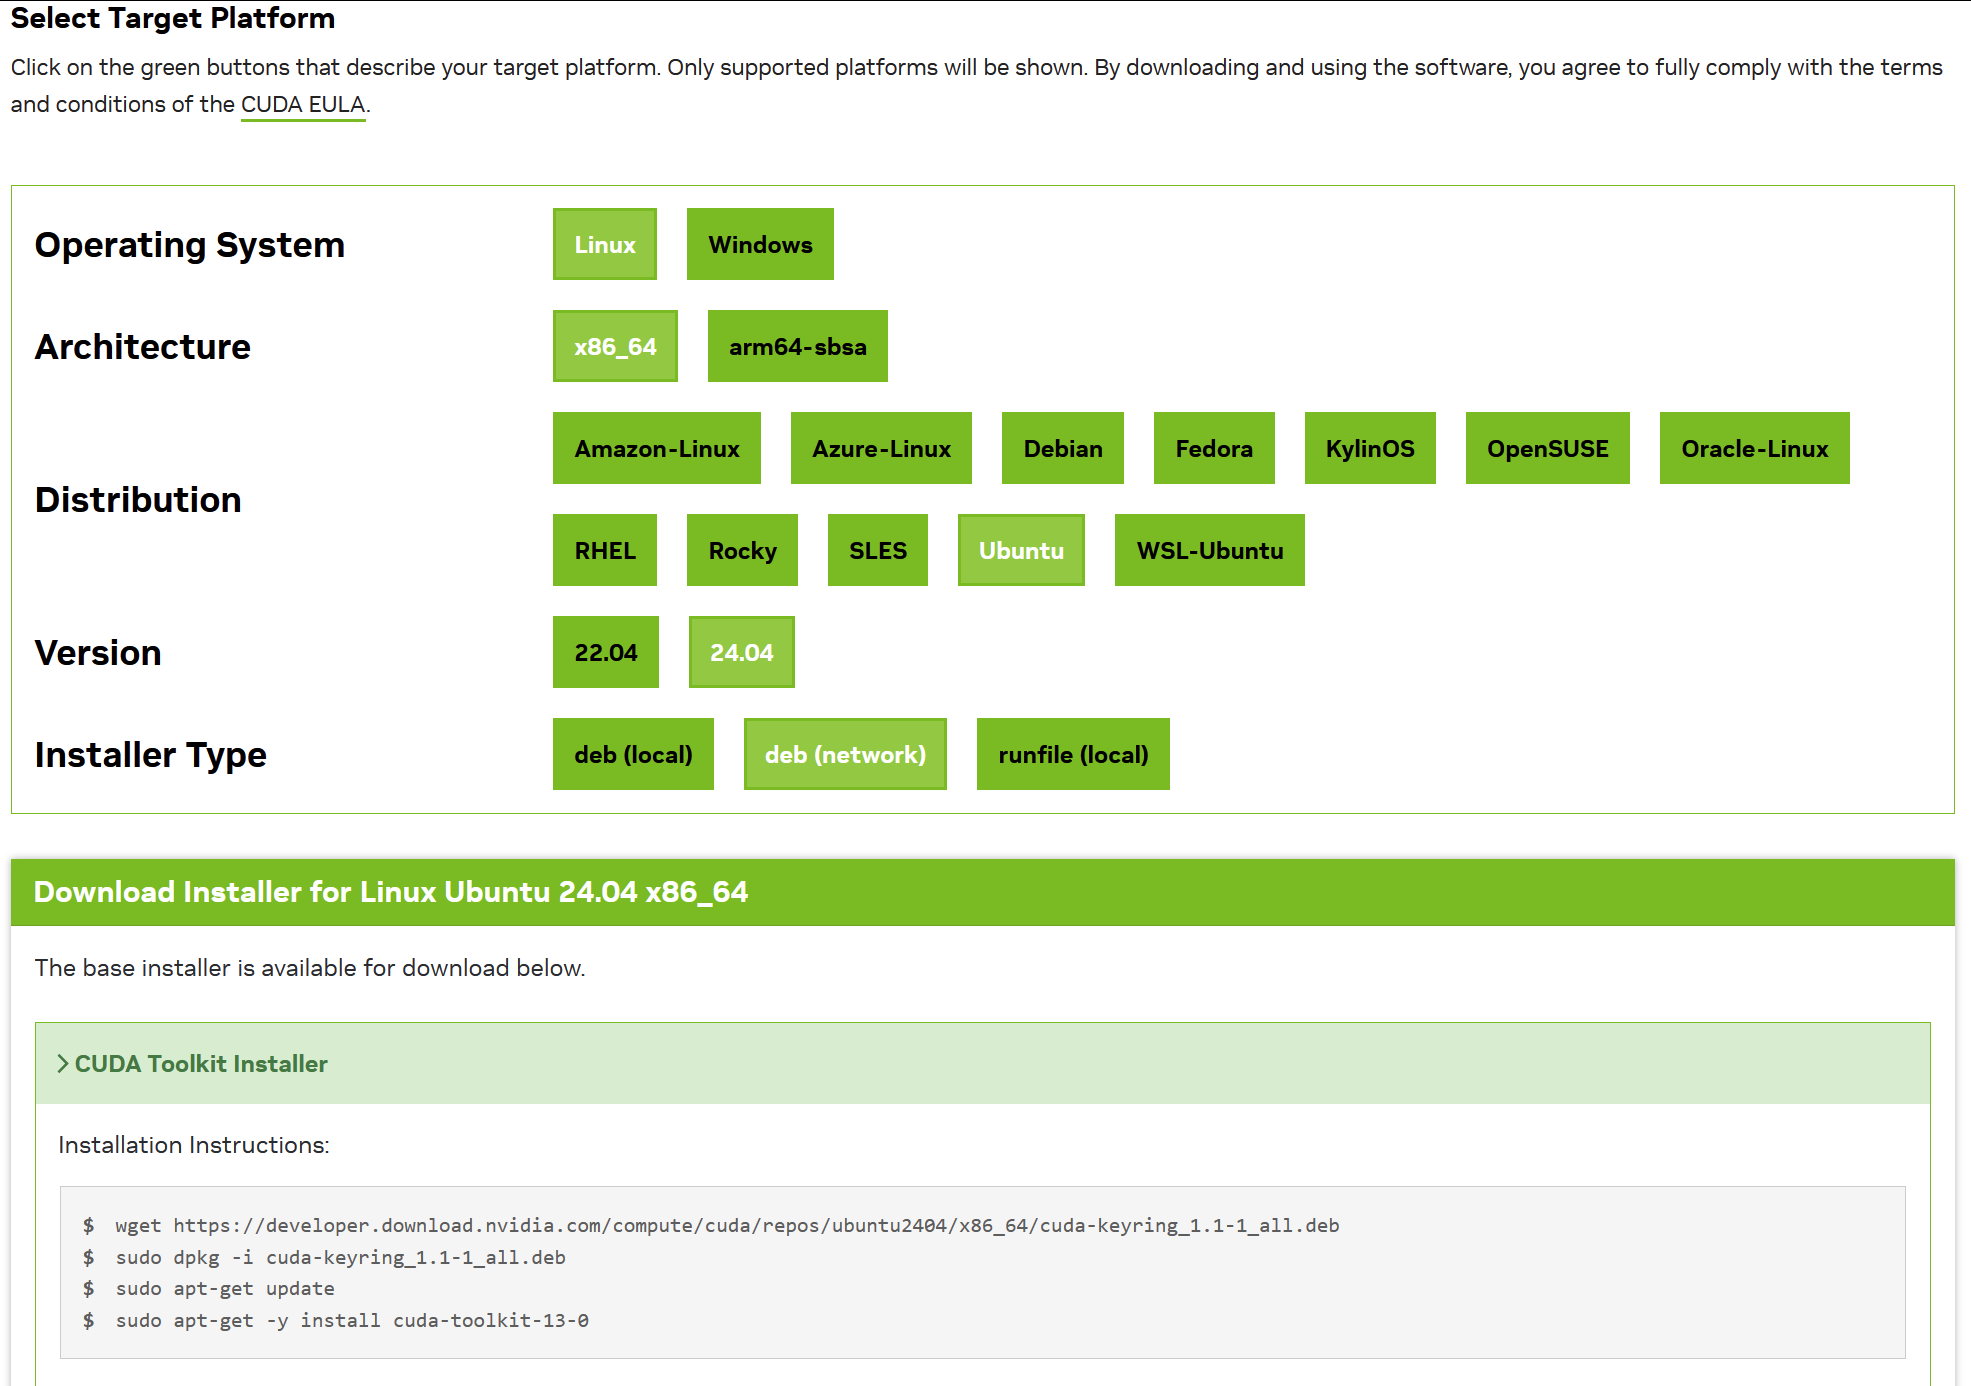
根据自己的版本选,windows版本的联网版安装包在文章最上面,本地安装包另外发,其他的看下表(给的都是x86_64联网安装,sbsa的直接把里面的x86_64改成sbsa即可):
另外,因为WSL-Ubuntu还没有支持CUDA13的cuDNN,如果要使用cuDNN得再下载一个CUDA12
#Amazon-Linux
sudo dnf config-manager --add-repo https://developer.download.nvidia.com/compute/cuda/repos/amzn2023/x86_64/cuda-amzn2023.repo
sudo dnf clean all
sudo dnf -y install cuda-toolkit-13-0

#Azure-Linux
curl https://developer.download.nvidia.com/compute/cuda/repos/azl3/x86_64/cuda-azl3.repo | sudo tee /etc/yum.repos.d/cuda-azl3.repo
sudo tdnf -y install azurelinux-repos-extended
sudo tdnf clean all
sudo tdnf -y install cuda-toolkit-13-0

#Debian
wget https://developer.download.nvidia.com/compute/cuda/repos/debian12/x86_64/cuda-keyring_1.1-1_all.deb
sudo dpkg -i cuda-keyring_1.1-1_all.deb
sudo apt-get update
sudo apt-get -y install cuda-toolkit-13-0

#Fedora
sudo dnf config-manager addrepo --from-repofile https://developer.download.nvidia.com/compute/cuda/repos/fedora42/x86_64/cuda-fedora42.repo
sudo dnf clean all
sudo dnf -y install cuda-toolkit-13-0

#KylinOS
sudo dnf config-manager --add-repo https://developer.download.nvidia.com/compute/cuda/repos/kylin10/x86_64/cuda-kylin10.repo
sudo dnf clean all
sudo dnf -y install cuda-toolkit-13-0

#OpenSUSE
sudo zypper addrepo https://developer.download.nvidia.com/compute/cuda/repos/opensuse15/x86_64/cuda-opensuse15.repo
sudo zypper refresh
sudo zypper install -y cuda-toolkit-13-0

#Redhat系
sudo dnf config-manager --add-repo https://developer.download.nvidia.com/compute/cuda/repos/rhel9/x86_64/cuda-rhel9.repo
sudo dnf clean all
sudo dnf -y install cuda-toolkit-13-0

#SLES
sudo zypper addrepo https://developer.download.nvidia.com/compute/cuda/repos/sles15/x86_64/cuda-sles15.repo
sudo zypper refresh
sudo zypper install -y cuda-toolkit-13-0

#Ubuntu
wget https://developer.download.nvidia.com/compute/cuda/repos/ubuntu2404/x86_64/cuda-keyring_1.1-1_all.deb
sudo dpkg -i cuda-keyring_1.1-1_all.deb
sudo apt-get update
sudo apt-get -y install cuda-toolkit-13-0

#WSL-Ubuntu
wget https://developer.download.nvidia.com/compute/cuda/repos/wsl-ubuntu/x86_64/cuda-keyring_1.1-1_all.deb
sudo dpkg -i cuda-keyring_1.1-1_all.deb
sudo apt-get update
sudo apt-get -y install cuda-toolkit-13-0
同一发行版代码基本相同,直接修改内部的版本号即可
例如Azure-Linux把azl3修改成azl2,Ubuntu可以把2404修改成2204
同时也可以根据自己NVDIA驱动支持的版本修改cuda-toolkit-13-0为cuda-toolkit-12-8等…
通过nvidia-smi查询最高支持的版本:
nvidia-smi

四、安装cuDNN
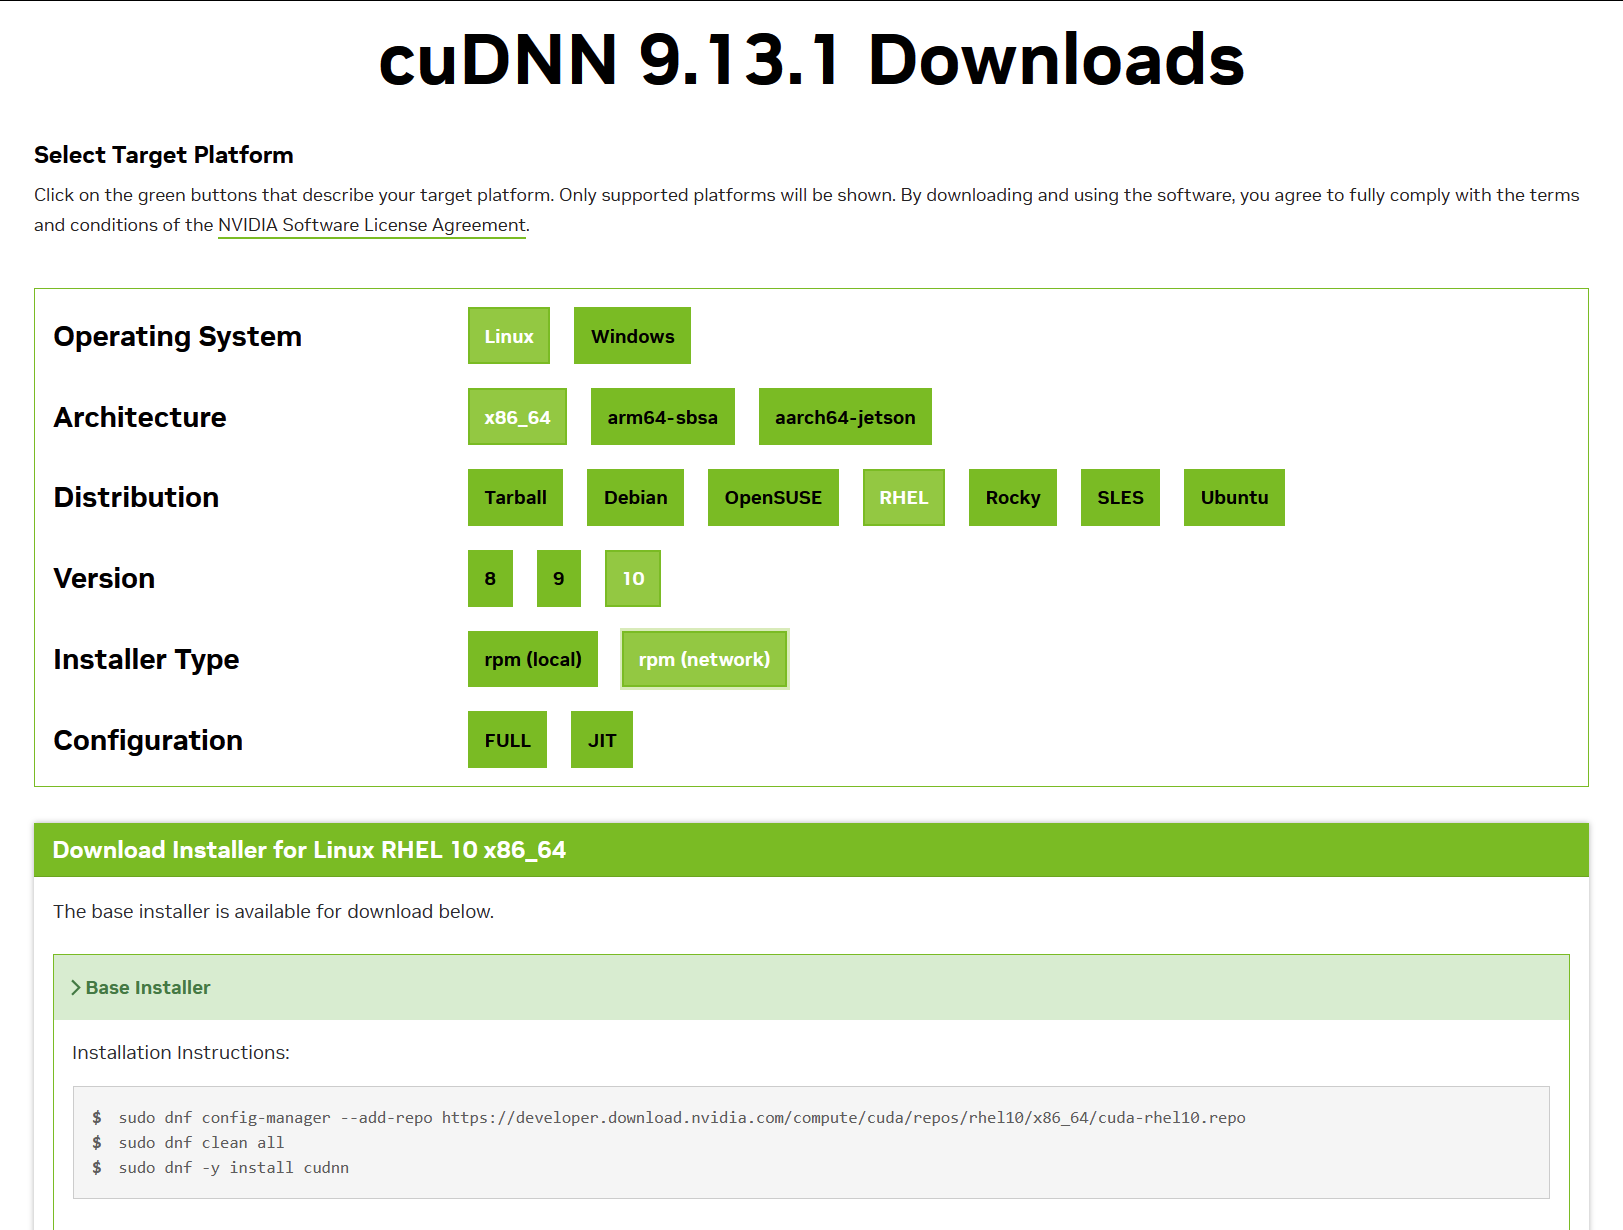
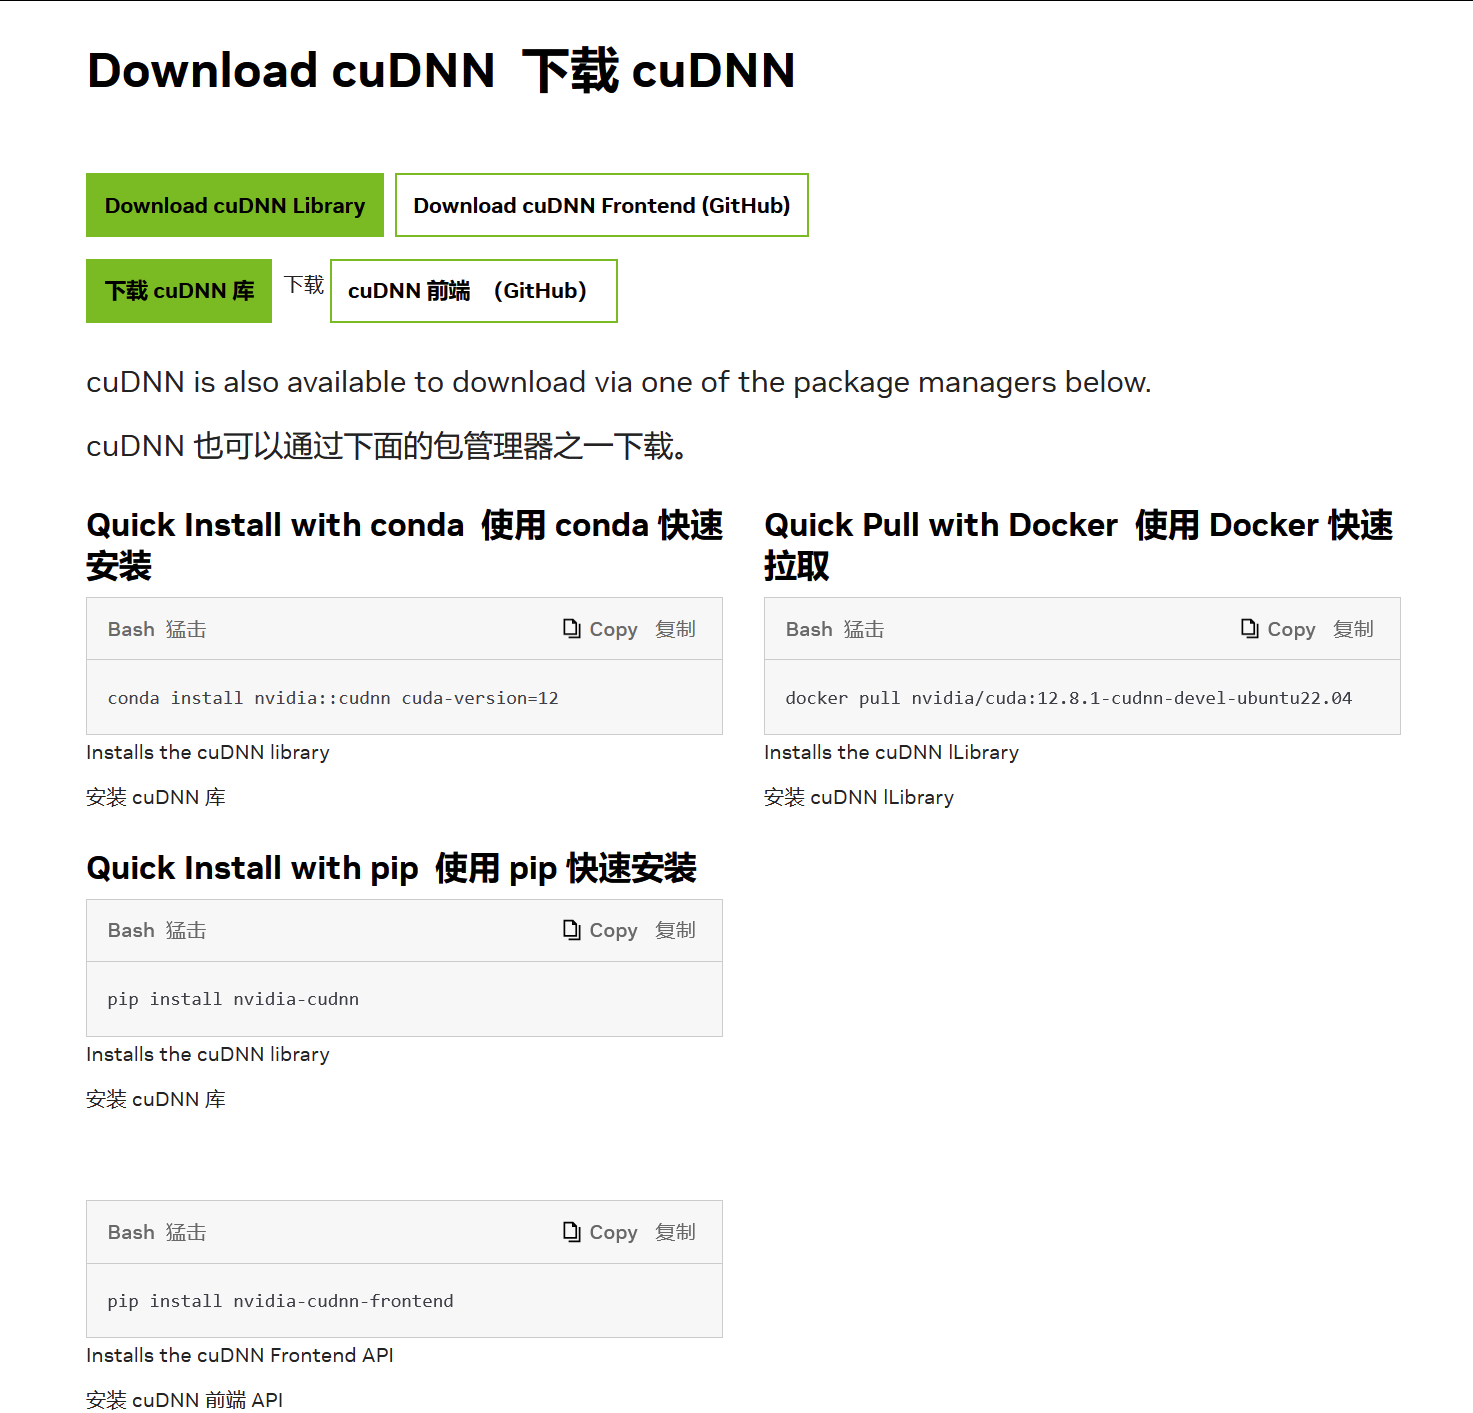
历史版本官网下载:cuDNN历史版本, 最新版参考:官网cuDNN9.13.1
1.Windows
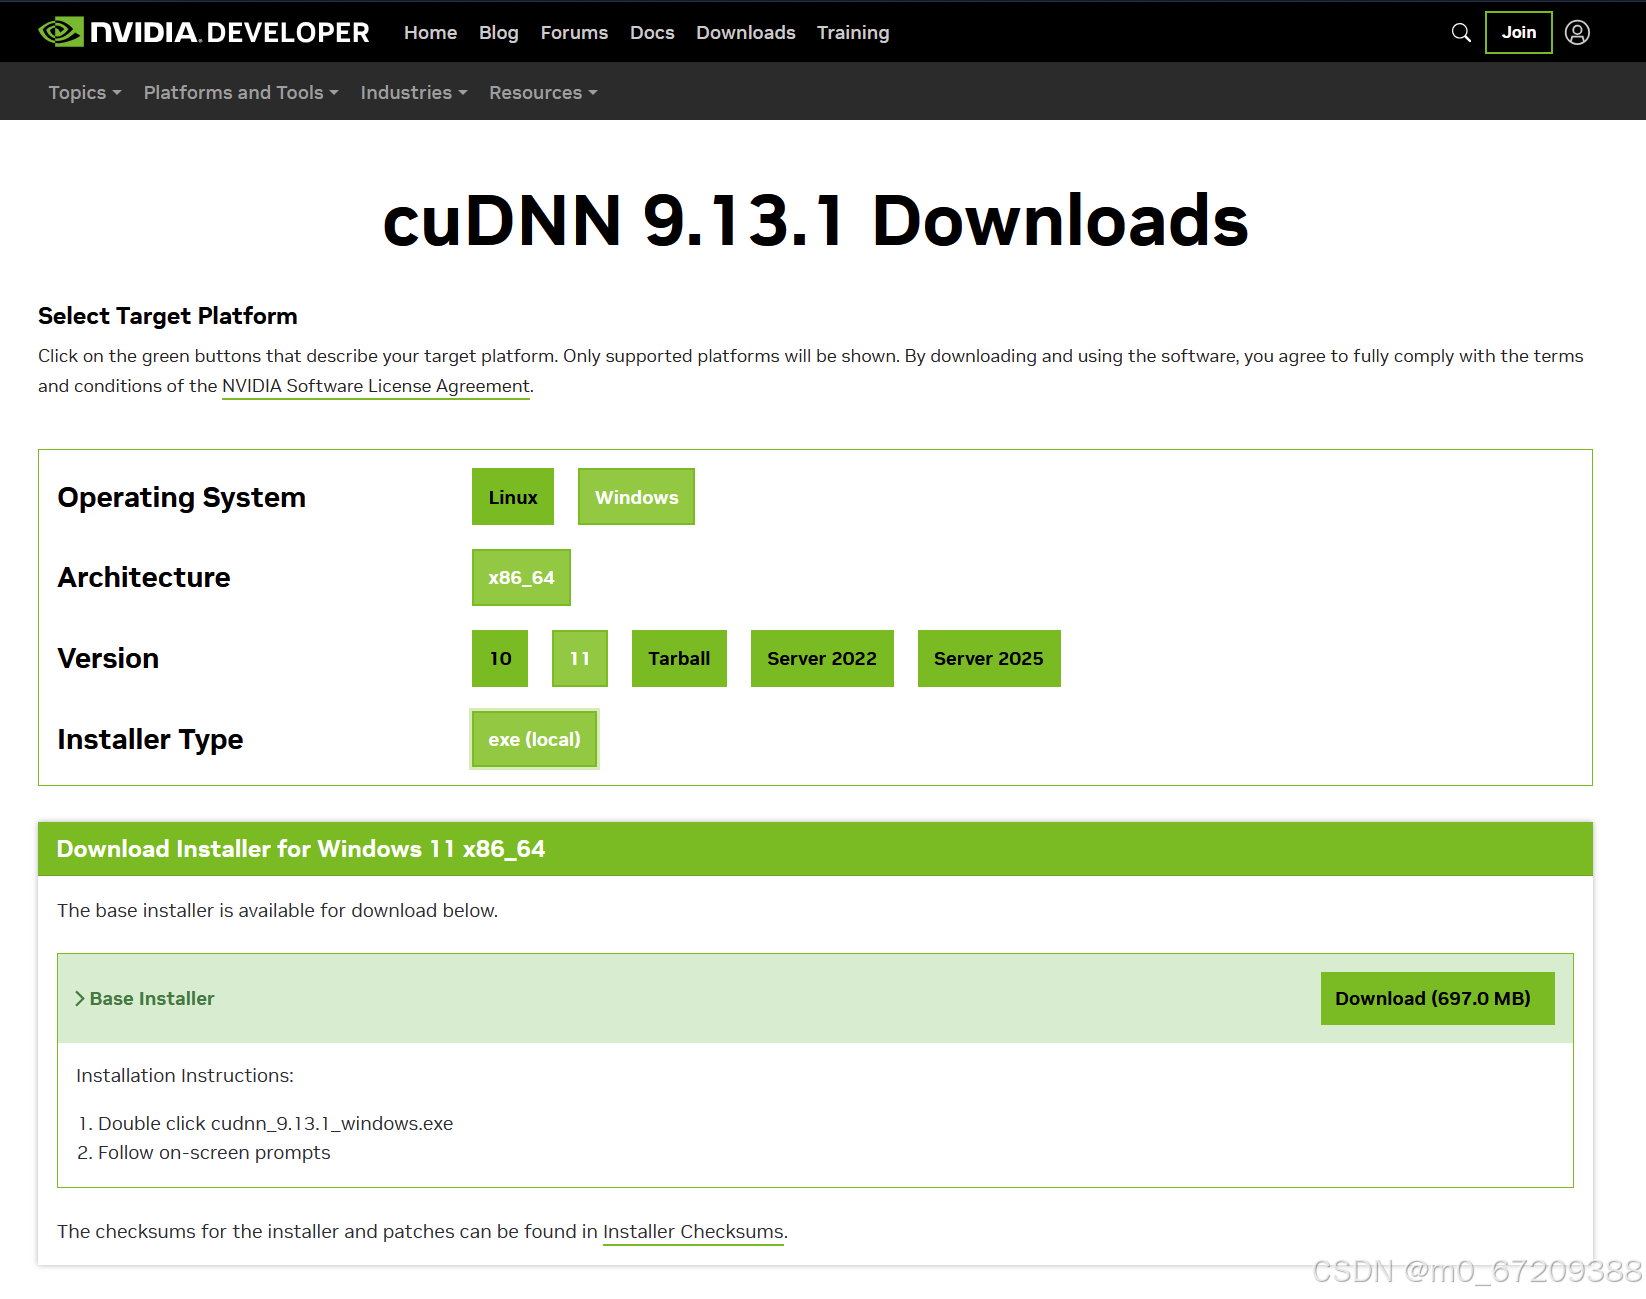
直接在这里下载本地安装包即可,我也把win11安装包上传到绑定资源了
*pip安装踩坑(win11)
后来发现好像是全局python版本忘改新的了,你们可以自己试试新版能不能装,能装告诉我一声我更新一下博文
这部分想看就看,跳过也行(就是说我也很好奇为什么官网上会有两个内容完全不同的cuDNN下载页)
我一开始尝试使用pip在win11上安装:
pip install nvidia-cudnn
然后就出错了:
Collecting nvidia-cudnn
  Downloading nvidia-cudnn-0.0.1.dev5.tar.gz (7.9 kB)
  Installing build dependencies ... done
  Getting requirements to build wheel ... error
  error: subprocess-exited-with-error

  × Getting requirements to build wheel did not run successfully.
  │ exit code: 1
  ╰─> [28 lines of output]
  #......
        RuntimeError:
      ###########################################################################################
      The package you are trying to install is only a placeholder project on PyPI.org repository.
      This package is hosted on NVIDIA Python Package Index.

      This package can be installed as:
      ```
      $ pip install nvidia-pyindex
      $ pip install nvidia-cudnn
      ```
      ###########################################################################################

      [end of output]
根据报错信息运行:
pip install nvidia-pyindex
然后又报错:
 pip install nvidia-pyindex
Collecting nvidia-pyindex
  Downloading nvidia-pyindex-1.0.9.tar.gz (10 kB)
  Installing build dependencies ... done
  Getting requirements to build wheel ... done
  Installing backend dependencies ... done
  Preparing metadata (pyproject.toml) ... done
Building wheels for collected packages: nvidia-pyindex
  Building wheel for nvidia-pyindex (pyproject.toml) ... error
  error: subprocess-exited-with-error

  × Building wheel for nvidia-pyindex (pyproject.toml) did not run successfully.
  │ exit code: 1
  ╰─> [81 lines of output]
  #......
   ModuleNotFoundError: No module named 'pip'


      [end of output]

  note: This error originates from a subprocess, and is likely not a problem with pip.
  ERROR: Failed building wheel for nvidia-pyindex
Failed to build nvidia-pyindex
ERROR: Failed to build installable wheels for some pyproject.toml based projects (nvidia-pyindex)
尽管它说No module named 'pip',但我pip更新几次还是这个报错。我看出错的位置是Building wheel ,于是猜想是wheel的问题,运行:
pip install wheel
再重新:
pip install nvidia-pyindex
pip install nvidia-cudnn
成功安装了nvidia-pyindex:
Successfully installed nvidia-pyindex-1.0.9
nvidia-cudnn还是报错:
Looking in indexes: https://pypi.org/simple, https://pypi.ngc.nvidia.com
Collecting nvidia-cudnn
  Downloading nvidia-cudnn-0.0.1.dev5.tar.gz (7.9 kB)
  Preparing metadata (setup.py) ... error
  error: subprocess-exited-with-error

  × python setup.py egg_info did not run successfully.
  │ exit code: 1
  ╰─> [17 lines of output]
  RuntimeError:
      ###########################################################################################
      The package you are trying to install is only a placeholder project on PyPI.org repository.
      This package is hosted on NVIDIA Python Package Index.

      This package can be installed as:
      ```
      $ pip install nvidia-pyindex
      $ pip install nvidia-cudnn
      ```
      ###########################################################################################

      [end of output]

  note: This error originates from a subprocess, and is likely not a problem with pip.
error: metadata-generation-failed

× Encountered error while generating package metadata.
╰─> See above for output.

note: This is an issue with the package mentioned above, not pip.
hint: See above for details.
最终我放弃了,发现可以直接装安装包
2.Dbain系(Ubuntu)
因为Ubuntu-24.04的apt已经有了cuDNN最新版9.13.1打包,安装时也没有出现错误,直接用apt下载即可,如果这里的方法行不通,也可以参考下一节。
另外,WSL目前还没有cuDNN9.13.1支持,可以先用sudo apt insatll nvidia-cudnn下载支持CUDA12的cuDNN 8.9.2,弹出的选项选择OK和I AGREE即可。
apt搜索可用的包:
apt search cudnn
输出:
libcudnn-frontend-dev/noble 0.9.2+ds-1 all
  c++ wrapper for the cudnn backend API (development files)

libcudnn9-cuda-11/unknown 9.10.2.21-1 amd64
  cuDNN runtime libraries for CUDA 11.8

libcudnn9-cuda-12/unknown 9.13.1.26-1 amd64
  cuDNN runtime libraries for CUDA 12.6

libcudnn9-cuda-13/unknown 9.13.1.26-1 amd64
  cuDNN runtime libraries for CUDA 13.0

libcudnn9-dev-cuda-11/unknown 9.10.2.21-1 amd64
  cuDNN development headers and symlinks for CUDA 11.8

libcudnn9-dev-cuda-12/unknown 9.13.1.26-1 amd64
  cuDNN development headers and symlinks for CUDA 12.6

libcudnn9-dev-cuda-13/unknown 9.13.1.26-1 amd64
  cuDNN development libraries for CUDA 13.0

libcudnn9-headers-cuda-11/unknown 9.10.2.21-1 amd64
  cuDNN header files for CUDA 11.8

libcudnn9-headers-cuda-12/unknown 9.13.1.26-1 amd64
  cuDNN header files for CUDA 12.9

libcudnn9-headers-cuda-13/unknown 9.13.1.26-1 amd64
  cuDNN header files for CUDA 13.0

libcudnn9-jit-cuda-11/unknown 9.10.2.21-1 amd64
  cuDNN-jit runtime libraries for CUDA 11.8

libcudnn9-jit-cuda-12/unknown 9.13.1.26-1 amd64
  cuDNN-jit runtime libraries for CUDA 12.9

libcudnn9-jit-cuda-13/unknown 9.13.1.26-1 amd64
  cuDNN-jit runtime libraries for CUDA 13.0

libcudnn9-jit-dev-cuda-11/unknown 9.10.2.21-1 amd64
  cuDNN-jit development libraries for CUDA 11.8

libcudnn9-jit-dev-cuda-12/unknown 9.13.1.26-1 amd64
  cuDNN-jit development libraries for CUDA 12.9

libcudnn9-jit-dev-cuda-13/unknown 9.13.1.26-1 amd64
  cuDNN-jit development libraries for CUDA 13.0

libcudnn9-samples/unknown 9.13.1.26-1 all
  cuDNN samples

libcudnn9-static-cuda-11/unknown 9.10.2.21-1 amd64
  cuDNN static libraries for CUDA 11.8

libcudnn9-static-cuda-12/unknown 9.13.1.26-1 amd64
  cuDNN static libraries for CUDA 12.6

libcudnn9-static-cuda-13/unknown 9.13.1.26-1 amd64
  cuDNN static libraries for CUDA 13.0
没有开发要求直接下载libcudnn9-cuda-12/13,frontend是有C++ API的前端版本,dev是开发版,backend/jit是即时编译
如果你是用底层C++来操作GPU则使用frontend,如果你是开发框架则使用backend/jit.如果你像我一样只是个python框架使用者,选择dev即可.
3.其他Linux版本
#Tarball
wget https://developer.download.nvidia.com/compute/cudnn/redist/cudnn/linux-x86_64/cudnn-linux-x86_64-9.13.1.26_cuda13-archive.tar.xz

#Debian
wget https://developer.download.nvidia.com/compute/cuda/repos/debian12/x86_64/cuda-keyring_1.1-1_all.deb
sudo dpkg -i cuda-keyring_1.1-1_all.deb
sudo apt-get update
sudo apt-get -y install cudnn

#OpenSUSE
sudo zypper addrepo https://developer.download.nvidia.com/compute/cuda/repos/opensuse15/x86_64/cuda-opensuse15.repo
sudo zypper refresh
sudo zypper install -y cudnn

#Redhat系
sudo dnf config-manager --add-repo https://developer.download.nvidia.com/compute/cuda/repos/rhel10/x86_64/cuda-rhel10.repo
sudo dnf clean all
sudo dnf -y install cudnn

#SLES
sudo zypper addrepo https://developer.download.nvidia.com/compute/cuda/repos/sles15/x86_64/cuda-sles15.repo
sudo zypper refresh
sudo zypper install -y cudnn

#Ubuntu
wget https://developer.download.nvidia.com/compute/cuda/repos/ubuntu2404/x86_64/cuda-keyring_1.1-1_all.deb
sudo dpkg -i cuda-keyring_1.1-1_all.deb
sudo apt-get update
sudo apt-get -y install cudnn
jit版本把cudnn改成cudnn_jit
对于Tarball:CUDA12.x版本把cuda13改成cuda12;对于其他:把-y cudnn改成-y cudnn9-cuda-12
五、验证安装和版本
1.NVIDIA-Driver
前面讲得很清楚了,这里就不再赘述了
nvidia-smi
2.CUDA-Tookit
nvcc --version
我在这里出现了安装13.0后依然显示12.0的情况:
nvcc: NVIDIA (R) Cuda compiler driver
Copyright (c) 2005-2023 NVIDIA Corporation
Built on Fri_Jan__6_16:45:21_PST_2023
Cuda compilation tools, release 12.0, V12.0.140
Build cuda_12.0.r12.0/compiler.32267302_0
尝试修改链接,依然没有解决问题
cd /usr/local
sudo rm -rf cuda
sudo ln -s cuda-13.0 cuda
nvcc --version
于是修改配置文件(不会使用linux文本编辑工具的看我第一篇博客)
 nano ~/.bashrc
 #vim ~/.bashrc #也可使用vim
notepad ~/.bashrc #(windows上也可使用记事本)
#code ~/.bashrc #(windows和linux上都可使用vscode)
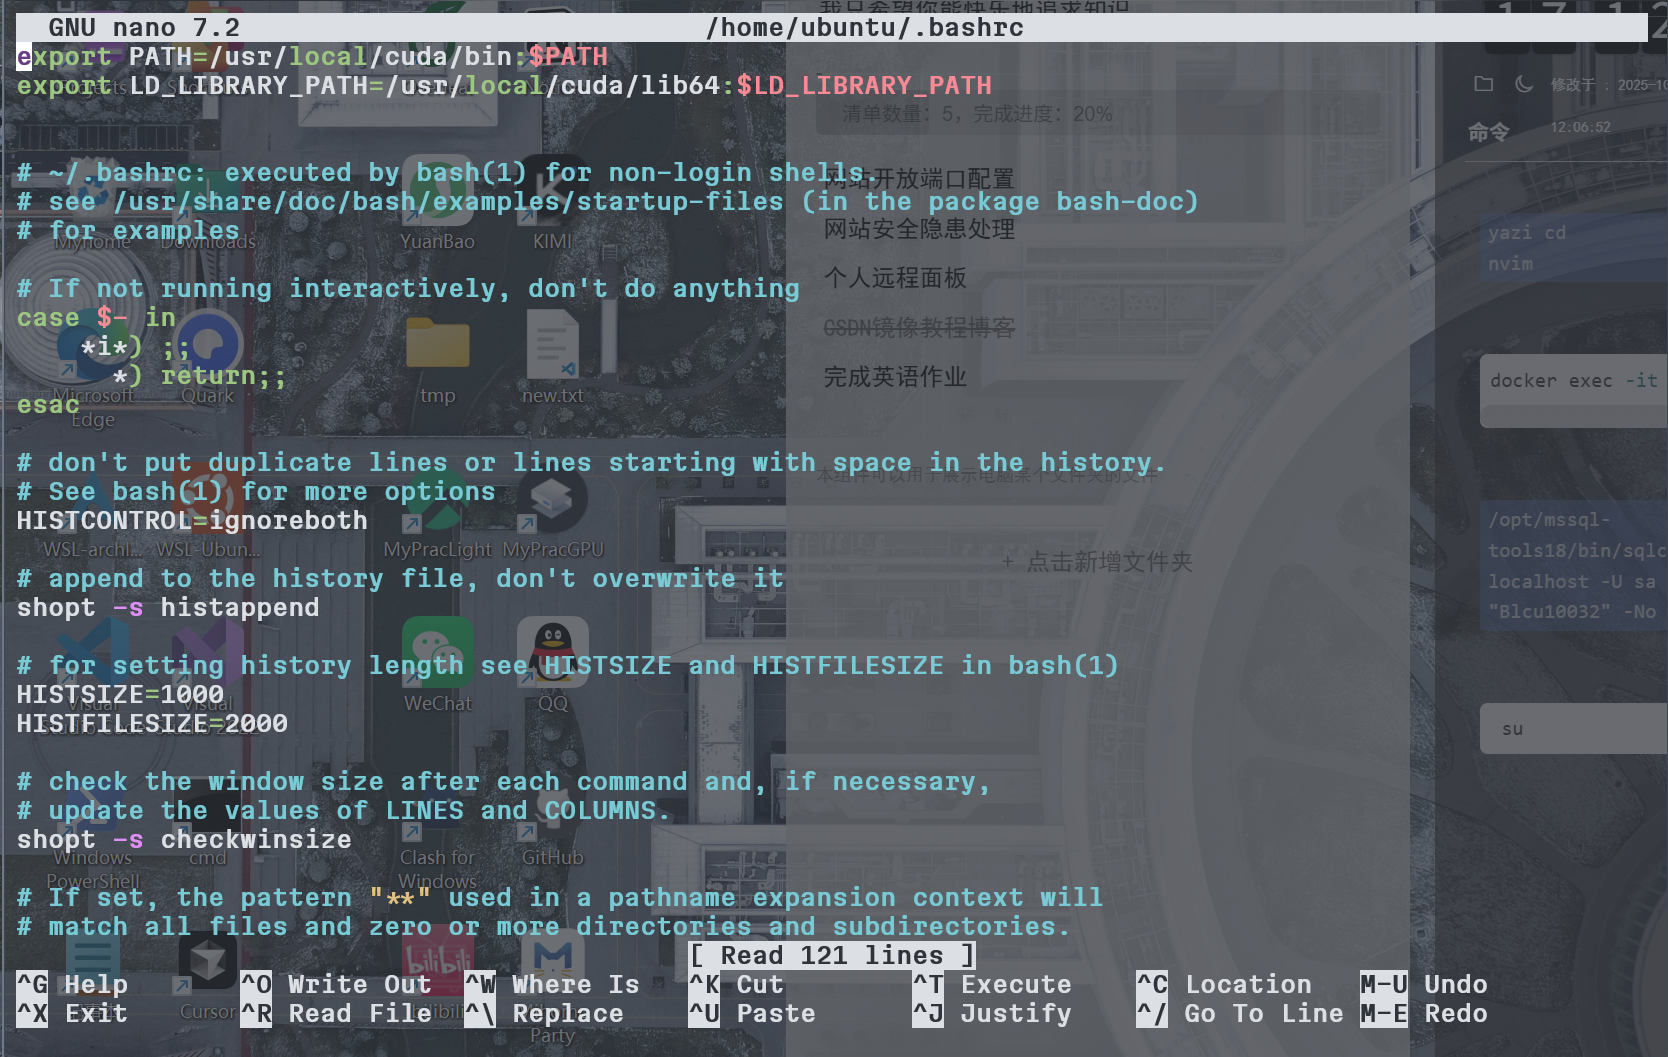
将以下代码加在最前面:
# 将 /usr/local/cuda/bin 添加到 PATH 的最前面
export PATH=/usr/local/cuda/bin:$PATH
# 同时确保库路径也设置好了
export LD_LIBRARY_PATH=/usr/local/cuda/lib64:$LD_LIBRARY_PATH
source ~/.bashrc  #修改立即生效
nvcc --version    #检查版本
然后成功更改了版本:
nvcc: NVIDIA (R) Cuda compiler driver
Copyright (c) 2005-2025 NVIDIA Corporation
Built on Wed_Aug_20_01:58:59_PM_PDT_2025
Cuda compilation tools, release 13.0, V13.0.88
Build cuda_13.0.r13.0/compiler.36424714_0
3.cuDNN-Linux
cuDNN没有直接的办法查看版本号,如果非要印证是否安装了可以find找一下头文件的位置
find /usr -name "cudnn_version.h" 2>/dev/null
我的结果是:
/usr/include/x86_64-linux-gnu/cudnn_version.h
于是运行:
ls /usr/include/x86_64-linux-gnu/
其中的输出有cudnn_cnn_v9.h ,证明安装的有cuDNN9.x版本
4.cuDNN-Win11
对于Windows我们可以用:
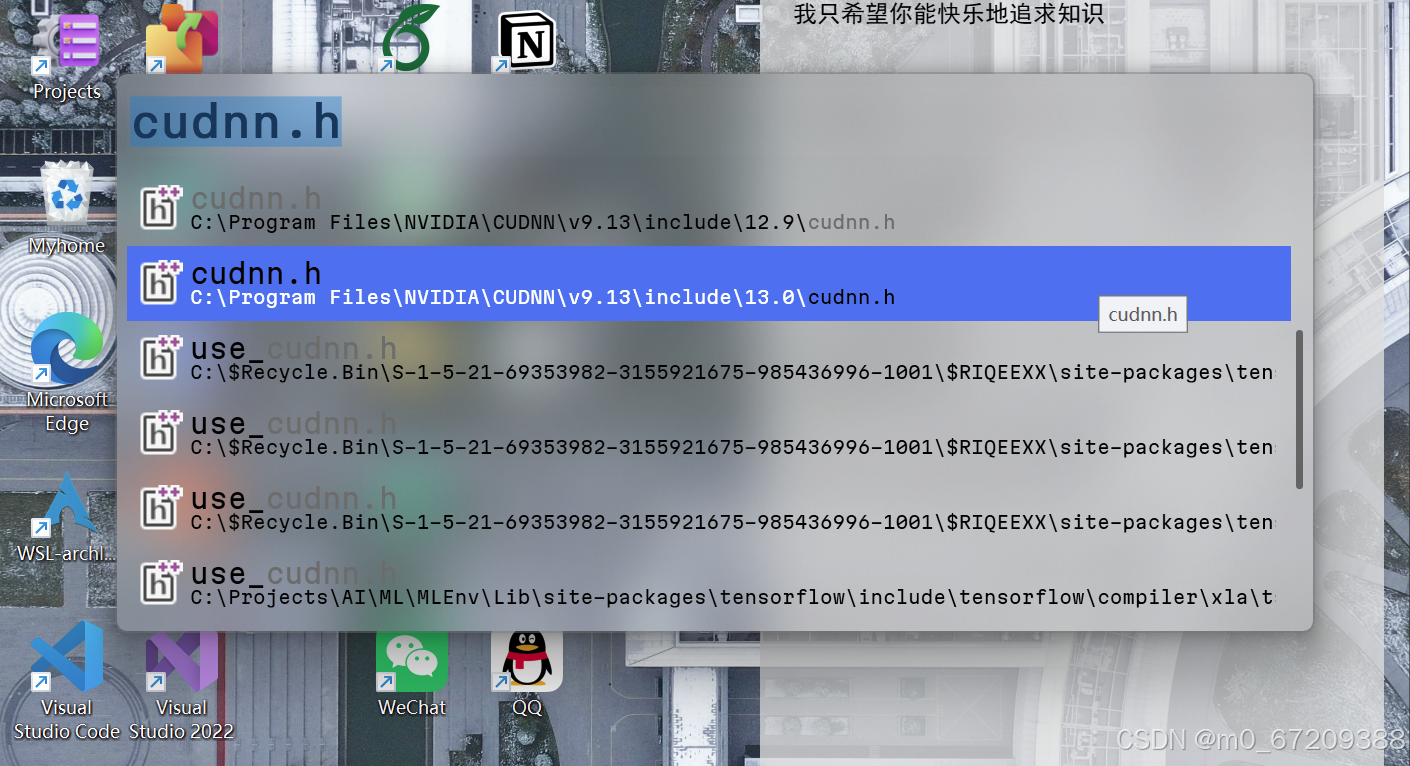
Get-ChildItem -Path C:\ -Name cudnn.h -File -Recurse -ErrorAction SilentlyContinue
我的结果是:
Program Files\NVIDIA\CUDNN\v9.13\include\12.9\cudnn.h
Program Files\NVIDIA\CUDNN\v9.13\include\13.0\cudnn.h
如果C盘文件太多会很慢,用Everything就会快很多,不过要自己安装,太偏题了所以就不讲了
六、框架支持测试程序
不管是安装驱动还是工具包,或者神经网络库,最终还是要保证期望的功能能够实现,所以最好再对功能进行验证(同时也是GPU编程练手)
注:代码中的中文和中文标点符号,以及emoji可能造成乱码(也可能不会)
1.C++支持
(这里我在控制台编写,也可以使用自己习惯的ide和文本编辑工具)
cat > test_cudnn.cu << 'EOF' #先运行,创建并编辑test_cudnn.cu
代码内容:
#include <iostream>
#include <cudnn.h>
#include <cuda_runtime.h>

int main() {

    int runtime_version = 0;
    int driver_version = 0;

    cudaRuntimeGetVersion(&runtime_version);
    cudaDriverGetVersion(&driver_version);

        std::cout << "CUDA Runtime Version: " << runtime_version / 1000 << "."
              << (runtime_version % 1000) / 10 << std::endl;
    		 std::cout << "CUDA Driver Version: " << driver_version / 1000 << "."
              << (driver_version % 1000) / 10 << std::endl;

        //创建句柄
        cudnnHandle_t handle;
        cudnnStatus_t status = cudnnCreate(&handle);
			 size_t cudnn_version = cudnnGetVersion();

    if (status == CUDNN_STATUS_SUCCESS) {

        std::cout << "cuDNN Version: " << cudnn_version / 10000 << "."
        			<< (cudnn_version % 10000) / 100 << "." << cudnn_version % 100 << std::endl;

        std::cout << "✅ cuDNN installed successfully!" << std::endl;

        // 不要忘记销毁句柄
        cudnnDestroy(handle);
    } else {
        std::cout << "❌ cuDNN initialization failed!" << std::endl;
    }
    return 0;
}
EOF #文件结束指令
nvcc -o test_cudnn test_cudnn.cu -lcudnn
#使用 nvcc(CUDA 编译器) 进行编译,并链接 cuDNN 库 (-lcudnn)
#上面这一句可能会有输出响应(我的win11有),也可能没有(我的Ubuntu没有)
./test_cudnn #运行
输出版本:
CUDA Runtime Version: 12.0
CUDA Driver Version: 13.0
cuDNN Version: 9.13.1
✅ cuDNN installed successfully!
rm ./test_cudnn
rm ./test_cudnn.cu #养成用完打扫的好习惯(
如果这里出现了以下提示(通常是Windows,因为linux会附带下载gcc):
nvcc fatal : Cannot find compiler 'cl.exe' in PATH
你可以将自己Visual Studio中自带的c语言编译器添加到环境变量,也可以新安装一个MinGW再添加到PATH

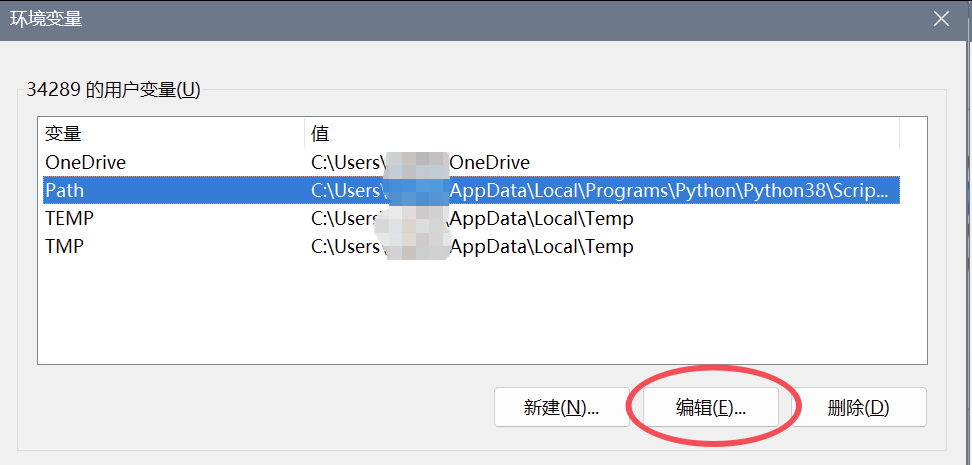

然后输入并保存:
C:\Program Files\Microsoft Visual Studio\2022\Community\VC\Tools\MSVC\14.43.34808\bin\Hostx64\x64
如果你的Microsoft Visual Studio不在C:\Program Files\下,那就找到真正的位置
2.pytorch支持
这里我也直接在控制台开工:
sudo apt install python3.12-venv #Debian系要单独安装才能使用venv虚拟环境
mkdir pytorch
cd pytorch
#养成在虚拟环境里安装库的好习惯
python3 -m venv torch #根据自己的情况,可以直接写python
source torch/bin/activate #激活虚拟环境(linux)
#torch/Scripts/activate #这里是windows的激活方法
pip install torch #安装pytorh
python3 #这里同样是根据自己的情况,可以直接写python
代码内容:
import torch

print(f"PyTorch version: {torch.__version__}")
print(f"CUDA available: {torch.cuda.is_available()}")
print(f"cuDNN enabled: {torch.backends.cudnn.enabled}")
print(f"cuDNN version: {torch.backends.cudnn.version()}")
print(f"PyTorch built with CUDA version: {torch.version.cuda}")
预期输出:
(torch) ubuntu@ubuntu:~/pytorch$ python3
Python 3.12.3 (main, Aug 14 2025, 17:47:21) [GCC 13.3.0] on linux
Type "help", "copyright", "credits" or "license" for more information.
>>> import torch
/home/ubuntu/pytorch/torch/lib/python3.12/site-packages/torch/_subclasses/functional_tensor.py:279: UserWarning: Failed to initialize NumPy: No module named 'numpy' (Triggered internally at /pytorch/torch/csrc/utils/tensor_numpy.cpp:81.)
  cpu = _conversion_method_template(device=torch.device("cpu"))
>>> print(f"PyTorch version: {torch.__version__}")
PyTorch version: 2.8.0+cu128
>>> print(f"CUDA available: {torch.cuda.is_available()}")
CUDA available: True
>>> print(f"cuDNN enabled: {torch.backends.cudnn.enabled}")
cuDNN enabled: True
>>> print(f"cuDNN version: {torch.backends.cudnn.version()}")
>cuDNN version: 91002
>>>> print(f"PyTorch built with CUDA version: {torch.version.cuda}")
PyTorch built with CUDA version: 12.8
>>> quit()#退出python
最后一个输出是PyTorch内置的CUDA版本(这个版本是PyTorch编译时绑定的,但我装的13.0也兼容)
*pytorch无CUDA支持解决方法
PyTorch version: 2.8.0+cpu
CUDA available: False
cuDNN enabled: True
cuDNN version: None
PyTorch built with CUDA version: None
我的win11上出现了这样的结果,说明我安装的pytorch是无CUDA支持的
要保证下载到有CUDA支持的pytorch,访问:pytorch官网
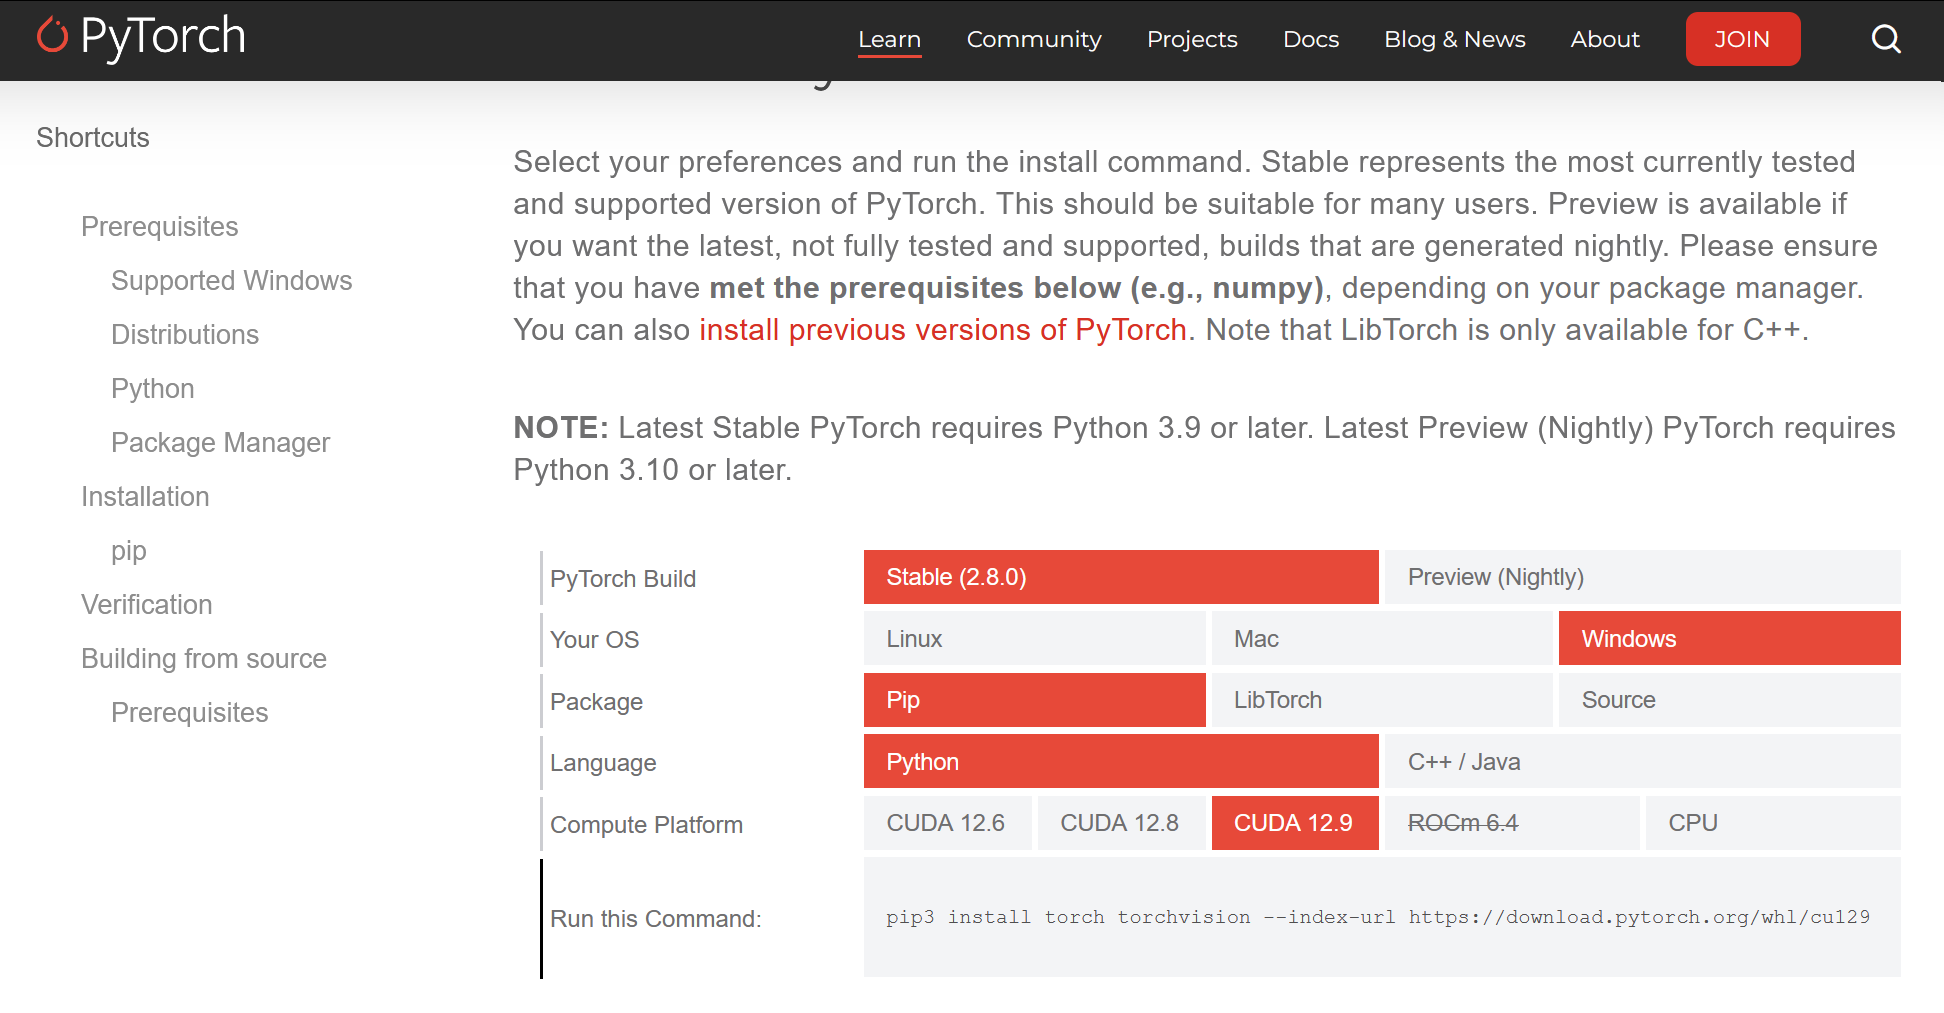
Linux和Windows的指令相同:
pip3 install torch torchvision --index-url https://download.pytorch.org/whl/cu130
我写这篇文字时还没有CUDA13的选项,但内置12.8和12.9的都支持CUDA13,这点我在自己的Ubuntu和Win11上都得到了验证。
后面的演示依然是12.9,不过不影响。
Successfully installed torch-2.8.0+cu129 torchvision-0.23.0+cu129
如果连不上可以用南京大学的镜像:
pip3 install torch torchvision torchaudio --index-url https://mirrors.nju.edu.cn/pytorch/whl/cu130
让我们重新运行前面的代码,预期结果如下:
PyTorch version: 2.8.0+cu129
CUDA available: True
cuDNN enabled: True
cuDNN version: 91002
PyTorch built with CUDA version: 12.9
deactivate #退出虚拟环境
cd .. #退出目录文件
3.tensorflow支持
mkdir tensorflow
cd tensorflow
#养成在虚拟环境里安装库的好习惯
python3 -m venv tf #根据自己的情况,可以直接写python
source tf/bin/activate #激活虚拟环境(linux)
#tf/Scripts/activate #这里是windows的激活方法
pip install tensorflow #安装tensorflow
python3 #这里同样是根据自己的情况,可以直接写python
import tensorflow as tf

print(f"TensorFlow version: {tf.__version__}")
print(f"TensorFlow CUDA available: {tf.test.is_built_with_cuda()}")
print(f"GPU available: {tf.config.list_physical_devices('GPU')}")
# TensorFlow 不会直接暴露CUDA和cuDNN版本,但能使用GPU就说明配置成功
预期输出:
(tf) ubuntu@ubuntu:~/tensorflow$ python3
Python 3.12.3 (main, Aug 14 2025, 17:47:21) [GCC 13.3.0] on linux
Type "help", "copyright", "credits" or "license" for more information.
>>> import tensorflow as tf
2025-10-08 18:26:36.705030: I tensorflow/core/platform/cpu_feature_guard.cc:210] This TensorFlow binary is optimized to use available CPU instructions in performance-critical operations.
To enable the following instructions: AVX2 FMA, in other operations, rebuild TensorFlow with the appropriate compiler flags.
>>> print(f"TensorFlow version: {tf.__version__}")
TensorFlow version: 2.20.0
>>> print(f"TensorFlow CUDA available: {tf.test.is_built_with_cuda()}")
TensorFlow CUDA available: True
>>> print(f"GPU available: {tf.config.list_physical_devices('GPU')}")
GPU available: [PhysicalDevice(name='/physical_device:GPU:0', device_type='GPU')]
>>> quit()
deactivate #退出虚拟环境
cd .. #退出目录文件
*原生win环境下tensorflow2.10+不支持GPU(使用WSL2)
我的win11上装的和unbuntu一摸一样的版本,然而tensorflow却提示不支持CUDA:
TensorFlow CUDA available: False
GPU available: []
根据官网信息,tensorflow2.10之后的版本不再为原生Windows提供GPU支持(也就是只能用WSL或者2.10以及以下版本)
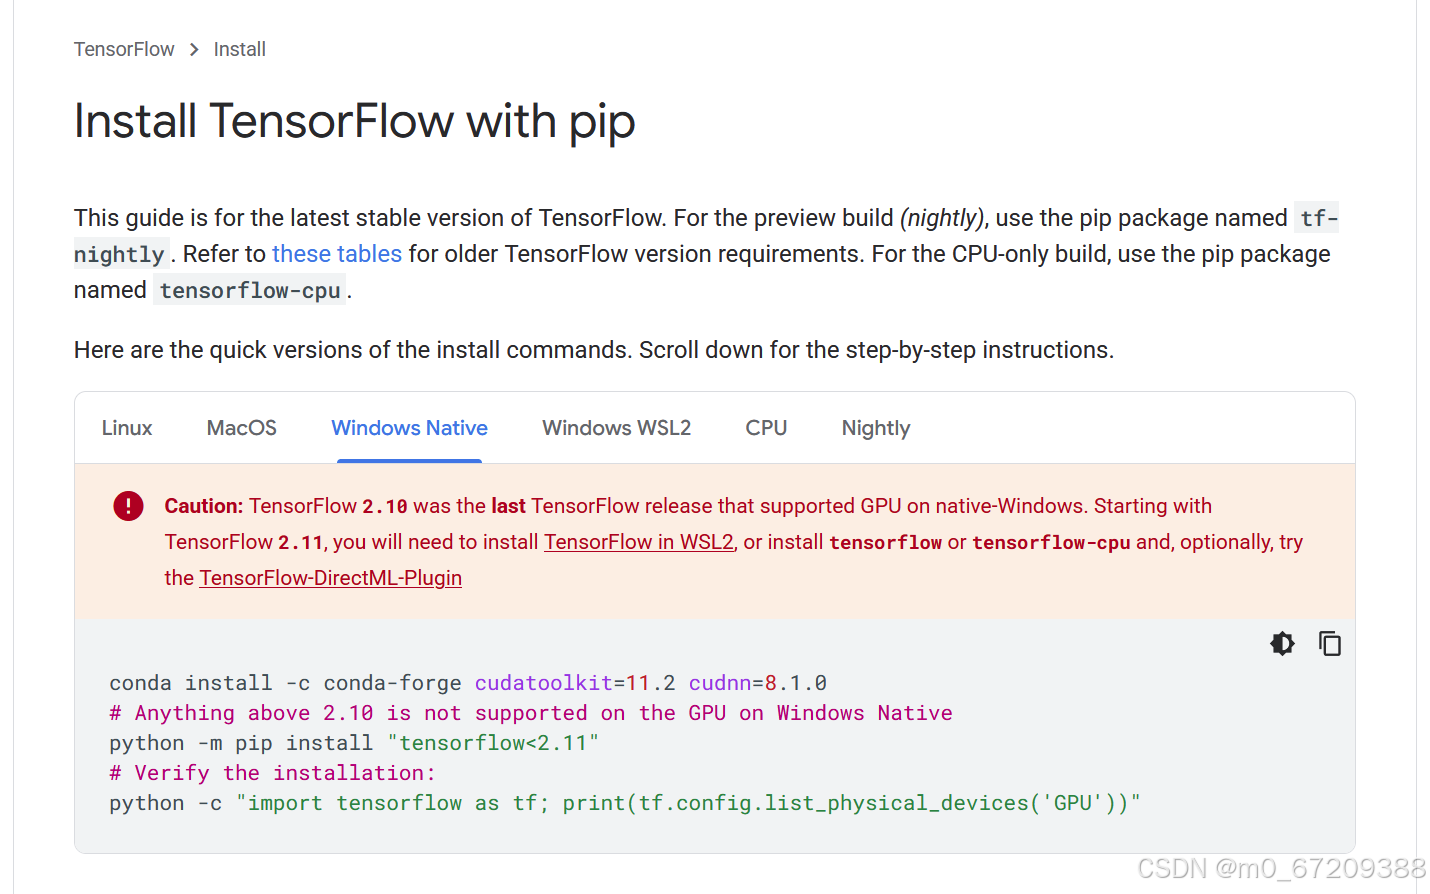
而根据:tensorflow官方版本对应说明
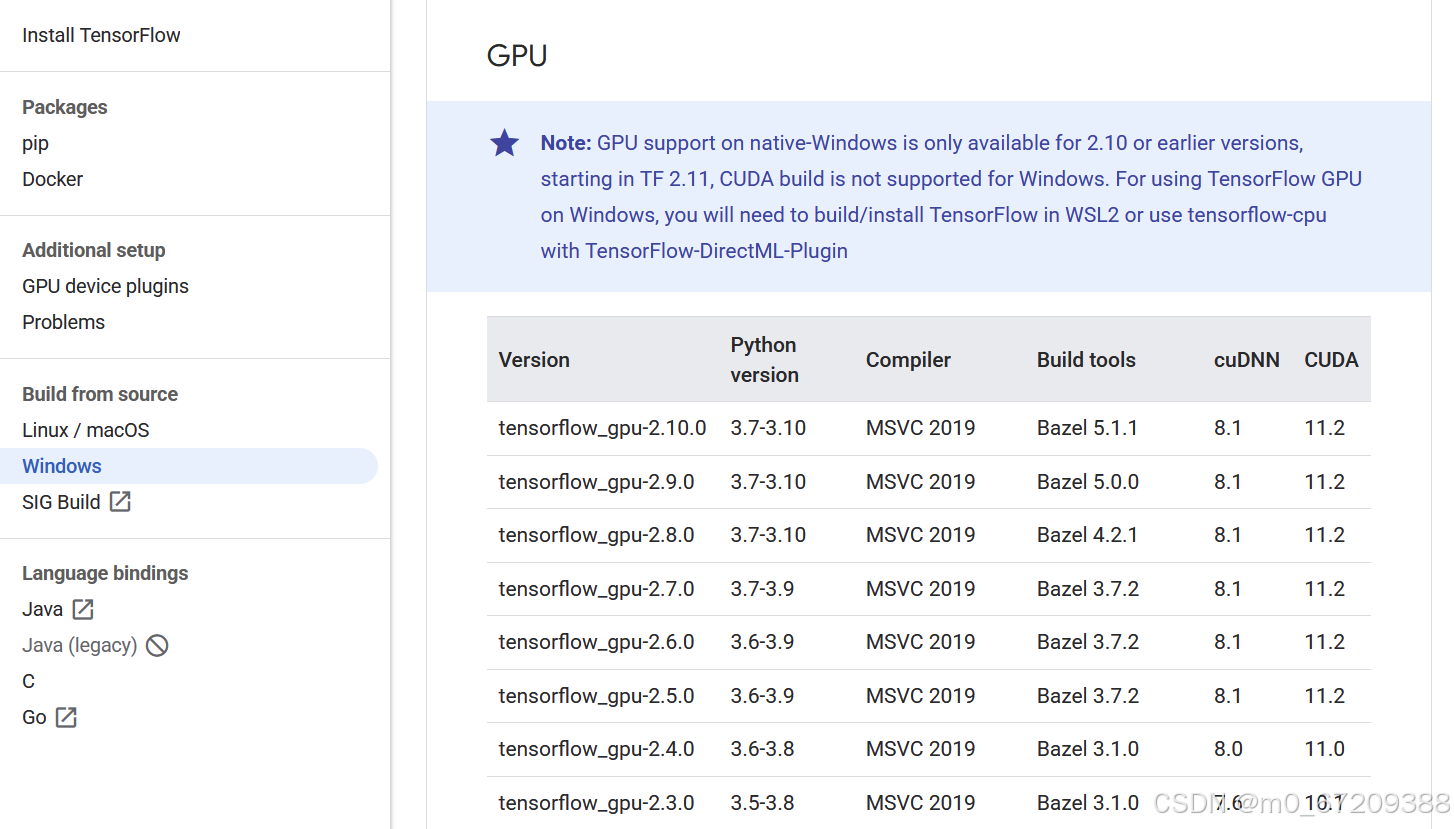
即使真的下载了tensorflow2.10,也不能够支持我们单独CUDA13最新版本,也就不属于本博客内容了。
不过一定要给出解决方法的话,那就是使用WSL2:
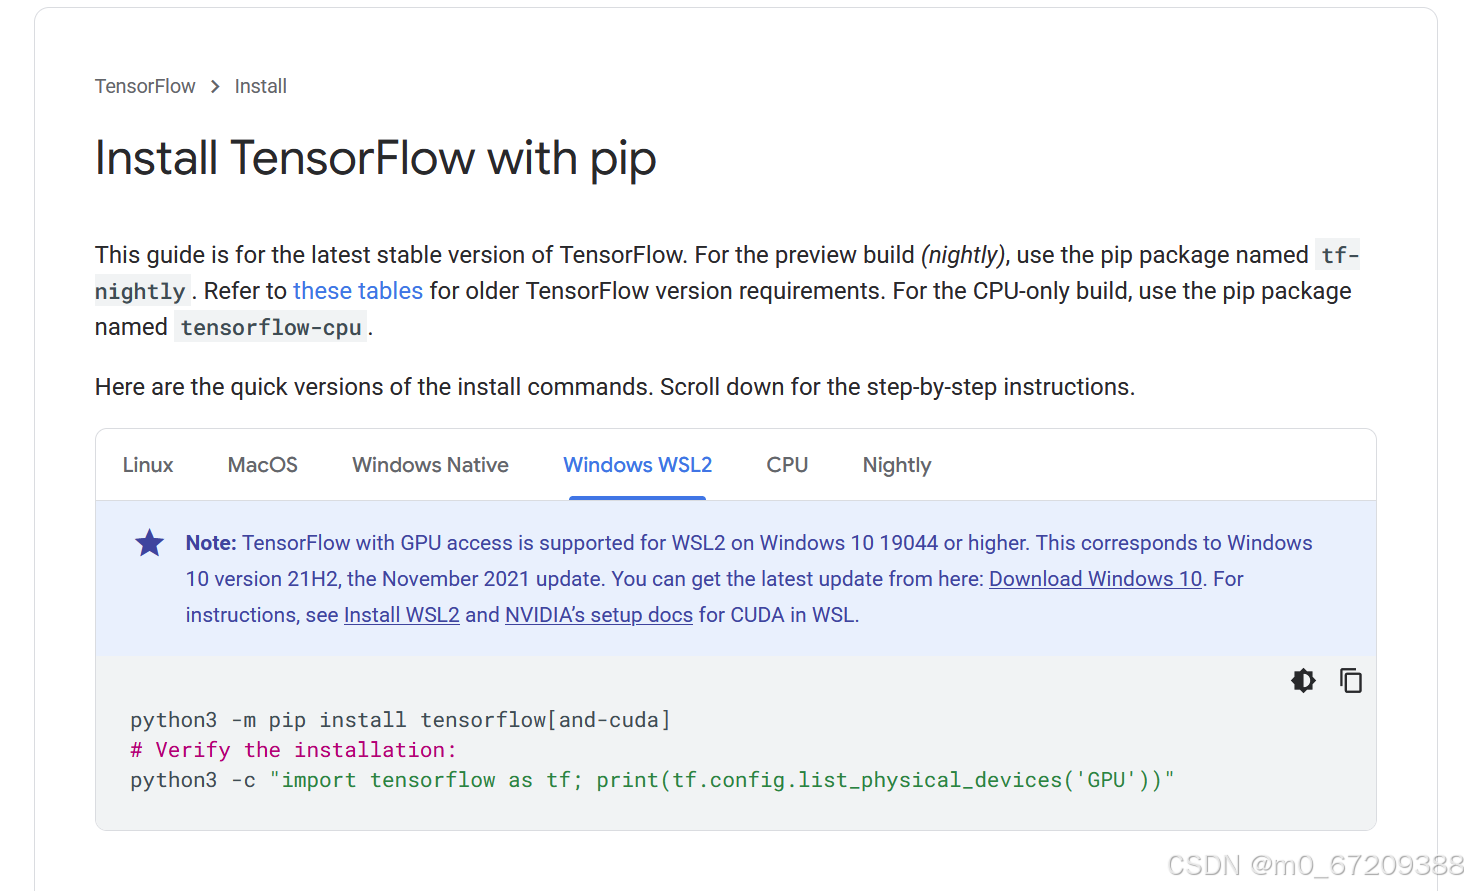
然后就是要用到GPU的话,最好选WSl-Ubuntu或其他Debian系,我在用WSl-Archlinux的时候经常看到有说只有Debian系的GPU支持,气得我够呛
重新在WSL2搭建环境:
pip install tensorflow[and-cuda]
这里的[and-cuda]一定要加上,否则——
运行,得到输出:
>>> print(f"TensorFlow CUDA available: {tf.test.is_built_with_cuda()}")
TensorFlow CUDA available: True
>>> print(f"GPU available: {tf.config.list_physical_devices('GPU')}")
WARNING: All log messages before absl::InitializeLog() is called are written to STDERR
W0000 00:00:1759992696.028735    3065 gpu_device.cc:2342] Cannot dlopen some GPU libraries. Please make sure the missing libraries mentioned above are installed properly if you would like to use GPU. Follow the guide at https://www.tensorflow.org/install/gpu for how to download and setup the required libraries for your platform.
Skipping registering GPU devices...
GPU available: []
显示tensorflow是支持CUDA的,但是找不到可用的GPU,并且提示缺少 GPU 库
如果遇到这种问题可以重新完整安装:
pip install tensorflow[and-cuda]
运行,得到输出:
>>> print(f"TensorFlow CUDA available: {tf.test.is_built_with_cuda()}")
TensorFlow CUDA available: True
>>> print(f"GPU available: {tf.config.list_physical_devices('GPU')}")
GPU available: [PhysicalDevice(name='/physical_device:GPU:0', device_type='GPU')]
哦耶~~~
七、进阶:GPU矩阵乘法运算+速度对比
最直接的测试是否兼容和可用的方式,同时也可以立即熟悉使用NVIDIA驱动的GPU编程
1.C++测试程序
创建文件并编辑
nano test_gpu.cu
notepad test_gpu.cu
或者先新建,再用其他工具编辑
touch test_gpu.cu
代码内容:
#include <iostream>
#include <chrono>
#include <cuda_runtime.h>
#include <cmath>
#include <iomanip>

// CUDA错误检查宏
#define CUDA_CHECK(call) \
    do { \
        cudaError_t err = call; \
        if (err != cudaSuccess) { \
            std::cerr << "CUDA error at " << __FILE__ << ":" << __LINE__ << " - " \
                      << cudaGetErrorString(err) << std::endl; \
            exit(EXIT_FAILURE); \
        } \
    } while (0)

// 使用较大的矩阵大小
const int MATRIX_SIZE = 1024;  // 1024x1024矩阵
const int BLOCK_SIZE = 16;     // 线程块大小

// CPU矩阵乘法
void cpu_matrix_multiply(const float* A, const float* B, float* C, int size) {
    for (int i = 0; i < size; ++i) {
        for (int j = 0; j < size; ++j) {
            float sum = 0.0f;
            for (int k = 0; k < size; ++k) {
                sum += A[i * size + k] * B[k * size + j];
            }
            C[i * size + j] = sum;
        }
    }
}

// GPU矩阵乘法内核(基础版本)
__global__ void gpu_matrix_multiply_basic(float* A, float* B, float* C, int size) {
    int row = blockIdx.y * blockDim.y + threadIdx.y;
    int col = blockIdx.x * blockDim.x + threadIdx.x;

    if (row < size && col < size) {
        float sum = 0.0f;
        for (int k = 0; k < size; ++k) {
            sum += A[row * size + k] * B[k * size + col];
        }
        C[row * size + col] = sum;
    }
}

// GPU矩阵乘法内核(使用共享内存优化)
__global__ void gpu_matrix_multiply_shared(float* A, float* B, float* C, int size) {
    // 为每个线程块声明共享内存
    __shared__ float As[BLOCK_SIZE][BLOCK_SIZE];
    __shared__ float Bs[BLOCK_SIZE][BLOCK_SIZE];

    // 计算当前线程处理的C矩阵中的行和列
    int row = blockIdx.y * BLOCK_SIZE + threadIdx.y;
    int col = blockIdx.x * BLOCK_SIZE + threadIdx.x;

    float sum = 0.0f;

    // 循环遍历所有需要的分块
    for (int t = 0; t < (size + BLOCK_SIZE - 1) / BLOCK_SIZE; ++t) {
        // 协作地将A和B的分块加载到共享内存
        int tiledCol = t * BLOCK_SIZE + threadIdx.x;
        int tiledRow = t * BLOCK_SIZE + threadIdx.y;

        // 加载A的分块(处理边界条件)
        if (row < size && tiledCol < size) {
            As[threadIdx.y][threadIdx.x] = A[row * size + tiledCol];
        } else {
            As[threadIdx.y][threadIdx.x] = 0.0f;
        }

        // 加载B的分块(处理边界条件)
        if (tiledRow < size && col < size) {
            Bs[threadIdx.y][threadIdx.x] = B[tiledRow * size + col];
        } else {
            Bs[threadIdx.y][threadIdx.x] = 0.0f;
        }

        // 等待所有线程完成数据加载
        __syncthreads();

        // 使用共享内存中的数据计算部分和
        for (int k = 0; k < BLOCK_SIZE; ++k) {
            sum += As[threadIdx.y][k] * Bs[k][threadIdx.x];
        }

        // 等待所有线程完成计算
        __syncthreads();
    }

    // 将结果写入全局内存
    if (row < size && col < size) {
        C[row * size + col] = sum;
    }
}

int main() {
    std::cout << "=== Large Matrix Multiplication Test ===" << std::endl;
    std::cout << "Matrix size: " << MATRIX_SIZE << "x" << MATRIX_SIZE << std::endl;
    std::cout << "Memory per matrix: "
              << (MATRIX_SIZE * MATRIX_SIZE * sizeof(float) / (1024.0 * 1024.0))
              << " MB" << std::endl;

    // 检查CUDA设备
    int deviceCount;
    CUDA_CHECK(cudaGetDeviceCount(&deviceCount));
    if (deviceCount == 0) {
        std::cerr << "Error: No CUDA devices found" << std::endl;
        return EXIT_FAILURE;
    }

    cudaDeviceProp prop;
    CUDA_CHECK(cudaGetDeviceProperties(&prop, 0));
    std::cout << "Using CUDA device: " << prop.name << std::endl;
    std::cout << "Available GPU memory: " << prop.totalGlobalMem / (1024.0 * 1024.0)
              << " MB" << std::endl;

    const int size = MATRIX_SIZE;
    const size_t mem_size = size * size * sizeof(float);

    // 检查内存是否足够
    if (mem_size * 3 > prop.totalGlobalMem) {
        std::cerr << "Error: Not enough GPU memory for " << size << "x" << size << " matrices" << std::endl;
        std::cerr << "Required: " << (mem_size * 3 / (1024.0 * 1024.0)) << " MB" << std::endl;
        std::cerr << "Available: " << prop.totalGlobalMem / (1024.0 * 1024.0) << " MB" << std::endl;
        return EXIT_FAILURE;
    }

    // 创建测试矩阵
    float* h_A = new float[size * size];
    float* h_B = new float[size * size];
    float* h_C_cpu = new float[size * size];
    float* h_C_gpu_basic = new float[size * size];
    float* h_C_gpu_shared = new float[size * size];

    // 初始化矩阵(使用随机值)
    std::cout << "Initializing matrices..." << std::endl;
    for (int i = 0; i < size * size; ++i) {
        h_A[i] = static_cast<float>(rand()) / RAND_MAX;
        h_B[i] = static_cast<float>(rand()) / RAND_MAX;
    }

    // CPU计算
    std::cout << "--- CPU Computation ---" << std::endl;
    auto start_cpu = std::chrono::high_resolution_clock::now();
    cpu_matrix_multiply(h_A, h_B, h_C_cpu, size);
    auto end_cpu = std::chrono::high_resolution_clock::now();
    std::chrono::duration<double> cpu_duration = end_cpu - start_cpu;

    std::cout << "CPU time: " << std::fixed << std::setprecision(3)
              << cpu_duration.count() << " seconds" << std::endl;

    // GPU计算 - 基础版本
    std::cout << "--- GPU Computation (Basic) ---" << std::endl;

    // 分配设备内存
    float *d_A, *d_B, *d_C;
    CUDA_CHECK(cudaMalloc(&d_A, mem_size));
    CUDA_CHECK(cudaMalloc(&d_B, mem_size));
    CUDA_CHECK(cudaMalloc(&d_C, mem_size));

    // 复制数据到设备
    CUDA_CHECK(cudaMemcpy(d_A, h_A, mem_size, cudaMemcpyHostToDevice));
    CUDA_CHECK(cudaMemcpy(d_B, h_B, mem_size, cudaMemcpyHostToDevice));

    // 设置线程块和网格大小
    dim3 threadsPerBlock(BLOCK_SIZE, BLOCK_SIZE);
    dim3 blocksPerGrid((size + threadsPerBlock.x - 1) / threadsPerBlock.x,
                       (size + threadsPerBlock.y - 1) / threadsPerBlock.y);

    auto start_gpu_basic = std::chrono::high_resolution_clock::now();

    // 启动GPU内核(基础版本)
    gpu_matrix_multiply_basic<<<blocksPerGrid, threadsPerBlock>>>(d_A, d_B, d_C, size);
    CUDA_CHECK(cudaGetLastError());
    CUDA_CHECK(cudaDeviceSynchronize());

    auto end_gpu_basic = std::chrono::high_resolution_clock::now();
    std::chrono::duration<double> gpu_basic_duration = end_gpu_basic - start_gpu_basic;

    // 复制结果回主机
    CUDA_CHECK(cudaMemcpy(h_C_gpu_basic, d_C, mem_size, cudaMemcpyDeviceToHost));

    std::cout << "GPU basic time: " << std::fixed << std::setprecision(3)
              << gpu_basic_duration.count() << " seconds" << std::endl;

    // GPU计算 - 共享内存优化版本
    std::cout << "--- GPU Computation (Shared Memory Optimized) ---" << std::endl;

    auto start_gpu_shared = std::chrono::high_resolution_clock::now();

    // 启动GPU内核(共享内存优化版本)
    gpu_matrix_multiply_shared<<<blocksPerGrid, threadsPerBlock>>>(d_A, d_B, d_C, size);
    CUDA_CHECK(cudaGetLastError());
    CUDA_CHECK(cudaDeviceSynchronize());

    auto end_gpu_shared = std::chrono::high_resolution_clock::now();
    std::chrono::duration<double> gpu_shared_duration = end_gpu_shared - start_gpu_shared;

    // 复制结果回主机
    CUDA_CHECK(cudaMemcpy(h_C_gpu_shared, d_C, mem_size, cudaMemcpyDeviceToHost));

    std::cout << "GPU shared memory time: " << std::fixed << std::setprecision(3)
              << gpu_shared_duration.count() << " seconds" << std::endl;

    // 清理设备内存
    CUDA_CHECK(cudaFree(d_A));
    CUDA_CHECK(cudaFree(d_B));
    CUDA_CHECK(cudaFree(d_C));

    // 性能比较
    std::cout << "--- Performance Comparison ---" << std::endl;
    std::cout << "CPU time: " << cpu_duration.count() << " seconds" << std::endl;
    std::cout << "GPU basic time: " << gpu_basic_duration.count() << " seconds" << std::endl;
    std::cout << "GPU shared memory time: " << gpu_shared_duration.count() << " seconds" << std::endl;
    std::cout << "Speedup (basic vs CPU): " << std::fixed << std::setprecision(2)
              << cpu_duration.count() / gpu_basic_duration.count() << "x" << std::endl;
    std::cout << "Speedup (shared vs CPU): " << std::fixed << std::setprecision(2)
              << cpu_duration.count() / gpu_shared_duration.count() << "x" << std::endl;
    std::cout << "Speedup (shared vs basic): " << std::fixed << std::setprecision(2)
              << gpu_basic_duration.count() / gpu_shared_duration.count() << "x" << std::endl;

    // 验证结果
    std::cout << "--- Result Verification ---" << std::endl;

    // 验证基础GPU版本
    float max_error_basic = 0.0f;
    for (int i = 0; i < size * size; ++i) {
        float error = fabs(h_C_cpu[i] - h_C_gpu_basic[i]);
        max_error_basic = fmax(max_error_basic, error);
    }
    std::cout << "Max error (basic): " << std::scientific << max_error_basic << std::endl;

    // 验证共享内存GPU版本
    float max_error_shared = 0.0f;
    for (int i = 0; i < size * size; ++i) {
        float error = fabs(h_C_cpu[i] - h_C_gpu_shared[i]);
        max_error_shared = fmax(max_error_shared, error);
    }
    std::cout << "Max error (shared): " << std::scientific << max_error_shared << std::endl;

        if (max_error_basic < 1e-10) {
        std::cout << "✅ CPU and GPU results are perfectly consistent" << std::endl;
    } else if (max_error_basic < 1e-5) {
        std::cout << "✅ CPU and GPU results are consistent (excellent accuracy)" << std::endl;
    } else if (max_error_basic < 1e-3) {
        std::cout << "⚠️ CPU and GPU results show minor differences (acceptable for most applications)" << std::endl;
    } else {
        std::cout << "❌ CPU and GPU results differ significantly" << std::endl;
    }

    // 清理主机内存
    delete[] h_A;
    delete[] h_B;
    delete[] h_C_cpu;
    delete[] h_C_gpu_basic;
    delete[] h_C_gpu_shared;

    std::cout << "Test completed successfully!" << std::endl;
    return 0;
}
编译和运行
nvcc -o test_gpu test_gpu.cu #没有用到cuDNN
./test_gpu
- 我的结果(Ubuntu云计算服务器32核CPU+显存64GNVIDIA T4显卡):
=== Large Matrix Multiplication Test ===
Matrix size: 1024x1024
Memory per matrix: 4 MB
Using CUDA device: Tesla T4
Available GPU memory: 14912.7 MB
Initializing matrices...
--- CPU Computation ---
CPU time: 3.943 seconds
--- GPU Computation (Basic) ---
GPU basic time: 0.009 seconds
--- GPU Computation (Shared Memory Optimized) ---
GPU shared memory time: 0.006 seconds
--- Performance Comparison ---
CPU time: 3.943 seconds
GPU basic time: 0.009 seconds
GPU shared memory time: 0.006 seconds
Speedup (basic vs CPU): 422.91x
Speedup (shared vs CPU): 677.10x
Speedup (shared vs basic): 1.60x
--- Result Verification ---
Max error (basic): 9.16e-05
Max error (shared): 9.16e-05
⚠️ CPU and GPU results show minor differences (acceptable for most applications)
Test completed successfully!
CPU时间: 3.943秒 - 这是单线程计算的典型速度
GPU基础版: 0.009秒 - 加快了非常多
GPU优化版: 0.006秒 - 更快了
误差水平: 9.16e-05(小数点后4~5位的浮点误差,可以接受)
- 我的结果(Win11笔记本)i7-13650HX+显存8G RTX 4060显卡):
=== Large Matrix Multiplication Test ===
Matrix size: 1024x1024
Memory per matrix: 4 MB
Using CUDA device: NVIDIA GeForce RTX 4060 Laptop GPU
Available GPU memory: 8187.5 MB
Initializing matrices...
--- CPU Computation ---
CPU time: 2.736 seconds
--- GPU Computation (Basic) ---
GPU basic time: 0.092 seconds
--- GPU Computation (Shared Memory Optimized) ---
GPU shared memory time: 0.003 seconds
--- Performance Comparison ---
CPU time: 2.736 seconds
GPU basic time: 0.092 seconds
GPU shared memory time: 0.003 seconds
Speedup (basic vs CPU): 29.65x
Speedup (shared vs CPU): 869.73x
Speedup (shared vs basic): 29.33x
--- Result Verification ---
Max error (basic): 9.16e-05
Max error (shared): 9.16e-05
⚠️  CPU and GPU results show minor differences (acceptable for most applications)
Test completed successfully!
CPU时间: 2.736秒 - 还比服务器的快一些
GPU基础版: 0.092秒 - 明显比GPU服务器慢,同时比CPU快
GPU优化版: 0.003秒 - 哇哦~
2.pytorch测试程序
cd pytorch
创建并编辑:
nano test_gpu.py
notepad test_gpu.py
或者先仅创建,再用其他工具编辑:
touch test_gpu.py
代码内容:
import torch
import time

# 设置设备
device_cpu = torch.device('cpu')
device_gpu = torch.device('cuda')

# 使用较大的矩阵
N = 1024

# 创建随机矩阵
A_cpu = torch.randn(N, N, device=device_cpu)
B_cpu = torch.randn(N, N, device=device_cpu)

#移动到GPU
A_gpu = A_cpu.to(device_gpu)
B_gpu = B_cpu.to(device_gpu)

# CPU计算
start_time = time.time()
C_cpu = torch.mm(A_cpu, B_cpu)
cpu_time = time.time() - start_time

# 预热:先运行一次不计时,让GPU完成初始化
_ = torch.mm(A_gpu, B_gpu)
torch.cuda.synchronize()

# GPU计算
start_time = time.time()
C_gpu = torch.mm(A_gpu, B_gpu)
torch.cuda.synchronize()  # 等待GPU计算完成
gpu_time = time.time() - start_time

# 输出结果
print(f"\nPyTorch Matrix Multiplication ({N}x{N})")
print(f"CPU time: {cpu_time:.4f} seconds")
print(f"GPU time: {gpu_time:.4f} seconds")
print(f"Speedup: {cpu_time / gpu_time:.2f}x")

# 将结果移回CPU进行验证
C_gpu_cpu = C_gpu.cpu()
# 验证结果一致性
max_error = torch.max(torch.abs(C_cpu - C_gpu_cpu))
print(f"Maximum error between CPU and GPU: {max_error.item()}")
source torch/bin/activate #激活虚拟环境(linux)
#torch/Scripts/activate #这里是windows的激活方法
pip install numpy #别忘了安装numpy
运行:
python3 test_gpu.py
python test_gpu.py
- 我的结果(Ubuntu云计算服务器32核CPU+显存64GNVIDIA T4显卡):
PyTorch Matrix Multiplication (1024x1024)
CPU time: 0.0050 seconds
GPU time: 0.0006 seconds
Speedup: 7.95x
Maximum error between CPU and GPU: 7.62939453125e-05
- 我的结果(Win11笔记本)i7-13650HX+显存8G RTX 4060显卡):
PyTorch Matrix Multiplication (1024x1024)
CPU time: 0.0130 seconds
GPU time: 0.0010 seconds
Speedup: 12.99x
Maximum error between CPU and GPU: 6.103515625e-05
似乎为数学计算而生的python用CPU计算会比C++更好,也有可能是应用了优化?
deactivate #退出虚拟环境
cd .. #退出目录文件
3.tensorflow测试程序
cd tensorflow
创建并编辑:
nano test_gpu.py
notepad test_gpu.py
或者先仅创建,再用其他工具编辑:
touch test_gpu.py
import tensorflow as tf
import time

# 检查可用设备
print("Available devices:")
for device in tf.config.list_physical_devices():
    print(f"  {device.device_type}: {device.name}")

# 矩阵大小
N = 1024   # 使用更大的矩阵

# 创建随机矩阵
A = tf.random.normal((N, N))
B = tf.random.normal((N, N))

# CPU计算
print("\nRunning on CPU...")
with tf.device('/CPU:0'):
    A_cpu = tf.identity(A)
    B_cpu = tf.identity(B)

    start_time = time.time()
    C_cpu = tf.matmul(A_cpu, B_cpu)
    cpu_time = time.time() - start_time

# GPU计算(如果可用)
gpu_available = tf.config.list_physical_devices('GPU')
if gpu_available:
    print("Running on GPU...")
    with tf.device('/GPU:0'):
        A_gpu = tf.identity(A)
        B_gpu = tf.identity(B)

        # 预热(第一次运行一般较慢)
        tf.matmul(A_gpu, B_gpu)

        start_time = time.time()
        C_gpu = tf.matmul(A_gpu, B_gpu)
        gpu_time = time.time() - start_time
else:
    print("GPU not available")
    gpu_time = float('inf')

# 输出结果
print(f"\nTensorFlow Matrix Multiplication ({N}x{N})")
print(f"CPU time: {cpu_time:.4f} seconds")
if gpu_available:
    print(f"GPU time: {gpu_time:.4f} seconds")
    print(f"Speedup: {cpu_time / gpu_time:.2f}x")

    # 验证结果一致性
    max_error = tf.reduce_max(tf.abs(C_cpu - C_gpu))
    print(f"Maximum error between CPU and GPU: {max_error.numpy()}")
else:
    print("GPU: Not available")
source tf/bin/activate #激活虚拟环境(linux)
#tf/Scripts/activate #这里是windows的激活方法
运行:
python3 test_gpu.py
python test_gpu.py
- 我的结果(Ubuntu云计算服务器32核CPU+显存64GNVIDIA T4显卡)(tensorflow2.20.0):
2025-10-08 21:33:45.265201: I tensorflow/core/platform/cpu_feature_guard.cc:210] This TensorFlow binary is optimized to use available CPU instructions in performance-critical operations.
To enable the following instructions: AVX2 FMA, in other operations, rebuild TensorFlow with the appropriate compiler flags.
Available devices:
  CPU: /physical_device:CPU:0
  GPU: /physical_device:GPU:0
WARNING: All log messages before absl::InitializeLog() is called are written to STDERR
I0000 00:00:1759930427.172182  100970 gpu_device.cc:2020] Created device /job:localhost/replica:0/task:0/device:GPU:0 with 13757 MB memory:  -> device: 0, name: Tesla T4, pci bus id: 0000:00:08.0, compute capability: 7.5

Running on CPU...
Running on GPU...

TensorFlow Matrix Multiplication (1024x1024)
CPU time: 0.0213 seconds
GPU time: 0.0003 seconds
Speedup: 84.88x
Maximum error between CPU and GPU: 8.392333984375e-05
- 我的结果(Win11笔记本WSL2-Ubuntu24.04环境)i7-13650HX+显存8G RTX 4060显卡):
2025-10-09 15:22:33.967581: I tensorflow/core/util/port.cc:153] oneDNN custom operations are on. You may see slightly different numerical results due to floating-point round-off errors from different computation orders. To turn them off, set the environment variable `TF_ENABLE_ONEDNN_OPTS=0`.
2025-10-09 15:22:34.000728: I tensorflow/core/platform/cpu_feature_guard.cc:210] This TensorFlow binary is optimized to use available CPU instructions in performance-critical operations.
To enable the following instructions: AVX2 AVX_VNNI FMA, in other operations, rebuild TensorFlow with the appropriate compiler flags.
2025-10-09 15:22:34.849191: I tensorflow/core/util/port.cc:153] oneDNN custom operations are on. You may see slightly different numerical results due to floating-point round-off errors from different computation orders. To turn them off, set the environment variable `TF_ENABLE_ONEDNN_OPTS=0`.
Available devices:
  CPU: /physical_device:CPU:0
  GPU: /physical_device:GPU:0
WARNING: All log messages before absl::InitializeLog() is called are written to STDERR
I0000 00:00:1759994555.346035    3525 gpu_device.cc:2020] Created device /job:localhost/replica:0/task:0/device:GPU:0 with 5561 MB memory:  -> device: 0, name: NVIDIA GeForce RTX 4060 Laptop GPU, pci bus id: 0000:01:00.0, compute capability: 8.9

Running on CPU...
Running on GPU...

TensorFlow Matrix Multiplication (1024x1024)
CPU time: 0.0173 seconds
GPU time: 0.0004 seconds
Speedup: 48.21x
Maximum error between CPU and GPU: 0.04720115661621094
输出了很多优化相关的提示信息,不过看来在这一任务下tensorflow的GPU速度更快呢
deactivate #退出虚拟环境
cd .. #退出目录文件
总结
在总共三个平台上完成GPU编程的环境搭建和测试花了我一天多的时间,一边搭建一边写攻略。也是因为写这个东西吧,每一步我怎么执行的都很清楚,加上一心想要完善攻略的态度也让我把原本的目标进行了提升,最后收获还是很大的。如果这篇文章有帮助到你的话,麻烦点个赞留个言。
最后,我想骂一下tensorflow不支持windows的事,太坑了。

AtomGit 是由开放原子开源基金会联合 CSDN 等生态伙伴共同推出的新一代开源与人工智能协作平台。平台坚持“开放、中立、公益”的理念,把代码托管、模型共享、数据集托管、智能体开发体验和算力服务整合在一起,为开发者提供从开发、训练到部署的一站式体验。
更多推荐



 53
53 0
0- 0


 已为社区贡献1条内容

所有评论(0)