ROS2入门教程(看这一篇就足够啦!!!)
本篇博客是我花费了大量时间整理得出的,本文介绍了ROS2的基础知识和实践操作,包括Linux常用命令、ROS2核心概念、节点创建与通信、服务与参数通信等内容。后续我还会写一篇关于ros2工具,导航,建模之类的博客,大家也可以去看看
大家要及时关注博主哦,以后想看的时候不会迷路
目录
linux基本操作
~ :代表用户的操作空间的目录
/ :代表最主目录
ls:查看当前路径的文件
./+文件名字: 就是直接执行文件(可执行文件为前提)
chmod a+x + 文件名字 :可以给予普通文件执行权限,变绿,变为可执行文件(更改文件或目录的权限)
python3 +文件名.py : 直接去调用编译器去执行
cat + 文件名字 :直接去显示文本里面的内容
nano :用nano编辑器去编辑文本
mkdir + 目录名: 创建一个目录/文件夹
touch + 文件名: 创建一个空文件
cd + 目录路径 :改变工作目录,未指定路径时回到用户主目录
pwd : 显示当前目录路径
rm : 删除文件或目录
echo :
ros2命令行基本操作
ros2 run 包名 文件名
ros2 node info 节点名称 : 查看节点的详细信息
ros2 topic echo 话题名称 : 输出话题数据
ros2 topic info 话题名称 : 查看话题的具体信息
ros2 interface show 消息接口 : 查看消息接口的详细定义
ros2 topic pub 话题名称 消息接口 "{给参数}" : 话题发布
ros2 topic list : 看到话题清单
ros2 service list -t : 查看服务列表, -t 显示服务的接口类型
接口类型分为请求接口和相应接口两部分
ros2 interface show + 服务接口: ---------分割线上面的时请求接口, 下面的是响应接口
ros2 service call + 服务名字 + 服务接口类型 + Request数据(按照请求接口给)"{x= 1}":调用指定的服务
服务名字后面带有Parameter的都是参数通信
ros2 param list : 查看当前所有节点的参数列表
ros2 param describe +节点名字 +参数名字: 查看指定节点的参数描述
ros2 param get + 节点 + 参数名字: 获得参数值
ros2 param set + 节点 + 参数名字 + n :设定参数值
ros2 run 包名 + 可执行文件名字 --ros-args -p + 参数名字:值 : 这就是启动的时候设定参数
ros2 run tf2_ros tf2_echo 父 子 :查看父 和子的坐标关系
rviz2 中可以保存配置文件, 用ctrl + shift + s
然后用rviz2 -d ~/chapt5/.... 就是用绝对路径就可以直接打开
用ros2 bag record + 话题 (/turtle/cmd_vel海龟控制) : 就可以记录我们的操作
用rso2 bag play + 生成的文件 : 就可以播放我们的命令
apt info : 查看某个包的具体信息
ros2 run teleop_twist_keyboard teleop_twist_keyboard : 这是用键盘控制机器人
ros2 run nav2_map_server map_saver_cli -f room(保存地点) : 这是一个地图保存的命令
当代码报错的时候用 --debug,就会打印出详细的日志,哪里出错了
环境变量:存储用户的信息
在linux中 ,以 . 开头的文件是隐藏文件
INFO :是日志的级别 也可以是warn
pirntenv:查看环境变量 (在后面加上 | grep + 环境变量的信息, 就可以进行过滤)
c++经过编译生成a.out才可以运行
常见问题
1很总要的一个问题,关于includePath问题
我们一般急用code .打开xxx_ws而不要用打开xxx,ws下会自动包含我们所要的依赖路径,如果直接打开xxx尽管我们配置了includePath但是还是会报错,这时候code 打开ws,然后将这个生成的配置拷贝到xxx下也可以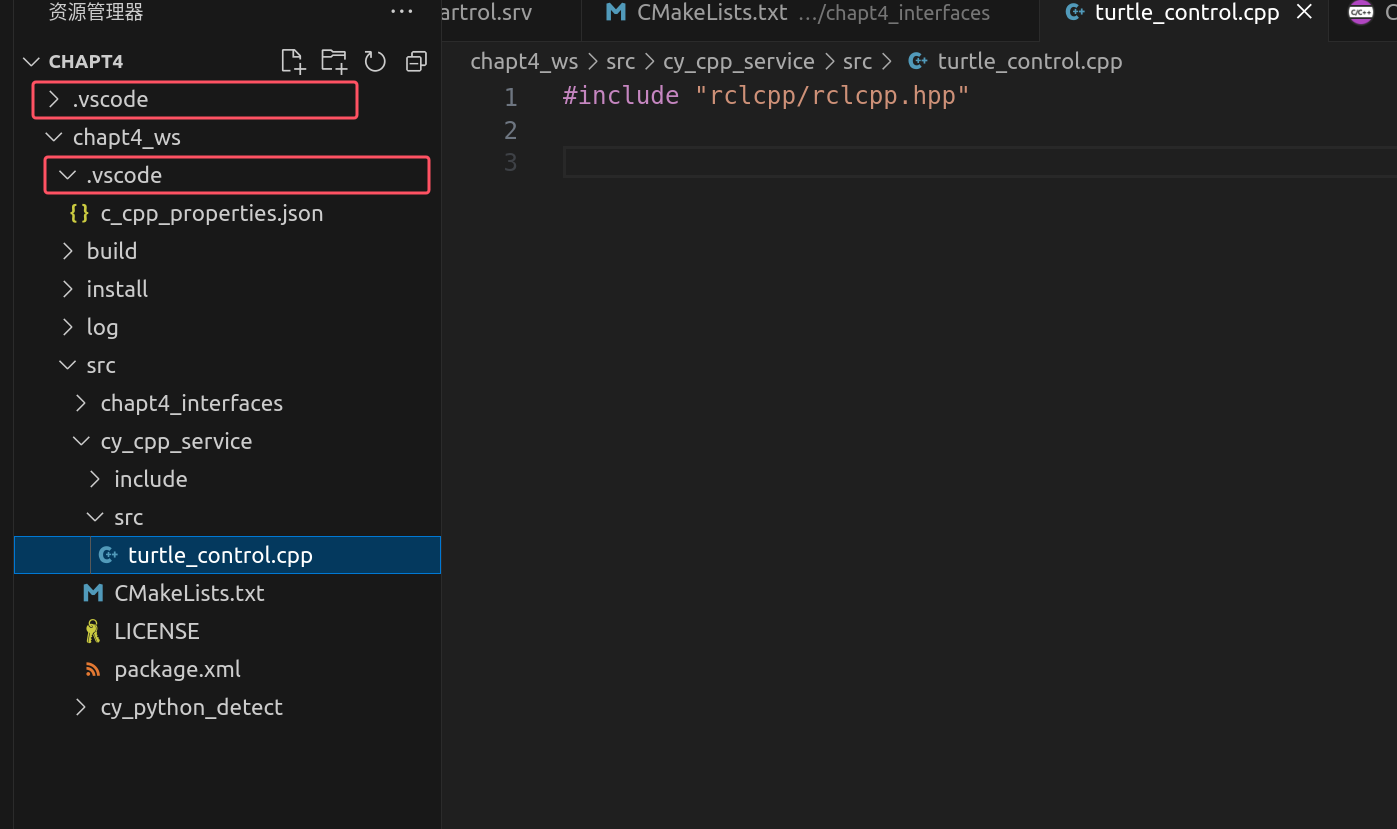
因为打开xxx的时候不会对xxx_ws的includePath进行设置
如果ubuntu突然没有了网,可以用这个指令去打开
nmcli networking on
没网就用这个指令!!!
第一章基本代码编写
1在linux下面编写代码
python3 文件.py 就可以直接执行python 文件
对于c++的文件,一个直接用g++取编译,但是这个依赖多了就不行了
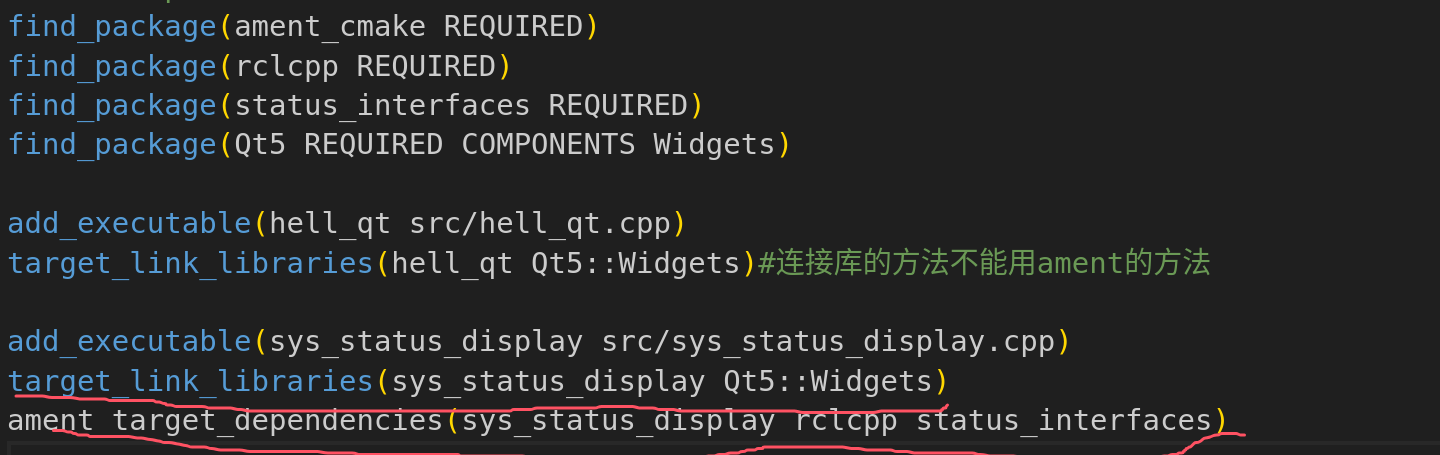
所以用CMakeList.txt 这种CMake来进行这种操作
在这个文件里面编写
然后cmake .
就能生成一个Makefile,再用make 就出现了一个可执行文件learn_cmake

ctrl+shift+5 :vs里面再打开一个终端
if __name__=='__main__':
    main()
在python里面这个是让这个文件当作脚本的时候可以调用main函数
第二章在功能包里面组织节点
其实在实际当中,可以直接先写一个单文件,然后直接编译运行,测试没问题之后再放到功能包里面
注意:在用ros2的时候就要去init我们使用的客户端库
ros2 pkg create :基本指令
--build-type ament_python :构建的类型(ament_cmake)
--license Apache-2.0 :证书
cy_python_pkg : 名字
-----------------------------------------------
colcon build : 构建功能包,在当前目录下扫面所有的功能包
source install/setup.bash : 修改环境变量,才能找到包
ros2 run 包名 文件名字:运行功能包
python实现
import rclpy-->这个是导入库
from rclpy.node import Node-->这个是从某个文件引入Node这个类1要去setup.py注册节点
"可执行文件名 = 包名.文件名:main"
2 package.xml 文件里面添加依赖(你在代码导入的库要添加对应的依赖)
<depend>rclpy</depend>
cpp实现
std::make_shared<类>(),创建这个类,并返回一个共享指针
与python一样再package.xml里面添加依赖
还有
cmake_minimum_required(VERSION 3.8)
project(ros2_cpp)

add_executable(ros2_cpp_node ros2_cpp_node.cpp)

find_package(rclcpp REQUIRED) #直接茶找到对应的头文件和库文件
message(STATUS ${rclcpp_INCLUDE_DIRS}) #头文件和rclcpp依赖的文件
message(STATUS ${rclcpp_LIBRARIES}) #库文件和rclcpp依赖的库文件
target_include_directories(ros2_cpp_node PUBLIC ${rclcpp_INCLUDE_DIRS}) #头文件的包含
target_link_libraries(ros2_cpp_node ${rclcpp_LIBRARIES}) #库文件链接
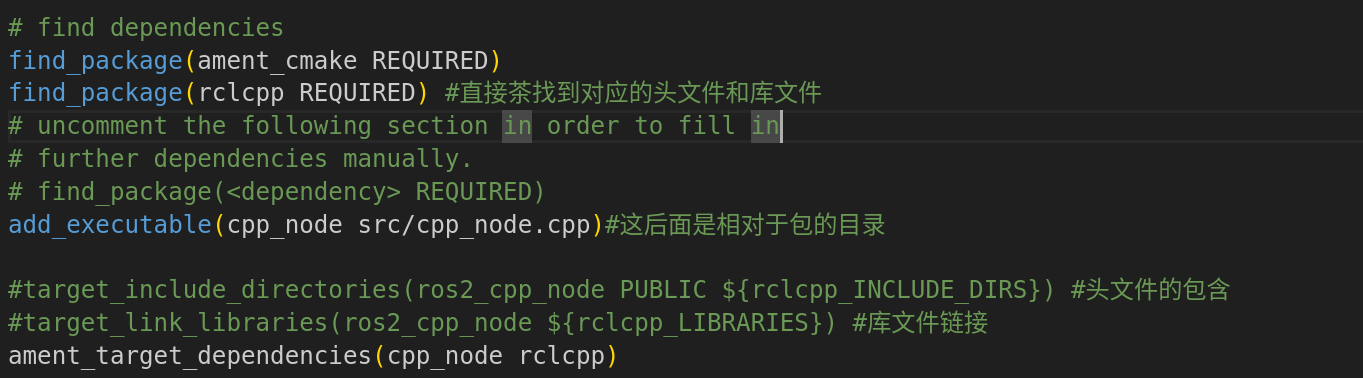
这个是不用功能包来用c++创建一个节点,并且用CMakeLists.txt来组织,因为要包含rclcpp,那么就要查找对应的头文件和库文件并且包含和连接
还有这个message可以不要,只是打印信息
如果是用功能包的话,也是要再CMakeLists.txt
添加找包,可执行,然后链接可以用ros2提供的一个更方便的
还有在c++中不像python里面会把可执行文件拷贝到Install目录下lib里面,这时候我们就要自己去拷贝
添加
install(TARGETS
  cpp_node
  DESTINATION lib/${PROJECT_NAME}
)
功能包
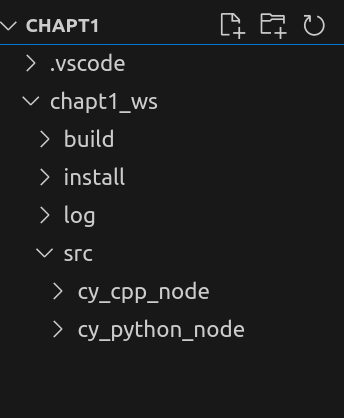
在功能包的构建中,如果一个功能包依赖于另外一个功能包构建的结果
那么在xml里面加上<depend>功能包名</depend>这样就可以先去构建这个指定功能包
这个就是我们以后创建功能包的格式,在ws下的src/创建功能包,然后在ws下构建功能包
多线程
每个线程都能独立运行,速度快
python实现
多线程库threading
threading.Tread(target= , args = ( ))
网上资源的下载库 requests
responst = requests.get(url)
response.encoding = 'utf-8'
url:网址
callback_world_count:统计次数的回调函数
python3 -m http.server : 启动一个服务器
import threading
import requests

class Downloadnovel:
    def download(self,url,callback_word_count):
        print(f"{threading.get_ident()}url:{url}")
        response = requests.get(url)
        response.encoding='utf-8'
        callback_word_count(url,response.text)


    def start_download(self,url,callback_word_count):
        thread = threading.Thread(target=self.download,args=(url,callback_word_count))
        thread.start()


def word_count(url,result):
    print(f'{url}:{len(result)}->{result[:5]}')

def main():
    download  = Downloadnovel()
    download.start_download('http://127.0.0.1:8000/text1.txt',word_count)
    download.start_download('http://127.0.0.1:8000/text2.txt',word_count)
    download.start_download('http://127.0.0.1:8000/text3.txt',word_count)
cpp实现
python 里面有requests库,直接可以再网络上请求c++不可以,需要导入第三方库
<memory> 用智能指针包这个头文件
<funcitional>用函数包装器
C++用http的时候要用到第三方库
include_directories(include)#包含头文件的目录(这个cmakelist里面加上,因为我们拷贝到cpp_pkg的include目录下了)
#include <iostream>
#include <thread>
#include <chrono>//时间相关
#include <functional>
#include "cpp-httplib/httplib.h"//下载器

class Download
{
public:
    //有两个参数,域名和地址分开的,用函数包装器来组织
    void download(const std::string& host,const std::string& path,
    const std::function<void(const std::string&,const std::string&)> &callback_word_count
    )
    {
        std::cout<<"线程"<<std::this_thread::get_id()<<std::endl;
        //c++的客户端是这样创建的
        httplib::Client client(host);
        auto response = client.Get(path);
        if(response && response->status == 200)
        {
            callback_word_count(path,response->body);
        }
    }

    void start_download(const std::string& host,const std::string& path,
    const std::function<void(const std::string&,const std::string&)> &callback_word_count
    )
    {
        //c++11的语法,包装起来
        auto download_fun = std::bind(&Download::download,this,std::placeholders::_1,
        std::placeholders::_2,std::placeholders::_3);
        std::thread thread(download_fun,host,path,callback_word_count);
        thread.detach();//线程分开(c++线程立刻运行,堵塞无法退出,这个分离就可以运行其他线程)
    }
private:
};

int main()
{
    auto d = Download();
    auto word_count = [](const std::string& path,const std::string& result) ->void {
        std::cout<<"下载完成"<<path<<":"<<result.length()<<"->"<<result.substr(0,5)
        <<std::endl;
    };
    d.start_download("http://127.0.0.1:8000","/text1.txt",word_count);
    d.start_download("http://127.0.0.1:8000","/text2.txt",word_count);
    d.start_download("http://127.0.0.1:8000","/text3.txt",word_count);
    std::this_thread::sleep_for(std::chrono::milliseconds(1000*10));
    return 0;

}
第三章话题通信
话题的名字
话题的接口 : 就是话题的数据类型
ecample_interfaces 是一个接口库,里面有我们用的/msg/String接口,我们是依照这个模板来写
python
话题发布小说
逐行,5秒一次,创建队列,每一行都存进去,然后每一行去发布
发布完成可以去查看话题是否发布了
发布话题
import rclpy
from rclpy.node import Node
import requests
from example_interfaces.msg import String
from queue import Queue
class NovelPubNode(Node):
    def __init__(self,node_name):
        super().__init__(node_name)
        self.get_logger().info(f'{node_name},启动')
        self.novel_queue_ = Queue()
        #创建话题发布着,接口,名字,队列大小
        self.novel_publisher_ = self.create_publisher(String,'novel',10)
        #创建定时器定时发布
        self.novel_timer_ = self.create_timer(5,self.timer_callback)

    def timer_callback(self):
        if self.novel_queue_.qsize()> 0:
            msg = String()
            msg.data = self.novel_queue_.get()
            self.novel_publisher_.publish(msg)
            self.get_logger().info(f'发布了:{msg}')


    def download(self,url):
        response = requests.get(url)
        response.encoding='utf-8'
        text = response.text
        self.get_logger().info(f'下载{url},{len(text)}')
        #text.splitlines
        for line in text.splitlines():
            self.novel_queue_.put(line)


def main():
    rclpy.init()
    node = NovelPubNode('novel_pub')
    node.download('http://0.0.0.0:8000/text1.txt')
    rclpy.spin(node)
    rclpy.shutdown()
订阅话题
用新的线程去朗读收到的话题
rclpy.ok()检测上下文是否ok
import rclpy
from rclpy.node import Node
import espeakng
from example_interfaces.msg import String
from queue import Queue
import threading
import time
class Novel_PubNode(Node):
    def __init__(self,node_name):
        super().__init__(node_name)
        self.novel_queue_ = Queue()
        self.novel_subscriber_ = self.create_subscription(String,'novel',self.novel_callback,10)
        self.thread_ = threading.Thread(target=self.speak_thread)
        self.thread_.start()

    #受到发布的信息就会调用这个函数
    def novel_callback(self,msg):
        self.novel_queue_.put(msg.data)

    def speak_thread(self):
        speaker = espeakng.Speaker()
        speaker.voice = 'zh'

        while rclpy.ok():
            if self.novel_queue_.qsize()>0:
                text = self.novel_queue_.get()
                self.get_logger().info(f'开始朗读:{text}')
                speaker.say(text)
                speaker.wait()#等待说完
            else:
                time.sleep(1)


def main():
    rclpy.init()
    node = Novel_PubNode('novel_sub')
    rclpy.spin(node)
    rclpy.shutdown()
cpp
发布速度控制海龟画圆
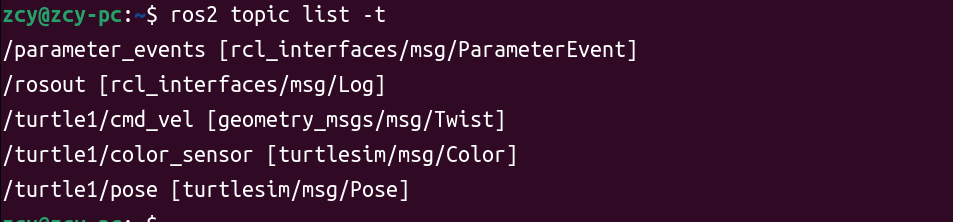
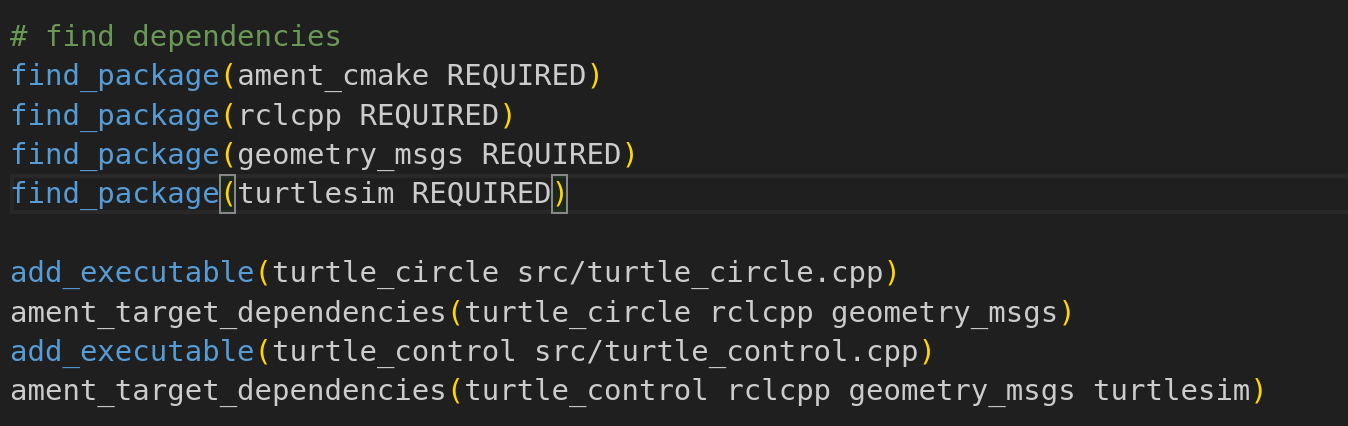
cmd_vel 和 pose 我们需要关注 这两个消息接口所在的地方我们需要添加依赖
在Include rclcpp/rclcpp.hpp的时候要添加配置/opt/ros/humble/include/**
explicit 关键字是防止构造函数隐式类型转换
c++中用指针都用共享指针
发布话题
创建和发布都在Node方法里面,但是c++需要用智能指针去管理
还有要包含消息接口
#include "rclcpp/rclcpp.hpp"
#include <chrono>
#include "geometry_msgs/msg/twist.hpp"//引入这个消息接口

using namespace std::chrono_literals;

class TurtleCircleNode: public rclcpp::Node
{
public:
    explicit TurtleCircleNode(const std::string& node_name)
    :Node(node_name)
    {
        publisher_ = this->create_publisher<geometry_msgs::msg::Twist>("/turtle1/cmd_vel",10);
        timer_ = this->create_wall_timer(1000ms,std::bind(&TurtleCircleNode::time_callback,this));
    }
//这个定时器里面发布消息!!核心!!
    void time_callback()
    {
        auto msg = geometry_msgs::msg::Twist();
        msg.linear.x = 1.0;
        msg.angular.z = 0.5;
        publisher_->publish(msg);
    }

private:
    rclcpp::TimerBase::SharedPtr timer_;
    rclcpp::Publisher<geometry_msgs::msg::Twist>::SharedPtr publisher_;
};

int main(char argc,char* argv[])
{
    rclcpp::init(argc,argv);
    auto node = std::make_shared<TurtleCircleNode>("turtle_circle");
    rclcpp::spin(node);
    rclcpp::shutdown();
}
订阅话题,实现闭环控制
#include "rclcpp/rclcpp.hpp"
#include <chrono>
#include "geometry_msgs/msg/twist.hpp"//引入这个消息接口
#include "turtlesim/msg/pose.hpp"
using namespace std::chrono_literals;

class TurtleControlNode: public rclcpp::Node
{
public:
    explicit TurtleControlNode(const std::string& node_name)
    :Node(node_name)
    {
        publisher_ = this->create_publisher<geometry_msgs::msg::Twist>("/turtle1/cmd_vel",10);
        subscripter_ = this->create_subscription<turtlesim::msg::Pose>("/turtle1/pose",10,
        std::bind(&TurtleControlNode::on_pose_receivered_,this,std::placeholders::_1));
    }
这里要注意,订阅者的回调函数可以用lamda表达式还可以写一个成员函数bind包装起来
注意有参数,参数就是一个共享指针

    void on_pose_receivered_(const turtlesim::msg::Pose::SharedPtr pose)//收到参数的共享指针
    {
        //1获取当前位置
        auto current_x = pose->x;
        auto current_y = pose->y;
        RCLCPP_INFO(get_logger(),"当前x:%f,y=%f",current_x,current_y);
        //2计算当前位置和目标位置的距离差和角度差
        auto distance = std::sqrt((target_x_-current_x)*(target_x_-current_x)+
        (target_y_-current_y)*(target_y_-current_y));
        auto angle = std::atan2((target_y_-current_y),(target_x_-current_x))-pose->theta;
        //3控制策略
        auto msg = geometry_msgs::msg::Twist();
        if(distance>0.1)
        {
            if(fabs(angle)>0.2)
            {
                msg.angular.z = fabs(angle);
            }
            else
            {
                msg.linear.x = k_*distance;
            }
        }

        //4限制线速度最大值
        if(msg.linear.x>max_speed_)
        {
            msg.linear.x = max_speed_;
        }


        publisher_->publish(msg);
    }

private:
    rclcpp::Subscription<turtlesim::msg::Pose>::SharedPtr subscripter_;
    rclcpp::Publisher<geometry_msgs::msg::Twist>::SharedPtr publisher_;
    double target_x_{1.0};
    double target_y_{1.0};
    double k_{1.0};//比例系数
    double max_speed_{3.0};
};

int main(char argc,char* argv[])
{
    rclcpp::init(argc,argv);
    auto node = std::make_shared<TurtleControlNode>("turtle_control");
    rclcpp::spin(node);
    rclcpp::shutdown();
}
注意:我们这里用了共享是指针,lamda表达式,函数包装器等等c++11的语法
我们的订阅和发布,都搞一个私有的成员变量,声明其共享指针,然后在构造函数中去初始化这个共享指针,这个rclcpp下有Subscription这个类,然后传入消息接口(其实这个消息接口也变成了类),这个类里面还有SharedPtr这个共享指针
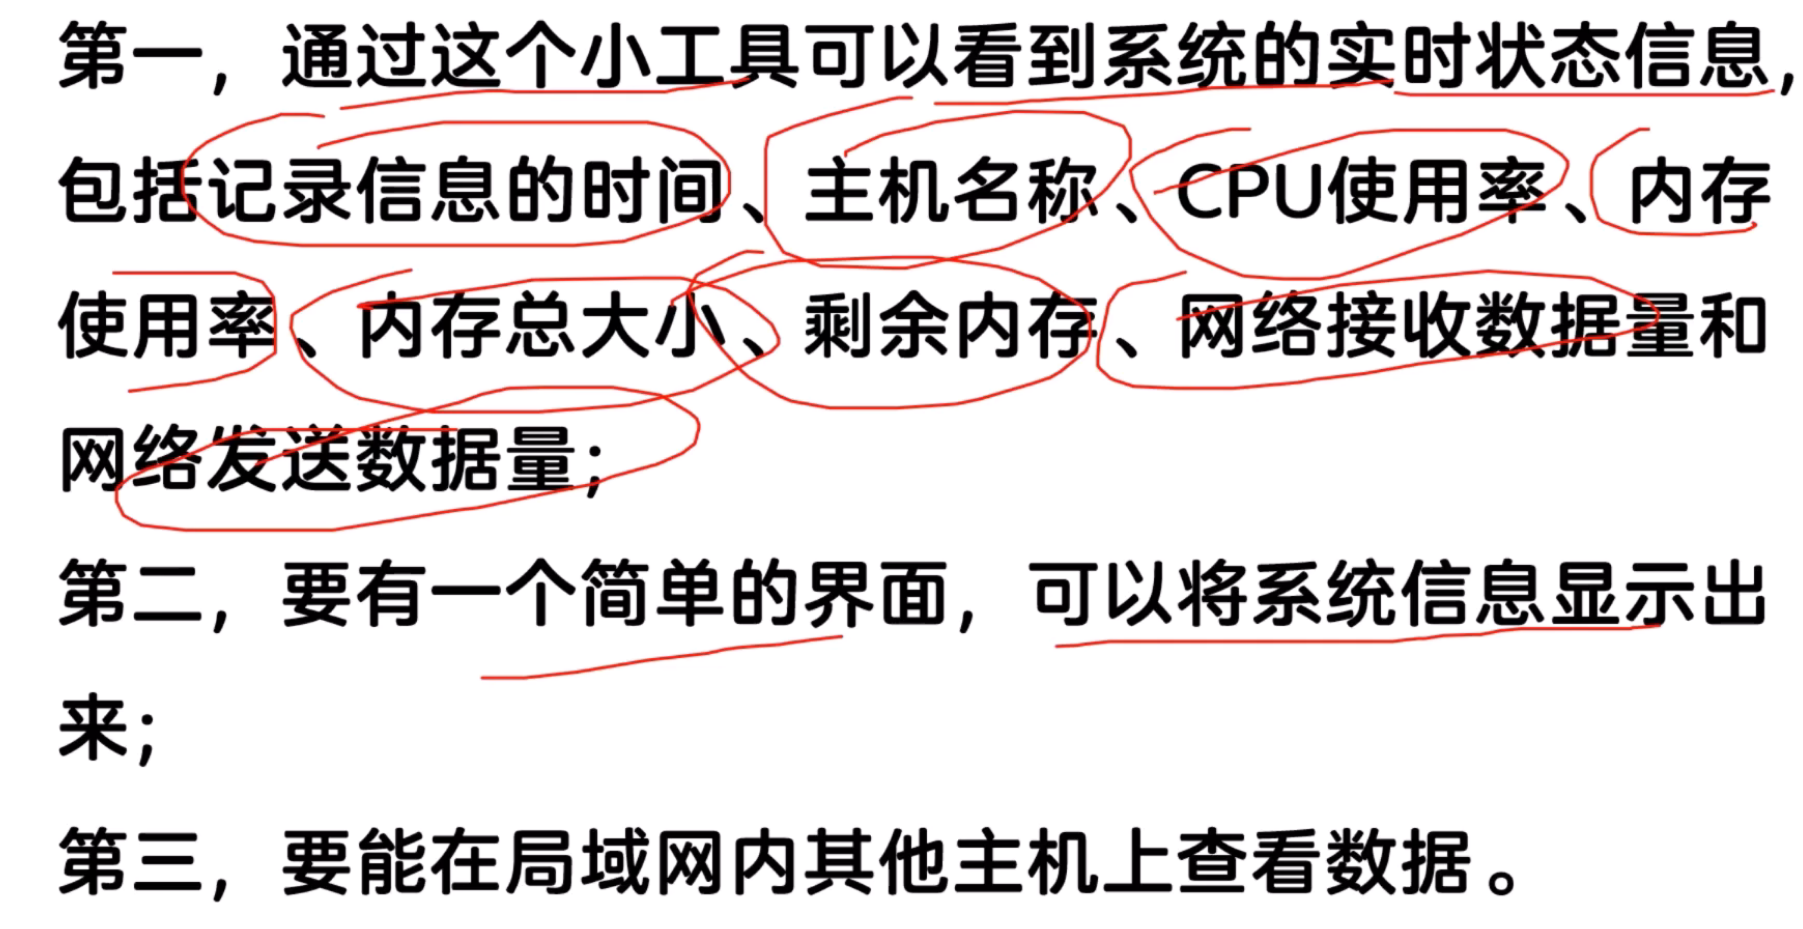
实践小项目
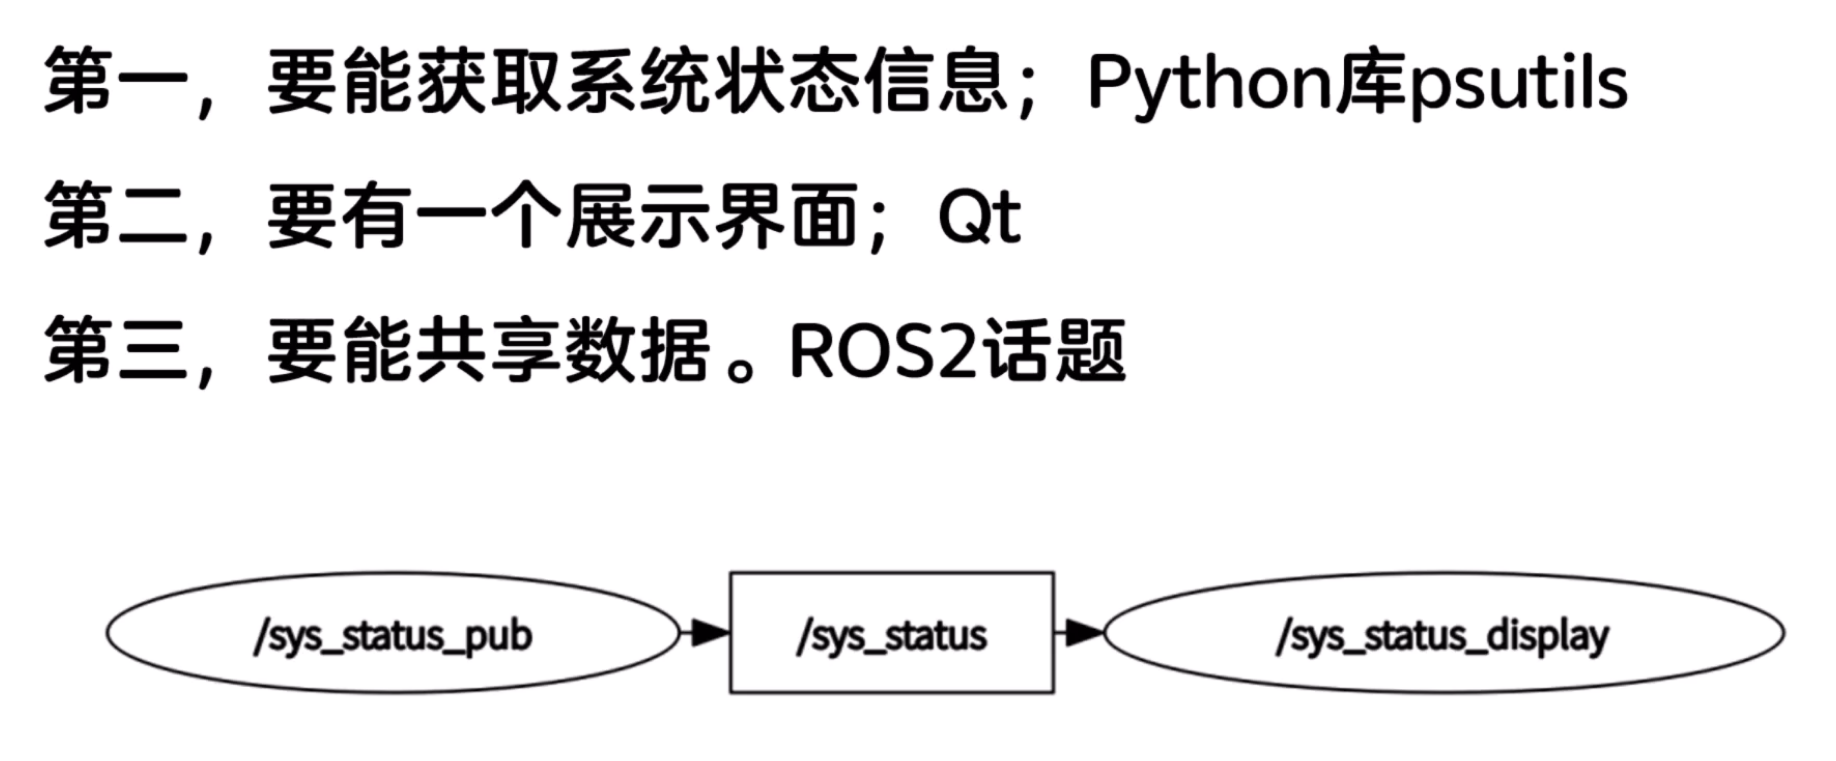
第一个创建消息接口包
c++方便用qt,python方便用库
之前我们都是用现成的接口,现在这个就是要自己去创建一个
创建接口都是用c++ 无法用python(这个自动类型推导)
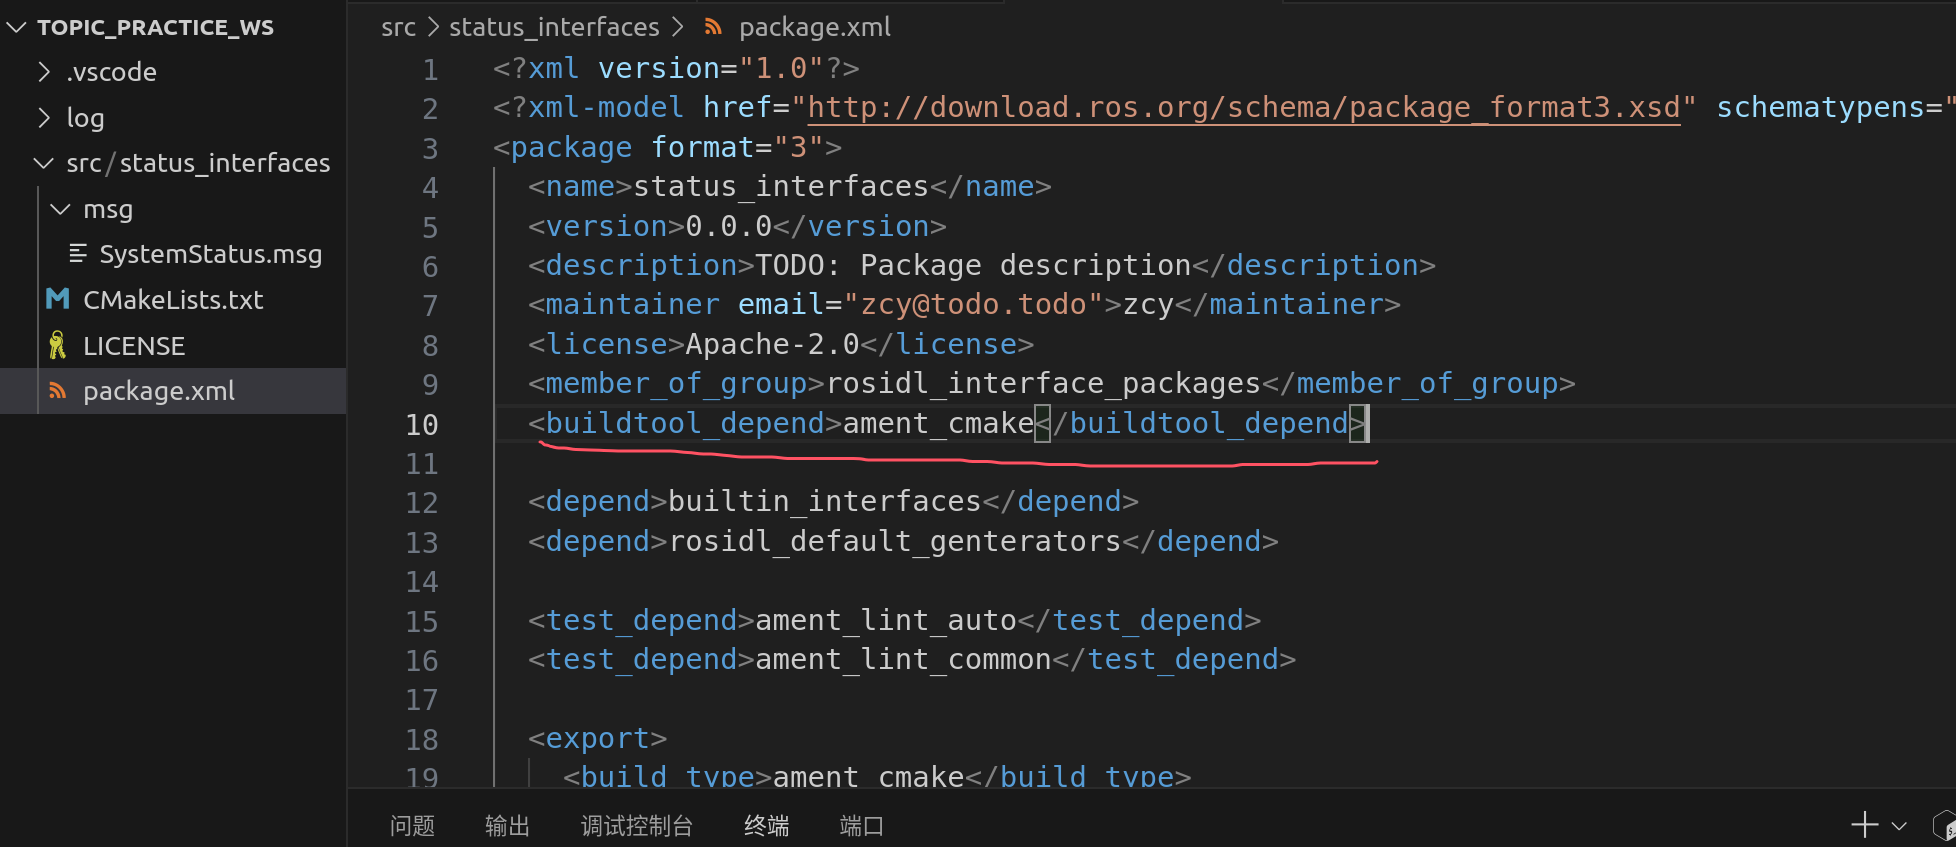
依赖:
builtin_interfaces:ros2中已有的一个消息接口功能包,可以使用其时间接口Time,表示记录时间信息
rosidl_default_genterators:用于将自定义的消息文件转换为c++,python源码的模块(转化为头文件或者库,方便调用)
这个首先创建出功能包,将下面的src,include删掉,重新创建一个msg目录,然后在这个目录下创建SystemStatus.msg文件
builtin_interfaces/Time stamp #记录时间戳
string host_name #系统名称
float32 cpu_percent #cpu使用率
float32 memory_percent #内存使用率
float32 memory_total #内存总量
float32 memory_available #剩余内存
float32 net_sent #网络发送数据量1MB=8Mb
float32 net_recv #网络接受数据量
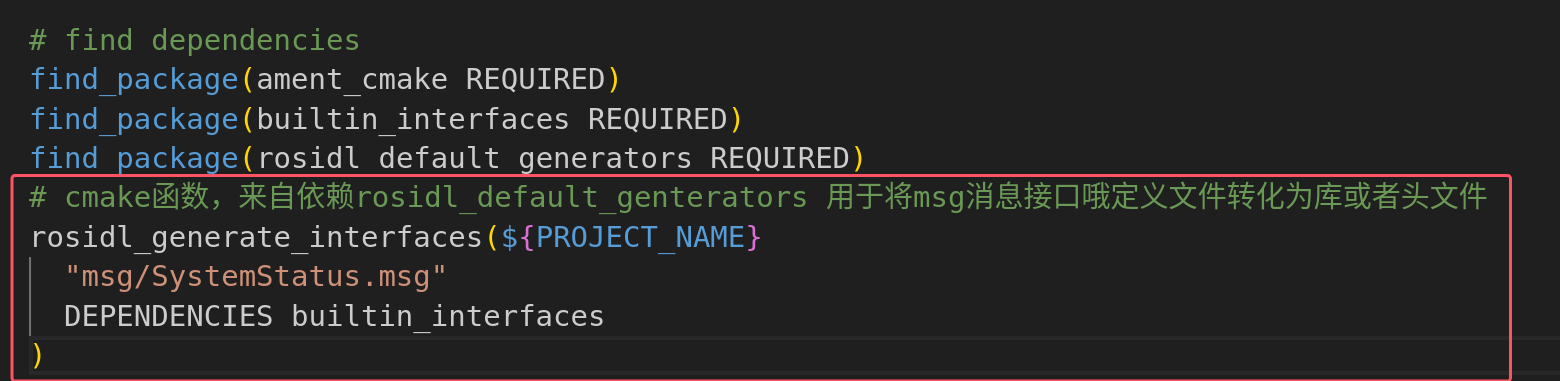
然后再cmakelist里面加上
声明这个功能包是一个消息接口的功能包
发布信息的包
import rclpy
from rclpy.node import Node
from status_interfaces.msg import SystemStatus
import psutil
import platform

class SysStatusPub(Node):
    def __init__(self, node_name):
        super().__init__(node_name)
        self.status_publisher_ = self.create_publisher(SystemStatus,"sys_status",10)
        self.timer_ = self.create_timer(1,self.time_callback)

    def time_callback(self):
        """
        builtin_interfaces/Time stamp #记录时间戳
        string host_name #系统名称
        float32 cpu_percent #cpu使用率
        float32 memory_percent #内存使用率
        float32 memory_total #内存总量
        float32 memory_available #剩余内存
        float32 net_sent #网络发送数据量1MB=8Mb
        float32 net_recv #网络接受数据量
        """
        cpu_percent = psutil.cpu_percent()
        memory_info = psutil.virtual_memory()
        net_io_counters = psutil.net_io_counters()
        msg = SystemStatus()
        msg.stamp = self.get_clock().now().to_msg()
        msg.host_name = platform.node()
        msg.cpu_percent = cpu_percent
        msg.memory_percent = memory_info.percent
        msg.memory_total = memory_info.total /1024/1024
        msg.memory_available = memory_info.available /1024/1024
        msg.net_sent = net_io_counters.bytes_sent /1024/1024
        msg.net_recv = net_io_counters.bytes_recv /1024/1024
        self.get_logger().info(f'发布{str(msg)}')
        self.status_publisher_.publish(msg)


def main():
    rclpy.init()
    node = SysStatusPub('sys_status_pub')
    rclpy.spin(node)
    rclpy.shutdown()
如果另外一个电脑上想要看到发布的订阅信息, 那么那个电脑上就要有这个消息接口来解析这个数据,所以把这个包拷贝过去source一下就可以里
订阅信息的包
qt的尝试
#include <QApplication> //提供类
#include <QLabel> //显示文本组件
#include <QString> //存字符窜

int main(int argc, char* argv[])
{
    QApplication app(argc, argv);
    QLabel* label = new QLabel();
    QString message = QString::fromStdString("Hello Qt! and cy");
    label->setText(message);//显示内容的方法
    label->show();
    app.exec();
    return 0;
}
Widgets是Qt5下面的图形界面组件
实现
#include "rclcpp/rclcpp.hpp"
#include <QApplication> //提供类
#include <QLabel> //显示文本组件
#include <QString> //存字符窜
#include "status_interfaces/msg/system_status.hpp"//一定要修改包含的配置才能用
using SystemStatus = status_interfaces::msg::SystemStatus;//这样方便使用
class SysStatusDisplay:public rclcpp::Node
{
private:
    rclcpp::Subscription<SystemStatus>::SharedPtr subscripter_;
public:
    SysStatusDisplay()
    :Node("sys_status_display")
    {
        QLabel* label_ = new QLabel();
        subscripter_ = this->create_subscription<SystemStatus>("sys_status",10,
        [&](const SystemStatus::SharedPtr msg)->void
        {
            label_->setText(get_qstr_from_msg(msg));//显示内容的方法
        });
        label_->setText(get_qstr_from_msg(
            std::make_shared<SystemStatus>()//传入空的共享指针
        ));
        label_->show();
    }

    QString get_qstr_from_msg(const SystemStatus::SharedPtr msg)
    {
        std::stringstream show_str;
        show_str
        << "===========系统状态可视化显示工具============\n"
        << "数 据 时 间:\t" << msg->stamp.sec << "\ts\n"
        << "用  户  名:\t" << msg->host_name << "\t\n"
        << "CPU使用率:\t" << msg->cpu_percent << "\t%\n"
        << "内存使用率:\t" << msg->memory_percent << "\t%\n"
        << "内存总大小:\t" << msg->memory_total << "\tMB\n"
        << "剩余有效内存:\t" << msg->memory_available << "\tMB\n"
        << "网络发送量:\t" << msg->net_sent << "\tMB\n"
        << "网络接收量:\t" << msg->net_recv << "\tMB\n"
        << "==========================================";
        return QString::fromStdString(show_str.str());
    }
};

int main(int argc, char* argv[])
{
    rclcpp::init(argc,argv);
    QApplication app(argc, argv);
    auto node = std::make_shared<SysStatusDisplay>();
    std::thread spin_thread([&]()->void
    {
        rclcpp::spin(node);//单独开一个线程去运行spin
    });
    spin_thread.detach();
    app.exec();//执行应用,阻塞代码
    rclcpp::shutdown();
    return 0;
}
依赖的不同处理方法
第四章服务
服务通信是由两个话题构成的,参数通信就是由服务通信构成的
服务通信也是有消息接口的,请求服务可以使用命令行也可以用rqt
参数是视为节点的设置,是基于服务通信
python实现
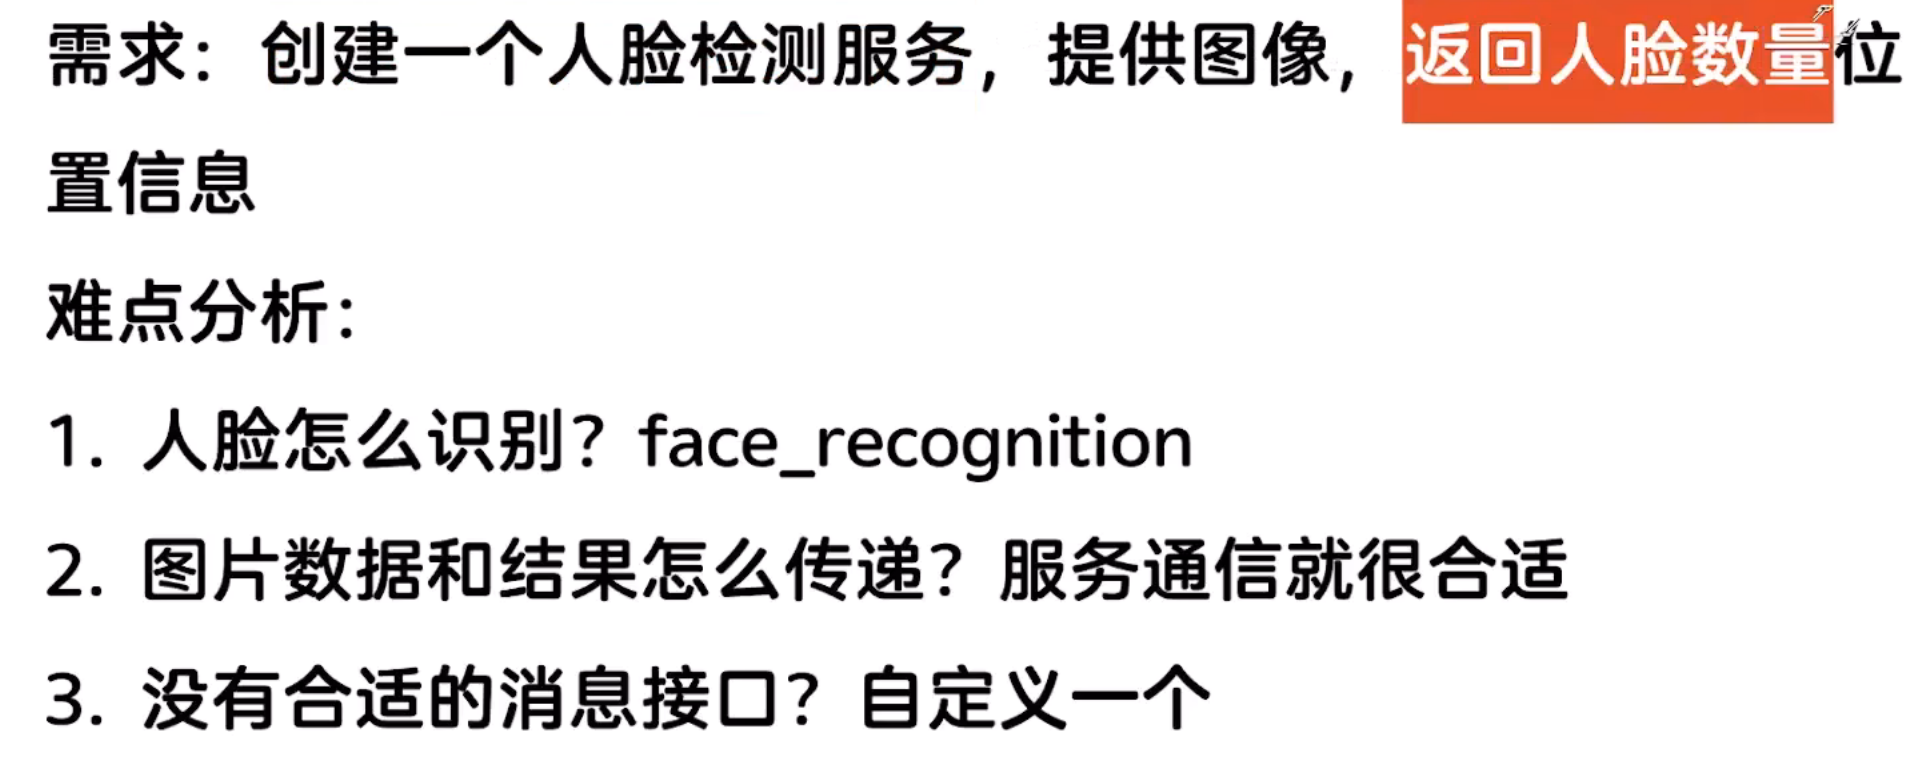
创建服务消息接口
服务的消息接口是srv,与话题的消息接口msg不同在创建包的时候同时要添加需要其他消息接口的依赖
sensor_msgs/Image image #原始图像
---
int16 number #人脸数
float32 use_time #识别时间
int32[] top
int32[] right
int32[] bottom
int32[] left
这里是在srv下创建FaceDetector.srv
sensor_msgs是添加的一个消息接口依赖
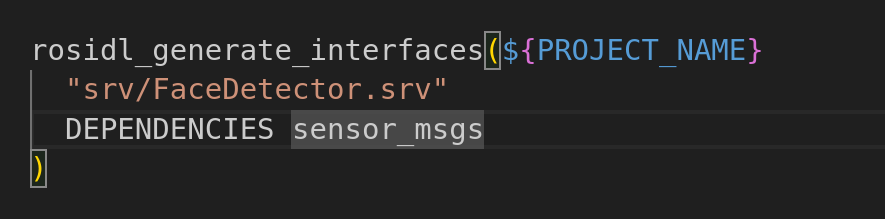
python人脸检测
在网上下载的图片下载到包的resource 里面,但是构建功能包的时候不回去拷贝到install下面,需要手动去拷贝

os库 os.path.join():这是拼接路径的时候自动给/ ,防止我们自己拼接的时候忘记加了
import face_recognition
import cv2
from ament_index_python.packages import get_package_share_directory
import os

def main():
    #获取图像的真实路径
    default_image_path = os.path.join(get_package_share_directory('cy_python_detect'),
    'resource/default.jpg')
    #使用opencv加载图像
    image = cv2.imread(default_image_path)
    #查找人脸
    face_locations = face_recognition.face_locations(image,
    number_of_times_to_upsample=1,model='hog')
    #绘制边框
    for top,right,bottom,left in face_locations:
        cv2.rectangle(image,(left,top),(right,bottom),(255,0,0),4)
    #显示结果
    cv2.imshow('Face_Detection',image)
    cv2.waitKey(0)
人脸检测服务实现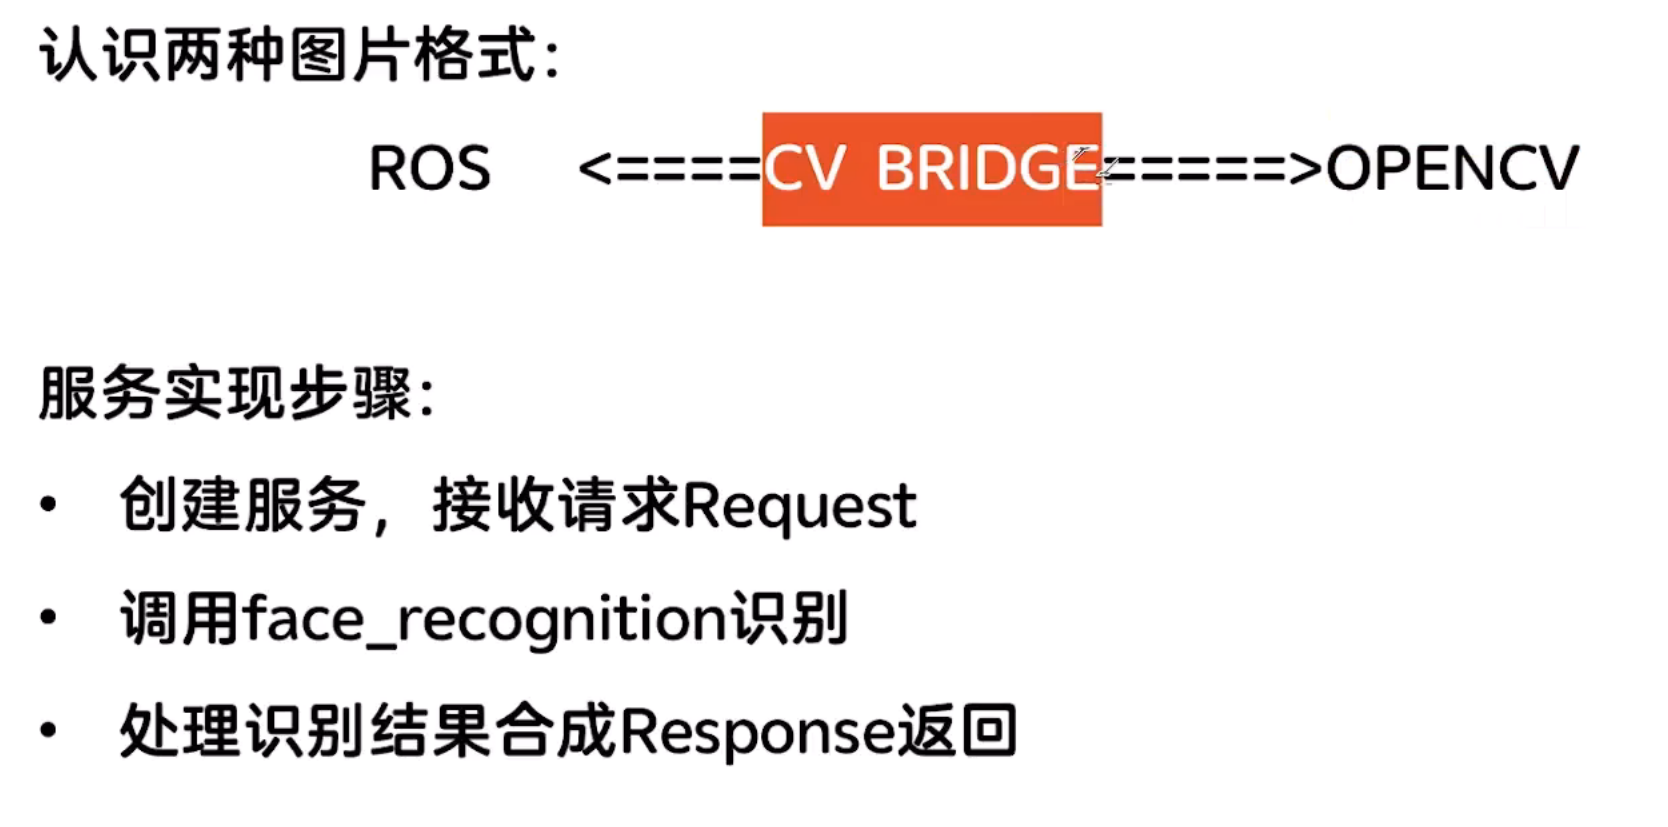
cv_bridge 中CvBridge中有格式转换
import rclpy
from rclpy.node import Node
from cv_bridge import CvBridge
from chapt4_interfaces.srv import FaceDetector
import face_recognition
import cv2
from ament_index_python.packages import get_package_share_directory
import os
import time

class FaceDetectorionNode(Node):
    def __init__(self):
        super().__init__('face_detect_node')
        self.brdge_ = CvBridge()
        self.service_ = self.create_service(FaceDetector,'/face_detect',
        self.detect_face_callback)
        self.default_image_path_ = default_image_path = os.path.join(get_package_share_directory('cy_python_detect'),'resource/default.jpg')
        self.number_of_times_to_upsample_=1
        self.model_='hog'
        self.get_logger().info('人脸检测服务已经启动')


    def detect_face_callback(self,request,response):
        if request.image.data:
            cv_image = self.brdge_.imgmsg_to_cv2(request.image)
        else:
            cv_image = cv2.imread(self.default_image_path_)
            self.get_logger().info('没有传入图像,使用默认图像')
        start_time = time.time()
        face_locations = face_recognition.face_locations(cv_image,
        number_of_times_to_upsample=self.number_of_times_to_upsample_,model=self.model_)
        end_time = time.time()
        self.get_logger().info(f'人脸检测完成用时:{end_time-start_time}')
        response.number = len(face_locations)
        response.use_time = end_time-start_time
        for top,right,bottom,left in face_locations:
            response.top.append(top)
            response.right.append(right)
            response.bottom.append(bottom)
            response.left.append(left)

        return response


def main():
    rclpy.init()
    node = FaceDetectorionNode()
    rclpy.spin(node)
    rclpy.shutdown()
这里我们手动去call这个服务去检查正确与否
人脸检测客户端的实现
构造request的时候是我们自己创建的消息接口的一个类(自动生成 的类)
而且在发送请求的时候会返回一个future,要判断future.done()来知道是否完成
import rclpy
from rclpy.node import Node
from cv_bridge import CvBridge
from chapt4_interfaces.srv import FaceDetector
import face_recognition
import cv2
from ament_index_python.packages import get_package_share_directory
import os
import time


class FaceDetectorClientNode(Node):
    def __init__(self):
        super().__init__('face_detect_client_node')
        self.brdge_ = CvBridge()
        self.client_ = self.create_client(FaceDetector,'/face_detect')
        self.default_image_path_ = default_image_path = os.path.join(get_package_share_directory('cy_python_detect'),
        'resource/test1.jpg')
        self.image_ = cv2.imread(self.default_image_path_)

    def sent_request(self):
        #判断服务端是否上线
        while self.client_.wait_for_service(timeout_sec=1) is False:
            self.get_logger().info('等待服务端上线....')
        #构造request
        request = FaceDetector.Request()
        request.image = self.brdge_.cv2_to_imgmsg(self.image_)
        #发送请求,并且等待服务完成
        future = self.client_.call_async(request)#需要等待服务端处理完成后才会把结果放到future里面
下面的两种方法本质都是等待,更好的是用回调函数
        # while future.done():
        #     time.sleep(1)#休眠当前的线程,等待服务处理完成,但是线程已经休眠了,那么就无法再接收到来自
        #服务端的返回
        #rclpy.spin_until_future_complete(self,future)#这里是等的方法,其实也可以用回调函数
        def result_callback(result_future):
            response = result_future.result()
            self.get_logger().info(f'收到响应,共检测到{response.number}张人脸,耗时{response.use_time}s')
            self.image_show(response)
        future.add_done_callback(result_callback)


    def image_show(self,response):
        #绘制人脸
        for i in range(response.number):
            top = response.top[i]
            right = response.right[i]
            bottom = response.bottom[i]
            left = response.left[i]
            cv2.rectangle(self.image_,(left,top),(right,bottom),(255,0,0),4)
        cv2.imshow('Face_Detection',self.image_)
        cv2.waitKey(0)#这里也会阻塞,也会导致spin无法正常运行,但是这里请求了一次,所以还可以用
        #如果多次请求的话就不能用了


def main():
    rclpy.init()
    node = FaceDetectorClientNode()
    node.sent_request()
    rclpy.spin(node)
    rclpy.shutdown()
cpp实现
做一个巡逻海龟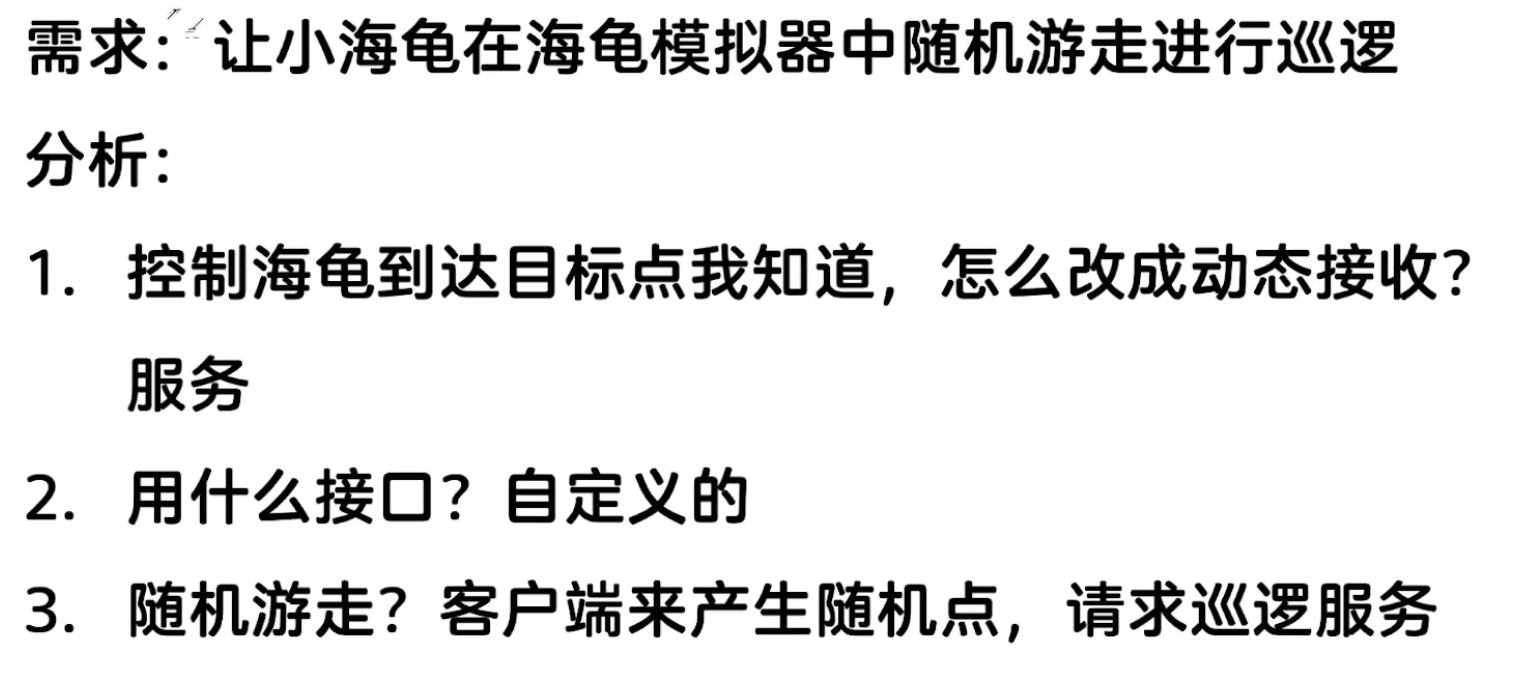
创建消息接口
sensor_msgs/Image image #原始图像
---
int16 number #人脸数
float32 use_time #识别时间
int32[] top
int32[] right
int32[] bottom
int32[] left
cpp服务端实现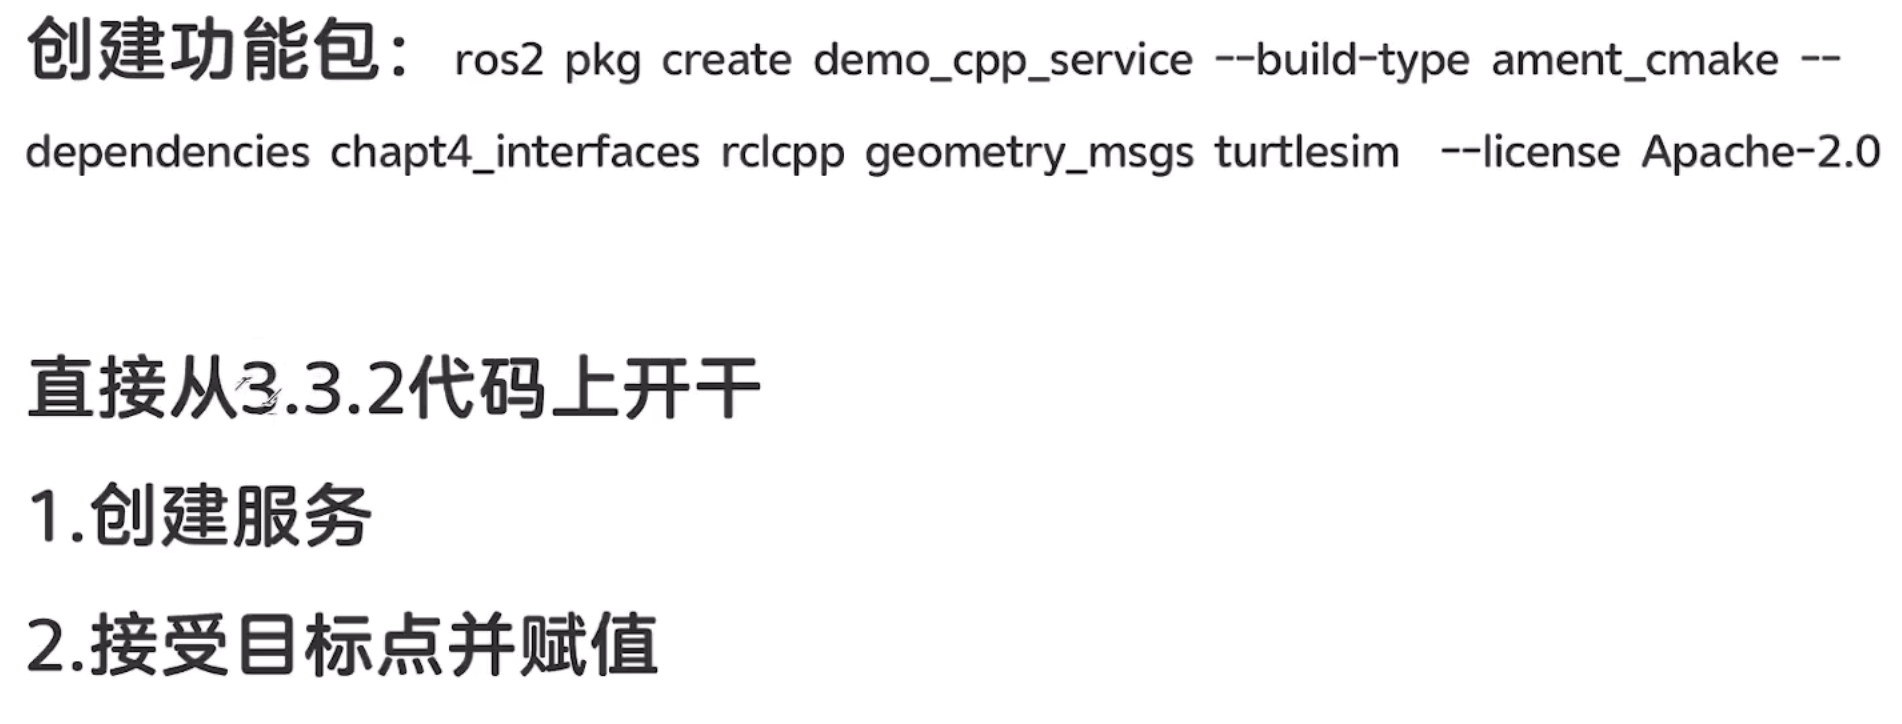
#include "rclcpp/rclcpp.hpp"
#include <chrono>
#include "geometry_msgs/msg/twist.hpp"//引入这个消息接口
#include "turtlesim/msg/pose.hpp"
#include "chapt4_interfaces/srv/partrol.hpp"
using Partrol = chapt4_interfaces::srv::Partrol;
using namespace std::chrono_literals;

class TurtleControlNode: public rclcpp::Node
{
public:
    explicit TurtleControlNode(const std::string& node_name)
    :Node(node_name)
    {
其实关键就是这一步,通过服务获得request然后返回response
        service_ = this->create_service<Partrol>("partrol",[&](const Partrol::Request::SharedPtr  request,
//这里还可以用std::make_sharedptr来获得共享指针
        Partrol::Response::SharedPtr response)->void{
            if((0<request->target_x && request->target_x<12)
            && (0<request->target_y && request->target_y<12))
            {
                target_x_ = request->target_x;
                target_y_ = request->target_y;
                response->result = Partrol::Response::SUCCESS;
            }
            else
            {
                response->result = Partrol::Response::FALL;
            }
        });
        publisher_ = this->create_publisher<geometry_msgs::msg::Twist>("/turtle1/cmd_vel",10);
        subscripter_ = this->create_subscription<turtlesim::msg::Pose>("/turtle1/pose",10,
        std::bind(&TurtleControlNode::on_pose_receivered_,this,std::placeholders::_1));
    }

    void on_pose_receivered_(const turtlesim::msg::Pose::SharedPtr pose)//收到参数的共享指针
    {
        //1获取当前位置
        auto current_x = pose->x;
        auto current_y = pose->y;
        RCLCPP_INFO(get_logger(),"当前x:%f,y=%f",current_x,current_y);
        //2计算当前位置和目标位置的距离差和角度差
        auto distance = std::sqrt((target_x_-current_x)*(target_x_-current_x)+
        (target_y_-current_y)*(target_y_-current_y));
        auto angle = std::atan2((target_y_-current_y),(target_x_-current_x))-pose->theta;
        //3控制策略
        auto msg = geometry_msgs::msg::Twist();
        if(distance>0.1)
        {
            if(fabs(angle)>0.2)
            {
                msg.angular.z = fabs(angle);
            }
            else
            {
                msg.linear.x = k_*distance;
            }
        }

        //4限制线速度最大值
        if(msg.linear.x>max_speed_)
        {
            msg.linear.x = max_speed_;
        }


        publisher_->publish(msg);
    }

private:
    rclcpp::Subscription<turtlesim::msg::Pose>::SharedPtr subscripter_;
    rclcpp::Publisher<geometry_msgs::msg::Twist>::SharedPtr publisher_;
    rclcpp::Service<Partrol>::SharedPtr service_;
    double target_x_{1.0};
    double target_y_{1.0};
    double k_{1.0};//比例系数
    double max_speed_{3.0};
};

int main(int argc,char* argv[])
{
    rclcpp::init(argc,argv);
    auto node = std::make_shared<TurtleControlNode>("turtle_control");
    rclcpp::spin(node);
    rclcpp::shutdown();
}
cpp客户端的实现
定时去call这个服务,生成随机点
引入<ctime >然后初始化随机数种子
async :是异步的意思
#include "rclcpp/rclcpp.hpp"
#include <chrono>
#include "chapt4_interfaces/srv/partrol.hpp"
using Partrol = chapt4_interfaces::srv::Partrol;
using namespace std::chrono_literals;

class PartrolClient: public rclcpp::Node
{
public:
    PartrolClient()
    :Node("partrol_client")
    {
        srand(time(NULL));
        partrol_client_ = this->create_client<Partrol>("partrol");
        timer_ = this->create_wall_timer(10s,[&]()->void {
            //1检测服务端是否上线
            while(!partrol_client_->wait_for_service(1s))
            {
                if(!rclcpp::ok())
                {
                    RCLCPP_WARN(this->get_logger(),"等待服务的过程中被打断");
                    return;
                }
                RCLCPP_INFO(this->get_logger(),"等待服务端上线...");
            }
            //2准备request,创建一个共享指针(都使用的共享指针来管理)
            auto request = std::make_shared<Partrol::Request>();
            request->target_x = rand()%15;
            request->target_y = rand()%15;
            RCLCPP_INFO(this->get_logger(),"目标点准备完成x:%f,y:%f",request->target_x,request->target_y);
            //3发送请求,然后等待返回,返回的时候哦调用回调函数
            partrol_client_->async_send_request(request,
            [&](rclcpp::Client<Partrol>::SharedFuture result_future)->void{
                //这里有个参数result_future是发送请求后返回的一个future值
                auto response = result_future.get();
                if(response->result==Partrol::Response::SUCCESS)
                {
                    RCLCPP_INFO(this->get_logger(),"目标点处理成功");
                }
                if(response->result==Partrol::Response::FALL)
                {
                    RCLCPP_WARN(this->get_logger(),"目标点处理失败");
                }
            });

        });

    };


private:
    rclcpp::TimerBase::SharedPtr timer_;
    rclcpp::Client<Partrol>::SharedPtr partrol_client_;
};

int main(int argc,char* argv[])
{
    rclcpp::init(argc,argv);
    auto node = std::make_shared<PartrolClient>();
    rclcpp::spin(node);
    rclcpp::shutdown();
}
在python中声明参数
self.declare_parameter('number_of_times_to_upsample_',1)
self.declare_parameter('model_','hog')
self.number_of_times_to_upsample_=self.get_parameter('number_of_times_to_upsample_').value
self.model_=self.get_parameter('model_').value
参数是基于服务实现的,调用服务就是通过回调函数实现的
要不然这个参数的设定只能是在初始化的时候完成的,在运行的时候就无法实现更新
添加回调函数更新参数
导入消息接口,用于构建参数处理结果(参数回调函数必须要有成功的返回值)
from rcl_interfaces.msg import SetParametersResult
    self.add_on_set_parameters_callback(self.parameters_callback)

    def parameters_callback(self,parameters):
        for parameter in parameters:
            self.get_logger().info(f'设置参数参数{parameter.name}->{parameter.value}')
            if parameter.name == 'number_of_times_to_upsample':
                self.number_of_times_to_upsample_ = parameter.value
            if parameter.name == 'model':
                self.model_ = parameter.value
        return SetParametersResult(successful=True)

#更新自身节点的参数的方法(在服务端的init里面)
self.set_parameters([rclpy.parameter('model',rclpy.Parameter.Type.String,'cnn')])
修改其他节点的参数
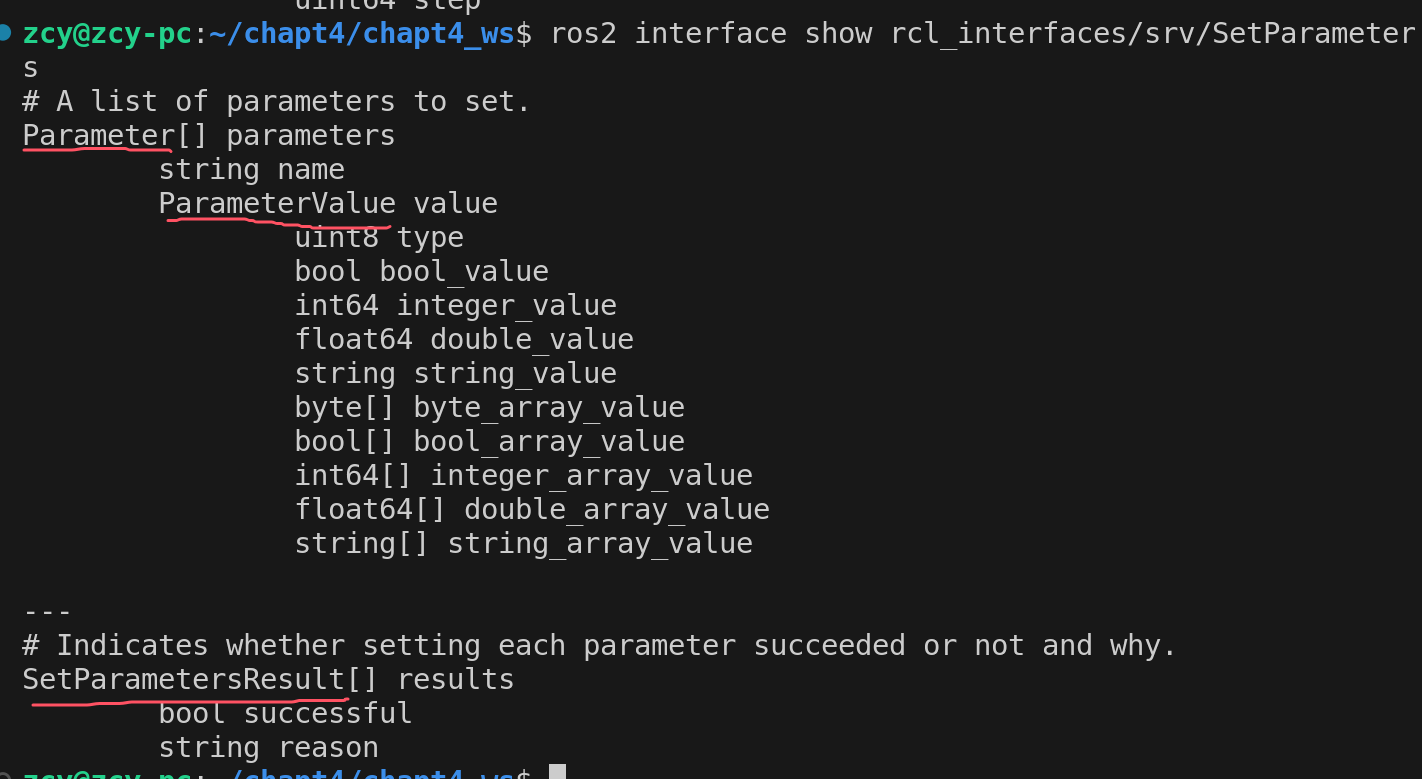
通过请求服务来修改节点的参数(服务端启动后这个节点就会提供一些消息接口可以进行请求参数服务)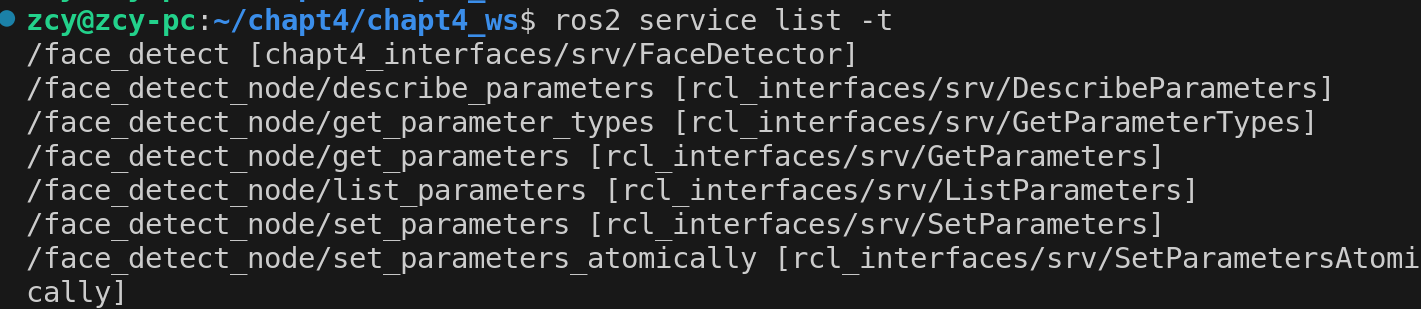
查看这个消息接口
import rclpy
from rclpy.node import Node
from cv_bridge import CvBridge
from chapt4_interfaces.srv import FaceDetector
import face_recognition
import cv2
from ament_index_python.packages import get_package_share_directory
import os
import time
from rcl_interfaces.srv import SetParameters
from rcl_interfaces.msg import Parameter,ParameterValue,ParameterType


class FaceDetectorClientNode(Node):
    def __init__(self):
        super().__init__('face_detect_client_node')
        self.brdge_ = CvBridge()
        self.client_ = self.create_client(FaceDetector,'/face_detect')
        self.default_image_path_ = default_image_path = os.path.join(get_package_share_directory('cy_python_detect'),
        'resource/test1.jpg')
        self.image_ = cv2.imread(self.default_image_path_)

    def call_set_parameters(self,parameters):
        #1判断服务端是否上线
        parameters_client = self.create_client(SetParameters,'/face_detect_node/set_parameters')
        while parameters_client.wait_for_service(timeout_sec=1) is False:
            self.get_logger().info('等待参数设置服务端上线...')
        #2构造request
        request = SetParameters.Request()
        request.parameters = parameters
        #3发送请求,等待服务完成
        future = parameters_client.call_async(request)
        rclpy.spin_until_future_complete(self,future)#这里建议等待
        response = future.result()
        return response
分两个函数,因为这个构造request比较复杂
    def update_detect_model(self,model='hog'):
        #创建参数对象
        param = Parameter()
        param.name = 'model'
        #创建参数值并且赋值
        param_value = ParameterValue()
        param_value.string_value = model
        param_value.type = ParameterType.PARAMETER_STRING
        param.value = param_value
        #请求更新参数并且处理
        #注意这里就是请求服务,相当于会调用call_set_parameters,通过这个来进行对服务端的请求
        response = self.call_set_parameters([param])
        for result in response.results:
            self.get_logger().info(f'设置参数结果{result.successful}原因:{result.reason}')


    def sent_request(self):
        #判断服务端是否上线
        while self.client_.wait_for_service(timeout_sec=1) is False:
            self.get_logger().info('等待服务端上线....')
        #构造request
        request = FaceDetector.Request()
        request.image = self.brdge_.cv2_to_imgmsg(self.image_)
        #发送请求,并且等待服务完成
        future = self.client_.call_async(request)#需要等待服务端处理完成后才会把结果放到future里面
        # while future.done():
        #     time.sleep(1)#休眠当前的线程,等待服务处理完成,但是线程已经休眠了,那么就无法再接收到来自
        #服务端的返回
        #rclpy.spin_until_future_complete(self,future)#这里是等的方法,其实也可以用回调函数
        def result_callback(result_future):
            response = result_future.result()
            self.get_logger().info(f'收到响应,共检测到{response.number}张人脸,耗时{response.use_time}s')
            #self.image_show(response)
        future.add_done_callback(result_callback)


    def image_show(self,response):
        #绘制人脸
        for i in range(response.number):
            top = response.top[i]
            right = response.right[i]
            bottom = response.bottom[i]
            left = response.left[i]
            cv2.rectangle(self.image_,(left,top),(right,bottom),(255,0,0),4)
        cv2.imshow('Face_Detection',self.image_)
        cv2.waitKey(0)#这里也会阻塞,也会导致spin无法正常运行,但是这里请求了一次,所以还可以用
        #如果多次请求的话就不能用了


def main():
    rclpy.init()
    node = FaceDetectorClientNode()
    node.update_detect_model('hog')
    node.sent_request()
    node.update_detect_model('cnn')
    node.sent_request()
    rclpy.spin(node)
    rclpy.shutdown()
在cpp中声明参数
        this->declare_parameter("k_",1.0);
        this->declare_parameter("max_speed_",3.0);
        this->get_parameter("k_",k_);
        this->get_parameter("max_speed_",max_speed_);
我们用的rqt之类的改变参数,只是更新ros2中参数的值,没有拷贝到成员变量中去
添加回调函数更新参数
#include "rcl_interfaces/msg/set_parameters_result.hpp"
using SetParametersResult = rcl_interfaces::msg::SetParametersResult;
using Partrol = chapt4_interfaces::srv::Partrol;
这是在构造函数里面实现的
而且这个回调函数找add_on_set.....这个函数定义,里面有一个模板可以用
 //this->set_parameter(rclcpp::Parameter("k_",2.0));//这是在内部修改参数
        parameters_callback_handel_ = this->add_on_set_parameters_callback(
            [&](const std::vector<rclcpp::Parameter> & parameters)
            ->rcl_interfaces::msg::SetParametersResult{
                rcl_interfaces::msg::SetParametersResult result;
                result.successful = true;
                for (const auto & parameter : parameters) {
                    RCLCPP_INFO(this->get_logger(),"更新参数%s=%f",parameter.get_name().c_str(),parameter.as_double());
                    if(parameter.get_name()=="k_")
                    {
                        k_ = parameter.as_double();
                    }
                    if(parameter.get_name()=="max_speed_")
                    {
                        max_speed_ = parameter.as_double();
                    }
                }
                return result;
            }
        );

private:
这个共享指针是必不可少的
    OnSetParametersCallbackHandle::SharedPtr parameters_callback_handel_;
修改其他节点的参数
需要导入很多消息接口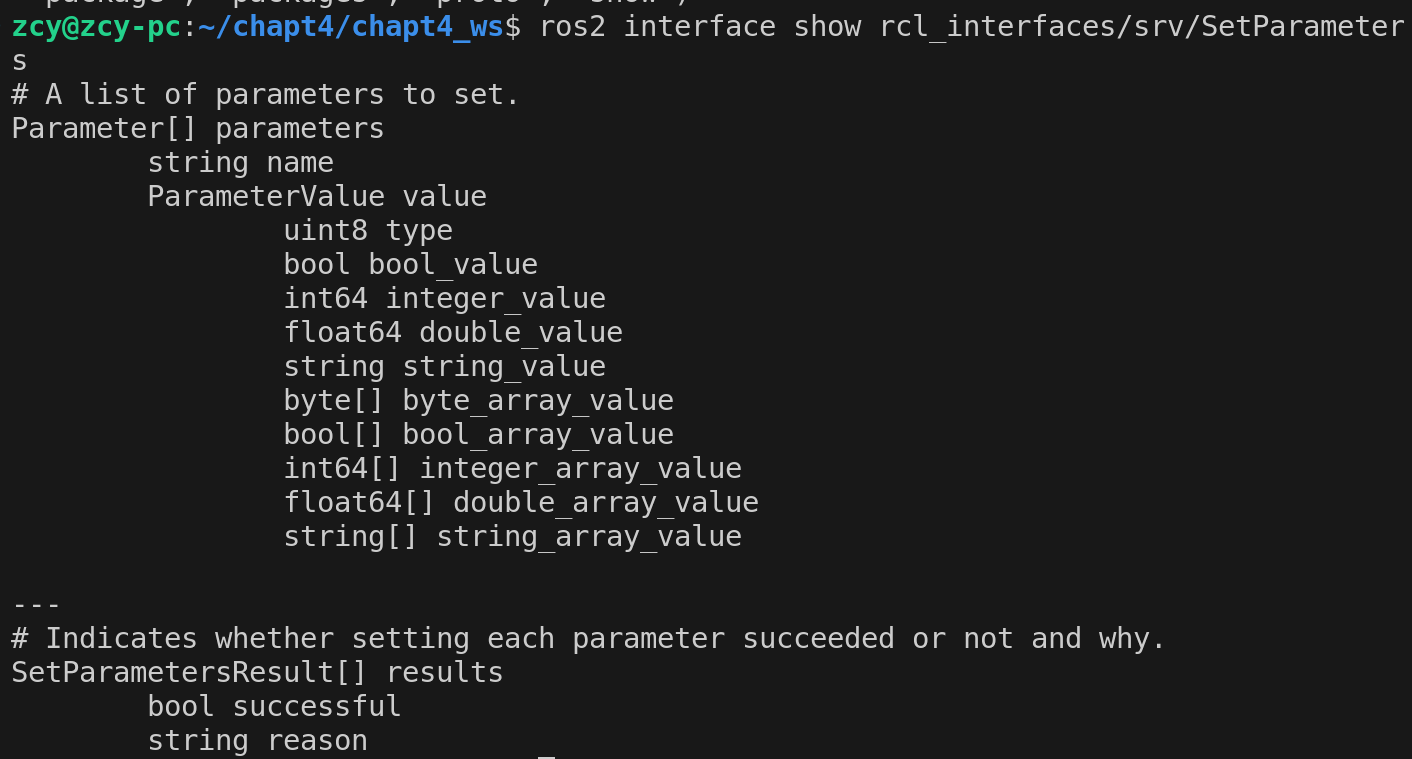
因为这个参数的更新比较麻烦以后如果要写,就cv
#include "rclcpp/rclcpp.hpp"
#include <chrono>
#include "chapt4_interfaces/srv/partrol.hpp"
#include "rcl_interfaces/msg/parameter.hpp"
#include "rcl_interfaces/msg/parameter_value.hpp"
#include "rcl_interfaces/msg/parameter_type.hpp"
#include "rcl_interfaces/srv/set_parameters.hpp"
using SetP = rcl_interfaces::srv::SetParameters;
using Partrol = chapt4_interfaces::srv::Partrol;
using namespace std::chrono_literals;

class PartrolClient: public rclcpp::Node
{
public:
    PartrolClient()
    :Node("partrol_client")
    {
        srand(time(NULL));
        partrol_client_ = this->create_client<Partrol>("partrol");
        timer_ = this->create_wall_timer(10s,[&]()->void {
            //1检测服务端是否上线
            while(!partrol_client_->wait_for_service(1s))
            {
                if(!rclcpp::ok())
                {
                    RCLCPP_WARN(this->get_logger(),"等待服务的过程中被打断");
                    return;
                }
                RCLCPP_INFO(this->get_logger(),"等待服务端上线...");
            }
            //2准备request,创建一个共享指针(都使用的共享指针来管理)
            auto request = std::make_shared<Partrol::Request>();
            request->target_x = rand()%15;
            request->target_y = rand()%15;
            RCLCPP_INFO(this->get_logger(),"目标点准备完成x:%f,y:%f",request->target_x,request->target_y);
            //3发送请求,然后等待返回,返回的时候哦调用回调函数
            partrol_client_->async_send_request(request,
            [&](rclcpp::Client<Partrol>::SharedFuture result_future)->void{
                //这里有个参数result_future是发送请求后返回的一个future值
                auto response = result_future.get();
                if(response->result==Partrol::Response::SUCCESS)
                {
                    RCLCPP_INFO(this->get_logger(),"目标点处理成功");
                }
                if(response->result==Partrol::Response::FALL)
                {
                    RCLCPP_WARN(this->get_logger(),"目标点处理失败");
                }
            });
         });
    };
    //创建客户端发送请求,返回结果
    SetP::Response::SharedPtr call_set_parameter(const rcl_interfaces::msg::Parameter & param)
    {
        auto param_client_ = this->create_client<SetP>("/turtle_control/set_parameters");
        //1检测服务端是否上线
        while(!param_client_->wait_for_service(1s))
        {
            if(!rclcpp::ok())
            {
                RCLCPP_WARN(this->get_logger(),"等待服务的过程中被打断");
                return nullptr;
            }
            RCLCPP_INFO(this->get_logger(),"等待服务端上线...");
        }
        //2准备request,创建一个共享指针(都使用的共享指针来管理)
        auto request = std::make_shared<SetP::Request>();
        request->parameters.push_back(param);
        //3发送请求,然后等待返回,返回的时候哦调用回调函数
        auto future = param_client_->async_send_request(request);
        rclcpp::spin_until_future_complete(this->get_node_base_interface(),future);
        auto response = future.get();
        return response;
    }

    //更新参数k_
    void update_server_param_k(double k)
    {
        //创建参数对象
        auto param = rcl_interfaces::msg::Parameter();
        param.name = "k_";
        //创建参数值
        auto param_value = rcl_interfaces::msg::ParameterValue();
        param_value.type = rcl_interfaces::msg::ParameterType::PARAMETER_DOUBLE;
        param_value.double_value = k;
        param.value = param_value;
        //请求更新参数并处理
        auto response = this->call_set_parameter(param);
        if(response==NULL)
        {
            RCLCPP_INFO(this->get_logger(),"参数更新失败");
            return ;
        }
        for(auto result:response->results)
        {
            if(result.successful==false)
            {
                RCLCPP_INFO(this->get_logger(),"参数更新失败,原因%s",result.reason.c_str());
            }
            else{
                RCLCPP_INFO(this->get_logger(),"参数更新成功");
            }
        }
    }

private:
    rclcpp::TimerBase::SharedPtr timer_;
    rclcpp::Client<Partrol>::SharedPtr partrol_client_;
};

int main(int argc,char* argv[])
{
    rclcpp::init(argc,argv);
    auto node = std::make_shared<PartrolClient>();
    node->update_server_param_k(4.0);
    rclcpp::spin(node);
    rclcpp::shutdown();
}
使用launch启动脚本
可以将多个节点同时启动
用python的方式来编写
generate_launch_description()
这个函数名字是定死的,返回值的类型也是定死的
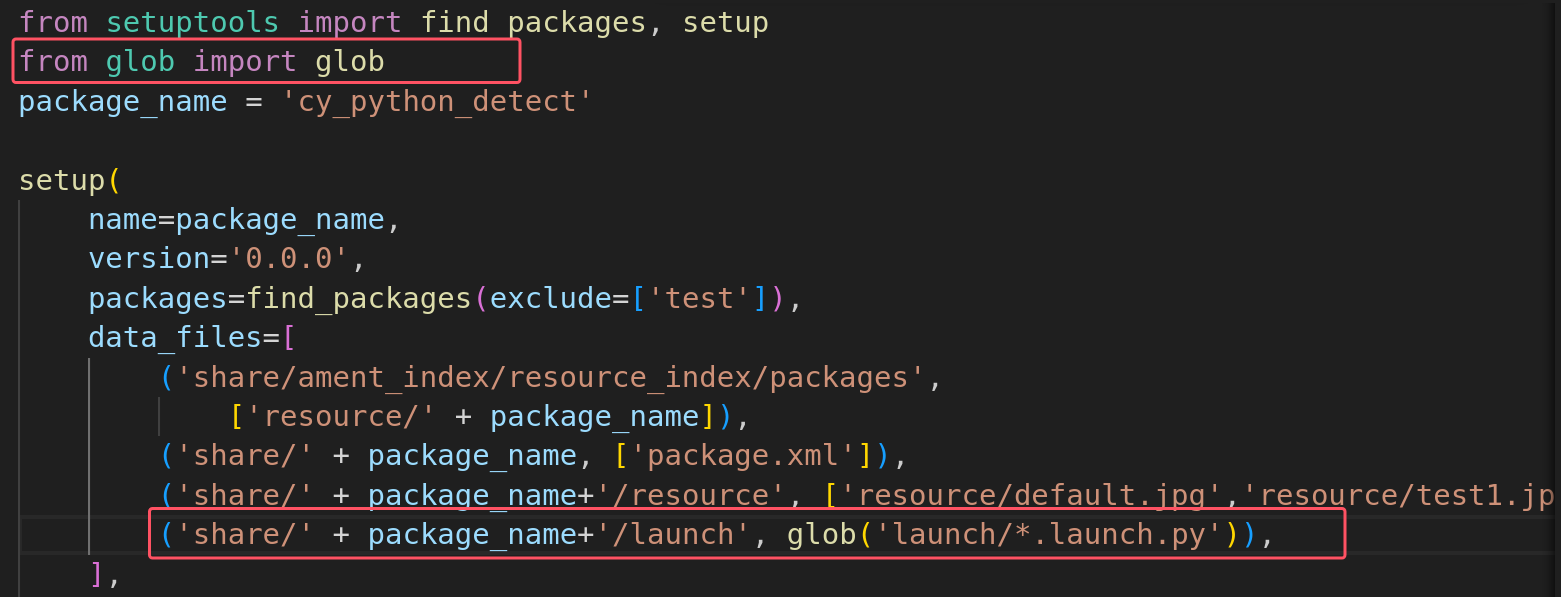
而且是在包下面创建launch目录,添加后缀为.launch.py的文件(c++包和python包都是这样编写的,但是一个要修改cmakelist,一个要修改setup.py),在这个里面编写
返回launch.LaunchDescription([action动作])
import launch
import launch_ros

def generate_launch_description():
    action_turtle_node = launch_ros.actions.Node(
        package= 'turtlesim',
        executable = 'turtlesim_node',
        output= 'screen'#输出的地点,可以是屏幕,log文件,两者都输出
    )
    action_partrol_client = launch_ros.actions.Node(
        package= 'cy_cpp_service',
        executable = 'partrol_client',
        output= 'log'
    )
    action_turtle_control = launch_ros.actions.Node(
        package= 'cy_cpp_service',
        executable = 'turtle_control',
        output= 'both'
    )
    return launch.LaunchDescription([
        action_turtle_node,
        action_partrol_client,
        action_turtle_control
    ])
cmakelist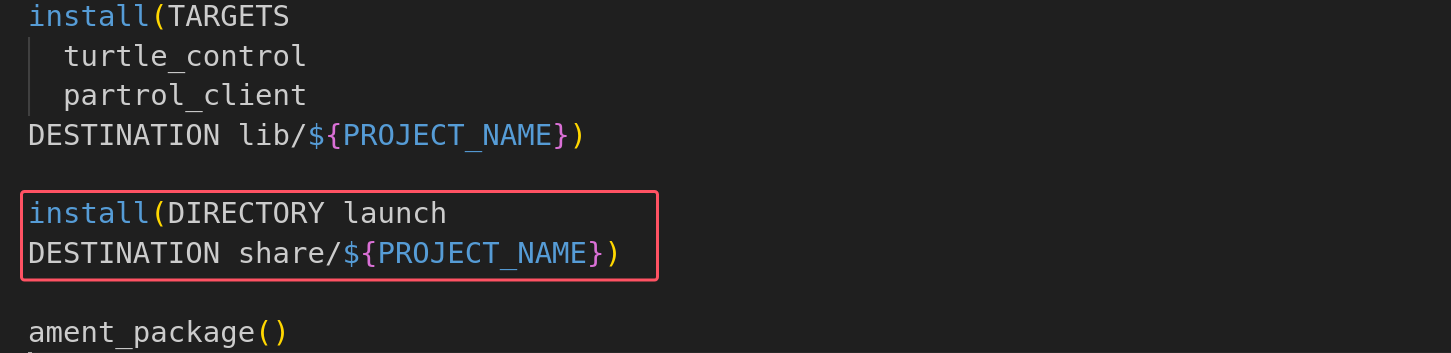
setup.py
使用launch传递参数
这里就不能用命令行指定参数了
1声明一个launch参数
2吧launch的参数传递给某个节点
import launch
import launch_ros

def generate_launch_description():
    #声明一个launch参数
    action_declare_arg_background_g = launch.actions.DeclareLaunchArgument('launch_arg_bg',default_value="150")
    #把launch参数手动的传递给某个节点
    action_turtle_node = launch_ros.actions.Node(
        package= 'turtlesim',
        executable = 'turtlesim_node',
        parameters=[{'background_g': launch.substitutions.LaunchConfiguration(
            'launch_arg_bg',default="150"
        )}],
        output= 'screen'#输出的地点,可以是屏幕,log文件,两者都输出
    )
    action_partrol_client = launch_ros.actions.Node(
        package= 'cy_cpp_service',
        executable = 'partrol_client',
        output= 'log'
    )
    action_turtle_control = launch_ros.actions.Node(
        package= 'cy_cpp_service',
        executable = 'turtle_control',
        output= 'both'
    )
    return launch.LaunchDescription([
        action_declare_arg_background_g,
        action_turtle_node,
        action_partrol_client,
        action_turtle_control
    ])
launch使用进阶
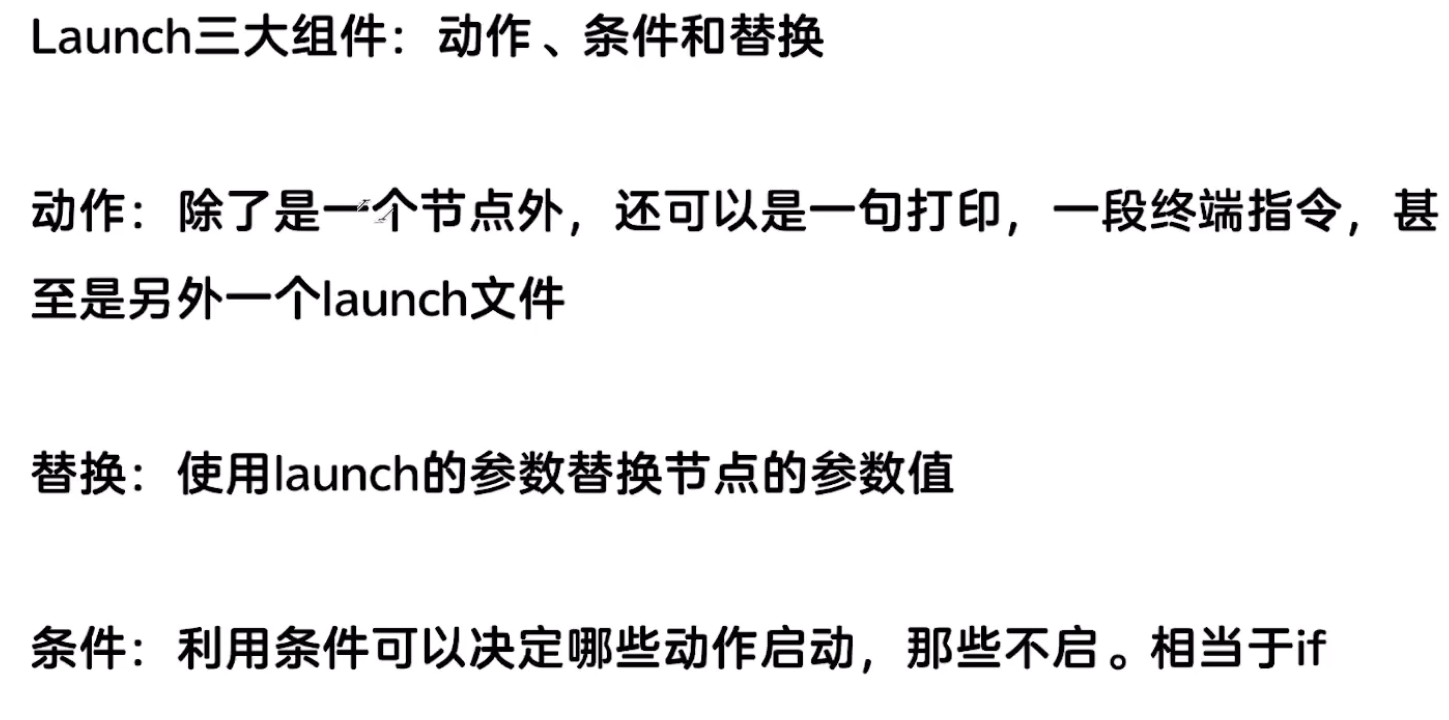
launch的运用在实际当中还是很多的
import launch
import launch.launch_description_sources
import launch_ros
from ament_index_python.packages import get_package_share_directory
def generate_launch_description():

    #声明参数,是否启动rqt
    action_declare_startup_rqt = launch.actions.DeclareLaunchArgument('startup_rqt',
    default_value="false")
    #参数声明和后要替换
    startup_rqt = launch.substitutions.LaunchConfiguration('startup_rqt',default="False")

    #1利用 IncludeLaunchDescription包含其他动作文件
    mutisim_launch_path = [get_package_share_directory("turtlesim"),"/launch","/multisim.launch.py"]
    action_include_launch = launch.actions.IncludeLaunchDescription(
    launch.launch_description_sources.PythonLaunchDescriptionSource(mutisim_launch_path)
    )

    #2利用ExecuteProcess 动作执行命令
    action_executeprocess = launch.actions.ExecuteProcess(
        #if startup_rqt
        # run:rqt
        condition = launch.conditions.IfCondition(startup_rqt),
        cmd=['rqt']
    )

    #3动作输出日志
    action_log_info = launch.actions.LogInfo(msg=str(mutisim_launch_path))

    #4组织动作成组,把多个动作放为一组
    action_group = launch.actions.GroupAction([
        #5动作定时器
        launch.actions.TimerAction(period=2.0,actions=[action_include_launch]),
        launch.actions.TimerAction(period=4.0,actions=[action_executeprocess])
    ])
    return launch.LaunchDescription([
        action_log_info,
        action_group
    ])
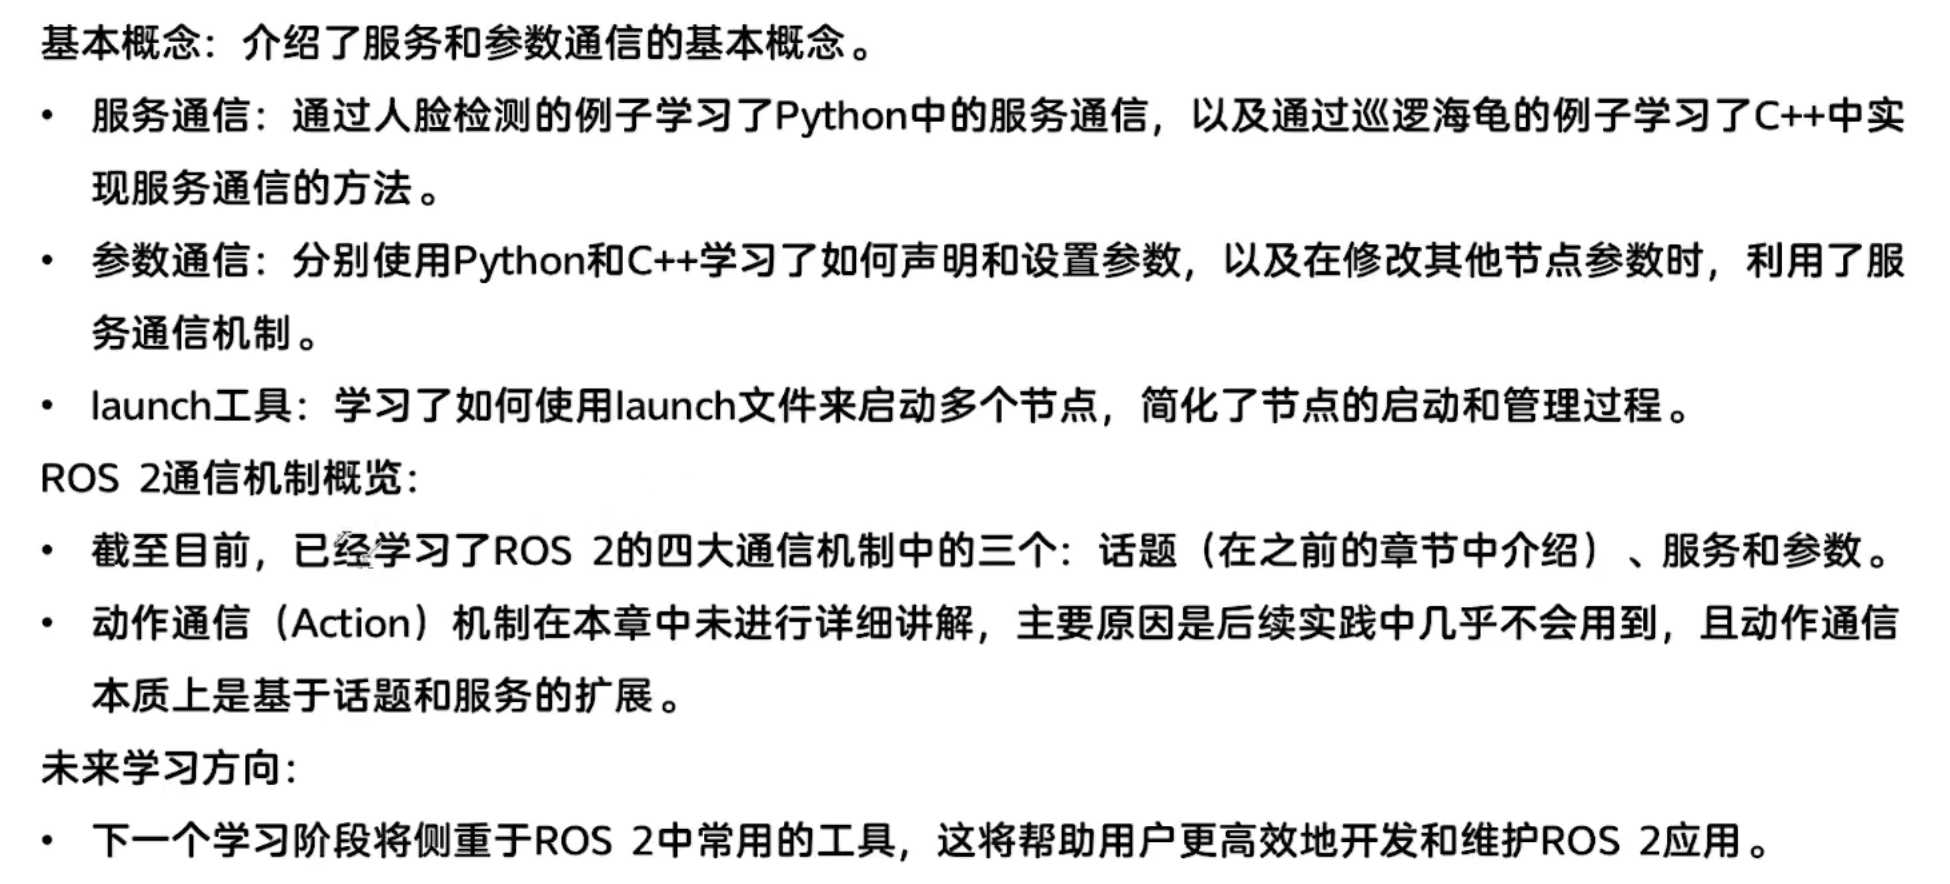
总结:

AtomGit 是由开放原子开源基金会联合 CSDN 等生态伙伴共同推出的新一代开源与人工智能协作平台。平台坚持“开放、中立、公益”的理念,把代码托管、模型共享、数据集托管、智能体开发体验和算力服务整合在一起,为开发者提供从开发、训练到部署的一站式体验。
更多推荐



 73
73 0
0- 0


 已为社区贡献1条内容

所有评论(0)