AI生成APP的UI自动化测试代码-快速上手
一、APP自动化测试基础知识—传统元素定位方法
安卓原生页面定位
1. Android SDK自带工具
Hierarchy Viewer:提供了一个可视化界面显示布局的层次结构,用于调试和测试,从而优化界面布局结构。
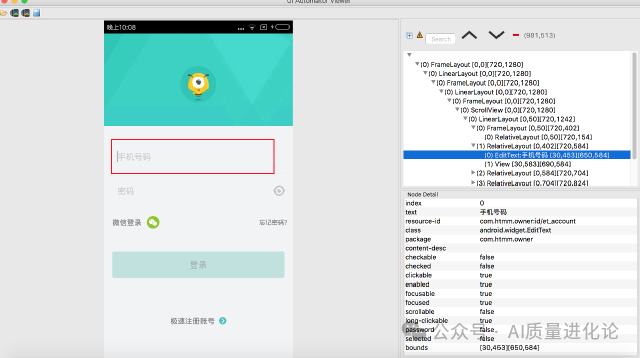
UI Automator Viewer:一个图形界面工具来扫描和分析应用的UI控件。
步骤:
1.下载Android SDK或者直接在Android studio里面下载SDK
2.电脑连接安卓手机,手机打开开发者模式并且切入调试模式。
3.打开tools目录的Hierarchy Viewer或uiautomatorviewer工具。
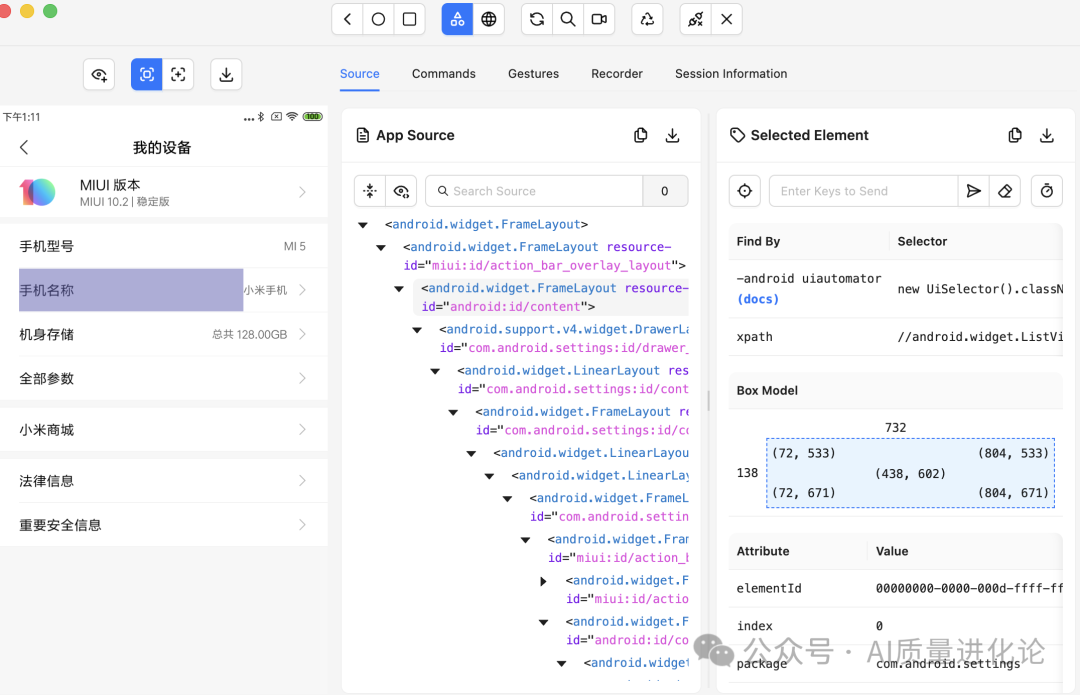
2. Appium Inspector
步骤:
1. 下载和安装Appium 和Appium Inspector
2. 启动Appium,启动Appium Inspector,填写Capability如下,连上手机,点击启动。
{"appium:udid": "设备号XXX","platformName": "Android","appium:automationName": "uiautomator2","appium:appPackage": "com.android.settings","appium:appActivity": ".MainSettings"}
3.启动成功后就可以定位元素
iOS 原生页面定位
1. Xcode的accessibility-inspector工具
步骤:
1.Mac系统下载和安装Xcode
2.在Xcode->Open Developer Tool->Accessibility Inspector打开该工具
3.连上测试手机,Accessibility Inspector选择测试的设备,就可以查看不同的页面元素和页面的层级结构
2. Appium的Inspector工具
使用同上面类似,只是Capability的设备信息,应用信息和驱动更换一下。
Web页面元素定位
1.Chrome浏览器自带的Inspect Devices
步骤:
1.电脑连接安卓手机,手机打开开发者模式并且切入调试模式。
2.打开Chrome浏览器,打开:chrome://inspect/#devices 链接就会出现如图页面,所有Google WebView内核的应用的web页面都会显示出来。
2.Safari浏览器自带的Inspect Devices
步骤:
1.设备端设置:iOS设备进入"设置 → Safari → 高级",开启"Web检查器"
2.Mac端设置:Safari偏好设置中启用"开发"菜单
3.连接方式:
USB有线连接(最稳定)
无线网络连接(需先有线配对)
4.使用流程:连接设备后,在Safari"开发"菜单中选择设备→应用→Web内容即可打开Web检查器。
3. Appium Inspector
操作同上,Appium Inspector很全面,但是的缺点就是慢,每次启动刷新都较慢。
二、快速生成
1.获取页面元素的集合
可以是上面的方法,将页面元素全部下载下来,最快的方法直接用adb,执行命令(如果在编辑器里面终端直接执行):
# 获取当前屏幕UI层级结构,从设备拉取到电脑
adb shell uiautomator dump /sdcard/ui.xml
adb pull /sdcard/ui.xml ./
2.直接生成定位元素
编辑器(带AI编码助手)可以用以下的提示方法生成代码,格式根据常用的自动化测试框架修改
@ui.xml 找出这个文件的所有定位元素根据以下格式生成,优先ID,XPATH,遇到相同的ID和XPATH多列出几个备用的:登录按钮= (AppiumBy.XPATH, "//*[@content-desc='返回']")
AI对话模式,例如元宝:
上传文件,附带文字:找出这个文件的所有定位元素根据以下格式生成,优先ID,XPATH,遇到相同的ID和XPATH多列出几个备用的--登录按钮= (AppiumBy.XPATH, "//*[@content-desc='返回']")
这里以知乎登录页面为例:
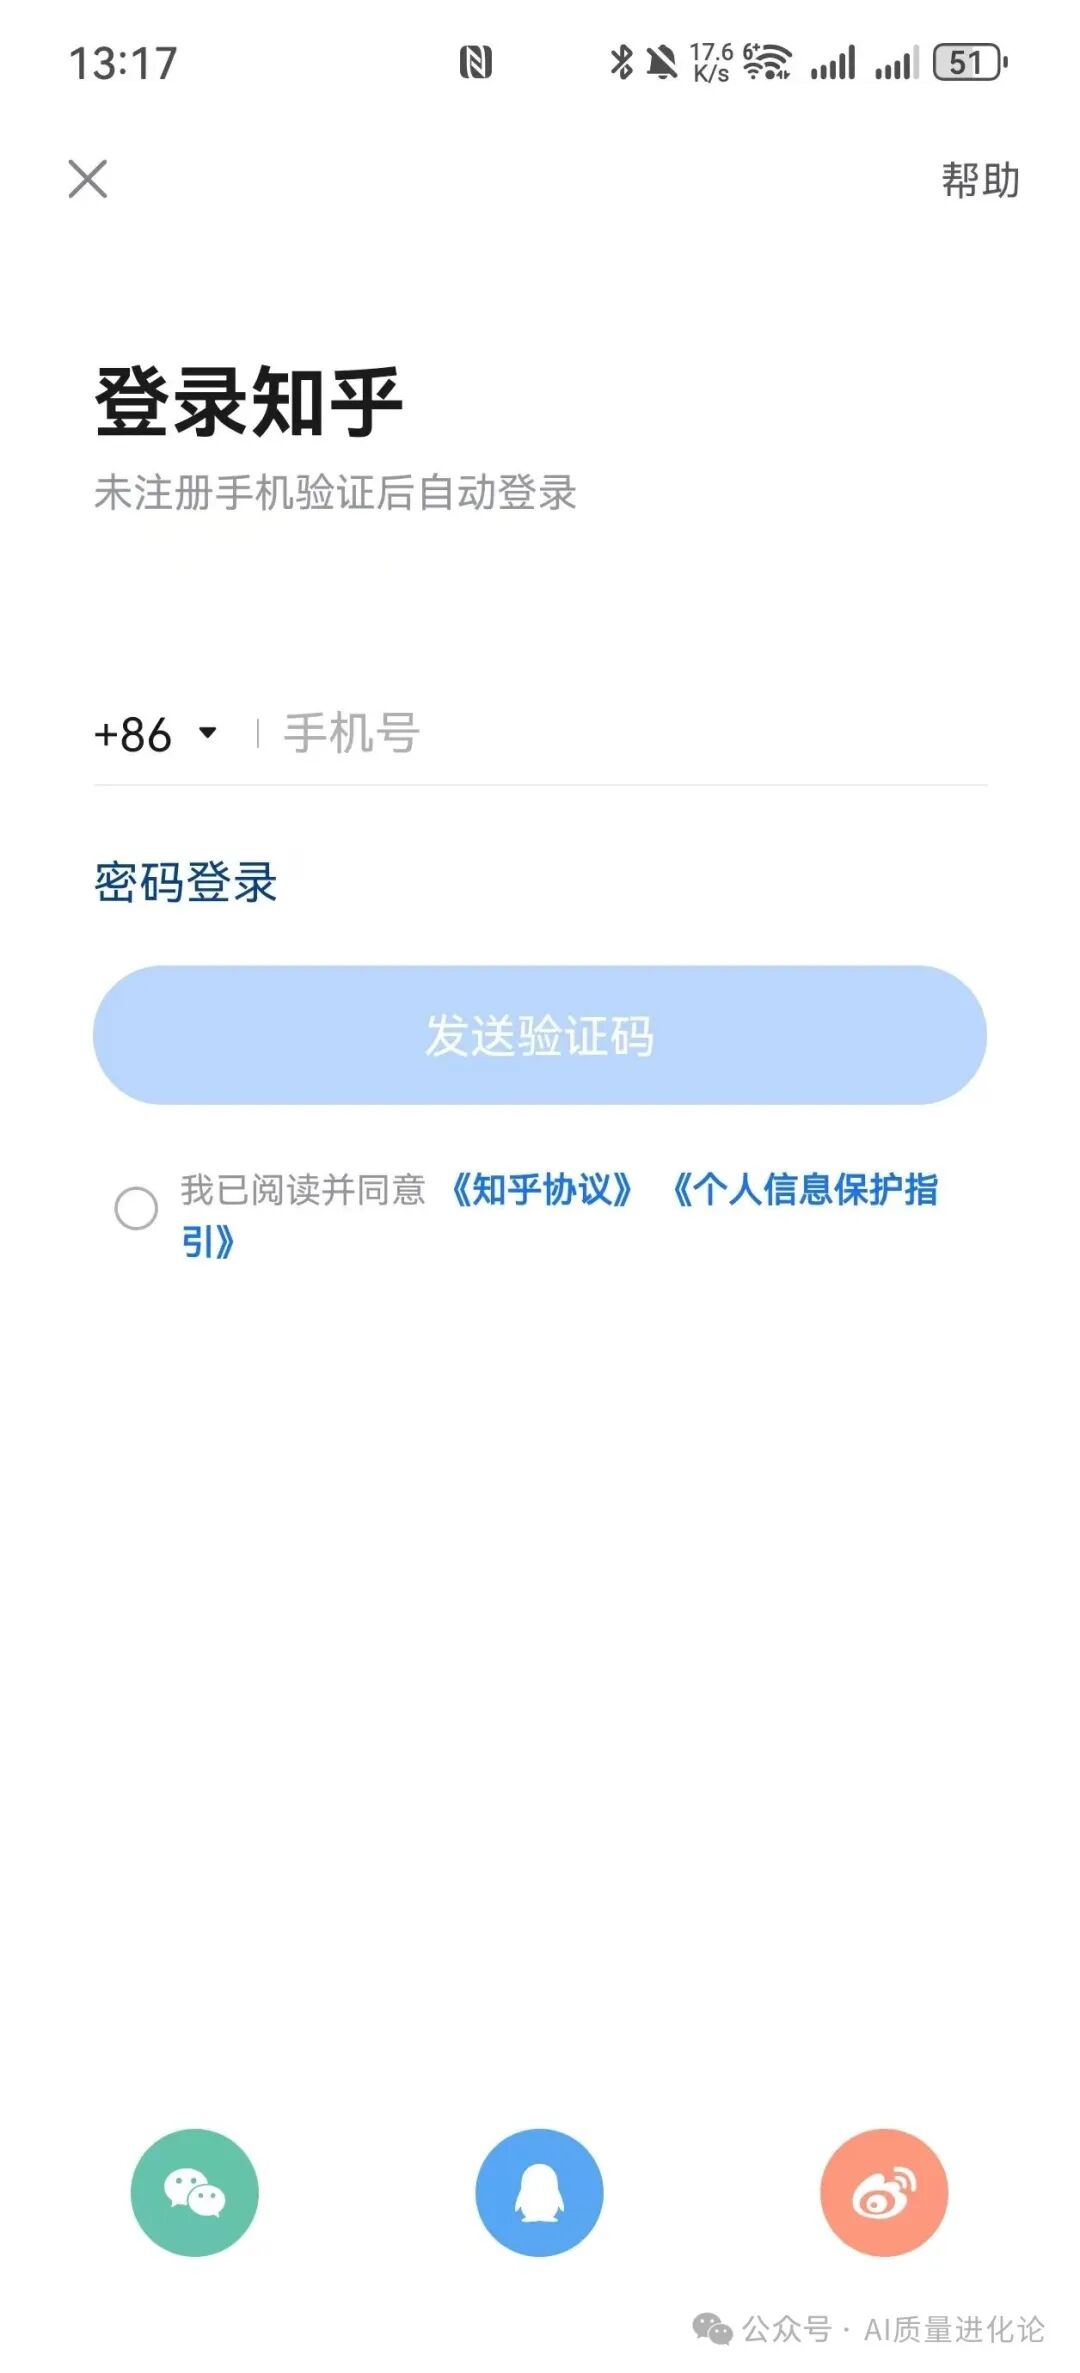
下面是生成的结果:
# ====== 顶部导航栏 ======
# 返回按钮
返回按钮_ID = (AppiumBy.ID, "com.zhihu.android:id/ivBack")

# 帮助按钮
帮助按钮_ID = (AppiumBy.ID, "com.zhihu.android:id/tvTopRightTitle")

# ====== 主登录区域 ======
# 主标题
主标题_登录知乎_ID = (AppiumBy.ID, "com.zhihu.android:id/tvTitle")

# 副标题
副标题_ID = (AppiumBy.ID, "com.zhihu.android:id/tvSubTitle")

# 手机号输入区域 (容器)
手机号输入区域容器_ID = (AppiumBy.ID, "com.zhihu.android:id/phone_input_view")

# 手机号输入框
手机号输入框_ID = (AppiumBy.ID, "com.zhihu.android:id/edit_text")
# 备用XPath (通过父容器定位)
手机号输入框_XPATH = (AppiumBy.XPATH, "//android.widget.FrameLayout[@resource-id='com.zhihu.android:id/phone_input_view']//android.widget.EditText")

# 国家/地区码选择
国家码选择_ID = (AppiumBy.ID, "com.zhihu.android:id/region_text_view")

# 密码登录链接
密码登录链接_ID = (AppiumBy.ID, "com.zhihu.android:id/password_login_link")

# 发送验证码按钮 (注意:当前 enabled="false")
发送验证码按钮_容器_ID = (AppiumBy.ID, "com.zhihu.android:id/btn_func")
发送验证码按钮_ID = (AppiumBy.ID, "com.zhihu.android:id/btn_progress")

# ====== 协议同意区域 ======
# 协议勾选框
协议勾选框_ID = (AppiumBy.ID, "com.zhihu.android:id/ivCheck")

# 协议声明文本
协议声明文本_ID = (AppiumBy.ID, "com.zhihu.android:id/privacyStatement")

# ====== 底部第三方登录区域 ======
# 微信登录入口
微信登录_ID = (AppiumBy.ID, "com.zhihu.android:id/wechatDoor")
# 备用XPath (通过索引)
微信登录_XPATH = (AppiumBy.XPATH, "(//android.widget.LinearLayout[@resource-id='com.zhihu.android:id/viewBottom']/android.widget.FrameLayout)[1]")

# QQ登录入口
QQ登录_ID = (AppiumBy.ID, "com.zhihu.android:id/qqDoor")
# 备用XPath (通过索引)
QQ登录_XPATH = (AppiumBy.XPATH, "(//android.widget.LinearLayout[@resource-id='com.zhihu.android:id/viewBottom']/android.widget.FrameLayout)[2]")

# 微博登录入口
微博登录_ID = (AppiumBy.ID, "com.zhihu.android:id/sinaDoor")
# 备用XPath (通过索引)
微博登录_XPATH = (AppiumBy.XPATH, "(//android.widget.LinearLayout[@resource-id='com.zhihu.android:id/viewBottom']/android.widget.FrameLayout)[3]")

# ====== 布局容器 (用于滚动、等待等上下文操作) ======
# 主内容容器
主内容容器_ID = (AppiumBy.ID, "android:id/content")
父片段容器_ID = (AppiumBy.ID, "com.zhihu.android:id/parent_fragment_content_id")

# 底部社交登录容器
底部社交登录容器_ID = (AppiumBy.ID, "com.zhihu.android:id/viewBottom")

# ====== 相同ID的备用XPath (如果上面的ID因动态加载失效) ======
# 所有可点击的 FrameLayout (底部三个登录入口属于此类)
可点击FrameLayout_列表_XPATH = (AppiumBy.XPATH, "//android.widget.FrameLayout[@clickable='true']")

# 所有可点击的 ImageView (返回按钮、协议勾选框属于此类)
可点击ImageView_列表_XPATH = (AppiumBy.XPATH, "//android.widget.ImageView[@clickable='true']")
# 返回按钮 (通过索引,不推荐,仅作备用)
返回按钮_XPATH_索引 = (AppiumBy.XPATH, "(//android.widget.ImageView[@clickable='true'])[1]")
# 协议勾选框 (通过索引,不推荐,仅作备用)
协议勾选框_XPATH_索引 = (AppiumBy.XPATH, "(//android.widget.ImageView[@clickable='true'])[2]")

# 所有包含文字“登录”的TextView
登录相关文本列表_XPATH = (AppiumBy.XPATH, "//android.widget.TextView[contains(@text, '登录')]")
3. 生成page的各种操作方法
如上,给出方法定义的模板,最好附加上当前模块的需求内容(如有测试用例步骤也可以附上),这里只给的模板是:
def send_message(self, message):
        self.输入框.click()
        self.输入框.send_keys(message)
        self.发送按钮.click()
自动生成了page的各项操作,一次性上传多个文件,系统将自动为每个文件创建并配置好完整的页面操作。
class ZhihuLoginPage:
    """知乎登录页面操作函数"""

    def input_phone_number(self, phone_number):
        """输入手机号"""
        self.手机号输入框.click()
        self.手机号输入框.clear()
        self.手机号输入框.send_keys(phone_number)

    def click_country_code(self):
        """点击国家/地区码选择"""
        self.国家码选择.click()

    def click_password_login(self):
        """点击'密码登录'链接"""
        self.密码登录链接.click()

    def click_send_verification_code(self):
        """点击'发送验证码'按钮"""
        # 注意:此按钮在手机号输入前为禁用状态
        if self.发送验证码按钮.is_enabled():
            self.发送验证码按钮.click()
        else:
            print("发送验证码按钮当前不可用,请先输入有效手机号")

    def check_privacy_agreement(self):
        """勾选隐私协议"""
        # 检查当前是否已勾选
        if not self.协议勾选框.is_selected():
            self.协议勾选框.click()

    def uncheck_privacy_agreement(self):
        """取消勾选隐私协议"""
        if self.协议勾选框.is_selected():
            self.协议勾选框.click()

    def click_help_button(self):
        """点击'帮助'按钮"""
        self.帮助按钮.click()

    def click_back_button(self):
        """点击返回按钮"""
        self.返回按钮.click()

    def click_wechat_login(self):
        """点击微信登录"""
        self.微信登录.click()

    def click_qq_login(self):
        """点击QQ登录"""
        self.QQ登录.click()

    def click_weibo_login(self):
        """点击微博登录"""
        self.微博登录.click()

    def login_by_phone_verification(self, phone_number):
        """
        通过手机验证码登录
        步骤:1.输入手机号 2.勾选协议 3.发送验证码
        """
        # 1. 输入手机号
        self.input_phone_number(phone_number)

        # 2. 勾选隐私协议
        self.check_privacy_agreement()

        # 3. 发送验证码
        self.click_send_verification_code()

        # 返回等待验证码输入页面对象
        return VerificationCodePage()

    def login_by_password(self, phone_number, password):
        """
        通过密码登录
        步骤:1.切换到密码登录 2.输入手机号 3.输入密码
        注意:此函数需要密码输入页面的元素支持
        """
        # 1. 切换到密码登录
        self.click_password_login()

        # 2. 输入手机号
        self.input_phone_number(phone_number)

        # 3. 输入密码(假设密码输入框在密码登录页面)
        # 注意:此部分需要密码登录页面的元素定位
        # self.密码输入框.send_keys(password)

        # 4. 点击登录按钮
        # self.登录按钮.click()

        print("密码登录功能需要密码页面的元素定位支持")
        return self

    def login_by_wechat(self):
        """通过微信登录"""
        self.click_wechat_login()
        # 处理微信授权弹窗等后续操作
        return WechatAuthPage()

    def login_by_qq(self):
        """通过QQ登录"""
        self.click_qq_login()
        # 处理QQ授权弹窗等后续操作
        return QQAuthPage()

    def login_by_weibo(self):
        """通过微博登录"""
        self.click_weibo_login()
        # 处理微博授权弹窗等后续操作
        return WeiboAuthPage()

    def get_login_title(self):
        """获取登录页面标题"""
        return self.主标题_登录知乎.text

    def get_subtitle(self):
        """获取登录页面副标题"""
        return self.副标题.text

    def is_send_code_button_enabled(self):
        """检查发送验证码按钮是否可用"""
        return self.发送验证码按钮.is_enabled()

    def is_privacy_checked(self):
        """检查隐私协议是否已勾选"""
        return self.协议勾选框.is_selected()

    def get_privacy_statement(self):
        """获取隐私协议声明文本"""
        return self.协议声明文本.text


# 以下为扩展的页面类,用于处理登录后的页面
class VerificationCodePage:
    """验证码输入页面(需要补充元素定位)"""
    def __init__(self):
        # 这里需要补充验证码页面的元素定位
        self.验证码输入框 = None
        self.验证码提交按钮 = None

    def input_verification_code(self, code):
        """输入验证码"""
        if self.验证码输入框:
            self.验证码输入框.click()
            self.验证码输入框.clear()
            self.验证码输入框.send_keys(code)

    def submit_verification_code(self):
        """提交验证码"""
        if self.验证码提交_button and self.验证码提交_button.is_enabled():
            self.验证码提交_button.click()


class WechatAuthPage:
    """微信授权页面(需要补充元素定位)"""
    pass


class QQAuthPage:
    """QQ授权页面(需要补充元素定位)"""
    pass


class WeiboAuthPage:
    """微博授权页面(需要补充元素定位)"""
    pass
4. 生成测试用例
同上,附加需求和手工测试用例,提示词越准确,内容更精确,生成的用例越精确
import pytest
import allure
import time
import logging
from appium import webdriver
from appium.webdriver.common.appiumby import AppiumBy
from selenium.webdriver.support.ui import WebDriverWait
from selenium.webdriver.support import expected_conditions as EC
# 假设的页面对象类(实际需要根据您的页面对象实现调整)
class HomePage:
    def __init__(self, driver):
        self.driver = driver
    def click_login_button(self):
        """点击登录按钮"""
        login_btn = self.driver.find_element(AppiumBy.ACCESSIBILITY_ID, "login_button")
        login_btn.click()
class LoginPage:
    def __init__(self, driver):
        self.driver = driver
    def input_phone_number(self, phone):
        """输入手机号"""
        phone_input = self.driver.find_element(AppiumBy.ACCESSIBILITY_ID, "phone_input")
        phone_input.clear()
        phone_input.send_keys(phone)
    def check_privacy_agreement(self):
        """勾选隐私协议"""
        checkbox = self.driver.find_element(AppiumBy.ACCESSIBILITY_ID, "privacy_checkbox")
        if not checkbox.is_selected():
            checkbox.click()
    def uncheck_privacy_agreement(self):
        """取消勾选隐私协议"""
        checkbox = self.driver.find_element(AppiumBy.ACCESSIBILITY_ID, "privacy_checkbox")
        if checkbox.is_selected():
            checkbox.click()
    def click_send_verification_code(self):
        """点击发送验证码"""
        send_btn = self.driver.find_element(AppiumBy.ACCESSIBILITY_ID, "send_code_button")
        send_btn.click()
    def is_send_code_button_enabled(self):
        """检查发送验证码按钮是否可用"""
        send_btn = self.driver.find_element(AppiumBy.ACCESSIBILITY_ID, "send_code_button")
        return send_btn.is_enabled()
    def click_password_login(self):
        """切换到密码登录"""
        password_login = self.driver.find_element(AppiumBy.ACCESSIBILITY_ID, "password_login_button")
        password_login.click()
    def click_wechat_login(self):
        """点击微信登录"""
        wechat_btn = self.driver.find_element(AppiumBy.ACCESSIBILITY_ID, "wechat_login_button")
        wechat_btn.click()
    def is_wechat_auth_popup_displayed(self):
        """检查微信授权弹窗是否显示"""
        try:
            popup = WebDriverWait(self.driver, 5).until(
                EC.presence_of_element_located((AppiumBy.ACCESSIBILITY_ID, "wechat_auth_popup"))
            )
            return popup.is_displayed()
        except:
            return False
    def click_qq_login(self):
        """点击QQ登录"""
        qq_btn = self.driver.find_element(AppiumBy.ACCESSIBILITY_ID, "qq_login_button")
        qq_btn.click()
    def is_qq_auth_popup_displayed(self):
        """检查QQ授权弹窗是否显示"""
        try:
            popup = WebDriverWait(self.driver, 5).until(
                EC.presence_of_element_located((AppiumBy.ACCESSIBILITY_ID, "qq_auth_popup"))
            )
            return popup.is_displayed()
        except:
            return False
    def click_weibo_login(self):
        """点击微博登录"""
        weibo_btn = self.driver.find_element(AppiumBy.ACCESSIBILITY_ID, "weibo_login_button")
        weibo_btn.click()
    def is_weibo_auth_popup_displayed(self):
        """检查微博授权弹窗是否显示"""
        try:
            popup = WebDriverWait(self.driver, 5).until(
                EC.presence_of_element_located((AppiumBy.ACCESSIBILITY_ID, "weibo_auth_popup"))
            )
            return popup.is_displayed()
        except:
            return False
    def click_back_button(self):
        """点击返回按钮"""
        back_btn = self.driver.find_element(AppiumBy.ACCESSIBILITY_ID, "back_button")
        back_btn.click()
    def click_help_button(self):
        """点击帮助按钮"""
        help_btn = self.driver.find_element(AppiumBy.ACCESSIBILITY_ID, "help_button")
        help_btn.click()
    def get_login_title(self):
        """获取登录标题"""
        title = self.driver.find_element(AppiumBy.ACCESSIBILITY_ID, "login_title")
        return title.text
    def get_subtitle(self):
        """获取副标题"""
        subtitle = self.driver.find_element(AppiumBy.ACCESSIBILITY_ID, "subtitle")
        return subtitle.text
    def is_privacy_checked(self):
        """检查隐私协议是否勾选"""
        checkbox = self.driver.find_element(AppiumBy.ACCESSIBILITY_ID, "privacy_checkbox")
        return checkbox.is_selected()
# 其他页面对象的占位类
class VerificationPage:
    def is_verification_page_displayed(self):
        return True
class PasswordLoginPage:
    def is_password_login_page_displayed(self):
        return True
class HelpPage:
    def is_help_page_displayed(self):
        return True
@allure.feature("登录功能")
class TestZhihuLogin:
    """
    知乎登录相关测试用例
    """
    @pytest.fixture(autouse=True)
    def setup(self, app_driver):
        """初始化测试环境"""
        self.driver = app_driver
        self.logger = logging.getLogger(__name__)
        # 初始化页面对象
        self.home = HomePage(self.driver)
        self.login_page = LoginPage(self.driver)
        self.verification_page = VerificationPage()
        self.password_login_page = PasswordLoginPage()
        self.help_page = HelpPage()
        yield
        # 测试后清理
        self.driver.quit()
    @pytest.mark.L1
    @pytest.mark.order(1)
    @allure.story("正向测试")
    def test_successful_verification_code_login(self):
        """
        测试手机验证码登录成功流程
        """
        with allure.step("进入登录页面"):
            self.home.click_login_button()
            self.logger.info("进入登录页面正常")
        with allure.step("输入手机号"):
            self.login_page.input_phone_number("13800138000")
            self.logger.info("输入手机号正常")
        with allure.step("勾选协议"):
            self.login_page.check_privacy_agreement()
            self.logger.info("勾选隐私协议正常")
        with allure.step("发送验证码"):
            self.login_page.click_send_verification_code()
            self.logger.info("点击发送验证码正常")
        with allure.step("验证跳转到验证码输入页面"):
            assert self.verification_page.is_verification_page_displayed(), "未跳转到验证码输入页面"
            self.logger.info("成功跳转到验证码输入页面")
    @pytest.mark.L1
    @pytest.mark.order(2)
    @allure.story("反向测试")
    def test_invalid_phone_number_login(self):
        """
        测试无效手机号登录
        """
        with allure.step("进入登录页面"):
            self.home.click_login_button()
        with allure.step("输入无效手机号"):
            self.login_page.input_phone_number("12345")
        with allure.step("验证发送验证码按钮不可用"):
            assert not self.login_page.is_send_code_button_enabled(), "无效手机号时发送按钮应不可用"
            self.logger.info("无效手机号时发送验证码按钮不可用,符合预期")
    @pytest.mark.L1
    @pytest.mark.order(3)
    @allure.story("反向测试")
    def test_login_without_agreement(self):
        """
        测试未勾选协议登录
        """
        with allure.step("进入登录页面"):
            self.home.click_login_button()
        with allure.step("输入有效手机号但不勾选协议"):
            self.login_page.input_phone_number("13800138000")
            self.login_page.uncheck_privacy_agreement()
        with allure.step("验证发送验证码按钮不可用"):
            assert not self.login_page.is_send_code_button_enabled(), "未勾选协议时发送按钮应不可用"
            self.logger.info("未勾选协议时发送验证码按钮不可用,符合预期")
    @pytest.mark.L1
    @pytest.mark.order(4)
    @allure.story("切换登录方式")
    def test_switch_to_password_login(self):
        """
        测试切换到密码登录方式
        """
        with allure.step("进入登录页面"):
            self.home.click_login_button()
        with allure.step("切换到密码登录"):
            self.login_page.click_password_login()
            self.logger.info("切换到密码登录页面正常")
        with allure.step("验证进入密码登录页面"):
            assert self.password_login_page.is_password_login_page_displayed(), "未成功切换到密码登录页面"
            self.logger.info("成功进入密码登录页面")
    @pytest.mark.L1
    @pytest.mark.order(5)
    @allure.feature("第三方登录")
    @allure.story("正向测试")
    def test_wechat_login_flow(self):
        """
        测试微信登录流程
        """
        with allure.step("进入登录页面"):
            self.home.click_login_button()
        with allure.step("点击微信登录"):
            self.login_page.click_wechat_login()
            self.logger.info("点击微信登录按钮正常")
        with allure.step("验证弹出微信授权页面"):
            assert self.login_page.is_wechat_auth_popup_displayed(), "未弹出微信授权页面"
            self.logger.info("成功弹出微信授权页面")
    @pytest.mark.L2
    @pytest.mark.order(6)
    @allure.feature("第三方登录")
    @allure.story("正向测试")
    def test_qq_login_flow(self):
        """
        测试QQ登录流程
        """
        with allure.step("进入登录页面"):
            self.home.click_login_button()
        with allure.step("点击QQ登录"):
            self.login_page.click_qq_login()
            self.logger.info("点击QQ登录按钮正常")
        with allure.step("验证弹出QQ授权页面"):
            assert self.login_page.is_qq_auth_popup_displayed(), "未弹出QQ授权页面"
            self.logger.info("成功弹出QQ授权页面")
    @pytest.mark.L2
    @pytest.mark.order(7)
    @allure.feature("第三方登录")
    @allure.story("正向测试")
    def test_weibo_login_flow(self):
        """
        测试微博登录流程
        """
        with allure.step("进入登录页面"):
            self.home.click_login_button()
        with allure.step("点击微博登录"):
            self.login_page.click_weibo_login()
            self.logger.info("点击微博登录按钮正常")
        with allure.step("验证弹出微博授权页面"):
            assert self.login_page.is_weibo_auth_popup_displayed(), "未弹出微博授权页面"
            self.logger.info("成功弹出微博授权页面")
    @pytest.mark.L1
    @pytest.mark.order(8)
    @allure.feature("页面导航")
    @allure.story("返回功能")
    def test_back_button_functionality(self):
        """
        测试返回按钮功能
        """
        with allure.step("进入登录页面"):
            self.home.click_login_button()
        with allure.step("点击返回按钮"):
            self.login_page.click_back_button()
            self.logger.info("点击返回按钮正常")
        with allure.step("验证返回到首页"):
            # 假设首页有特定的元素可以验证
            home_element = self.driver.find_element(AppiumBy.ACCESSIBILITY_ID, "home_element")
            assert home_element.is_displayed(), "未成功返回到首页"
            self.logger.info("成功返回到首页")
    @pytest.mark.L2
    @pytest.mark.order(9)
    @allure.feature("页面功能")
    @allure.story("帮助功能")
    def test_help_button_functionality(self):
        """
        测试帮助按钮功能
        """
        with allure.step("进入登录页面"):
            self.home.click_login_button()
        with allure.step("点击帮助按钮"):
            self.login_page.click_help_button()
            self.logger.info("点击帮助按钮正常")
        with allure.step("验证进入帮助页面"):
            assert self.help_page.is_help_page_displayed(), "未进入帮助页面"
            self.logger.info("成功进入帮助页面")
    @pytest.mark.L1
    @pytest.mark.order(10)
    @allure.feature("页面UI")
    @allure.story("元素显示")
    def test_login_page_elements_display(self):
        """
        测试登录页面元素正常显示
        """
        with allure.step("进入登录页面"):
            self.home.click_login_button()
        with allure.step("验证各元素正常显示"):
            assert self.login_page.get_login_title() == "登录知乎", "登录标题显示不正确"
            assert "未注册手机验证后自动登录" in self.login_page.get_subtitle(), "副标题显示不正确"
            assert self.login_page.is_send_code_button_enabled() == False, "发送验证码按钮初始状态应为不可用"
            assert self.login_page.is_privacy_checked() == False, "隐私协议初始状态应为未勾选"
            self.logger.info("登录页面所有元素显示正常")
    @pytest.mark.L2
    @pytest.mark.order(11)
    @allure.story("边界测试")
    def test_phone_number_format_boundary(self):
        """
        测试手机号格式边界值
        """
        with allure.step("进入登录页面"):
            self.home.click_login_button()
        with allure.step("测试边界值:手机号长度"):
            test_cases = [
                ("1380013800", False),  # 10位,过短
                ("138001380001", False),  # 12位,过长
                ("13800138000", True),  # 11位,正确
                ("18812345678", True),  # 11位,正确
            ]
            for phone, expected_enabled in test_cases:
                self.login_page.input_phone_number(phone)
                time.sleep(0.5)  # 等待UI响应
                if expected_enabled:
                    assert self.login_page.is_send_code_button_enabled(), f"手机号{phone}应该使发送按钮可用"
                else:
                    assert not self.login_page.is_send_code_button_enabled(), f"手机号{phone}应该使发送按钮不可用"
            self.logger.info("手机号格式边界值测试通过")
    @pytest.mark.L3
    @pytest.mark.order(12)
    @allure.feature("性能测试")
    @allure.story("响应时间")
    def test_login_page_response_time(self):
        """
        测试登录页面响应时间
        """
        with allure.step("测试登录页面加载时间"):
            start_time = time.time()
            self.home.click_login_button()
            load_time = time.time() - start_time
            assert load_time < 3, f"登录页面加载时间过长: {load_time}秒"
            self.logger.info(f"登录页面加载时间正常: {load_time:.2f}秒")
        with allure.step("测试输入响应时间"):
            start_time = time.time()
            self.login_page.input_phone_number("13800138000")
            response_time = time.time() - start_time
            assert response_time < 1, f"输入响应时间过长: {response_time}秒"
            self.logger.info(f"输入响应时间正常: {response_time:.2f}秒")
    @pytest.mark.L3
    @pytest.mark.order(13)
    @allure.feature("兼容性测试")
    @allure.story("多设备适配")
    def test_login_page_layout_compatibility(self):
        """
        测试登录页面布局兼容性
        """
        with allure.step("进入登录页面"):
            self.home.click_login_button()
        with allure.step("验证各元素位置和尺寸"):
            window_size = self.driver.get_window_size()
            # 这里假设我们有方法获取页面元素
            # 实际上需要根据具体的元素定位器来获取
            elements_to_check = [
                (self.login_page.get_login_title, "主标题-登录知乎"),
                ("phone_input", "手机号输入框"),
                ("send_code_button", "发送验证码按钮"),
            ]
            for element_getter, name in elements_to_check:
                try:
                    if callable(element_getter):
                        # 如果element_getter是可调用的,调用它获取元素
                        element = element_getter()
                    else:
                        # 否则假设element_getter是accessibility_id
                        element = self.driver.find_element(AppiumBy.ACCESSIBILITY_ID, element_getter)
                    location = element.location
                    size = element.size
                    # 检查元素是否在屏幕可见区域内
                    assert 0 <= location['x'] <= window_size['width'], f"{name} x坐标异常"
                    assert 0 <= location['y'] <= window_size['height'], f"{name} y坐标异常"
                    # 检查元素尺寸是否合理
                    assert size['width'] > 0 and size['height'] > 0, f"{name} 尺寸异常"
                except Exception as e:
                    self.logger.warning(f"检查元素{name}时出错: {e}")
            self.logger.info("登录页面布局适配性测试通过")
总结,根据自己的自动化测试框架,调整对应的提示词,形成自己的skills,每个页面分开生成,避免AI偷懒,这样就可以更快解决各种问题。
如果在使用 Appium 过程中遇到任何问题,诚邀您在评论区留言,我们一起探讨解决。

AtomGit 是由开放原子开源基金会联合 CSDN 等生态伙伴共同推出的新一代开源与人工智能协作平台。平台坚持“开放、中立、公益”的理念,把代码托管、模型共享、数据集托管、智能体开发体验和算力服务整合在一起,为开发者提供从开发、训练到部署的一站式体验。
更多推荐
 4
4 0
0- 0


 已为社区贡献2条内容

所有评论(0)