latex绘图实战:绘制粒子物理标准模型表
文章目录
实战-粒子物理标准模型
Carsten Burgard用tikz绘制了粒子物理的标准模型,链接为Standard model of physics,出图如下
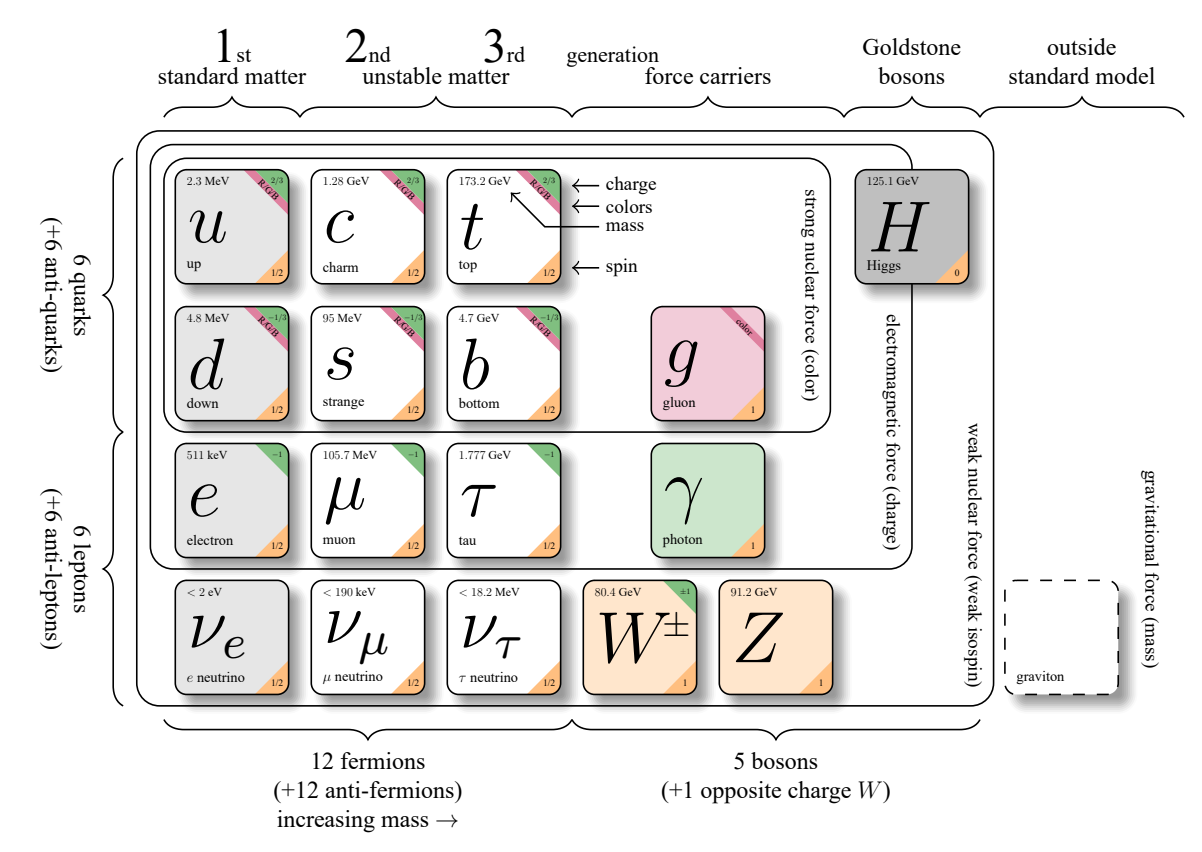
上图由不同粒子的特征方框组成,该方框包括诸多元素,包括粒子的名称、质量、自选等,且其背景色可以更改。通过矩形外线,将粒子分为强力作用、电磁力作用和弱力作用三种类别;左侧花括号将其分为夸克和轻子;下方花括号将其分为费米子和玻色子。
下面对其绘图代码分为三段进行讲解。
绘图元素
在导言区,该图主要分为两部分,首先是用tikzset语句规范了绘图元素,然后用newcommand指令给出单个粒子的绘制指令。
下面是文件头和tikzset的内容,其中【etoolbox】库提供了条件显示(\ifstrempty)功能,会在后面用到,在这一段并没有用到。
\documentclass[border=10pt]{standalone}
\usepackage{tikz}
\usetikzlibrary{calc,positioning,shadows.blur,decorations.pathreplacing}
\usepackage{etoolbox}

\tikzset{%
        brace/.style = { decorate, decoration={brace, amplitude=5pt} },
       mbrace/.style = { decorate, decoration={brace, amplitude=5pt, mirror} },
        label/.style = { black, midway, scale=0.5, align=center },
     toplabel/.style = { label, above=.5em, anchor=south },
    leftlabel/.style = { label,rotate=-90,left=.5em,anchor=north },
  bottomlabel/.style = { label, below=.5em, anchor=north },
        force/.style = { rotate=-90,scale=0.4 },
        round/.style = { rounded corners=2mm },
       legend/.style = { right,scale=0.4 },
        nosep/.style = { inner sep=0pt },
   generation/.style = { anchor=base }
}
在上面的代码中,规范了括号、标签等基本绘图元素。以brace为例,通过decorate参数声明样式,【decoration】用来具体配置装饰效果,brace为装饰类型,指定画花括号形状;amplitude=5pt表示花括号凸起的高度为5pt。
单个粒子
下面是单个粒子的绘制指令。
\newcommand\particle[7][white]{%
  \begin{tikzpicture}[x=1cm, y=1cm]
    \path[fill=#1,blur shadow={shadow blur steps=5}] (0.1,0) -- (0.9,0)
        arc (90:0:1mm) -- (1.0,-0.9) arc (0:-90:1mm) -- (0.1,-1.0)
        arc (-90:-180:1mm) -- (0,-0.1) arc(180:90:1mm) -- cycle;
    \ifstrempty{#7}{}{\path[fill=purple!50!white]
        (0.6,0) --(0.7,0) -- (1.0,-0.3) -- (1.0,-0.4);}
    \ifstrempty{#6}{}{\path[fill=green!50!black!50] (0.7,0) -- (0.9,0)
        arc (90:0:1mm) -- (1.0,-0.3);}
    \ifstrempty{#5}{}{\path[fill=orange!50!white] (1.0,-0.7) -- (1.0,-0.9)
        arc (0:-90:1mm) -- (0.7,-1.0);}
    \draw[\ifstrempty{#2}{dashed}{black}] (0.1,0) -- (0.9,0)
        arc (90:0:1mm) -- (1.0,-0.9) arc (0:-90:1mm) -- (0.1,-1.0)
        arc (-90:-180:1mm) -- (0,-0.1) arc(180:90:1mm) -- cycle;
    \ifstrempty{#7}{}{\node at(0.825,-0.175) [rotate=-45,scale=0.2] {#7};}
    \ifstrempty{#6}{}{\node at(0.9,-0.1)  [nosep,scale=0.17] {#6};}
    \ifstrempty{#5}{}{\node at(0.9,-0.9)  [nosep,scale=0.2] {#5};}
    \ifstrempty{#4}{}{\node at(0.1,-0.1)  [nosep,anchor=west,scale=0.25]{#4};}
    \ifstrempty{#3}{}{\node at(0.1,-0.85) [nosep,anchor=west,scale=0.3] {#3};}
    \ifstrempty{#2}{}{\node at(0.1,-0.5)  [nosep,anchor=west,scale=1.5] {#2};}
  \end{tikzpicture}
}
在particle中,共有7个输入参数,其功能依次为
- #1 填充色
- #2 可选参数,表示粒子名称,如果空置则不显示,例如最右侧的引力子。
- #3 可选参数,为粒子说明,空置同样不显示,例如 W ± , Z W^\pm, Z W±,Z粒子
- #4 可选参数,为粒子质量。
- #5 可选参数,为粒子自旋,倾置于右下角。
- #6 可选参数,为粒子电荷,倾置于右上角。
- #7 可选参数,为粒子色荷,倾置于右上角。
其中,#5, #6, #7这三个参数,除了后半段用于指名node文字之外,中段还用于设置这些文字的背景,其中#5(自选)背景色为淡橘色;#6(电荷)背景色为深绿色;#7(色荷)背景色为浅红色。
文档区
在定义好每个粒子的绘制函数后,即可在文档区方便地调用,其绘图代码如下。
\begin{document}
\begin{tikzpicture}[x=1.2cm, y=1.2cm]
  \draw[round] (-0.5,0.5) rectangle (4.4,-1.5);
  \draw[round] (-0.6,0.6) rectangle (5.0,-2.5);
  \draw[round] (-0.7,0.7) rectangle (5.6,-3.5);

  \node at(0, 0)   {\particle[gray!20!white]
                   {$u$}        {up}       {$2.3$ MeV}{1/2}{$2/3$}{R/G/B}};
  \node at(0,-1)   {\particle[gray!20!white]
                   {$d$}        {down}    {$4.8$ MeV}{1/2}{$-1/3$}{R/G/B}};
  \node at(0,-2)   {\particle[gray!20!white]
                   {$e$}        {electron}       {$511$ keV}{1/2}{$-1$}{}};
  \node at(0,-3)   {\particle[gray!20!white]
                   {$\nu_e$}    {$e$ neutrino}         {$<2$ eV}{1/2}{}{}};
  \node at(1, 0)   {\particle
                   {$c$}        {charm}   {$1.28$ GeV}{1/2}{$2/3$}{R/G/B}};
  \node at(1,-1)   {\particle
                   {$s$}        {strange}  {$95$ MeV}{1/2}{$-1/3$}{R/G/B}};
  \node at(1,-2)   {\particle
                   {$\mu$}      {muon}         {$105.7$ MeV}{1/2}{$-1$}{}};
  \node at(1,-3)   {\particle
                   {$\nu_\mu$}  {$\mu$ neutrino}    {$<190$ keV}{1/2}{}{}};
  \node at(2, 0)   {\particle
                   {$t$}        {top}    {$173.2$ GeV}{1/2}{$2/3$}{R/G/B}};
  \node at(2,-1)   {\particle
                   {$b$}        {bottom}  {$4.7$ GeV}{1/2}{$-1/3$}{R/G/B}};
  \node at(2,-2)   {\particle
                   {$\tau$}     {tau}          {$1.777$ GeV}{1/2}{$-1$}{}};
  \node at(2,-3)   {\particle
                   {$\nu_\tau$} {$\tau$ neutrino}  {$<18.2$ MeV}{1/2}{}{}};
  \node at(3,-3)   {\particle[orange!20!white]
                   {$W^{\hspace{-.3ex}\scalebox{.5}{$\pm$}}$}
                                {}              {$80.4$ GeV}{1}{$\pm1$}{}};
  \node at(4,-3)   {\particle[orange!20!white]
                   {$Z$}        {}                    {$91.2$ GeV}{1}{}{}};
  \node at(3.5,-2) {\particle[green!50!black!20]
                   {$\gamma$}   {photon}                        {}{1}{}{}};
  \node at(3.5,-1) {\particle[purple!20!white]
                   {$g$}        {gluon}                    {}{1}{}{color}};
  \node at(5,0)    {\particle[gray!50!white]
                   {$H$}        {Higgs}              {$125.1$ GeV}{0}{}{}};
  \node at(6.1,-3) {\particle
                   {}           {graviton}                       {}{}{}{}};

  \node at(4.25,-0.5) [force]      {strong nuclear force (color)};
  \node at(4.85,-1.5) [force]    {electromagnetic force (charge)};
  \node at(5.45,-2.4) [force] {weak nuclear force (weak isospin)};
  \node at(6.75,-2.5) [force]        {gravitational force (mass)};

  \draw [<-] (2.5,0.3)   -- (2.7,0.3)          node [legend] {charge};
  \draw [<-] (2.5,0.15)  -- (2.7,0.15)         node [legend] {colors};
  \draw [<-] (2.05,0.25) -- (2.3,0) -- (2.7,0) node [legend]   {mass};
  \draw [<-] (2.5,-0.3)  -- (2.7,-0.3)         node [legend]   {spin};

  \draw [mbrace] (-0.8,0.5)  -- (-0.8,-1.5)
                 node[leftlabel] {6 quarks\\(+6 anti-quarks)};
  \draw [mbrace] (-0.8,-1.5) -- (-0.8,-3.5)
                 node[leftlabel] {6 leptons\\(+6 anti-leptons)};
  \draw [mbrace] (-0.5,-3.6) -- (2.5,-3.6)
                 node[bottomlabel]
                 {12 fermions\\(+12 anti-fermions)\\increasing mass $\to$};
  \draw [mbrace] (2.5,-3.6) -- (5.5,-3.6)
                 node[bottomlabel] {5 bosons\\(+1 opposite charge $W$)};

  \draw [brace] (-0.5,.8) -- (0.5,.8) node[toplabel]         {standard matter};
  \draw [brace] (0.5,.8)  -- (2.5,.8) node[toplabel]         {unstable matter};
  \draw [brace] (2.5,.8)  -- (4.5,.8) node[toplabel]          {force carriers};
  \draw [brace] (4.5,.8)  -- (5.5,.8) node[toplabel]       {Goldstone\\bosons};
  \draw [brace] (5.5,.8)  -- (7,.8)   node[toplabel] {outside\\standard model};

  \node at (0,1.2)   [generation] {1\tiny st};
  \node at (1,1.2)   [generation] {2\tiny nd};
  \node at (2,1.2)   [generation] {3\tiny rd};
  \node at (2.8,1.2) [generation] {\tiny generation};
\end{tikzpicture}
\end{document}
小结
本文介绍了使用TikZ绘制粒子物理标准模型图的LaTeX实现方法。通过自定义\particle命令,可灵活绘制包含粒子名称、质量、自旋、电荷等信息的彩色方块。图中粒子按强力、电磁力、弱力作用分类,并用花括号区分夸克/轻子、费米子/玻色子。代码分为三部分:1)定义基本绘图样式;2)实现粒子绘制函数,支持7个参数控制显示内容;3)文档区调用函数生成完整图表。该方案利用TikZ库实现阴影、圆角等效果,通过条件判断实现可选参数的灵活显示。

AtomGit 是由开放原子开源基金会联合 CSDN 等生态伙伴共同推出的新一代开源与人工智能协作平台。平台坚持“开放、中立、公益”的理念,把代码托管、模型共享、数据集托管、智能体开发体验和算力服务整合在一起,为开发者提供从开发、训练到部署的一站式体验。
更多推荐
 15
15 0
0- 0


 已为社区贡献17条内容

所有评论(0)