python并发编程学习——asyncio
什么是asyncio
产生背景
Python在处理I/O密集型任务时遇到的问题。传统的多线程编程模型在处理大量I/O操作时,由于线程创建和管理的开销,效率较低。为了解决这个问题,Python从3.4版本开始引入了asyncio库,它能够在单个线程内实现并发,避免了多线程带来的开销,从而提升了性能并降低了复杂度。
如何使用
import asyncio

@asyncio.coroutine
def func1():
    print(1)
    # 网络IO请求:下载一张图片
    yield from asyncio.sleep(2)  # 遇到IO耗时操作,自动化切换到tasks中的其他任务
    print(2)


@asyncio.coroutine
def func2():
    print(3)
    # 网络IO请求:下载一张图片
    yield from asyncio.sleep(2) # 遇到IO耗时操作,自动化切换到tasks中的其他任务
    print(4)


tasks = [
    asyncio.ensure_future( func1() ),
    asyncio.ensure_future( func2() )
]

loop = asyncio.get_event_loop()
loop.run_until_complete(asyncio.wait(tasks))
核心内容
事件循环
async用于执行未完成任务,并在任务完成后,从任务列表中移除。
这步骤为
import asyncio

# 去生成或获取一个事件循环
loop = asyncio.get_event_loop()

# 将任务放到`任务列表`
loop.run_until_complete(任务)
uvloop
uvloop是 asyncio 中的事件循环的替代方案,替换后可以使得asyncio性能提高。事实上,uvloop要比nodejs、gevent等其他python异步框架至少要快2倍,性能可以比肩Go语言。
使用
-
安装uvloop
pip3 install uvloop -
在项目中想要使用uvloop替换asyncio的事件循环也非常简单,只要在代码中这么做就行。
import asyncio
import uvloop
asyncio.set_event_loop_policy(uvloop.EventLoopPolicy())

# 编写asyncio的代码,与之前写的代码一致。

# 内部的事件循环自动化会变为uvloop
asyncio.run(...)
注意:知名的asgi uvicorn内部就是使用的uvloop的事件循环。
协程函数的编写
协程函数编写后,需要实例化并加入事件循环中的任务列表,函数内部的逻辑才会执行
import asyncio

async def func():
    print("快来搞我吧!")

result = func()
loop = asyncio.get_event_loop()
loop.run_until_complete(result)
python3.7之后,可以通过使用asyncio.run替代上面注册任务到事件循环,简化了代码的编写
import asyncio

async def func():
    print("快来搞我吧!")

result = func()
asyncio.run(result)
await
使用:await+可等待对象
await在接收到可等待对象的返回值之后,才会继续执行后续的逻辑。
import asyncio

async def others():
    print("start")
    await asyncio.sleep(2)
    print('end')
    return '返回值'

async def func():
    print("执行协程函数内部代码")

    # 遇到IO操作挂起当前协程(任务),等IO操作完成之后再继续往下执行。当前协程挂起时,事件循环可以去执行其他协程(任务)。
    response1 = await others()
    print("IO请求结束,结果为:", response1)

    response2 = await others()
    print("IO请求结束,结果为:", response2)

asyncio.run( func() )
可等待对象
Future对象
asyncio中的Future对象是一个相对更偏向底层的可对象,通常我们不会直接用到这个对象,而是直接使用Task对象来完成任务的并和状态的追踪。( Task 是 Futrue的子类 )
Future为我们提供了异步编程中的 最终结果 的处理(Task类也具备状态处理的功能)。
简单使用
async def main():
    # 获取当前事件循环
    loop = asyncio.get_running_loop()

    # # 创建一个任务(Future对象),这个任务什么都不干。
    fut = loop.create_future()

    # 等待任务最终结果(Future对象),没有结果则会一直等下去。
    await fut

asyncio.run(main())
因为await需要得到可等待对象返回值才会走后续逻辑,而Future对象不绑定任何行为,是不会自动返回值的,所以想要让事件循环获取Future的结果,则需要手动设置。
import asyncio

async def set_after(fut):
    await asyncio.sleep(2)
    fut.set_result("666")

async def main():
    # 获取当前事件循环
    loop = asyncio.get_running_loop()

    # 创建一个任务(Future对象),没绑定任何行为,则这个任务永远不知道什么时候结束。
    fut = loop.create_future()

    # 创建一个任务(Task对象),绑定了set_after函数,函数内部在2s之后,会给fut赋值。
    # 即手动设置future任务的最终结果,那么fut就可以结束了。
    await loop.create_task(set_after(fut))

    # 等待 Future对象获取 最终结果,否则一直等下去
    data = await fut
    print(data)

asyncio.run(main())
而Task对象继承了Future对象,其实就对Future进行扩展,他可以实现在对应绑定的函数执行完成之后,自动执行set_result,从而实现自动结束。
python中另一个Future对象
在Python的concurrent.futures模块中也有一个Future对象,这个对象是基于线程池和进程池实现异步操作时使用的对象。
两个Future对象是不同的,他们是为不同的应用场景而设计,例如:concurrent.futures.Future不支持await语法等。
为何python提供这个功能
其实,一般在程序开发中我们要么统一使用 asyncio 的协程实现异步操作,要么都使用进程池和线程池实现异步操作。但如果 协程的异步和 进程池/线程池的异步 混搭时,那么就会用到此功能了。
简单使用:
import time
import asyncio
import concurrent.futures

def func1():
    # 某个耗时操作
    time.sleep(2)
    return "SB"

async def main():
    loop = asyncio.get_running_loop()

    # 1. Run in the default loop's executor ( 默认ThreadPoolExecutor )
    # 第一步:内部会先调用 ThreadPoolExecutor 的 submit 方法去线程池中申请一个线程去执行func1函数,并返回一个concurrent.futures.Future对象
    # 第二步:调用asyncio.wrap_future将concurrent.futures.Future对象包装为asycio.Future对象。
    # 因为concurrent.futures.Future对象不支持await语法,所以需要包装为 asycio.Future对象 才能使用。
    fut = loop.run_in_executor(None, func1)
    result = await fut
    print('default thread pool', result)

    # 2. Run in a custom thread pool:
    # with concurrent.futures.ThreadPoolExecutor() as pool:
    #     result = await loop.run_in_executor(
    #         pool, func1)
    #     print('custom thread pool', result)

    # 3. Run in a custom process pool:
    # with concurrent.futures.ProcessPoolExecutor() as pool:
    #     result = await loop.run_in_executor(
    #         pool, func1)
    #     print('custom process pool', result)

asyncio.run(main())
应用场景:
比如一个系统80%都是用asyncio实现异步编程,但是可能剩下的20%涉及到其他第三方接口,它不支持asyncio,那么要支持它进行异步操作,就可以使用python提供的线程池、进程池来实现。
import asyncio
import requests


async def download_image(url):
    # 发送网络请求,下载图片(遇到网络下载图片的IO请求,自动化切换到其他任务)
    print("开始下载:", url)

    loop = asyncio.get_event_loop()
    # requests模块默认不支持异步操作,所以就使用线程池来配合实现了。
    # 1. Run in the default loop's executor ( 默认ThreadPoolExecutor )
    # 第一步:内部会先调用 ThreadPoolExecutor 的 submit 方法去线程池中申请一个线程去执行requests.get函数,并返回一个concurrent.futures.Future对象
    # 第二步:调用asyncio.wrap_future将concurrent.futures.Future对象包装为asycio.Future对象。
    # 因为concurrent.futures.Future对象不支持await语法,所以需要包装为 asycio.Future对象 才能使用。
    future = loop.run_in_executor(None, requests.get, url)

    response = await future
    print('下载完成')
    # 图片保存到本地文件
    file_name = url.rsplit('_')[-1]
    with open(file_name, mode='wb') as file_object:
        file_object.write(response.content)


if __name__ == '__main__':
    url_list = [
        'https://www3.autoimg.cn/newsdfs/g26/M02/35/A9/120x90_0_autohomecar__ChsEe12AXQ6AOOH_AAFocMs8nzU621.jpg',
        'https://www2.autoimg.cn/newsdfs/g30/M01/3C/E2/120x90_0_autohomecar__ChcCSV2BBICAUntfAADjJFd6800429.jpg',
        'https://www3.autoimg.cn/newsdfs/g26/M0B/3C/65/120x90_0_autohomecar__ChcCP12BFCmAIO83AAGq7vK0sGY193.jpg'
    ]

    tasks = [download_image(url) for url in url_list]

    loop = asyncio.get_event_loop()
    loop.run_until_complete( asyncio.wait(tasks) )
如何知道第三方接口是否支持asyncio编程
- await调用第三方接口,看是否有报错,报错就代表不支持
- 查看源码中是否有提及asyncio的适配
如果第三方接口或者使用了旧版同步接口(不支持asyncio),怎么使用asyncio保证其不会阻塞线程
Task对象(常用)
Task继承Future,Task对象内部await结果的处理基于Future对象来的。
作用:
更高效地添加多个协程对象到事件循环中。
官方说明:
Tasks are used to schedule coroutines concurrently.
When a coroutine is wrapped into a Task with functions likeasyncio.create_task()
the coroutine is automatically scheduled to run soon。
翻译:Tasks用于并发调度协程,通过asyncio.create_task(协程对象)的方式创建Task对象,这样可以让协程加入事件循环中等待被调度执行。除了使用asyncio.create_task()函数以外,还可以用低层级的loop.create_task()或ensure_future()函数。不建议手动实例化 Task 对象。
多个task对象执行完后,怎么知道哪个结果是哪个函数的呢?
可以通过在create_task中设置参数name,然后在返回的列表中查询Task对象获取结果
import asyncio


async def func():
    print(1)
    await asyncio.sleep(2)
    print(2)
    return "返回值"

async def main():
    print("main开始")

    task_list = [
        asyncio.create_task(func(), name='n1'),
        asyncio.create_task(func(), name='n2')
    ]

    print("main结束")

    done, pending = await asyncio.wait(task_list, timeout=None)
    print(done)

asyncio.run(main())
异步迭代器
什么是异步迭代器
实现了 __aiter__() 和 __anext__() 方法的对象。__anext__ 必须返回一个 awaitable 对象。async for 会处理异步迭代器的 __anext__() 方法所返回的可等待对象,直到其引发一个 StopAsyncIteration 异常。由 PEP 492 引入。
什么是异步可迭代对象?
可在 async for 语句中被使用的对象。必须通过它的 __aiter__() 方法返回一个 asynchronous iterator。由 PEP 492 引入。
import asyncio


class Reader(object):
    """ 自定义异步迭代器(同时也是异步可迭代对象) """

    def __init__(self):
        self.count = 0

    async def readline(self):
        # await asyncio.sleep(1)
        self.count += 1
        if self.count == 100:
            return None
        return self.count

    def __aiter__(self):
        return self

    async def __anext__(self):
        val = await self.readline()
        if val == None:
            raise StopAsyncIteration
        return val


async def func():
    # 创建异步可迭代对象
    async_iter = Reader()
    # async for 必须要放在async def函数内,否则语法错误。
    async for item in async_iter:
        print(item)

asyncio.run(func())
异步迭代器其实没什么太大的作用,只是支持了async for语法而已。
异步上下文管理器(常用)
此种对象通过定义 __aenter__() 和 __aexit__() 方法来对 async with 语句中的环境进行控制。由 PEP 492 引入。
import asyncio


class AsyncContextManager:
	def __init__(self):
        self.conn = conn

    async def do_something(self):
        # 异步操作数据库
        return 666

    async def __aenter__(self):
        # 异步链接数据库
        self.conn = await asyncio.sleep(1)
        return self

    async def __aexit__(self, exc_type, exc, tb):
        # 异步关闭数据库链接
		await asyncio.sleep(1)


async def func():
	# async with 不能单独使用,必须在async函数内调用
    async with AsyncContextManager() as f:
        result = await f.do_something()
        print(result)


asyncio.run(func())
这个异步的上下文管理器还是比较有用的,平时在开发过程中 打开、处理、关闭 操作时,就可以用这种方式来处理。
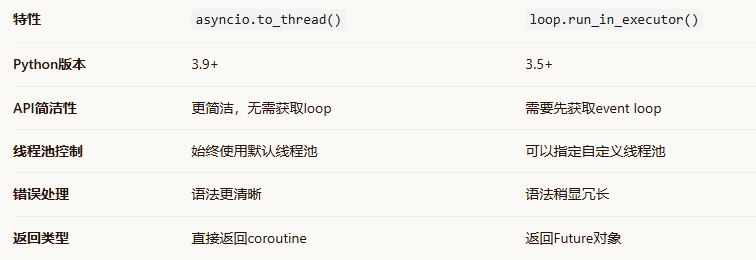
to_thread(python3.9+)
- 作用:将同步阻塞 I/O 函数(如 time.sleep、requests.get、pymysql旧库)丢到线程池中运行,解放事件循环线程。
- 它是run_in_executor的语法糖
import asyncio
import time

# 一个同步的阻塞函数
def blocking_io_task(name, duration):
    print(f"{name}: 开始执行,将阻塞 {duration} 秒")
    time.sleep(duration)  # 模拟I/O阻塞
    print(f"{name}: 执行完成")
    return f"{name}的结果"

async def main():
    # 使用to_thread在单独的线程中运行阻塞函数
    task1 = asyncio.to_thread(blocking_io_task, "任务1", 2)
    task2 = asyncio.to_thread(blocking_io_task, "任务2", 1)

    # 并发执行
    results = await asyncio.gather(task1, task2)
    print(f"结果: {results}")

# 运行
asyncio.run(main())
与run_in_executor的区别
import asyncio
import concurrent.futures
from functools import partial

def compute_intensive_task(x, y):
    # 模拟计算密集型任务
    result = 0
    for i in range(x, y):
        result += i
    return result

async def thread_pool_comparison():
    # 使用to_thread - 自动使用默认线程池
    tasks_to_thread = []
    for i in range(3):
        task = asyncio.to_thread(compute_intensive_task, i*1000, (i+1)*1000)
        tasks_to_thread.append(task)

    # 使用run_in_executor - 可以自定义线程池
    loop = asyncio.get_running_loop()

    # 创建自定义线程池
    custom_pool = concurrent.futures.ThreadPoolExecutor(
        max_workers=2,
        thread_name_prefix="CustomThread"
    )

    tasks_run_in_executor = []
    for i in range(3, 6):
        task = loop.run_in_executor(
            custom_pool,
            partial(compute_intensive_task, i*1000, (i+1)*1000)
        )
        tasks_run_in_executor.append(task)

    # 并发执行
    results1 = await asyncio.gather(*tasks_to_thread)
    results2 = await asyncio.gather(*tasks_run_in_executor)

    print(f"to_thread结果: {sum(results1)}")
    print(f"run_in_executor结果: {sum(results2)}")

    # 清理自定义线程池
    custom_pool.shutdown(wait=True)
场景
对于CPU密集型阻塞(如复杂计算、图像处理、非线程安全的C++库):
-
方案:使用 loop.run_in_executor()配合 ProcessPoolExecutor,将调用丢到进程池。
-
原理:每个进程有独立的 Python 解释器和内存空间,彻底绕过 GIL,实现真正的并行计算。
import asyncio
import time
from concurrent.futures import ThreadPoolExecutor, ProcessPoolExecutor

# 1. 模拟一个同步的、耗时的I/O操作(如旧版requests.get)
def blocking_io(url):
    time.sleep(2)  # 模拟网络I/O等待
    return f"Data from {url}"

# 2. 模拟一个CPU密集型计算
def cpu_bound_task(n):
    return sum(i * i for i in range(n))  # 纯计算,无I/O

async def main():
    loop = asyncio.get_event_loop()

    # 场景A:调用同步I/O函数,用线程池
    print("处理I/O阻塞...")
    # 方法1 (Python 3.9+): 使用默认线程池
    result_io = await asyncio.to_thread(blocking_io, "http://example.com")
    print(result_io)

    # 方法2: 使用自定义线程池(可控制大小)
    with ThreadPoolExecutor(max_workers=5) as thread_pool:
        result_io2 = await loop.run_in_executor(thread_pool, blocking_io, "http://test.com")
        print(result_io2)

    # 场景B:调用CPU密集型函数,用进程池
    print("处理CPU计算...")
    with ProcessPoolExecutor() as process_pool:
        result_cpu = await loop.run_in_executor(process_pool, cpu_bound_task, 10**7)
        print(f"CPU计算结果长度: {len(str(result_cpu))}")

# 运行
asyncio.run(main())

AtomGit 是由开放原子开源基金会联合 CSDN 等生态伙伴共同推出的新一代开源与人工智能协作平台。平台坚持“开放、中立、公益”的理念,把代码托管、模型共享、数据集托管、智能体开发体验和算力服务整合在一起,为开发者提供从开发、训练到部署的一站式体验。
更多推荐

 5
5 0
0- 0


 已为社区贡献1条内容

所有评论(0)