YOLOv26 + Miniconda + VOC2012 训练全流程
一、安装 Miniconda(环境基础)
1. 下载 Miniconda
官方直链(选对应系统):
-
Windows: https://repo.anaconda.com/miniconda/Miniconda3-latest-Windows-x86_64.exe
-
Linux: https://repo.anaconda.com/miniconda/Miniconda3-latest-Linux-x86_64.sh
-
MacOS: https://repo.anaconda.com/miniconda/Miniconda3-latest-MacOSX-x86_64.sh
如果下载速度慢,可以使用清华大学开源软件镜像站
清华大学开源软件镜像站 https://mirrors.tuna.tsinghua.edu.cn/
2. 安装
-
Windows:双击 exe,全程默认下一步,最后勾选「Add Miniconda3 to my PATH environment variable」
-
Linux/Mac:终端执行
bash 下载的 *.sh文件,全程回车 + 输入 yes(*表示下载的Miniconda文件名)
bash *.sh二、拉取 YOLOv26 源码
1. 新建文件夹(任意位置),打开终端(Windows 用 CMD/PowerShell)
2. 克隆代码(git 命令)
git clone https://github.com/wangxinlong9/YOLOv26.git
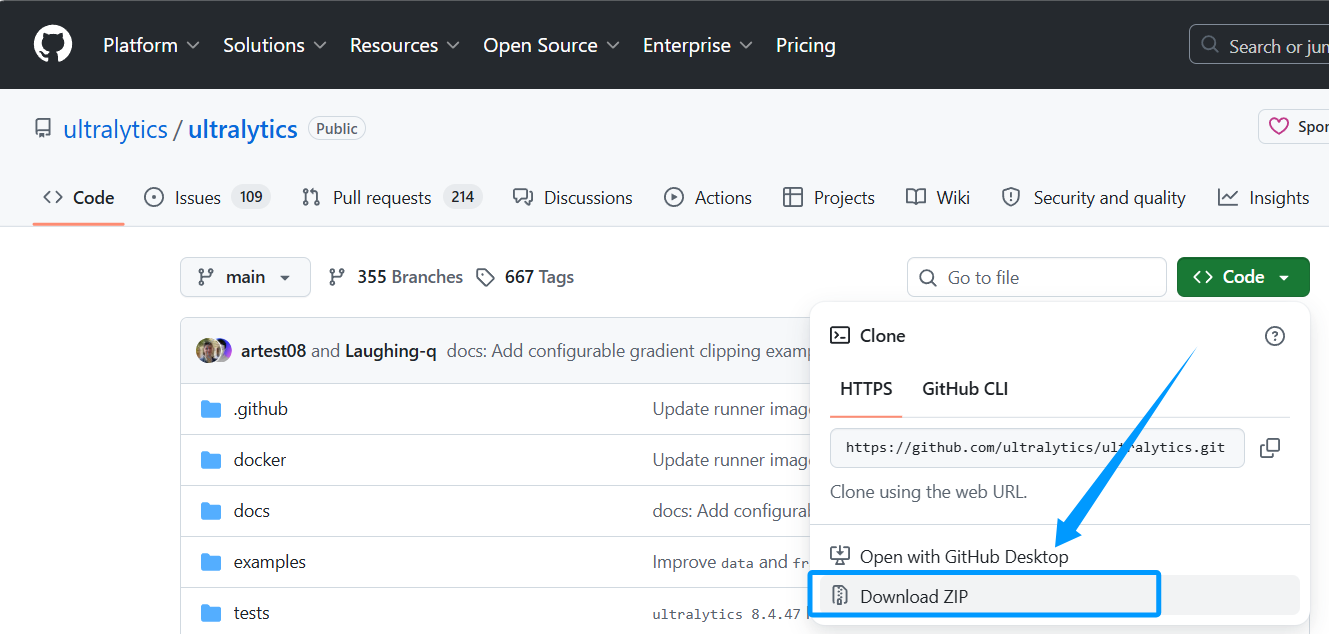
如果下载速度慢,可以在github下载YOLOv26 源码
GitHub - YOLO 🚀https://github.com/ultralytics/ultralytics
三、配置 Conda 虚拟环境
1. 创建环境
conda create -n yolov26 python=3.10 -y
2. 激活环境
conda activate yolov26
✅ 终端前缀出现 (yolov26) 说明激活成功
四、安装项目依赖
1. 安装基础依赖
# pyproject.toml 使用配置文件下载所需依赖包
pip install -e .
2. 安装 PyTorch(CPU/GPU 通用)
# CPU版本(无显卡用这个) pip install torch torchvision torchaudio # GPU版本(有NVIDIA显卡用这个) pip install torch torchvision torchaudio --index-url https://download.pytorch.org/whl/cu118
五、获取 VOC2012 数据集(官方直链)
1. 下载数据集
仅需下载 1 个主文件(训练 + 验证集): 官方直链:http://host.robots.ox.ac.uk/pascal/VOC/voc2012/VOCtrainval_11-May-2012.tarhttp://host.robots.ox.ac.uk/pascal/VOC/voc2012/VOCtrainval_11-May-2012.tar
2. 解压数据集
-
Windows:右键解压到
YOLOv26/datasets/目录下 -
Linux:终端执行(先把下载的 tar 放到 datasets 文件夹)
cd datasets
tar -xvf VOCtrainval_11-May-2012.tar
3. 最终路径
确保路径为:YOLOv26/datasets/VOCdevkit/(VOC2012 文件夹在里面)
六、VOC 数据集 XML 标注转换为YOLO 格式 TXT 标注
import os
import xml.etree.ElementTree as ET
from tqdm import tqdm
from PIL import Image  # 统一放在顶部,更规范

# ====================== 配置项(你只需要改这里)=====================
VOC_CLASSES_FILE = "voc_classes.txt"      # VOC类别名称文件(输入)
CLASS_MAP_SAVE_FILE = "class_names.txt"   # 类别名→编号映射(输出,YOLO用)
VOC_ANNOTATIONS_DIR = "VOC2012/Annotations"  # XML标注文件夹
VOC_IMAGES_DIR = "train_data/images"          # 图片文件夹
YOLO_LABELS_SAVE_DIR = "train_data/labels"    # 输出YOLO标签路径
# ====================================================================

# 读取类别文件,生成 {类别名: 编号} 映射
def read_classes(classes_path):
    with open(classes_path, 'r', encoding='utf-8') as f:
        class_names = f.read().strip().split()
    return {name: idx for idx, name in enumerate(class_names)}

# 保存 类别编号+名称 映射文件
def save_class_map(class_map, save_path):
    with open(save_path, 'w', encoding='utf-8') as f:
        # 按编号排序,保证顺序正确
        sorted_classes = sorted(class_map.items(), key=lambda x: x[1])
        for cls_name, cls_id in sorted_classes:
            f.write(f"{cls_id} {cls_name}\n")
    print(f"类别映射已保存到:{save_path}")

# 单张 XML 转 YOLO 格式(坐标归一化)
def convert_xml2yolo(xml_path, class_map, img_w, img_h):
    tree = ET.parse(xml_path)
    root = tree.getroot()
    yolo_lines = []

    for obj in root.iter('object'):
        # 获取类别名称
        cls_name = obj.find('name').text.strip()
        if cls_name not in class_map:
            continue
        cls_id = class_map[cls_name]

        # 获取标注框坐标
        bndbox = obj.find('bndbox')
        xmin = float(bndbox.find('xmin').text)
        ymin = float(bndbox.find('ymin').text)
        xmax = float(bndbox.find('xmax').text)
        ymax = float(bndbox.find('ymax').text)

        # VOC坐标 → YOLO归一化中心坐标
        dw = 1.0 / img_w
        dh = 1.0 / img_h
        x = (xmin + xmax) / 2.0 * dw  # 中心x
        y = (ymin + ymax) / 2.0 * dh  # 中心y
        w = (xmax - xmin) * dw        # 宽度
        h = (ymax - ymin) * dh        # 高度

        # 标准YOLO格式:类别id x y w h(保留6位小数)
        yolo_lines.append(f"{cls_id} {x:.6f} {y:.6f} {w:.6f} {h:.6f}")

    return yolo_lines

# 批量转换所有XML
def batch_convert():
    # 创建输出文件夹
    os.makedirs(YOLO_LABELS_SAVE_DIR, exist_ok=True)
    # 读取类别映射
    class_map = read_classes(VOC_CLASSES_FILE)

    # 保存类别映射文件
    save_class_map(class_map, CLASS_MAP_SAVE_FILE)

    # 获取所有XML文件
    xml_files = [f for f in os.listdir(VOC_ANNOTATIONS_DIR) if f.endswith('.xml')]

    print(f"找到 {len(xml_files)} 个XML标注,开始转换...")

    for xml_file in tqdm(xml_files, desc="转换进度"):
        # 匹配对应图片(XML文件名 = 图片文件名)
        img_name = xml_file.replace('.xml', '.jpg')
        img_path = os.path.join(VOC_IMAGES_DIR, img_name)

        # 无对应图片则跳过
        if not os.path.exists(img_path):
            continue

        # 获取图片宽高
        with Image.open(img_path) as img:
            img_w, img_h = img.size

        # 转换标注
        xml_path = os.path.join(VOC_ANNOTATIONS_DIR, xml_file)
        label_lines = convert_xml2yolo(xml_path, class_map, img_w, img_h)

        # 保存YOLO格式txt标签
        txt_save_path = os.path.join(YOLO_LABELS_SAVE_DIR, xml_file.replace('.xml', '.txt'))
        with open(txt_save_path, 'w', encoding='utf-8') as f:
            f.write('\n'.join(label_lines))

    print(f"全部转换完成!YOLO标签已保存到:{YOLO_LABELS_SAVE_DIR}")

if __name__ == "__main__":
    batch_convert()
# voc_classes.txt
aeroplane
bicycle
bird
boat
bottle
bus
car
cat
chair
cow
diningtable
dog
horse
motorbike
person
pottedplant
sheep
sofa
train
tvmonitor# class_names.txt
0 aeroplane
1 bicycle
2 bird
3 boat
4 bottle
5 bus
6 car
7 cat
8 chair
9 cow
10 diningtable
11 dog
12 horse
13 motorbike
14 person
15 pottedplant
16 sheep
17 sofa
18 train
19 tvmonitor
七、修改YOLO配置文件
# data.yaml
path: datasets # dataset root dir
train: train_data/train_yolo.txt
val: train_data/val_yolo.txt

# Classes
names:
  0: aeroplane
  1: bicycle
  2: bird
  3: boat
  4: bottle
  5: bus
  6: car
  7: cat
  8: chair
  9: cow
  10: diningtable
  11: dog
  12: horse
  13: motorbike
  14: person
  15: pottedplant
  16: sheep
  17: sofa
  18: train
  19: tvmonitor
# train.py
from ultralytics import YOLO
# Load a COCO-pretrained YOLO26n model
model = YOLO("yolo26n.pt")
# Train the model on the COCO8 example dataset for 100 epochs
results = model.train(data="./datasets/data.yaml", epochs=100,batch=64)参数说明(无需修改,仅参考)
-
-data:指定 VOC2012 配置文件 -
batch-size:根据显卡显存调整 -
epochs=100:训练轮次
八、开始训练 VOC2012
基础训练命令
python train.py
训练完成后,权重和日志保存在: runs/train/exp/ 文件夹下
-
最佳权重:
best.pt -
训练日志 / 可视化图表:自动生成

AtomGit 是由开放原子开源基金会联合 CSDN 等生态伙伴共同推出的新一代开源与人工智能协作平台。平台坚持“开放、中立、公益”的理念,把代码托管、模型共享、数据集托管、智能体开发体验和算力服务整合在一起,为开发者提供从开发、训练到部署的一站式体验。
更多推荐



 7
7 0
0- 0


 已为社区贡献1条内容

所有评论(0)