重头开始看NAV2文档(二)——里程计
本文参考中文文档NAV2 文档,英文原版NAV2 documentation
程计负责odom到底盘base_link的TF
在NAV2中还需要发布nav_msgs/Odometry类型的消息提供机器人的位姿和速度
该类型具体信息可见common_interfaces/nav_msgs/msg/Odometry.msg at humble
# This represents estimates of position and velocity in free space.
# The pose in this message should be specified in the coordinate frame given by header.frame_id
# The twist in this message should be specified in the coordinate frame given by the child_frame_id

# Includes the frame id of the pose parent.
std_msgs/Header header    #就时间戳有用

# Frame id the pose is pointing at. The twist is in this coordinate frame.
string child_frame_id

# Estimated pose that is typically relative to a fixed world frame.
geometry_msgs/PoseWithCovariance pose    #提供机器人相对于header.frame_id指定坐标系的位置和方向

# Estimated linear and angular velocity relative to child_frame_id.
geometry_msgs/TwistWithCovariance twist    # xyz和四元数
在Gazebo中模拟URDF模型必须保证模型中有inertia元素
一、在上节的URDF代码中添加IMU
上节链接重头开始看NAV2文档(一)——URDF-CSDN博客
(不想一步一步改可以跳到后面有完整代码)
将下面的代码添加到上节代码最后一行</robot>之前
<link name="imu_link">
  <visual>        <!-- 视觉 -->
    <geometry>
      <box size="0.1 0.1 0.1"/>
    </geometry>
  </visual>

  <collision>    <!-- 碰撞 -->
    <geometry>
      <box size="0.1 0.1 0.1"/>
    </geometry>
  </collision>

  <xacro:box_inertia m="0.1" w="0.1" d="0.1" h="0.1"/>    <!-- 惯性 -->
</link>

<joint name="imu_joint" type="fixed">    <!-- 关节连接 -->
  <parent link="base_link"/>
  <child link="imu_link"/>
  <origin xyz="0 0 0.01"/>
</joint>

 <gazebo reference="imu_link">
  <sensor name="imu_sensor" type="imu">
   <plugin filename="libgazebo_ros_imu_sensor.so" name="imu_plugin">
      <ros>
        <namespace>/demo</namespace>
        <remapping>~/out:=imu</remapping>
      </ros>
      <initial_orientation_as_reference>false</initial_orientation_as_reference>
    </plugin>
    <always_on>true</always_on>
    <update_rate>100</update_rate>
    <visualize>true</visualize>
    <imu>
      <angular_velocity>
        <x>
          <noise type="gaussian">
            <mean>0.0</mean>
            <stddev>2e-4</stddev>
            <bias_mean>0.0000075</bias_mean>
            <bias_stddev>0.0000008</bias_stddev>
          </noise>
        </x>
        <y>
          <noise type="gaussian">
            <mean>0.0</mean>
            <stddev>2e-4</stddev>
            <bias_mean>0.0000075</bias_mean>
            <bias_stddev>0.0000008</bias_stddev>
          </noise>
        </y>
        <z>
          <noise type="gaussian">
            <mean>0.0</mean>
            <stddev>2e-4</stddev>
            <bias_mean>0.0000075</bias_mean>
            <bias_stddev>0.0000008</bias_stddev>
          </noise>
        </z>
      </angular_velocity>
      <linear_acceleration>
        <x>
          <noise type="gaussian">
            <mean>0.0</mean>
            <stddev>1.7e-2</stddev>
            <bias_mean>0.1</bias_mean>
            <bias_stddev>0.001</bias_stddev>
          </noise>
        </x>
        <y>
          <noise type="gaussian">
            <mean>0.0</mean>
            <stddev>1.7e-2</stddev>
            <bias_mean>0.1</bias_mean>
            <bias_stddev>0.001</bias_stddev>
          </noise>
        </y>
        <z>
          <noise type="gaussian">
            <mean>0.0</mean>
            <stddev>1.7e-2</stddev>
            <bias_mean>0.1</bias_mean>
            <bias_stddev>0.001</bias_stddev>
          </noise>
        </z>
      </linear_acceleration>
    </imu>
  </sensor>
</gazebo>
差分驱动模型插件
下面这段代码放到上面代码</gazebo>之后,</robot>之前
<gazebo>
  <plugin name='diff_drive' filename='libgazebo_ros_diff_drive.so'>
    <ros>
      <namespace>/demo</namespace>
    </ros>

    <!-- wheels -->
    <left_joint>drivewhl_l_joint</left_joint>
    <right_joint>drivewhl_r_joint</right_joint>

    <!-- kinematics -->
    <wheel_separation>0.4</wheel_separation>
    <wheel_diameter>0.2</wheel_diameter>

    <!-- limits -->
    <max_wheel_torque>20</max_wheel_torque>
    <max_wheel_acceleration>1.0</max_wheel_acceleration>

    <!-- output -->
    <publish_odom>true</publish_odom>
    <publish_odom_tf>false</publish_odom_tf>
    <publish_wheel_tf>true</publish_wheel_tf>

    <odometry_frame>odom</odometry_frame>
    <robot_base_frame>base_link</robot_base_frame>
  </plugin>
</gazebo>
完整代码如下:
<?xml version="1.0"?>
<robot name="sam_bot" xmlns:xacro="http://ros.org/wiki/xacro">

  <!-- Define robot constants -->
  <xacro:property name="base_width" value="0.31"/>  <!-- 底盘宽 -->
  <xacro:property name="base_length" value="0.42"/> <!-- 底盘长 -->
  <xacro:property name="base_height" value="0.18"/> <!-- 底盘高 -->

  <xacro:property name="wheel_radius" value="0.10"/><!-- 轮子半径 -->
  <xacro:property name="wheel_width" value="0.04"/> <!-- 轮子宽度 -->
  <xacro:property name="wheel_ygap" value="0.025"/> <!-- 轮子和底盘y轴的间距 -->
  <xacro:property name="wheel_zoff" value="0.05"/>  <!-- 定位后轮到z轴 -->
  <xacro:property name="wheel_xoff" value="0.12"/>  <!-- 定位后轮到x轴 -->

  <xacro:property name="caster_xoff" value="0.14"/> <!-- 定位前轮到x轴 -->

  <!-- Define intertial property macros  -->
  <xacro:macro name="box_inertia" params="m w h d">    <!-- 定义矩形盒子的惯性 -->
    <inertial>                                         <!-- m惯性 w宽度 h高度 d深度 -->
      <origin xyz="0 0 0" rpy="${pi/2} 0 ${pi/2}"/>
      <mass value="${m}"/>
      <inertia ixx="${(m/12) * (h*h + d*d)}" ixy="0.0" ixz="0.0" iyy="${(m/12) * (w*w + d*d)}" iyz="0.0" izz="${(m/12) * (w*w + h*h)}"/>        <!-- 惯性矩阵 -->
    </inertial>
  </xacro:macro>

  <xacro:macro name="cylinder_inertia" params="m r h">    <!-- 定义圆柱体的惯性 -->
    <inertial>
      <origin xyz="0 0 0" rpy="${pi/2} 0 0" />
      <mass value="${m}"/>
      <inertia ixx="${(m/12) * (3*r*r + h*h)}" ixy = "0" ixz = "0" iyy="${(m/12) * (3*r*r + h*h)}" iyz = "0" izz="${(m/2) * (r*r)}"/>
    </inertial>
  </xacro:macro>

  <xacro:macro name="sphere_inertia" params="m r">        <!-- 定义球体的惯性 -->
    <inertial>
      <mass value="${m}"/>
      <inertia ixx="${(2/5) * m * (r*r)}" ixy="0.0" ixz="0.0" iyy="${(2/5) * m * (r*r)}" iyz="0.0" izz="${(2/5) * m * (r*r)}"/>
    </inertial>
  </xacro:macro>

  <!-- Robot Base -->
  <link name="base_link">
    <visual>    <!-- 在visual中的参数只有视觉效果,没有物理属性 -->
      <geometry>
        <box size="${base_length} ${base_width} ${base_height}"/>
      </geometry>
      <material name="Cyan">
        <color rgba="0 1.0 1.0 1.0"/>    <!-- 颜色 -->
      </material>
    </visual>

    <collision>
      <geometry>
        <box size="${base_length} ${base_width} ${base_height}"/>
      </geometry>
    </collision>

    <xacro:box_inertia m="15" w="${base_width}" d="${base_length}" h="${base_height}"/>
  </link>

  <xacro:box_inertia m="15" w="${base_width}" d="${base_length}" h="${base_height}"/>

  <!-- Robot Footprint -->
  <link name="base_footprint"/>
  <joint name="base_joint" type="fixed"> <!-- fixed将base_joint固定在base_link上 -->
    <parent link="base_link"/>        <!-- 父 -->
    <child link="base_footprint"/>    <!-- 子。子固定在父上面-->
    <origin xyz="0.0 0.0 ${-(wheel_radius+wheel_zoff)}" rpy="0 0 0"/>  <!-- 父与子之间的xyz位移和旋转 -->
  </joint>

  <!-- Wheels -->
  <xacro:macro name="wheel" params="prefix x_reflect y_reflect">  <!-- prefix为关节名称添加前缀     x、y_prefix在x、y轴翻转轮子位置 -->
    <link name="${prefix}_link">
      <visual>
        <origin xyz="0 0 0" rpy="${pi/2} 0 0"/>
        <geometry>
            <cylinder radius="${wheel_radius}" length="${wheel_width}"/>
        </geometry>
        <material name="Gray">
          <color rgba="0.5 0.5 0.5 1.0"/>
        </material>
      </visual>

      <collision>
        <origin xyz="0 0 0" rpy="${pi/2} 0 0"/>
        <geometry>
          <cylinder radius="${wheel_radius}" length="${wheel_width}"/>
        </geometry>
      </collision>

      <xacro:cylinder_inertia m="0.5" r="${wheel_radius}" h="${wheel_width}"/>
    </link>

    <xacro:cylinder_inertia m="0.5" r="${wheel_radius}" h="${wheel_width}"/>

    <joint name="${prefix}_joint" type="continuous">  <!-- continuous允许不限角度的旋转 -->
      <parent link="base_link"/>
      <child link="${prefix}_link"/>
      <origin xyz="${x_reflect*wheel_xoff} ${y_reflect*(base_width/2+wheel_ygap)} ${-wheel_zoff}" rpy="0 0 0"/>   <!-- x、y_reflect控制轮子沿x、y轴进行翻转 -->
      <axis xyz="0 1 0"/>    <!-- 关节围绕y轴旋转 -->
    </joint>
  </xacro:macro>

  <xacro:wheel prefix="drivewhl_l" x_reflect="-1" y_reflect="1" />   <!-- 实例化 -->
  <xacro:wheel prefix="drivewhl_r" x_reflect="-1" y_reflect="-1" />

  <!-- Caster Wheel -->
  <link name="front_caster">
    <visual>
      <geometry>
        <sphere radius="${(wheel_radius+wheel_zoff-(base_height/2))}"/>
      </geometry>
      <material name="Cyan">
        <color rgba="0 1.0 1.0 1.0"/>
      </material>
    </visual>

    <collision>
      <origin xyz="0 0 0" rpy="0 0 0"/>
      <geometry>
        <sphere radius="${(wheel_radius+wheel_zoff-(base_height/2))}"/>
      </geometry>
    </collision>

    <xacro:sphere_inertia m="0.5" r="${(wheel_radius+wheel_zoff-(base_height/2))}"/>
  </link>

  <joint name="caster_joint" type="fixed">
    <parent link="base_link"/>
    <child link="front_caster"/>
    <origin xyz="${caster_xoff} 0.0 ${-(base_height/2)}" rpy="0 0 0"/>
  </joint>

<link name="imu_link">
  <visual>        <!-- 视觉 -->
    <geometry>
      <box size="0.1 0.1 0.1"/>
    </geometry>
  </visual>

  <collision>    <!-- 碰撞 -->
    <geometry>
      <box size="0.1 0.1 0.1"/>
    </geometry>
  </collision>

  <xacro:box_inertia m="0.1" w="0.1" d="0.1" h="0.1"/>    <!-- 惯性 -->
</link>

<joint name="imu_joint" type="fixed">    <!-- 关节连接 -->
  <parent link="base_link"/>
  <child link="imu_link"/>
  <origin xyz="0 0 0.01"/>
</joint>

 <gazebo reference="imu_link">
  <sensor name="imu_sensor" type="imu">
   <plugin filename="libgazebo_ros_imu_sensor.so" name="imu_plugin">
      <ros>
        <namespace>/demo</namespace>
        <remapping>~/out:=imu</remapping>
      </ros>
      <initial_orientation_as_reference>false</initial_orientation_as_reference>
    </plugin>
    <always_on>true</always_on>
    <update_rate>100</update_rate>
    <visualize>true</visualize>
    <imu>
      <angular_velocity>
        <x>
          <noise type="gaussian">
            <mean>0.0</mean>
            <stddev>2e-4</stddev>
            <bias_mean>0.0000075</bias_mean>
            <bias_stddev>0.0000008</bias_stddev>
          </noise>
        </x>
        <y>
          <noise type="gaussian">
            <mean>0.0</mean>
            <stddev>2e-4</stddev>
            <bias_mean>0.0000075</bias_mean>
            <bias_stddev>0.0000008</bias_stddev>
          </noise>
        </y>
        <z>
          <noise type="gaussian">
            <mean>0.0</mean>
            <stddev>2e-4</stddev>
            <bias_mean>0.0000075</bias_mean>
            <bias_stddev>0.0000008</bias_stddev>
          </noise>
        </z>
      </angular_velocity>
      <linear_acceleration>
        <x>
          <noise type="gaussian">
            <mean>0.0</mean>
            <stddev>1.7e-2</stddev>
            <bias_mean>0.1</bias_mean>
            <bias_stddev>0.001</bias_stddev>
          </noise>
        </x>
        <y>
          <noise type="gaussian">
            <mean>0.0</mean>
            <stddev>1.7e-2</stddev>
            <bias_mean>0.1</bias_mean>
            <bias_stddev>0.001</bias_stddev>
          </noise>
        </y>
        <z>
          <noise type="gaussian">
            <mean>0.0</mean>
            <stddev>1.7e-2</stddev>
            <bias_mean>0.1</bias_mean>
            <bias_stddev>0.001</bias_stddev>
          </noise>
        </z>
      </linear_acceleration>
    </imu>
  </sensor>
</gazebo>

<gazebo>
  <plugin name='diff_drive' filename='libgazebo_ros_diff_drive.so'>
    <ros>
      <namespace>/demo</namespace>
    </ros>

    <!-- wheels -->
    <left_joint>drivewhl_l_joint</left_joint>
    <right_joint>drivewhl_r_joint</right_joint>

    <!-- kinematics -->
    <wheel_separation>0.4</wheel_separation>
    <wheel_diameter>0.2</wheel_diameter>

    <!-- limits -->
    <max_wheel_torque>20</max_wheel_torque>
    <max_wheel_acceleration>1.0</max_wheel_acceleration>

    <!-- output -->
    <publish_odom>true</publish_odom>
    <publish_odom_tf>false</publish_odom_tf>
    <publish_wheel_tf>true</publish_wheel_tf>

    <odometry_frame>odom</odometry_frame>
    <robot_base_frame>base_link</robot_base_frame>
  </plugin>
</gazebo>

</robot>
二、增加gazebo
1.编辑launch
(不想一步一步改直接跳到后面有完整代码)
删掉下面这段代码移除关节状态发布器的GUI(就是第一节中出来的那个控制轮胎的滑条框)
joint_state_publisher_gui_node = launch_ros.actions.Node(
  package='joint_state_publisher_gui',
  executable='joint_state_publisher_gui',
  name='joint_state_publisher_gui',
  condition=launch.conditions.IfCondition(LaunchConfiguration('gui'))
)
这个gui参数也删 :
DeclareLaunchArgument(name='gui', default_value='True',
description='Flag to enable joint_state_publisher_gui')删掉下面这段代码的最后一行:
joint_state_publisher_node = launch_ros.actions.Node(
  package='joint_state_publisher',
  executable='joint_state_publisher',
  name='joint_state_publisher',
  condition=launch.conditions.UnlessCondition(LaunchConfiguration('gui')) # Remove this line只删这行!!!!!!!!!!!!!!!!!
)
在return launch.LaunchDescription([这个块里面添加gazebo启动代码:
launch.actions.ExecuteProcess(cmd=['gazebo', '--verbose', '-s', 'libgazebo_ros_init.so', '-s', 'libgazebo_ros_factory.so'], output='screen'),在return launch.LaunchDescription([这行之前添加代码生成sam_bot:
spawn_entity = launch_ros.actions.Node(
  package='gazebo_ros',
  executable='spawn_entity.py',
  arguments=['-entity', 'sam_bot', '-topic', 'robot_description'],
  output='screen'
)
在倒数第二行的rviz_node前面添加:
joint_state_publisher_gui_node,完整launch.py代码:
import launch
from launch.substitutions import Command, LaunchConfiguration
import launch_ros
import os

def generate_launch_description():
    pkg_share = launch_ros.substitutions.FindPackageShare(package='sam_bot_description').find('sam_bot_description')
    default_model_path = os.path.join(pkg_share, 'src/description/sam_bot_description.urdf')
    default_rviz_config_path = os.path.join(pkg_share, 'rviz/urdf_config.rviz')

    robot_state_publisher_node = launch_ros.actions.Node(
        package='robot_state_publisher',
        executable='robot_state_publisher',
        parameters=[{'robot_description': Command(['xacro ', LaunchConfiguration('model')])}]
    )
    joint_state_publisher_node = launch_ros.actions.Node(
        package='joint_state_publisher',
        executable='joint_state_publisher',
        name='joint_state_publisher',
    )
    rviz_node = launch_ros.actions.Node(
        package='rviz2',
        executable='rviz2',
        name='rviz2',
        output='screen',
        arguments=['-d', LaunchConfiguration('rvizconfig')],
    )

    spawn_entity = launch_ros.actions.Node(
        package='gazebo_ros',
        executable='spawn_entity.py',
        arguments=['-entity', 'sam_bot', '-topic', 'robot_description'],
        output='screen'
    )

    return launch.LaunchDescription([
        launch.actions.DeclareLaunchArgument(name='model', default_value=default_model_path,
                                            description='Absolute path to robot urdf file'),
        launch.actions.DeclareLaunchArgument(name='rvizconfig', default_value=default_rviz_config_path,
                                            description='Absolute path to rviz config file'),
        launch.actions.ExecuteProcess(cmd=['gazebo', '--verbose', '-s', 'libgazebo_ros_init.so', '-s',
                                           'libgazebo_ros_factory.so'], output='screen'),
        joint_state_publisher_node,
        robot_state_publisher_node,
        spawn_entity,
        rviz_node
    ])
2.编辑package.xml
删掉这行
<exec_depend>joint_state_publisher_gui</exec_depend>3.编译
保存,colcon,source,执行
ros2 launch sam_bot_description display.launch.py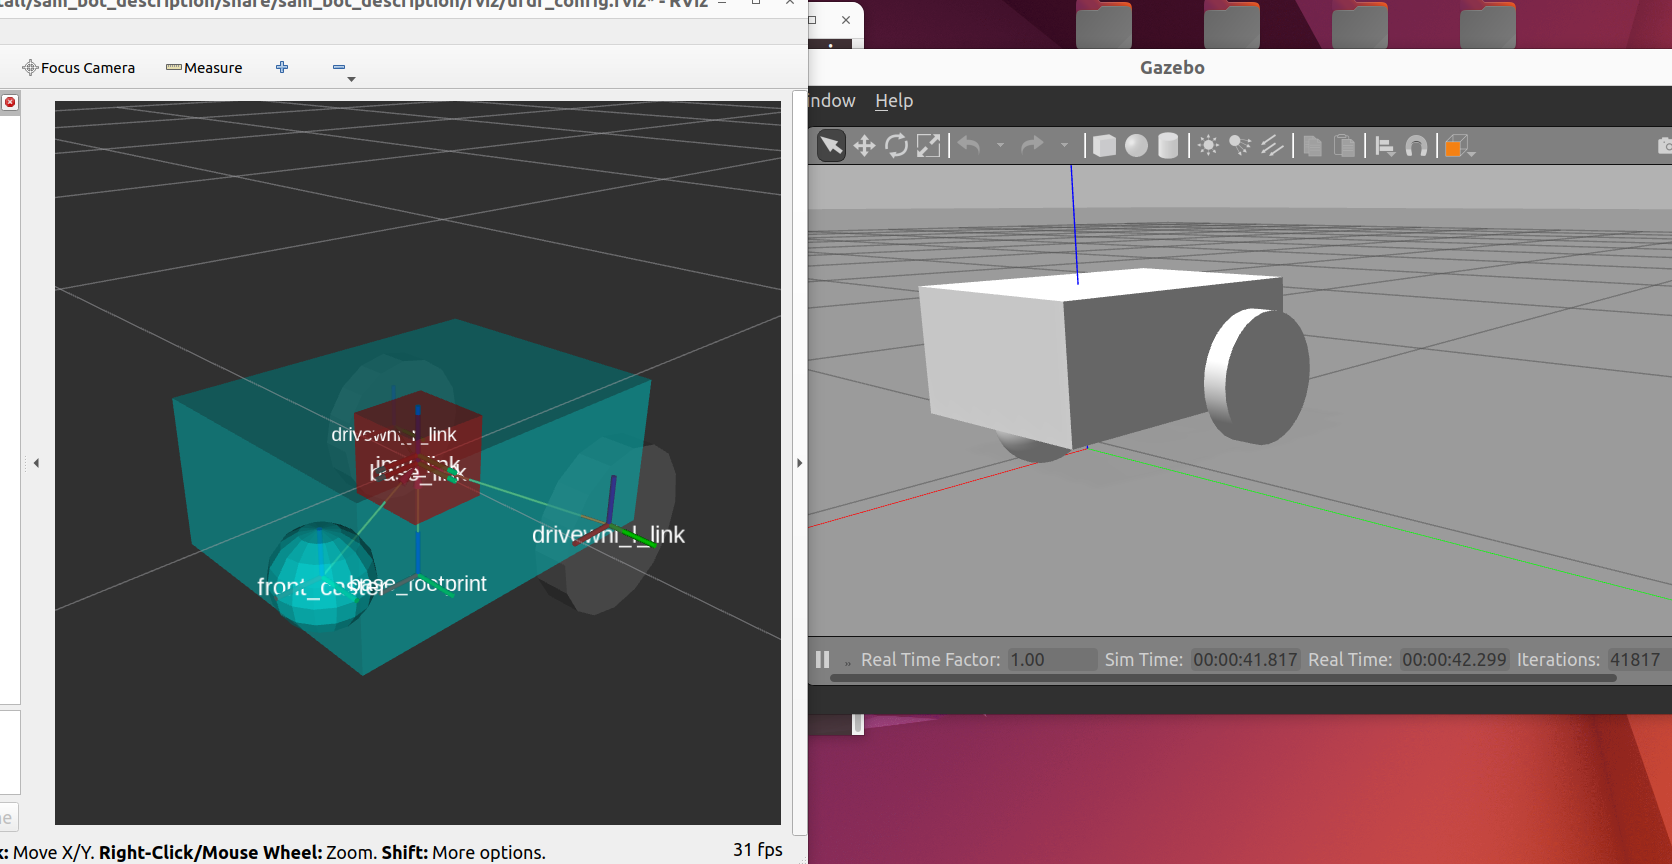
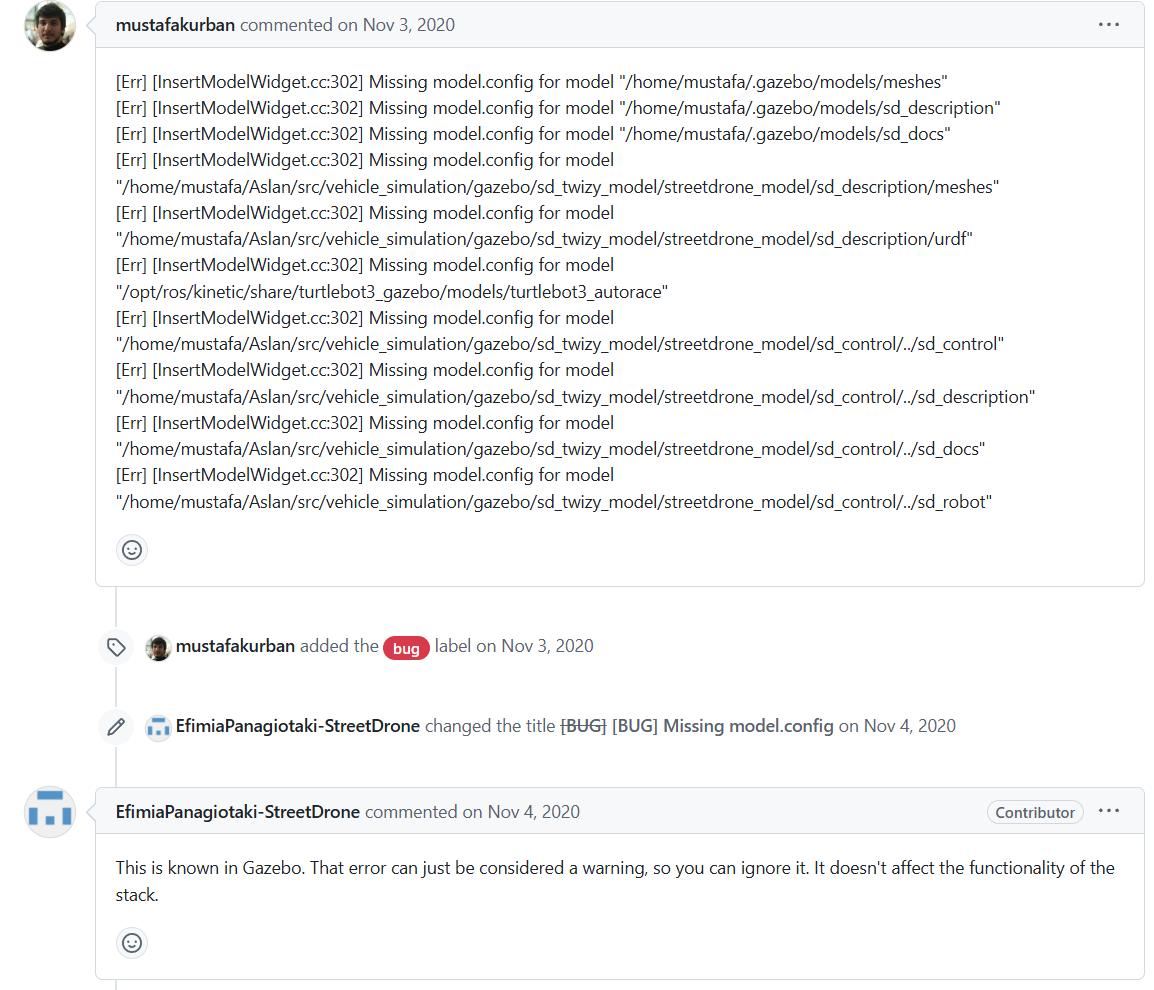
运行gazebo的时候可能会出现报错[Err] [InsertModelWidget.cc:302] Missing model.config for model,一片红,不用管,四年了似乎还没修好
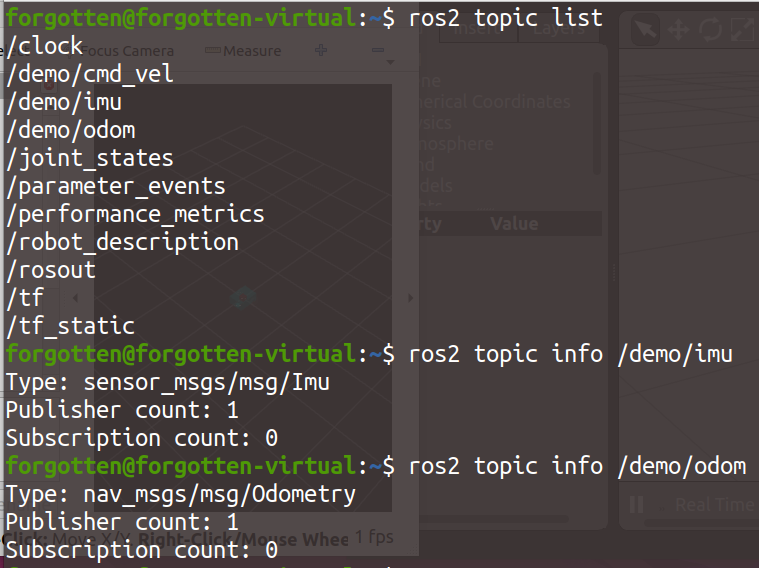
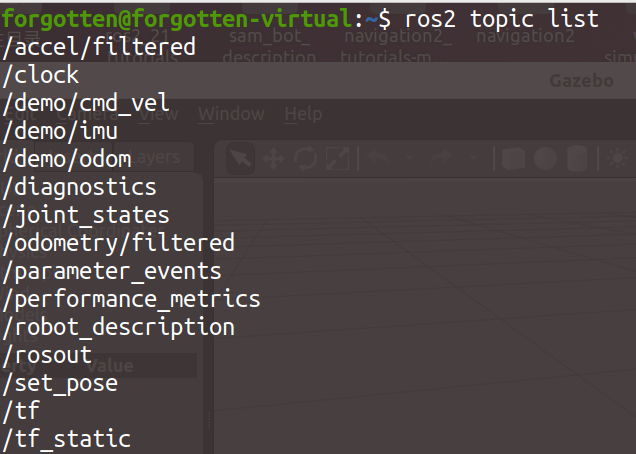
可以查看话题的信息:
三、使用odom和imu定位
定位将使用robot_localization包来融合多个传感器数据进行定位。下面使用刚才发布的话题/demo/Imu和话题/demo/odom进行融合定位。
1、安装robot_localization
sudo apt install ros-<ros2-distro>-robot-localization2、配置robot_localization
使用扩展卡尔曼滤波器ekf_node来融合里程计信息。
在sam_bot_description目录下新建文件夹config,在其中新建文件ekf.yaml,并写入代码:
### ekf config file ###
ekf_filter_node:
    ros__parameters:
# The frequency, in Hz, at which the filter will output a position estimate. Note that the filter will not begin
# computation until it receives at least one message from one of theinputs. It will then run continuously at the
# frequency specified here, regardless of whether it receives more measurements. Defaults to 30 if unspecified.
        frequency: 30.0

# ekf_localization_node and ukf_localization_node both use a 3D omnidirectional motion model. If this parameter is
# set to true, no 3D information will be used in your state estimate. Use this if you are operating in a planar
# environment and want to ignore the effect of small variations in the ground plane that might otherwise be detected
# by, for example, an IMU. Defaults to false if unspecified.
        two_d_mode: false

# Whether to publish the acceleration state. Defaults to false if unspecified.
        publish_acceleration: true

# Whether to broadcast the transformation over the /tf topic. Defaultsto true if unspecified.
        publish_tf: true

# 1. Set the map_frame, odom_frame, and base_link frames to the appropriate frame names for your system.
#     1a. If your system does not have a map_frame, just remove it, and make sure "world_frame" is set to the value of odom_frame.
# 2. If you are fusing continuous position data such as wheel encoder odometry, visual odometry, or IMU data, set "world_frame"
#    to your odom_frame value. This is the default behavior for robot_localization's state estimation nodes.
# 3. If you are fusing global absolute position data that is subject to discrete jumps (e.g., GPS or position updates from landmark
#    observations) then:
#     3a. Set your "world_frame" to your map_frame value
#     3b. MAKE SURE something else is generating the odom->base_link transform. Note that this can even be another state estimation node
#         from robot_localization! However, that instance should *not* fuse the global data.
        map_frame: map              # Defaults to "map" if unspecified
        odom_frame: odom            # Defaults to "odom" if unspecified
        base_link_frame: base_link  # Defaults to "base_link" ifunspecified
        world_frame: odom           # Defaults to the value of odom_frame if unspecified

        odom0: demo/odom
        odom0_config: [true,  true,  true,
                       false, false, false,
                       false, false, false,
                       false, false, true,
                       false, false, false]

        imu0: demo/imu
        imu0_config: [false, false, false,
                      true,  true,  true,
                      false, false, false,
                      false, false, false,
                      false, false, false]
本例子中,输入的话题有nav_msgs/Odometry和sensor_msgs/Imu,因此使用“odom0”和“imu0”。将“odom0”的值设置为“demo/odom”用来发布“nav_msgs/Odometry”;同理,“imu0”设置为“demo/imu”,发布“sensor_msgs/Imu”。
下面的XXX_config用于指定滤波器使用的传感器的值。参数的顺序是x、y、z、roll、pitch、yaw、vx、vy、vz、vroll、vpitch、vyaw、ax、ay、az。
在例子中,“odom0_config”中1,2,3,12为true,即滤波器只会使用“odom0”的x、y、z和vyaw的值。在“imu0_config”矩阵中只使用了滚转、俯仰和偏航。典型的移动机器人级别的IMU还会提供角速度和线性加速度。为了使``robot_localization``正常工作,你不应该融合彼此导出的多个字段。由于角速度已经融合到IMU内部以提供滚转、俯仰和偏航的估计值,因此我们不应该融合用于推导这些信息的角速度。此外,在没有使用非常高质量(且贵)的IMU时角速度通常具有较大的噪声,因此我们也不融合角速度。(这段我也没太懂,下面是英文原文)
    In the imu0_config matrix, you’ll notice that only roll, pitch, and yaw are used.
Typical mobile robot-grade IMUs will also provide angular velocities and linear
accelerations. For robot_localization to work properly, you should not fuse in
multiple fields that are derivative of each other. Since angular velocity is fused
internally to the IMU to provide the roll, pitch and yaw estimates, we should not
fuse in the angular velocities used to derive that information. We also do not fuse
in angular velocity due to the noisy characteristics it has when not using
exceptionally high quality (and expensive) IMUs.
3、编辑launch
将“ekf_node”添加到启动文件:
在return launch.LaunchDescription([这一行代码上面加上代码:
    robot_localization_node = launch_ros.actions.Node(
       package='robot_localization',
       executable='ekf_node',
       name='ekf_filter_node',
       output='screen',
       parameters=[os.path.join(pkg_share, 'config/ekf.yaml'), {'use_sim_time': LaunchConfiguration('use_sim_time')}]
    )
在return launch.LaunchDescription([的块中添加:
launch.actions.DeclareLaunchArgument(name='use_sim_time', default_value='True',
                                            description='Flag to enable use_sim_time'),
在最后的rviz_node上面添加:“robot_localization_node,”(记得逗号)
4、编辑package.xml
添加robot_localization依赖:
在package.xml中的</exec_depend>下面添加:
<exec_depend>robot_localization</exec_depend>5、编辑CMakeList
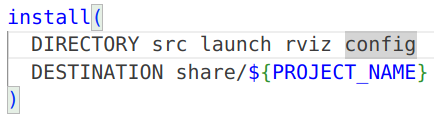
追加config目录:
在install里面的最后加上config
6、编译
保存,colcon,source,执行
ros2 launch sam_bot_description display.launch.py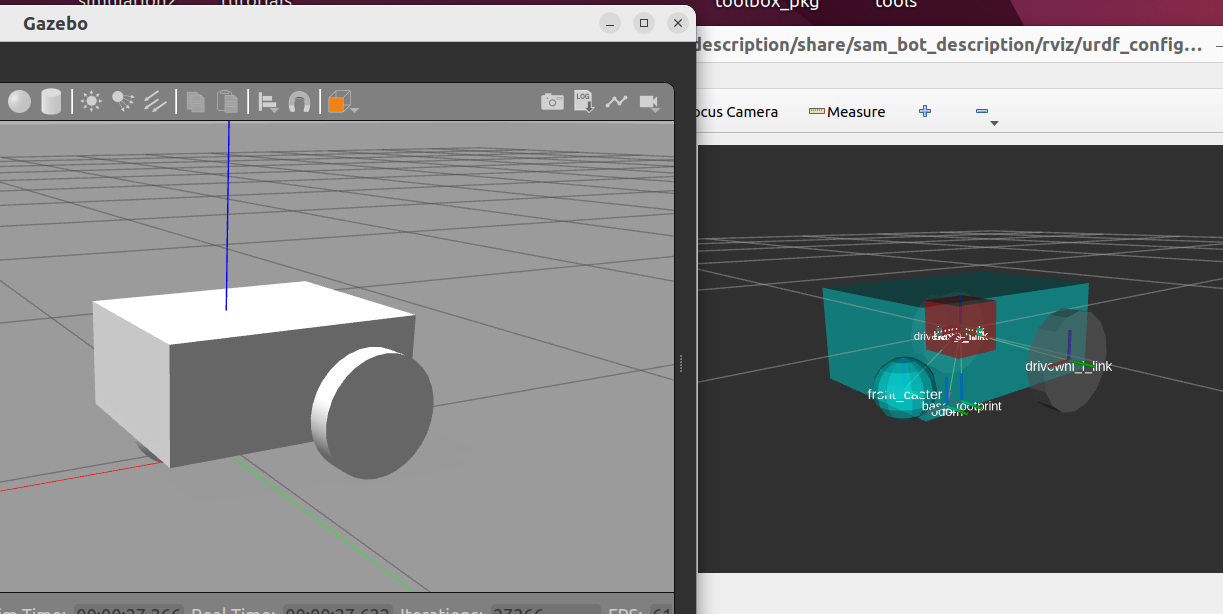
还是这个界面,主要看看有没有/odometry/filtered,/tf,/accel/filtered这三个话题
看看/ekf_filter_node的信息:
ros2 node info /ekf_filter_node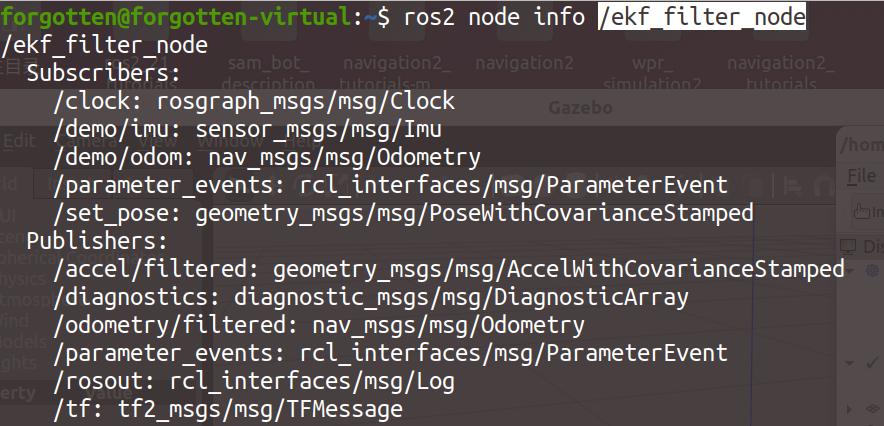
看到/ekf_filter_node订阅了/demo/odom和/demo/imu并发布/tf,/odometry/filtered,/accel/filtered
输入下面的指令看看有没有发布odom到base_link的变换:
ros2 run tf2_ros tf2_echo odom base_link四、各种问题
跑一遍一个问题,人给我整麻了
1、TF_OLD_DATA
如果你被TF_OLD_DATA ignoring data的WARNING刷屏了,我参考了这个文章ROS2学习遇到的问题1---TF_OLD_DATA,主要是将launch.py中的这行代码:
parameters=[os.path.join(pkg_share, 'config/ekf.yaml'), {'use_sim_time': LaunchConfiguration('use_sim_time')}]改成这样:
parameters=[os.path.join(pkg_share, 'config/ekf.yaml'), {'use_sim_time':True}]显式地告诉ROS使用仿真时间就能用了。
2024/10/25
后来单纯改这个use_sim_time又不行了,依旧是这个文章救了我狗命,修改差速轮的配置,将remap这一行去掉就可以了。
以后要是/cmd_vel有问题再改吧,麻了

AtomGit 是由开放原子开源基金会联合 CSDN 等生态伙伴共同推出的新一代开源与人工智能协作平台。平台坚持“开放、中立、公益”的理念,把代码托管、模型共享、数据集托管、智能体开发体验和算力服务整合在一起,为开发者提供从开发、训练到部署的一站式体验。
更多推荐

 35
35 0
0- 0


 已为社区贡献1条内容

所有评论(0)