Flutter框架开发鸿蒙项目——原生扩展(图像处理)
·
一、原生扩展概述
原生扩展(Native Extension)允许开发者在Flutter应用中调用平台原生代码,实现Flutter框架无法直接提供的功能。通过原生扩展,可以访问设备硬件、系统API和第三方SDK,极大扩展了Flutter的应用场景。
原生扩展类型
| 类型 | 实现语言 | 调用方式 | 性能 | 复杂度 |
|---|---|---|---|---|
| FFI(Foreign Function Interface) | C/C++/Rust | 直接调用函数 | 极高 | 中等 |
| Platform Channel | Java/Kotlin/Swift | 方法通道 | 较高 | 简单 |
| Native API | Dart Native | 原生API | 高 | 复杂 |
| Isolate通信 | Dart | Isolate消息 | 高 | 简单 |
应用场景
- 硬件访问:蓝牙、NFC、传感器
- 系统功能:文件系统、网络、通知
- 第三方SDK:支付、地图、社交分享
- 性能优化:图像处理、加密算法
- 遗留代码:集成现有的原生代码库
二、FFI原生扩展
1. FFI基本概念
FFI(Foreign Function Interface)是Dart调用原生C函数的接口,提供了高性能的跨语言调用能力。
2. FFI实现流程
3. FFI类型映射
| Dart类型 | C类型 | Rust类型 |
|---|---|---|
int |
int32_t |
i32 |
double |
double |
f64 |
Pointer<T> |
T* |
*mut T |
String |
char* |
*const c_char |
Array |
T[] |
[T; N] |
三、Platform Channel原生扩展
1. Platform Channel架构
┌─────────────────────────────────────┐
│     Flutter应用层 (Dart)          │
│  ┌──────────────────────────┐     │
│  │ MethodChannel            │     │
│  └──────────────────────────┘     │
└────────────┬───────────────────────┘
             │ 序列化/反序列化
┌────────────▼───────────────────────┐
│     Embedding层 (平台桥接)         │
│  ┌──────────────────────────┐     │
│  │ MessageCodec            │     │
│  └──────────────────────────┘     │
└────────────┬───────────────────────┘
             │
┌────────────▼───────────────────────┐
│     原生平台层                    │
│  ┌──────────┐  ┌──────────┐     │
│  │ Android  │  │   iOS    │     │
│  └──────────┘  └──────────┘     │
└─────────────────────────────────────┘
2. MethodChannel实现
// Flutter端
class NativeExtension {
  static const MethodChannel _channel =
      MethodChannel('com.example.native');

  static Future<String> getPlatformName() async {
    try {
      final String result = await _channel.invokeMethod('getPlatformName');
      return result;
    } on PlatformException catch (e) {
      throw Exception('Failed: ${e.message}');
    }
  }

  static Future<int> addNumbers(int a, int b) async {
    try {
      final int result = await _channel.invokeMethod('add', {
        'a': a,
        'b': b,
      });
      return result;
    } on PlatformException catch (e) {
      throw Exception('Failed: ${e.message}');
    }
  }
}
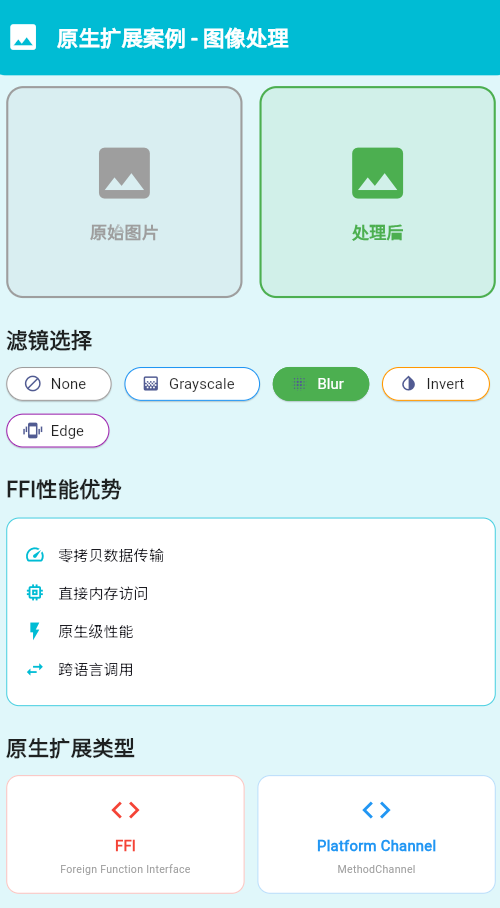
四、原生扩展案例:图像处理
案例介绍
本案例实现一个高性能的图像处理扩展,使用FFI调用C++原生代码进行图像滤镜处理。
实现步骤
1. 创建C++原生库
// native/src/image_filter.cpp
#include <stdint.h>
#include <string.h>

extern "C" {

// 图像结构体
typedef struct {
    uint8_t* data;
    int width;
    int height;
    int channels;
} Image;

// 创建图像
Image* create_image(int width, int height, int channels) {
    Image* image = new Image();
    image->width = width;
    image->height = height;
    image->channels = channels;
    image->data = new uint8_t[width * height * channels];
    return image;
}

// 释放图像
void free_image(Image* image) {
    if (image) {
        if (image->data) {
            delete[] image->data;
        }
        delete image;
    }
}

// 灰度滤镜
void apply_grayscale(Image* image) {
    if (!image || !image->data) return;

    uint8_t* data = image->data;
    int size = image->width * image->height * image->channels;

    for (int i = 0; i < size; i += image->channels) {
        uint8_t r = data[i];
        uint8_t g = data[i + 1];
        uint8_t b = data[i + 2];
        uint8_t gray = (uint8_t)(0.299 * r + 0.587 * g + 0.114 * b);
        data[i] = gray;
        data[i + 1] = gray;
        data[i + 2] = gray;
    }
}

// 模糊滤镜
void apply_blur(Image* image, int radius) {
    if (!image || !image->data || radius <= 0) return;

    int width = image->width;
    int height = image->height;
    int channels = image->channels;
    int size = width * height * channels;

    uint8_t* temp_data = new uint8_t[size];
    memcpy(temp_data, image->data, size);

    // 简化的模糊算法
    for (int y = radius; y < height - radius; y++) {
        for (int x = radius; x < width - radius; x++) {
            int r_sum = 0, g_sum = 0, b_sum = 0;
            int count = 0;

            for (int dy = -radius; dy <= radius; dy++) {
                for (int dx = -radius; dx <= radius; dx++) {
                    int idx = ((y + dy) * width + (x + dx)) * channels;
                    r_sum += temp_data[idx];
                    g_sum += temp_data[idx + 1];
                    b_sum += temp_data[idx + 2];
                    count++;
                }
            }

            int idx = (y * width + x) * channels;
            image->data[idx] = (uint8_t)(r_sum / count);
            image->data[idx + 1] = (uint8_t)(g_sum / count);
            image->data[idx + 2] = (uint8_t)(b_sum / count);
        }
    }

    delete[] temp_data;
}

// 反色滤镜
void apply_invert(Image* image) {
    if (!image || !image->data) return;

    uint8_t* data = image->data;
    int size = image->width * image->height * image->channels;

    for (int i = 0; i < size; i += image->channels) {
        data[i] = 255 - data[i];         // Red
        data[i + 1] = 255 - data[i + 1]; // Green
        data[i + 2] = 255 - data[i + 2]; // Blue
    }
}

// 边缘检测
void apply_edge_detection(Image* image) {
    if (!image || !image->data) return;

    Image* temp = create_image(image->width, image->height, image->channels);
    memcpy(temp->data, image->data,
           image->width * image->height * image->channels);

    int width = image->width;
    int height = image->height;
    int channels = image->channels;

    // Sobel算子
    int sobel_x[3][3] = {
        {-1, 0, 1},
        {-2, 0, 2},
        {-1, 0, 1}
    };

    int sobel_y[3][3] = {
        {-1, -2, -1},
        {0, 0, 0},
        {1, 2, 1}
    };

    for (int y = 1; y < height - 1; y++) {
        for (int x = 1; x < width - 1; x++) {
            int gx = 0, gy = 0;

            for (int ky = 0; ky < 3; ky++) {
                for (int kx = 0; kx < 3; kx++) {
                    int idx = ((y + ky - 1) * width + (x + kx - 1)) * channels;
                    int gray = temp->data[idx]; // 使用红色通道
                    gx += gray * sobel_x[ky][kx];
                    gy += gray * sobel_y[ky][kx];
                }
            }

            int magnitude = (int)sqrt((double)(gx * gx + gy * gy));
            int idx = (y * width + x) * channels;
            image->data[idx] = (uint8_t)(magnitude > 255 ? 255 : magnitude);
            image->data[idx + 1] = image->data[idx];
            image->data[idx + 2] = image->data[idx];
        }
    }

    free_image(temp);
}

}
2. 编写FFI绑定
// lib/native/image_filter_ffi.dart
import 'dart:ffi';
import 'package:ffi/ffi.dart';
// 定义类型
typedef _CreateImageFunc = Pointer<Image> Function(Int32, Int32, Int32);
typedef CreateImageFunc = Pointer<Image> Function(int, int, int);
typedef _FreeImageFunc = Void Function(Pointer<Image>);
typedef FreeImageFunc = void Function(Pointer<Image>);
typedef _ApplyGrayscaleFunc = Void Function(Pointer<Image>);
typedef ApplyGrayscaleFunc = void Function(Pointer<Image>);
typedef _ApplyBlurFunc = Void Function(Pointer<Image>, Int32);
typedef ApplyBlurFunc = void Function(Pointer<Image>, int);
typedef _ApplyInvertFunc = Void Function(Pointer<Image>);
typedef ApplyInvertFunc = void Function(Pointer<Image>);
typedef _ApplyEdgeDetectionFunc = Void Function(Pointer<Image>);
typedef ApplyEdgeDetectionFunc = void Function(Pointer<Image>);
// 图像结构体
class Image extends Struct {
<Uint8>()
external Pointer<Uint8> data;
()
external int width;
()
external int height;
()
external int channels;
}
// 加载原生库
class ImageFilter {
final DynamicLibrary _library;
late final CreateImageFunc _createImage;
late final FreeImageFunc _freeImage;
late final ApplyGrayscaleFunc _applyGrayscale;
late final ApplyBlurFunc _applyBlur;
late final ApplyInvertFunc _applyInvert;
late final ApplyEdgeDetectionFunc _applyEdgeDetection;
factory ImageFilter() {
if (Platform.isAndroid) {
return ImageFilter._(DynamicLibrary.open('libimage_filter.so'));
} else if (Platform.isIOS) {
return ImageFilter._(DynamicLibrary.open('image_filter.framework/image_filter'));
} else if (Platform.isWindows) {
return ImageFilter._(DynamicLibrary.open('image_filter.dll'));
}
throw UnsupportedError('Unsupported platform');
}
ImageFilter._(this._library) {
_createImage = _library
.lookup<NativeFunction<_CreateImageFunc>>('create_image')
.asFunction();
_freeImage = _library
.lookup<NativeFunction<_FreeImageFunc>>('free_image')
.asFunction();
_applyGrayscale = _library
.lookup<NativeFunction<_ApplyGrayscaleFunc>>('apply_grayscale')
.asFunction();
_applyBlur = _library
.lookup<NativeFunction<_ApplyBlurFunc>>('apply_blur')
.asFunction();
_applyInvert = _library
.lookup<NativeFunction<_ApplyInvertFunc>>('apply_invert')
.asFunction();
_applyEdgeDetection = _library
.lookup<NativeFunction<_ApplyEdgeDetectionFunc>>('apply_edge_detection')
.asFunction();
}
Pointer<Image> createImage(int width, int height, int channels) {
return _createImage(width, height, channels);
}
void freeImage(Pointer<Image> image) {
_freeImage(image);
}
void applyGrayscale(Pointer<Image> image) {
_applyGrayscale(image);
}
void applyBlur(Pointer<Image> image, int radius) {
_applyBlur(image, radius);
}
void applyInvert(Pointer<Image> image) {
_applyInvert(image);
}
void applyEdgeDetection(Pointer<Image> image) {
_applyEdgeDetection(image);
}
}
3. 创建Flutter UI
// lib/image_filter_demo.dart
import 'dart:typed_data';
import 'dart:ui' as ui;
import 'package:flutter/material.dart';
import 'package:image_picker/image_picker.dart';
import 'native/image_filter_ffi.dart';
class ImageFilterDemo extends StatefulWidget {
const ImageFilterDemo({Key? key}) : super(key: key);
_ImageFilterDemoState createState() => _ImageFilterDemoState();
}
class _ImageFilterDemoState extends State<ImageFilterDemo> {
final ImagePicker _picker = ImagePicker();
final ImageFilter _filter = ImageFilter();
ui.Image? _originalImage;
ui.Image? _filteredImage;
bool _isProcessing = false;
String _selectedFilter = 'None';
void initState() {
super.initState();
_loadDefaultImage();
}
Future<void> _loadDefaultImage() async {
// 加载默认图片
final bytes = await DefaultAssetBundle.of(context)
.load('assets/images/default.jpg');
final codec = await ui.instantiateImageCodec(bytes.buffer.asUint8List());
final frame = await codec.getNextFrame();
setState(() {
_originalImage = frame.image;
_filteredImage = frame.image;
});
}
Future<void> _pickImage() async {
final XFile? image = await _picker.pickImage(source: ImageSource.gallery);
if (image != null) {
final bytes = await image.readAsBytes();
final codec = await ui.instantiateImageCodec(bytes);
final frame = await codec.getNextFrame();
setState(() {
_originalImage = frame.image;
_filteredImage = frame.image;
});
}
}
Future<void> _applyFilter(String filterType) async {
if (_originalImage == null || _isProcessing) return;
setState(() {
_isProcessing = true;
_selectedFilter = filterType;
});
try {
// 获取图片数据
final byteData = await _originalImage!.toByteData(format: ui.ImageByteFormat.rawRgba);
final rgbaBytes = byteData!.buffer.asUint8List();
// 创建图像对象
final imagePtr = _filter.createImage(
_originalImage!.width,
_originalImage!.height,
4,
);
// 复制数据
final imageData = imagePtr.ref.data;
for (int i = 0; i < rgbaBytes.length; i++) {
imageData[i] = rgbaBytes[i];
}
// 应用滤镜
switch (filterType) {
case 'Grayscale':
_filter.applyGrayscale(imagePtr);
break;
case 'Blur':
_filter.applyBlur(imagePtr, 3);
break;
case 'Invert':
_filter.applyInvert(imagePtr);
break;
case 'Edge Detection':
_filter.applyEdgeDetection(imagePtr);
break;
}
// 转换回ui.Image
final processedBytes = Uint8List(_originalImage!.width *
_originalImage!.height * 4);
for (int i = 0; i < processedBytes.length; i++) {
processedBytes[i] = imageData[i];
}
final codec = await ui.instantiateImageCodec(
processedBytes,
targetWidth: _originalImage!.width,
targetHeight: _originalImage!.height,
format: ui.ImageByteFormat.rawRgba,
);
final frame = await codec.getNextFrame();
// 释放资源
_filter.freeImage(imagePtr);
setState(() {
_filteredImage = frame.image;
_isProcessing = false;
});
} catch (e) {
setState(() {
_isProcessing = false;
});
ScaffoldMessenger.of(context).showSnackBar(
SnackBar(content: Text('滤镜应用失败: $e')),
);
}
}
Widget build(BuildContext context) {
return Scaffold(
appBar: AppBar(
title: const Text('原生扩展图像处理'),
actions: [
IconButton(
icon: const Icon(Icons.photo_library),
onPressed: _pickImage,
),
],
),
body: Column(
children: [
// 图片显示区域
Expanded(
child: Padding(
padding: const EdgeInsets.all(20),
child: Row(
children: [
Expanded(
child: _buildImageView('原始图片', _originalImage),
),
const SizedBox(width: 20),
Expanded(
child: _buildImageView('处理后', _filteredImage),
),
],
),
),
),
// 滤镜选择区域
Container(
padding: const EdgeInsets.all(20),
decoration: BoxDecoration(
color: Colors.grey.shade100,
borderRadius: const BorderRadius.vertical(top: Radius.circular(20)),
),
child: Column(
crossAxisAlignment: CrossAxisAlignment.start,
children: [
const Text(
'选择滤镜',
style: TextStyle(
fontSize: 18,
fontWeight: FontWeight.bold,
),
),
const SizedBox(height: 16),
Wrap(
spacing: 12,
runSpacing: 12,
children: [
_buildFilterButton('None', Icons.block),
_buildFilterButton('Grayscale', Icons.grayscale),
_buildFilterButton('Blur', Icons.blur_on),
_buildFilterButton('Invert', Icons.invert_colors),
_buildFilterButton('Edge Detection', Icons.edgesensor_high),
],
),
],
),
),
],
),
);
}
Widget _buildImageView(String label, ui.Image? image) {
return Container(
decoration: BoxDecoration(
color: Colors.white,
borderRadius: BorderRadius.circular(16),
boxShadow: [
BoxShadow(
color: Colors.black.withOpacity(0.1),
blurRadius: 10,
),
],
),
child: Column(
children: [
Padding(
padding: const EdgeInsets.all(12),
child: Text(
label,
style: const TextStyle(
fontSize: 16,
fontWeight: FontWeight.bold,
),
),
),
Expanded(
child: image != null
? CustomPaint(
painter: _ImagePainter(image),
)
: const Center(child: CircularProgressIndicator()),
),
],
),
);
}
Widget _buildFilterButton(String filter, IconData icon) {
final isSelected = _selectedFilter == filter;
return ElevatedButton.icon(
icon: Icon(icon),
label: Text(filter),
onPressed: () => _applyFilter(filter),
style: ElevatedButton.styleFrom(
backgroundColor: isSelected ? Colors.blue : Colors.white,
foregroundColor: isSelected ? Colors.white : Colors.black,
side: BorderSide(color: Colors.blue.shade300),
),
);
}
}
class _ImagePainter extends CustomPainter {
final ui.Image image;
_ImagePainter(this.image);
void paint(Canvas canvas, Size size) {
final srcRect = Rect.fromLTWH(0, 0, image.width.toDouble(), image.height.toDouble());
final dstRect = Rect.fromLTWH(0, 0, size.width, size.height);
canvas.drawImageRect(image, srcRect, dstRect, Paint());
}
bool shouldRepaint(_ImagePainter oldDelegate) => true;
}
五、性能优化与最佳实践
1. 内存管理
// 及时释放原生资源
void dispose() {
if (_imagePtr != null) {
_filter.freeImage(_imagePtr!);
}
super.dispose();
}
2. 批量处理
// 批量处理多张图片
Future<void> processBatch(List<ui.Image> images) async {
  for (var image in images) {
    await _processImage(image);
  }
}
3. 错误处理
try {
  await _applyFilter('Grayscale');
} catch (e) {
  debugPrint('滤镜应用失败: $e');
  // 优雅降级
}
总结
原生扩展为Flutter应用提供了访问平台原生能力的强大机制。通过FFI和Platform Channel,开发者可以调用原生代码实现高性能功能,如图像处理、硬件访问等。本案例的图像处理应用展示了从C++原生代码到Flutter UI的完整实现流程,包括内存管理、错误处理和性能优化等最佳实践。
欢迎加入开源鸿蒙跨平台社区:https://openharmonycrossplatform.csdn.net

AtomGit 是由开放原子开源基金会联合 CSDN 等生态伙伴共同推出的新一代开源与人工智能协作平台。平台坚持“开放、中立、公益”的理念,把代码托管、模型共享、数据集托管、智能体开发体验和算力服务整合在一起,为开发者提供从开发、训练到部署的一站式体验。
更多推荐

 18
18 0
0- 0


 已为社区贡献16条内容

所有评论(0)