Windows 环境下安装最 OpenClaw 详细教程
文章目录
Windows 环境下安装最新版 OpenClaw 详细教程
OpenClaw 是一款强大的 AI 网关工具。本文将带你在 Windows 系统上完成从零到运行的完整部署流程,并涵盖常见报错的解决方案。
前置条件
- Windows 10(64 位),版本 2004(Build 19041)或更高
- 网络连接正常
- 具有管理员权限的用户账户
查看系统版本:按
Win + R,输入winver回车即可查看。
安装路线选择
根据你的使用场景,选择适合的安装路线:
| 路线 | 说明 | 适合人群 |
|---|---|---|
| 路线 A:Windows 原生 | 直接在 Windows 上运行 | 大多数用户推荐 |
| 路线 B:WSL2(Linux) | 在 Windows 内运行 Linux 环境 | 偏好 Linux 工具链的用户 |
- 路线 A:完成第一步,跳过第二步,再按顺序完成第三步至第八步。
- 路线 B:完成第一步、第二步(含 WSL 内的完整安装流程),再跳至第六步完成初始化,无需执行第三、四、五、七步;第八步日常管理命令在 WSL 内同样适用,可供参考。
第一步:升级 PowerShell 7(推荐)
Windows 10 内置 PowerShell 5.1,推荐升级到 PowerShell 7+,获得更好的语法支持与错误提示。
方式一:winget 安装(推荐)
以管理员身份打开 PowerShell,执行:
winget install --id Microsoft.PowerShell --source winget
正常安装显示如下:
已找到 PowerShell [Microsoft.PowerShell] 版本 7.6.0.0
此应用程序由其所有者授权给你。
Microsoft 对第三方程序包概不负责,也不向第三方程序包授予任何许可证。
正在下载 https://github.com/PowerShell/PowerShell/releases/download/v7.6.0/PowerShell-7.6.0-win-x64.msi
  ██████████████████████████████   109 MB /  109 MB
已成功验证安装程序哈希
正在启动程序包安装...
已成功安装
若提示
winget不存在,请先前往 Microsoft Store 搜索 “应用安装程序” 安装或更新,或使用方式二。
方式二:下载安装包
前往 PowerShell GitHub Releases 下载最新版本的 PowerShell-7.x.x-win-x64.msi,双击安装,一路点击 Next。
安装时建议勾选:
- Add PowerShell to PATH Environment Variable
- Enable PowerShell remoting
验证
$PSVersionTable
显示如下:
Name                           Value
----                           -----
PSVersion                      7.6.0
PSEdition                      Core
GitCommitId                    7.6.0
OS                             Microsoft Windows 10.0.19045
Platform                       Win32NT
PSCompatibleVersions           {1.0, 2.0, 3.0, 4.0…}
PSRemotingProtocolVersion      2.4
SerializationVersion           1.1.0.1
WSManStackVersion              3.0
即升级成功。安装完成后,后续所有命令均在 PowerShell 7 中执行。
第二步:安装 WSL2(可选,路线 B)
若选择路线 A(Windows 原生),可跳过此步骤直接进入第三步。
WSL2 可让你在 Windows 上运行完整的 Linux 环境。WSL2 要求 Windows 10 版本 2004(Build 19041) 或更高。
1. 启用 WSL 与虚拟化功能
以管理员身份运行 PowerShell,依次执行:
# 启用 WSL 子系统
dism.exe /online /enable-feature /featurename:Microsoft-Windows-Subsystem-Linux /all /norestart

# 启用虚拟机平台(WSL2 依赖)
dism.exe /online /enable-feature /featurename:VirtualMachinePlatform /all /norestart
执行完毕后重启电脑。
2. 安装 WSL2 内核并设置默认版本
# 自动完成 WSL 启用、内核安装,并默认安装 Ubuntu
wsl --install
# 或
wsl --update
也可以手动下载 WSL2 Linux 内核更新包 双击安装。
# 设置默认版本为 WSL2
wsl --set-default-version 2
3. 安装 Ubuntu 发行版
wsl --install Ubuntu-24.04
或前往 Microsoft Store 搜索 “Ubuntu 24.04” 点击安装。首次启动按提示创建 Linux 用户名和密码。
4. 验证安装
wsl --list --verbose
显示如下:
  NAME            STATE           VERSION
* AlmaLinux-8     Stopped         2
  Ubuntu-24.04    Running         2
Ubuntu 对应的 VERSION 列显示 2 即成功。若提示虚拟化未启用,请进入主板 BIOS 开启 Intel VT-x 或 AMD-V。
路线 B 用户:以下步骤 5 至 8 均在 WSL Ubuntu 终端内执行(bash 命令),执行完毕后即完成 OpenClaw 的完整部署,无需执行本文第三、四、五、七步。
5. 更新系统并安装基础工具
打开 WSL Ubuntu 终端,执行:
sudo apt update && sudo apt upgrade -y
sudo apt install -y curl git build-essential
6. 安装 Node.js 24
使用 n-install 脚本安装 Node.js v24.14.1:
curl -fsSL https://raw.githubusercontent.com/mklement0/n-install/stable/bin/n-install | bash -s 24
验证:
node -v
npm -v
确认版本输出为 v24.14.1 和 11.11.0。
7. 安装 OpenClaw
使用官方一键安装脚本:
curl -fsSL https://openclaw.ai/install.sh | bash
安装完成后刷新环境变量,使 openclaw 命令生效:
source ~/.bashrc
验证:
openclaw -v
输出版本号即表示安装成功。
8. 进阶配置(推荐)
修改权限配置,将权限 profile 从 coding 改为 full,以获得完整功能权限:
sed -i 's/"profile": "coding"/"profile": "full"/g' ~/.openclaw/openclaw.json
设置开机自启服务(需要 WSL2 已启用 systemd):
sudo openclaw gateway install-service
sudo systemctl enable openclaw-gateway --now
验证 systemd 是否已启用:执行
ps -p 1 -o comm=,输出systemd则支持。若未启用,可在/etc/wsl.conf中添加:[boot] systemd=true保存后在 PowerShell 中执行
wsl --shutdown重启 WSL 即可。
路线 B 用户:WSL 内安装完成后,请继续执行第六步完成
openclaw onboard初始化配置。
第三步:安装 Node.js
Node.js 是运行 OpenClaw 的核心环境,要求版本 v24.14.1。
1. 下载并安装
前往 Node.js 官网 下载 v24.14.1 的 Windows 安装包(.msi),双击运行,一路点击 Next。
安装时请确认勾选 “Add to PATH” 选项,否则终端无法识别
node命令。
2. 验证安装
重新打开 PowerShell 窗口后输入:
node -v
npm -v
输出 v24.14.1 和 11.11.0 即表示安装成功。
3. 处理脚本执行策略报错(如遇)
若提示 cannot be loaded because running scripts is disabled,以管理员身份运行:
Set-ExecutionPolicy -ExecutionPolicy RemoteSigned -Scope CurrentUser
输入 Y 确认后重试。
4. 配置国内 npm 镜像(推荐)
npm config set registry https://registry.npmmirror.com
验证:
npm config get registry
# 输出 https://registry.npmmirror.com 即为成功
第四步:安装 Git
Git 用于 OpenClaw 管理组件依赖,必须安装。
前往 Git 官网 下载 Git for Windows(x64 Setup),双击安装,一路点击 Next。
验证(重新打开 PowerShell 后):
git -v
第五步:安装 OpenClaw
建议以管理员身份运行 PowerShell:右键点击开始菜单 → Windows PowerShell(管理员) 或 PowerShell 7(管理员)。
根据你的网络环境,选择对应的安装方式:
方式一:一键安装(推荐)
以管理员身份运行 PowerShell,执行以下命令:
iwr -useb https://openclaw.ai/install.ps1 | iex
脚本将自动完成下载与安装,无需手动配置环境变量。安装完成后跳至验证安装。
若提示
running scripts is disabled,请先执行:Set-ExecutionPolicy -ExecutionPolicy RemoteSigned -Scope CurrentUser输入
Y确认后重试。
方式二:标准安装(网络畅通)
适合可以正常访问 GitHub 的用户。安装最新版本:
npm install -g openclaw@latest
安装完成后跳至验证安装。
方式三:镜像加速安装(GitHub 访问受限)
步骤 1:若 npm 安装时提示 SSH 权限错误(Permission denied (publickey) / Error 128),将 SSH 替换为 HTTPS:
git config --global url."https://github.com/".insteadOf ssh://git@github.com/
步骤 2:若仍提示连接超时(443 端口),配置 GitHub 镜像加速:
git config --global url."https://github.moeyy.xyz/https://github.com/".insteadOf "https://github.com/"
注意:第三方镜像可能随时失效,如上述地址不可用,可搜索其他可用镜像(如
githubfast.com)。
步骤 3:重新执行安装:
npm install -g openclaw@latest
安装完成后跳至验证安装。
方式四:离线安装(完全无法访问 GitHub)
此方式适合 GitHub 完全不可达的情况,通过手动补充依赖完成安装。
步骤 1:创建安装目录
先运行安装命令,等它开始下载后按 Ctrl+C 中断(目的是让 npm 创建目录结构):
npm i -g openclaw@latest
# 看到下载开始后,按 Ctrl+C 中断
步骤 2:手动下载 libsignal-node
在浏览器中前往 GitHub 搜索 libsignal-node,进入对应仓库,点击 Code → Download ZIP 下载压缩包。
步骤 3:放置依赖文件
- 解压 ZIP,将文件夹重命名为
libsignal-node(去掉-master等后缀) - 将文件夹复制到以下路径(将
用户名替换为你的 Windows 用户名):
C:\Users\用户名\AppData\Roaming\npm\node_modules\openclaw\node_modules\
步骤 4:完成安装
npm install -g openclaw@latest
npm 会识别已存在的依赖并跳过下载,完成剩余安装。
验证安装
  OpenClaw Installer

[OK] Windows detected
[OK] Node.js version 24.14.1 found
[*] Installing OpenClaw (openclaw@latest)...
[OK] OpenClaw installed

OpenClaw installed successfully (OpenClaw 2026.3.24 (cff6dc9))!

Settled in. Time to automate your life whether you're ready or not.

Starting setup...


🦞 OpenClaw 2026.3.24 (cff6dc9) — Built by lobsters, for humans. Don't question the hierarchy.

Windows detected - OpenClaw runs great on WSL2!
Native Windows might be trickier.
Quick setup: wsl --install (one command, one reboot)
Guide: https://docs.openclaw.ai/windows
▄▄▄▄▄▄▄▄▄▄▄▄▄▄▄▄▄▄▄▄▄▄▄▄▄▄▄▄▄▄▄▄▄▄▄▄▄▄▄▄▄▄▄▄▄▄▄▄▄▄▄▄
██░▄▄▄░██░▄▄░██░▄▄▄██░▀██░██░▄▄▀██░████░▄▄▀██░███░██
██░███░██░▀▀░██░▄▄▄██░█░█░██░█████░████░▀▀░██░█░█░██
██░▀▀▀░██░█████░▀▀▀██░██▄░██░▀▀▄██░▀▀░█░██░██▄▀▄▀▄██
▀▀▀▀▀▀▀▀▀▀▀▀▀▀▀▀▀▀▀▀▀▀▀▀▀▀▀▀▀▀▀▀▀▀▀▀▀▀▀▀▀▀▀▀▀▀▀▀▀▀▀▀
                  🦞 OPENCLAW 🦞

┌  OpenClaw setup
│
◇  Security ─────────────────────────────────────────────────────────────────────────────────╮
│                                                                                            │
│  Security warning — please read.                                                           │
│                                                                                            │
│  OpenClaw is a hobby project and still in beta. Expect sharp edges.                        │
│  By default, OpenClaw is a personal agent: one trusted operator boundary.                  │
│  This bot can read files and run actions if tools are enabled.                             │
│  A bad prompt can trick it into doing unsafe things.                                       │
│                                                                                            │
│  OpenClaw is not a hostile multi-tenant boundary by default.                               │
│  If multiple users can message one tool-enabled agent, they share that delegated tool      │
│  authority.                                                                                │
│                                                                                            │
│  If you’re not comfortable with security hardening and access control, don’t run           │
│  OpenClaw.                                                                                 │
│  Ask someone experienced to help before enabling tools or exposing it to the internet.     │
│                                                                                            │
│  Recommended baseline:                                                                     │
│  - Pairing/allowlists + mention gating.                                                    │
│  - Multi-user/shared inbox: split trust boundaries (separate gateway/credentials, ideally  │
│    separate OS users/hosts).                                                               │
│  - Sandbox + least-privilege tools.                                                        │
│  - Shared inboxes: isolate DM sessions (`session.dmScope: per-channel-peer`) and keep      │
│    tool access minimal.                                                                    │
│  - Keep secrets out of the agent’s reachable filesystem.                                   │
│  - Use the strongest available model for any bot with tools or untrusted inboxes.          │
│                                                                                            │
│  Run regularly:                                                                            │
│  openclaw security audit --deep                                                            │
│  openclaw security audit --fix                                                             │
│                                                                                            │
│  Must read: https://docs.openclaw.ai/gateway/security                                      │
│                                                                                            │
├────────────────────────────────────────────────────────────────────────────────────────────╯
│
◇  I understand this is personal-by-default and shared/multi-user use requires lock-down. Continue?
路线 A 用户说明:上方输出中 OpenClaw 程序会提示推荐使用 WSL2,这是程序的默认建议,路线 A 无需安装 WSL,直接继续后续步骤即可正常使用。
输入Yes确认,其他暂时跳过。
查看版本:
openclaw -v
输出版本号即表示安装成功。
附:Windows Defender 拦截处理
若安全软件将 npm 全局安装脚本误报为威胁:
- 临时暂停实时保护,安装完成后重新开启
- 或将 npm 全局模块目录加入白名单:
C:\Users\用户名\AppData\Roaming\npm
第六步:初始化 OpenClaw
运行交互式 onboard 命令完成首次配置(后续配置变更亦执行此命令):
openclaw onboard
按照以下指引逐步操作,部分选项请根据自身实际情况进行配置:
| 步骤 | 提示内容 | 推荐选择 | 备注 |
|---|---|---|---|
| 1 | I understand this is personal-by-default and shared/multi-user use requires lock-down. Continue? | Yes | 确认个人使用模式免锁定 |
| 2 | Setup mode | QuickStart | 快速模式,跳过高级配置 |
| 3 | Config handling | Update values | 更新已有配置而非覆盖 |
| 4 | Create Agent store dir at ~\.openclaw\agents? | Yes | 创建 Agent 存储目录 |
| 5 | Model/auth provider | Custom Provider | 使用自定义模型提供商 |
| 6 | Gateway provider | Custom Provider | 使用自定义网关提供商 |
| 7 | API Base URL | http://127.0.0.1:11434 | 本地模型API服务地址,其他模型服务提供商请自行填写 |
| 8 | How do you want to provide this API key? | Paste API key now | 选择粘贴方式提供密钥 |
| 9 | API Key (leave blank if not required) | (空) | 本地服务无需密钥,直接回车。其他API服务,请填写密钥 |
| 10 | Endpoint compatibility | OpenAI-compatible | 使用 OpenAI 兼容接口格式 |
| 11 | Endpoint ID | custom-zhenze-huhehaote-cmecloud-cn | 自定义端点标识符 |
| 12 | Model ID | minimax-m2.5 | 指定使用的模型名称 |
| 13 | Channels | Skip for now | 暂不配置通知渠道,如在这一步需要配置如飞书、企业微信等,可选择 |
| 14 | Search provider | Skip for now | 暂不配置搜索服务 |
| 15 | Configure skills now? (recommended) | Yes | 立即配置技能插件 |
| 16 | Configure gateway now? (recommended) | Yes | 立即配置网关服务 |
| 17 | Install missing skill dependencies | ◼ 💎 obsidian | 选中安装 obsidian 技能,支持 Markdown 笔记操作,根据情况选择,无需求跳过即可。空格键选中,回车键确认 |
| 18 | Set GOOGLE_PLACES_API_KEY for goplaces? | No | 无需地图服务 |
| 19 | Set NOTION_API_KEY for notion? | No | 无需 Notion 集成 |
| 20 | Set OPENAI_API_KEY for openai-whisper-api? | No | 无需语音识别服务 |
| 21 | Set ELEVENLABS_API_KEY for sag? | No | 无需语音合成服务 |
| 22 | Enable hooks? | boot-md / bootstrap-extra-files / command-logger / session-memory | 启用启动和会话相关钩子,空格键都选中,回车键确认 |
| 23 | Gateway service already installed | Restart | 重启网关使配置生效 |
配置完成之后选择在Web UI中打开,配置正确之后,页面输入相关问题后内容显示如下:
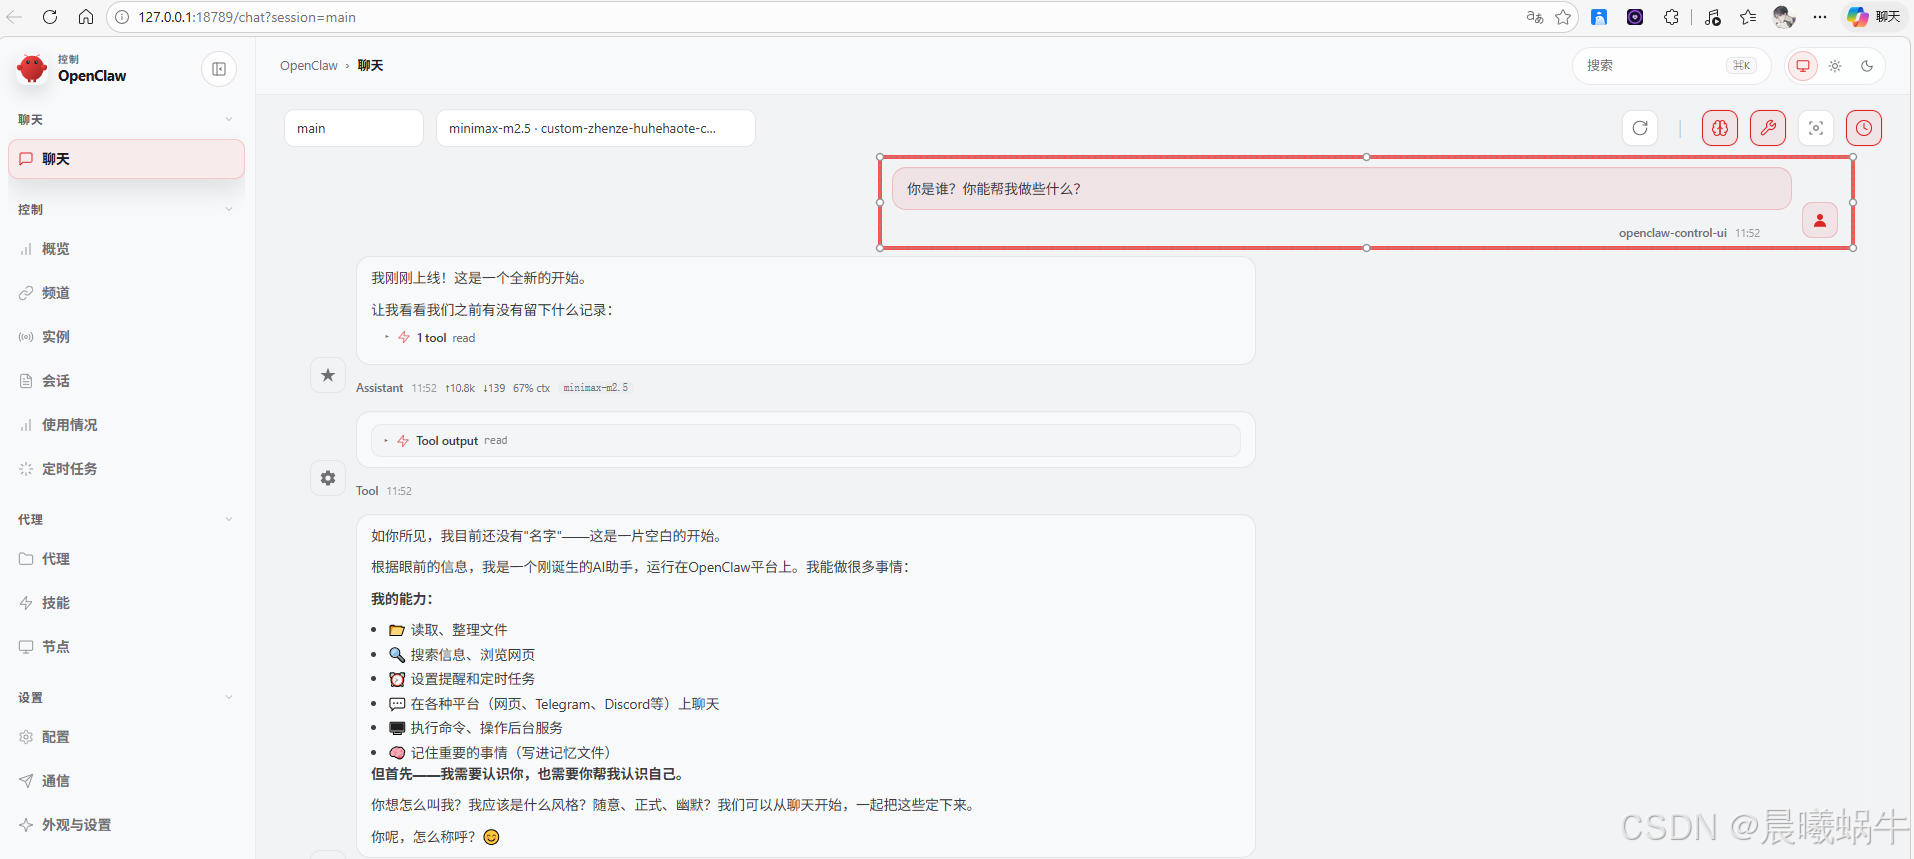
运行成功后会自动弹出一个 CMD 窗口(OpenClaw 的网关进程),请勿关闭该窗口。
若 Windows 弹出网络访问权限提示,请选择允许。
第七步:进阶配置
修改权限配置(推荐)
打开 C:\Users\用户名\.openclaw,用文本编辑器编辑 openclaw.json。
找到:
"tools": {
    "profile": "coding"
  }
修改为:
"tools": {
  "profile": "full"
}
保存后执行:
openclaw gateway restart
full赋予 OpenClaw 完整系统工具权限(如读取硬件信息、操作文件等),请根据需求决定是否开启。验证:向 OpenClaw 发送"请告诉我当前电脑的硬件信息",能正常回复即配置成功。
第八步:日常管理命令速查
Gateway 网关管理
| 操作 | 命令 |
|---|---|
| 启动网关 | openclaw gateway start |
| 停止网关 | openclaw gateway stop |
| 重启网关 | openclaw gateway restart |
| 查看状态 | openclaw gateway status |
其他常用命令
openclaw tui              # 打开命令行交互界面(TUI)
openclaw browser start    # 启动浏览器服务
openclaw browser stop     # 停止浏览器服务
openclaw status           # 查看整体运行状态
openclaw logs --follow    # 实时查看日志
openclaw dashboard        # 打开控制面板
openclaw doctor           # 系统诊断
openclaw doctor --fix     # 自动修复问题
总结
至此,OpenClaw 已在 Windows 系统上完整部署并运行。整个流程分为八个步骤:
- 升级 PowerShell 7(推荐)— 获得更好的终端体验
- 安装 WSL2(可选,路线 B)— 在 Windows 上运行 Linux 环境
- 安装 Node.js v24.14.1 — 满足运行时要求,并配置国内镜像加速
- 安装 Git — 用于管理组件依赖
- 安装 OpenClaw — 四种方式按需选择:一键安装 / 标准安装 / 镜像加速 / 离线安装
- 初始化配置 — 通过交互式向导完成首次设置
- 进阶配置 — 修改权限配置文件,释放完整功能
- 日常管理 — 掌握常用命令进行运维维护
遇到问题时,优先使用 openclaw doctor 进行自动诊断,或通过 openclaw logs --follow 实时查看日志排查故障。

AtomGit 是由开放原子开源基金会联合 CSDN 等生态伙伴共同推出的新一代开源与人工智能协作平台。平台坚持“开放、中立、公益”的理念,把代码托管、模型共享、数据集托管、智能体开发体验和算力服务整合在一起,为开发者提供从开发、训练到部署的一站式体验。
更多推荐



 12
12 0
0- 0


 已为社区贡献7条内容

所有评论(0)