【端侧部署系列】CenterNet部署至全志开发板
本文参考了全志提供的《NPU开发环境部署参考指南》,使用Docker镜像环境进行模型编译,《NPU_模型部署_开发指南》也提供在AW_NPU_Model_Zoo/doc中
1.CenterNet模型简介
CenterNet是一种基于关键点检测的单阶段目标检测模型,通过预测目标中心点、尺寸和偏移量实现检测。其轻量化的特性适合端侧部署,如全志开发板(如T736、T527等)。
2.开发工具下载:
进入全志客户服务平台(这里放不了链接...),进行账号创建,完成之后进入首页,右上角有一个工作台,然后点击资源下载→工具查询→AI开发SDK,下载对应的工具包
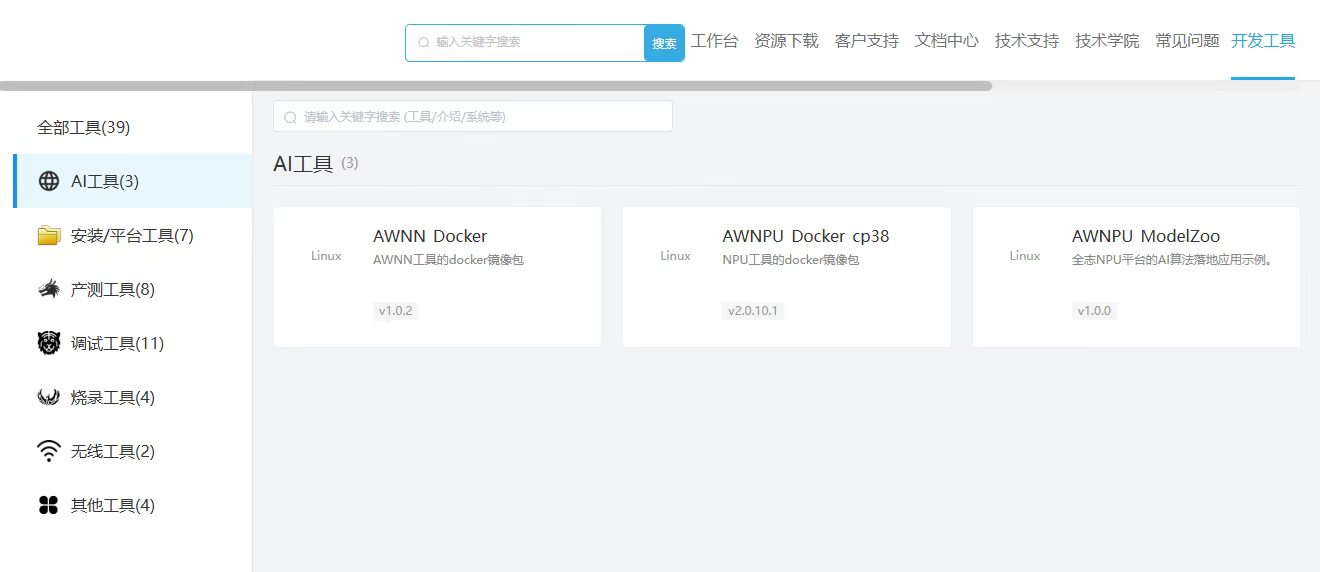
Docker 镜像包是用于快速配置开发环境,它集成了 NPU 平台部署 AI 算法所需的软件、工具包,使用 Docker 镜像进行开发则无须进行 Acuity Toolkit 和 VivanteIDE 工具安装。
Model Zoo 包含了一些经典模型的部署案例
3.开发环境创建
3.1安装 Docker 工具
需要Ubuntu系统的开发环境,服务器、PC、虚拟机均可。
3.2解压下载好的镜像工具包
下载全志提供的镜像,这里选择awnpu_cp38_docker v2.0.10
unzip ubuntu-npu_v2.0.10.tar.zip                #解压镜像文件

sudo docker load -i ubuntu-npu_v2.0.10.tar  	#载入镜像

sudo docker images                                #查看镜像
3.2创建工作目录并建立容器
创建data目录并将awnpu_model_zoo-v1.0.0解压
mkdir docker_data

cd docker_data

unzip awnpu_model_zoo-v1.0.0

pwd    #当前目录路径
创建容器( 只需执行一次)需要根据自己的目录来创建容器的工作目录 ,-v 表示目录映射关系,可用于把本地目录映射为docker容器下的目录,$(pwd)为当前目录,可改为指定路径
sudo docker run --ipc=host -itd -v $(pwd):/workspace --name user_v2.0.10 ubuntu-npu:v2.0.10 /bin/bash进入容器
sudo docker ps -a                        #查看容器
sudo docker exec -it 容器ID /bin/bash    #进入容器

cd /workspace/                            #切换到工作目录
4.模型准备
下载CenterNet代码并编译运行,开源项目地址如下
由于标准版centernet的主干网络中包含可变形卷积操作,即DCNv2模块,onnx不支持该算子,影响后续pt模型转onnx模型,因此直接不使用该版本的centernet,也不用编译DCNv2。
本项目采用res_18作为主干网络的centernet模型。开源工程中提供了模型架构但是没有给出该版本的权重,因此调用开源程序./src/main.py进行自训练,训练参数如下:(训练图像仅使用了5000张,检测效果不佳,建议基于完整coco数据集充分训练)
python3 main.py ctdet --exp_id centernet_res --arch res_18 --dataset coco --batch_size 4 --master_batch 4 --lr 1.25e-4 --num_workers 2 --num_epochs 100 --input_h 256 --input_w 256 --lr_step 60,80,90 训练完成后导出onnx模型,保存最后一层特征,注意热力图hm的输出经过了sigmoid
class CenterNetWrapper(nn.Module):
def __init__(self, model):
super(CenterNetWrapper, self).__init__()
self.model = model
def forward(self, x):
out = self.model(x)[-1]
hm = torch.sigmoid(out['hm'])
wh = out['wh']
reg = out['reg'] if 'reg' in out else torch.zeros_like(wh[:, :2])
return hm, wh, reg
def main():
opt = opts().init(['ctdet'])
opt.arch = 'res_18'
opt.load_model = '../models/model_last.pth'
opt.num_classes = 80
opt.heads = {'hm': opt.num_classes, 'wh': 2, 'reg': 2}
opt.head_conv = 64
print('Creating model...')
model = create_model(opt.arch, opt.heads, opt.head_conv)
model = load_model(model, opt.load_model)
model.eval()
wrapped_model = CenterNetWrapper(model)
input_h, input_w = 256, 256
dummy_input = torch.randn(1, 3, input_h, input_w)
onnx_file = "centernet_rt.onnx"
torch.onnx.export(
wrapped_model,
dummy_input,
onnx_file,
export_params=True,
opset_version=11,
input_names=['input'],
output_names=['hm', 'wh', 'reg']
)用Netron软件打开查看,模型输出包含三个张量:hm、wh 和 reg。 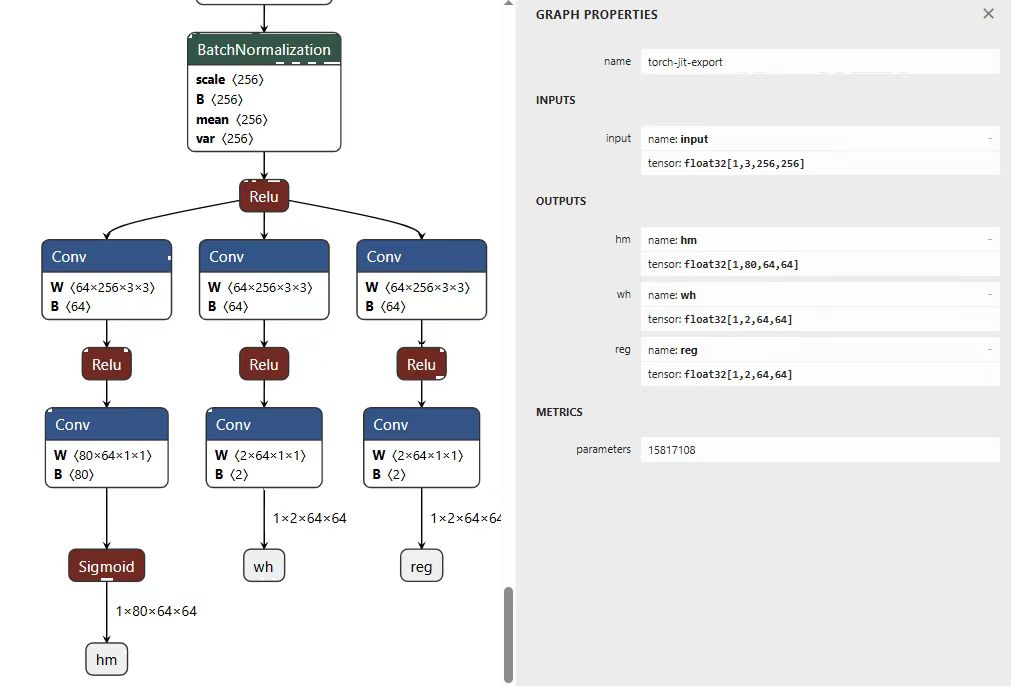
本文训练的onnx模型下载链接后续会上传model_zoo/examples中。注意:模型没有经过充分训练,仅用于分析部署的正确性。
5.模型测试
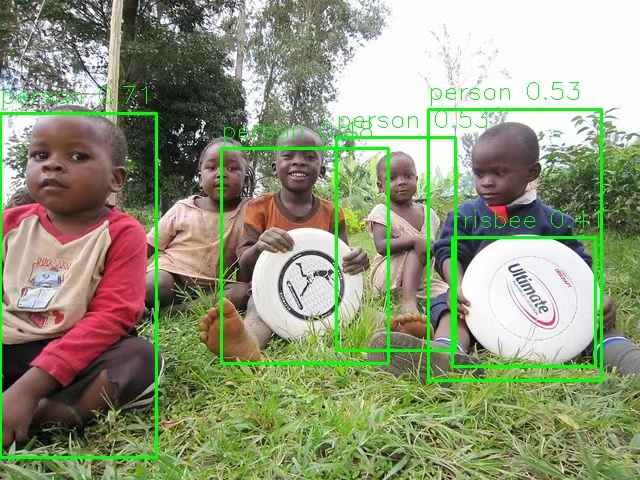
用本项目aw_npu_model_zoo/examples/centernet工程下的./convert_model/python/centernet_onnx_inference.py测试onnx模型:
6.模型部署
6.1模型转换
模型转换主要包含onnx模型导入、量化、导出为NPU可识别的模型格式等步骤,在 aw_npu_model_zoo/examples/centernet/convert_model/中包含了对模型的操作工具。
其中config_yml.py文件为模型的相关参数配置,在模型导出时会用到这个文件。
# "database"
DATASET = ['../../dataset/coco_12/dataset.txt']
DATASET_TYPE = ["TEXT"]# mean, scale ##根据模型训练中的图像预处理参数
MEAN = [104, 114, 120]
SCALE = [0.01357, 0.01429, 0.01409]# reverse_channel: True bgr, False rgb
REVERSE_CHANNEL = False# add_preproc_node, True or False
ADD_PREPROC_NODE = True
# "preproc_type"
PREPROC_TYPE = ["IMAGE_RGB"]# add_postproc_node, quant output -> float32 output
ADD_POSTPROC_NODE = True
模型导入、量化、导出等步骤:
# using xxx_env.sh to create softlink
./convert_model_env.sh

# 导入
# pegasus_import.sh <model_name>
./pegasus_import.sh centernet_rt

# 量化
# pegasus_quantize.sh <model_name> <quantize_type> <calibration_set_size>
./pegasus_quantize.sh centernet_rt uint8 12

# 仿真(可选)
# pegasus_inference.sh <model_name> <quantize_type>
./pegasus_inference.sh centernet_rt uint8

# 导出nb模型
# pegasus_export_ovx_nbg.sh <model_name> <quantize_type> <platform>
./pegasus_export_ovx_nbg.sh centernet_rt uint8 t736

# 导出的模型文件存放在../model目录
# 例如 ../model/centernet_rt_uint8_t736.nb
6.2预处理与后处理
配置文件model_config.h
/****************************************************************************
*  model config header file
****************************************************************************/
#ifndef _MODEL_CONFIG_H_
#define _MODEL_CONFIG_H_

#include <iostream>
#include <vector>


#define COCO    1
//#define COCO    0

#if COCO
// coco, 80 class
#define CLASS_NUM           80

/* 256 *256 */
#define LETTERBOX_ROWS      256
#define LETTERBOX_COLS      256


#define SCORE_THRESHOLD     0.4f
#define NMS_THRESHOLD       0.45f

const std::vector<std::string> g_classes_name{
    "person", "bicycle", "car", "motorcycle", "airplane", "bus", "train", "truck", "boat", "traffic_light",
    "fire_hydrant", "stop_sign", "parking_meter", "bench", "bird", "cat", "dog", "horse", "sheep", "cow",
    "elephant", "bear", "zebra", "giraffe", "backpack", "umbrella", "handbag", "tie", "suitcase", "frisbee",
    "skis", "snowboard", "sports_ball", "kite", "baseball_bat", "baseball_glove", "skateboard", "surfboard",
    "tennis_racket", "bottle", "wine_glass", "cup", "fork", "knife", "spoon", "bowl", "banana", "apple",
    "sandwich", "orange", "broccoli", "carrot", "hot_dog", "pizza", "donut", "cake", "chair", "couch",
    "potted_plant", "bed", "dining_table", "toilet", "tv", "laptop", "mouse", "remote", "keyboard", "cell_phone",
    "microwave", "oven", "toaster", "sink", "refrigerator", "book", "clock", "vase", "scissors", "teddy_bear",
    "hair_drier", "toothbrush"
};


#else

#endif

#endif
模型输入预处理代码centernet_pre.cpp如下,对输入图像保持高宽比缩放到256*256,数据的归一化在npu中进行。
#include <opencv2/opencv.hpp>
#include <vector>
#include <cmath>
#include <cstring> // for memcpy

#include "model_config.h"

#include <cstring>
#include <cstdio>
#include <cassert>
#include <opencv2/opencv.hpp>

#include <cstring>
#include <cstdio>
#include <cassert>
#include <opencv2/opencv.hpp>


struct LetterBoxInfo
{
    cv::Mat image;
    float scale;
    int pad_x;
    int pad_y;
};

LetterBoxInfo letterbox_image(const cv::Mat& image, const cv::Size& target_size)
{
    LetterBoxInfo info;
    int ih = image.rows;
    int iw = image.cols;
    int h = target_size.height;
    int w = target_size.width;

    float scale = std::min((float)w / iw, (float)h / ih);
    int nw = (int)(iw * scale);
    int nh = (int)(ih * scale);

    cv::Mat resized;
    cv::resize(image, resized, cv::Size(nw, nh), 0, 0, cv::INTER_LINEAR);
    cv::Mat new_image = cv::Mat(h, w, CV_8UC3, cv::Scalar(128, 128, 128));

    int dx = (w - nw) / 2;
    int dy = (h - nh) / 2;
    resized.copyTo(new_image(cv::Rect(dx, dy, nw, nh)));

    info.image = new_image;
    info.scale = scale;
    info.pad_x = dx;
    info.pad_y = dy;
    return info;
}

void get_input_data(const char* image_file, unsigned char* input_data, int letterbox_rows, int letterbox_cols)
{
    cv::Mat sample = cv::imread(image_file, 1);
    if (sample.empty()) {
        fprintf(stderr, "cv::imread %s failed\n", image_file);
        memset(input_data, 128, letterbox_rows * letterbox_cols * 3);
        return;
    }

    cv::Mat rgb;
    cv::cvtColor(sample, rgb, cv::COLOR_BGR2RGB);
    LetterBoxInfo letterbox = letterbox_image(rgb, cv::Size(letterbox_cols, letterbox_rows));

    memcpy(input_data, letterbox.image.data, letterbox_rows * letterbox_cols * 3);
}


int centernet_preprocess_no_copy(const char* imagepath, void* buff_ptr, unsigned int buff_size)
{
    int img_c = 3;
    int letterbox_rows = LETTERBOX_ROWS;
    int letterbox_cols = LETTERBOX_COLS;
    int img_size = letterbox_rows * letterbox_cols * img_c;
    unsigned int data_size = img_size * sizeof(uint8_t);

    if (data_size > buff_size) {
        printf("data size (%u) > buff size (%u), please check code.\n", data_size, buff_size);
        return -1;
    }

    get_input_data(imagepath, (unsigned char*)buff_ptr, letterbox_rows, letterbox_cols);

    return 0;
}
模型输出包含三个张量:hm、wh 和 reg。其中hm用于检测目标中心点的位置和类别。wh用于还原原始图像中的边界框尺寸。reg用于将低分辨率特征图上的中心点坐标“反量化”回原始图像坐标。
需要对npu输出张量进行解码,如对hm进行3*3池化操作,获取区域的极大值来确定目标类别,再结合wh和reg来确定检测框,后处理代码centernet_post.cpp如下。
#include <iostream>
#include <vector>
#include <algorithm>
#include <cmath>
#include <cstring>
#include <map>
#include <opencv2/opencv.hpp>

#include "model_config.h"

#define INPUT_W          LETTERBOX_COLS
#define INPUT_H           LETTERBOX_ROWS
#define FEAT_SIZE        64		//输出特征维度
#define DOWN_SCALE       4		//下采样

struct Detection {
    float x1, y1, x2, y2;
    float score;
    int class_id;
};

struct Object {
    cv::Rect_<float> rect;
    int label;
    float prob;
};

static float calculate_iou(const Detection& a, const Detection& b)
{
    float inter_x1 = std::max(a.x1, b.x1);
    float inter_y1 = std::max(a.y1, b.y1);
    float inter_x2 = std::min(a.x2, b.x2);
    float inter_y2 = std::min(a.y2, b.y2);

    float w = std::max(0.0f, inter_x2 - inter_x1);
    float h = std::max(0.0f, inter_y2 - inter_y1);
    float inter_area = w * h;

    float area_a = (a.x2 - a.x1) * (a.y2 - a.y1);
    float area_b = (b.x2 - b.x1) * (b.y2 - b.y1);
    float union_area = area_a + area_b - inter_area;
    return union_area < 1e-6 ? 0 : inter_area / union_area;
}

static std::vector<Detection> nms(std::vector<Detection> dets, float thresh)
{
    std::vector<Detection> res;
    if (dets.empty()) return res;

    std::sort(dets.begin(), dets.end(), [](const Detection& a, const Detection& b){
        return a.score > b.score;
    });

    std::vector<bool> suppress(dets.size(), false);
    for (size_t i = 0; i < dets.size(); ++i)
    {
        if (suppress[i]) continue;
        res.push_back(dets[i]);
        for (size_t j = i + 1; j < dets.size(); ++j)
        {
            if (suppress[j]) continue;
            if (calculate_iou(dets[i], dets[j]) > thresh)
                suppress[j] = true;
        }
    }
    return res;
}


static int detect_centernet_rt(const cv::Mat& bgr, std::vector<Object>& objects, float** output)
{
    const int feat_size = FEAT_SIZE;
    const int num_cls = CLASS_NUM;

    const float* hm   = output[0];
    const float* wh   = output[1];
    const float* reg  = output[2];

    // 存储每个 (y,x) 位置的最佳类别和最高分
    struct PointScore {
        float max_score = -1e9f;
        int best_cls = -1;
    };
    std::vector<PointScore> point_best(feat_size * feat_size);

    // ===================== 同一个位置只留最高分类别 =====================
    for (int c = 0; c < num_cls; c++) {
        for (int y = 0; y < feat_size; y++) {
            for (int x = 0; x < feat_size; x++) {
                int idx = c * feat_size * feat_size + y * feat_size + x;
                float score = hm[idx];

                if (score < SCORE_THRESHOLD)
                    continue;

                int pos_idx = y * feat_size + x;
                if (score > point_best[pos_idx].max_score) {
                    point_best[pos_idx].max_score = score;
                    point_best[pos_idx].best_cls = c;
                }
            }
        }
    }

    std::vector<Detection> dets;


    for (int y = 0; y < feat_size; y++) {
        for (int x = 0; x < feat_size; x++) {
            int pos_idx = y * feat_size + x;
            int best_cls = point_best[pos_idx].best_cls;
            float best_score = point_best[pos_idx].max_score;

            if (best_cls < 0 || best_score < SCORE_THRESHOLD)
                continue;

            // 只取当前位置分数最高的类别,其他类别全部跳过
            int idx = best_cls * feat_size * feat_size + y * feat_size + x;

            float rx = reg[0 * feat_size * feat_size + y * feat_size + x];
            float ry = reg[1 * feat_size * feat_size + y * feat_size + x];
            float w  = wh[0 * feat_size * feat_size + y * feat_size + x];
            float h  = wh[1 * feat_size * feat_size + y * feat_size + x];

            float cx = x + rx;
            float cy = y + ry;
            float x1 = (cx - w * 0.5f) * 4;
            float y1 = (cy - h * 0.5f) * 4;
            float x2 = (cx + w * 0.5f) * 4;
            float y2 = (cy + h * 0.5f) * 4;

            Detection d;
            d.x1 = x1; d.y1 = y1; d.x2 = x2; d.y2 = y2;
            d.score = best_score;
            d.class_id = best_cls;
            dets.push_back(d);
        }
    }

    // ==================== 同类别 NMS====================
    std::map<int, std::vector<Detection>> class_map;
    for (auto& d : dets) {
        class_map[d.class_id].push_back(d);
    }

    std::vector<Detection> final_dets;
    for (auto& kv : class_map) {
        auto& list = kv.second;
        auto nms_result = nms(list, 0.3f);
        final_dets.insert(final_dets.end(), nms_result.begin(), nms_result.end());
    }

    // 排序
    std::sort(final_dets.begin(), final_dets.end(), [](const Detection& a, const Detection& b) {
        return a.score > b.score;
    });
    if (final_dets.size() > 100)
        final_dets.resize(100);

    // 坐标映射
    float scale = std::min((float)INPUT_W / bgr.cols, (float)INPUT_H / bgr.rows);
    int new_w = (int)(bgr.cols * scale);
    int new_h = (int)(bgr.rows * scale);
    int pad_x = (INPUT_W - new_w) / 2;
    int pad_y = (INPUT_H - new_h) / 2;

    objects.clear();
    for (auto& d : final_dets) {
        Object obj;
        obj.rect.x = (d.x1 - pad_x) / scale;
        obj.rect.y = (d.y1 - pad_y) / scale;
        obj.rect.width  = (d.x2 - d.x1) / scale;
        obj.rect.height = (d.y2 - d.y1) / scale;
        obj.label = d.class_id;
        obj.prob = d.score;

        obj.rect.x = std::max(0.0f, std::min(obj.rect.x, (float)bgr.cols - 1));
        obj.rect.y = std::max(0.0f, std::min(obj.rect.y, (float)bgr.rows - 1));
        objects.push_back(obj);
    }

    return 0;
}


static void draw_objects(const cv::Mat& bgr, const std::vector<Object>& objects)
{
    cv::Mat image = bgr.clone();
    for (size_t i = 0; i < objects.size(); i++) {
        const Object& obj = objects[i];
        fprintf(stderr, "%2d: %3.0f%%, [%4.0f, %4.0f, %4.0f, %4.0f], %s\n",
                obj.label, obj.prob * 100,
                obj.rect.x, obj.rect.y,
                obj.rect.x + obj.rect.width,
                obj.rect.y + obj.rect.height,
                g_classes_name[obj.label].c_str());

        cv::rectangle(image, obj.rect, cv::Scalar(0, 255, 0), 2);
        char text[256];
        sprintf(text, "%s %.1f%%", g_classes_name[obj.label].c_str(), obj.prob * 100);

        int baseLine = 0;
        cv::Size label_size = cv::getTextSize(text, cv::FONT_HERSHEY_SIMPLEX, 0.5, 1, &baseLine);
        int x = (int)obj.rect.x;
        int y = (int)obj.rect.y - label_size.height - baseLine;
        if (y < 0) y = 0;
        if (x + label_size.width > image.cols) x = image.cols - label_size.width;

        cv::rectangle(image, cv::Rect(x, y, label_size.width, label_size.height + baseLine),
                      cv::Scalar(255, 255, 255), -1);
        cv::putText(image, text, cv::Point(x, y + label_size.height),
                    cv::FONT_HERSHEY_SIMPLEX, 0.5, cv::Scalar(0, 0, 0));
    }
    cv::imwrite("output_centernet.png", image);
}

int centernet_postprocess(const char *imagepath, float **output)
{
    cv::Mat m = cv::imread(imagepath, 1);
    if (m.empty()) {
        fprintf(stderr, "cv::imread %s failed\n", imagepath);
        return -1;
    }
    std::vector<Object> objects;
    detect_centernet_rt(m, objects, output);
    draw_objects(m, objects);
    fprintf(stderr, "detection num: %zu\n", objects.size());
    return 0;
}
6.3编译
在ubuntu服务器上编译,再把模型发送至板端进行推理,需要用到交叉编译。
6.3.1解压opencv压缩包
# 进入目录
cd ../../../3rdparty/opencv/
# 解压,选择对应平台
# armhf, eg: V85x, R853
unzip opencv-3.4.16-gnueabihf-linux.zip
# linux aarch64, eg: T527/MR527/MR536/T536/A733/T736
unzip opencv-4.9.0-aarch64-linux-sunxi-glibc.zip
# android aarch64, eg: T527/A733/T736
unzip opencv-4.9.0-android.zip
6.3.2准备交叉编译工具链
# 进入目录
cd ../../0-toolchains/
# 解压
# armhf, V85x, R853
unzip arm-openwrt-linux-muslgnueabi.zip
chmod 777 -R ./arm-openwrt-linux-muslgnueabi
# aarch64, MR527, T527, MR536, T536, A733, T736
tar xvf gcc-arm-10.3-2021.07-x86_64-aarch64-none-linux-gnu.tar.xz
# aarch64 for debian11, T527, A733, T736
tar vxf gcc-arm-10.2-2020.11-x86_64-aarch64-none-linux-gnu.tar.xz
6.3.3编译可执行文件
以T736平台为例 ,编译生成的文件在centernet/install/centernet_demo_linux_t736
cd ../examples
./build_linux.sh -t t736 -p centernet
6.4板端推理
push 可执行文件、模型文件、输入图片到板端目录
adb push install/centernet_demo_linux_t736 /mnt/UDISK/运行:
adb shell
cd /mnt/UDISK/centernet_demo_linux_t736

# 可选
export LD_LIBRARY_PATH=./lib

# 运行可执行文件
# ./centernet_demo_t736 -h 查看执行示例说明
chmod +x ./centernet_demo_t736
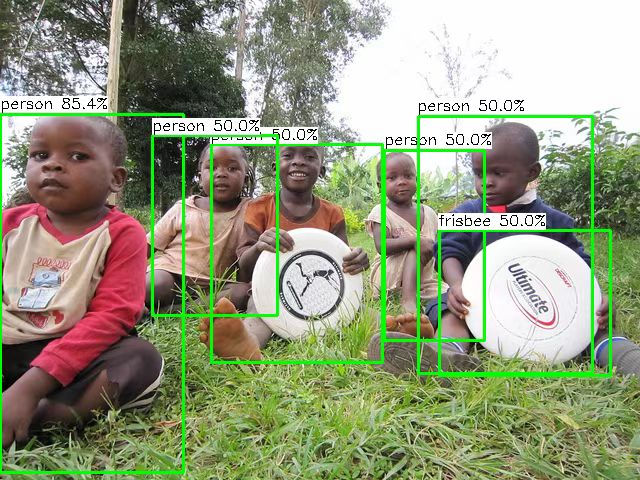
./centernet_demo_t736 -nb model/centernet_rt_uint8_t736.nb -i model/people.jpg
目标检测结果output_nb.png:

AtomGit 是由开放原子开源基金会联合 CSDN 等生态伙伴共同推出的新一代开源与人工智能协作平台。平台坚持“开放、中立、公益”的理念,把代码托管、模型共享、数据集托管、智能体开发体验和算力服务整合在一起,为开发者提供从开发、训练到部署的一站式体验。
更多推荐



 10
10 0
0- 0


 已为社区贡献1条内容

所有评论(0)