仿 muduo库 从零实现高并发TCP服务框架 (二)
仿 muduo库 从零实现高并发TCP服务框架-CSDN博客 https://blog.csdn.net/2502_91433987/article/details/161161792?spm=1011.2124.3001.6209附: 项目代码链接:
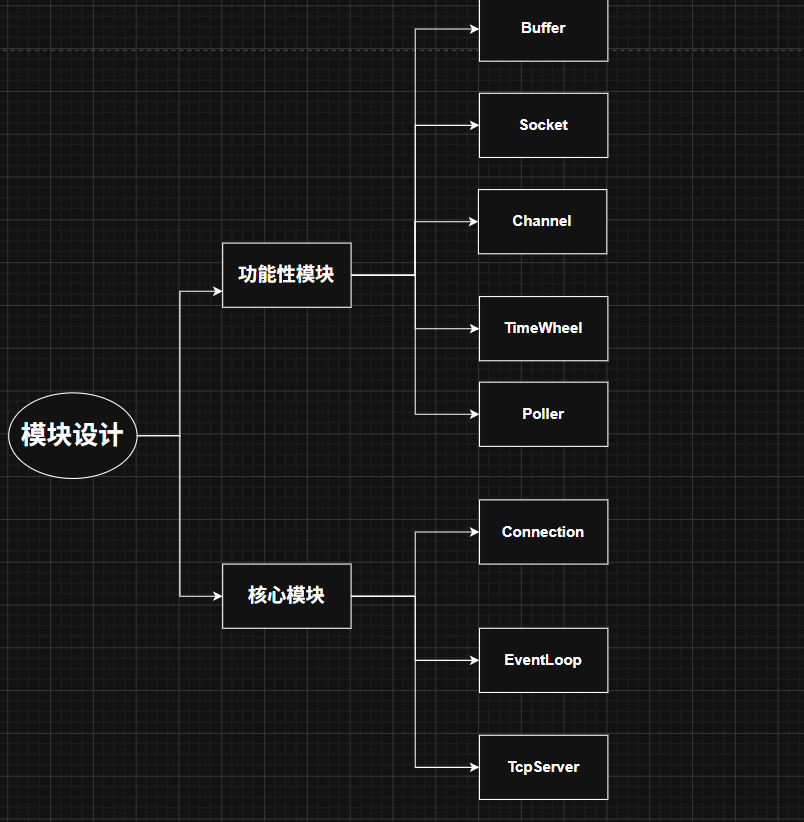
上一章简单介绍了项目的设计思想和模块设计,并且完成了日志模块、Buffer模块、Socket模块、Channel模块、Poller模块这些基础功能性模块的设计细节。
这一章我们继续来完成接下来的功能性模块和核心模块,我将逐步介绍如何在高并发下保持高性能的核心设计,我们从EventLoop模块开始……
5. 模块实现
5.5 EventLoop模块
通过前文的只言片语,我们了解到它是用来事件回调执行的模块。没错,在Reactor模型里,它就是扮演事件派发和事件执行的角色。
对于事件执行,有了Channel和Poller模块的铺垫,是可以想象到:上层设置了Channel的事件回调和监听事件;设置了监听事件之后呢,立马交由Poller去监听着;当这个Channel的某个事件触发了,Poller也就得知了;Poller将所有触发事件的Channel交给EventLoop,由EventLoop来执行这些事件回调。这一切顺理成章……
那么事件派发呢?这不好理解,涉及到One Thread One Loop的设计:
表面上看,One Thread One Loop 指的是每个线程都有一个独立的EventLoop;但是,实际上其中内核不止于此,更重要的是,每个线程独立管理连接(Connection模块还没写,只需要了解:一个Connecion,对应一个文件描述符,对应一个Channel),具体体现在各自管理的连接的所有操作都必须在各自线程执行,这样就能完美避开资源在多线程被使用所需要的互斥竞争,其本质在于各线程独立占有并使用资源,也就是减少了临时资源。
如何实现?
首先,每一个EventLoop里独立管理了一个Poller监听,那么从新连接的建立(Connection模块的事儿)到监听事件,再到事件触发,交给EventLoop执行事件回调,他们不就都在各自线程执行了。好了,感觉已经妥了?真的这样就够了吗?当然不是,且不说在高并发的复杂场景下,各线程调用其他线程所管理的连接的回调其实很常见;再有,业务逻辑中可能会有不同的连接间的交互问题,比如说聊天业务,不同线程间的连接互相发消息是基操了。
既然One Loop One Poller 不够,那咋办?
隆重介绍,真正的核心设计:任务队列,每个Loop维护一个任务队列,只要在执行回调前,判断一下自己是否处在对的线程,如果不是,把回调放入队列,到时依次执行。
好的,接下来,我们根据上述来梳理一下。
有什么:
1. 线程id:对应线程的标识、2. _poller:事件监控器、3. 任务队列、4. eventfd:事件监控唤醒器、5. _mutex:保护任务队列线程安全
class EventLoop
{
private:
    using task_t = std::function<void()>;
    std::thread::id _thread_id;
    Poller _poller;         //事件监控
    int _event_fd;          //唤醒事件监控阻塞的情况
    std::shared_ptr<Channel> _event_channel;  //封装使用eventfd,同样用Poller监听

    std::vector<task_t> _tasks;     // 任务池--被其他线程获取的任务,压入任务池
    std::mutex _mutex;             //保护任务池的线程安全
    TimeQueue _time_wheel; // 时间轮,整合定时器模块
}
eventfd相关调用(epoll_wait阻塞的时候,也就是暂时没有事件触发的时候,这个线程阻塞在那里等。这对于我们来说太浪费了,因为任务队列中很有可能还有任务等着执行呢,所以每次将任务压入队列,我们就让eventfd唤醒epoll_wait)
class EventLoop
{
public:
    static int CreateEventfd()
    {
        int ret = eventfd(0, EFD_CLOEXEC | EFD_NONBLOCK);
        if(ret < 0)
        {
            LOG(FATAL)<< "create eventfd failed";
            abort();
        }
        return ret;
    }
    void ReadEventfd()
    {
        uint64_t res = 0;
        int ret = read(_event_fd, &res, sizeof res);
        if(ret < 0)
        {
            if(errno == EINTR || errno == EAGAIN)
                return;
            LOG(FATAL)<< "read eventfd failed";
            abort();
        }
        return;
    }
    void WakeUpEventfd()
    {
        uint64_t res = 1;
        int ret = write(_event_fd, &res, sizeof res);
        if(ret < 0)
        {
            if(errno == EINTR)
                return;
            LOG(FATAL)<< "write eventfd failed";
            abort();
        }
        return;
    }
}
(eventfd其实很简单,你往里写一次,那读事件就被唤醒,所以就监听读事件,每当你往里写,epoll_wait不也被唤醒了吗。所以说明明是写,却给他取名“WakeUp”,而读事件回调实际上啥事儿没干)
干什么:
1. 设置eventfd的读回调和读监听;
2. 依次执行任务队列的任务的接口;(注释写一次拿出来降低互斥冲突,啥冲突?别的线程此时还能向队列压入任务呢)
3. 开启回调执行循环(a. 拿到触发事件的Channel,b. 执行Channel触发事件的回调,c. 执行任务队列任务)
4. 压入任务队列的接口 (先判断一波,在对的线程,直接执行;不在,插入任务队列)
5. 对Poller监控的Channel及其事件的增删改接口(Channel中存了EventLoop的指针,所以这个刚好在这里实现)
class EventLoop
{
public:
    EventLoop()
        :_thread_id(std::this_thread::get_id())
        ,_poller(Poller())
        ,_event_fd(CreateEventfd())
        ,_event_channel(std::make_shared<Channel>(this, _event_fd))
        ,_time_wheel(this)
    {
        // 开启对eventfd的读事件监听,通过写入唤醒读事件,从而唤醒事件监听的阻塞
        _event_channel->SetReadCall(std::bind(&EventLoop::ReadEventfd, this));
        _event_channel->SetRead();
    }
    ~EventLoop() {LOG(INFO)<< "eventloop released"; }
    void RunAllTasks()
    {
        std::vector<task_t> working; //上锁,直接一次拿出来,后面慢慢执行,大大降低互斥冲突
        {
            std::unique_lock<std::mutex> lock(_mutex);
            working.swap(_tasks);
        }
        for(auto f : working) //依次执行
            f();
    }
    void Start()
    {
        while(true)
        {
            //1.监听事件
            std::vector<Channel *> actives;
            _poller.Poll(&actives);
            //2.处理事件
            for(auto c : actives)
                c->HandleEvents();

            //3.执行任务
            RunAllTasks();
        }
    }
// 运行任务 和操作任务池
    bool IsInLoop()
    {return _thread_id == std::this_thread::get_id(); }
    // 压入对应Loop任务队列
    void QueueInLoop(task_t task)
    {
        {
            std::unique_lock<std::mutex> lock(_mutex);
            _tasks.push_back(task);
        }
        WakeUpEventfd(); // 防止事件监听被阻塞,延误任务执行
    }
    void RunInLoop(task_t task)
    {
        if(IsInLoop()) //是当前线程的任务, 直接执行
            return task();
        return QueueInLoop(task);
    }
// poller 相关接口
    void UpdateEvent(Channel *chan)
    {_poller.Update(chan); }
    void RemoveEvent(Channel *chan)
    {_poller.Remove(chan); }
// timewheel 相关接口
    void AddTimer(uint64_t timer_id, int delay, OnTimeCallback callback)
    {_time_wheel.AddTimer(timer_id, delay, callback); }
    void RefreshTimer(uint64_t timer_id)
    {_time_wheel.RefreshTimer(timer_id); }
    void CancelTimer(uint64_t timer_id)
    {_time_wheel.CancelTimer(timer_id); }
    bool HasTimer(uint64_t timer_id)
    {return _time_wheel.HasTimer(timer_id);}
};
void Channel::Update(){loop->UpdateEvent(this);}
void Channel::Remove(){loop->RemoveEvent(this);}
void TimeQueue::AddTimer(uint64_t timer_id, int delay, OnTimeCallback callback)
{_loop->RunInLoop(std::bind(&TimeQueue::AddTimerInLoop, this, timer_id, delay, callback)); }
void TimeQueue::RefreshTimer(uint64_t timer_id)
{_loop->RunInLoop(std::bind(&TimeQueue::RefreshTimerInLoop, this, timer_id)); }
void TimeQueue::CancelTimer(uint64_t timer_id)
{_loop->RunInLoop(std::bind(&TimeQueue::CancelTimerInLoop, this, timer_id)); }
5.6 TimeWheel模块
时间轮模块,时间轮是EventLoop的一个组件,虽说只是一个组件,但它代码量不小,而且不简单。防止恶意的超时连接占用资源,我们可以用时间轮和定时器设置超时断连机制;并且可以提供添加定时任务的接口,上层也能自由添加定时任务。
如何实现?
定时器+时间轮+timerfd
定时器(Timer):绑定一个定时任务,这个对象析构,这个任务就被执行
using OnTimeCallback = std::function<void()>;
using ReleaseCallback = std::function<void()>;
class Timer
{
private:
    uint64_t _timer_id;// 定时器id
    int _delay; // 延迟时间
    bool _cancled;
    OnTimeCallback _task; // 到时回调(同样在释放时执行)
    ReleaseCallback _release; // 释放回调
public:
    Timer(uint64_t timer_id, int delay, OnTimeCallback &callback)
        : _timer_id(timer_id), _delay(delay), _task(callback), _cancled(false)
    {}
    ~Timer()
    {
        if (_release) _release();
        // 如果定时器被取消,则无需执行回调函数
        if(_task && !_cancled) _task();
    }

    void Cancel() {_cancled = true;}
    void SetRelease(const ReleaseCallback &relscall) {_release = relscall;}

    int _Delay() {return _delay;}
};
时间轮(_timewheel)和滴答指针(_time):时间轮本质是一个装了定时器的shared_ptr的桶(vector<vector<TimerPtr>>),滴答指针是桶的下标,每隔一秒往后走一步,不断在桶里循环。滴答指针每到一个位置,就clear()……
都串起来了,为什么定时器要在析构的时候执行任务,为什么事件轮里装的是shared_ptr,还有如何延迟任务(你不可能知到一个连接从连上到断开要多久,你只能在连接再次发送请求后延迟断连任务)。只有当shared_ptr的引用计数为0时,也就是时间轮中不再有这个定时器的shared_ptr时,定时器析构,自动执行任务(你仔细看它还自动把自己从_timermap里删了);延迟任务,你只需要把这个定时器的shared_ptr放入后面的桶里,就能延长定时器的生命周期,也就延迟了任务。
(别急看代码,先看完timerfd的部分)
#define MAXSECOND 60
class TimeQueue
{
    using TimerPtr = std::shared_ptr<Timer>;
    using TimerWeakPtr = std::weak_ptr<Timer>;
private:
    int _time; // 滴答指针 秒
    int _capacity; // 时间轮节点数量 以秒为单位,60个节点
    std::vector<std::vector<TimerPtr>> _timewheel; // 时间轮 本轮
    std::unordered_map<uint64_t, TimerWeakPtr> _timermap; // 用weakptr保存timer指针,不至于让sharedptr引用计数增大

    EventLoop *_loop;
    int _timerfd; // 自动时间托管
    std::unique_ptr<Channel> _timer_channel;
private:
    //跑起滴答指针,执行到时任务
    void RunOnTimeTask()
    {
        //向后跑一秒
        _time = (_time + 1) % _capacity;
        // task被设置在析构时执行,当sharedptr的引用计数为0,自动执行
        _timewheel[_time].clear();
    }
       //删除保存的指针
    void ReleasePtr(uint64_t timer_id)
    {
        // LOG(INFO)<< "timer-"<< timer_id<< " released";
        auto it = _timermap.find(timer_id);
        assert(it != _timermap.end());
        _timermap.erase(it);
    }
    //添加计时器
    void AddTimerInLoop(uint64_t timer_id, int delay, OnTimeCallback callback)
    {
        assert(delay < _capacity && delay > 0);
        // 检查timer_id的使用情况
        auto it = _timermap.find(timer_id);
        if(it != _timermap.end())
            return;
        // 构造一个计时器
        TimerPtr pt = std::make_shared<Timer>(timer_id, delay, callback);
        pt->SetRelease(std::bind(&TimeQueue::ReleasePtr, this, timer_id));
        // 添加timer到当前时间之后delay秒的位置
        int pos = (_time + delay) % _capacity;
        _timewheel[pos].push_back(pt);
        // 保存timer指针
        _timermap[timer_id] = TimerWeakPtr(pt);
    }
    //刷新定时任务
    void RefreshTimerInLoop(uint64_t timer_id)
    {
        auto it = _timermap.find(timer_id);
        assert(it != _timermap.end());
        //延时到delay秒之后
        int delay = it->second.lock()->_Delay();
        _timewheel[(_time + delay) % _capacity].emplace_back(it->second);
    }
    //删除一个计时器
    void CancelTimerInLoop(uint64_t timer_id)
    {
        auto it = _timermap.find(timer_id);
        if(it == _timermap.end()) return;
        //设置canceled
        it->second.lock()->Cancel();
        //不能删除保存的指针,因为无法删除timewheel中的所有记录
    }
public:
    TimeQueue(EventLoop *loop)
        :_time(0), _capacity(MAXSECOND), _timewheel(_capacity)
        , _loop(loop), _timerfd(CreateTimerfd()), _timer_channel(std::make_unique<Channel>(_loop, _timerfd))
    {
        // 将timerfd添加到读监听, 自动托管跑起滴答指针
        _timer_channel->SetReadCall(std::bind(&TimeQueue::OnTime, this));
        _timer_channel->SetRead();
    }
    ~TimeQueue(){}

    void AddTimer(uint64_t timer_id, int delay, OnTimeCallback callback);
    void RefreshTimer(uint64_t timer_id);
    void CancelTimer(uint64_t timer_id);
    // 都是在函数内部被使用(注意线程安全),
    bool HasTimer(uint64_t timer_id)
    {
        auto it = _timermap.find(timer_id);
        return (it != _timermap.end());
    }
};
timerfd(时间驱动):想过没,刚刚说让滴答指针每隔一秒走一步,谁去驱动它走呢,谁来计时呢?系统提供的timerfd来,简单来说,创建好timerfd后,给它设置超时时长,每超时一次,都会记录下来(累加次数),一旦超时一次,也会唤醒读事件,而读取出的正是刚刚一段时间的超时次数。这样的性质就是为了计时设计的:设置超时时长为1s,用Poller监听,每次读出超时多少次,滴答指针就跑多少步。(为什么会读到超时多次呢?超时一次时,读事件立马被唤醒,但是读回调还得排队执行啊,别的事件回调在跑的时候,时间也是会跑的……)
class TimeQueue
{
public:
    int _timerfd; // 自动时间托管
    std::unique_ptr<Channel> _timer_channel;
private:
    int CreateTimerfd()
    {
        int timerfd = timerfd_create(CLOCK_MONOTONIC, 0);
        if(timerfd < 0)
        {
            LOG(ERROR)<< "timerfd_create failed...";
            abort();
        }
        struct itimerspec itime;
        itime.it_value.tv_sec = 1;
        itime.it_value.tv_nsec = 0;// 第一次1s超时
        itime.it_interval.tv_sec = 1;
        itime.it_interval.tv_nsec = 0;// 第一次之后每隔一秒超时
        int ret = timerfd_settime(timerfd, 0, &itime, NULL);
        if(ret < 0)
        {
            LOG(ERROR)<< "timerfd_settime failed...";
            abort();
        }
        return timerfd;
    }
    int ReadTimefd()
    {
        uint64_t res; //返回超时多少次
        int ret = read(_timerfd, &res, sizeof res);
        if(ret < 0)
        {
            LOG(ERROR)<< "read timerfd failed...";
            abort();
        }
        return res;
    }
    void OnTime()
    {
        // 超时多少秒,滴答指针跑多少次
        int times = ReadTimefd();
        for(int i = 0; i < times; ++i)
            RunOnTimeTask();
    }
}
(这个timerfd和eventfd都是单一功能的这种工具,诶,你有没有想过有了timerfd之后,即使别的事件不会触发,但是timerfd是一定会触发的,也就是说epoll_wait不会永远阻塞住,那么eventfd还有意义吗)*思考*
(timewheel 的 AddTimer,RefreshTimer,CancelTimer三个接口为什么还有一个”InLoop“的版本,而且它们的实现怎么在EventLoop模块的后面?)*思考*
5.7 LoopThread模块 & LoopThreadPool模块
这两个模块没有出现在前面的介绍里,不要担心,整体来说他们功能比较简单,也比较小。
LoopThread:
功能就是创建一个线程和一个EventLoop,对应起来。
说起来容易,只是有一个很尴尬的问题,EventLoop是晚于线程构建的。为啥呀?别忘了EventLoop的thread_id怎么来的:获取当前线程Id。其实,细想一番这也是合情合理的,毕竟是鸡生的蛋嘛;那么,尴尬又在哪里呢?有一种情况奥,当主线程先创建出子线程,立马,去拿这个Event Loop对象的指针,但是这时子线程还没构建出EventLoop,那主线程拿到的就是NULL了,那就不玩完了……
为了解决这个异步构建和获取的问题,我们用std::mutex + std::condition_variable 来解决,首先EventLoop对象的指针是临界资源,获取和赋值时加锁保护;当其他线程想要获取_loop时,1)如果没有竞争到锁,说明_loop在赋值或者别的线程在获取,等到拿到锁时,说明了赋值成功或者有一个线程获取到了安全的指针,所以我这次获取是安全的;2)如果竞争到锁,但是发现_loop是NULL,那么利用条件变量,我先睡会,锁给别人用,等到子线程给_loop赋值完,就唤醒所有沉睡的线程,他们醒来发现已经赋值好了,就都去竞争锁,依次就获取到了安全的指针。
// 管理一个EventLoop对应一个thread
class LoopThread
{
private:
    std::mutex _mutex;             // 保护_loop
    std::condition_variable _cond; // 条件变量
    EventLoop* _loop;    // 在线程内部构造, 先给NULL
    std::thread _thread;
private:
    void ThreadEntry()
    {
        LOG(DEBUG)<< "New Thread : "<< std::this_thread::get_id();
        EventLoop loop; // 真正创建一个loop
        {   // 加锁保护给_loop赋值的过程
            std::unique_lock<std::mutex> lock(_mutex);
            _loop = &loop;
            _cond.notify_all();
        }
        // 运行起来eventloop
        loop.Start();
        LOG(INFO)<< "thread: "<< std::this_thread::get_id()<<" released";
    }
public:
    LoopThread() :_thread(&LoopThread::ThreadEntry, this), _loop(nullptr)
    {}
    ~LoopThread() {LOG(INFO)<< "threadloop released"; }
    // 获取EventLoop对象的指针
    EventLoop* GetLoop()
    {
        EventLoop* loop = nullptr;
        {   // 加锁保护获取_loop的过程
            std::unique_lock<std::mutex> lock(_mutex);
            // 等待另一线程把_loop构造了
            _cond.wait(lock, [this](){return (_loop != nullptr); });
            loop = _loop;
        }
        return loop;
    }
};
LoopThreadPool:
一个线程池?更准确一点说应该是Loop池。这里不仅仅管理了IO线程,还管理着主线程的事件循环。还记得文章最最开始说的主从Reactor架构吗?看到这里说起来就比较容易懂了:
一个Reactor对应了一个EventLoop,一个EventLoop对应了一个线程,主从Reactor就对应着主从线程。一切都清晰起来了,主Reactor对应着主线程,就专门干监听新连接的活,监听到的新连接就分派给从Reactor,也就是子线程,专门监听分派给我的连接的的事件,并且执行触发事件的回调,也就是IO,所以子线程也叫IO线程。多个线程同时跑,这就是高并发的精髓,结合现代设备的多核特点,每个核都有一个线程在跑,性能被完全压榨出来了。
这个模块的功能很简单:创建子线程、分配Loop(轮转依次分配:一人一个轮着来)
class LoopThreadPool
{
private:
    EventLoop *_base_loop;  // 主Reactor---只负责建立新连接
    int _IO_thread_count;   // IO线程的数量
    int _index;             // 轮转分配新连接的下标 --- 分配策略:轮转依次分配
    std::vector<LoopThread *> _loop_thread_pool;  // 从Reactor的线程池 从Reactor---负责连接的事件监听,和事件的处理
    std::vector<EventLoop *> _event_loop_pool;    // 线程池对应的eventloop池,一次性拿出
public:
    LoopThreadPool(EventLoop *baseloop) :_base_loop(baseloop), _IO_thread_count(0), _index(0)
    {}
    // 设置IO线程的数量
    void SetCount(int count) {_IO_thread_count = count;/*LOG(DEBUG)<< _IO_thread_count;*/ }
    // 构建loopthread
    void Create()
    {
        if(_IO_thread_count == 0) return;
        _loop_thread_pool.resize(_IO_thread_count);
        _event_loop_pool.resize(_IO_thread_count);
        for(int i = 0; i < _IO_thread_count; ++i)
        {
            _loop_thread_pool[i] = new LoopThread();
            _event_loop_pool[i] = _loop_thread_pool[i]->GetLoop();
        }
    }
    // 获取下一个loop
    EventLoop *GetNextLoop()
    {
        // _IO_thread_count为0, 单Reactor模式
        if(_IO_thread_count == 0) return _base_loop;
        // 轮转依次分配
        _index = (_index + 1) % _IO_thread_count;
        return _event_loop_pool[_index];
    }
};
(你看这里就是创建完线程立马就拿_loop,所以说前面的设计不可谓多此一举)
这章说完,最开始的两个关键词:One Thread One Loop、主从Reactor 也有了概念,对于高并发和Reactor的理解也深入很多。接下来一章,我们将啃下一块最容易出Bug、最难理解的硬骨头——Connection。
持续关注,未完待续……

AtomGit 是由开放原子开源基金会联合 CSDN 等生态伙伴共同推出的新一代开源与人工智能协作平台。平台坚持“开放、中立、公益”的理念,把代码托管、模型共享、数据集托管、智能体开发体验和算力服务整合在一起,为开发者提供从开发、训练到部署的一站式体验。
更多推荐



 28
28 0
0- 0


 已为社区贡献2条内容

所有评论(0)