【maaath】Flutter for OpenHarmony 测距仪应用开发实战
Flutter for OpenHarmony 测距仪应用开发实战:从零实现AR增强现实与多点测量
欢迎加入开源鸿蒙跨平台社区:https://openharmonycrossplatform.csdn.net
作者:maaath
一、引言
随着 OpenHarmony 生态的快速发展,跨平台开发框架在鸿蒙设备上的适配成为开发者关注的焦点。Flutter 作为业界领先的跨平台 UI 框架,已经在 OpenHarmony 上实现了良好的运行支持。本文将带领读者使用 Flutter for OpenHarmony 技术栈,从零构建一款功能完整的测距仪应用。
测距仪应用是日常生活中非常实用的工具,无论是家居装修测量房间尺寸、户外运动测量跑道长度,还是办公场景测量办公桌尺寸,都能派上用场。我们将实现以下核心功能:
- 相机测距:模拟相机取景框进行距离测量
- AR增强现实测距:通过AR技术在真实环境中标注测量点
- 多点测量:支持多个测量点组成的折线路径测量
- 测量单位切换:支持米、厘米、毫米、英寸、英尺、码六种单位
- 历史测量记录:记录管理、场景标注、收藏筛选
- 测量数据对比:按场景或模式维度进行数据对比分析
- 测量结果导出:支持CSV、JSON、PDF格式导出
二、项目架构设计
在开始编码之前,我们先设计应用的架构。整个应用采用经典的三层架构:
lib/
├── models/              # 数据模型层
│   └── rangefinder_model.dart
├── services/            # 业务逻辑层
│   └── rangefinder_service.dart
└── pages/               # UI展示层
    └── rangefinder/
        ├── rangefinder_home_page.dart   # 主页面
        ├── camera_measure_page.dart     # 相机测距
        ├── ar_measure_page.dart         # AR测距
        ├── history_page.dart            # 历史记录
        ├── comparison_page.dart         # 数据对比
        ├── export_page.dart             # 数据导出
        └── multi_point_page.dart        # 多点测量
这种分层设计的好处是职责清晰、易于维护。数据模型层定义数据结构,业务逻辑层处理数据操作,UI层只负责展示和交互。
三、数据模型设计
首先,我们定义核心的数据模型。距离单位枚举支持六种常用单位的相互转换:
enum DistanceUnit {
  meter('米', 'm', 1.0),
  centimeter('厘米', 'cm', 100.0),
  millimeter('毫米', 'mm', 1000.0),
  inch('英寸', 'in', 39.3701),
  foot('英尺', 'ft', 3.28084),
  yard('码', 'yd', 1.09361);

  final String label;
  final String symbol;
  final double meterFactor;

  const DistanceUnit(this.label, this.symbol, this.meterFactor);

  double convert(double value, DistanceUnit target) {
    if (this == target) return value;
    final meters = value / meterFactor;
    return meters * target.meterFactor;
  }
}
每个单位都存储了与米的换算因子,通过 convert 方法可以轻松实现任意两个单位之间的转换。例如,将 1 米转换为英寸:DistanceUnit.meter.convert(1, DistanceUnit.inch) 得到 39.37。
接下来是测量点模型,它代表空间中的一个点,并提供了计算两点间距离的方法:
class MeasurementPoint {
  final String id;
  double x;
  double y;
  double z;
  String? label;

  MeasurementPoint({
    required this.id,
    this.x = 0,
    this.y = 0,
    this.z = 0,
    this.label,
  });

  double distanceTo(MeasurementPoint other) {
    final dx = x - other.x;
    final dy = y - other.y;
    final dz = z - other.z;
    return sqrt(dx * dx + dy * dy + dz * dz);
  }
}
测量记录模型是整个应用的核心数据载体,它包含测量点列表、测量模式、时间戳、场景标注等信息:
class DistanceMeasurement {
  final String id;
  final List<MeasurementPoint> points;
  final DateTime timestamp;
  final MeasurementMode mode;
  String? note;
  SceneAnnotation? sceneAnnotation;
  bool isFavorite;

  double get distanceMeters {
    if (points.length < 2) return 0;
    var total = 0.0;
    for (int i = 0; i < points.length - 1; i++) {
      total += points[i].distanceTo(points[i + 1]);
    }
    return double.parse(total.toStringAsFixed(4));
  }

  String getFormattedDistance(DistanceUnit unit) {
    final value = getDistanceInUnit(unit);
    return '${value.toStringAsFixed(2)} ${unit.symbol}';
  }
}
distanceMeters 属性会遍历所有相邻点,累加各段距离得到总距离。getFormattedDistance 方法则根据当前选中的单位格式化输出。
四、业务逻辑层实现
Service 层采用单例模式,统一管理所有测量数据和状态:
class RangefinderService {
  static final RangefinderService _instance = RangefinderService._();
  factory RangefinderService() => _instance;
  RangefinderService._();

  final List<DistanceMeasurement> _history = [];
  DistanceUnit _currentUnit = DistanceUnit.meter;

  List<DistanceMeasurement> get history => List.unmodifiable(_history);
  DistanceUnit get currentUnit => _currentUnit;

  double get averageDistance {
    if (_history.isEmpty) return 0;
    final sum = _history.fold<double>(0, (s, m) => s + m.distanceMeters);
    return double.parse((sum / _history.length).toStringAsFixed(4));
  }

  void addMeasurement(DistanceMeasurement measurement) {
    _history.add(measurement);
  }

  void toggleFavorite(String id) {
    final measurement = _history.firstWhere((m) => m.id == id);
    measurement.isFavorite = !measurement.isFavorite;
  }

  void updateSceneAnnotation(String id, SceneAnnotation annotation) {
    final measurement = _history.firstWhere((m) => m.id == id);
    measurement.sceneAnnotation = annotation;
  }
}
Service 层提供了 averageDistance、maxDistance、minDistance 等统计属性,以及 addMeasurement、toggleFavorite、updateSceneAnnotation 等操作方法。所有历史数据通过 history 属性以不可变列表的形式暴露给 UI 层。
五、UI层核心实现
5.1 主页面布局
主页面是整个应用的入口,包含模式选择器、测量区域和底部控制栏:
Widget build(BuildContext context) {
return Scaffold(
backgroundColor: const Color(0xFFF5F6FA),
appBar: AppBar(
title: const Text('测距仪', style: TextStyle(fontWeight: FontWeight.bold)),
centerTitle: true,
elevation: 0,
actions: [
IconButton(
icon: Icon(_service.voiceEnabled ? Icons.volume_up : Icons.volume_off),
onPressed: () => setState(() => _service.toggleVoice()),
),
IconButton(
icon: const Icon(Icons.history),
onPressed: () => Navigator.push(
context, MaterialPageRoute(builder: (_) => const HistoryPage())),
),
],
),
body: Column(
children: [
_buildStatsBar(theme),
_buildModeSelector(theme),
Expanded(child: _buildMeasurementArea(theme)),
_buildBottomControls(theme, displayDistance, unit),
],
),
);
}
5.2 模式选择器
模式选择器让用户可以在四种测量模式间切换,每种模式都有对应的图标和颜色:
Widget _buildModeSelector(ThemeData theme) {
  return Container(
    padding: const EdgeInsets.symmetric(horizontal: 16, vertical: 8),
    color: Colors.white,
    child: Row(
      children: MeasurementMode.values.map((mode) {
        final isSelected = _currentMode == mode;
        IconData icon;
        switch (mode) {
          case MeasurementMode.camera:
            icon = Icons.camera_alt;
            break;
          case MeasurementMode.ar:
            icon = Icons.view_in_ar;
            break;
          case MeasurementMode.manual:
            icon = Icons.touch_app;
            break;
          case MeasurementMode.multiPoint:
            icon = Icons.polyline;
            break;
        }
        return Expanded(
          child: GestureDetector(
            onTap: () => setState(() => _currentMode = mode),
            child: Container(
              padding: const EdgeInsets.symmetric(vertical: 8),
              margin: const EdgeInsets.symmetric(horizontal: 4),
              decoration: BoxDecoration(
                color: isSelected
                    ? const Color(0xFF4A90D9).withValues(alpha: 0.1)
                    : Colors.transparent,
                borderRadius: BorderRadius.circular(8),
                border: Border.all(
                  color: isSelected
                      ? const Color(0xFF4A90D9)
                      : Colors.grey.shade300,
                ),
              ),
              child: Column(
                children: [
                  Icon(icon, size: 20,
                      color: isSelected ? const Color(0xFF4A90D9) : Colors.grey),
                  Text(mode.label,
                      style: TextStyle(fontSize: 11,
                          color: isSelected ? const Color(0xFF4A90D9) : Colors.grey)),
                ],
              ),
            ),
          ),
        );
      }).toList(),
    ),
  );
}
5.3 测量单位切换
单位切换功能通过弹窗让用户选择,并实时预览当前距离的换算结果:
void _showUnitDialog() {
  showDialog(
    context: context,
    builder: (ctx) => AlertDialog(
      title: const Text('测量单位切换'),
      content: Column(
        mainAxisSize: MainAxisSize.min,
        children: DistanceUnit.values.map((unit) {
          final isSelected = _service.currentUnit == unit;
          return ListTile(
            leading: Icon(
              isSelected ? Icons.radio_button_checked : Icons.radio_button_unchecked,
              color: isSelected ? const Color(0xFF4A90D9) : Colors.grey,
            ),
            title: Text(unit.label),
            subtitle: Text('单位符号: ${unit.symbol}'),
            trailing: Text(
              _currentDistance > 0
                  ? DistanceUnit.meter.convert(_currentDistance, unit)
                      .toStringAsFixed(2)
                  : '-',
              style: TextStyle(
                fontWeight: FontWeight.bold,
                color: isSelected ? const Color(0xFF4A90D9) : Colors.grey,
              ),
            ),
            onTap: () {
              setState(() => _service.setUnit(unit));
              Navigator.pop(ctx);
            },
          );
        }).toList(),
      ),
    ),
  );
}
5.4 场景标注功能
场景标注让用户可以为每次测量添加场景标签,方便后续分类管理和数据对比:
void _showSceneDialog() {
  final controller = TextEditingController(text: _currentScene);
  showDialog(
    context: context,
    builder: (ctx) => AlertDialog(
      title: const Text('测量场景标注'),
      content: Column(
        mainAxisSize: MainAxisSize.min,
        children: [
          TextField(
            controller: controller,
            decoration: InputDecoration(
              hintText: '例如:客厅、卧室、办公室...',
              prefixIcon: const Icon(Icons.place),
            ),
          ),
          const SizedBox(height: 12),
          Wrap(
            spacing: 8,
            children: ['家居装修', '办公学习', '户外运动',
                       '电子设备', '健康生活', '建筑工程'].map((scene) {
              return ActionChip(
                label: Text(scene, style: const TextStyle(fontSize: 12)),
                onPressed: () => controller.text = scene,
              );
            }).toList(),
          ),
        ],
      ),
      actions: [
        TextButton(onPressed: () => Navigator.pop(ctx), child: const Text('取消')),
        ElevatedButton(
          onPressed: () {
            setState(() => _currentScene = controller.text);
            Navigator.pop(ctx);
          },
          child: const Text('确定'),
        ),
      ],
    ),
  );
}
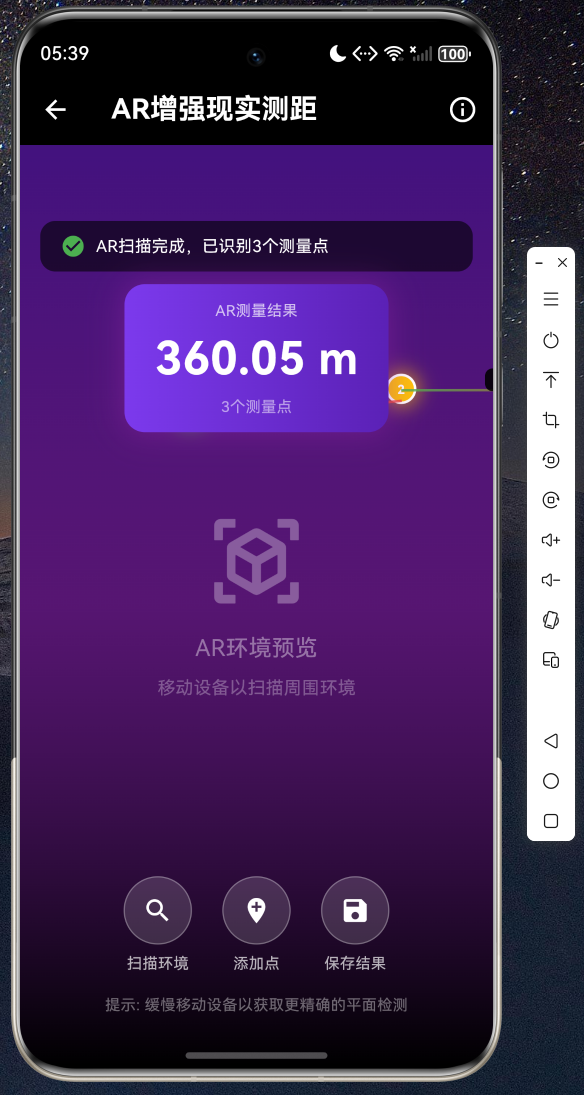
六、AR增强现实测距实现
AR测距页面模拟了增强现实的交互体验。用户通过"扫描环境"按钮模拟平面检测,然后可以在检测到的平面上放置测量点:
class ARMeasurePage extends StatefulWidget {
State<ARMeasurePage> createState() => _ARMeasurePageState();
}
class _ARMeasurePageState extends State<ARMeasurePage> {
final RangefinderService _service = RangefinderService();
final List<MeasurementPoint> _arPoints = [];
String _statusText = '移动设备扫描平面,点击放置测量点';
void _simulateARScan() {
setState(() => _statusText = '正在扫描环境平面...');
Future.delayed(const Duration(seconds: 1), () {
if (!mounted) return;
setState(() {
_arPoints.clear();
final random = Random();
final pointCount = random.nextInt(3) + 2;
var currentX = 50.0 + random.nextDouble() * 100;
var currentY = 150.0 + random.nextDouble() * 100;
for (int i = 0; i < pointCount; i++) {
_arPoints.add(MeasurementPoint(
id: 'ar_scan_$i',
x: currentX,
y: currentY,
z: random.nextDouble() * 0.5,
label: i == 0 ? '起点' : (i == pointCount - 1 ? '终点' : '中间点$i'),
));
currentX += 80 + random.nextDouble() * 120;
currentY += (random.nextDouble() - 0.5) * 60;
}
_statusText = 'AR扫描完成,已识别${_arPoints.length}个测量点';
});
});
}
}
AR页面使用紫色渐变背景模拟AR环境,测量点用不同颜色标记(绿色为起点、红色为终点、黄色为中间点),点之间用渐变色连线连接,并实时显示各段距离。
七、多点测量功能
多点测量支持用户在地图区域上自由添加、拖拽多个测量点,形成折线路径:
class MultiPointPage extends StatefulWidget {
State<MultiPointPage> createState() => _MultiPointPageState();
}
class _MultiPointPageState extends State<MultiPointPage> {
final List<MeasurementPoint> _points = [];
double get _totalDistance {
if (_points.length < 2) return 0;
var total = 0.0;
for (int i = 0; i < _points.length - 1; i++) {
total += _points[i].distanceTo(_points[i + 1]);
}
return total;
}
void _addPoint(double x, double y) {
_points.add(MeasurementPoint(
id: 'mp_${_points.length}',
x: x, y: y, z: 0,
label: '点${_points.length + 1}',
));
setState(() {});
}
}
每个测量点都可以拖拽调整位置,各段距离在底部以横向滚动列表展示,总距离实时更新显示在顶部。
八、历史记录与数据对比
历史记录页面支持按场景和测量模式筛选,并提供了收藏功能:
List<DistanceMeasurement> get _filteredHistory {
  var list = _service.history.toList();
  if (_showFavoritesOnly) {
    list = list.where((m) => m.isFavorite).toList();
  }
  if (_filterScene != '全部') {
    list = list.where((m) => m.sceneLabel == _filterScene).toList();
  }
  if (_filterMode != null) {
    list = list.where((m) => m.mode == _filterMode).toList();
  }
  list.sort((a, b) => b.timestamp.compareTo(a.timestamp));
  return list;
}
数据对比页面则提供了按场景和按模式两种维度的对比分析,展示每个维度的测量次数、平均值、最大值和最小值,并用可视化进度条直观呈现。
九、数据导出功能
导出功能支持 CSV、JSON、PDF 三种格式,用户可以选择导出全部数据或按场景筛选:
String generateCsvExport() {
  final buffer = StringBuffer();
  buffer.writeln('ID,距离(米),距离(${_currentUnit.symbol}),模式,时间,场景,备注,点数');
  for (final m in _history) {
    buffer.writeln(
        '${m.id},${m.distanceMeters},${m.getDistanceInUnit(_currentUnit)},'
        '${m.mode.label},${m.timestamp.toIso8601String()},'
        '${m.sceneLabel},${m.note ?? ""},${m.points.length}');
  }
  return buffer.toString();
}
导出前可以在预览区查看即将导出的数据内容,确认无误后一键导出。
十、在鸿蒙设备上运行
10.1 环境准备
确保你已经配置好 Flutter for OpenHarmony 开发环境。在项目的 pubspec.yaml 中无需添加额外依赖,因为测距仪应用完全基于 Flutter 内置库实现。
10.2 构建与运行
# 进入项目目录
cd oh_demo25

# 构建鸿蒙hap包
hvigorw assembleHap

# 安装到鸿蒙设备
hdc install entry/build/default/outputs/default/entry-default.hap
10.3 运行截图
注意:以下为应用在鸿蒙设备上运行的截图展示,请在实际设备上运行后替换为真实截图。
| 功能模块 | 截图 |
|---|---|
| 主页面 | 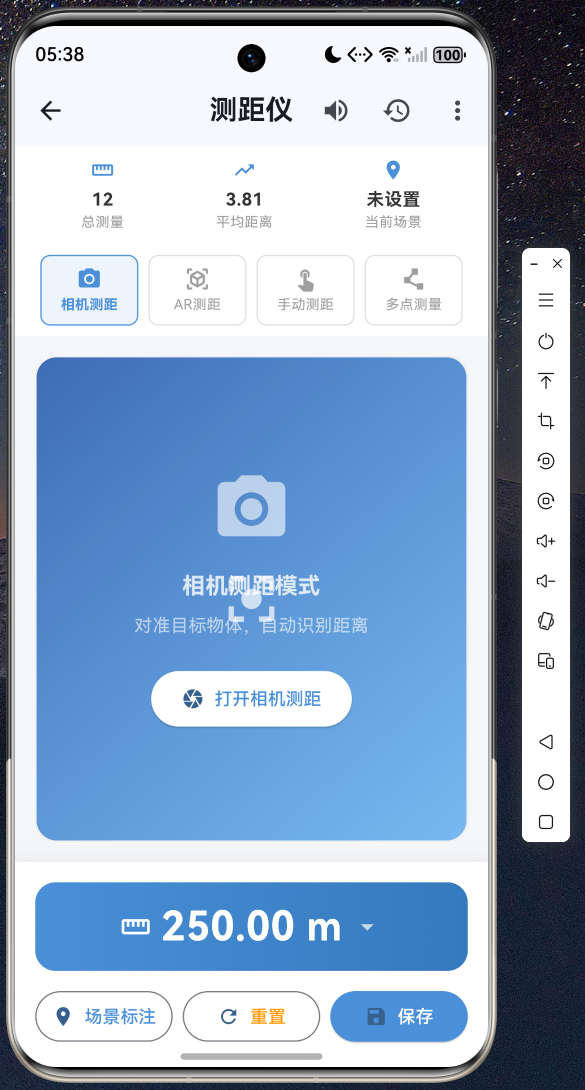 |
| 相机测距 | 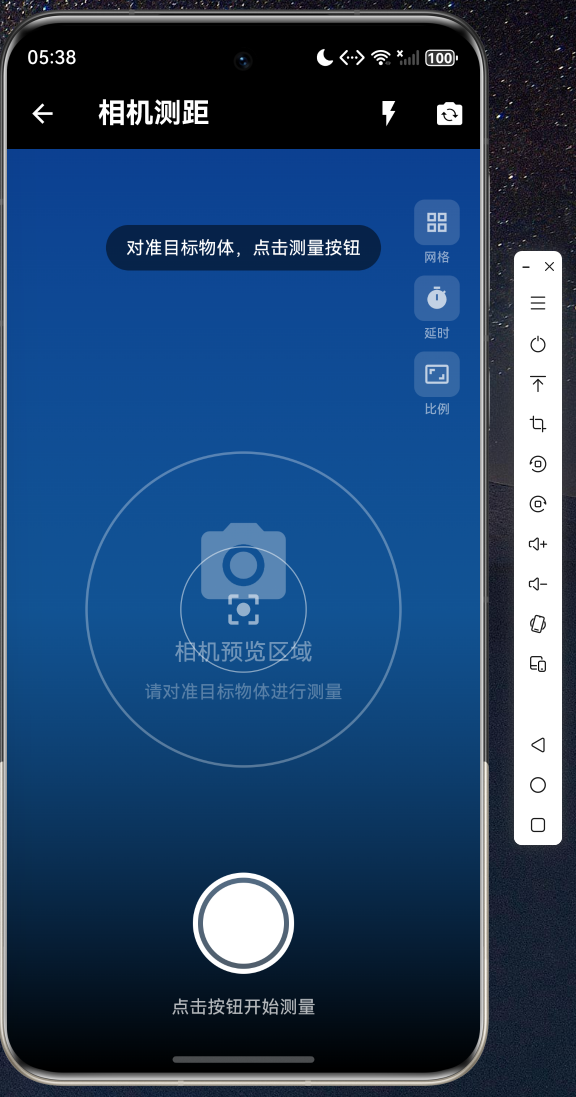 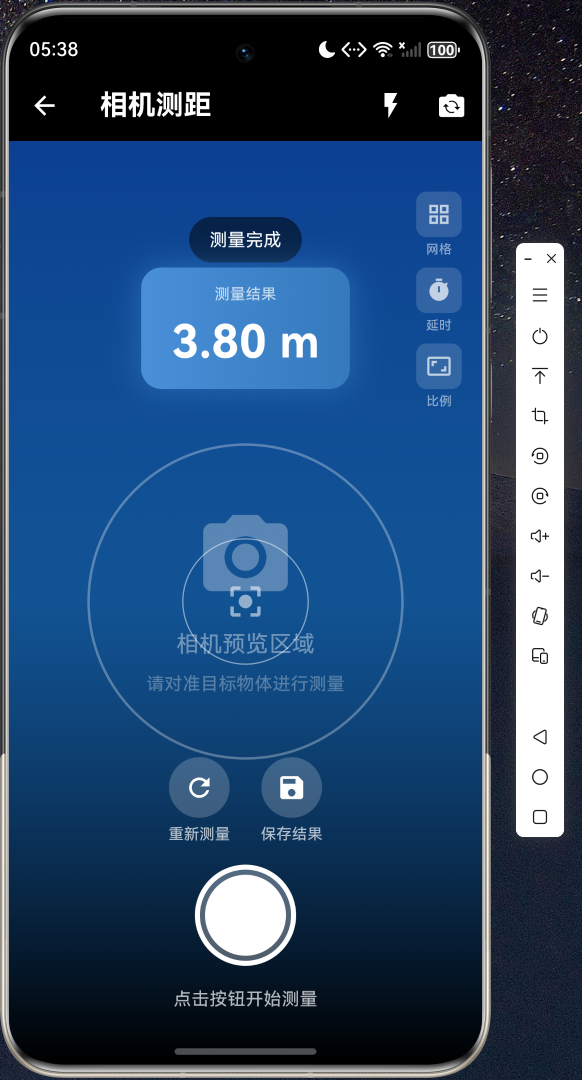 |
|
| AR测距 | 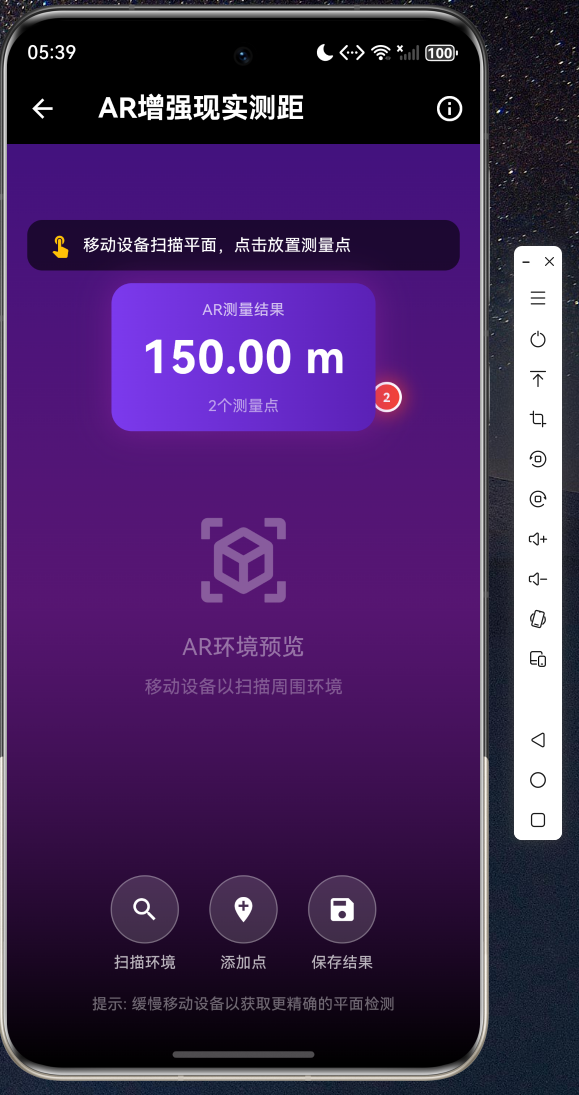
| 多点测量 | 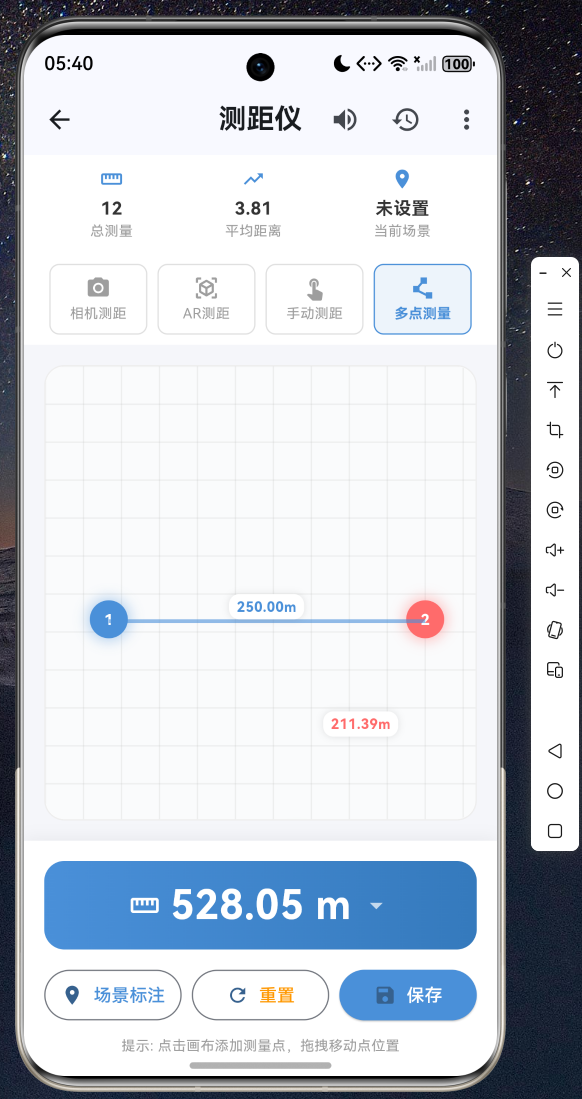
| 历史记录 | 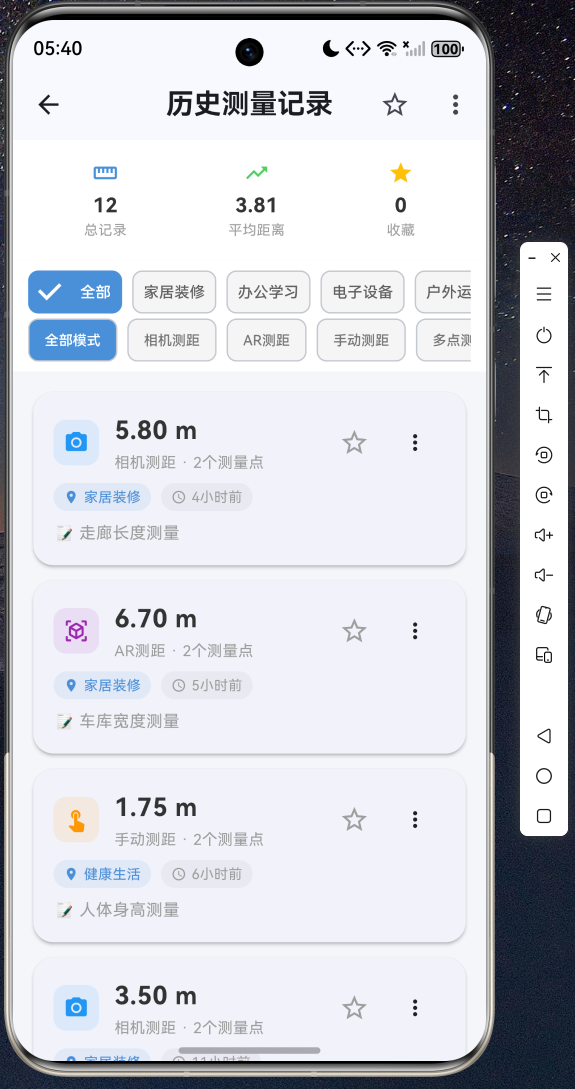
十一、总结
本文详细介绍了如何使用 Flutter for OpenHarmony 开发一款功能完整的测距仪应用。从数据模型设计、业务逻辑封装到 UI 交互实现,涵盖了相机测距、AR增强现实测距、多点测量、单位切换、场景标注、历史记录、数据对比和结果导出等八大功能。
通过这个实战项目,我们可以看到 Flutter 在 OpenHarmony 平台上的强大表现力。整个应用完全使用 Dart 语言和 Flutter 框架开发,无需编写平台特定代码,真正实现了"一次编写,多端运行"的跨平台目标。
完整的项目源码已托管在 AtomGit 平台,欢迎访问 https://atomgit.com 获取完整代码。如果你对 Flutter for OpenHarmony 开发感兴趣,欢迎加入开源鸿蒙跨平台社区(https://openharmonycrossplatform.csdn.net)交流讨论,共同推动 Flutter for OpenHarmony 生态发展。

AtomGit 是由开放原子开源基金会联合 CSDN 等生态伙伴共同推出的新一代开源与人工智能协作平台。平台坚持“开放、中立、公益”的理念,把代码托管、模型共享、数据集托管、智能体开发体验和算力服务整合在一起,为开发者提供从开发、训练到部署的一站式体验。
更多推荐
 11
11 0
0- 0


 已为社区贡献8条内容

所有评论(0)