YOLO26改进| 特征融合 | 双向指导 + 自适应权重 + 低光降噪增强【CVPR】
💡💡💡本专栏所有程序均经过测试,可成功执行💡💡💡
本文给大家带来的教程是将YOLO26的特征融合替换为LCA来提取特征。文章在介绍主要的原理后,将手把手教学如何进行模块的代码添加和修改,并将修改后的完整代码放在文章的最后,方便大家一键运行,小白也可轻松上手实践。以帮助您更好地学习深度学习目标检测YOLO系列的挑战。
目录
1.论文
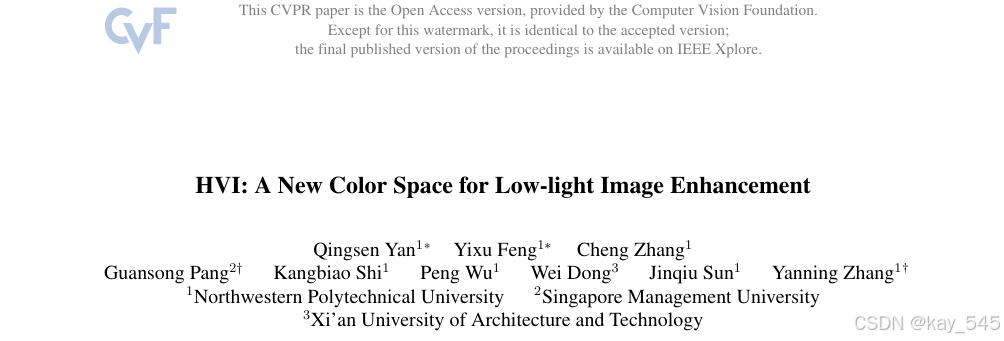
论文地址:HVI: ANewColor Space for Low-light Image Enhancement
官方代码:官方代码仓库点击即可跳转
2. LCA代码实现
2.1 将LCA添加到YOLO26中
关键步骤一:在ultralytics\ultralytics\nn\modules下面新建文件夹models,在文件夹下新建LCA.py,粘贴下面代码
import torch
import torch.nn as nn
import torch.functional as F
from einops import rearrange

from ultralytics.nn.modules.conv import Conv

class LayerNorm(nn.Module):
    r""" LayerNorm that supports two data formats: channels_last (default) or channels_first.
    The ordering of the dimensions in the inputs. channels_last corresponds to inputs with
    shape (batch_size, height, width, channels) while channels_first corresponds to inputs
    with shape (batch_size, channels, height, width).
    """
    def __init__(self, normalized_shape, eps=1e-6, data_format="channels_first"):
        super().__init__()
        self.weight = nn.Parameter(torch.ones(normalized_shape))
        self.bias = nn.Parameter(torch.zeros(normalized_shape))
        self.eps = eps
        self.data_format = data_format
        if self.data_format not in ["channels_last", "channels_first"]:
            raise NotImplementedError
        self.normalized_shape = (normalized_shape, )

    def forward(self, x):
        if self.data_format == "channels_last":
            return F.layer_norm(x, self.normalized_shape, self.weight, self.bias, self.eps)
        elif self.data_format == "channels_first":
            u = x.mean(1, keepdim=True)
            s = (x - u).pow(2).mean(1, keepdim=True)
            x = (x - u) / torch.sqrt(s + self.eps)
            x = self.weight[:, None, None] * x + self.bias[:, None, None]
            return x

class CAB(nn.Module):
    def __init__(self, dim, num_heads, bias):
        super(CAB, self).__init__()
        self.num_heads = num_heads
        self.temperature = nn.Parameter(torch.ones(num_heads, 1, 1))

        self.q = nn.Conv2d(dim, dim, kernel_size=1, bias=bias)
        self.q_dwconv = nn.Conv2d(dim, dim, kernel_size=3, stride=1, padding=1, groups=dim, bias=bias)
        self.kv = nn.Conv2d(dim, dim*2, kernel_size=1, bias=bias)
        self.kv_dwconv = nn.Conv2d(dim*2, dim*2, kernel_size=3, stride=1, padding=1, groups=dim*2, bias=bias)
        self.project_out = nn.Conv2d(dim, dim, kernel_size=1, bias=bias)

    def forward(self, x, y):
        b, c, h, w = x.shape

        q = self.q_dwconv(self.q(x))
        kv = self.kv_dwconv(self.kv(y))
        k, v = kv.chunk(2, dim=1)

        q = rearrange(q, 'b (head c) h w -> b head c (h w)', head=self.num_heads)
        k = rearrange(k, 'b (head c) h w -> b head c (h w)', head=self.num_heads)
        v = rearrange(v, 'b (head c) h w -> b head c (h w)', head=self.num_heads)

        q = torch.nn.functional.normalize(q, dim=-1)
        k = torch.nn.functional.normalize(k, dim=-1)

        attn = (q @ k.transpose(-2, -1)) * self.temperature
        attn = nn.functional.softmax(attn,dim=-1)

        out = (attn @ v)

        out = rearrange(out, 'b head c (h w) -> b (head c) h w', head=self.num_heads, h=h, w=w)

        out = self.project_out(out)
        return out

class IEL(nn.Module):
    def __init__(self, dim, ffn_expansion_factor=2.66, bias=False):
        super(IEL, self).__init__()

        hidden_features = int(dim*ffn_expansion_factor)

        self.project_in = nn.Conv2d(dim, hidden_features*2, kernel_size=1, bias=bias)

        self.dwconv = nn.Conv2d(hidden_features*2, hidden_features*2, kernel_size=3, stride=1, padding=1, groups=hidden_features*2, bias=bias)
        self.dwconv1 = nn.Conv2d(hidden_features, hidden_features, kernel_size=3, stride=1, padding=1, groups=hidden_features, bias=bias)
        self.dwconv2 = nn.Conv2d(hidden_features, hidden_features, kernel_size=3, stride=1, padding=1, groups=hidden_features, bias=bias)

        self.project_out = nn.Conv2d(hidden_features, dim, kernel_size=1, bias=bias)

        self.Tanh = nn.Tanh()
    def forward(self, x):
        x = self.project_in(x)
        x1, x2 = self.dwconv(x).chunk(2, dim=1)
        x1 = self.Tanh(self.dwconv1(x1)) + x1
        x2 = self.Tanh(self.dwconv2(x2)) + x2
        x = x1 * x2
        x = self.project_out(x)
        return x

class LCA(nn.Module):
    def __init__(self, in_dim, out_dim, num_heads=8, bias=False):
        super(LCA, self).__init__()
        self.norm = LayerNorm(out_dim)
        self.gdfn = IEL(out_dim)
        self.ffn = CAB(out_dim, num_heads, bias=bias)

        self.conv1x1 = nn.ModuleList([])
        for i in in_dim:
            if i != out_dim:
                self.conv1x1.append(Conv(i, out_dim, 1))
            else:
                self.conv1x1.append(nn.Identity())

    def forward(self, inputs):
        x, y = inputs
        x = self.conv1x1[0](x)
        y = self.conv1x1[1](y)
        x = x + self.ffn(self.norm(x),self.norm(y))
        x = x + self.gdfn(self.norm(x))
        return x
2.2 更改init.py文件
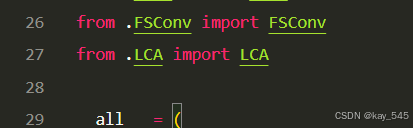
关键步骤二:在文件ultralytics\ultralytics\nn\modules\models文件夹下新建__init__.py文件,先导入函数
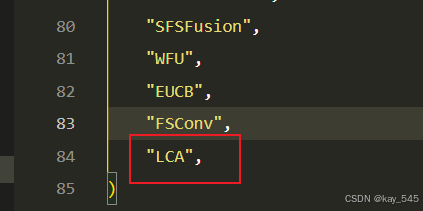
然后在下面的__all__中声明函数
2.3 添加yaml文件
关键步骤三:在/ultralytics/ultralytics/cfg/models/26下面新建文件yolo26_LCA.yaml文件,粘贴下面的内容
- 目标检测
# Ultralytics 🚀 AGPL-3.0 License - https://ultralytics.com/license

# Ultralytics YOLO26 object detection model with P3/8 - P5/32 outputs
# Model docs: https://docs.ultralytics.com/models/yolo26
# Task docs: https://docs.ultralytics.com/tasks/detect

# Parameters
nc: 80 # number of classes
end2end: True # whether to use end-to-end mode
reg_max: 1 # DFL bins
scales: # model compound scaling constants, i.e. 'model=yolo26n.yaml' will call yolo26.yaml with scale 'n'
  # [depth, width, max_channels]
  n: [0.50, 0.25, 1024] # summary: 260 layers, 2,572,280 parameters, 2,572,280 gradients, 6.1 GFLOPs
  s: [0.50, 0.50, 1024] # summary: 260 layers, 10,009,784 parameters, 10,009,784 gradients, 22.8 GFLOPs
  m: [0.50, 1.00, 512] # summary: 280 layers, 21,896,248 parameters, 21,896,248 gradients, 75.4 GFLOPs
  l: [1.00, 1.00, 512] # summary: 392 layers, 26,299,704 parameters, 26,299,704 gradients, 93.8 GFLOPs
  x: [1.00, 1.50, 512] # summary: 392 layers, 58,993,368 parameters, 58,993,368 gradients, 209.5 GFLOPs

# YOLO26n backbone
backbone:
  # [from, repeats, module, args]
  - [-1, 1, Conv, [64, 3, 2]] # 0-P1/2
  - [-1, 1, Conv, [128, 3, 2]] # 1-P2/4
  - [-1, 2, C3k2, [256, False, 0.25]] # 2-P2/4
  - [-1, 1, Conv, [256, 3, 2]] # 3-P3/8
  - [-1, 2, C3k2, [512, False, 0.25]] # 4-P3/8
  - [-1, 1, Conv, [512, 3, 2]] # 5-P4/16
  - [-1, 2, C3k2, [512, True]] # 6-P4/16
  - [-1, 1, Conv, [1024, 3, 2]] # 7-P5/32
  - [-1, 2, C3k2, [1024, True]] # 8-P5/32
  - [-1, 1, SPPF, [1024, 5, 3, True]] # 9-P5/32
  - [-1, 2, C2PSA, [1024]] # 10-P5/32

# YOLO26n head
head:
  - [-1, 1, nn.Upsample, [None, 2, "nearest"]] # 11-P4/16
  - [[-1, 6], 1, LCA, [512]] # 12-P4/16
  - [-1, 2, C3k2, [512, True]] # 13-P4/16

  - [-1, 1, nn.Upsample, [None, 2, "nearest"]] # 14-P3/8
  - [[-1, 4], 1, LCA, [256]] # 15-P3/8
  - [-1, 2, C3k2, [256, True]] # 16-P3/8

  - [-1, 1, Conv, [256, 3, 2]] # 17-P4/16
  - [[-1, 13], 1, LCA, [512]] # 18-P4/16
  - [-1, 2, C3k2, [512, True]] # 19-P4/16

  - [-1, 1, Conv, [512, 3, 2]] # 20-P5/32
  - [[-1, 10], 1, LCA, [1024]] # 21-P5/32
  - [-1, 1, C3k2, [1024, True, 0.5, True]] # 22-P5/32

- [[16, 19, 22], 1, Detect, [nc]] # 23-P3/8,P4/16,P5/32- 语义分割
# Ultralytics 🚀 AGPL-3.0 License - https://ultralytics.com/license

# Ultralytics YOLO26 object detection model with P3/8 - P5/32 outputs
# Model docs: https://docs.ultralytics.com/models/yolo26
# Task docs: https://docs.ultralytics.com/tasks/detect

# Parameters
nc: 80 # number of classes
end2end: True # whether to use end-to-end mode
reg_max: 1 # DFL bins
scales: # model compound scaling constants, i.e. 'model=yolo26n.yaml' will call yolo26.yaml with scale 'n'
  # [depth, width, max_channels]
  n: [0.50, 0.25, 1024] # summary: 260 layers, 2,572,280 parameters, 2,572,280 gradients, 6.1 GFLOPs
  s: [0.50, 0.50, 1024] # summary: 260 layers, 10,009,784 parameters, 10,009,784 gradients, 22.8 GFLOPs
  m: [0.50, 1.00, 512] # summary: 280 layers, 21,896,248 parameters, 21,896,248 gradients, 75.4 GFLOPs
  l: [1.00, 1.00, 512] # summary: 392 layers, 26,299,704 parameters, 26,299,704 gradients, 93.8 GFLOPs
  x: [1.00, 1.50, 512] # summary: 392 layers, 58,993,368 parameters, 58,993,368 gradients, 209.5 GFLOPs

# YOLO26n backbone
backbone:
  # [from, repeats, module, args]
  - [-1, 1, Conv, [64, 3, 2]] # 0-P1/2
  - [-1, 1, Conv, [128, 3, 2]] # 1-P2/4
  - [-1, 2, C3k2, [256, False, 0.25]] # 2-P2/4
  - [-1, 1, Conv, [256, 3, 2]] # 3-P3/8
  - [-1, 2, C3k2, [512, False, 0.25]] # 4-P3/8
  - [-1, 1, Conv, [512, 3, 2]] # 5-P4/16
  - [-1, 2, C3k2, [512, True]] # 6-P4/16
  - [-1, 1, Conv, [1024, 3, 2]] # 7-P5/32
  - [-1, 2, C3k2, [1024, True]] # 8-P5/32
  - [-1, 1, SPPF, [1024, 5, 3, True]] # 9-P5/32
  - [-1, 2, C2PSA, [1024]] # 10-P5/32

# YOLO26n head
head:
  - [-1, 1, nn.Upsample, [None, 2, "nearest"]] # 11-P4/16
  - [[-1, 6], 1, LCA, [512]] # 12-P4/16
  - [-1, 2, C3k2, [512, True]] # 13-P4/16

  - [-1, 1, nn.Upsample, [None, 2, "nearest"]] # 14-P3/8
  - [[-1, 4], 1, LCA, [256]] # 15-P3/8
  - [-1, 2, C3k2, [256, True]] # 16-P3/8

  - [-1, 1, Conv, [256, 3, 2]] # 17-P4/16
  - [[-1, 13], 1, LCA, [512]] # 18-P4/16
  - [-1, 2, C3k2, [512, True]] # 19-P4/16

  - [-1, 1, Conv, [512, 3, 2]] # 20-P5/32
  - [[-1, 10], 1, LCA, [1024]] # 21-P5/32
  - [-1, 1, C3k2, [1024, True, 0.5, True]] # 22-P5/32

- [[16, 19, 22], 1, Segment, [nc, 32, 256]]- 旋转目标检测
# Ultralytics 🚀 AGPL-3.0 License - https://ultralytics.com/license

# Ultralytics YOLO26 object detection model with P3/8 - P5/32 outputs
# Model docs: https://docs.ultralytics.com/models/yolo26
# Task docs: https://docs.ultralytics.com/tasks/detect

# Parameters
nc: 80 # number of classes
end2end: True # whether to use end-to-end mode
reg_max: 1 # DFL bins
scales: # model compound scaling constants, i.e. 'model=yolo26n.yaml' will call yolo26.yaml with scale 'n'
  # [depth, width, max_channels]
  n: [0.50, 0.25, 1024] # summary: 260 layers, 2,572,280 parameters, 2,572,280 gradients, 6.1 GFLOPs
  s: [0.50, 0.50, 1024] # summary: 260 layers, 10,009,784 parameters, 10,009,784 gradients, 22.8 GFLOPs
  m: [0.50, 1.00, 512] # summary: 280 layers, 21,896,248 parameters, 21,896,248 gradients, 75.4 GFLOPs
  l: [1.00, 1.00, 512] # summary: 392 layers, 26,299,704 parameters, 26,299,704 gradients, 93.8 GFLOPs
  x: [1.00, 1.50, 512] # summary: 392 layers, 58,993,368 parameters, 58,993,368 gradients, 209.5 GFLOPs

# YOLO26n backbone
backbone:
  # [from, repeats, module, args]
  - [-1, 1, Conv, [64, 3, 2]] # 0-P1/2
  - [-1, 1, Conv, [128, 3, 2]] # 1-P2/4
  - [-1, 2, C3k2, [256, False, 0.25]] # 2-P2/4
  - [-1, 1, Conv, [256, 3, 2]] # 3-P3/8
  - [-1, 2, C3k2, [512, False, 0.25]] # 4-P3/8
  - [-1, 1, Conv, [512, 3, 2]] # 5-P4/16
  - [-1, 2, C3k2, [512, True]] # 6-P4/16
  - [-1, 1, Conv, [1024, 3, 2]] # 7-P5/32
  - [-1, 2, C3k2, [1024, True]] # 8-P5/32
  - [-1, 1, SPPF, [1024, 5, 3, True]] # 9-P5/32
  - [-1, 2, C2PSA, [1024]] # 10-P5/32

# YOLO26n head
head:
  - [-1, 1, nn.Upsample, [None, 2, "nearest"]] # 11-P4/16
  - [[-1, 6], 1, LCA, [512]] # 12-P4/16
  - [-1, 2, C3k2, [512, True]] # 13-P4/16

  - [-1, 1, nn.Upsample, [None, 2, "nearest"]] # 14-P3/8
  - [[-1, 4], 1, LCA, [256]] # 15-P3/8
  - [-1, 2, C3k2, [256, True]] # 16-P3/8

  - [-1, 1, Conv, [256, 3, 2]] # 17-P4/16
  - [[-1, 13], 1, LCA, [512]] # 18-P4/16
  - [-1, 2, C3k2, [512, True]] # 19-P4/16

  - [-1, 1, Conv, [512, 3, 2]] # 20-P5/32
  - [[-1, 10], 1, LCA, [1024]] # 21-P5/32
  - [-1, 1, C3k2, [1024, True, 0.5, True]] # 22-P5/32

- [[16, 19, 22], 1, OBB, [nc, 1]]温馨提示:本文只是对yolo26基础上添加模块,如果要对yolo26 n/l/m/x进行添加则只需要指定对应的depth_multiple 和 width_multiple
end2end: True # whether to use end-to-end mode
reg_max: 1 # DFL bins
scales: # model compound scaling constants, i.e. 'model=yolo26n.yaml' will call yolo26.yaml with scale 'n'
  # [depth, width, max_channels]
  n: [0.50, 0.25, 1024] # summary: 260 layers, 2,572,280 parameters, 2,572,280 gradients, 6.1 GFLOPs
  s: [0.50, 0.50, 1024] # summary: 260 layers, 10,009,784 parameters, 10,009,784 gradients, 22.8 GFLOPs
  m: [0.50, 1.00, 512] # summary: 280 layers, 21,896,248 parameters, 21,896,248 gradients, 75.4 GFLOPs
  l: [1.00, 1.00, 512] # summary: 392 layers, 26,299,704 parameters, 26,299,704 gradients, 93.8 GFLOPs
  x: [1.00, 1.50, 512] # summary: 392 layers, 58,993,368 parameters, 58,993,368 gradients, 209.5 GFLOPs
2.4 在task.py中进行注册
关键步骤四:在parse_model函数中进行注册,添加LCA
先在task.py导入函数

然后在task.py文件下找到parse_model这个函数,如下图,添加LCA

        elif m in frozenset({LCA}):
            c1, c2 = [ch[fi] for fi in f], args[0]
            c2 = make_divisible(min(c2, max_channels) * width, 8)
            args = [c1, c2, *args[1:]]
2.5 执行程序
关键步骤五: 在ultralytics文件中新建train.py,将model的参数路径设置为yolo26_LCA.yaml的路径即可 【注意是在外边的Ultralytics下新建train.py】
from ultralytics import YOLO
import warnings
warnings.filterwarnings('ignore')
from pathlib import Path

if __name__ == '__main__':


    # 加载模型
    model = YOLO("ultralytics/cfg/26/yolo26.yaml")  # 你要选择的模型yaml文件地址
    # Use the model
    results = model.train(data=r"你的数据集的yaml文件地址",
                          epochs=100, batch=16, imgsz=640, workers=4, name=Path(model.cfg).stem)  # 训练模型
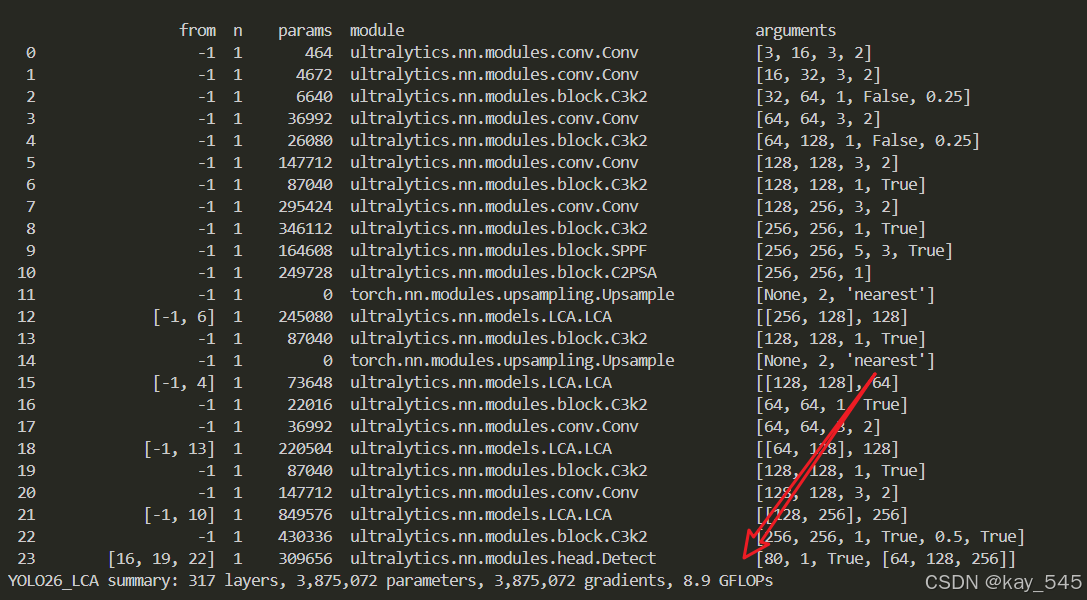
🚀运行程序,如果出现下面的内容则说明添加成功🚀
                   from  n    params  module                                       arguments
  0                  -1  1       464  ultralytics.nn.modules.conv.Conv             [3, 16, 3, 2]
  1                  -1  1      4672  ultralytics.nn.modules.conv.Conv             [16, 32, 3, 2]
  2                  -1  1      6640  ultralytics.nn.modules.block.C3k2            [32, 64, 1, False, 0.25]
  3                  -1  1     36992  ultralytics.nn.modules.conv.Conv             [64, 64, 3, 2]
  4                  -1  1     26080  ultralytics.nn.modules.block.C3k2            [64, 128, 1, False, 0.25]
  5                  -1  1    147712  ultralytics.nn.modules.conv.Conv             [128, 128, 3, 2]
  6                  -1  1     87040  ultralytics.nn.modules.block.C3k2            [128, 128, 1, True]
  7                  -1  1    295424  ultralytics.nn.modules.conv.Conv             [128, 256, 3, 2]
  8                  -1  1    346112  ultralytics.nn.modules.block.C3k2            [256, 256, 1, True]
  9                  -1  1    164608  ultralytics.nn.modules.block.SPPF            [256, 256, 5, 3, True]
 10                  -1  1    249728  ultralytics.nn.modules.block.C2PSA           [256, 256, 1]
 11                  -1  1         0  torch.nn.modules.upsampling.Upsample         [None, 2, 'nearest']
 12             [-1, 6]  1    245080  ultralytics.nn.models.LCA.LCA                [[256, 128], 128]
 13                  -1  1     87040  ultralytics.nn.modules.block.C3k2            [128, 128, 1, True]
 14                  -1  1         0  torch.nn.modules.upsampling.Upsample         [None, 2, 'nearest']
 15             [-1, 4]  1     73648  ultralytics.nn.models.LCA.LCA                [[128, 128], 64]
 16                  -1  1     22016  ultralytics.nn.modules.block.C3k2            [64, 64, 1, True]
 17                  -1  1     36992  ultralytics.nn.modules.conv.Conv             [64, 64, 3, 2]
 18            [-1, 13]  1    220504  ultralytics.nn.models.LCA.LCA                [[64, 128], 128]
 19                  -1  1     87040  ultralytics.nn.modules.block.C3k2            [128, 128, 1, True]
 20                  -1  1    147712  ultralytics.nn.modules.conv.Conv             [128, 128, 3, 2]
 21            [-1, 10]  1    849576  ultralytics.nn.models.LCA.LCA                [[128, 256], 256]
 22                  -1  1    430336  ultralytics.nn.modules.block.C3k2            [256, 256, 1, True, 0.5, True]
 23        [16, 19, 22]  1    309656  ultralytics.nn.modules.head.Detect           [80, 1, True, [64, 128, 256]]
YOLO26_LCA summary: 317 layers, 3,875,072 parameters, 3,875,072 gradients, 8.9 GFLOPs
3. 完整代码分享
主页侧边
4. GFLOPs
关于GFLOPs的计算方式可以查看:百面算法工程师 | 卷积基础知识——Convolution
未改进的YOLO26n GFLOPs
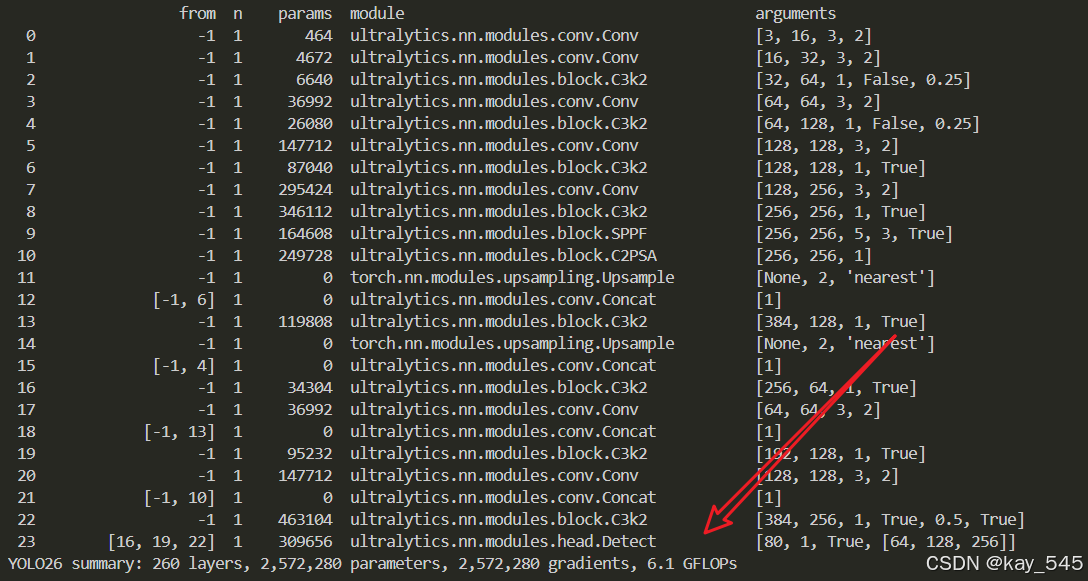
改进后的GFLOPs
5. 进阶
可以与其他的注意力机制或者损失函数等结合,进一步提升检测效果
6.总结
通过以上的改进方法,我们成功提升了模型的表现。这只是一个开始,未来还有更多优化和技术深挖的空间。在这里,我想隆重向大家推荐我的专栏——<专栏地址:YOLO26改进-论文涨点——点击跳转看所有内容,关注不迷路!>。这个专栏专注于前沿的深度学习技术,特别是目标检测领域的最新进展,不仅包含对YOLO26的深入解析和改进策略,还会定期更新来自各大顶会(如CVPR、NeurIPS等)的论文复现和实战分享。
为什么订阅我的专栏? ——专栏地址:YOLO26改进-论文涨点——点击跳转看所有内容,关注不迷路!
-
前沿技术解读:专栏不仅限于YOLO系列的改进,还会涵盖各类主流与新兴网络的最新研究成果,帮助你紧跟技术潮流。
-
详尽的实践分享:所有内容实践性也极强。每次更新都会附带代码和具体的改进步骤,保证每位读者都能迅速上手。
-
问题互动与答疑:订阅我的专栏后,你将可以随时向我提问,获取及时的答疑。
-
实时更新,紧跟行业动态:不定期发布来自全球顶会的最新研究方向和复现实验报告,让你时刻走在技术前沿。
专栏适合人群:
-
对目标检测、YOLO系列网络有深厚兴趣的同学
-
希望在用YOLO算法写论文的同学
-
对YOLO算法感兴趣的同学等

AtomGit 是由开放原子开源基金会联合 CSDN 等生态伙伴共同推出的新一代开源与人工智能协作平台。平台坚持“开放、中立、公益”的理念,把代码托管、模型共享、数据集托管、智能体开发体验和算力服务整合在一起,为开发者提供从开发、训练到部署的一站式体验。
更多推荐


 31
31 0
0- 0


 已为社区贡献20条内容

所有评论(0)