LocalAIAssistant And AI Girlfriend
LocalAIAssistant And AI Girlfriend
English
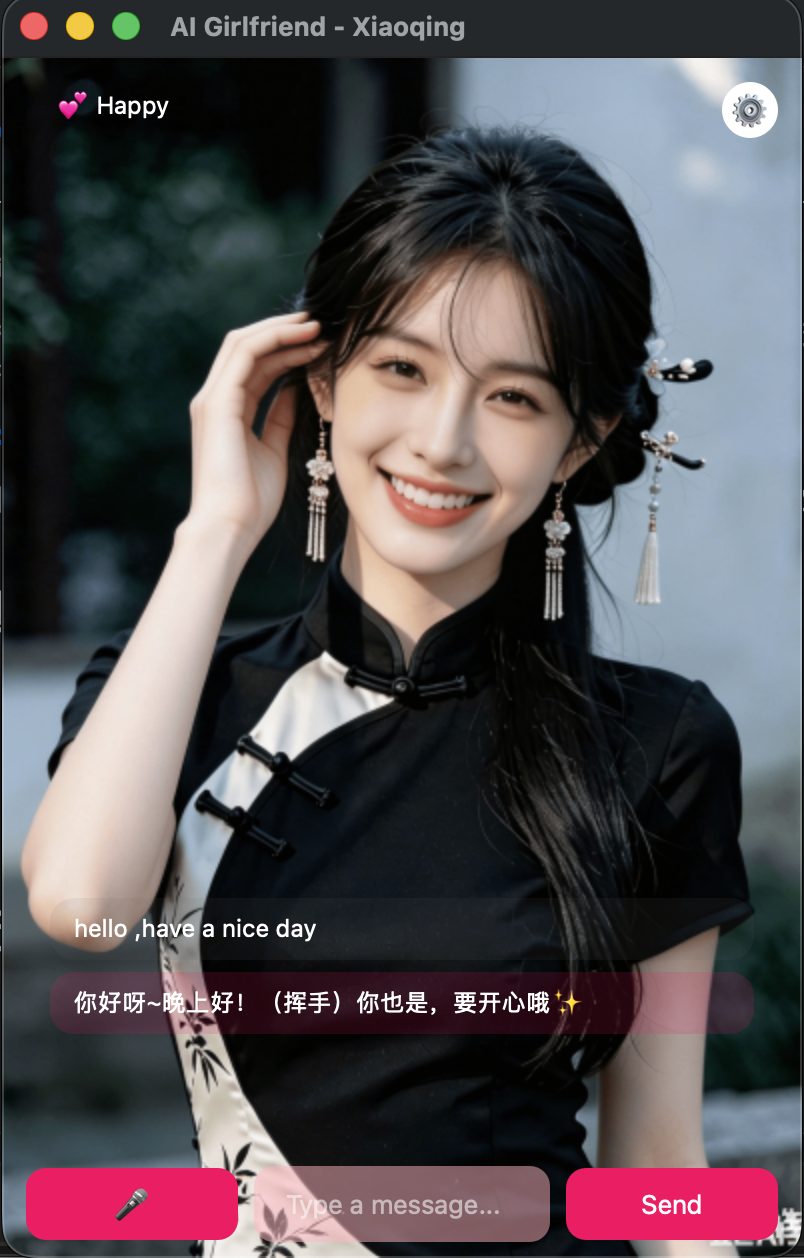
A cross-platform AI assistant desktop application based on Qt 6, supporting both GUI and CLI modes, with a built-in AI Girlfriend voice interaction module.
Github repo: https://github.com/nathanpenny520/LocalAIAssistant.git
Features
Core Features
- Dual Mode Support — GUI interface + CLI command line
- File Upload — Support for text, image, and PDF file attachments
- Streaming Output — SSE real-time display, AI responses appear character by character
- Session Management — Multi-session switching, history persistence
- Multi-language — Simplified Chinese / English switching
- Theme Switching — Light / Dark / Follow System
- Cross-platform — macOS / Windows / Linux (Linux not tested)
AI Girlfriend Module 🎀
- Independent Window — Immersive full-screen avatar background
- Emotion System — 11 expressions real-time switching (happy, shy, loving, playful, etc.)
- Memory System — Automatically records user information via text markers, long-term memory persistence
- Voice Interaction — Voice input (ASR) + Voice output (TTS)
- Personality Customization — Modify personality.md to customize character
- Shortcut Key — Command/Ctrl+G to quickly open/close girlfriend window
⚠️ Platform Compatibility:
- macOS: Full voice input/output support ✅
- Windows: Voice output (TTS) works normally, voice input (ASR) not supported ⚠️
- Linux: Author has no Linux laptop, not tested yet
Tech Stack
| Item | Technology |
|---|---|
| Language | C++17 |
| Framework | Qt 6.x (Widgets, Network, Multimedia, WebSockets) |
| Build | CMake 3.16+ |
| PDF Parsing | Poppler 26.x (PDF upload not supported if not installed) |
| Voice Service | iFlytek Open Platform (WebSocket API) |
Project Structure
sourcecode-ai-assistant/
├── src/
│   ├── core/           # Core business logic (network, session, file handling)
│   ├── ui/             # GUI interface (main window, settings dialog)
│   ├── cli/            # CLI command line interface
│   └── girlfriend/     # AI Girlfriend module
│       ├── girlfriendwindow.cpp  # Girlfriend window
│       ├── avatarwidget.cpp       # Avatar/expression component
│       ├── personalityengine.cpp  # Personality engine, emotion detection
│       ├── voicemanager.cpp       # Voice management (iFlytek ASR/TTS)
│       ├── memorymanager.cpp      # Long-term memory management
│       ├── personality.md         # Personality Prompt (customizable)
│       └── memory.md              # User memory archive
├── AIGirlfriend/       # Expression image resources (11 images)
├── scripts/            # Build scripts
│   ├── build.sh        # Unified cross-platform build script
│   └── setup.sh        # First-time clone initialization script
├── translations/       # Internationalization translation files
├── resources/          # Resource files (icons, configs)
├── cmake/              # CMake configuration templates
├── CMakeLists.txt      # CMake main configuration file
├── .gitattributes      # Git line ending configuration
├── .gitignore          # Git ignore rules
├── .env.example        # iFlytek voice credential template
├── LICENSE             # MIT License
├── README.md           # Chinese documentation
└── README_EN.md        # English documentation
First-time Setup
After cloning the project, run the initialization script to check your environment:
./scripts/setup.sh
This script will:
- Copy
.env.example→.env(iFlytek voice credential template) - Check build dependencies (CMake, compiler, Qt, Poppler)
- Show missing dependencies and installation guides
Tip: Run this script to quickly verify if your environment meets build requirements.
Build Steps
1. Install Dependencies
| Software | Version | macOS | Windows | Linux |
|---|---|---|---|---|
| C++ Compiler | C++17 | Xcode CLT | MinGW (Qt bundled) or MSVC | GCC 9+ |
| Qt | 6.x | Official or Homebrew | Official (MinGW or MSVC) | Package Manager |
| Qt Multimedia | ⚠️ Extra selection | Homebrew auto-install | Qt Maintenance Tool select | qt6-multimedia-dev |
| Qt WebSockets | ⚠️ Extra selection | Homebrew auto-install | Qt Maintenance Tool select | qt6-websockets-dev |
| CMake | 3.16+ | brew install cmake | Official Download | sudo apt install cmake |
| Poppler | 26.x | brew install poppler | MSYS2 or vcpkg | sudo apt install poppler |
Qt Module Note: Multimedia and WebSockets need to be manually selected in Qt Maintenance Tool (required for voice features)
macOS Quick Install
# Install Xcode Command Line Tools
xcode-select --install

# Install Homebrew (if not installed)
# See: https://brew.sh

# Install dependencies (qt@6 includes Multimedia and WebSockets)
brew install cmake qt@6 poppler

# Note: For official Qt installation, manually select Multimedia and WebSockets in Maintenance Tool
Linux Quick Install (Ubuntu/Debian)
sudo apt update
sudo apt install build-essential cmake qt6-base-dev qt6-base-dev-tools qt6-multimedia-dev qt6-websockets-dev libpoppler-cpp-dev
Windows Quick Install
Option 1: MinGW (Recommended, no Visual Studio needed)
- Install Git for Windows (includes Git Bash)
- Install CMake
- Install Qt 6:
- Select
Qt 6.x.x for MinGW 11.2 64-bit(Qt bundles compiler, no extra Visual Studio needed) - ⚠️ Important: Manually select Qt Multimedia and Qt WebSockets in Qt Maintenance Tool (required for voice features)
- Select
- Install Poppler: via MSYS2 (
pacman -S poppler) or vcpkg
Option 2: MSVC (Requires Visual Studio)
- Install Visual Studio 2019+ (with C++ development tools)
- Install CMake
- Install Qt 6:
- Select
Qt 6.x.x for MSVC 2019 64-bit - ⚠️ Important: Manually select Qt Multimedia and Qt WebSockets in Qt Maintenance Tool (required for voice features)
- Select
- Install Poppler: via MSYS2 or vcpkg
Tip: MinGW version is lighter, Qt installer bundles compiler; MSVC version has better debugging experience.
2. Build Project
cd scripts
./build.sh
Windows Note:
- Must run in Git Bash (bundled with Git for Windows)
- Script auto-detects Qt and MinGW compiler paths, no manual environment variable setup needed
Build Options
# Clean rebuild
./build.sh -c

# Debug build
./build.sh -d

# Specify Qt path
./build.sh -q /path/to/qt

# Build CLI only
./build.sh LocalAIAssistant-CLI

# Build GUI only
./build.sh LocalAIAssistant

# Show help
./build.sh help
Build Artifacts
| Platform | GUI | CLI |
|---|---|---|
| macOS | build/LocalAIAssistant.app | build/LocalAIAssistant-CLI |
| Windows | build/LocalAIAssistant.exe | build/LocalAIAssistant-CLI.exe |
| Linux | build/LocalAIAssistant | build/LocalAIAssistant-CLI |
Usage
Run GUI Version
# macOS
open build/LocalAIAssistant.app

# Windows
build\LocalAIAssistant.exe

# Windows debug mode (shows log console)
build\LocalAIAssistant.exe --debug

# Linux
./build/LocalAIAssistant
Windows Debug Tip: Use
--debugflag to show debug console window for viewing logs. Can also set environment variableLOCALAI_DEBUG=1.
Run CLI Version
# macOS / Linux
./build/LocalAIAssistant-CLI

# Windows (Git Bash)
./build/LocalAIAssistant-CLI.exe

# Windows (CMD/PowerShell)
build\LocalAIAssistant-CLI.exe
CLI Command Examples:
# Enter interactive chat
./build/LocalAIAssistant-CLI chat

# Single query
./build/LocalAIAssistant-CLI ask "What is artificial intelligence?"

# Session management
./build/LocalAIAssistant-CLI sessions -l    # List sessions
./build/LocalAIAssistant-CLI sessions -n    # New session

# Configuration management
./build/LocalAIAssistant-CLI config --show-config
./build/LocalAIAssistant-CLI config --api-url "http://127.0.0.1:11434"
CLI Interactive Commands
Available in CLI chat mode:
| Command | Function |
|---|---|
/help | Show help |
/new | New session |
/list | List all sessions |
/switch <id> | Switch session |
/delete <id> | Delete session |
/config | Show configuration |
/file <path> | Add file attachment |
/listfiles | View pending files |
/clearfiles | Clear file list |
/exit | Exit program |
Configure AI Service
The program needs to connect to an AI service to work.
Local Deployment: Ollama (Some features may not work)
- Download and install Ollama: https://ollama.com/download
- Download model:
ollama pull llama3 - Configure in program settings:
- API URL:
http://127.0.0.1:11434 - Model name:
llama3
- API URL:
Use Cloud API (Recommended, Verified)
| Service | API URL | Description |
|---|---|---|
| OpenAI | https://api.openai.com | Requires API Key |
| Paratera | https://llmapi.paratera.com | China API proxy service |
| Other OpenAI compatible services | Configure per provider docs | — |
AI Girlfriend Module Configuration
The AI Girlfriend module provides voice interaction experience, requires iFlytek voice service configuration.
Step 1: Register iFlytek Open Platform Account
- Visit iFlytek Open Platform: https://www.xfyun.cn
- Register and login
- Go to “Console” → “Create Application”
Step 2: Enable Voice Services
Enable the following services in your application:
| Service | Name | Purpose |
|---|---|---|
| Voice Dictation (Recognition) | Streaming (WebSocket) | Speech to text |
| Voice Synthesis | Ultra-realistic (WebSocket) | Text to speech |
Step 3: Get API Credentials
After creating application, get three credentials from console:
APPID     - Application ID
API Key   - API Key
API Secret - API Secret
Step 4: Configure Credentials
Create .env file in project root:
# Copy template
cp .env.example .env

# Edit and fill in your credentials
.env file content:
XFYUN_APP_ID=your_app_id
XFYUN_API_KEY=your_api_key
XFYUN_API_SECRET=your_api_secret
Security Note:
.envfile is in.gitignore, won’t be committed to Git.
TTS Voice Selection
Modify .env to select different voice tones:
| Voice Parameter | Name | Characteristics |
|---|---|---|
x6_wumeinv_pro | Wumei Sister | Natural, rich emotion ⭐Recommended, needs manual addition |
x6_lingfeiyi_pro | Lingfeiyi | Youthful warm, male voice ⭐Recommended, included after enabling |
Using AI Girlfriend Module
Open AI Girlfriend Window
Select “AI Girlfriend” from View menu, or use shortcut Ctrl/Cmd+G.
Voice Interaction Flow
1. Click 🎤 button to start recording (button turns red 🔴)
2. Speak into microphone
3. Click button again to stop recording
4. Wait for recognition, text auto-sent
5. AI response auto-played via voice
Windows Users Note: Voice input (ASR) currently not available on Windows. You can still use text input, voice output (TTS) works normally.
Customize Personality
Edit src/girlfriend/personality.md to customize AI girlfriend’s personality and response style.
Rebuild or copy file to application resource directory after modification.
Memory System Mechanism
AI girlfriend’s memory system is implemented via text markers (defined in personality.md through system prompt, memory system code not recommended to remove), no API tool calls needed.
Dependency Installation Supplement
Qt 6 Multimedia and WebSockets Modules
AI girlfriend voice features require Qt Multimedia (audio recording/playback) and Qt WebSockets (iFlytek API connection) modules.
macOS (Qt Official Installation):
- Open
/Applications/Qt/MaintenanceTool.app - Select “Add or remove components”
- Find Qt 6.x → Additional Libraries
- Select “Qt Multimedia” and “Qt WebSockets”
- Click Install
Note: Homebrew installed
qt@6already includes both modules.
Linux (Package Manager):
# Ubuntu/Debian
sudo apt install qt6-multimedia-dev qt6-websockets-dev

# Fedora
sudo dnf install qt6-qtmultimedia-devel qt6-qtwebsockets-devel

# Arch Linux
sudo pacman -S qt6-multimedia qt6-websockets
Windows (Qt Official Installation):
Same as macOS, select Multimedia and WebSockets in Qt Maintenance Tool.
Development Environment
Qt Version Requirements
- Minimum: Qt 6.10.3
- Recommended: Qt 6.10.3
Compiler Requirements
- C++17 support (required)
- macOS: AppleClang 10.0+ (Xcode 10+)
- Windows: MSVC 2019+ or MinGW GCC 9+ (Qt bundled)
- Linux: GCC 9+ or Clang 10+
Data Storage Location
AI girlfriend data files are stored in the girlfriend/ subdirectory of user data directory:
| Platform | Data Directory Path |
|---|---|
| macOS | ~/Library/Application Support/LocalAIAssistant/girlfriend/ |
| Windows | %APPDATA%\LocalAIAssistant\girlfriend\ |
| Linux | ~/.local/share/LocalAIAssistant/girlfriend/ |
Files in subdirectory:
| File | Content |
|---|---|
girlfriend_session.json | Conversation history + emotion state |
memory.md | User memory archive (basic info, preferences, events) |
FAQ
Voice Features Not Working
Problem: Voice button shows “Voice not configured”
Solution:
- Check if
.envfile exists and credentials are correct - Confirm “Voice Dictation” and “Ultra-realistic Voice Synthesis” services are enabled in iFlytek console
- Confirm Qt Multimedia and WebSockets modules are installed
- Rebuild application
Windows Voice Input Issue:
Voice input (ASR) currently not supported on Windows due to Windows Media Foundation audio subsystem compatibility with Qt 6 QAudioSource. May be fixed in future versions.
Temporary workaround:
- Use text input instead of voice input
- Voice output (TTS) should still work normally
WebSockets Not Found During Build
Problem: Could NOT find Qt6WebSockets
Solution: Install Qt WebSockets module (see “Dependency Installation Supplement” above)
iFlytek API Errors
Problem: Voice recognition returns error codes
Common Error Codes:
| Error Code | Cause | Solution |
|---|---|---|
| 10005 | API Key error | Check credentials |
| 10006 | Invalid parameter | Check APPID format |
| 10007 | Illegal parameter | Check API Secret |
| 10010 | No authorization | Enable corresponding service |
| 10014 | Engine not enabled | Enable voice service in console |
| 10700 | Engine error | Contact iFlytek support |
AI Response Too Long, Sounds Like Customer Service
Problem: Response exceeds 50 characters, mechanical tone
Solution: Edit personality.md to adjust personality, ensure it includes:
- Response length limit (under 30 characters)
- Colloquial expression rules
- Prohibit customer service language like “you”, “according to my understanding”
Expression Not Switching
Problem: Avatar expression always default state
Solution:
- Check if AI response contains
[emotion:xxx]marker - Confirm
AIGirlfriend/directory has complete images (11 files) - Check console log to confirm emotion detection triggered
Memory Not Recorded
Problem: AI doesn’t remember previously shared information
Solution:
- Check if
memory.mdfile has content (in user data directory) - Confirm AI response contains
[update memory:xxx]marker - Some models don’t support special marker output, try different model
- Emphasize memory rules in
personality.mdto guide AI output
License

AtomGit 是由开放原子开源基金会联合 CSDN 等生态伙伴共同推出的新一代开源与人工智能协作平台。平台坚持“开放、中立、公益”的理念,把代码托管、模型共享、数据集托管、智能体开发体验和算力服务整合在一起,为开发者提供从开发、训练到部署的一站式体验。
更多推荐


 9
9 0
0- 0



 已为社区贡献4条内容

所有评论(0)