Netty
Netty 实现客户端和服务端的双向通信
后端主动向前端发送消息的实现方式
- websocket : 客户端和服务端的双向通信,基于ws协议
- sse: 实现服务端向客户端主动发送消息,基于http协议
- netty: 服务端和客户端的双向通信,支持tcp,ws 等 并发性能很强
BIO/NIO/AIO
- bio: 同步阻塞IO
- NIO: 同步非阻塞IO
- AIO: 异步非阻塞IO
同步与异步: 关注的是消息通知的机制。
- 同步: 调用者需要主动等待或轮询结果。
- 异步: 被调用者通过回调、事件通知等方式,主动通知调用者结果。
阻塞和非阻塞: 关注的是调用者的状态
- 调用结果返回前,调用者线程被挂起,不能做其他事。
- 调用结果返回前,调用者线程可以立即返回(去做其他事),不会被挂起。
Netty
netty是一个异步的,基于事件驱动的网络应用框架
用于快速开发可维护的,高性能
Netty基于Reactor模式
Reactor模式是一种典型的事件驱动+非阻塞I/O(NIO)的高并发网络编程模型,核心是利用I/O多路复用集中监听事件,并通过事件分发器调用对应的事件处理器完成业务逻辑,从而避免为每个连接创建线程的高开销
IO多路复用是一种高效的网络编程技术,允许单个线程同时监控多个文件描述符的状态。当某个描述符就绪时,程序可以立即对其进行读写操作。这种机制广泛应用于高并发场景,如网络服务器和数据库系统。
应用场景:
- 物联网
- 高并发互联网系统
- 分布式系统: RPC的通信框架,DUbbo,Zookeeper,RocketMQ
- 游戏行业
技术特征:
- 高并发:基于 NIO(非阻塞 IO)开发,相比于 BIO(阻塞 IO),并发性能大大提高。
- 传输快:依赖于零拷贝特性,减少不必要的内存拷贝,实现更高效的传输。
- 封装好:封装了 NIO 操作的很多细节,提供了易于使用的调用接口。
- 扩展性强:通过 ChannelHandler 可以灵活地扩展通信框架。
- 性能优异:与其他 NIO 框架相比,Netty 的综合性能最优。
- 运行稳定:修复了所有已知的 NIO bug,让开发人员可以专注于业务本身。
核心组件:
- Bootstrap:Netty 提供的一个工厂类,可以通过它来完成 Netty 的客户端或服务端组件的组装,以及程序的初始化和启动。Netty 提供了两个引导类:ServerBootstrap 用于服务端,Bootstrap 用于客户端。
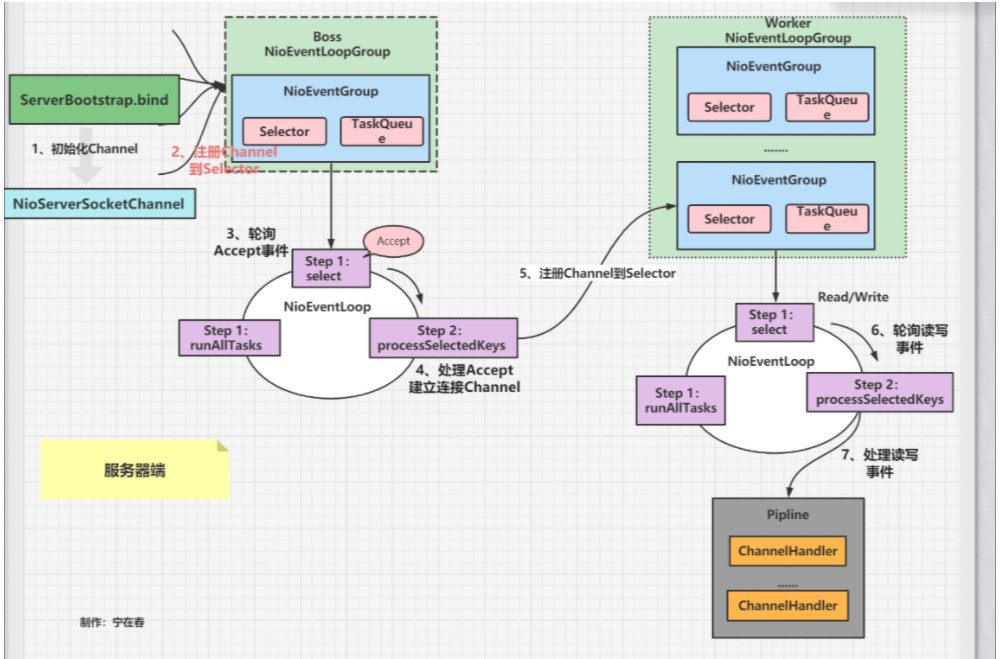
- Boss Group:一个或多个 EventLoop,专门负责接收客户端连接(处理 Accept 事件)。它接收到连接后,会将连接注册到 Worker Group。
- Worker Group:一组 EventLoop,负责处理连接的读写 I/O 事件以及执行 ChannelHandler 中的业务逻辑
- EventLoop:本质是一个死循环,用于监听 I/O 事件和分配任务。一个 Channel 生命周期内的所有操作(连接、读、写)都由同一个 EventLoop 线程处理,保证了线程安全性 。
- Channel:代表一个网络连接(Socket)。Netty 提供了 NioServerSocketChannel(服务端)、NioSocketChannel(客户端)等实现 。
- ChannelHandler:业务逻辑的容器。例如处理入站数据的 ChannelInboundHandler 和处理出站数据的 ChannelOutboundHandler 。
- ChannelPipeline:一个双向链表,负责将多个 ChannelHandler 串联起来。数据流经 Pipeline 时会被每个 Handler 处理
Netty服务端工作流程图
简单演示:
服务端
import io.netty.bootstrap.ServerBootstrap;
import io.netty.channel.*;
import io.netty.channel.nio.NioEventLoopGroup;
import io.netty.channel.socket.SocketChannel;
import io.netty.channel.socket.nio.NioServerSocketChannel;
public class EchoServer {
private final int port;
public EchoServer(int port) {
this.port = port;
}
public void start() throws Exception {
// 1. 创建线程组: boss 处理连接,worker 处理读写
EventLoopGroup bossGroup = new NioEventLoopGroup(1); // 单线程处理连接
EventLoopGroup workerGroup = new NioEventLoopGroup(); // 默认线程数为 CPU核心数*2
try {
// 2. 创建服务端启动助手
ServerBootstrap b = new ServerBootstrap();
b.group(bossGroup, workerGroup)
.channel(NioServerSocketChannel.class) // 3. 指定 Channel 类型
.option(ChannelOption.SO_BACKLOG, 128) // 4. 设置 TCP 参数,等待队列大小
.childOption(ChannelOption.SO_KEEPALIVE, true) // 保持长连接
.childHandler(new ChannelInitializer<SocketChannel>() { // 5. 配置 Pipeline
@Override
public void initChannel(SocketChannel ch) {
ChannelPipeline p = ch.pipeline();
// 添加自定义的业务处理器
p.addLast(new EchoServerHandler());
}
});
// 6. 绑定端口并启动服务 (同步等待)
ChannelFuture f = b.bind(port).sync();
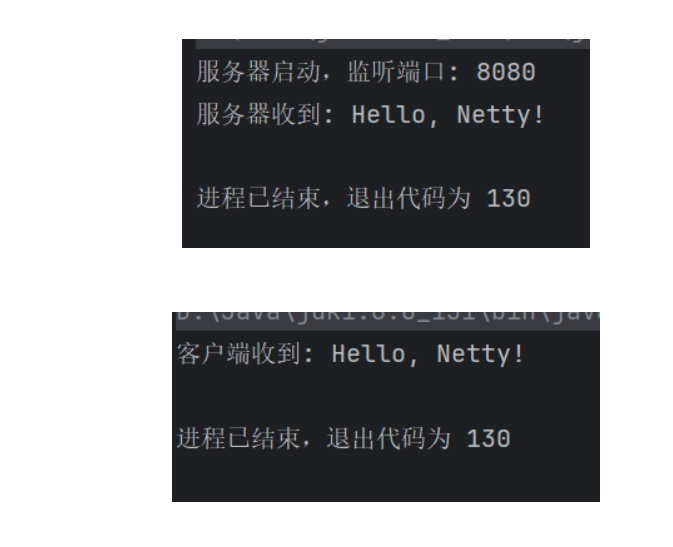
System.out.println("服务器启动,监听端口: " + port);
// 7. 等待服务端监听通道关闭
f.channel().closeFuture().sync();
} finally {
// 8. 优雅关闭线程组
bossGroup.shutdownGracefully();
workerGroup.shutdownGracefully();
}
}
public static void main(String[] args) throws Exception {
new EchoServer(8080).start();
}
}
服务端ChannelHandler
import io.netty.buffer.ByteBuf;
import io.netty.buffer.Unpooled;
import io.netty.channel.ChannelFutureListener;
import io.netty.channel.ChannelHandlerContext;
import io.netty.channel.ChannelInboundHandlerAdapter;
import io.netty.util.CharsetUtil;

// 继承 ChannelInboundHandlerAdapter 来处理入站 I/O 事件
public class EchoServerHandler extends ChannelInboundHandlerAdapter {

    // 当有数据可读时被调用
    @Override
    public void channelRead(ChannelHandlerContext ctx, Object msg) {
        ByteBuf in = (ByteBuf) msg;
        System.out.println("服务器收到: " + in.toString(CharsetUtil.UTF_8));

        // 将收到的消息写回客户端(注意:此时只是写入缓冲区,并未真正发送)
        ctx.write(in);
        // ctx.flush();
        // ctx.writeAndFlush(in); // 写入并刷新缓冲区
    }

    // 当数据读取完成时被调用
    @Override
    public void channelReadComplete(ChannelHandlerContext ctx) {
        // 将缓冲区中的数据刷新到 Socket 并关闭通道
        ctx.writeAndFlush(Unpooled.EMPTY_BUFFER).addListener(ChannelFutureListener.CLOSE);
    }

    // 处理异常
    @Override
    public void exceptionCaught(ChannelHandlerContext ctx, Throwable cause) {
        cause.printStackTrace();
        ctx.close();
    }
}
客户端:
package com.yp.app1;

import io.netty.bootstrap.Bootstrap;
import io.netty.channel.ChannelFuture;
import io.netty.channel.ChannelInitializer;
import io.netty.channel.EventLoopGroup;
import io.netty.channel.nio.NioEventLoopGroup;
import io.netty.channel.socket.SocketChannel;
import io.netty.channel.socket.nio.NioSocketChannel;

public class EchoClient {
    // 服务端ip和端口
    private final String host;
    private final int port;

    public EchoClient(String host, int port) {
        this.host = host;
        this.port = port;
    }

    public void start() throws Exception {
        EventLoopGroup group = new NioEventLoopGroup();
        try {
            Bootstrap b = new Bootstrap();
            b.group(group)
                    .channel(NioSocketChannel.class)
                    .handler(new ChannelInitializer<SocketChannel>() {
                        @Override
                        protected void initChannel(SocketChannel ch) {
                            ch.pipeline().addLast(new EchoClientHandler()); // 添加客户端处理器
                        }
                    });

            // 连接服务端
            ChannelFuture f = b.connect(host, port).sync();

            // 等待连接关闭
            f.channel().closeFuture().sync();
        } finally {
            // 优雅地关闭EventLoopGroup,释放资源
            group.shutdownGracefully();
        }
    }

    public static void main(String[] args) throws Exception {
        new EchoClient("127.0.0.1", 8080).start();
    }
}
客户端Handler
import io.netty.buffer.ByteBuf;
import io.netty.buffer.Unpooled;
import io.netty.channel.ChannelHandlerContext;
import io.netty.channel.SimpleChannelInboundHandler;
import io.netty.util.CharsetUtil;

public class EchoClientHandler extends SimpleChannelInboundHandler<ByteBuf> {

    // 当与服务器连接建立成功后,立即发送消息
    @Override
    public void channelActive(ChannelHandlerContext ctx) {
        ctx.writeAndFlush(Unpooled.copiedBuffer("Hello, Netty!", CharsetUtil.UTF_8));
    }

    // 接收服务器的响应
    @Override
    protected void channelRead0(ChannelHandlerContext ctx, ByteBuf msg) {
        System.out.println("客户端收到: " + msg.toString(CharsetUtil.UTF_8));
    }

    @Override
    public void exceptionCaught(ChannelHandlerContext ctx, Throwable cause) {
        cause.printStackTrace();
        ctx.close();
    }
}
入站和出站
入站: 读数据,需要进行数据的解码
出站: 写数据,进行数据的编码
入站(Inbound):数据从外部进入系统。
流向:Socket -> ChannelPipeline -> 你的业务逻辑。
本质:读数据。
就像你家的信箱,邮递员(外部)把信塞进来,你(业务逻辑)去取信。
出站(Outbound):数据从系统发送到外部。
流向:你的业务逻辑 -> ChannelPipeline -> Socket。
本质:写数据。
就像你写好信要寄出去,你把信(业务逻辑)投进邮筒,邮递员(网络)取走送走
在 Netty 中,处理这两种事件的组件分别继承自不同的接口或类:
● 入站处理器(Inbound Handler)
○ 通常继承 ChannelInboundHandlerAdapter 或实现 ChannelInboundHandler,属于数据解码操作
○ 核心方法:channelRead()(有数据可读时触发)、channelActive()(连接建立时触发)、exceptionCaught()(异常时触发)等。
● 出站处理器(Outbound Handler)
○ 通常继承 ChannelOutboundHandlerAdapter 或实现 ChannelOutboundHandler。属于数据编码操作
○ 核心方法:write()(将数据写回客户端时触发)、flush()(刷新缓冲区时触发)、connect()、disconnect() 等。
Pipeline 的执行顺序
通过addLast()方法,向ChannelPipeline中添加入站和出站处理器
在 ChannelPipeline 中,入站处理器和出站处理器的执行方向是相反的。
假设我们把处理器像链表一样排列在 Pipeline 中:
Head <–> 入站处理器A <–> 入站处理器B <–> 出站处理器C <–> 出站处理器D <–> Tail
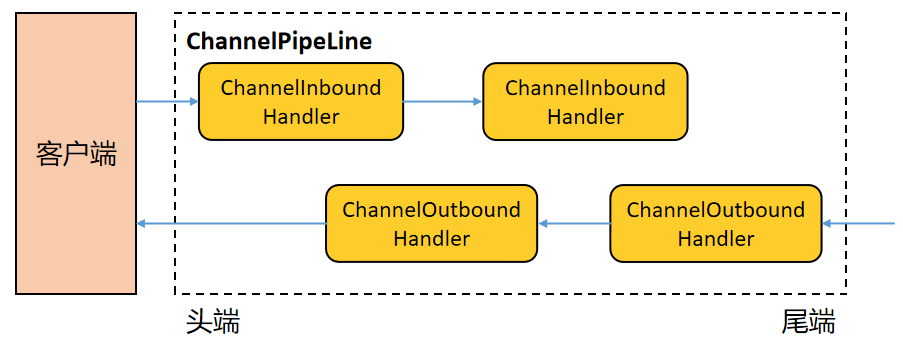
入站事件(从Head流向Tail)
Socket 收到数据(入站)。
- 数据从 Head 开始,依次经过所有入站处理器(A -> B)。
- 注意,它不会经过出站处理器(C、D),除非你在某个入站处理器里手动触发出站事件。
- 到达 Tail 后,通常意味着数据解析完成,交给业务逻辑。
出站事件(从Tail流向Head)
- 业务代码调用 ctx.writeAndFlush()(出站)。
- 数据从 Tail 开始向前传播,依次经过所有出站处理器(D -> C)。
- 注意,它不会反向经过入站处理器(B、A)。
- 最终到达 Head,由底层的 Socket 将数据发送出去。
入站处理器:调用 ctx.fireChannelRead() 将事件向后(Tail方向)传递。
出站处理器:调用 ctx.write() 或 ctx.channel().write() 将事件向前(Head方向)传递。
定义3个相同的入站处理器
InBoundHandler1、InBoundHandler2、InBoundHandler3
import io.netty.buffer.ByteBuf;
import io.netty.channel.ChannelHandlerContext;
import io.netty.channel.ChannelInboundHandlerAdapter;
import io.netty.util.CharsetUtil;

public class InBoundHandler1 extends ChannelInboundHandlerAdapter {
    @Override
    public void channelRead(ChannelHandlerContext ctx, Object msg) throws Exception {
        String data = ((ByteBuf) msg).toString(CharsetUtil.UTF_8);
        System.out.println("InBoundHandler1 read: " + data);
        // If do not call fireChannelRead, the next ChannelHandler will not exec.
        ctx.fireChannelRead(msg);
        System.out.println("exit InBoundHandler1 channelRead");
    }


    @Override
    public void exceptionCaught(ChannelHandlerContext ctx, Throwable cause) throws Exception {
        System.out.println("InBoundHandler1 exception");
    }
}
定义3个相同的出站处理器
OutBoundHandler1、OutBoundHandler2、OutBoundHandler3
import io.netty.channel.ChannelHandlerContext;
import io.netty.channel.ChannelOutboundHandlerAdapter;
import io.netty.channel.ChannelPromise;

public class OutBoundHandler1 extends ChannelOutboundHandlerAdapter {
    @Override
    public void write(ChannelHandlerContext ctx, Object msg, ChannelPromise promise) throws Exception {
        System.out.println("OutBoundHandler1 write");
        ctx.write(msg);
        System.out.println("Exit OutBoundHandler1 write");
    }
}
粘包和半包
在基于TCP的通信中,半包是指一次读取到的只是一个完整消息的一部分,而粘包是一次读取到多个消息连在一起。
由于TCP是无边界的字节流协议,这种现象很常见。
演示代码:
服务端:
import io.netty.bootstrap.ServerBootstrap;
import io.netty.channel.ChannelFuture;
import io.netty.channel.ChannelInitializer;
import io.netty.channel.EventLoopGroup;
import io.netty.channel.nio.NioEventLoopGroup;
import io.netty.channel.socket.SocketChannel;
import io.netty.channel.socket.nio.NioServerSocketChannel;
import java.net.InetSocketAddress;
public class EchoServer {
private final int port;
public EchoServer(int port) {
this.port = port;
}
public static void main(String[] args) throws InterruptedException {
EchoServer echoServer = new EchoServer(9999);
System.out.println("服务器即将启动");
echoServer.start();
}
public void start() throws InterruptedException {
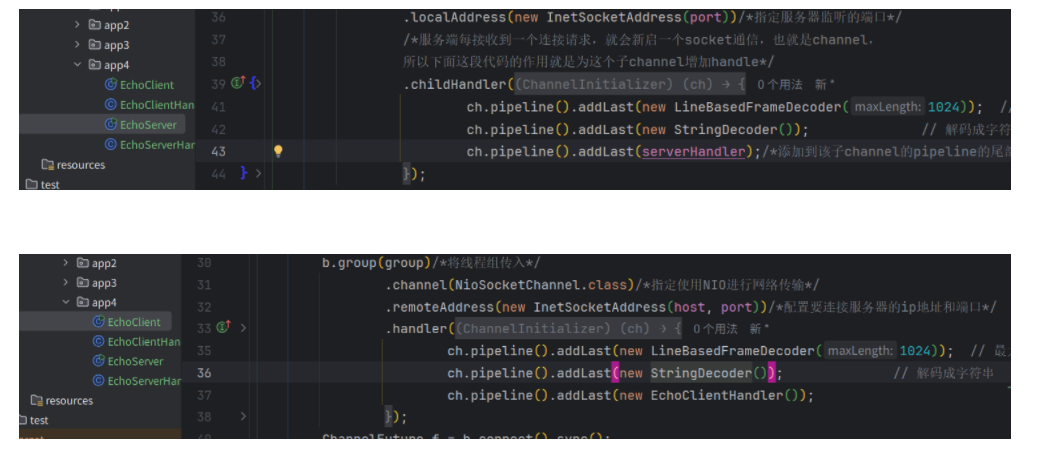
EchoServerHandler serverHandler = new EchoServerHandler();
EventLoopGroup group = new NioEventLoopGroup();/*线程组*/
try {
ServerBootstrap b = new ServerBootstrap();/*服务端启动必须*/
b.group(group)/*将线程组传入*/
.channel(NioServerSocketChannel.class)/*指定使用NIO进行网络传输*/
.localAddress(new InetSocketAddress(port))/*指定服务器监听的端口*/
/*服务端每接收到一个连接请求,就会新启一个socket通信,也就是channel,
所以下面这段代码的作用就是为这个子channel增加handle*/
.childHandler(new ChannelInitializer<SocketChannel>() {
protected void initChannel(SocketChannel ch) throws Exception {
ch.pipeline().addLast(serverHandler);/*添加到该子channel的pipeline的尾部*/
}
});
ChannelFuture f = b.bind().sync();/*异步绑定到服务器,sync()会阻塞直到完成*/
System.out.println("服务器启动完成,等待客户端的连接和数据.....");
f.channel().closeFuture().sync();/*阻塞直到服务器的channel关闭*/
} finally {
group.shutdownGracefully().sync();/*优雅关闭线程组*/
}
}
}
服务端handler
import io.netty.buffer.ByteBuf;
import io.netty.buffer.Unpooled;
import io.netty.channel.ChannelHandler;
import io.netty.channel.ChannelHandlerContext;
import io.netty.channel.ChannelInboundHandlerAdapter;
import io.netty.util.CharsetUtil;
import java.util.concurrent.atomic.AtomicInteger;
// 同一个实例可以被多次添加到一个或者多个ChannelPipeline中
@ChannelHandler.Sharable
public class EchoServerHandler extends ChannelInboundHandlerAdapter {
private AtomicInteger counter = new AtomicInteger(0);
/*** 服务端读取到网络数据后的处理*/
@Override
public void channelRead(ChannelHandlerContext ctx, Object msg) throws Exception {
ByteBuf in = (ByteBuf) msg;
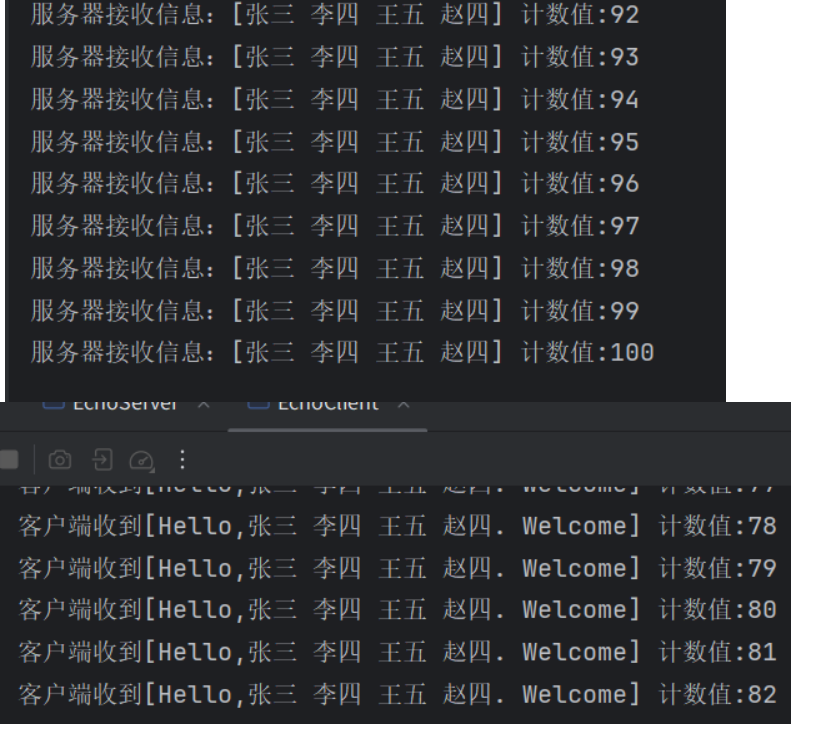
String request = in.toString(CharsetUtil.UTF_8);
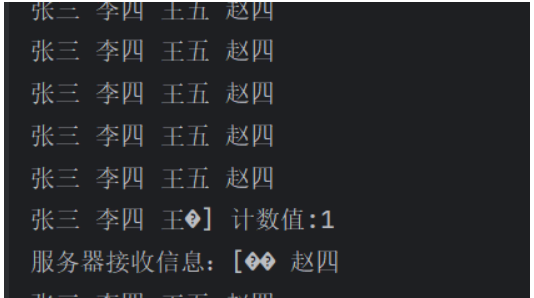
System.out.println("服务器接收信息:[" + request
+ "] 计数值:" + counter.incrementAndGet());
String resp = "Hello," + request + ". Welcome"
+ System.getProperty("line.separator");
// 向客户端返回信息
ctx.writeAndFlush(Unpooled.copiedBuffer(resp.getBytes()));
}
/*** 发生异常后的处理*/
@Override
public void exceptionCaught(ChannelHandlerContext ctx, Throwable cause) throws Exception {
cause.printStackTrace();
ctx.close();
}
}
客户端
import io.netty.bootstrap.Bootstrap;
import io.netty.channel.ChannelFuture;
import io.netty.channel.ChannelInitializer;
import io.netty.channel.EventLoopGroup;
import io.netty.channel.nio.NioEventLoopGroup;
import io.netty.channel.socket.SocketChannel;
import io.netty.channel.socket.nio.NioSocketChannel;

import java.net.InetSocketAddress;

public class EchoClient {

    private final int port;
    private final String host;

    public EchoClient(int port, String host) {
        this.port = port;
        this.host = host;
    }

    public void start() throws InterruptedException {
        EventLoopGroup group = new NioEventLoopGroup();/*线程组*/
        try {
            final Bootstrap b = new Bootstrap();
            /*客户端启动必须*/
            b.group(group)/*将线程组传入*/
                    .channel(NioSocketChannel.class)/*指定使用NIO进行网络传输*/
                    .remoteAddress(new InetSocketAddress(host, port))/*配置要连接服务器的ip地址和端口*/
                    .handler(new ChannelInitializer<SocketChannel>() {
                        protected void initChannel(SocketChannel ch) throws Exception {
                            ch.pipeline().addLast(new EchoClientHandler());
                        }
                    });
            ChannelFuture f = b.connect().sync();
            f.channel().closeFuture().sync();
        } finally {
            group.shutdownGracefully().sync();
        }
    }

    public static void main(String[] args) throws InterruptedException {
        new EchoClient(9999, "127.0.0.1").start();
    }
}
客户端handler
import io.netty.buffer.ByteBuf;

import io.netty.buffer.Unpooled;

import io.netty.channel.ChannelHandlerContext;

import io.netty.channel.SimpleChannelInboundHandler;

import io.netty.util.CharsetUtil;

import java.util.concurrent.atomic.AtomicInteger;

public class EchoClientHandler extends SimpleChannelInboundHandler<ByteBuf> {

    private AtomicInteger counter = new AtomicInteger(0);

    /*** 客户端读取到网络数据后的处理*/
    protected void channelRead0(ChannelHandlerContext ctx, ByteBuf msg) throws Exception {
        System.out.println("客户端收到[" + msg.toString(CharsetUtil.UTF_8)
                + "] 计数值:" + counter.incrementAndGet());
    }

    /*** 客户端被通知channel活跃后,做事*/
    @Override
    public void channelActive(ChannelHandlerContext ctx) throws Exception {
        ByteBuf msg = null;
        String request = "张三 李四 王五 赵四" + System.getProperty("line.separator");
        for (int i = 0; i < 100; i++) {
            msg = Unpooled.buffer(request.length());
            msg.writeBytes(request.getBytes());
            ctx.writeAndFlush(msg);
        }
    }

    /*** 发生异常后的处理*/
    @Override
    public void exceptionCaught(ChannelHandlerContext ctx, Throwable cause) throws Exception {
        cause.printStackTrace();
        ctx.close();
    }
}
输出:
解决方案
对于粘包和拆包问题,常见的解决方案有四种:
- 客户端在发送数据包的时候,每个包都固定长度大小。如果客户端发送的数据长度不足指定字节的长度,则通过补充空格的方式补全到指定长度,Netty提供了FixedLengthFrameDecoder方式进行处理
- 客户端在每个包的末尾使用固定的分隔符,例如\r\n,如果一个包被拆分了,则等待下一个包发送过来之后找到其中的\r\n,然后对其拆分后的头部部分与前一个包的剩余部分进行合并,这样就得到了一个完整的包。Netty提供了两个编解码的类,LineBasedFrameDecoder(根据换行符)和DelimiterBasedFrameDecoder(自定义分隔符)进行处理
- 将消息分为消息头和消息体,在消息头中存储整个消息的长度,只有读取到足够长度的消息,才认为是读到了一个完整的消息,一般使用LengthFieldBasedFrameDecoder与LengthFieldPrepender配合处理
- 对于较复杂的协议信息,可以通过自定义协议进行粘包和拆包的处理。比如可以通过继承LengthFieldBasedFrameDecoder和LengthFieldPrepender来实现粘包和拆包的处理,也可以通过实现MessageToByteEncoder和ByteToMessageDecoder进行处理
下面通过使用分隔符,在server,和client添加如下代码,同时
注意,指定泛型要注意,匹配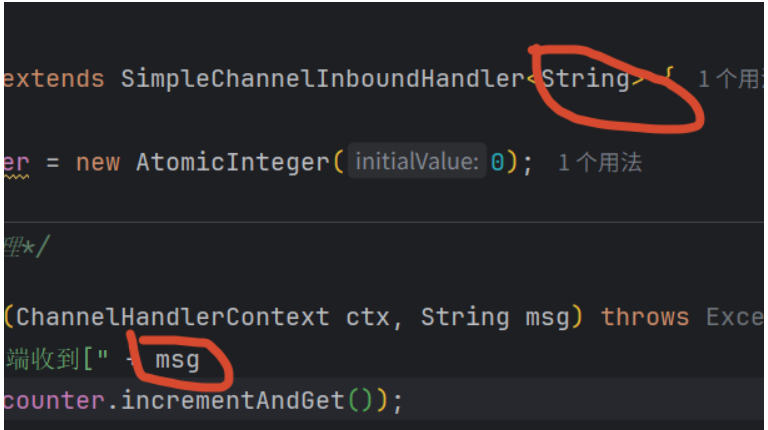
输出:
实际操作中,会使用自定义格式这种方式:
自定义消息(协议)
public class Message {
    private int magicNumber;      // 魔数
    private byte version;         // 版本号
    private byte serializerType;  // 序列化类型
    private byte command;         // 指令类型
    private int length;           // 数据长度
    private String content;       // 实际内容


    public Message() {
        this.magicNumber = 0xCAFEBABE;
        this.version = 1;
        this.serializerType = 0;  // 默认使用字符串直接传输
    }


    public Message(byte command, String content) {
        this();
        this.command = command;
        this.content = content;
        this.length = content != null ? content.getBytes().length : 0;
    }


    // Getters and Setters
    public int getMagicNumber() {
        return magicNumber;
    }


    public void setMagicNumber(int magicNumber) {
        this.magicNumber = magicNumber;
    }


    public byte getVersion() {
        return version;
    }


    public void setVersion(byte version) {
        this.version = version;
    }


    public byte getSerializerType() {
        return serializerType;
    }


    public void setSerializerType(byte serializerType) {
        this.serializerType = serializerType;
    }


    public byte getCommand() {
        return command;
    }


    public void setCommand(byte command) {
        this.command = command;
    }


    public int getLength() {
        return length;
    }


    public void setLength(int length) {
        this.length = length;
    }


    public String getContent() {
        return content;
    }


    public void setContent(String content) {
        this.content = content;
        this.length = content != null ? content.getBytes().length : 0;
    }


    @Override
    public String toString() {
        return "Message{" +
                "magicNumber=" + Integer.toHexString(magicNumber) +
                ", version=" + version +
                ", command=" + command +
                ", length=" + length +
                ", content='" + content + '\'' +
                '}';
    }
}
自定义编码器和解码器
import io.netty.buffer.ByteBuf;
import io.netty.channel.ChannelHandlerContext;
import io.netty.handler.codec.LengthFieldBasedFrameDecoder;

import java.nio.charset.StandardCharsets;

public class MessageDecoder extends LengthFieldBasedFrameDecoder {

    /**
     * 参数说明:
     * maxFrameLength: 最大帧长度,防止内存溢出
     * lengthFieldOffset: 长度字段的偏移量,魔数(4) + 版本(1) + 序列化类型(1) + 指令(1) = 7
     * lengthFieldLength: 长度字段本身占用的字节数,数据长度字段占4字节
     * lengthAdjustment: 长度调整值,数据长度字段之后还有数据内容,所以不需要调整,为0
     * initialBytesToStrip: 解码后跳过的字节数,我们保留完整头部用于解析,所以为0
     */
    public MessageDecoder() {
        super(1024 * 1024,  // 最大帧长度 1MB
                7,            // 长度字段偏移量:魔数4 + 版本1 + 序列化类型1 + 指令1 = 7
                4,            // 长度字段长度:数据长度字段占4字节
                0,            // 长度调整值
                0);           // 初始跳过字节数
    }

    @Override
    protected Object decode(ChannelHandlerContext ctx, ByteBuf in) throws Exception {
        // 调用父类方法,如果数据不够或者数据不完整,会返回null
        ByteBuf frame = (ByteBuf) super.decode(ctx, in);
        if (frame == null) {
            return null;
        }

        try {
            // 读取魔数
            int magicNumber = frame.readInt();
            if (magicNumber != 0xCAFEBABE) {
                throw new RuntimeException("魔数校验失败: " + Integer.toHexString(magicNumber));
            }

            // 读取版本号
            byte version = frame.readByte();

            // 读取序列化类型
            byte serializerType = frame.readByte();

            // 读取指令类型
            byte command = frame.readByte();

            // 读取数据长度
            int length = frame.readInt();

            // 读取数据内容
            String content = "";
            if (length > 0) {
                byte[] contentBytes = new byte[length];
                frame.readBytes(contentBytes);
                content = new String(contentBytes, StandardCharsets.UTF_8);
            }

            // 构建Message对象
            Message message = new Message();
            message.setMagicNumber(magicNumber);
            message.setVersion(version);
            message.setSerializerType(serializerType);
            message.setCommand(command);
            message.setLength(length);
            message.setContent(content);

            System.out.println("解码器 - 接收到消息: " + message);
            return message;

        } finally {
            // 释放frame
            frame.release();
        }
    }
}
编码器
import io.netty.buffer.ByteBuf;
import io.netty.channel.ChannelHandlerContext;
import io.netty.handler.codec.MessageToByteEncoder;


import java.nio.charset.StandardCharsets;


public class MessageEncoder extends MessageToByteEncoder<Message> {


    @Override
    protected void encode(ChannelHandlerContext ctx, Message msg, ByteBuf out) throws Exception {
        // 1. 写入魔数 (4字节)
        out.writeInt(msg.getMagicNumber());


        // 2. 写入版本号 (1字节)
        out.writeByte(msg.getVersion());


        // 3. 写入序列化类型 (1字节)
        out.writeByte(msg.getSerializerType());


        // 4. 写入指令类型 (1字节)
        out.writeByte(msg.getCommand());


        // 5. 写入数据长度 (4字节)
        byte[] contentBytes = msg.getContent() != null ?
                msg.getContent().getBytes(StandardCharsets.UTF_8) : new byte[0];
        out.writeInt(contentBytes.length);


        // 6. 写入实际数据
        if (contentBytes.length > 0) {
            out.writeBytes(contentBytes);
        }


        System.out.println("编码器 - 发送消息: " + msg + ", 字节数: " + out.readableBytes());
    }
}
客户端
package com.yp.app5;
import io.netty.bootstrap.Bootstrap;
import io.netty.channel.ChannelFuture;
import io.netty.channel.ChannelInitializer;
import io.netty.channel.EventLoopGroup;
import io.netty.channel.nio.NioEventLoopGroup;
import io.netty.channel.socket.SocketChannel;
import io.netty.channel.socket.nio.NioSocketChannel;
import io.netty.handler.logging.LogLevel;
import io.netty.handler.logging.LoggingHandler;
public class LengthFieldBasedClient {
private final String host;
private final int port;
public LengthFieldBasedClient(String host, int port) {
this.host = host;
this.port = port;
}
public void start() throws Exception {
EventLoopGroup group = new NioEventLoopGroup();
try {
Bootstrap bootstrap = new Bootstrap();
bootstrap.group(group)
.channel(NioSocketChannel.class)
.handler(new ChannelInitializer<SocketChannel>() {
@Override
protected void initChannel(SocketChannel ch) throws Exception {
ch.pipeline()
.addLast(new LoggingHandler(LogLevel.DEBUG))
.addLast(new MessageDecoder())
.addLast(new MessageEncoder())
.addLast(new ClientBusinessHandler());
}
});
System.out.println("客户端启动,连接服务器 " + host + ":" + port);
ChannelFuture future = bootstrap.connect(host, port).sync();
// 获取Channel,用于发送消息
SocketChannel channel = (SocketChannel) future.channel();
// 模拟粘包情况:连续发送多个消息
simulateStickyPackets(channel);
// 等待连接关闭
channel.closeFuture().sync();
} finally {
group.shutdownGracefully();
}
}
/**
* 模拟粘包:连续发送多个消息,不使用flush
* 这些消息会在TCP缓冲区中粘在一起,但我们的解码器能正确分割
*/
private void simulateStickyPackets(SocketChannel channel) {
System.out.println("开始模拟粘包发送...");
// 发送5条消息,连续写入但不立即flush
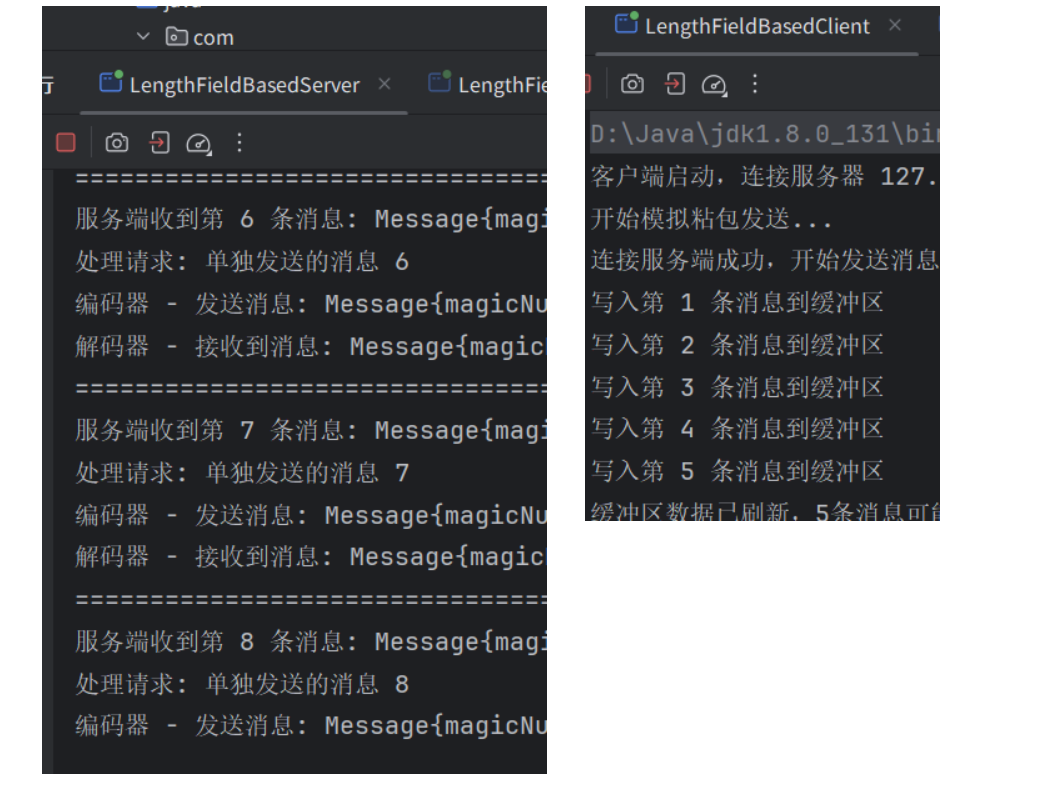
for (int i = 1; i <= 5; i++) {
Message message = new Message((byte) 1, "这是第 " + i + " 条消息,用于测试粘包");
// 使用write,不立即flush,让消息在缓冲区粘在一起
channel.write(message);
System.out.println("写入第 " + i + " 条消息到缓冲区");
}
// 最后一次性flush,模拟粘包发送
channel.flush();
System.out.println("缓冲区数据已刷新,5条消息可能粘在一起发送");
// 延时一下,再发送另一批消息
try {
Thread.sleep(1000);
} catch (InterruptedException e) {
e.printStackTrace();
}
// 第二批消息,这次每条都flush(模拟非粘包情况)
System.out.println("\n开始发送第二批消息(每条独立flush)...");
for (int i = 6; i <= 8; i++) {
Message message = new Message((byte) 1, "单独发送的消息 " + i);
channel.writeAndFlush(message);
System.out.println("发送第 " + i + " 条消息并立即flush");
try {
Thread.sleep(500); // 间隔500ms
} catch (InterruptedException e) {
e.printStackTrace();
}
}
}
public static void main(String[] args) throws Exception {
new LengthFieldBasedClient("127.0.0.1", 8080).start();
}
}
package com.yp.app5;

import io.netty.channel.ChannelHandlerContext;
import io.netty.channel.SimpleChannelInboundHandler;

public class ClientBusinessHandler extends SimpleChannelInboundHandler<Message> {

    private int responseCount = 0;

    @Override
    protected void channelRead0(ChannelHandlerContext ctx, Message msg) throws Exception {
        responseCount++;
        System.out.println("客户端收到第 " + responseCount + " 条响应: " + msg);
    }

    @Override
    public void channelActive(ChannelHandlerContext ctx) throws Exception {
        System.out.println("连接服务端成功,开始发送消息...");
    }

    @Override
    public void exceptionCaught(ChannelHandlerContext ctx, Throwable cause) throws Exception {
        cause.printStackTrace();
        ctx.close();
    }
}
服务端:
package com.yp.app5;

import io.netty.bootstrap.ServerBootstrap;
import io.netty.channel.ChannelFuture;
import io.netty.channel.ChannelInitializer;
import io.netty.channel.ChannelOption;
import io.netty.channel.EventLoopGroup;
import io.netty.channel.nio.NioEventLoopGroup;
import io.netty.channel.socket.SocketChannel;
import io.netty.channel.socket.nio.NioServerSocketChannel;
import io.netty.handler.logging.LogLevel;
import io.netty.handler.logging.LoggingHandler;

public class LengthFieldBasedServer {

    private final int port;

    public LengthFieldBasedServer(int port) {
        this.port = port;
    }

    public void start() throws Exception {
        EventLoopGroup bossGroup = new NioEventLoopGroup(1);
        EventLoopGroup workerGroup = new NioEventLoopGroup();

        try {
            ServerBootstrap bootstrap = new ServerBootstrap();
            bootstrap.group(bossGroup, workerGroup)
                    .channel(NioServerSocketChannel.class)
                    .option(ChannelOption.SO_BACKLOG, 128)
                    .childOption(ChannelOption.SO_KEEPALIVE, true)
                    .handler(new LoggingHandler(LogLevel.INFO))
                    .childHandler(new ChannelInitializer<SocketChannel>() {
                        @Override
                        protected void initChannel(SocketChannel ch) throws Exception {
                            ch.pipeline()
                                    // 添加日志处理器,方便查看原始字节流
                                    .addLast(new LoggingHandler(LogLevel.DEBUG))
                                    // 添加解码器(处理粘包)
                                    .addLast(new MessageDecoder())
                                    // 添加编码器
                                    .addLast(new MessageEncoder())
                                    // 添加业务处理器
                                    .addLast(new ServerBusinessHandler());
                        }
                    });

            System.out.println("服务端启动中,监听端口: " + port);
            ChannelFuture future = bootstrap.bind(port).sync();
            System.out.println("服务端启动成功");

            // 等待服务端关闭
            future.channel().closeFuture().sync();

        } finally {
            bossGroup.shutdownGracefully();
            workerGroup.shutdownGracefully();
        }
    }

    public static void main(String[] args) throws Exception {
        new LengthFieldBasedServer(8080).start();
    }
}
package com.yp.app5;

import io.netty.channel.ChannelHandlerContext;
import io.netty.channel.SimpleChannelInboundHandler;

public class ServerBusinessHandler extends SimpleChannelInboundHandler<Message> {

    private int messageCount = 0;

    @Override
    protected void channelRead0(ChannelHandlerContext ctx, Message msg) throws Exception {
        messageCount++;
        System.out.println("=================================");
        System.out.println("服务端收到第 " + messageCount + " 条消息: " + msg);

        // 根据指令类型处理
        switch (msg.getCommand()) {
            case 1: // 请求
                System.out.println("处理请求: " + msg.getContent());
                // 创建响应消息
                Message response = new Message((byte) 2, "服务端已收到: " + msg.getContent());
                // 发送响应
                ctx.writeAndFlush(response);
                break;
            case 3: // 心跳
                System.out.println("收到心跳消息");
                break;
            default:
                System.out.println("未知指令: " + msg.getCommand());
        }
    }

    @Override
    public void channelActive(ChannelHandlerContext ctx) throws Exception {
        System.out.println("客户端连接建立: " + ctx.channel().remoteAddress());
    }

    @Override
    public void channelInactive(ChannelHandlerContext ctx) throws Exception {
        System.out.println("客户端连接断开: " + ctx.channel().remoteAddress());
    }

    @Override
    public void exceptionCaught(ChannelHandlerContext ctx, Throwable cause) throws Exception {
        cause.printStackTrace();
        ctx.close();
    }
}
自动重连
在分布式系统和网络编程中,网络连接是不可靠的,可能因为以下原因断开:
- 网络波动:瞬时网络中断
- 服务端重启:服务器维护或崩溃
本例使用IdleStateHandler机制实现自动重连。在Netty中,IdleStateHandler 是一个用于心跳检测的处理器,它可以监测连接的空闲状态并触发相应的事件。这个机制主要用于检测远程端点是否存活,如果不存活或不活跃,则对空闲的Socket连接进行处理,避免资源浪费。
public IdleStateHandler(
    int readerIdleTimeSeconds,
    int writerIdleTimeSeconds,
    int allIdleTimeSeconds) {


    this(readerIdleTimeSeconds, writerIdleTimeSeconds, allIdleTimeSeconds,
         TimeUnit.SECONDS);
}
- readerIdleTimeSeconds:读超时。即当在指定的时间间隔内没有从 Channel 读取到数据时,会触发一个 READER_IDLE 的 IdleStateEvent 事件
- writerIdleTimeSeconds: 写超时。即当在指定的时间间隔内没有数据写入到 Channel 时,会触发一个 WRITER_IDLE 的 IdleStateEvent 事件
- allIdleTimeSeconds: 读/写超时。即当在指定的时间间隔内没有读或写操作时,会触发一个 ALL_IDLE 的 IdleStateEvent 事件
Handler中一般需要重写userEventTriggered ,userEventTriggered 是 ChannelInboundHandlerAdapter 提供的一个回调方法,常与 IdleStateHandler 配合,用于处理读/写空闲事件,实现心跳检测与超时处理。
零拷贝技术
零拷贝(Zero-Copy) 是一种减少数据在内核态与用户态之间不必要拷贝次数的 I/O 优化技术,其核心目标是降低 CPU 占用、减少上下文切换、提升高并发场景下的吞吐性能。
内核态是操作系统内核运行的模式,具有对硬件资源的完全控制权限,可以直接访问CPU、内存、磁盘等资源,并执行特权指令。内核态主要用于内存管理、进程调度、设备驱动等核心功能。
用户态是普通应用程序运行的模式,权限受到限制,无法直接访问硬件资源。用户态程序需要通过系统调用向内核请求服务,例如文件操作、网络通信等。
Netty的零拷贝主要体现在以下五个方面:
| 技术/策略 | 零拷贝体现 | 核心作用 |
|---|---|---|
| 直接内存(Direct Buffers) | 使用堆外内存进行Socket读写,避免JVM堆内存到直接内存的二次拷贝。 | 减少一次用户态内部的内存复制,提升I/O性能。 |
| 文件传输(FileRegion) | 包装FileChannel.transferTo()方法,支持操作系统级别的零拷贝,数据直接在内核空间从磁盘传输到网络。 |
彻底避免了用户态和内核态之间的数据复制,极大地提高了大文件传输的效率。 |
| 组合缓冲区(CompositeByteBuf) | 将多个ByteBuf组合成一个逻辑上的ByteBuf,内部通过对象引用来维护,无需物理拷贝。 |
消除了合并多个缓冲区时的内存复制操作。 |
| 缓冲区切片(Slice)与包装(Wrap) | slice()操作将ByteBuf分解为多个共享同一内存区域的子缓冲区;wrappedBuffer()操作将byte[]/ByteBuffer等包装为ByteBuf,共享底层数组。 |
在拆包、组包或将外部数据转为Netty对象时,避免了数据的内存复制。 |
| 内存池(PooledByteBufAllocator) | 复用预先分配的直接内存或堆内存,而不是每次使用都重新创建和销毁。 | 避免了频繁的内存分配和释放带来的性能开销和GC压力。 |
本文以从磁盘读取数据为例,了解下零拷贝
注意:图片来自网络,https://zhuanlan.zhihu.com/p/1895465665000896082
传统的IO技术实现传输过程:
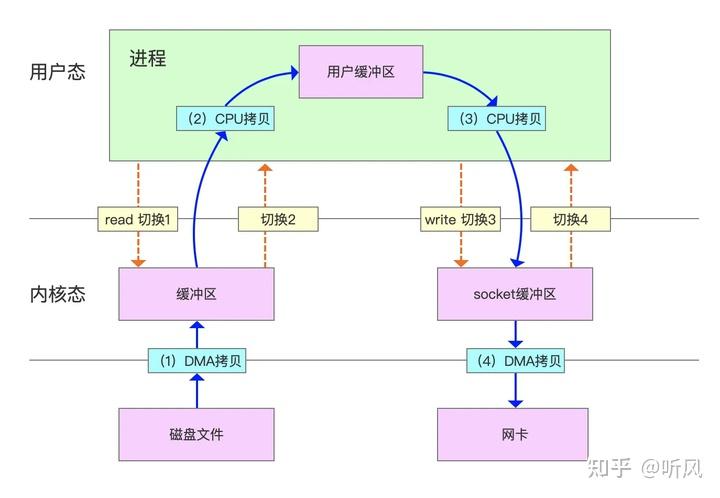
四次拷贝:磁盘到内核空间的内核缓冲区,内核缓冲区到用户缓冲区,用户缓冲区到内核空间的socket缓冲区,内核的socket缓冲区到网卡
还发生了4次用户态与内核态的上下文切换,因为发生了两次系统调用,一次是read(),一次是write(),每次系统调用都得先从用户态切换到内核态,等内核完成任务后,再从内核态切换回用户态。
mmap方案:
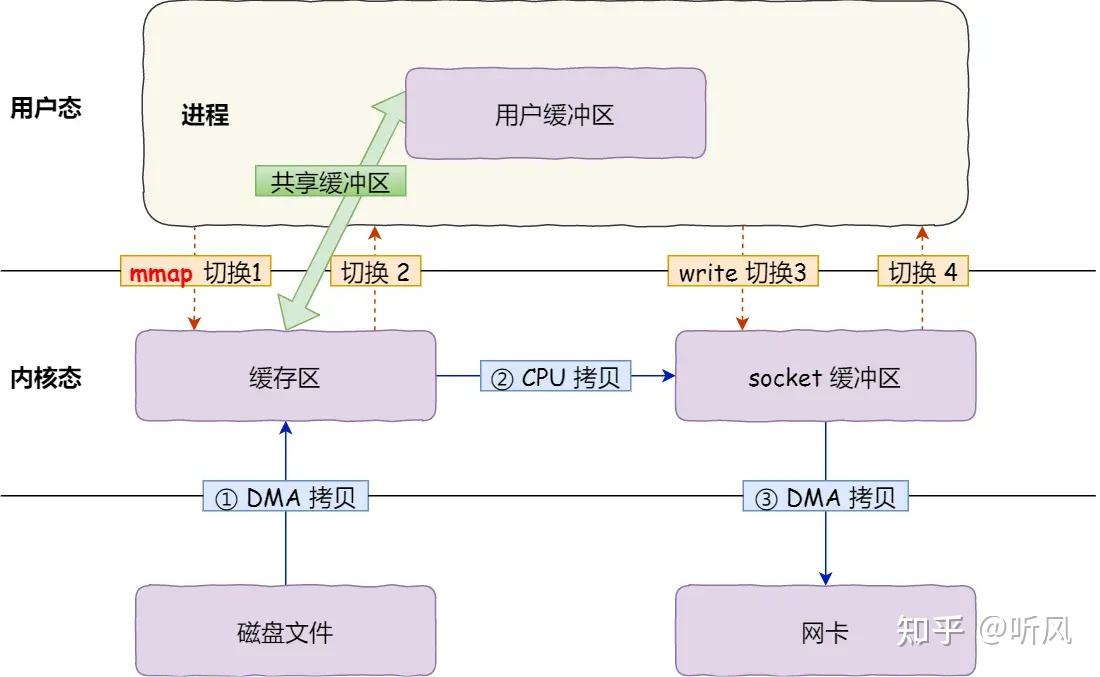
用户缓冲区和内核缓冲区建立映射关系,相当于用户进程直接访问内核缓冲区,中间使用了3次拷贝,4次切换
sendfile+dma方案:
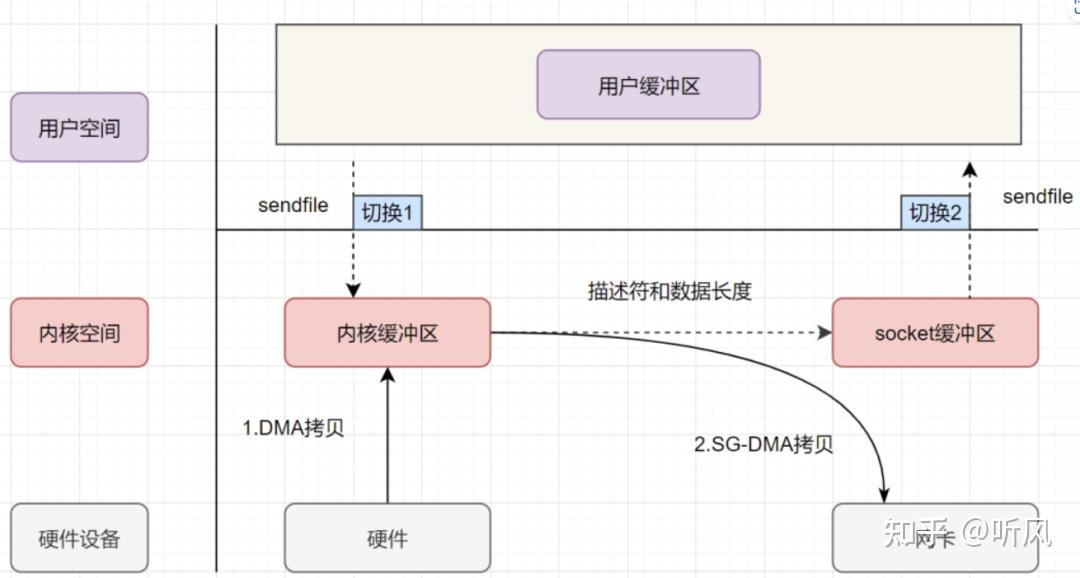
内核中的内核缓冲区和socket缓冲区,不进行数据拷贝,直接通过sg-dma将内核缓冲区数据拷贝到网卡,中间发生了2次切换
|
| 文件传输(FileRegion) | 包装FileChannel.transferTo()方法,支持操作系统级别的零拷贝,数据直接在内核空间从磁盘传输到网络。 | 彻底避免了用户态和内核态之间的数据复制,极大地提高了大文件传输的效率。 |
| 组合缓冲区(CompositeByteBuf) | 将多个ByteBuf组合成一个逻辑上的ByteBuf,内部通过对象引用来维护,无需物理拷贝。 | 消除了合并多个缓冲区时的内存复制操作。 |
| 缓冲区切片(Slice)与包装(Wrap) | slice()操作将ByteBuf分解为多个共享同一内存区域的子缓冲区;wrappedBuffer()操作将byte[]/ByteBuffer等包装为ByteBuf,共享底层数组。 | 在拆包、组包或将外部数据转为Netty对象时,避免了数据的内存复制。 |
| 内存池(PooledByteBufAllocator) | 复用预先分配的直接内存或堆内存,而不是每次使用都重新创建和销毁。 | 避免了频繁的内存分配和释放带来的性能开销和GC压力。 |
本文以从磁盘读取数据为例,了解下零拷贝
注意:图片来自网络,https://zhuanlan.zhihu.com/p/1895465665000896082
传统的IO技术实现传输过程:
[外链图片转存中…(img-33XLYfXS-1777282395833)]
四次拷贝:磁盘到内核空间的内核缓冲区,内核缓冲区到用户缓冲区,用户缓冲区到内核空间的socket缓冲区,内核的socket缓冲区到网卡
还发生了4次用户态与内核态的上下文切换,因为发生了两次系统调用,一次是read(),一次是write(),每次系统调用都得先从用户态切换到内核态,等内核完成任务后,再从内核态切换回用户态。
mmap方案:
[外链图片转存中…(img-kJpYsPjO-1777282395833)]
用户缓冲区和内核缓冲区建立映射关系,相当于用户进程直接访问内核缓冲区,中间使用了3次拷贝,4次切换
sendfile+dma方案:
[外链图片转存中…(img-GiAUPWsj-1777282395833)]
内核中的内核缓冲区和socket缓冲区,不进行数据拷贝,直接通过sg-dma将内核缓冲区数据拷贝到网卡,中间发生了2次切换

AtomGit 是由开放原子开源基金会联合 CSDN 等生态伙伴共同推出的新一代开源与人工智能协作平台。平台坚持“开放、中立、公益”的理念,把代码托管、模型共享、数据集托管、智能体开发体验和算力服务整合在一起,为开发者提供从开发、训练到部署的一站式体验。
更多推荐
 8
8 0
0- 0


 已为社区贡献4条内容

所有评论(0)