从零开始设计一个智能体编排系统 - 架构篇
导读:随着大模型技术的普及,如何让 AI 智能体完成复杂任务成为关键挑战。本文带你深入了解一个可视化智能体编排系统的架构设计,揭秘如何用前端技术实现类似 RAGFlow、Dify 的智能体工作流引擎。

一、为什么需要智能体编排?
1.1 从单一对话到复杂工作流
早期的 AI 应用大多是简单的"一问一答"模式:
用户提问 → LLM 处理 → 返回答案
但实际业务场景要复杂得多:
用户提问 → 知识检索 → 条件判断 → 调用工具 → 数据处理 → 多轮对话 → 最终回复
智能体编排系统就是为了解决这个问题而生——它让开发者可以通过可视化拖拽的方式,将多个 AI 能力组件组合成完整的工作流。
1.2 典型应用场景
- 智能客服:自动检索知识库 + 多轮对话 + 工单创建
- 数据分析助手:数据查询 → 分析处理 → 图表生成 → 报告输出
- 内容创作工作流:选题生成 → 大纲编写 → 内容创作 → 审核发布
- 自动化运维:异常检测 → 根因分析 → 自动修复 → 通知上报
二、技术选型与整体架构
2.1 核心技术栈

为什么选择 VueFlow?
VueFlow 是基于 Vue 3 的流程图库,提供了:
- 🎯 节点拖拽和定位
- 🔗 连线和边管理
- 🔍 缩放和平移
- 📦 自定义节点组件
- ⚡ 高性能渲染(支持大规模节点)
2.2 整体架构图
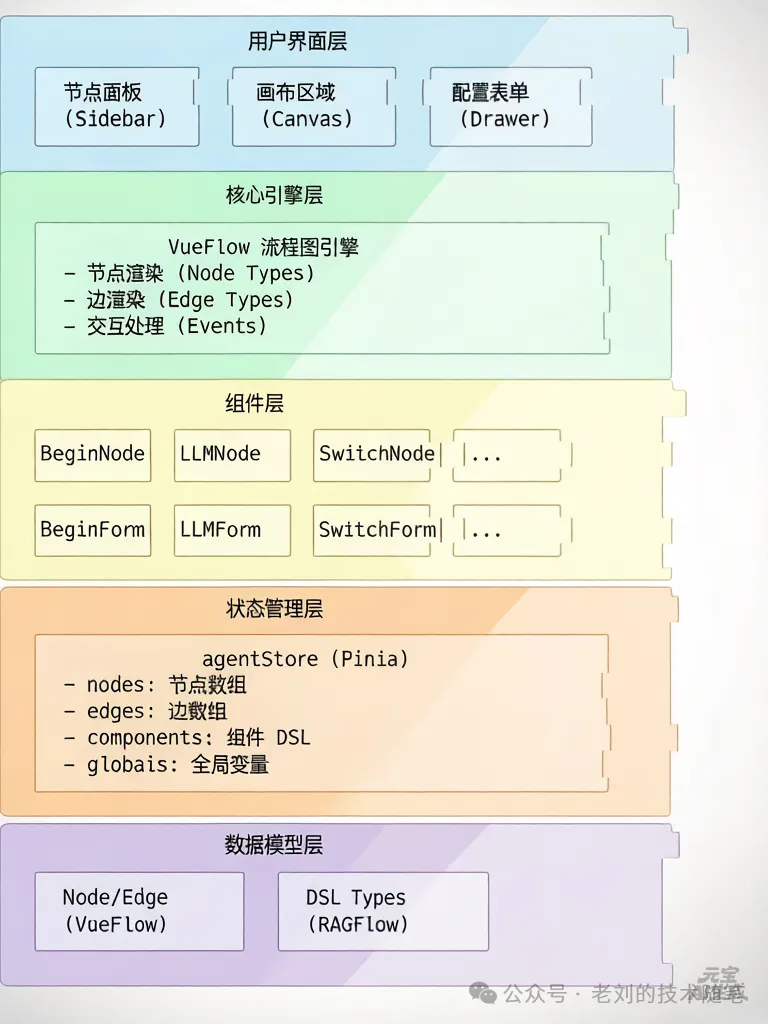
2.3 目录结构
src/views/AgentView/
├── index.vue              # 页面入口(保存/加载/导航)
├── components/
│   ├── AgentCanvas.vue    # 画布核心组件
│   ├── NodeFormDrawer.vue # 节点配置抽屉
│   ├── CustomEdge.vue     # 自定义边组件
│   └── VariableSelect.vue # 变量选择器
├── nodes/
│   ├── BaseNode.vue       # 基础节点模板
│   ├── BeginNode.vue      # 开始节点
│   ├── LLMNode.vue        # LLM 节点
│   ├── SwitchNode.vue     # 条件分支节点
│   ├── RetrievalNode.vue  # 知识检索节点
│   ├── IterationNode.vue  # 迭代节点
│   ├── LoopNode.vue       # 循环节点
│   └── ... (18+ 节点类型)
├── forms/
│   ├── BeginForm.vue      # 开始节点配置
│   ├── LLMForm.vue        # LLM 配置
│   ├── SwitchForm.vue     # 条件分支配置
│   └── ... (对应各节点)
├── stores/
│   └── agentStore.ts      # 状态管理
├── types/
│   ├── index.ts           # 节点类型定义
│   └── agents.ts          # DSL 类型定义
└── utils/
    └── ...                # 工具函数
三、核心设计:DSL 驱动
3.1 什么是 DSL?
DSL(Domain Specific Language) 是领域特定语言,用于描述智能体工作流的结构和逻辑。
我们的 DSL 设计参考了 RAGFlow,包含以下核心部分:
interface DslRoot {
  components: Record<string, Component>  // 组件定义
  graph: Graph                           // 图结构(节点 + 边)
  globals: Globals                       // 全局变量
  variables: Variable[]                  // 变量定义
  history: any[]                         // 执行历史
  messages: any[]                        // 消息记录
  path: any[]                            // 执行路径
  retrieval: any[]                       // 检索配置
}
3.2 图结构:节点与边
// 节点定义
interface Node {
  id: string              // 唯一标识(如:beginNode-abc123)
  type: string            // 节点类型(如:beginNode, agentNode)
  position: { x, y }      // 画布坐标
  data: {
    label: string         // 节点标签
    name: string          // 节点名称(可编辑)
    form: any             // 配置表单数据
  }
  parentId?: string       // 父节点 ID(用于容器节点)
}

// 边定义
interface Edge {
  id: string              // 唯一标识
  source: string          // 源节点 ID
  target: string          // 目标节点 ID
  sourceHandle: string    // 源连接点(如:'start', 'Case 1')
  targetHandle: string    // 目标连接点(如:'end')
}
3.3 组件模型
每个节点对应一个 Component,包含执行所需的全部信息:
interface Component {
  obj: {
    component_name: string     // 组件名称(如:Begin, Agent)
    params: Record<string, any> // 组件参数
  }
  upstream: string[]   // 上游组件 ID 列表
  downstream: string[] // 下游组件 ID 列表
  parent_id?: string   // 父组件 ID(用于嵌套)
}
示例:一个 LLM 组件
{
  "obj": {
    "component_name": "Agent",
    "params": {
      "llm_id": "gpt-4",
      "temperature": 0.7,
      "prompts": [
        {"role": "system", "content": "你是一个智能助手"}
      ],
      "tools": [
        {
          "component_name": "SearchTool",
          "params": {"query": "{sys.query}"}
        }
      ],
      "exception_goto": ["errorHandlerNode"]
    }
  },
  "upstream": ["beginNode"],
  "downstream": ["messageNode"]
}
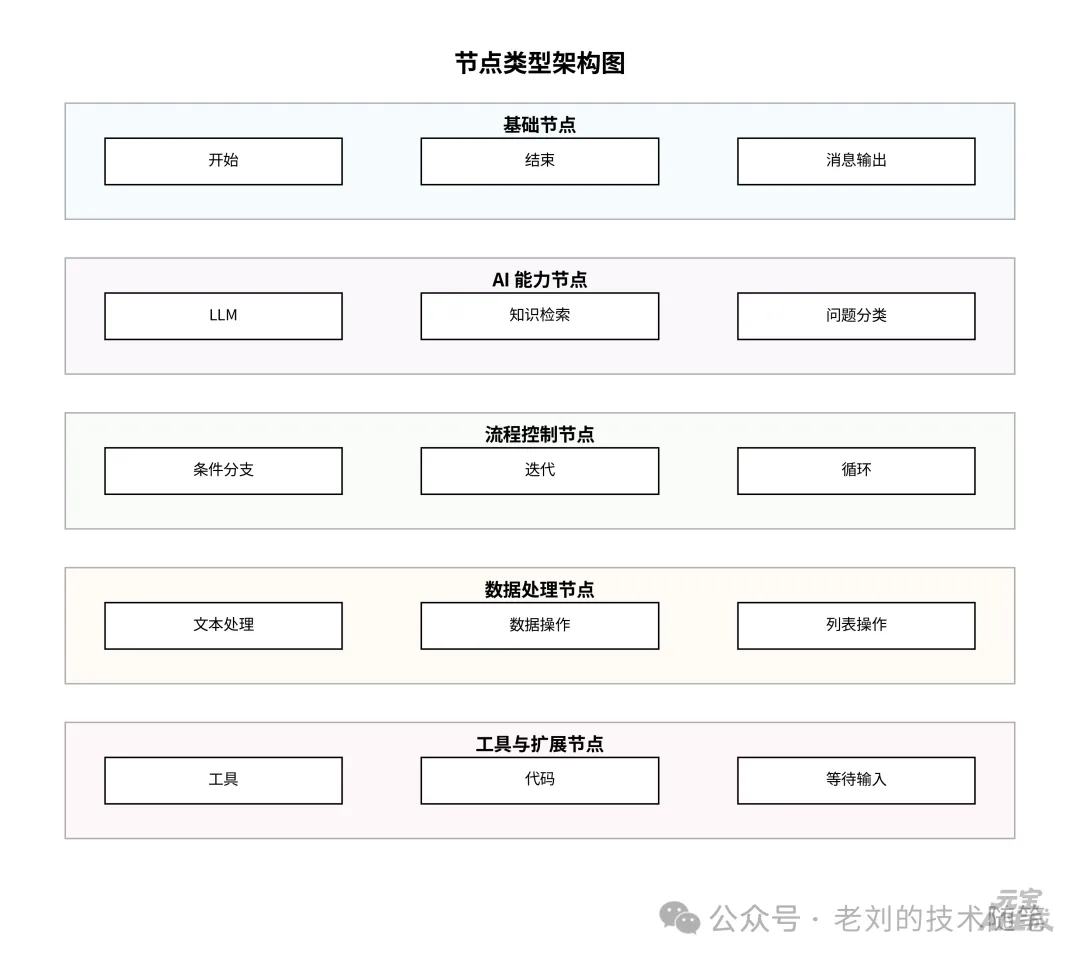
四、节点系统设计
4.1 节点类型全景图
系统支持 18+ 种节点类型,覆盖智能体编排的各种场景:
4.2 节点组件架构
所有节点都继承自 BaseNode,保证统一的视觉和交互:
<!-- BaseNode.vue - 基础模板 -->
<template>
  <div class="agent-node-wrapper">
    <!-- 输入连接点 -->
    <Handle type="target" position="left" id="end" />

    <!-- 输出连接点 -->
    <Handle type="source" position="right" id="start" />

    <div class="node">
      <!-- 头部:图标 + 名称 -->
      <div class="header" @click="openForm">
        <el-icon><component :is="icon" /></el-icon>
        <span>{{ name }}</span>
      </div>

      <!-- 内容:自定义预览 -->
      <div class="content">
        <slot name="content" />
      </div>

      <!-- 工具栏:运行/复制/删除 -->
      <div class="toolbar">
        <el-button @click="handleRun">运行</el-button>
        <el-button @click="handleCopy">复制</el-button>
        <el-button @click="handleDelete">删除</el-button>
      </div>
    </div>
  </div>
</template>
具体节点实现(以 LLMNode 为例):
<!-- LLMNode.vue -->
<template>
  <BaseNode
    :id="id"
    :data="data"
    node-icon="ChatDotRound"
    node-class="agent-node llm-node"
    node-default-name="智能体"
    @update="handleUpdate"
    @delete="handleDelete"
  >
    <template #content>
      <!-- 显示模型名称和提示词预览 -->
      <div class="llm-preview">
        <span>{{ data.form.llm_id || '未选择模型' }}</span>
        <p>{{ truncateText(data.form.user_prompt, 50) }}</p>
      </div>
    </template>
  </BaseNode>
</template>
4.3 节点注册机制
// nodes/index.ts
import { markRaw } from 'vue'
import BeginNode from './BeginNode.vue'
import LLMNode from './LLMNode.vue'
// ... 其他节点

export const nodeTypes = {
  [AgentNodeType.Begin]: markRaw(BeginNode),
  [AgentNodeType.LLM]: markRaw(LLMNode),
  // ... 其他节点映射
}

// 节点类型枚举
export enum AgentNodeType {
  Begin = 'beginNode',
  LLM = 'agentNode',
  Retrieval = 'retrievalNode',
  Switch = 'switchNode',
  // ... 其他类型
}
五、状态管理:Pinia Store
5.1 agentStore 核心结构
// stores/agentStore.ts
export const useAgentStore = defineStore('agent', () => {
  // 状态
  const agentState = ref<AgentState>({
    id: '',
    title: '',
    dsl: {
      components: {},
      graph: { nodes: [], edges: [] },
      globals: { 'sys.query': '', 'sys.user_id': '' },
      variables: []
    }
  })

  // 计算属性
  const nodes = computed(() => agentState.value.dsl.graph.nodes)
  const edges = computed(() => agentState.value.dsl.graph.edges)
  const components = computed(() => agentState.value.dsl.components)

  // 核心方法
  function addNode(nodeType: AgentNodeType, position) { ... }
  function updateNode(nodeId: string, newData: any) { ... }
  function deleteNode(nodeId: string) { ... }
  function addEdge(source: string, target: string, ...) { ... }
  function loadDsl(dsl: DslRoot) { ... }

  return { agentState, nodes, edges, addNode, updateNode, ... }
})
5.2 关键操作:添加节点
function addNode(nodeType: AgentNodeType, position?: { x, y }) {
  // 1. 获取节点默认数据
  const defaultData = getNodeDefaultData(nodeType)

  // 2. 创建新节点
  const newNode: AgentNode = {
    id: getUuid(nodeType),  // 生成唯一 ID
    type: nodeType,
    position: position || { x: 100, y: 100 },
    data: defaultData
  }

  // 3. 添加到节点数组
  agentState.value.dsl.graph.nodes = [
    ...agentState.value.dsl.graph.nodes,
    newNode
  ]

  // 4. 同步更新 components
  updateComponentForNode(newNode)

  // 5. 特殊处理:Loop/Iteration 自动创建子节点
  if (nodeType === AgentNodeType.Loop) {
    const loopItemNode = {
      id: getUuid(AgentNodeType.LoopItem),
      type: AgentNodeType.LoopItem,
      parentId: newNode.id,
      position: { x: 50, y: 100 }
    }
    // ... 添加到 nodes
  }

  return newNode
}
5.3 关键操作:连线与组件同步
function addEdge(source: string, target: string, sourceHandle?: string, targetHandle?: string) {
  // 1. 创建新边
  const newEdge: AgentEdge = {
    id: `edge__${source}-${target}`,
    source,
    target,
    sourceHandle: sourceHandle || 'start',
    targetHandle: targetHandle || 'end'
  }

  // 2. 添加到边数组
  agentState.value.dsl.graph.edges = [
    ...agentState.value.dsl.graph.edges,
    newEdge
  ]

  // 3. 更新所有组件的 upstream/downstream
  updateComponentsFromEdges(agentState.value.dsl.graph.edges)
}

function updateComponentsFromEdges(edges: Edge[]) {
  // 遍历所有节点,重新计算上下游关系
  Object.keys(components.value).forEach(componentId => {
    components.value[componentId].downstream = getDownstreamNodes(componentId)
    components.value[componentId].upstream = getUpstreamNodes(componentId)
  })

  // 特殊处理:Switch/Categorize 需要根据边重建 params
  rebuildSwitchAndCategorizeParams()
}
六、数据流:从 UI 到 DSL
6.1 用户操作流程

6.2 配置保存流程

6.3 保存与导出
// 保存智能体
async function handleSave() {
  // 1. 校验画布数据
  if (!canvasData.value.nodes?.length) {
    message.warning('请设计智能体流程')
    return
  }

  // 2. 检查开始节点
  const hasBeginNode = canvasData.value.nodes.some(n => n.type === 'beginNode')
  if (!hasBeginNode) {
    message.warning('请添加开始节点')
    return
  }

  // 3. 构建 DSL
  const dsl = {
    components: agentStore.components,
    graph: {
      nodes: agentStore.nodes,
      edges: agentStore.edges
    },
    globals: agentStore.globals,
    variables: agentStore.variables
  }

  // 4. 调用 API 保存
  await AgentApi.saveAgent({
    id: agentId,
    name: agentName,
    graph: JSON.stringify(dsl.graph),
    dsl: JSON.stringify(dsl)
  })
}

// 导出 DSL
function handleExportDsl() {
  const dsl = agentStore.agentState.dsl
  const blob = new Blob([JSON.stringify(dsl, null, 2)], { type: 'application/json' })
  const url = URL.createObjectURL(blob)
  const a = document.createElement('a')
  a.href = url
  a.download = `${agentName}-dsl.json`
  a.click()
}
七、关键技术挑战与解决方案
7.1 挑战一:节点与组件的双向同步
问题:VueFlow 的 Node/Edge 与 RAGFlow 的 Component 是两套模型,如何保持同步?
解决方案:
// 监听 nodes 变化,自动更新 components
watch(() => agentStore.nodes, (newNodes) => {
  updateComponentsFromNodes(newNodes)
}, { deep: true })

// 每个节点更新时,只更新对应的 component
function updateComponentForNode(node: Node) {
  const componentName = getComponentNameFromNodeType(node.type)
  components.value[node.id] = {
    obj: {
      component_name: componentName,
      params: buildParams(node)  // 根据节点类型构建参数
    },
    upstream: getUpstreamNodes(node.id),
    downstream: getDownstreamNodes(node.id)
  }
}
7.2 挑战二:特殊节点的连线逻辑
问题:Switch 节点有多个输出(Case 1, Case 2, Default),如何处理?
解决方案:
// Switch 节点的 Handle 定义
<template>
  <BaseNode>
    <!-- 多个输出连接点 -->
    <Handle id="Case 1" type="source" position="right" />
    <Handle id="Case 2" type="source" position="right" />
    <Handle id="end_cpn_ids" type="source" position="right" />
  </BaseNode>
</template>

// 构建 Switch 参数时,根据边重建条件
function buildSwitchParams(edges: Edge[], node: Node) {
  const conditions = node.data.form.conditions || []

  return {
    conditions: conditions.map((cond, index) => ({
      items: cond.items,
      logical_operator: cond.logical_operator,
      to: edges
        .filter(e => e.source === node.id && e.sourceHandle === `Case ${index + 1}`)
        .map(e => e.target)
    })),
    end_cpn_ids: edges
      .filter(e => e.source === node.id && e.sourceHandle === 'end_cpn_ids')
      .map(e => e.target)
  }
}
7.3 挑战三:容器节点(Iteration/Loop)的嵌套
问题:Iteration/Loop 内部可以包含多个子节点,如何管理父子关系?
解决方案:
// 创建 Loop 节点时,自动创建 LoopItem
function addNode(nodeType: AgentNodeType) {
  if (nodeType === AgentNodeType.Loop) {
    const loopNode = createLoopNode()
    const loopItemNode = {
      id: getUuid(AgentNodeType.LoopItem),
      type: AgentNodeType.LoopItem,
      parentId: loopNode.id,  // 关键:设置父节点
      parentNode: loopNode.id,
      extent: 'parent',       // VueFlow 特性:限制在父节点内
      zIndex: 20              // 确保在父节点上层
    }
    nodes.value = [...nodes.value, loopNode, loopItemNode]
  }
}

// 删除节点时,级联删除子节点
function deleteNode(nodeId: string) {
  const idsToDelete = new Set([nodeId])

  // 找到所有子节点
  nodes.value.forEach(n => {
    if (n.parentId === nodeId) idsToDelete.add(n.id)
  })

  // 批量删除
  nodes.value = nodes.value.filter(n => !idsToDelete.has(n.id))
}
7.4 挑战四:变量引用系统
问题:节点之间如何传递数据?如何引用上游节点的输出?
解决方案:
// 变量格式:{nodeId@outputName}
// 示例:{beginNode@userId}, {llmNode@content}

// 变量选择器组件
<VariableSelect
  v-model="selectedVariable"
  :current-node-id="currentNodeId"
  :filter-types="['string', 'number']"
/>

// 转换变量格式(RAGFlow 格式:nodeId@field)
function convertVariableFormat(variable: string) {
  // 去掉花括号
  let varName = variable.replace(/^\{/, '').replace(/\}$/, '')

  // 转换分隔符:nodeId.field -> nodeId@field
  const lastDotIndex = varName.lastIndexOf('.')
  if (lastDotIndex > 0 && !varName.startsWith('sys.')) {
    varName = varName.substring(0, lastDotIndex) + '@' + varName.substring(lastDotIndex + 1)
  }

  return varName
}
八、性能优化
8.1 响应式优化
// 避免深度监听导致的性能问题
watch(
  () => agentStore.dsl.graph.nodes,
  (newNodes) => {
    // 只更新变化的部分
    const changedNodes = diffNodes(oldNodes, newNodes)
    updateComponentsForNodes(changedNodes)
  },
  { deep: false }  // 关键:关闭深度监听
)
8.2 渲染优化
<!-- 使用 markRaw 避免不必要的响应式转换 -->
import { markRaw } from 'vue'

export const nodeTypes = {
  [AgentNodeType.Begin]: markRaw(BeginNode),
  [AgentNodeType.LLM]: markRaw(LLMNode)
}

<!-- 使用 v-memo 缓存节点组件 -->
<VueFlow>
  <template #node-LLMNode="slotProps">
    <LLMNode
      v-memo="[slotProps.id, slotProps.data.form]"
      v-bind="slotProps"
    />
  </template>
</VueFlow>
8.3 大规模节点优化
- ✅ 虚拟滚动:只渲染可视区域内的节点
- ✅ 懒加载:节点配置表单按需加载
- ✅ 防抖处理:拖拽时延迟更新 DSL
- ✅ Web Worker:复杂计算(如 DSL 序列化)放到 Worker
九、总结与展望
9.1 架构设计要点回顾
- DSL 驱动:标准化的数据结构,支持序列化/反序列化
- 组件化设计:18+ 节点类型,每种节点独立组件
- 状态管理:Pinia 统一管理,保证数据一致性
- 可视化引擎:基于 VueFlow,提供流畅的交互体验
- RAGFlow 兼容:支持导入导出,降低迁移成本
9.2 后续优化方向
- 🎯 协作编辑:多人实时协同编辑工作流
- 🎯 版本控制:工作流版本管理和回滚
- 🎯 调试工具:可视化执行追踪和断点调试
- 🎯 性能监控:节点执行耗时分析
- 🎯 AI 辅助:基于 AI 自动推荐工作流结构
9.3 系列文章预告
本文介绍了整体架构,后续文章将深入各个模块:
- ✅ 架构篇(本文)- 整体设计和技术选型
- 📝 DSL 设计篇 - 数据结构与序列化
- 📝 画布实现篇 - VueFlow 集成与交互
- 📝 节点系统篇 - 18 种节点的实现细节
- 📝 表单系统篇 - 动态表单与变量引用
- 📝 状态管理篇 - Pinia Store 设计
- 📝 高级特性篇 - 迭代/循环/嵌套
- 📝 实战篇 - 从零构建一个完整智能体
附录:核心代码索引
如果你想在项目中深入研究,以下是关键文件:
src/views/AgentFlow/
├── index.vue              # L78-757: 页面入口和保存逻辑
├── components/AgentCanvas.vue  # L1-1388: 画布核心
├── stores/agentStore.ts   # L1-1098: 状态管理
├── types/index.ts         # L1-595: 类型定义
├── types/agents.ts        # L1-431: DSL 类型
├── nodes/index.ts         # L1-373: 节点注册
└── nodes/BaseNode.vue     # L1-254: 基础节点模板
作者注:本文基于 agent-flow 项目的实际代码分析编写,力求还原真实的架构设计过程。欢迎在评论区讨论或提问!
下一篇:从零开始设计一个智能体编排系统 - DSL 设计篇(敬请期待)

AtomGit 是由开放原子开源基金会联合 CSDN 等生态伙伴共同推出的新一代开源与人工智能协作平台。平台坚持“开放、中立、公益”的理念,把代码托管、模型共享、数据集托管、智能体开发体验和算力服务整合在一起,为开发者提供从开发、训练到部署的一站式体验。
更多推荐
 9
9 0
0- 0


 已为社区贡献5条内容

所有评论(0)