第10节:OpenLLM实战环境搭建【从0到1手把手搭建】
引言
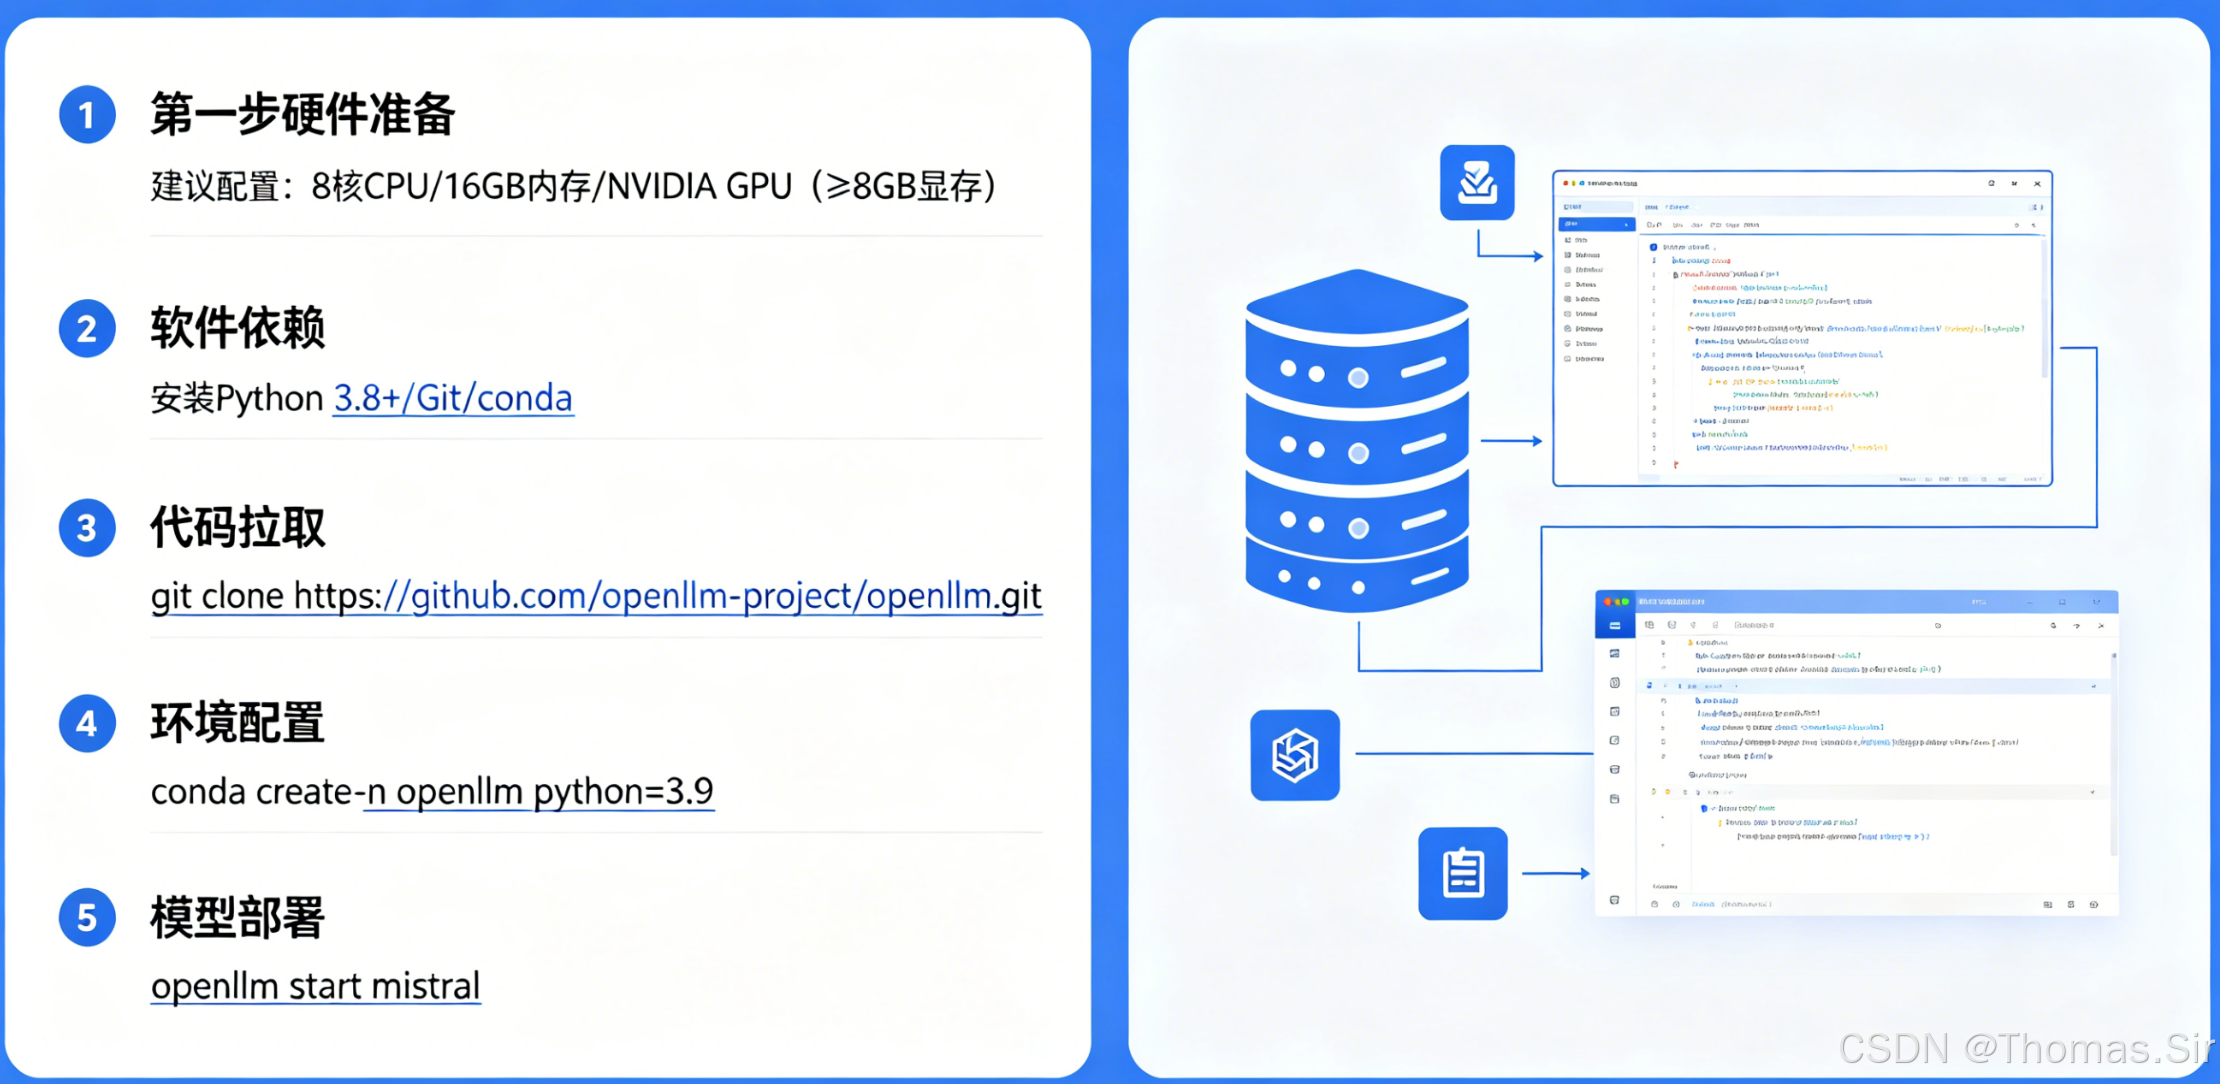
在人工智能技术快速发展的今天,大型语言模型已成为各行业数字化转型的重要工具。OpenLLM 作为一个开源的大语言模型服务平台,提供了模型部署、推理服务和管理的一体化解决方案。无论是个人开发者、中小型企业还是大型组织,都能够通过 OpenLLM 快速搭建自己的语言模型服务。本文将系统性地介绍 OpenLLM 的完整部署流程,涵盖环境准备、安装配置到服务验证的全过程,为不同应用场景的用户提供实用指导。
一、环境准备与前置要求
硬件要求
成功部署大语言模型服务首先需要合适的硬件支持。硬件的选择直接影响推理速度、并发处理能力和运营成本,需要根据实际应用场景和模型大小进行合理配置。
CPU/GPU 配置建议
消费级 GPU 配置方案
对于个人开发者和小规模应用场景,消费级显卡提供了性价比极高的解决方案。以下为不同模型规模对应的推荐配置:
-
小型模型(7B-13B 参数)
- 推荐显卡:NVIDIA RTX 3090/4090
- 显存要求:24GB 以上
- 内存要求:32GB DDR4
- 适用场景:个人研究、原型开发、低并发生产环境
-
中型模型(13B-34B 参数)
- 推荐显卡:双路 RTX 4090
- 显存要求:48GB 以上
- 内存要求:64GB DDR4
- 存储要求:NVMe SSD 1TB
- 适用场景:中小型企业应用、中等并发服务
企业级 GPU 配置方案
对于大规模生产环境和商业应用,企业级硬件提供了更高的稳定性和计算效率:
-
大型模型(70B 参数以上)
- 推荐显卡:NVIDIA A100 40GB/80GB
- 数量配置:2-8 张并行
- 显存要求:160GB 以上
- 内存要求:256GB DDR5 ECC
- 存储要求:NVMe SSD 阵列
-
超大规模部署
- 推荐显卡:NVIDIA H100
- 集群配置:4+ 节点
- 网络:InfiniBand 高速互联
- 存储:分布式存储系统
- 适用场景:高并发生产环境、多租户服务
消费级与企业级 GPU 对比
消费级显卡的优势在于购置成本低、功耗相对较小,适合预算有限或实验性项目。然而,在稳定性、显存带宽和长期运行可靠性方面不如企业级产品。企业级 GPU 虽然初期投资较高,但提供了更好的计算效率、错误校正内存和厂商技术支持,适合对服务可用性有严格要求的商业应用。
纯 CPU 部署方案
在特定场景下,也可以考虑纯 CPU 部署:
- 轻量级模型(7B 以下)
- CPU 要求:Intel Xeon 银牌以上或 AMD EPYC
- 核心数量:16 核以上
- 内存要求:128GB 以上
- 适用场景:对延迟不敏感、批量处理任务
软件环境
正确的软件环境是确保模型服务稳定运行的基础。以下为推荐的操作系统和软件配置:
操作系统
推荐使用 Linux 发行版,特别是 Ubuntu 20.04 LTS 或更高版本,因为其在大规模部署场景下有更好的稳定性和社区支持。对于 Windows 用户,建议通过 WSL2 运行 Ubuntu 环境。
# 检查操作系统版本
cat /etc/os-release
# 输出示例:
# NAME="Ubuntu"
# VERSION="20.04.5 LTS (Focal Fossa)"
Python 环境
Python 3.8-3.10 版本是目前最稳定的选择,与大多数深度学习框架保持良好兼容。
# 安装 Python 3.9
sudo apt update
sudo apt install python3.9 python3.9-venv python3.9-dev

# 创建虚拟环境
python3.9 -m venv openllm-env
source openllm-env/bin/activate
依赖库安装
核心依赖库的版本兼容性对服务稳定性至关重要:
# 升级 pip 确保安装顺利
pip install --upgrade pip

# 安装 PyTorch(根据 CUDA 版本选择)
# CUDA 11.8 版本
pip install torch torchvision torchaudio --index-url https://download.pytorch.org/whl/cu118

# 安装 transformers 库
pip install transformers>=4.30.0

# 安装 accelerate 用于分布式推理
pip install accelerate>=0.20.0

# 安装 OpenLLM 核心依赖
pip install openllm

# 安装其他辅助库
pip install datasets sentencepiece protobuf

# 可选:安装量化相关库
pip install bitsandbytes>=0.40.0
版本兼容性说明
- Transformers 4.30+ 支持最新的模型架构
- Accelerate 0.20+ 提供优化的分布式推理
- Bitsandbytes 0.40+ 支持 8 位和 4 位量化
环境校验
在开始部署前,必须验证环境配置的正确性,避免后续出现难以排查的问题。
依赖包兼容性测试
创建测试脚本验证核心库的兼容性:
# 文件名:env_test.py
"""
环境兼容性测试脚本
用于验证各依赖库版本兼容性
"""

import sys
import torch
import transformers
import accelerate

def test_environment():
    """测试环境配置"""
    print("=== 环境兼容性测试 ===\n")

    # 检查 Python 版本
    print(f"Python 版本: {sys.version}")

    # 检查 PyTorch
    print(f"PyTorch 版本: {torch.__version__}")
    print(f"CUDA 是否可用: {torch.cuda.is_available()}")

    if torch.cuda.is_available():
        print(f"CUDA 版本: {torch.version.cuda}")
        print(f"GPU 数量: {torch.cuda.device_count()}")
        for i in range(torch.cuda.device_count()):
            gpu_name = torch.cuda.get_device_name(i)
            print(f"GPU {i}: {gpu_name}")

    # 检查其他关键库
    print(f"Transformers 版本: {transformers.__version__}")
    print(f"Accelerate 版本: {accelerate.__version__}")

    # 简单张量计算测试
    if torch.cuda.is_available():
        x = torch.randn(3, 3).cuda()
        y = torch.randn(3, 3).cuda()
        z = torch.matmul(x, y)
        print("\nGPU 计算测试: 通过")

    print("\n=== 环境测试完成 ===")
    return True

if __name__ == "__main__":
    test_environment()
运行测试脚本:
python env_test.py
GPU 加速配置验证
完整的 CUDA 环境验证流程:
# 文件名:cuda_test.py
"""
CUDA 环境验证脚本
验证 GPU 加速功能是否正常
"""

import torch
import subprocess
import platform

def check_cuda_installation():
    """检查 CUDA 安装"""
    print("=== CUDA 环境验证 ===\n")

    # 检查 nvcc 版本
    try:
        nvcc_output = subprocess.check_output(["nvcc", "--version"],
                                            stderr=subprocess.STDOUT)
        nvcc_str = nvcc_output.decode('utf-8')
        print("nvcc 版本信息:")
        print(nvcc_str.split('\n')[3])  # 显示版本行
    except FileNotFoundError:
        print("警告: nvcc 未找到,请检查 CUDA 安装")
        return False

    # 检查 PyTorch CUDA 支持
    cuda_available = torch.cuda.is_available()
    print(f"\nPyTorch CUDA 可用: {cuda_available}")

    if cuda_available:
        # 获取 CUDA 设备信息
        device_count = torch.cuda.device_count()
        print(f"检测到 GPU 数量: {device_count}")

        for i in range(device_count):
            print(f"\n--- GPU {i} 详细信息 ---")
            print(f"设备名称: {torch.cuda.get_device_name(i)}")
            print(f"显存总量: {torch.cuda.get_device_properties(i).total_memory / 1e9:.2f} GB")
            print(f"计算能力: {torch.cuda.get_device_properties(i).major}."
                  f"{torch.cuda.get_device_properties(i).minor}")

        # 运行简单基准测试
        run_gpu_benchmark()

    return cuda_available

def run_gpu_benchmark():
    """运行 GPU 基准测试"""
    print("\n--- GPU 性能基准测试 ---")

    # 创建测试数据
    size = 4096
    a = torch.randn(size, size).cuda()
    b = torch.randn(size, size).cuda()

    # 预热
    for _ in range(10):
        _ = torch.matmul(a, b)

    # 正式测试
    import time
    torch.cuda.synchronize()
    start_time = time.time()

    iterations = 100
    for _ in range(iterations):
        c = torch.matmul(a, b)

    torch.cuda.synchronize()
    elapsed = time.time() - start_time

    # 计算性能
    flops = 2 * size ** 3 * iterations
    gflops = flops / elapsed / 1e9

    print(f"矩阵大小: {size}×{size}")
    print(f"测试时间: {elapsed:.2f} 秒")
    print(f"计算性能: {gflops:.2f} GFLOPS")

    # 显存带宽测试
    run_memory_bandwidth_test()

def run_memory_bandwidth_test():
    """显存带宽测试"""
    print("\n--- 显存带宽测试 ---")

    # 大矩阵复制测试
    size = 10000
    a = torch.randn(size, size).cuda()

    import time
    torch.cuda.synchronize()
    start = time.time()

    # 多次复制测试带宽
    b = a.clone()

    torch.cuda.synchronize()
    elapsed = time.time() - start

    data_size = a.numel() * a.element_size() * 2  # 读取和写入
    bandwidth = data_size / elapsed / 1e9  # GB/s

    print(f"测试数据大小: {data_size / 1e9:.2f} GB")
    print(f"传输时间: {elapsed:.4f} 秒")
    print(f"显存带宽: {bandwidth:.2f} GB/s")

    # 清理显存
    del a, b
    torch.cuda.empty_cache()

if __name__ == "__main__":
    success = check_cuda_installation()
    if success:
        print("\nCUDA 环境验证通过")
    else:
        print("\nCUDA 环境存在问题,请检查安装")
运行验证:
python cuda_test.py
验证结果解读
正常输出应包含:
- nvcc 版本信息
- PyTorch CUDA 可用状态
- GPU 详细信息
- 计算性能数据
- 显存带宽数据
如果出现错误,需要检查:
- CUDA 驱动版本与 PyTorch 要求是否匹配
- GPU 是否支持 CUDA
- 显存是否充足
- 系统环境变量配置
二、OpenLLM 安装与基础配置
多种安装方式对比
OpenLLM 提供多种安装方式以适应不同的使用场景。选择合适的安装方式可以简化后续的维护和升级工作。
源码安装
源码安装适合需要定制化修改或参与开发的用户:
# 克隆 OpenLLM 仓库
git clone https://github.com/bentoml/OpenLLM.git
cd OpenLLM

# 切换到稳定版本
git checkout v0.4.0  # 使用最新稳定版本

# 使用 pip 安装
pip install -e .

# 验证安装
python -c "import openllm; print(openllm.__version__)"
源码安装优势
- 可以修改源代码适应特定需求
- 便于调试和问题排查
- 第一时间获取最新功能
源码安装注意事项
- 需要安装编译工具链
- 依赖管理相对复杂
- 可能遇到版本兼容性问题
pip 安装
pip 是最简单快捷的安装方式,适合大多数用户:
# 安装 OpenLLM 核心包
pip install openllm

# 安装可选组件
pip install "openllm[grpc]"  # 安装 gRPC 支持
pip install "openllm[vllm]"  # 安装 vLLM 集成
pip install "openllm[quantize]"  # 安装量化支持

# 验证安装
openllm --version
pip 安装最佳实践
- 始终在虚拟环境中安装
- 固定版本以确保一致性
- 分批安装避免依赖冲突
# 创建 requirements.txt
cat > requirements.txt << EOF
openllm==0.4.0
transformers==4.35.0
torch==2.1.0
accelerate==0.24.0
EOF

# 批量安装
pip install -r requirements.txt
Docker 容器安装
Docker 安装提供最一致的运行环境,适合生产部署:
# 拉取官方镜像
docker pull ghcr.io/bentoml/openllm:latest

# 运行测试容器
docker run -it --rm \
  -p 3000:3000 \
  ghcr.io/bentoml/openllm:latest \
  openllm -h

# 使用特定版本
docker pull ghcr.io/bentoml/openllm:0.4.0
Docker 生产部署示例
# docker-compose.yml 配置
version: '3.8'

services:
  openllm:
    image: ghcr.io/bentoml/openllm:0.4.0
    container_name: openllm-service
    ports:
      - "3000:3000"
    volumes:
      - ./models:/models
      - ./config:/config
    environment:
      - OPENLLM_MODEL=google/flan-t5-large
      - OPENLLM_MODEL_ID=/models/flan-t5-large
    deploy:
      resources:
        reservations:
          devices:
            - driver: nvidia
              count: 1
              capabilities: [gpu]
    command: openllm start google/flan-t5-large
安装方式对比表
| 特性 | 源码安装 | pip 安装 | Docker 安装 |
|---|---|---|---|
| 安装复杂度 | 高 | 低 | 中 |
| 定制能力 | 高 | 低 | 中 |
| 环境隔离 | 依赖虚拟环境 | 依赖虚拟环境 | 完全隔离 |
| 部署速度 | 慢 | 快 | 快 |
| 适合场景 | 开发调试 | 快速体验 | 生产部署 |
| 更新维护 | 手动更新 | pip 更新 | 镜像更新 |
| 资源占用 | 灵活 | 灵活 | 固定 |
核心配置文件
正确的配置文件是确保服务正常运行的关键。OpenLLM 支持多种配置方式,包括配置文件、环境变量和命令行参数。
config.yaml 配置文件
创建配置文件统一管理服务参数:
# config.yaml
# OpenLLM 主配置文件

# 模型配置
model:
  # 模型标识符
  id: "mistralai/Mistral-7B-Instruct-v0.1"
  # 本地模型路径(如已下载)
  local_path: "/home/user/models/mistral-7b"
  # 模型格式
  format: "safetensors"
  # 量化配置
  quantization: "int8"  # 可选: int4, int8, none

# 推理配置
inference:
  # 批处理大小
  batch_size: 4
  # 最大生成长度
  max_new_tokens: 512
  # 温度参数
  temperature: 0.7
  # Top-p 采样
  top_p: 0.9
  # Top-k 采样
  top_k: 50
  # 重复惩罚
  repetition_penalty: 1.1

# 服务器配置
server:
  # 服务地址
  host: "0.0.0.0"
  # 服务端口
  port: 3000
  # 工作进程数
  workers: 1
  # 超时设置
  timeout: 300
  # 跨域设置
  cors:
    enabled: true
    origins: ["*"]

# 硬件配置
hardware:
  # GPU 配置
  gpu:
    enabled: true
    # GPU 设备ID
    device_ids: [0]
    # 显存分配策略
    memory_fraction: 0.9
  # CPU 配置
  cpu:
    threads: 4

# 缓存配置
cache:
  # 模型缓存目录
  model_cache: "/var/cache/openllm/models"
  # 临时文件目录
  tmp_dir: "/tmp/openllm"
  # 清理策略
  cleanup_strategy: "lru"
  # 最大缓存大小(GB)
  max_size: 50

# 监控配置
monitoring:
  # 指标收集
  metrics: true
  # 日志级别
  log_level: "INFO"
  # 性能指标
  enable_metrics: true
  # 健康检查端点
  health_check: "/health"

# 安全配置
security:
  # API 密钥认证
  api_key: "your-api-key-here"
  # 启用 TLS
  ssl:
    enabled: false
    cert_path: "/path/to/cert.pem"
    key_path: "/path/to/key.pem"
  # 速率限制
  rate_limit:
    enabled: true
    requests_per_minute: 60
.env 环境变量配置
使用环境变量管理敏感信息和环境特定配置:
# .env 文件
# 模型配置
OPENLLM_MODEL_ID=mistralai/Mistral-7B-Instruct-v0.1
OPENLLM_MODEL_PATH=/models/mistral-7b
OPENLLM_MODEL_FORMAT=safetensors

# 服务器配置
OPENLLM_HOST=0.0.0.0
OPENLLM_PORT=3000
OPENLLM_WORKERS=2
OPENLLM_TIMEOUT=300

# 硬件配置
CUDA_VISIBLE_DEVICES=0
OPENLLM_GPU_MEMORY_FRACTION=0.9

# 缓存配置
OPENLLM_CACHE_DIR=/var/cache/openllm
HUGGINGFACE_HUB_CACHE=/var/cache/huggingface
TRANSFORMERS_CACHE=/var/cache/transformers

# 安全配置
OPENLLM_API_KEY=your-secret-api-key-here
OPENLLM_ENABLE_AUTH=true

# 网络配置
HTTP_PROXY=http://proxy.example.com:8080
HTTPS_PROXY=http://proxy.example.com:8080
NO_PROXY=localhost,127.0.0.1

# 性能优化
OPENLLM_BATCH_SIZE=4
OPENLLM_MAX_SEQ_LENGTH=2048
OPENLLM_QUANTIZE=int8
环境变量加载
# 文件名:load_env.py
"""
环境变量加载示例
演示如何加载和管理配置
"""

import os
from dotenv import load_dotenv

def load_environment():
    """加载环境配置"""

    # 加载 .env 文件
    load_dotenv()

    # 获取模型配置
    model_config = {
        'model_id': os.getenv('OPENLLM_MODEL_ID',
                             'mistralai/Mistral-7B-Instruct-v0.1'),
        'model_path': os.getenv('OPENLLM_MODEL_PATH'),
        'model_format': os.getenv('OPENLLM_MODEL_FORMAT', 'safetensors'),
    }

    # 获取服务器配置
    server_config = {
        'host': os.getenv('OPENLLM_HOST', '0.0.0.0'),
        'port': int(os.getenv('OPENLLM_PORT', '3000')),
        'workers': int(os.getenv('OPENLLM_WORKERS', '1')),
        'timeout': int(os.getenv('OPENLLM_TIMEOUT', '300')),
    }

    # 获取硬件配置
    hardware_config = {
        'gpu_enabled': os.getenv('CUDA_VISIBLE_DEVICES') is not None,
        'gpu_memory_fraction': float(os.getenv('OPENLLM_GPU_MEMORY_FRACTION', '0.9')),
    }

    return {
        'model': model_config,
        'server': server_config,
        'hardware': hardware_config,
    }

if __name__ == "__main__":
    config = load_environment()
    print("加载的配置:")
    for section, values in config.items():
        print(f"\n{section.upper()}:")
        for key, value in values.items():
            print(f"  {key}: {value}")
基础命令入门
掌握基础命令是使用 OpenLLM 的第一步。以下为常用命令的详细说明。
模型列表查看
OpenLLM 支持多种预训练模型,查看可用模型:
# 查看支持的模型列表
openllm models

# 查看特定模型家族的模型
openllm models --model-family llama
openllm models --model-family mistral

# 查看模型的详细配置
openllm models --show-config

# 输出格式控制
openllm models --output json
openllm models --output yaml
模型列表命令输出示例
$ openllm models
Available models:
├── mistralai/Mistral-7B-Instruct-v0.1
├── meta-llama/Llama-2-7b-chat-hf
├── google/flan-t5-xxl
├── facebook/opt-6.7b
└── ... 20+ more models

Supported formats: safetensors, pytorch, gguf
版本验证
验证安装版本和组件兼容性:
# 查看 OpenLLM 版本
openllm --version

# 详细版本信息
openllm version --verbose

# 检查系统信息
openllm info

# 检查依赖兼容性
openllm doctor
版本检查脚本
# 文件名:check_versions.py
"""
版本兼容性检查脚本
确保各组件版本兼容
"""

import subprocess
import sys
import json

def check_versions():
    """检查所有组件版本"""

    print("系统组件版本检查\n")

    # 检查 OpenLLM 版本
    try:
        result = subprocess.run(['openllm', '--version'],
                              capture_output=True, text=True)
        print(f"OpenLLM 版本: {result.stdout.strip()}")
    except FileNotFoundError:
        print("OpenLLM 未安装")
        return False

    # 检查 Python 版本
    print(f"Python 版本: {sys.version.split()[0]}")

    # 检查 CUDA 版本
    try:
        result = subprocess.run(['nvcc', '--version'],
                              capture_output=True, text=True)
        lines = result.stdout.strip().split('\n')
        for line in lines:
            if 'release' in line:
                cuda_version = line.split()[-2]
                print(f"CUDA 版本: {cuda_version}")
                break
    except FileNotFoundError:
        print("CUDA 版本: 未安装")

    # 检查 PyTorch
    try:
        import torch
        print(f"PyTorch 版本: {torch.__version__}")
        if torch.cuda.is_available():
            print(f"PyTorch CUDA: {torch.version.cuda}")
    except ImportError:
        print("PyTorch: 未安装")

    # 检查 Transformers
    try:
        import transformers
        print(f"Transformers 版本: {transformers.__version__}")
    except ImportError:
        print("Transformers: 未安装")

    # 检查系统资源
    check_system_resources()

    return True

def check_system_resources():
    """检查系统资源"""
    print("\n系统资源检查")

    try:
        import psutil

        # 内存使用
        memory = psutil.virtual_memory()
        print(f"内存总量: {memory.total / 1e9:.2f} GB")
        print(f"内存可用: {memory.available / 1e9:.2f} GB")
        print(f"内存使用率: {memory.percent}%")

        # GPU 信息
        try:
            import torch
            if torch.cuda.is_available():
                print(f"\nGPU 数量: {torch.cuda.device_count()}")
                for i in range(torch.cuda.device_count()):
                    memory_allocated = torch.cuda.memory_allocated(i) / 1e9
                    memory_cached = torch.cuda.memory_reserved(i) / 1e9
                    print(f"GPU {i} 已分配显存: {memory_allocated:.2f} GB")
                    print(f"GPU {i} 缓存显存: {memory_cached:.2f} GB")
        except:
            pass

    except ImportError:
        print("安装 psutil 以获取详细系统信息: pip install psutil")

if __name__ == "__main__":
    print("=" * 50)
    success = check_versions()
    print("\n" + "=" * 50)
    if success:
        print("版本检查完成")
    else:
        print("存在配置问题")
帮助命令使用
OpenLLM 提供了详细的帮助系统:
# 查看全局帮助
openllm --help

# 查看特定命令帮助
openllm start --help
openllm build --help
openllm serve --help

# 查看模型特定选项
openllm start mistralai/Mistral-7B-Instruct-v0.1 --help

# 查看配置帮助
openllm config --help
常用命令速查表
# 启动服务
openllm start <model-id> [options]

# 构建模型
openllm build <model-id>

# 运行推理
openllm query <endpoint> "<prompt>"

# 管理服务
openllm list
openllm stop <service-id>
openllm status

# 配置管理
openllm config get <key>
openllm config set <key> <value>
openllm config list
三、基础部署验证:快速启动第一个 LLM 服务
示例模型选择
选择合适的入门模型对于快速验证部署至关重要。以下是推荐的轻量级模型:
Mistral-7B 模型特点
Mistral-7B 是目前最优秀的 7B 参数级别模型之一,具有以下特点:
-
性能表现
- 在多项基准测试中超越 Llama-2 13B
- 支持 8K 上下文长度
- 高效的注意力机制
-
资源需求
- FP16 精度:约 14GB 显存
- INT8 量化:约 8GB 显存
- 内存需求:至少 16GB 系统内存
-
适合场景
- 原型开发
- 中小规模生产部署
- 教育和研究用途
Llama 3 8B 模型特点
Meta 最新发布的 Llama 3 8B 模型是另一个优秀选择:
-
性能优势
- 改进的指令跟随能力
- 更好的多语言支持
- 优化的推理效率
-
部署考虑
- 需要接受使用协议
- Hugging Face 账号认证
- 商业使用限制
模型选择决策树
是否需要商业授权?
├── 是 → 选择 Mistral-7B
└── 否 → 选择 Llama-3-8B

是否有 GPU 资源?
├── 有 8GB+ 显存 → FP16 精度
├── 有 4-8GB 显存 → INT8 量化
└── 无 GPU → CPU 推理(需 32GB+ 内存)

部署规模?
├── 个人/测试 → 单 GPU
├── 中小规模 → 多 GPU
└── 大规模 → 模型并行
完整部署步骤
模型下载
方法一:使用 OpenLLM 自动下载
# 使用 OpenLLM 下载模型
openllm download mistralai/Mistral-7B-Instruct-v0.1

# 指定下载路径
openllm download mistralai/Mistral-7B-Instruct-v0.1 \
  --model-dir ./models/mistral-7b

# 使用特定格式下载
openllm download mistralai/Mistral-7B-Instruct-v0.1 \
  --format safetensors \
  --quantize int8
方法二:手动下载脚本
# 文件名:download_model.py
"""
模型下载脚本
支持断点续传和进度显示
"""

import os
import sys
from huggingface_hub import snapshot_download
from transformers import AutoConfig, AutoTokenizer, AutoModelForCausalLM

def download_model_huggingface(model_id, local_dir, token=None):
    """
    从 Hugging Face 下载模型
    Args:
        model_id: 模型标识符
        local_dir: 本地保存目录
        token: Hugging Face token
    """

    print(f"开始下载模型: {model_id}")
    print(f"保存到: {local_dir}")

    # 确保目录存在
    os.makedirs(local_dir, exist_ok=True)

    # 下载配置
    config = AutoConfig.from_pretrained(model_id, token=token)
    config.save_pretrained(local_dir)
    print("✓ 配置下载完成")

    # 下载分词器
    tokenizer = AutoTokenizer.from_pretrained(model_id, token=token)
    tokenizer.save_pretrained(local_dir)
    print("✓ 分词器下载完成")

    # 下载模型(可选择不下载权重,仅下载配置)
    try:
        model = AutoModelForCausalLM.from_pretrained(
            model_id,
            token=token,
            low_cpu_mem_usage=True,
            torch_dtype="auto"
        )
        model.save_pretrained(local_dir, safe_serialization=True)
        print("✓ 模型权重下载完成")
    except Exception as e:
        print(f"⚠ 模型权重下载失败: {e}")
        print("将仅下载配置和分词器")

    return local_dir

def download_with_resume(model_id, local_dir, token=None):
    """
    支持断点续传的下载
    """

    # 检查是否已部分下载
    required_files = ['config.json', 'tokenizer.json', 'model.safetensors']
    existing_files = []

    if os.path.exists(local_dir):
        for file in required_files:
            filepath = os.path.join(local_dir, file)
            if os.path.exists(filepath):
                existing_files.append(file)

    if len(existing_files) > 0:
        print(f"发现已下载文件: {existing_files}")
        response = input("是否继续下载缺失文件?(y/n): ")
        if response.lower() != 'y':
            print("下载取消")
            return

    # 使用 snapshot_download 支持断点续传
    try:
        snapshot_download(
            repo_id=model_id,
            local_dir=local_dir,
            local_dir_use_symlinks=False,
            resume_download=True,
            token=token,
            ignore_patterns=["*.msgpack", "*.h5", "*.ot", "*.tflite"]
        )
        print("模型下载完成")
    except Exception as e:
        print(f"下载失败: {e}")
        sys.exit(1)

if __name__ == "__main__":
    # 配置参数
    MODEL_ID = "mistralai/Mistral-7B-Instruct-v0.1"
    LOCAL_DIR = "./models/mistral-7b"

    # 可选:设置 Hugging Face token
    HF_TOKEN = os.getenv("HF_TOKEN")

    # 下载模型
    download_with_resume(MODEL_ID, LOCAL_DIR, HF_TOKEN)

    # 验证下载
    print("\n验证下载文件:")
    for root, dirs, files in os.walk(LOCAL_DIR):
        level = root.replace(LOCAL_DIR, '').count(os.sep)
        indent = ' ' * 2 * level
        print(f"{indent}{os.path.basename(root)}/")
        subindent = ' ' * 2 * (level + 1)
        for file in files[:10]:  # 显示前10个文件
            print(f"{subindent}{file}")
        if len(files) > 10:
            print(f"{subindent}... 和其他 {len(files)-10} 个文件")
模型下载优化技巧
- 使用镜像加速
# 设置环境变量使用镜像
export HF_ENDPOINT=https://hf-mirror.com
- 多线程下载
# 使用 aria2 加速
pip install huggingface_hub[cli]
huggingface-cli download --resume-download \
  --local-dir ./models \
  mistralai/Mistral-7B-Instruct-v0.1
- 只下载必要文件
# 下载配置和分词器
from transformers import AutoConfig, AutoTokenizer
config = AutoConfig.from_pretrained("mistralai/Mistral-7B-Instruct-v0.1")
tokenizer = AutoTokenizer.from_pretrained("mistralai/Mistral-7B-Instruct-v0.1")
服务启动
基础启动命令
# 最简单启动方式
openllm start mistralai/Mistral-7B-Instruct-v0.1

# 指定端口和主机
openllm start mistralai/Mistral-7B-Instruct-v0.1 \
  --port 8080 \
  --host 0.0.0.0

# 指定本地模型路径
openllm start ./models/mistral-7b \
  --model-id mistralai/Mistral-7B-Instruct-v0.1
高级启动配置
# 启动脚本:start_service.sh
#!/bin/bash

# 设置环境变量
export CUDA_VISIBLE_DEVICES=0
export OPENLLM_MODEL_CACHE="/var/cache/openllm"
export OPENLLM_LOG_LEVEL="INFO"

# 模型配置
MODEL_ID="mistralai/Mistral-7B-Instruct-v0.1"
MODEL_PATH="./models/mistral-7b"

# 服务器配置
HOST="0.0.0.0"
PORT="3000"
WORKERS="1"
TIMEOUT="300"

# 推理参数
MAX_LENGTH="512"
TEMPERATURE="0.7"
TOP_P="0.9"

# 检查模型是否存在
if [ ! -d "$MODEL_PATH" ]; then
    echo "模型不存在,开始下载..."
    openllm download "$MODEL_ID" --model-dir "$MODEL_PATH"
fi

# 启动服务
echo "启动 OpenLLM 服务..."
echo "模型: $MODEL_ID"
echo "地址: http://$HOST:$PORT"
echo "文档: http://$HOST:$PORT/docs"

openllm start "$MODEL_ID" \
  --model-dir "$MODEL_PATH" \
  --host "$HOST" \
  --port "$PORT" \
  --workers "$WORKERS" \
  --timeout "$TIMEOUT" \
  --max-new-tokens "$MAX_LENGTH" \
  --temperature "$TEMPERATURE" \
  --top-p "$TOP_P" \
  --cors
使用配置文件启动
# 启动配置文件:start_config.yaml
model:
  id: "mistralai/Mistral-7B-Instruct-v0.1"
  path: "./models/mistral-7b"
  quantize: "int8"

server:
  host: "0.0.0.0"
  port: 3000
  workers: 2
  timeout: 300
  cors: true

inference:
  max_new_tokens: 512
  temperature: 0.7
  top_p: 0.9
  top_k: 50
  repetition_penalty: 1.1
  do_sample: true
# 使用配置文件启动
openllm start --config start_config.yaml
本地调用示例
Python 客户端调用
# 文件名:client_example.py
"""
OpenLLM 客户端调用示例
支持同步和异步调用
"""

import requests
import json
import time
from typing import Dict, Any, Optional

class OpenLLMClient:
    """OpenLLM REST API 客户端"""

    def __init__(self, base_url: str = "http://localhost:3000"):
        """
        初始化客户端
        Args:
            base_url: OpenLLM 服务地址
        """
        self.base_url = base_url.rstrip('/')
        self.session = requests.Session()

        # 设置超时
        self.timeout = 300

        # 验证连接
        self._check_connection()

    def _check_connection(self):
        """检查服务连接"""
        try:
            health_url = f"{self.base_url}/healthz"
            response = self.session.get(health_url, timeout=5)
            if response.status_code == 200:
                print("成功连接到 OpenLLM 服务")
            else:
                print(f"⚠ 服务响应异常: {response.status_code}")
        except requests.exceptions.ConnectionError:
            print("无法连接到 OpenLLM 服务")
            print(f"请检查服务是否在 {self.base_url} 运行")
            raise

    def get_model_info(self) -> Dict[str, Any]:
        """获取模型信息"""
        try:
            url = f"{self.base_url}/v1/models"
            response = self.session.get(url, timeout=10)
            response.raise_for_status()
            return response.json()
        except Exception as e:
            print(f"获取模型信息失败: {e}")
            return {}

    def generate_text(self,
                     prompt: str,
                     max_tokens: int = 512,
                     temperature: float = 0.7,
                     top_p: float = 0.9,
                     stream: bool = False) -> Dict[str, Any]:
        """
        文本生成
        Args:
            prompt: 输入提示
            max_tokens: 最大生成长度
            temperature: 温度参数
            top_p: top-p 采样参数
            stream: 是否流式输出
        Returns:
            生成结果
        """

        # 构建请求数据
        data = {
            "prompt": prompt,
            "max_new_tokens": max_tokens,
            "temperature": temperature,
            "top_p": top_p,
            "do_sample": temperature > 0,
        }

        headers = {
            "Content-Type": "application/json",
            "Accept": "text/event-stream" if stream else "application/json"
        }

        endpoint = "/generate_stream" if stream else "/generate"
        url = f"{self.base_url}{endpoint}"

        try:
            if stream:
                return self._stream_generation(url, data, headers)
            else:
                response = self.session.post(
                    url,
                    json=data,
                    headers=headers,
                    timeout=self.timeout
                )
                response.raise_for_status()
                return response.json()

        except requests.exceptions.Timeout:
            print(f"请求超时 (timeout={self.timeout}s)")
            return {"error": "Request timeout"}
        except Exception as e:
            print(f"生成失败: {e}")
            return {"error": str(e)}

    def _stream_generation(self, url: str, data: Dict, headers: Dict):
        """处理流式生成"""
        try:
            response = self.session.post(
                url,
                json=data,
                headers=headers,
                timeout=self.timeout,
                stream=True
            )
            response.raise_for_status()

            print("流式生成开始...")
            full_response = ""

            for line in response.iter_lines():
                if line:
                    line_str = line.decode('utf-8')
                    if line_str.startswith("data: "):
                        data_str = line_str[6:]  # 移除 "data: " 前缀
                        if data_str == "[DONE]":
                            print("\n生成完成")
                            break

                        try:
                            chunk = json.loads(data_str)
                            token = chunk.get("text", "")
                            full_response += token
                            print(token, end="", flush=True)
                        except json.JSONDecodeError:
                            continue

            return {"text": full_response}

        except Exception as e:
            print(f"\n流式生成错误: {e}")
            return {"error": str(e)}

    def batch_generate(self,
                      prompts: list,
                      **kwargs) -> list:
        """批量生成文本"""
        results = []
        for i, prompt in enumerate(prompts):
            print(f"处理第 {i+1}/{len(prompts)} 个提示...")
            result = self.generate_text(prompt, **kwargs)
            results.append(result)
        return results

# 使用示例
def main():
    """客户端使用示例"""

    # 初始化客户端
    client = OpenLLMClient("http://localhost:3000")

    # 获取模型信息
    print("\n模型信息:")
    model_info = client.get_model_info()
    if model_info:
        for key, value in model_info.items():
            print(f"{key}: {value}")

    # 单次生成示例
    print("\n单次生成测试:")
    prompt = "请用中文解释什么是人工智能"

    result = client.generate_text(
        prompt=prompt,
        max_tokens=200,
        temperature=0.7,
        stream=False
    )

    if "text" in result:
        print(f"\n提示: {prompt}")
        print(f"回答: {result['text']}")
    else:
        print(f"生成失败: {result}")

    # 流式生成示例
    print("\n流式生成测试:")
    stream_prompt = "写一个关于机器学习的简短故事"

    result = client.generate_text(
        prompt=stream_prompt,
        max_tokens=100,
        temperature=0.8,
        stream=True
    )

    # 批量生成示例
    print("\n批量生成测试:")
    prompts = [
        "什么是深度学习?",
        "Python 有哪些优点?",
        "如何学习编程?"
    ]

    batch_results = client.batch_generate(
        prompts=prompts,
        max_tokens=100,
        temperature=0.5
    )

    for i, (prompt, result) in enumerate(zip(prompts, batch_results)):
        print(f"\n[{i+1}] 提示: {prompt}")
        if "text" in result:
            print(f"回答: {result['text'][:100]}...")
        else:
            print(f"失败: {result}")

if __name__ == "__main__":
    main()
命令行调用
# 使用 openllm query 命令
openllm query "请用中文解释什么是人工智能" \
  --model-id mistralai/Mistral-7B-Instruct-v0.1 \
  --max-new-tokens 200 \
  --temperature 0.7

# 从文件读取输入
echo "请用中文解释什么是人工智能" > prompt.txt
openllm query @prompt.txt \
  --model-id mistralai/Mistral-7B-Instruct-v0.1

# 批量处理
cat prompts.txt | xargs -I {} openllm query "{}" \
  --model-id mistralai/Mistral-7B-Instruct-v0.1
cURL 调用示例
# 简单文本生成
curl -X POST http://localhost:3000/generate \
  -H "Content-Type: application/json" \
  -d '{
    "prompt": "请用中文解释什么是人工智能",
    "max_new_tokens": 200,
    "temperature": 0.7
  }'

# 流式生成
curl -X POST http://localhost:3000/generate_stream \
  -H "Content-Type: application/json" \
  -H "Accept: text/event-stream" \
  -d '{
    "prompt": "写一个关于机器学习的简短故事",
    "max_new_tokens": 100,
    "temperature": 0.8
  }'

# 获取模型信息
curl http://localhost:3000/v1/models

# 健康检查
curl http://localhost:3000/healthz
部署验证
接口测试
完整的接口测试套件
# 文件名:api_tests.py
"""
OpenLLM API 测试套件
验证所有接口功能
"""

import requests
import json
import time
import pytest
from typing import Dict, List, Any

class OpenLLMTestSuite:
    """OpenLLM API 测试套件"""

    def __init__(self, base_url: str = "http://localhost:3000"):
        self.base_url = base_url
        self.session = requests.Session()
        self.test_results = []

    def test_health_endpoint(self) -> bool:
        """测试健康检查端点"""
        test_name = "健康检查端点"
        try:
            url = f"{self.base_url}/healthz"
            response = self.session.get(url, timeout=5)

            success = response.status_code == 200
            self._record_test(test_name, success,
                            f"状态码: {response.status_code}")
            return success

        except Exception as e:
            self._record_test(test_name, False, str(e))
            return False

    def test_models_endpoint(self) -> bool:
        """测试模型信息端点"""
        test_name = "模型信息端点"
        try:
            url = f"{self.base_url}/v1/models"
            response = self.session.get(url, timeout=10)

            success = response.status_code == 200
            if success:
                data = response.json()
                self._record_test(test_name, True,
                                f"模型: {data.get('model_id', '未知')}")
            else:
                self._record_test(test_name, False,
                                f"状态码: {response.status_code}")
            return success

        except Exception as e:
            self._record_test(test_name, False, str(e))
            return False

    def test_generate_endpoint(self) -> bool:
        """测试生成端点"""
        test_name = "文本生成端点"
        try:
            url = f"{self.base_url}/generate"
            payload = {
                "prompt": "你好,请介绍一下你自己。",
                "max_new_tokens": 50,
                "temperature": 0.1
            }

            start_time = time.time()
            response = self.session.post(
                url,
                json=payload,
                timeout=30
            )
            elapsed = time.time() - start_time

            success = response.status_code == 200
            if success:
                data = response.json()
                text = data.get("text", "")
                tokens = len(text) if text else 0
                self._record_test(test_name, True,
                                f"耗时: {elapsed:.2f}s, 生成长度: {tokens} 字符")
            else:
                self._record_test(test_name, False,
                                f"状态码: {response.status_code}")
            return success

        except Exception as e:
            self._record_test(test_name, False, str(e))
            return False

    def test_stream_endpoint(self) -> bool:
        """测试流式生成端点"""
        test_name = "流式生成端点"
        try:
            url = f"{self.base_url}/generate_stream"
            payload = {
                "prompt": "流式测试:",
                "max_new_tokens": 20,
                "temperature": 0.1
            }

            headers = {
                "Content-Type": "application/json",
                "Accept": "text/event-stream"
            }

            response = self.session.post(
                url,
                json=payload,
                headers=headers,
                timeout=30,
                stream=True
            )

            success = response.status_code == 200
            if success:
                chunks = 0
                for line in response.iter_lines():
                    if line:
                        chunks += 1
                        if chunks >= 3:  # 至少读取3个chunk
                            break

                self._record_test(test_name, True,
                                f"收到 {chunks} 个数据块")
            else:
                self._record_test(test_name, False,
                                f"状态码: {response.status_code}")
            return success

        except Exception as e:
            self._record_test(test_name, False, str(e))
            return False

    def test_batch_generate(self) -> bool:
        """测试批量生成"""
        test_name = "批量生成测试"
        try:
            url = f"{self.base_url}/generate"

            # 准备批量请求
            prompts = [
                "什么是机器学习?",
                "Python 是什么?",
                "人工智能有哪些应用?"
            ]

            results = []
            for prompt in prompts:
                payload = {
                    "prompt": prompt,
                    "max_new_tokens": 30,
                    "temperature": 0.1
                }

                response = self.session.post(url, json=payload, timeout=30)
                if response.status_code == 200:
                    data = response.json()
                    results.append(data.get("text", ""))
                else:
                    self._record_test(test_name, False,
                                    f"批量请求失败: {response.status_code}")
                    return False

            # 验证结果
            valid_results = [r for r in results if r]
            success = len(valid_results) == len(prompts)

            self._record_test(
                test_name,
                success,
                f"成功: {len(valid_results)}/{len(prompts)}"
            )
            return success

        except Exception as e:
            self._record_test(test_name, False, str(e))
            return False

    def test_error_handling(self) -> bool:
        """测试错误处理"""
        test_name = "错误处理测试"
        try:
            url = f"{self.base_url}/generate"

            # 测试无效请求
            invalid_payloads = [
                {},  # 空请求
                {"prompt": ""},  # 空提示
                {"prompt": "test", "max_new_tokens": -1},  # 无效参数
            ]

            error_count = 0
            for payload in invalid_payloads:
                response = self.session.post(url, json=payload, timeout=10)
                if response.status_code != 200:
                    error_count += 1

            # 至少应该有部分错误
            success = error_count > 0
            self._record_test(test_name, success,
                            f"捕获错误: {error_count}/{len(invalid_payloads)}")
            return success

        except Exception as e:
            self._record_test(test_name, False, str(e))
            return False

    def _record_test(self, name: str, success: bool, message: str = ""):
        """记录测试结果"""
        result = {
            "test": name,
            "status": "通过" if success else "失败",
            "message": message,
            "timestamp": time.strftime("%Y-%m-%d %H:%M:%S")
        }
        self.test_results.append(result)

        # 打印结果
        status_icon = "yes" if success else "no"
        print(f"{status_icon} {name}: {message}")

    def run_all_tests(self) -> Dict[str, Any]:
        """运行所有测试"""
        print("=" * 50)
        print("开始 OpenLLM API 测试")
        print("=" * 50)

        tests = [
            self.test_health_endpoint,
            self.test_models_endpoint,
            self.test_generate_endpoint,
            self.test_stream_endpoint,
            self.test_batch_generate,
            self.test_error_handling,
        ]

        for test_func in tests:
            test_func()
            time.sleep(1)  # 避免请求过载

        # 统计结果
        total = len(self.test_results)
        passed = sum(1 for r in self.test_results if r["status"] == "通过")
        failed = total - passed

        print("\n" + "=" * 50)
        print("测试结果统计")
        print("=" * 50)
        print(f"总测试数: {total}")
        print(f"通过: {passed}")
        print(f"失败: {failed}")
        print(f"通过率: {passed/total*100:.1f}%")

        if failed > 0:
            print("\n失败的测试:")
            for result in self.test_results:
                if result["status"] == "失败":
                    print(f"  - {result['test']}: {result['message']}")

        return {
            "total": total,
            "passed": passed,
            "failed": failed,
            "results": self.test_results
        }

def main():
    """运行测试套件"""
    # 修改为你的 OpenLLM 服务地址
    test_suite = OpenLLMTestSuite("http://localhost:3000")

    try:
        results = test_suite.run_all_tests()

        # 生成测试报告
        report = {
            "timestamp": time.strftime("%Y-%m-%d %H:%M:%S"),
            "service_url": test_suite.base_url,
            "summary": {
                "total": results["total"],
                "passed": results["passed"],
                "failed": results["failed"],
                "success_rate": results["passed"] / results["total"]
            },
            "details": results["results"]
        }

        # 保存报告
        with open("api_test_report.json", "w", encoding="utf-8") as f:
            json.dump(report, f, ensure_ascii=False, indent=2)

        print(f"\n测试报告已保存到: api_test_report.json")

        # 返回退出码
        exit_code = 0 if results["failed"] == 0 else 1
        exit(exit_code)

    except Exception as e:
        print(f"测试执行失败: {e}")
        exit(1)

if __name__ == "__main__":
    main()
推理结果查看
推理结果分析工具
# 文件名:analyze_results.py
"""
推理结果分析工具
验证生成结果的质量和一致性
"""

import json
import time
from typing import List, Dict, Any
import statistics

class InferenceAnalyzer:
    """推理结果分析器"""

    def __init__(self):
        self.results = []
        self.metrics = {}

    def add_result(self,
                   prompt: str,
                   response: str,
                   latency: float,
                   token_count: int):
        """添加推理结果"""
        result = {
            "prompt": prompt,
            "response": response,
            "latency": latency,
            "token_count": token_count,
            "timestamp": time.time()
        }
        self.results.append(result)

    def calculate_metrics(self) -> Dict[str, Any]:
        """计算性能指标"""
        if not self.results:
            return {}

        latencies = [r["latency"] for r in self.results]
        token_counts = [r["token_count"] for r in self.results]

        # 基本统计
        self.metrics = {
            "total_requests": len(self.results),
            "avg_latency": statistics.mean(latencies),
            "min_latency": min(latencies),
            "max_latency": max(latencies),
            "p95_latency": statistics.quantiles(latencies, n=20)[18],  # 95th percentile
            "avg_tokens_per_second": statistics.mean(
                [tc/l for tc, l in zip(token_counts, latencies)]
            ),
            "total_tokens": sum(token_counts),
        }

        return self.metrics

    def analyze_response_quality(self) -> Dict[str, Any]:
        """分析响应质量"""
        quality_metrics = {
            "avg_response_length": 0,
            "empty_responses": 0,
            "repetitive_responses": 0,
        }

        if not self.results:
            return quality_metrics

        total_length = 0
        for result in self.results:
            response = result["response"]
            total_length += len(response)

            # 检查空响应
            if not response.strip():
                quality_metrics["empty_responses"] += 1

            # 检查重复内容
            words = response.split()
            if len(words) > 10:
                # 简单重复检测
                unique_words = set(words)
                if len(unique_words) / len(words) < 0.5:
                    quality_metrics["repetitive_responses"] += 1

        quality_metrics["avg_response_length"] = total_length / len(self.results)

        return quality_metrics

    def run_benchmark(self,
                     client,
                     prompts: List[str],
                     **generation_args) -> Dict[str, Any]:
        """运行基准测试"""
        print(f"开始基准测试,共 {len(prompts)} 个提示")
        print("=" * 50)

        for i, prompt in enumerate(prompts, 1):
            print(f"进度: {i}/{len(prompts)}")

            start_time = time.time()
            result = client.generate_text(prompt, **generation_args)
            end_time = time.time()

            latency = end_time - start_time
            response = result.get("text", "")
            token_count = len(response)  # 近似值

            self.add_result(prompt, response, latency, token_count)

            print(f"  延迟: {latency:.2f}s")
            print(f"  生成: {response[:50]}...")
            print("-" * 30)

        # 计算指标
        performance = self.calculate_metrics()
        quality = self.analyze_response_quality()

        # 打印报告
        self.print_report(performance, quality)

        return {
            "performance": performance,
            "quality": quality,
            "results": self.results
        }

    def print_report(self, performance: Dict, quality: Dict):
        """打印测试报告"""
        print("\n" + "=" * 50)
        print("推理基准测试报告")
        print("=" * 50)

        print("\n性能指标:")
        print(f"  总请求数: {performance.get('total_requests', 0)}")
        print(f"  平均延迟: {performance.get('avg_latency', 0):.2f}s")
        print(f"  最小延迟: {performance.get('min_latency', 0):.2f}s")
        print(f"  最大延迟: {performance.get('max_latency', 0):.2f}s")
        print(f"  P95延迟: {performance.get('p95_latency', 0):.2f}s")
        print(f"  平均token/秒: {performance.get('avg_tokens_per_second', 0):.2f}")
        print(f"  总token数: {performance.get('total_tokens', 0)}")

        print("\n质量指标:")
        print(f"  平均响应长度: {quality.get('avg_response_length', 0):.1f} 字符")
        print(f"  空响应数: {quality.get('empty_responses', 0)}")
        print(f"  重复响应数: {quality.get('repetitive_responses', 0)}")

        # 延迟分布
        if self.results:
            latencies = [r["latency"] for r in self.results]
            print(f"\n延迟分布:")
            print(f"  <1s: {sum(1 for l in latencies if l < 1)}")
            print(f"  1-5s: {sum(1 for l in latencies if 1 <= l < 5)}")
            print(f"  5-10s: {sum(1 for l in latencies if 5 <= l < 10)}")
            print(f"  >10s: {sum(1 for l in latencies if l >= 10)}")

    def save_results(self, filename: str = "inference_results.json"):
        """保存结果到文件"""
        report = {
            "timestamp": time.strftime("%Y-%m-%d %H:%M:%S"),
            "metrics": {
                "performance": self.metrics,
                "quality": self.analyze_response_quality()
            },
            "results": self.results
        }

        with open(filename, "w", encoding="utf-8") as f:
            json.dump(report, f, ensure_ascii=False, indent=2)

        print(f"\n详细结果已保存到: {filename}")

# 使用示例
def main():
    """运行基准测试"""

    # 创建客户端
    from client_example import OpenLLMClient
    client = OpenLLMClient("http://localhost:3000")

    # 准备测试提示
    test_prompts = [
        "请用中文解释什么是深度学习",
        "Python 有哪些主要特性?",
        "写一个简单的排序算法",
        "人工智能的发展历史",
        "机器学习的应用场景有哪些?",
        "什么是神经网络?",
        "解释一下过拟合现象",
        "大数据的特点是什么?",
        "云计算有哪些服务模式?",
        "区块链技术的基本原理"
    ]

    # 创建分析器
    analyzer = InferenceAnalyzer()

    # 运行测试
    results = analyzer.run_benchmark(
        client=client,
        prompts=test_prompts,
        max_tokens=100,
        temperature=0.7,
        top_p=0.9
    )

    # 保存结果
    analyzer.save_results("benchmark_results.json")

    return results

if __name__ == "__main__":
    main()
基础性能监控
性能监控仪表板
# 文件名:performance_monitor.py
"""
性能监控工具
实时监控 OpenLLM 服务性能
"""

import time
import psutil
import requests
import json
from datetime import datetime
from typing import Dict, List, Any
import threading
import queue

class PerformanceMonitor:
    """性能监控器"""

    def __init__(self, service_url: str = "http://localhost:3000"):
        self.service_url = service_url
        self.metrics_history = []
        self.running = False
        self.monitor_thread = None
        self.alert_queue = queue.Queue()

        # 监控配置
        self.monitor_interval = 5  # 秒
        self.alert_thresholds = {
            "cpu_percent": 90.0,
            "memory_percent": 90.0,
            "response_time": 10.0,  # 秒
            "error_rate": 0.1,  # 10%
        }

    def start_monitoring(self, duration: int = 300):
        """开始监控"""
        self.running = True
        self.monitor_thread = threading.Thread(
            target=self._monitor_loop,
            args=(duration,)
        )
        self.monitor_thread.daemon = True
        self.monitor_thread.start()

        # 启动告警处理器
        alert_thread = threading.Thread(target=self._process_alerts)
        alert_thread.daemon = True
        alert_thread.start()

        print(f"开始监控服务: {self.service_url}")
        print(f"监控间隔: {self.monitor_interval}秒")
        print(f"监控时长: {duration}秒")
        print("=" * 50)

    def stop_monitoring(self):
        """停止监控"""
        self.running = False
        if self.monitor_thread:
            self.monitor_thread.join(timeout=10)
        print("\n监控已停止")

    def _monitor_loop(self, duration: int):
        """监控循环"""
        start_time = time.time()

        while self.running and (time.time() - start_time) < duration:
            try:
                metrics = self.collect_metrics()
                self.metrics_history.append(metrics)

                # 检查告警
                self._check_alerts(metrics)

                # 打印状态
                self._print_status(metrics)

                # 等待下一个间隔
                time.sleep(self.monitor_interval)

            except Exception as e:
                print(f"监控错误: {e}")
                time.sleep(self.monitor_interval)

        self.running = False

    def collect_metrics(self) -> Dict[str, Any]:
        """收集性能指标"""
        timestamp = datetime.now().isoformat()

        # 系统指标
        cpu_percent = psutil.cpu_percent(interval=1)
        memory = psutil.virtual_memory()
        disk = psutil.disk_usage('/')

        # 网络连接
        net_io = psutil.net_io_counters()

        # 进程指标
        process_metrics = self._get_process_metrics()

        # 服务指标
        service_metrics = self._get_service_metrics()

        # GPU 指标(如果可用)
        gpu_metrics = self._get_gpu_metrics()

        metrics = {
            "timestamp": timestamp,
            "system": {
                "cpu_percent": cpu_percent,
                "memory_percent": memory.percent,
                "memory_used_gb": memory.used / 1e9,
                "memory_total_gb": memory.total / 1e9,
                "disk_percent": disk.percent,
                "disk_free_gb": disk.free / 1e9,
                "net_sent_mb": net_io.bytes_sent / 1e6,
                "net_recv_mb": net_io.bytes_recv / 1e6,
            },
            "process": process_metrics,
            "service": service_metrics,
            "gpu": gpu_metrics,
        }

        return metrics

    def _get_process_metrics(self) -> Dict[str, Any]:
        """获取进程指标"""
        try:
            # 查找 OpenLLM 进程
            for proc in psutil.process_iter(['pid', 'name', 'cmdline']):
                try:
                    cmdline = proc.info['cmdline']
                    if cmdline and 'openllm' in ' '.join(cmdline).lower():
                        process = psutil.Process(proc.info['pid'])

                        with process.oneshot():
                            cpu = process.cpu_percent()
                            memory = process.memory_info()
                            threads = process.num_threads()
                            connections = len(process.connections())

                        return {
                            "pid": proc.info['pid'],
                            "cpu_percent": cpu,
                            "memory_rss_mb": memory.rss / 1e6,
                            "memory_vms_mb": memory.vms / 1e6,
                            "threads": threads,
                            "connections": connections,
                        }
                except (psutil.NoSuchProcess, psutil.AccessDenied):
                    continue
        except Exception:
            pass

        return {}

    def _get_service_metrics(self) -> Dict[str, Any]:
        """获取服务指标"""
        try:
            # 健康检查
            health_start = time.time()
            health_response = requests.get(
                f"{self.service_url}/healthz",
                timeout=5
            )
            health_time = time.time() - health_start

            # 模型信息
            model_response = requests.get(
                f"{self.service_url}/v1/models",
                timeout=5
            )

            # 简单推理测试
            test_start = time.time()
            test_response = requests.post(
                f"{self.service_url}/generate",
                json={
                    "prompt": "test",
                    "max_new_tokens": 10,
                    "temperature": 0.1
                },
                timeout=10
            )
            inference_time = time.time() - test_start

            return {
                "health_status": health_response.status_code == 200,
                "health_response_time": health_time,
                "model_available": model_response.status_code == 200,
                "inference_response_time": inference_time,
                "inference_status": test_response.status_code == 200,
            }

        except Exception as e:
            return {
                "health_status": False,
                "error": str(e)
            }

    def _get_gpu_metrics(self) -> Dict[str, Any]:
        """获取 GPU 指标"""
        try:
            import torch
            if torch.cuda.is_available():
                gpu_metrics = []
                for i in range(torch.cuda.device_count()):
                    gpu_metrics.append({
                        "device_id": i,
                        "name": torch.cuda.get_device_name(i),
                        "memory_allocated_gb": torch.cuda.memory_allocated(i) / 1e9,
                        "memory_cached_gb": torch.cuda.memory_reserved(i) / 1e9,
                        "memory_total_gb": torch.cuda.get_device_properties(i).total_memory / 1e9,
                        "utilization": torch.cuda.utilization(i) if hasattr(torch.cuda, 'utilization') else None,
                    })
                return {"gpus": gpu_metrics}
        except:
            pass

        return {"gpus": []}

    def _check_alerts(self, metrics: Dict[str, Any]):
        """检查告警条件"""
        alerts = []

        # CPU 告警
        if metrics["system"]["cpu_percent"] > self.alert_thresholds["cpu_percent"]:
            alerts.append(f"CPU 使用率过高: {metrics['system']['cpu_percent']:.1f}%")

        # 内存告警
        if metrics["system"]["memory_percent"] > self.alert_thresholds["memory_percent"]:
            alerts.append(f"内存使用率过高: {metrics['system']['memory_percent']:.1f}%")

        # 响应时间告警
        if "inference_response_time" in metrics["service"]:
            rt = metrics["service"]["inference_response_time"]
            if rt > self.alert_thresholds["response_time"]:
                alerts.append(f"推理响应时间过长: {rt:.2f}s")
# 服务健康告警
if not metrics["service"].get("health_status", True):
    alerts.append("服务健康检查失败")

# 推理状态告警
if not metrics["service"].get("inference_status", True):
    alerts.append("推理请求失败")

# 如果有告警,加入队列
if alerts:
    alert_info = {
        "timestamp": metrics["timestamp"],
        "alerts": alerts,
        "metrics": metrics
    }
    self.alert_queue.put(alert_info)

def _process_alerts(self):
"""处理告警队列"""
while self.running:
    try:
        alert_info = self.alert_queue.get(timeout=1)
        self._send_alert(alert_info)
    except queue.Empty:
        continue
    except Exception as e:
        print(f"处理告警时出错: {e}")

def _send_alert(self, alert_info: Dict[str, Any]):
"""发送告警(这里打印到控制台,可扩展为邮件、短信等)"""
print("\n性能告警!")
print(f"时间: {alert_info['timestamp']}")
print("告警内容:")
for alert in alert_info["alerts"]:
    print(f"  - {alert}")

# 可以在这里添加发送邮件、短信、Webhook等逻辑
# 例如: send_email_alert(alert_info)
# 或者: send_slack_notification(alert_info)

def _print_status(self, metrics: Dict[str, Any]):
"""打印当前状态"""
system = metrics["system"]
process = metrics["process"]
service = metrics["service"]
gpu = metrics.get("gpu", {})

# 清屏并打印状态仪表板
print("\n" + "=" * 60)
print("OpenLLM 性能监控仪表板")
print("=" * 60)

# 系统状态
print(f"\n系统状态:")
print(f"  CPU使用率: {system['cpu_percent']:6.1f}% | ", end="")
print(f"内存: {system['memory_percent']:5.1f}% ({system['memory_used_gb']:.1f}/{system['memory_total_gb']:.1f} GB)")
print(f"  磁盘使用: {system['disk_percent']:6.1f}% | ", end="")
print(f"网络: 发送 {system['net_sent_mb']:.1f} MB, 接收 {system['net_recv_mb']:.1f} MB")

# 进程状态
if process:
    print(f"\n 进程状态 (PID: {process.get('pid', 'N/A')}):")
    print(f"  CPU使用率: {process.get('cpu_percent', 0):6.1f}% | ", end="")
    print(f"内存: {process.get('memory_rss_mb', 0):.1f} MB (RSS)")
    print(f"  线程数: {process.get('threads', 0):4d} | ", end="")
    print(f"连接数: {process.get('connections', 0):4d}")

# 服务状态
print(f"\n服务状态:")
health_icon = "yes" if service.get("health_status") else "no"
model_icon = "=yes" if service.get("model_available") else "no"
inference_icon = "yes" if service.get("inference_status") else "no"

print(f"  健康检查: {health_icon} ({service.get('health_response_time', 0):.3f}s)")
print(f"  模型可用: {model_icon}")
print(f"  推理服务: {inference_icon} ({service.get('inference_response_time', 0):.3f}s)")

# GPU状态
if gpu and "gpus" in gpu and gpu["gpus"]:
    print(f"\nGPU状态:")
    for gpu_info in gpu["gpus"]:
        memory_percent = (gpu_info["memory_allocated_gb"] / gpu_info["memory_total_gb"]) * 100
        print(f"  GPU {gpu_info['device_id']} ({gpu_info['name']}):")
        print(f"    显存: {memory_percent:5.1f}% ({gpu_info['memory_allocated_gb']:.1f}/{gpu_info['memory_total_gb']:.1f} GB)")
        if gpu_info.get("utilization") is not None:
            print(f"    利用率: {gpu_info['utilization']:5.1f}%")

# 历史数据统计(如果有)
if len(self.metrics_history) > 1:
    print(f"\n📈 历史统计 (最近 {len(self.metrics_history)} 次采样):")
    response_times = [m["service"].get("inference_response_time", 0)
                    for m in self.metrics_history
                    if m["service"].get("inference_response_time")]
    if response_times:
        avg_rt = sum(response_times) / len(response_times)
        max_rt = max(response_times)
        print(f"  平均推理延迟: {avg_rt:.3f}s")
        print(f"  最大推理延迟: {max_rt:.3f}s")

print("\n" + "-" * 60)
print("按 Ctrl+C 停止监控")

def generate_report(self, filename: str = None) -> Dict[str, Any]:
"""生成监控报告"""
if not self.metrics_history:
    return {"error": "没有监控数据"}

# 计算统计信息
response_times = []
cpu_usages = []
memory_usages = []

for metrics in self.metrics_history:
    rt = metrics["service"].get("inference_response_time")
    if rt:
        response_times.append(rt)

    cpu_usages.append(metrics["system"]["cpu_percent"])
    memory_usages.append(metrics["system"]["memory_percent"])

# 基本统计
import statistics
report = {
    "monitoring_period": {
        "start": self.metrics_history[0]["timestamp"],
        "end": self.metrics_history[-1]["timestamp"],
        "duration_seconds": (
            datetime.fromisoformat(self.metrics_history[-1]["timestamp"]) -
            datetime.fromisoformat(self.metrics_history[0]["timestamp"])
        ).total_seconds(),
        "sample_count": len(self.metrics_history)
    },
    "performance_metrics": {
        "response_time": {
            "average": statistics.mean(response_times) if response_times else 0,
            "p95": statistics.quantiles(response_times, n=20)[18] if len(response_times) >= 20 else 0,
            "max": max(response_times) if response_times else 0,
            "min": min(response_times) if response_times else 0
        },
        "cpu_usage": {
            "average": statistics.mean(cpu_usages),
            "max": max(cpu_usages),
            "min": min(cpu_usages)
        },
        "memory_usage": {
            "average": statistics.mean(memory_usages),
            "max": max(memory_usages),
            "min": min(memory_usages)
        }
    },
    "service_availability": {
        "health_check_success_rate": sum(1 for m in self.metrics_history
                                        if m["service"].get("health_status", False)) / len(self.metrics_history),
        "inference_success_rate": sum(1 for m in self.metrics_history
                                    if m["service"].get("inference_status", False)) / len(self.metrics_history)
    },
    "alerts_triggered": self.alert_queue.qsize(),
    "raw_metrics": self.metrics_history[-100:]  # 保留最近100个数据点
}

# 如果指定了文件名,保存报告
if filename:
    with open(filename, "w", encoding="utf-8") as f:
        json.dump(report, f, ensure_ascii=False, indent=2)
    print(f"监控报告已保存到: {filename}")

return report
使用示例
def main():

"""运行性能监控"""

import signal

import sys


# 创建监控器
monitor = PerformanceMonitor("http://localhost:3000")

# 设置信号处理,以便优雅退出
def signal_handler(sig, frame):
    print("\n接收到停止信号,正在停止监控...")
    monitor.stop_monitoring()

    # 生成报告
    report = monitor.generate_report("performance_report.json")

    # 打印摘要
    print("\n" + "=" * 50)
    print("监控摘要")
    print("=" * 50)
    print(f"监控时长: {report['monitoring_period']['duration_seconds']:.0f} 秒")
    print(f"采样次数: {report['monitoring_period']['sample_count']}")
    print(f"平均CPU使用率: {report['performance_metrics']['cpu_usage']['average']:.1f}%")
    print(f"平均内存使用率: {report['performance_metrics']['memory_usage']['average']:.1f}%")
    print(f"平均推理延迟: {report['performance_metrics']['response_time']['average']:.3f} 秒")
    print(f"服务健康检查成功率: {report['service_availability']['health_check_success_rate']*100:.1f}%")
    print(f"推理成功率: {report['service_availability']['inference_success_rate']*100:.1f}%")
    print(f"触发告警: {report['alerts_triggered']} 次")

    sys.exit(0)

signal.signal(signal.SIGINT, signal_handler)
signal.signal(signal.SIGTERM, signal_handler)

# 开始监控(默认监控5分钟)
print("启动性能监控,按 Ctrl+C 停止")
monitor.start_monitoring(duration=300)

# 保持主线程运行
try:
    while monitor.running:
        time.sleep(1)
except KeyboardInterrupt:
    signal_handler(signal.SIGINT, None)
if __name__="main":
	main()
扩展:Web 仪表板
class PerformanceDashboard:

"""简单的 Web 性能仪表板"""

from flask import Flask, render_template, jsonify
import threading

app = Flask(__name__)

def __init__(self, monitor: PerformanceMonitor, host='0.0.0.0', port=5000):
    self.monitor = monitor
    self.host = host
    self.port = port
    self.app.add_url_rule('/', 'index', self.index)
    self.app.add_url_rule('/metrics', 'metrics', self.get_metrics)
    self.app.add_url_rule('/status', 'status', self.get_status)

def index(self):
    """仪表板主页"""
    return render_template('dashboard.html')  # 需要创建模板

def get_metrics(self):
    """获取最新的性能指标(JSON API)"""
    if self.monitor.metrics_history:
        latest = self.monitor.metrics_history[-1]
        return jsonify(latest)
    return jsonify({"error": "No metrics available"})

def get_status(self):
    """获取服务状态摘要"""
    if not self.monitor.metrics_history:
        return jsonify({"status": "unknown"})

    latest = self.monitor.metrics_history[-1]
    service_status = latest["service"]

    status = "healthy"
    if not service_status.get("health_status", True):
        status = "unhealthy"
    elif latest["system"]["cpu_percent"] > 90:
        status = "degraded"
    elif latest["system"]["memory_percent"] > 90:
        status = "degraded"

    return jsonify({
        "status": status,
        "timestamp": latest["timestamp"],
        "cpu_percent": latest["system"]["cpu_percent"],
        "memory_percent": latest["system"]["memory_percent"],
        "service_healthy": service_status.get("health_status", False)
    })

def start(self):
    """启动仪表板"""
    threading.Thread(target=self.app.run,
                    kwargs={'host': self.host, 'port': self.port, 'debug': False}).start()
    print(f"性能仪表板已启动: http://{self.host}:{self.port}")

使用 Web 仪表板

def start_dashboard():

"""启动带仪表板的监控"""

monitor = PerformanceMonitor("http://localhost:3000")

dashboard = PerformanceDashboard(monitor, port=5001)

# 启动监控
monitor.start_monitoring(duration=3600)  # 监控1小时

# 启动仪表板
dashboard.start()

# 保持运行
try:
    while monitor.running:
        time.sleep(1)
except KeyboardInterrupt:
    monitor.stop_monitoring()
    print("监控已停止")

# 运行示例

if__name__="main":
	start_dashboard()
总结
本文详细介绍了 OpenLLM 的完整部署流程,从环境准备、安装配置到服务验证的全过程。通过本文的指导,您可以:
- 环境准备:根据模型规模选择合适的硬件配置,正确设置软件环境
- 安装配置:选择适合的安装方式,正确配置模型和服务参数
- 服务部署:快速启动第一个 LLM 服务,并进行全面验证
- 性能监控:实时监控服务状态,确保服务稳定运行
关键最佳实践总结:
- 环境一致性:使用虚拟环境或 Docker 确保环境一致性
- 配置管理:通过配置文件管理服务参数,便于版本控制和复用
- 监控告警:建立完善的监控体系,及时发现和处理问题
- 资源优化:根据实际需求调整批处理大小、量化策略等参数
- 安全防护:合理配置网络访问权限,使用 API 密钥认证
故障排除指南:
- 服务无法启动:检查端口占用、依赖版本、模型文件完整性
- 推理速度慢:检查 GPU 使用率、调整批处理大小、启用量化
- 内存不足:减小模型尺寸、启用模型分片、增加交换空间
- 网络问题:配置代理、使用国内镜像源、检查防火墙设置
通过本文的指导,您应该能够成功部署和管理自己的大语言模型服务。OpenLLM 提供了灵活且强大的功能,可以满足从个人使用到企业级部署的各种需求。随着对系统的熟悉,您可以进一步探索高级功能,如模型微调、多模型部署、负载均衡等,构建更加完善的大语言模型应用生态。
🌟 感谢您耐心阅读到这里!
💡 如果本文对您有所启发欢迎:
👍 点赞📌 收藏 📤 分享给更多需要的伙伴。
🗣️ 期待在评论区看到您的想法, 共同进步。
🔔 关注我,持续获取更多干货内容~
🤗 我们下篇文章见~

AtomGit 是由开放原子开源基金会联合 CSDN 等生态伙伴共同推出的新一代开源与人工智能协作平台。平台坚持“开放、中立、公益”的理念,把代码托管、模型共享、数据集托管、智能体开发体验和算力服务整合在一起,为开发者提供从开发、训练到部署的一站式体验。
更多推荐


 0
0 0
0- 0


 已为社区贡献205条内容

所有评论(0)