Spring Security 实现权限控制(认证 + 授权全流程)
一、权限控制
1.1 认证和授权概念
在实际生产环境中,系统资源不能随意访问,必须先确认用户身份,再分配操作权限,这就是认证与授权要解决的问题。
- 认证:识别用户身份,验证用户名 / 密码、手机号验证码等,让系统知道 “你是谁”。
- 授权:认证通过后,指定用户可操作的功能、可访问的资源,让系统知道 “你能做什么”。
权限控制本质就是对用户完成认证 + 授权的全流程管理。
1.2 权限模块数据模型
实现权限控制需要5 / 7 张核心表支撑,角色表 t_role 处于核心位置,用户、权限、菜单均与角色为多对多关系。
涉及表结构:

- 用户表 t_user
- 权限表 t_permission
- 角色表 t_role
- 菜单表 t_menu
- 用户角色关系表 t_user_role
- 角色权限关系表 t_role_permission
- 角色菜单关系表 t_role_menu
表使用场景:
- 认证:仅需用户表 t_user,校验用户名 / 密码即可。
- 授权:需 7 张表联动,根据用户→角色→菜单 / 权限,确定用户可访问资源与操作权限。
1.3 Spring Security 简介
Spring Security 是 Spring 官方提供的强大、高度可定制的认证与授权框架,是 Spring 项目安全管控的事实标准。
核心优势:
- 完整支持认证、授权
- 防护会话固定、点击劫持、CSRF 攻击
- 与 Servlet API、Spring Web MVC 无缝集成
- 易扩展,满足自定义安全需求
Maven 依赖:
xml
<!--security启动器-->
<dependency>
    <groupId>org.springframework.boot</groupId>
    <artifactId>spring-boot-starter-security</artifactId>
</dependency>
常用权限框架:Spring Security、Apache Shiro。
1.4 Spring Security 入门案例
1.4.1 工程搭建
xml
<?xml version="1.0" encoding="UTF-8"?>
<project xmlns="http://maven.apache.org/POM/4.0.0"
         xmlns:xsi="http://www.w3.org/2001/XMLSchema-instance"
         xsi:schemaLocation="http://maven.apache.org/POM/4.0.0 http://maven.apache.org/xsd/maven-4.0.0.xsd">
    <parent>
        <artifactId>ICan_parent</artifactId>
        <groupId>com.hg</groupId>
        <version>1.0-SNAPSHOT</version>
    </parent>
    <modelVersion>4.0.0</modelVersion>

    <artifactId>spring_security</artifactId>

    <dependencies>
        <dependency>
            <groupId>org.springframework.boot</groupId>
            <artifactId>spring-boot-starter-web</artifactId>
        </dependency>
        <dependency>
            <groupId>org.springframework.boot</groupId>
            <artifactId>spring-boot-starter-security</artifactId>
        </dependency>
    </dependencies>
</project>
1.4.2 创建启动类
java
@SpringBootApplication
@EnableWebSecurity
public class SpringSecurityApp {
    public static void main(String[] args) {
        ConfigurableApplicationContext ac = SpringApplication.run(SpringSecurityApp.class, args);
    }
}
1.4.3 启动测试
访问 http://localhost:8080,Spring Security 自动生成默认登录页面,需输入账号密码登录。
1.4.5 FilterChainProxy 核心过滤器
Spring Boot 启动时,会加载名为 springSecurityFilterChain 的过滤器 FilterChainProxy,所有请求先经过此过滤器,再分发到对应子过滤器处理。
@SpringBootApplication
@EnableWebSecurity//启动security
public class SpringSecurityApp {
    public static void main(String[] args) {
        ConfigurableApplicationContext ac = SpringApplication.run(SpringSecurityApp.class, args);
        Object bean = ac.getBean("springSecurityFilterChain");
        //输出class org.springframework.security.web.FilterChainProxy
        System.out.println(bean.getClass());
    }
}
点击进入FilterChainProxy的源码,执行过滤器时会调用这个类的doFiler方法:
再进入doFilterInternal方法里面打断点,观察它的具体的初始化流程:
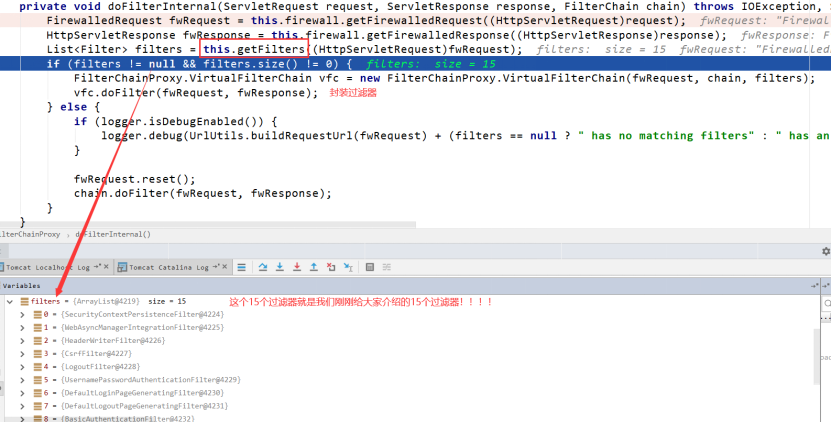
1.4.6 Spring Security 15 个常用过滤器
- SecurityContextPersistenceFilter:初始化安全上下文,保存认证权限信息
- WebAsyncManagerIntegrationFilter:集成 Spring 异步机制
- HeaderWriterFilter:添加请求头安全信息
- CsrfFilter:防跨域请求伪造攻击
- LogoutFilter:处理退出登录,清除认证信息
- UsernamePasswordAuthenticationFilter:用户名密码认证核心过滤器
- DefaultLoginPageGeneratingFilter:生成默认登录页
- DefaultLogoutPageGeneratingFilter:生成默认退出页
- BasicAuthenticationFilter:解析 Basic 认证请求头
- RequestCacheAwareFilter:缓存请求对象
- SecurityContextHolderAwareRequestFilter:包装 Request,扩展 API
- AnonymousAuthenticationFilter:未登录时创建匿名身份
- SessionManagementFilter:限制同一用户会话数量
- ExceptionTranslationFilter:统一处理安全异常
- FilterSecurityInterceptor:权限校验核心过滤器
1.5 入门案例改进(适配生产环境)
原生入门案例存在 4 个问题:所有资源都需认证、需要自定义的登录页、明文配置账号、密码明文存储,需针对性优化。
1.5.1 配置可匿名访问资源
@Component
public class WebSecurityConfig extends WebSecurityConfigurerAdapter{
    //配置认证信息来源
    @Override
    protected void configure(AuthenticationManagerBuilder auth) throws Exception {
        super.configure(auth);
    }

    //忽略静态资源,匿名访问
    @Override
    public void configure(WebSecurity web) throws Exception {
        web.ignoring().antMatchers("/pages/**");
    }

    //HTTP请求安全配置
    @Override
    protected void configure(HttpSecurity http) throws Exception {
        super.configure(http);
    }
}
效果:pages目录下的文件可以在没有认证的情况下任意访问
1.5.2 使用自定义登录页面
1.自定义 login.html
<!DOCTYPE html>
<html lang="en">
<head>
<meta charset="UTF-8">
<title>登录页面</title>
</head>
<body>
<h3>自定义登录页面</h3>
<form action="/login" method="post">
username:<input type="text" name="username"><br>
password:<input type="password" name="password"><br>
<input type="submit" value="登录">
</form>
</body>
</html>
2.安全配置优化
@Component
public class WebSecurityConfig extends WebSecurityConfigurerAdapter{
    @Override
    protected void configure(AuthenticationManagerBuilder auth) throws Exception {
        super.configure(auth);
    }

    @Override
    public void configure(WebSecurity web) throws Exception {
        web.ignoring().antMatchers("/login.html");
    }
    @Override
    protected void configure(HttpSecurity http) throws Exception {
        //自定义登录页
        http.formLogin()
                .loginPage("/login.html")
                .loginProcessingUrl("/login")
                .usernameParameter("username")
                .passwordParameter("password")
                .defaultSuccessUrl("/pages/index.html",true); //登录成功,总是返回的页面
 //权限配置
    http.authorizeRequests()
        .anyRequest().authenticated();

    //关闭CSRF防护
    http.csrf().disable();
    }
}效果:使用http://localhost:8080/访问,此时就能访问自定义的登录页面。
1.6 从数据库查询用户信息
生产环境需从数据库动态加载用户,需实现 UserDetailsService 接口,框架自动调用完成认证。
@Service
public class UserServiceImpl implements UserDetailsService {
    //模拟数据库用户数据
    private static Map<String, UserInfo> mapSql = new HashMap<>();
    static {
        BCryptPasswordEncoder passwordEncoder = new BCryptPasswordEncoder();
        mapSql.put("admin",new UserInfo("admin", passwordEncoder.encode("111")));
        mapSql.put("test",new UserInfo("test",passwordEncoder.encode("222")));
    }

    @Override
    public UserDetails loadUserByUsername(String username) throws UsernameNotFoundException {
        UserInfo userInfo = mapSql.get(username);
        if (userInfo == null){
            return null;
        }
        //明文密码{noop}
        String password = "{noop}"+userInfo.getPassword();
        //权限校验码
        List<GrantedAuthority> list = new ArrayList<>();
        list.add(new SimpleGrantedAuthority("add"));
        list.add(new SimpleGrantedAuthority("delete"));
        list.add(new SimpleGrantedAuthority("ROLE_ADMIN"));
        return new User(username, password, authorityArrayList);
    }
}
UserInfo 用户实体类:
//用户实体
public class UserInfo {
String username;
String password;
public UserInfo(String username,String password){
this.username = username;
this.password = password;
}
public String getUsername() {
return username;
}
public void setUsername(String username) {
this.username = username;
}
public String getPassword() {
return password;
}
public void setPassword(String password) {
this.password = password;
}
@Override
public String toString() {
return "UserInfo{" +
"username='" + username + '\'' +
", password='" + password + '\'' +
'}';
}
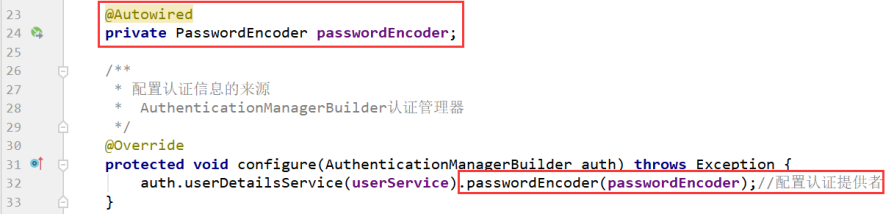
}配置认证管理器 WebSecurityConfig.class :
@Autowired
private UserService userService;

@Override
protected void configure(AuthenticationManagerBuilder auth) throws Exception {
    auth.userDetailsService(userService);
}
1.7 密码加密(BCrypt)
明文密码不安全,采用 BCryptPasswordEncoder 加密,随机盐混入密文,匹配无需单独存盐。
加密特点:同一密码每次加密结果不同,matches() 方法可正确匹配。
1.配置加密 Bean
WebSecurityConfig.class
@Bean
public PasswordEncoder passwordEncoder(){
    return new BCryptPasswordEncoder();
}
2.WebSecurityConfig.class 中指定密码加密对象
3.修改UserService实现类
@Service
public class UserServiceImpl implements UserDetailsService {
//模拟向mysql数据库中插入数据
private static Map<String, UserInfo> mapSql = new HashMap<>();
static {
BCryptPasswordEncoder passwordEncoder = new BCryptPasswordEncoder();
mapSql.put("admin",new UserInfo("admin", passwordEncoder.encode("111")));
mapSql.put("test",new UserInfo("test",passwordEncoder.encode("222")));
}
@Override
public UserDetails loadUserByUsername(String username) throws UsernameNotFoundException {
//模拟从数据库中查询用户
UserInfo userInfo = mapSql.get(username);
if (userInfo == null){
return null;
}
//模拟查询数据库中用户的密码 去掉明文标识{noop}
String password = userInfo.getPassword();
//权限校验码
List<GrantedAuthority> authorityArrayList = new ArrayList<>();
authorityArrayList.add(new SimpleGrantedAuthority("add"));
authorityArrayList.add(new SimpleGrantedAuthority("delete"));
authorityArrayList.add(new SimpleGrantedAuthority("ROLE_ADMIN"));
return new User(username, password, authorityArrayList);
}
@Bean
public PasswordEncoder passwordEncoder(){
return new BCryptPasswordEncoder();
}
}
1.8 配置多种权限校验规则
按权限 / 角色细粒度控制页面访问:
为了测试方便,首先在项目中创建a.html、b.html、c.html几个页面
WebSecurityConfig.class:
    @Override
    protected void configure(HttpSecurity http) throws Exception {
        //自定义登录页
        http.formLogin()
                .loginPage("/login.html")
                .loginProcessingUrl("/login")
                .usernameParameter("username")
                .passwordParameter("password")
                .defaultSuccessUrl("/pages/index.html",true); //登录成功,总是返回的页面
        //权限配置
        http.authorizeRequests()
                //a.html页面需add权限访问
                .mvcMatchers("/pages/a.html").hasAuthority("add")
                //b.html页面需delete权限访问
                .mvcMatchers("/pages/b.html").hasAuthority("delete")
                //c.html需ADMIN角色访问
                .mvcMatchers("/pages/c.html").hasRole("ADMIN")
                .anyRequest().authenticated();  //任意请求必须认证过的
        //关闭跨站请求防护
        http.csrf().disable();
    }
为方便测试,改造UserServiceImpl
@Service
public class UserServiceImpl implements UserDetailsService {
    private static Map<String, UserInfo> mapSql = new HashMap<>();
    static {
        BCryptPasswordEncoder passwordEncoder = new BCryptPasswordEncoder();
        mapSql.put("admin",new UserInfo("admin", passwordEncoder.encode("111")));
        mapSql.put("test",new UserInfo("test",passwordEncoder.encode("222")));
    }

    @Override
    public UserDetails loadUserByUsername(String username) throws UsernameNotFoundException {
        UserInfo userInfo = mapSql.get(username);
        if (userInfo == null){
            return null;
        }
        //密码
        String password = userInfo.getPassword();
        //权限校验码
        List<GrantedAuthority> authorityArrayList = new ArrayList<>();
        if ("admin".equals(username)) {
            authorityArrayList.add(new SimpleGrantedAuthority("add"));
        }
        if ("test".equals(username)) {
            authorityArrayList.add(new SimpleGrantedAuthority("delete"));
        }
        if ("admin".equals(username)) {
            authorityArrayList.add(new SimpleGrantedAuthority("ROLE_ADMIN"));
        }
        return new User(username, password, authorityArrayList);
    }
    @Bean
    public PasswordEncoder passwordEncoder(){
        return new BCryptPasswordEncoder();
    }
}
此时分别用admin用户和test用户登录测试效果。
1.9 注解方式权限控制
更灵活的方法级权限控制,开启注解后直接在接口上标注。
1.开启注解支持
@Component
@EnableGlobalMethodSecurity(prePostEnabled = true)  //开启权限注解支持
public class WebSecurityConfig extends WebSecurityConfigurerAdapter{
}
2.Controller类权限注解
@RestController
@RequestMapping("/hello")
public class HelloController {
    @RequestMapping("/add")
    @PreAuthorize("hasAuthority('add')")//表示用户必须拥有add权限才能调用当前方法
    public String add(){
        System.out.println("add...");
        return "success";
    }

    @RequestMapping("/delete")
    @PreAuthorize("hasAuthority('delete')")//表示用户必须拥有delete权限 才能调用当前方法
    public String delete(){
        System.out.println("delete.....");
        return "success";
    }
    @RequestMapping("/admin")
    @PreAuthorize("hasRole('ROLE_ADMIN')")//表示用户必须拥有ROLE_ADMIN角色 才能调用当前方法
    public String admin(){
        System.out.println("admin.....");
        return "success";
    }
}
1.10 退出登录配置
请求 /logout 自动退出,清除认证状态,跳转至登录页。
@Override
protected void configure(HttpSecurity http) throws Exception {
    //原有配置...
    //退出登录配置
    http.logout().logoutUrl("/logout").logoutSuccessUrl("/login.html");
}
二、权限控制实战
权限控制核心是认证(登录)与授权(权限校验),本项目基于7 张权限表(用户、角色、权限、菜单及关联表)实现数据支撑。
1.1 导入 Spring Security 依赖
在ICan_backend工程的pom.xml添加启动器:
<!--security启动器-->
<dependency>
    <groupId>org.springframework.boot</groupId>
    <artifactId>spring-boot-starter-security</artifactId>
</dependency>
1.2 实现认证逻辑(UserDetailsService)
自定义用户认证服务,查询用户、角色、权限信息并封装为UserDetails:
java
@Component
public class SpringSecurityUserService implements UserDetailsService {

    @Reference
    UserService userService;

    @Override
    public UserDetails loadUserByUsername(String username) throws UsernameNotFoundException {
        User user = userService.findUserByUsername(username);
        if(user==null){
            return null;
        }
        List<GrantedAuthority> list = new ArrayList<>();
        Set<Role> roles = user.getRoles();
        for(Role role:roles){
            // 添加角色权限
            list.add(new SimpleGrantedAuthority(role.getKeyword()));
            Set<Permission> permissions = role.getPermissions();
            for(Permission permission:permissions){
                // 添加资源权限
                list.add(new SimpleGrantedAuthority(permission.getKeyword()));
            }
        }
        UserDetails userDetails = new org.springframework.security.core.userdetails.User(
                username,user.getPassword(),list);
        return userDetails;
    }
}
1.3 业务层与数据层实现
1.3.1 UserService 接口
java
public interface UserService {
    User findUserByUsername(String username);
}
1.3.2 UserServiceImpl 实现类
@Service
public class UserServiceImpl implements UserService {

    @Autowired
    UserDao userDao;
    @Autowired
    RoleDao roleDao;
    @Autowired
    PermissionDao permissionDao;

    @Override
    public User findUserByUsername(String username) {
        User user = userDao.findByUsername(username);
        if(user==null){
            return null;
        }
        Integer userId = user.getId();
        Set<Role> roles = roleDao.findByUserId(userId);
        if(roles!=null||roles.size()>0){
            for(Role role:roles){
                Integer roleId = role.getId();
                Set<Permission> permissions = permissionDao.findByRoleId(roleId);
                if(permissions!=null||permissions.size()>0){
                   role.setPermissions(permissions);
                }
            }
            user.setRoles(roles);
        }
        return user;
    }
}
1.3.3 Dao 层与 Mapper 文件
UserDao
public interface UserDao {
     User findByUsername(String username);
}
UserDao.xml
<mapper namespace="com.hg.dao.UserDao">
    <select id="findByUsername" parameterType="String" resultType="com.hg.pojo.User">
          select * from t_user where username = #{username}
    </select>
</mapper>
RoleDao
public interface RoleDao {
    Set<Role> findByUserId(int id);
}
RoleDao.xml
xml
<mapper namespace="com.hg.dao.RoleDao">
    <select id="findByUserId" parameterType="int" resultType="com.hg.pojo.Role">
        SELECT *  FROM t_role WHERE  id  IN(
              SELECT role_id  FROM t_user_role WHERE user_id=#{userId})
    </select>
</mapper>
PermissionDao
public interface PermissionDao {
    Set<Permission> findByRoleId(int roleId);
}
PermissionDao.xml
<mapper namespace="com.hg.dao.PermissionDao">
    <select id="findByRoleId" parameterType="int" resultType="com.hg.pojo.Permission">
        SELECT *  FROM t_permission WHERE id IN(
              SELECT  permission_id FROM t_role_permission WHERE role_id=#{roleId}
    )
    </select>
</mapper>
1.4 Spring Security 配置类
创建配置类,完成认证、授权、登录、登出配置:
java
@Configuration
@EnableGlobalMethodSecurity(prePostEnabled = true)
public class WebSecurityConfig extends WebSecurityConfigurerAdapter {

    @Autowired
    private UserDetailsService userDetailsService;
    @Autowired
    private PasswordEncoder passwordEncoder;

    @Override
    protected void configure(AuthenticationManagerBuilder auth) throws Exception {
        // 自定义用户认证 + 密码加密
        auth.userDetailsService(userDetailsService).passwordEncoder(passwordEncoder);
    }

    @Override
    protected void configure(HttpSecurity http) throws Exception {
        // 开启跨域
        http.cors();
        // 关闭CSRF防护
        http.csrf().disable();
        // 登录配置
        http.formLogin().loginProcessingUrl("/login")
                .successHandler((request, response, authentication) -> {
                    response.setContentType("application/json;charset=utf-8");
                    Object user = SecurityContextHolder.getContext().getAuthentication().getPrincipal();
                    response.getWriter().write(new ObjectMapper().writeValueAsString(new Result(true, "登陆成功", user)));
                })
                .failureHandler((request, response, e) -> {
                    response.setContentType("application/json;charset=utf-8");
                    response.getWriter().write(new ObjectMapper().writeValueAsString(new Result(false, "登陆失败")));
                });
        // 所有请求都需要认证
        http.authorizeRequests().anyRequest().authenticated();
        // 登出配置
        http.logout().logoutUrl("/logout")
                .logoutSuccessHandler((request, response, authentication) -> {
                    response.setContentType("application/json;charset=utf-8");
                    response.getWriter().write(new ObjectMapper().writeValueAsString(new Result(true, "登出成功")));
                })
                .invalidateHttpSession(true);
    }

    // 密码加密器BCrypt
    @Bean
    public PasswordEncoder passwordEncoder(){
        return new BCryptPasswordEncoder();
    }
}
1.5 接口权限控制(@PreAuthorize)
在 Controller 方法上添加权限注解,示例(CheckItemController):
java
// 新增检查项
@RequestMapping("/add")
@PreAuthorize("hasAuthority('CHECKITEM_ADD')")
public Result add(@RequestBody CheckItem checkItem){
    try{
        checkItemService.addCheckItem(checkItem);
    }catch(Exception e){
        e.printStackTrace();
        return new Result(false, MessageConstant.ADD_CHECKITEM_FAIL);
    }
    return new Result(true, MessageConstant.ADD_CHECKITEM_SUCCESS);
}

// 分页查询
@RequestMapping("/findPage")
@PreAuthorize("hasAuthority('CHECKITEM_QUERY')")
public PageResult findPage(@RequestBody QueryPageBean queryPageBean){
    PageResult pageResult=checkItemService.findPage(queryPageBean);
    return pageResult;
}

// 删除检查项
@RequestMapping("/delete")
@PreAuthorize("hasAuthority('CHECKITEM_DELETE')")
public Result delete(Integer id){
    try{
        checkItemService.deleteCheckItemById(id);
    }catch (Exception e){
        e.printStackTrace();
        return new Result(false, MessageConstant.DELETE_CHECKITEM_FAIL);
    }
    return new Result(true, MessageConstant.DELETE_CHECKITEM_SUCCESS);
}

// 修改检查项
@RequestMapping("/edit")
@PreAuthorize("hasAuthority('CHECKITEM_EDIT')")
public Result edit(@RequestBody CheckItem checkItem){
    try{
        checkItemService.updateCheckItem(checkItem) ;
    }catch(Exception e){
        e.printStackTrace();
        return new Result(false, MessageConstant.EDIT_CHECKITEM_FAIL);
    }
    return new Result(true, MessageConstant.EDIT_CHECKITEM_SUCCESS);
}
1.6 前端权限不足提示
捕获 403 异常,提示无权限:
javascript
// 权限不足提示
showMessage(r){
    if(r == 'Error: Request failed with status code 403'){
        this.$message.error('无访问权限');
        return;
    }else{
        this.$message.error('未知错误');
        return;
    }
},
// 删除操作
handleDelete(row) {
    this.$confirm("你确定要删除当前数据吗?","提示",{
        type:'warning'
    }).then(()=>{
        axios.get("/checkitem/delete.do?id=" + row.id).then((res) => {
            if(res.data.flag){
                this.$message({
                    type:'success',
                    message:res.data.message
                });
                this.findPage();
            }else{
                this.$message.error(res.data.message);
            }
        }).catch((r)=>{
            this.showMessage(r);
        });
    }).catch(()=>{
        this.$message({
            type:'info',
            message:'操作已取消'
        });
    });
}
1.7 用户登出功能
1.页面添加登出链接:
html
<el-dropdown-item divided>
    <span style="display:block;"><a href="/logout.do">退出</a></span>
</el-dropdown-item>
2.Security 配置简化版登出(可选):
java
http.logout()
    .logoutUrl("/logout")
    .logoutSuccessUrl("/login.html")
    .invalidateHttpSession(true);
可直接基于此方案,对接后台管理系统权限管控。

AtomGit 是由开放原子开源基金会联合 CSDN 等生态伙伴共同推出的新一代开源与人工智能协作平台。平台坚持“开放、中立、公益”的理念,把代码托管、模型共享、数据集托管、智能体开发体验和算力服务整合在一起,为开发者提供从开发、训练到部署的一站式体验。
更多推荐


 21
21 0
0- 0


 已为社区贡献4条内容

所有评论(0)