RHEL——Web高性能服务器Nginx
# Nginx 是一款高性能的 HTTP 服务器和反向代理服务器,采用异步事件驱动架构,支持高并发连接,常用于静态资源服务、负载均衡和反向代理。
- 由 WEB Server 处理静态报文和 Application 处理动态报文能高性能响应请求
一、web 服务器介绍
1. Apache 经典的 Web 服务器(Web Server)
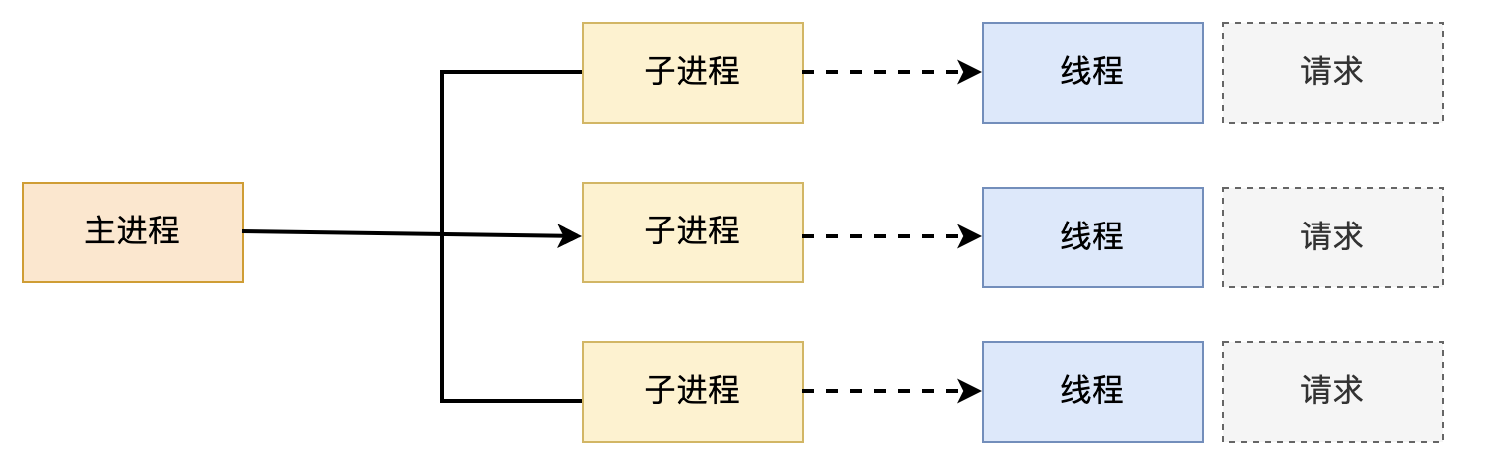
(1)Apache perfork 模型
# 派生模式,有一个主进程,然后生成多个子进程,使用 select 模型,最大并发1024
# 每一个用户请求需要主进程开启一个子进程来服务
# 当用户挂机(即长链接,不传输数据)时,子进程不会自动关闭,会造成大量资源浪费
# 优点:稳定
# 缺点:占用资源多,并发性差,不适用于高并发场景
(2)Apache worker 模型
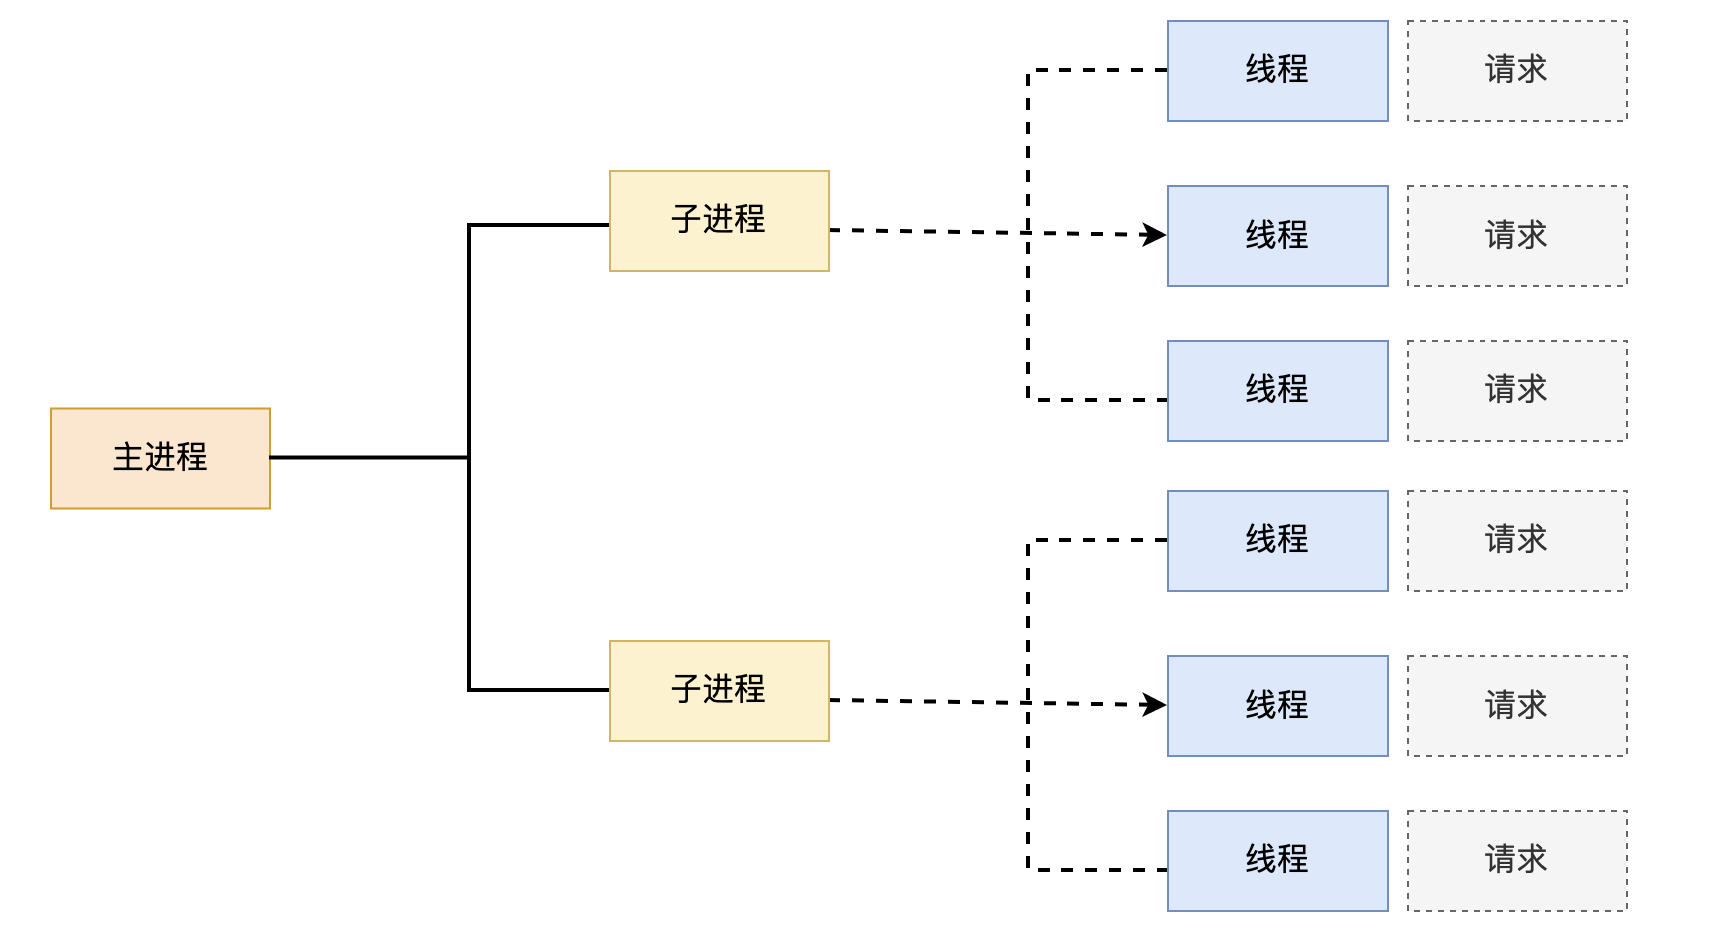
# 多进程和多线程混合模型
# 由一个控制进程启动多个子进程
# 每个子进程包含固定线程
# 由线程来相应用户请求
# 当线程不够用时,还会再开一个新的子进程,在子进程中启动线程处理数据
# 优点:相比于 prefork 占用内存较少,但可以处理更多的请求
# 缺点:使用的是 keepalived 的长连接方式,某一个线程会被一直占用,即便没有数据传输,也需要等待超时才会释放。若过多线程被占用,会导致高并发场景下的服务无线程可用(在prefork模式下同样发生)
(3)Apache event 模型
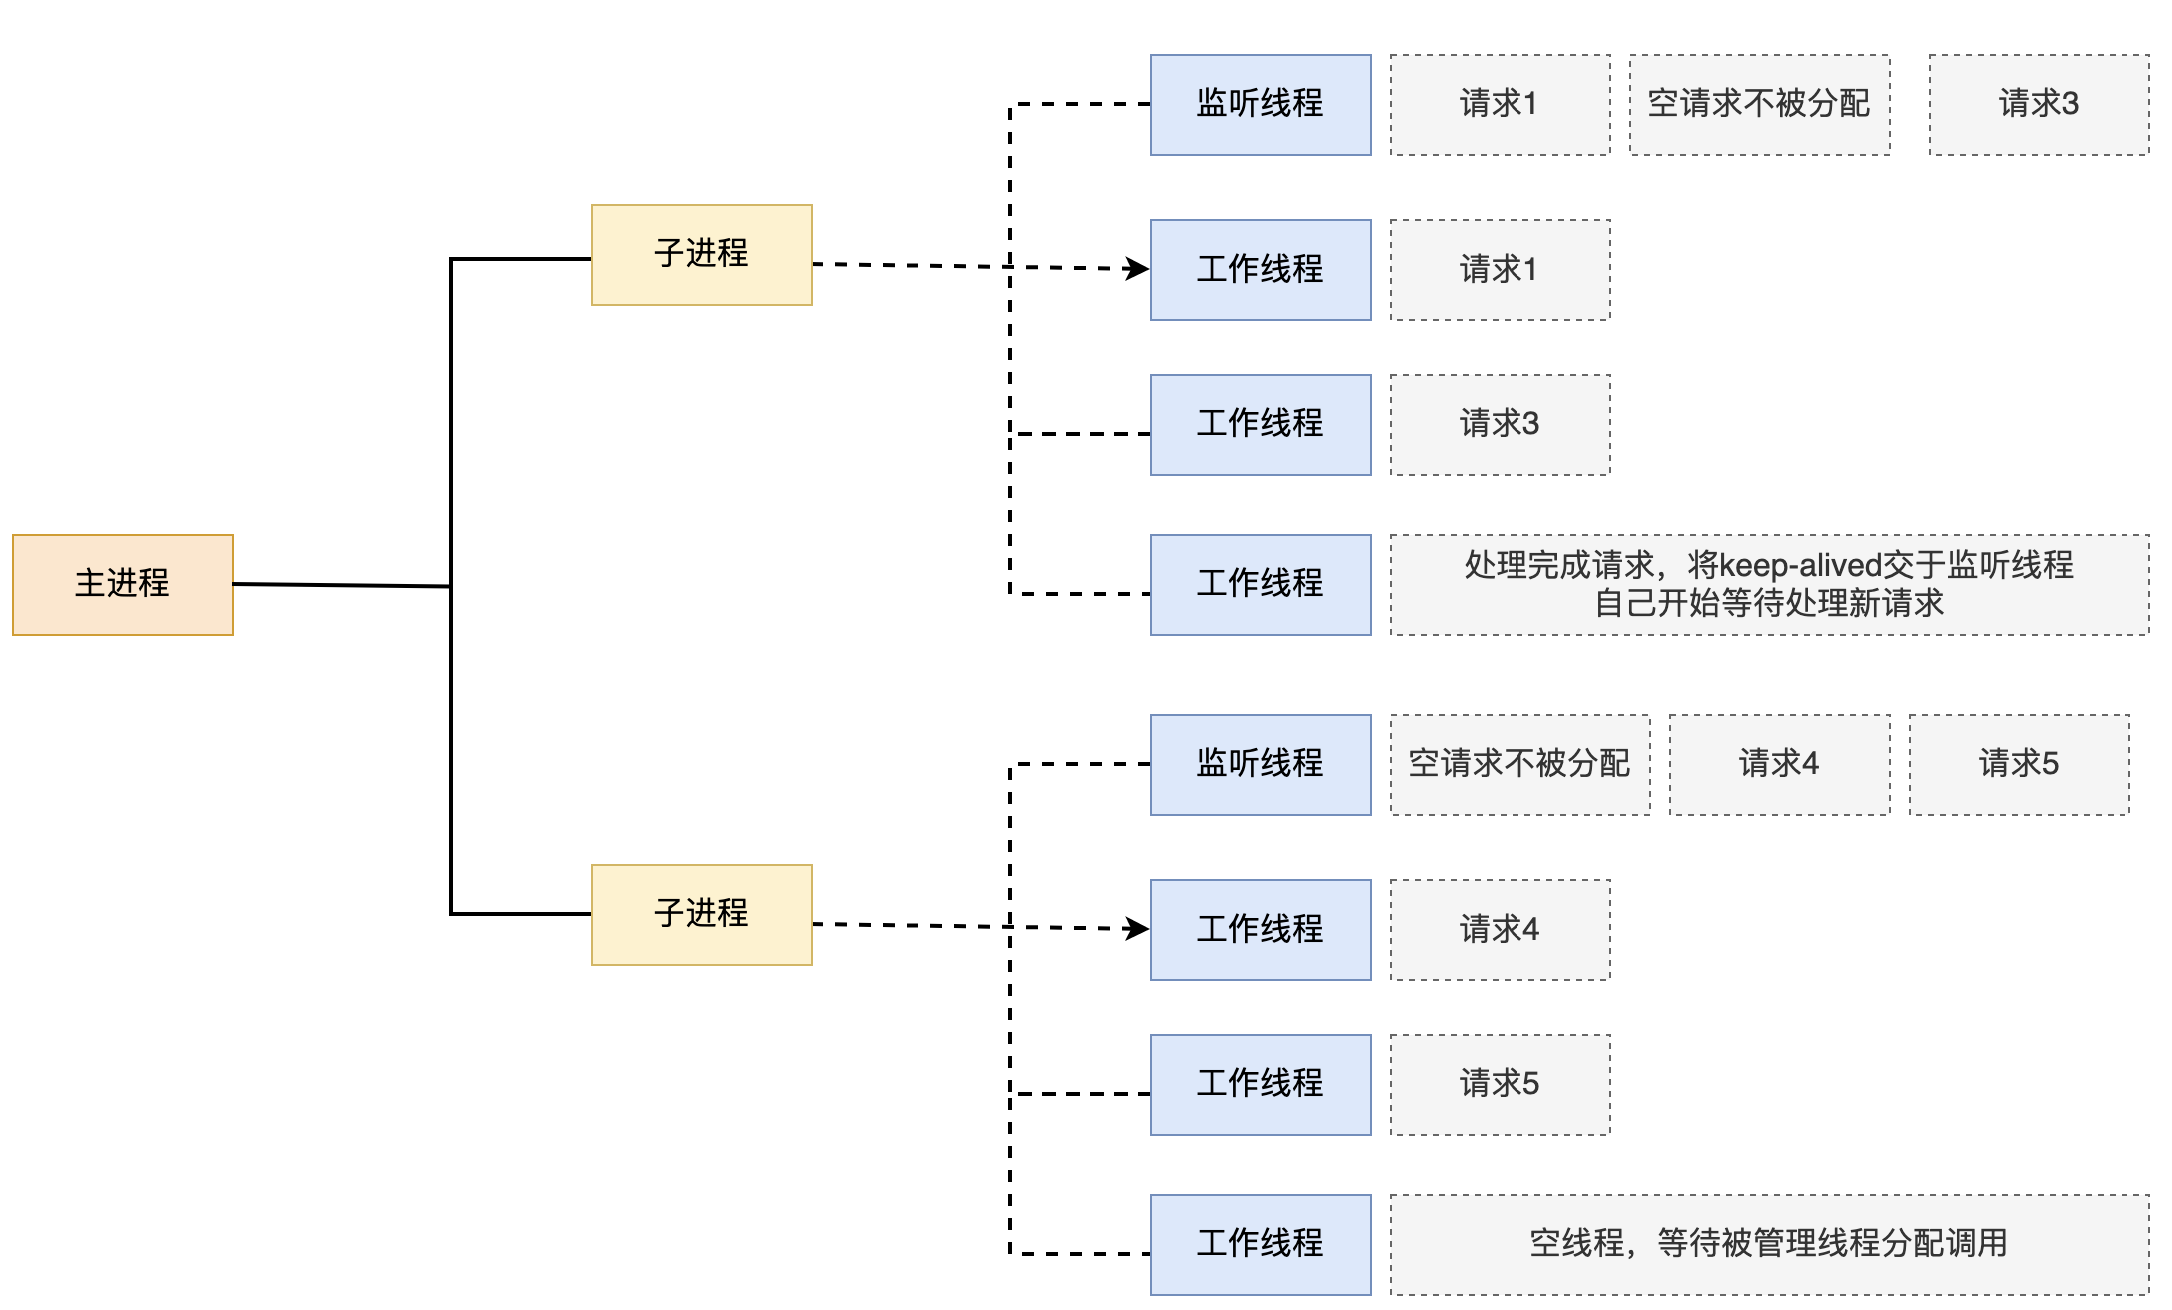
# 事件驱动模型,由子进程下的监听线程来分配工作线程处理数据
# 每个工作线程可处理多个数据
# 当工作线程处理完数据后,没有新请求时,监听线程会立即回收工作线程
# 当监听线程挂掉后,整个子进程就瘫痪了
# 优点:单线程响应多请求,占据资源更少,高并发场景下表现优秀,有空线程会立即释放
# 缺点:没有线程安全控制
2. Nginx 高性能的 Web 服务器
(1)Nginx 版本
# 分企业版和社区版
# 企业版:NGINX |F5
# 社区版(免费):https://nginx.org/
(2)Nginx 工作场景
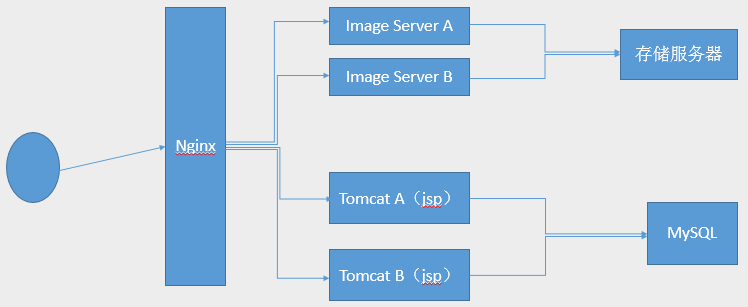
# 当用户发送一个请求过来时,Nginx 可以对其进行动静分离
# 由 Image Server(对应Web Server)处理静态报文
# Tomcat(对应Application)处理动态报文,再和 MySQL 进行交互
3. 服务器 I/O 模型
(1)I/O 类型
# I/O 是只在计算机中 Input/Output,IOPS(Input/Output Per Second)即每秒的输入输出量
# 磁盘 I/O:从磁盘读取出来的速率
# 网络 I/O:数据在网络中的传输速率
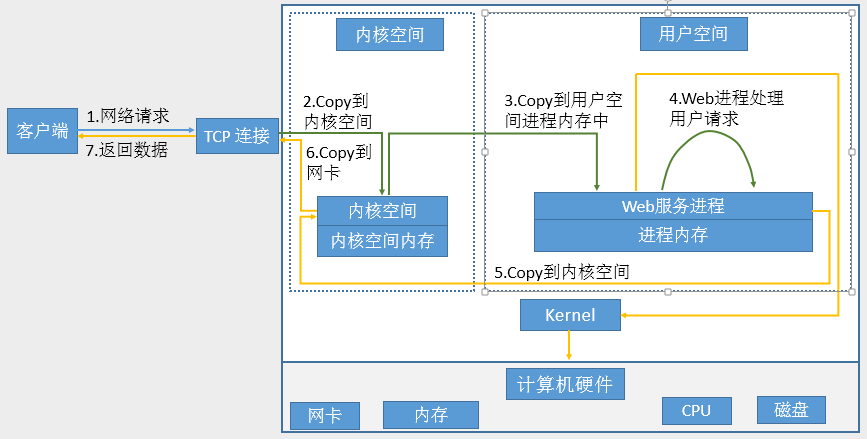
# 网络 I/O 在客户访问 web 服务流程
# 磁盘 I/O 和网络 I/O 都要经历两阶段
- 第一阶段:将数据从文件加载到内核内存空间(缓冲区),等待数据准备完成,时间较长
- 第二阶段:将数据从内核缓冲区复制到用户空间的进程内存中,时间较短
(2)I/O 模型
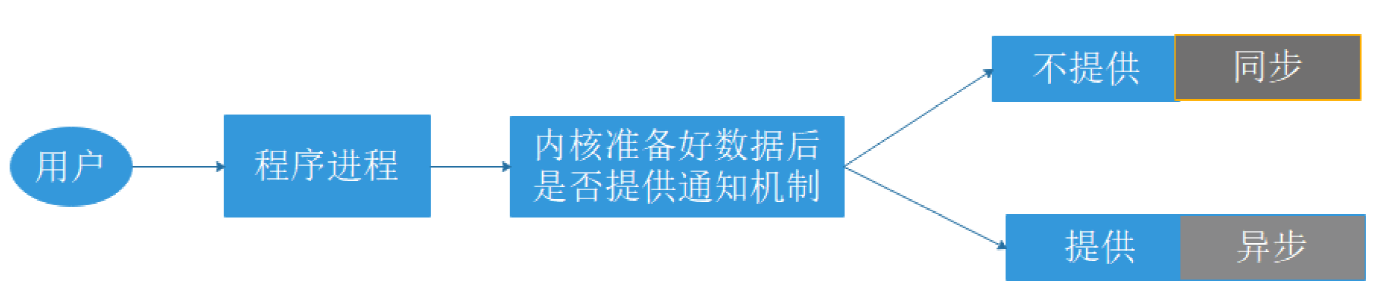
# 同步:用户访问 web 服务时,通过进程来响应请求,内核来处理数据同时不向进程提供反馈
# 异步:用户访问 web 服务时,通过进程来响应请求,内核来处理数据同时向进程提供反馈
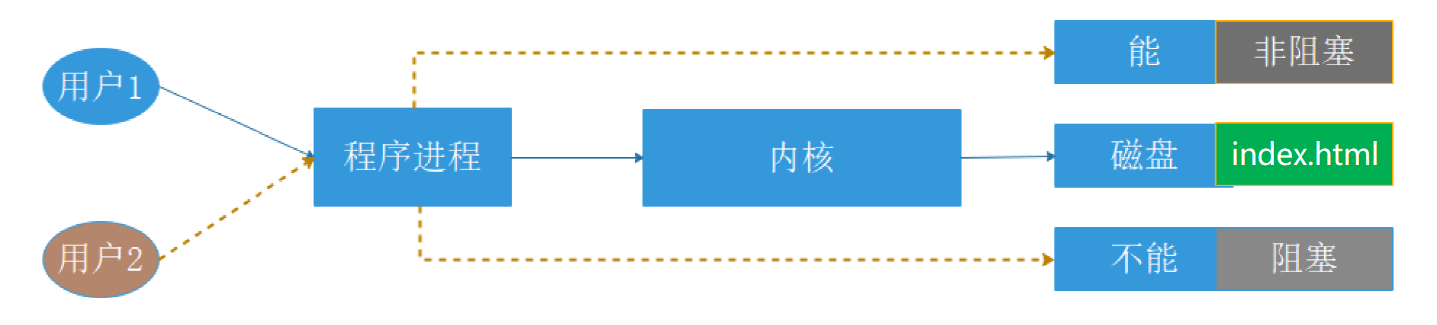
# 阻塞:进程响应用户请求时,只等待内核处理完数据,而不响应其他用户请求
# 非阻塞:进程响应用户请求时,不等待内核处理数据,而去相应其他用户请求
(3)阻塞型 I/O 模型(blocking IO)
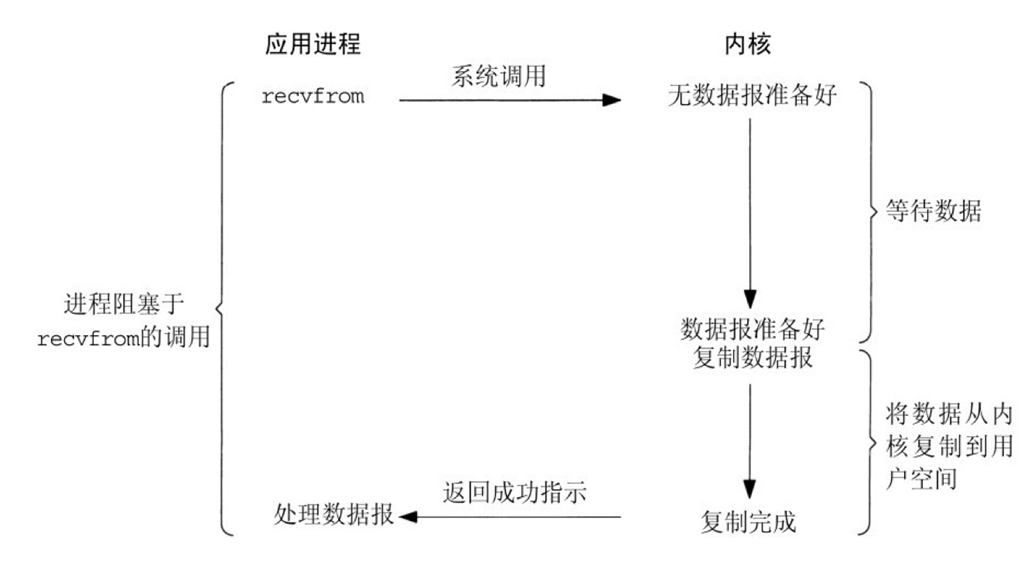
# 即同步阻塞型 I/O
# 进程等待内核处理数据
- 第一部分:等待硬盘复制到内核空间
- 第二部分:等待内核复制到用户空间
# 内核处理完数据,由进程自行检测,内核不会反馈给进程
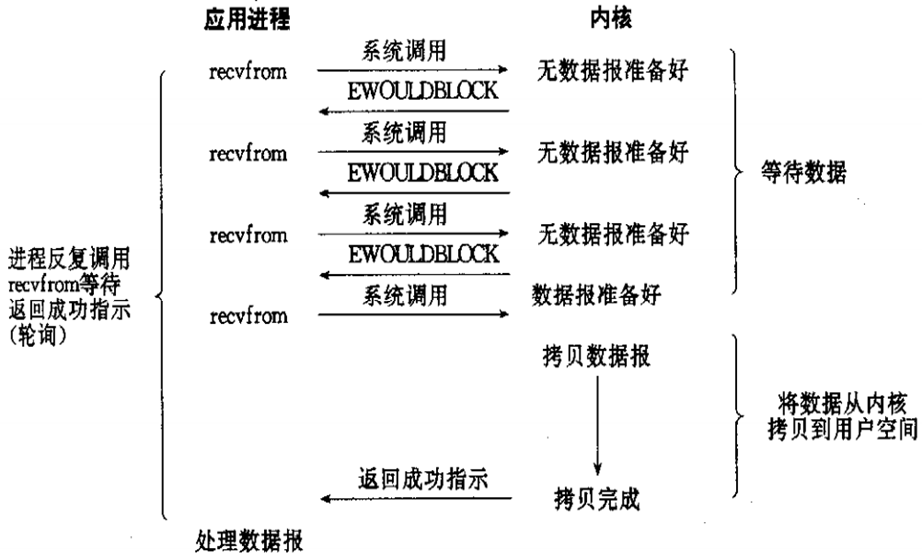
(4)非阻塞型 I/O 模型(noblocking IO)
# 即同步非阻塞型 I/O
# 在磁盘复制到内核这段时间(即等待数据部分),进程可以做其他事,但不能响应其他请求
# 在进程做其他事时(等待数据部分),同时时不时查看内核是否处理完磁盘复制到内核的数据
# 内核处理完数据是不会反馈给进程的,只有等进程自行检查到内核处理完数据,内核才执行下一步工作
# 在将数据从内核复制到用户空间的这段时间,进程必须等待,不能做其他事
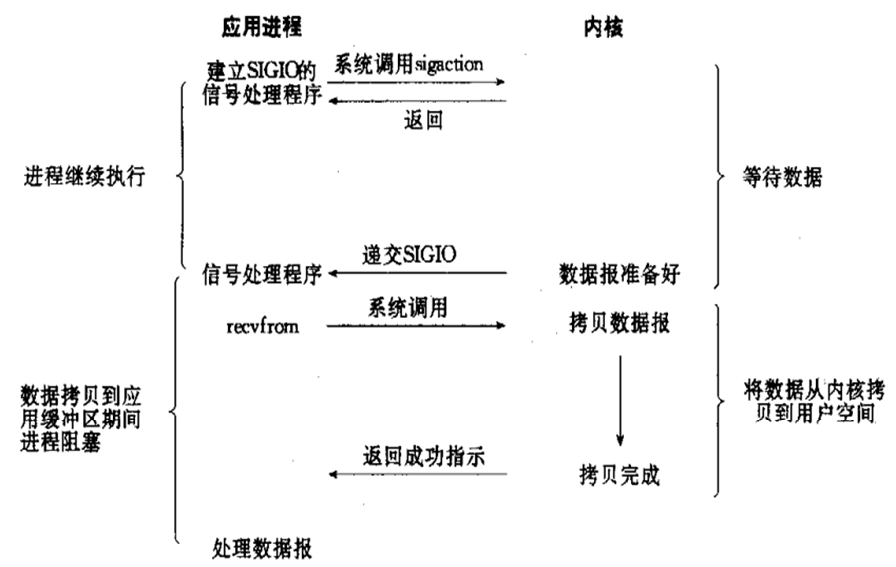
(5)信号驱动式 I/O 模型(signal-driven IO)
# 即异步阻塞型 I/O
# 进程在内核处理磁盘复制数据到内核空间时(等待数据部分),可以去做其他事,但不能响应其他请求
# 当内核处理完数据时会反馈给进程,等进程回来后,则内核会将数据从内核复制到用户空间,进程在这段时间不能做其他事
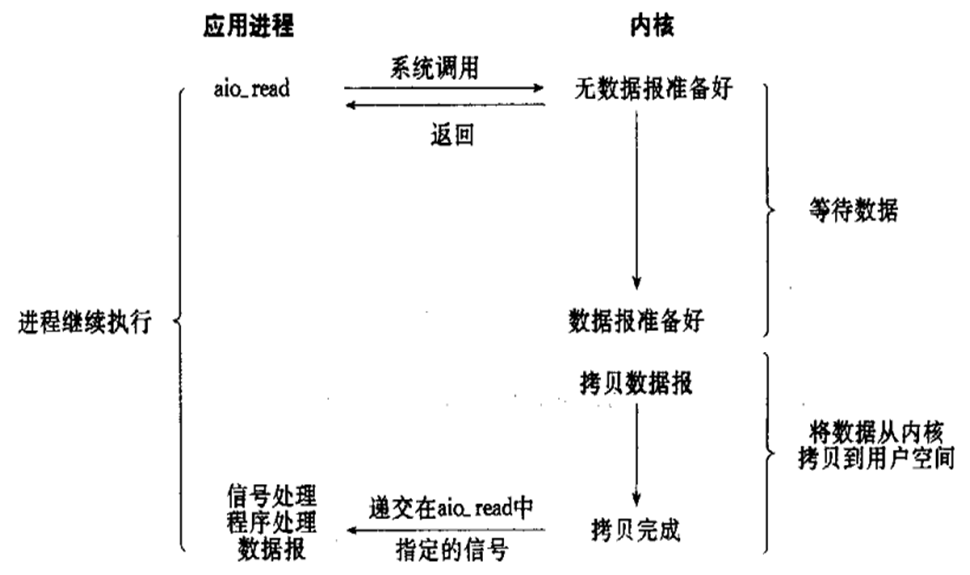
(6)异步 I/O 模型(asynchronous IO)
# 即异步非阻塞型 I/O
# 进程在内核处理由磁盘复制数据到内核空间再到用户空间的这段时间,进程可以去做其他事,但不能响应其他请求
# 等内核处理完所有数据并反馈给进程后,进程才会回来处理数据
# 而现在的 nginx 用的就是异步 I/O 模型
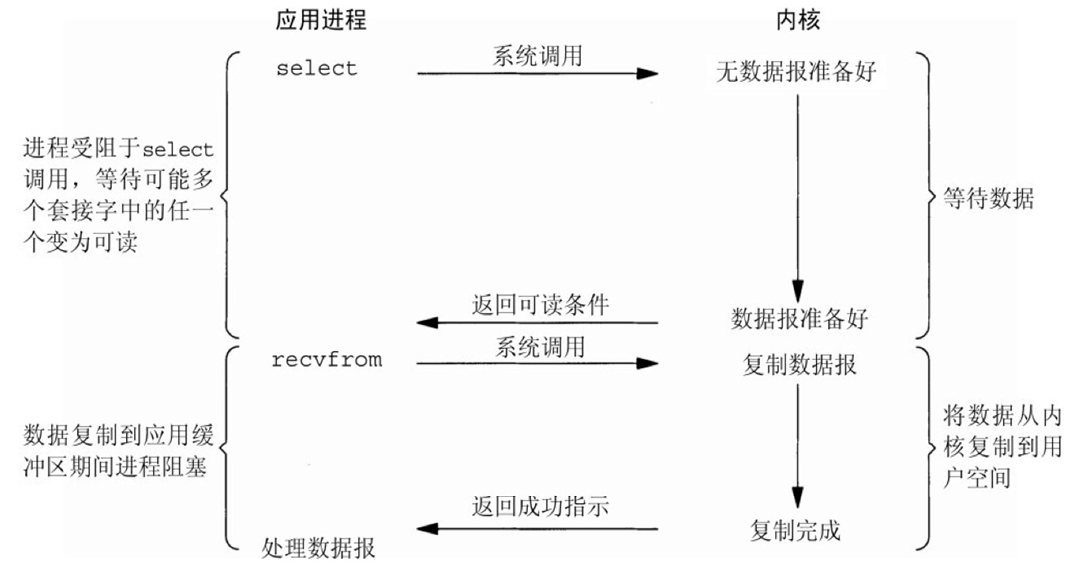
(7)多路复用 I/O 型(I/O multiplexing)
# 解决了单个进程不能响应多个 I/O 请求的问题
# I/O multiplexing 也有同步、异步、阻塞和非阻塞
# 异步 I/O 模型和多路复用 I/O 型结合真正实现nginx服务
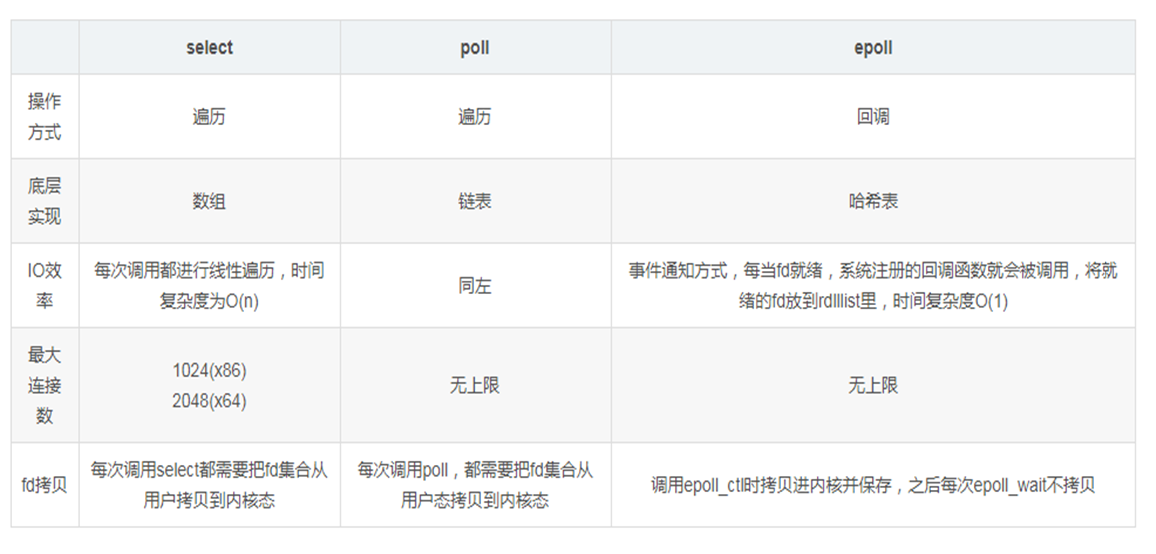
# I/O multiplexing 包括 select、poll、epoll 三种系统调用
# select 系统调用
- 进程和内核都通过 select 来筛选存储表格里的 I/O 请求
- 进程在做其他事时同时可以响应并处理多个 I/O 请求
- 内核处理完一个 I/O 请求的数据后会通过 select 来处理下一个 I/O 请求的数据
- 存储表格最大支持1024个 I/O 请求
- 支持所有系统
# poll 系统调用
- 在 select 的基础上解决了只能存储1024请求,能存储无限个请求,但要全部循环遍历
- 若遍历第 n 个请求未准备好,遍历到第 n+1 个请求时,第 n 个请求才准备好,那么第 n 个请求也要等到下一次遍历时才能执行
- 支持所有系统
# epoll 系统调用
- 在 poll 的基础上解决了需要全部遍历的问题,一样能存储无限个请求,但只有限遍历多个请求
- 比如在10个请求中遍历,哪个请求好了处理哪个;处理完一个请求后会立即放入新请求进行比遍历
- 只支持 Linux 系统
# 三种系统调用比较
4. 零拷贝技术
(1)传统拷贝
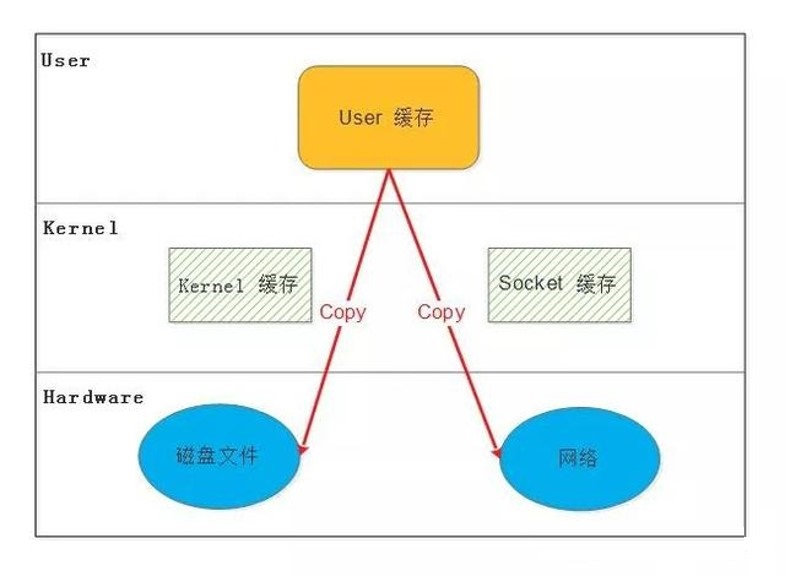
# 传统拷贝过程
- 用户通过网络访问 Socket(内核)发来一个请求,然后 Socket 拷贝请求到 User 用户空间
- nginx(在用户空间)收到请求后构建响应报文,但构建响应报文需要用到用户想看到的内容
- 而用户空间不能直接到磁盘获取内容(避免系统受到破坏),则通过 kernel(内核)去访问磁盘获取文件
- 磁盘将文件拷贝到 kernel,再由 kernel 拷贝文件到用户空间
- nginx 获得文件后构建响应报文再拷贝到Socket,由 Socket 通过网络回应用户
# 整个过程用了4次拷贝,重复多次数据,极大的消耗了 CPU 资源
(2)MMAP(Memory Mapping)
# 零拷贝的三种方法:MMAP、SENDFILE、DMA 辅助的 SENDFILE
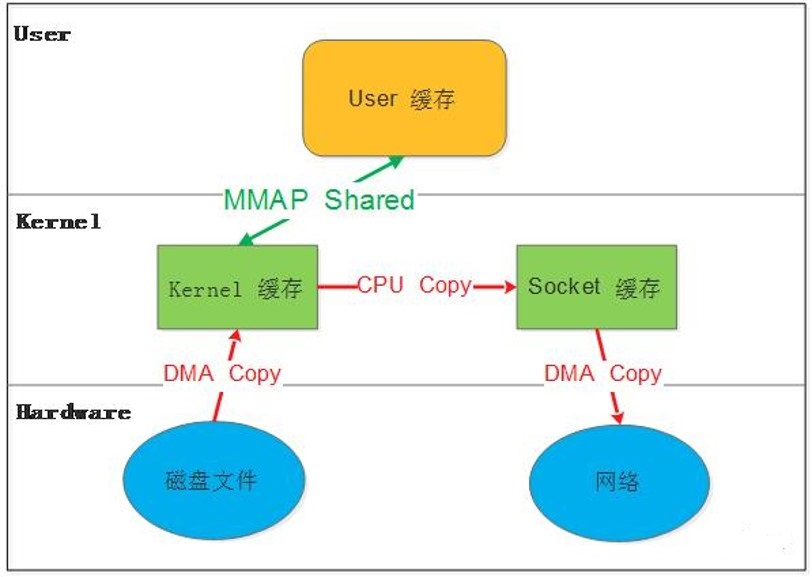
# MMAP——内存映射
# 拷贝过程
- 由 Socket 拷贝请求到用户空间
- 通过 kernel(内核空间)共享出部分空间给用户空间,与其形成一个直连通道
- nginx(用户空间)所需的内容由磁盘拷贝到 kernel,用户空间能直接查看内容
- 再由 nginx 构建响应报文拷贝到 Socket
# 整个过程用了3拷贝,节省了 kernel 拷贝到用户空间
(3)SENDFILE
# 拷贝过程
- 用户发来请求时,直接由磁盘拷贝内容到 kernel,再由 kernel 拷贝到 Socket
- 然后 nginx 直接在 Socket 进行响应报文封装
# 整个过程用2拷贝,节省了 Socket 拷贝到用户空间
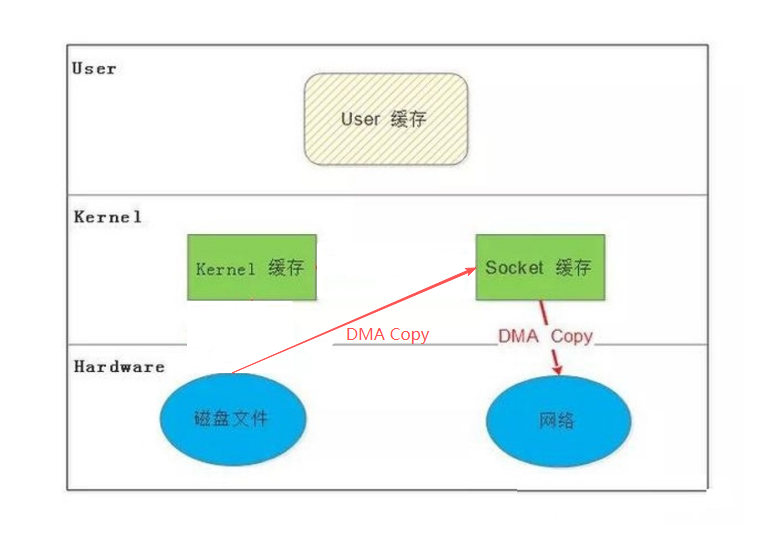
(4)DMA 辅助的 SENDFILE
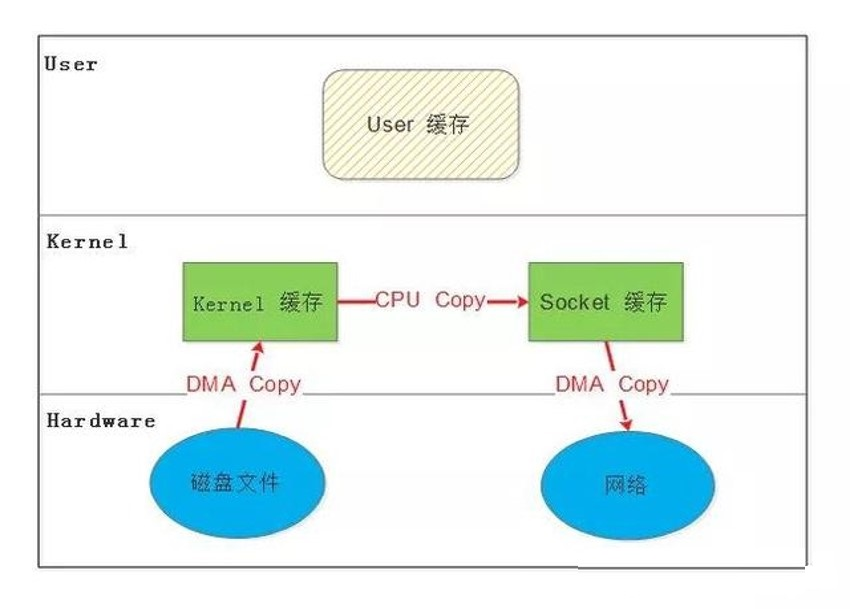
# DMA——直连内存访问
# 拷贝过程
- 用户发来请求,直接由磁盘拷贝内容到 Socket
- 然后 nginx 直接在 Socket 进行响应报文封装
# 整个过程用1拷贝,节省了 Kernel 拷贝到 Socket(即内核间的拷贝)
# 但这种方式的拷贝需要硬件——内存直通卡才能实现
二、Nginx 架构
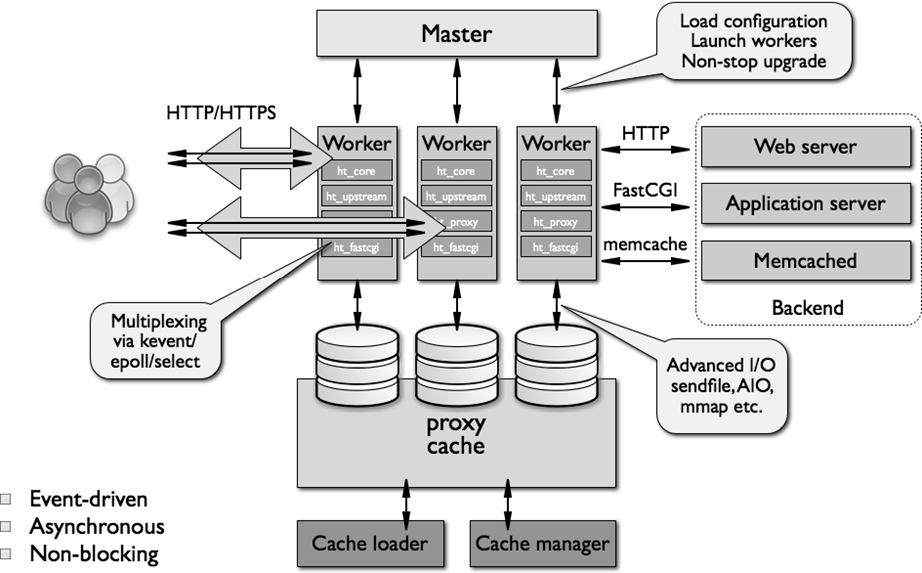
1. nginx 的架构
# 系统开启一个主进程 Master,主进程再开启多个子进程 Worker(工作进程)
# 用户访问 HTTP/HTTPS 都由 Worker 处理
# 如果是静态的请求,则由 Worker 向磁盘获取数据构建响应报文,再发给客户
# 如果是动态的请求,Worker 还需要访问 Application server(应用服务);比如是 php 应用,则通过 FastCG 访问 php,构建 php 执行结果,再将结果返回给 Worker 构建响应报文发给客户
# 如果再次访问上一个动态请求,为了提高性能,则结合 Application server 和 Memcached(缓存),将 Application server 执行的结果存储到 Memcached 中,再由 Worker 直接向 Memcached获取数据构建响应报文发给客户
# nginx 除了能处理 HTTP/HTTPS,还能做为反向代理,由 proxy cache 作为调度器调度后方的RealServer,实现动静分离
2. nginx 进程结构
# nginx 由单个主进程、多个子进程和多个线程组成的模型
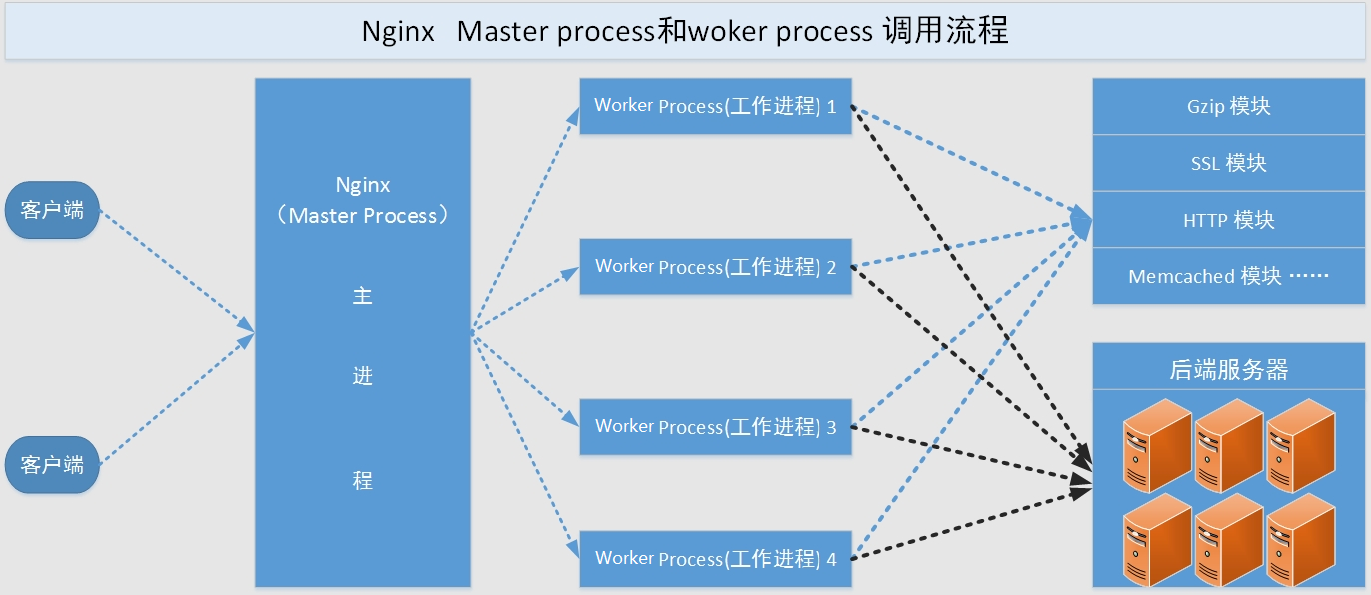
# 主进程(Master Process)功能:
- 对外接口:接受外部的操作(信号)
- 对内转发:根据外部操作的不同,通过信号管理 Worker
- 监控:监控 worker 进程的运行状态,worker 进程异常终止后,自动重启 worker 进程
- 读取 Nginx 配置文件并验证其有效性和正确性
- 建立、绑定和关闭 socket 连接
- 按照配置生成、管理和结束工作进程
- 接受外界指令,比如重启、升级和退出服务器等命令
- 不中断服务,实现平滑升级,重启服务并应用新的配置
- 开启日志文件,获取文件描述符
- 不中断服务,实现平滑升级,升级失败进行回滚处理
- 编译和处理 perl 脚本
# 子进程(Worker Process)功能:
- 所有 Worker 进程都是平等的
- 实际处理:网络请求,由 worker 进程处理
- worker 进程数量:一般设置为核心数,充分利用 CPU 资源,同时避免进程数量过多,导致进程竞争 CPU 资源
- 增加上下文切换的损耗
- 接受处理客户的请求
- 将请求依次送入各个功能模块进行处理
- I/O 调用,获取响应数据
- 与后端服务器通信,接收后端服务器的处理结果
- 缓存数据,访问缓存索引,查询和调用缓存数据
- 发送请求结果,响应客户的请求
- 接收主程序指令,比如重启、升级和退出等
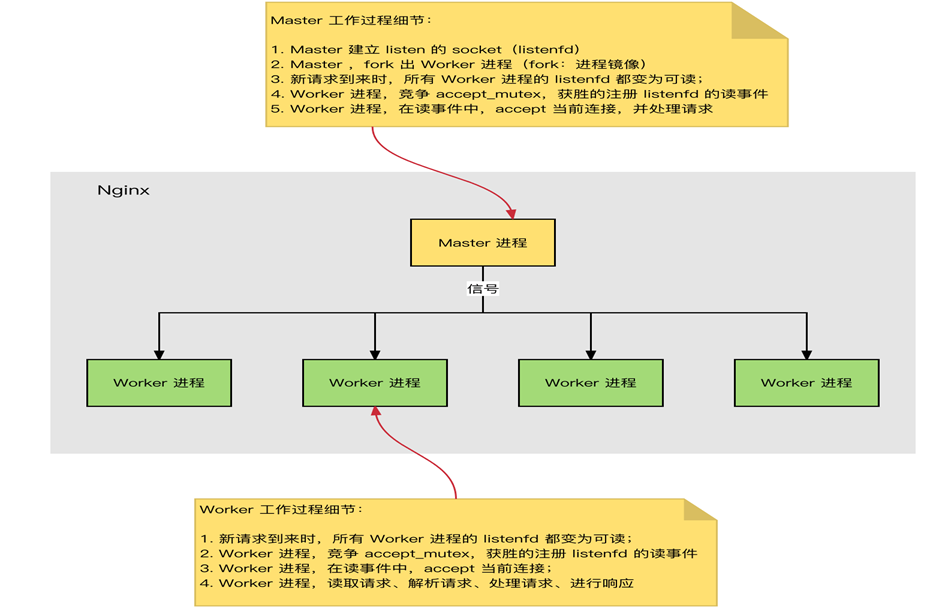
# 进程工作过程
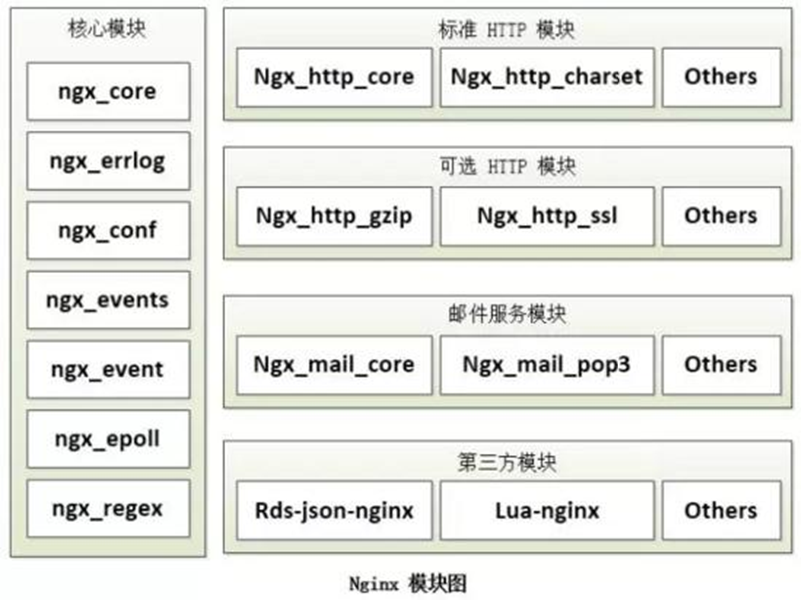
3. nginx 的模块
# 核心模块
- ngx_core:源码
- ngx_errlog:日志
- ngx_conf:配置文件
- ngx_events:事件模块框架
- ngx_event:事件处理核心
- ngx_epoll:高性能事件驱动
- ngx_regex:正则表达式
# 标准 HTTP 模块
- Ngx_http_core:http 核心
- Ngx_http_charset:字符集
# 可选 HTTP 模块
- Ngx_http_gzip:解压
- Ngx_http_ssl:加密
# 邮件服务模块
- Ngx_mall_core:邮件服务核心
- Ngx_mall_pop3:POP3 邮件协议支持
# 第三方模块
- Rds-json-nginx:输出 JSON 格式响应
- Lua-nginx:支持 Lua 脚本
三、Nginx 的源码编译
1. Nginx 的安装
(1)nginx 的安装
# HAProxy 和 Keepalived 属于调度类软件,Nginx属于服务类软件
# 由于 Nginx 是 Web 服务器的核心,rpm 软件带的 nginx 安装包(即系统自带的 nginx 安装包)版本太老(1.20版本),功能定制化太高,无法修改功能,难以保证我们的服务性能需求,所以我们需要做一个 nginx 的源码安装
# 克隆一台虚拟机,ip:192.168.153.100/24,主机名:Nginx
[root@Nginx ~]# dnf list nginx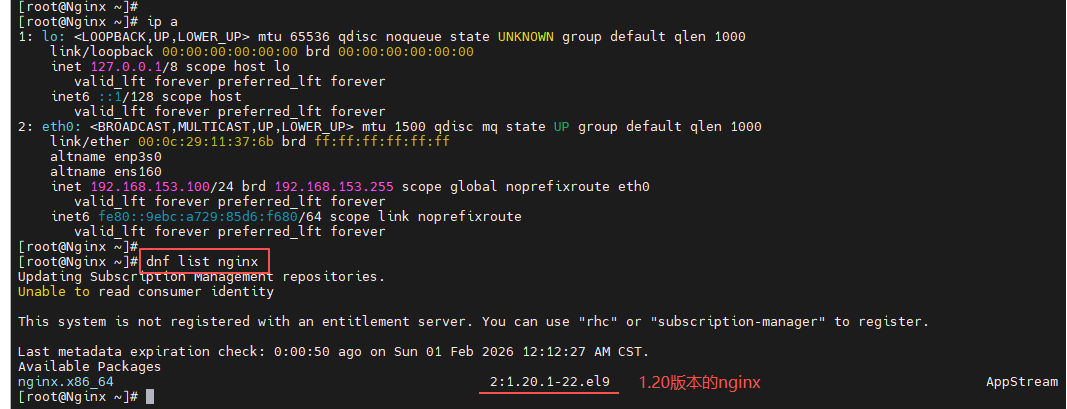
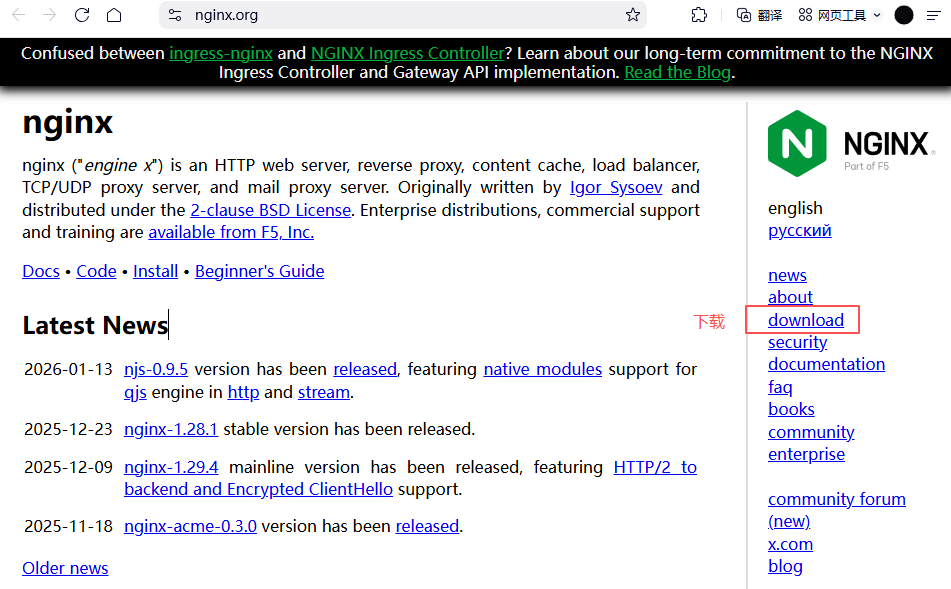
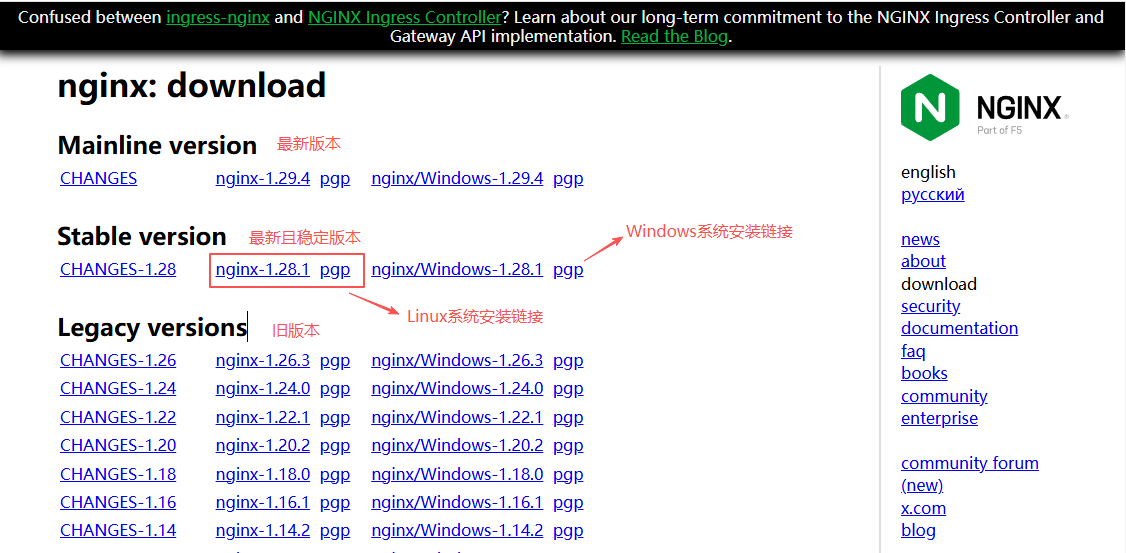
# 访问 https://nginx.org/,点击 download,选择最新的稳定版 nginx1.28 版本,选中1.28版本右击选择复制链接地址:https://nginx.org/download/nginx-1.28.1.tar.gz
# 到远程虚拟机中下载
[root@Nginx ~]# wget https://nginx.org/download/nginx-1.28.1.tar.gz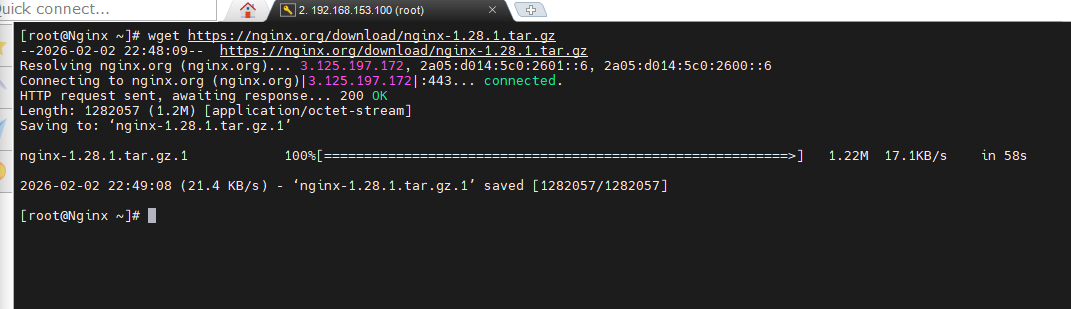
(2)解压 nginx
# 解压 nginx 后进入查看文件
[root@Nginx ~]# ls
anaconda-ks.cfg  nginx-1.28.1.tar.gz
[root@Nginx ~]# tar zxf nginx-1.28.1.tar.gz
[root@Nginx ~]# ls
anaconda-ks.cfg  nginx-1.28.1  nginx-1.28.1.tar.gz
[root@Nginx ~]# cd nginx-1.28.1/
[root@Nginx nginx-1.28.1]# ls
auto     CHANGES.ru          conf       contrib          html     man        SECURITY.md
CHANGES  CODE_OF_CONDUCT.md  configure  CONTRIBUTING.md  LICENSE  README.md  src
(3)检测环境
# configure 是 nginx 的检测脚本,"--with···"——加载模块,"--without···"——不装这个模块
# "--with···"越多,则 nginx 依赖越多(功能越强);"--without···"越多,功能越少
[root@Nginx nginx-1.28.1]# file configure
configure: POSIX shell script, ASCII text executable
[root@Nginx nginx-1.28.1]# ./configure --help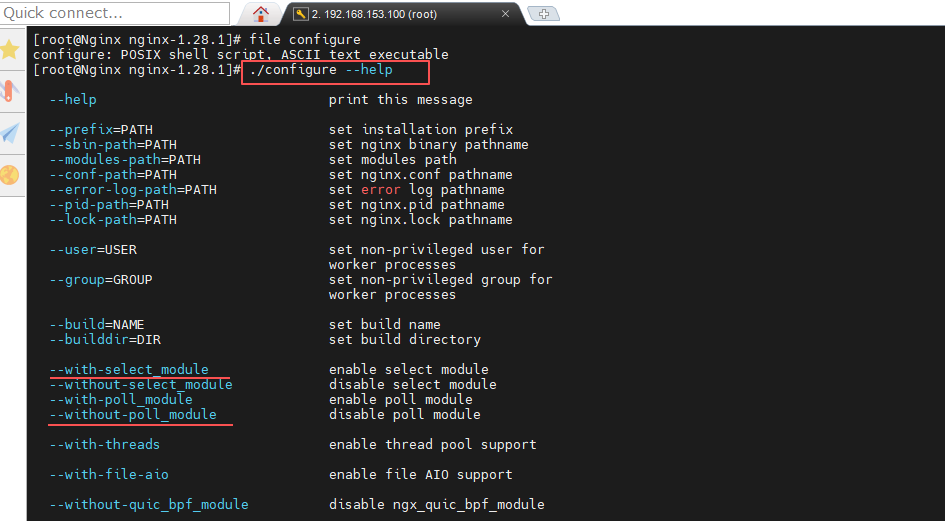
# 检测并指定 nginx 的安装路径(--prefix);然后因为我们的 nginx 还是源码,缺少编译器导致报错,所以需要安装 gcc(c语言编译器)
[root@Nginx nginx-1.28.1]# ./configure --prefix=/usr/local/nginx \
> --usr=nginx \
> --group=nginx \
> --with-http_ssl_module \
> --with-http_v2_module \
> --with-http_realip_module \
> --with-http_stub_status_module \
> --with-http_gzip_static_module \
> --with_pcre \
> --with-stream \
> --with-stream_ssl_module \
> --with-stream_realip_module
./configure: error: invalid option "--usr=nginx"

[root@Nginx nginx-1.28.1]# dnf install gcc -y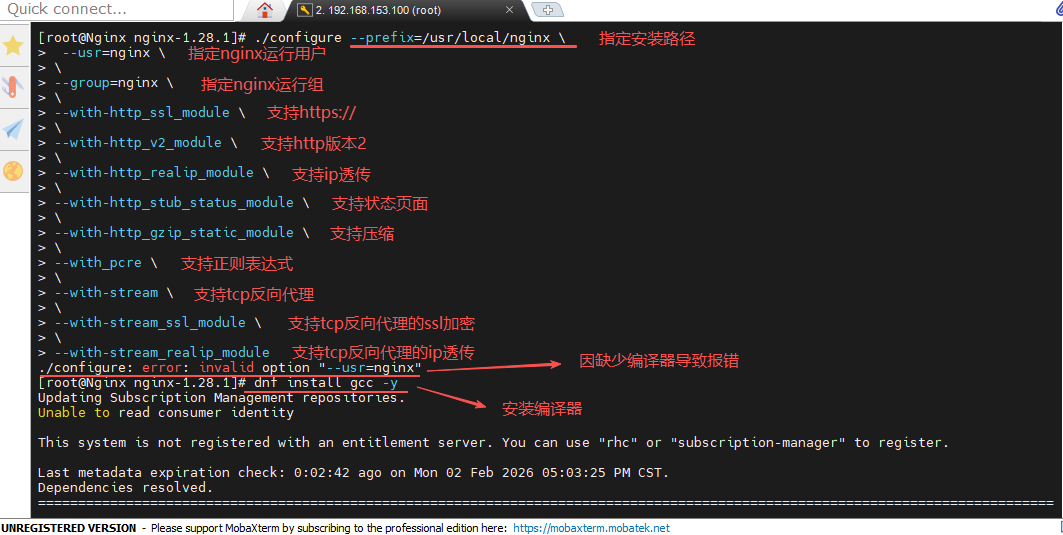
# 再次进行检测(注意:进行编译时的代码不能有多余的空格);运行编译后出现报错(“./configure: error: the HTTP rewrite module requires the PCRE library.”),the PCRE library——表示正则表达式的开发库;即没有正则表达式开发库,所以需要我们去安装
[root@Nginx nginx-1.28.1]# ./configure --prefix=/usr/local/nginx --user=nginx --group=nginx --with-http_ssl_module --with-http_v2_module --with-http_realip_module --with-http_stub_status_module --with-http_gzip_static_module --with-pcre --with-stream --with-stream_ssl_module --with-stream_realip_module
checking for OS
 + Linux 5.14.0-570.12.1.el9_6.x86_64 x86_64
checking for C compiler ... found
 + using GNU C compiler
 + gcc version: 11.5.0 20240719 (Red Hat 11.5.0-5) (GCC)
checking for gcc -pipe switch ... found
checking for -Wl,-E switch ... found
checking for gcc builtin atomic operations ... found
······
checking for PCRE library in /opt/local/ ... not found
checking for PCRE library in /opt/homebrew/ ... not found

./configure: error: the HTTP rewrite module requires the PCRE library.
You can either disable the module by using --without-http_rewrite_module
option, or install the PCRE library into the system, or build the PCRE library
statically from the source with nginx by using --with-pcre=<path> option.
# 查找 PCRE 开发库并安装
[root@Nginx nginx-1.28.1]# dnf search PCRE
······
pcre2-devel.x86_64 : Development files for pcre2
······
[root@Nginx nginx-1.28.1]# dnf install pcre2-devel.x86_64 -y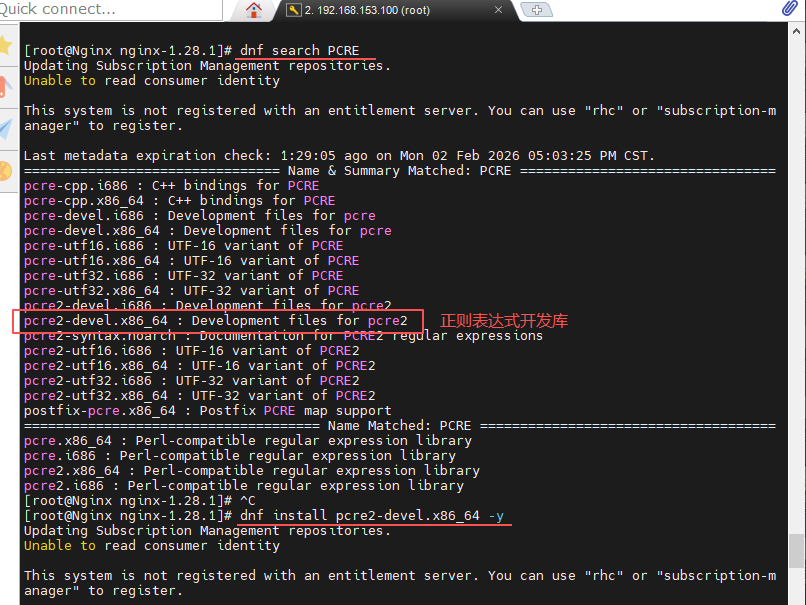
# 继续检测排错(“./configure: error: SSL modules require the OpenSSL library.”),查找并安装OpanSSL 开发库
[root@Nginx nginx-1.28.1]# ./configure --prefix=/usr/local/nginx --user=nginx --group=nginx --with-http_ssl_module --with-http_v2_module --with-http_realip_module --with-http_stub_status_module --with-http_gzip_static_module --with-pcre --with-stream --with-stream_ssl_module --with-stream_realip_module
·····
checking for OpenSSL library in /opt/local/ ... not found
checking for OpenSSL library in /opt/homebrew/ ... not found

./configure: error: SSL modules require the OpenSSL library.
You can either do not enable the modules, or install the OpenSSL library
into the system, or build the OpenSSL library statically from the source
with nginx by using --with-openssl=<path> option.

[root@Nginx nginx-1.28.1]# dnf search openssl
······
penssl-devel.x86_64 : Files for development of applications which will use OpenSSL
······
[root@Nginx nginx-1.28.1]# dnf install openssl-devel.x86_64 -y
# 检测排错(“./configure: error: the HTTP gzip module requires the zlib library.”),查找并安装zlib 开发库
[root@Nginx nginx-1.28.1]# ./configure --prefix=/usr/local/nginx --user=nginx --group=nginx --with-http_ssl_module --with-http_v2_module --with-http_realip_module --with-http_stub_status_module --with-http_gzip_static_module --with-pcre --with-stream --with-stream_ssl_module --with-stream_realip_module
·····
checking for OpenSSL library ... found
checking for zlib library ... not found

./configure: error: the HTTP gzip module requires the zlib library.
You can either disable the module by using --without-http_gzip_module
option, or install the zlib library into the system, or build the zlib library
statically from the source with nginx by using --with-zlib=<path> option.

[root@Nginx nginx-1.28.1]# dnf search zlib
······
zlib-devel.x86_64 : Header files and libraries for Zlib development
[root@Nginx nginx-1.28.1]# dnf install zlib-devel.x86_64 -y
# 一直检测直到无报错
[root@Nginx nginx-1.28.1]# ./configure --prefix=/usr/local/nginx --user=nginx --group=nginx --with-http_ssl_module --with-http_v2_module --with-http_realip_module --with-http_stub_status_module --with-http_gzip_static_module --with-pcre --with-stream --with-stream_ssl_module --with-stream_realip_module
······
  nginx http fastcgi temporary files: "fastcgi_temp"
  nginx http uwsgi temporary files: "uwsgi_temp"
  nginx http scgi temporary files: "scgi_temp"
(4)编译 nginx
# make——编译,make install——安装编译完后的程序(即将编译后的所有软件拷贝到--prefix指定路径下)
# Makefile 即 /root/nginx-1.28.1/Makefile 在哪里,make···的命令就在哪里执行
# /root/nginx-1.28.1/objs——这是 nginx 的项目,编译完后会自动在这个目录下生成 nginx 程序
[root@Nginx nginx-1.28.1]# ls
auto        CODE_OF_CONDUCT.md  contrib          LICENSE   objs         src
CHANGES     conf                CONTRIBUTING.md  Makefile  README.md
CHANGES.ru  configure           html             man       SECURITY.md
[root@Nginx nginx-1.28.1]# find -name nginx
[root@Nginx nginx-1.28.1]# make
make -f objs/Makefile
·····
[root@Nginx nginx-1.28.1]# make install
make -f objs/Makefile install
make[1]: Entering directory '/root/nginx-1.28.1'
test -d '/usr/local/nginx' || mkdir -p '/usr/local/nginx'
······
[root@Nginx nginx-1.28.1]# find -name nginx
./objs/nginx
(5)启动 nginx
# 设定 nginx 的环境变量,不然系统识别不到 nginx 命令,则无法启动 nginx
# 创建 nginx,因为编译时指定了 nginx 运行用户
# nginx 启动完后,将"How are you?"写到 nginx 默认发布文件下 /usr/local/nginx/html/index.html进行测试
[root@Nginx ~]# vim ~/.bash_profile
  1 # .bash_profile
  2
  3 # Get the aliases and functions
  4 if [ -f ~/.bashrc ]; then
  5     . ~/.bashrc
  6 fi
  7
  8 # User specific environment and startup programs
  9 export PATH=$PATH:/usr/local/nginx/sbin/

[root@Nginx ~]# source ~/.bash_profile
[root@Nginx ~]# useradd -s /sbin/nologin -M nginx
[root@Nginx ~]# cd /usr/local/nginx/sbin/
[root@Nginx sbin]# nginx

[root@Nginx sbin]# ps aux | grep nginx
root       46548  0.0  0.0  14688  2356 ?        Ss   19:36   0:00 nginx: master process nginx
nginx      46549  0.0  0.1  14888  4020 ?        S    19:36   0:00 nginx: worker process
root       46551  0.0  0.0   6408  2304 pts/0    S+   19:37   0:00 grep --color=auto nginx

[root@Nginx sbin]# echo "How are you?" > /usr/local/nginx/html/index.html
[root@Nginx sbin]# curl 192.168.153.100
How are you?
(6)编写 nginx 的启动脚本
# 因为源码编译下的软件默认是没有启动文件的即 xxx.service(如:nginx.service)
# 在 /lib/systemd/system/(服务配置文件)目录下编写 nginx 的启动脚本 nginx.service
[root@Nginx ~]# vim /lib/systemd/system/nginx.service
[Unit]
Description=The NGINX HTTP and reverse proxy server
After=syslog.target network-online.target remote-fs.target nss-lookup.target
Wants=network-online.target

[Service]
Type=forking
ExecStartPre=/usr/local/nginx/sbin/nginx -t
ExecStart=/usr/local/nginx/sbin/nginx
ExecReload=/usr/local/nginx/sbin/nginx -s reload
ExecStop=/bin/kill -s QUIT $MAINPID
PrivateTmp=true

[Install]
WantedBy=multi-user.target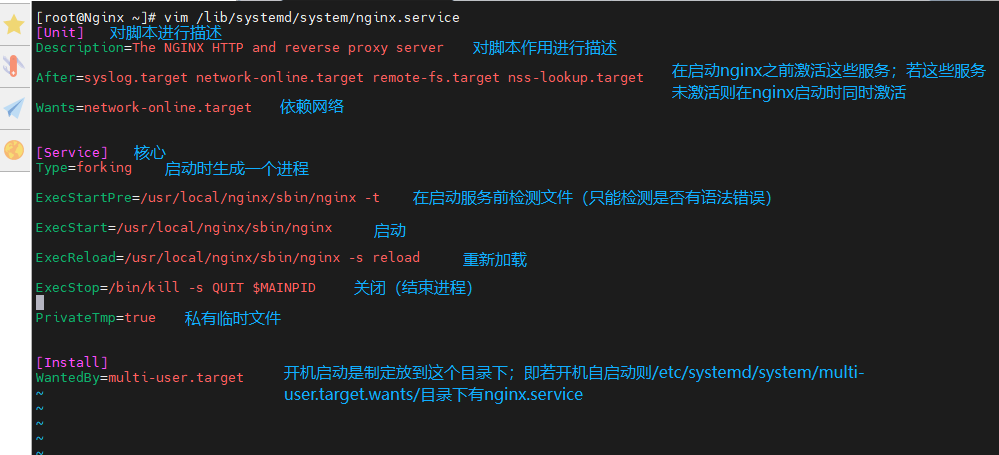
# 若有 apache 和旧 nginx 进程即80端口被占用,则关闭服务、结束进程
[root@Nginx ~]# ps aux | grep nginx
[root@Nginx ~]# netstat -antlupe | grep 80
[root@Nginx ~]# systemctl stop http
[root@Nginx ~]# pkill -9 nginx
# 刷新 systemd 配置(daemon-reload),识别新服务 nginx,查看状态并开启开机自启动
[root@Nginx ~]# systemctl daemon-reload
[root@Nginx ~]# systemctl status nginx.service
○ nginx.service - The NGINX HTTP and reverse proxy server
     Loaded: loaded (/usr/lib/systemd/system/nginx.service; disabled; preset: disabled)
     Active: inactive (dead)

[root@Nginx ~]# systemctl enable --now nginx.service
Created symlink /etc/systemd/system/multi-user.target.wants/nginx.service → /usr/lib/systemd/system/nginx.service.

[root@Nginx ~]# reboot
[root@Nginx ~]# systemctl status nginx.service
2. nginx 的平滑升级和回滚
(1)平滑升级和回滚的介绍
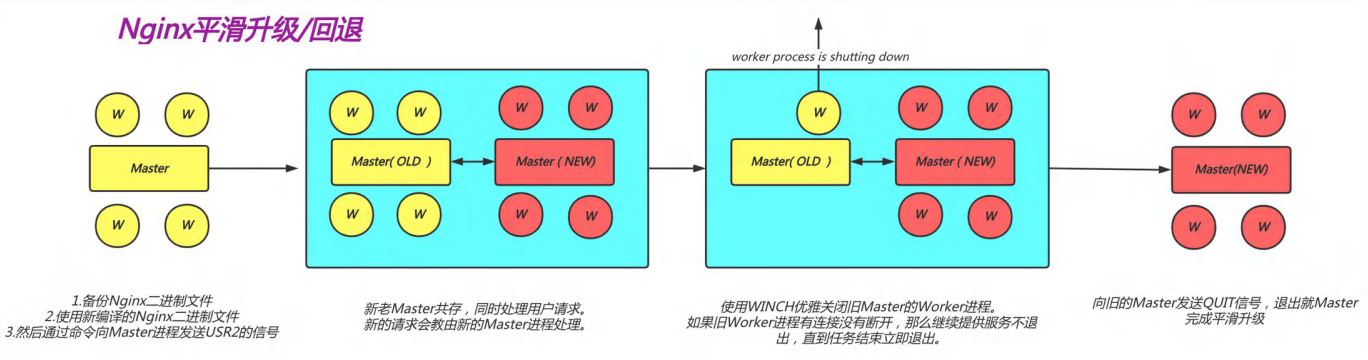
# 由于业务的需要,我们可能需要升级版本或者回调版本,但不能停止服务,所以我们需要不停机维护即平滑升级或回滚
# 平滑升级:在系统的 webv1 版本正常工作时,是在一个主进程下开启多个子进程进行服务;然后系统再安装编译 webv2 版本,当 v2 的主进程和子进程都开启后,则回收 v1 版本的子进程
# 回滚:重新启动 v1 的子进程,再回收 v2 的子进程,当所有业务都跑到 v1 子进程后,则杀死 v2的主进程
(2)平滑升级
# 下载并解压高版本 nginx,然后为了提高一点安全性,我们可以隐藏版本号(NGINX_VERSION),也可以修改软件名称(NGINX_VER,这里的名称未修改)
[root@Nginx ~]# wget https://nginx.org/download/nginx-1.29.4.tar.gz
[root@Nginx ~]# tar zxf nginx-1.29.4.tar.gz
[root@Nginx ~]# cd nginx-1.29.4/

[root@Nginx nginx-1.29.4]# vim src/core/nginx.h
······
 12 #define nginx_version      1029004
 13 #define NGINX_VERSION      ""
 14 #define NGINX_VER          "nginx/" NGINX_VERSION
# 检测、编译
#这里的编译不能执行 make install,因为执行后会将原版本服务配置
[root@Nginx nginx-1.29.4]# ./configure --prefix=/usr/local/nginx --user=nginx --group=nginx --with-http_ssl_module --with-http_v2_module --with-http_realip_module --with-http_stub_status_module --with-http_gzip_static_module --with-pcre --with-stream --with-stream_ssl_module --with-stream_realip_module
[root@Nginx nginx-1.29.4]# make
# 替换 nginx 版本
# 现在 /root/nginx-1.29.4/objs/nginx 是新版本的nginx软件,而我们要将 /usr/local/nginx/sbin/nginx即旧版本的 nginx 软件备份,在将新版本的 nginx 复制(覆盖旧nginx)到这个工作目录下 /usr/local/nginx/sbin/
# 因为 sbin 目录下已经有同名文件了,cp 复制即覆盖时会询问一声,/cp 则是不询问,-f 表示强制
[root@Nginx nginx-1.29.4]# ls objs/
[root@Nginx sbin]# cd /usr/local/nginx/sbin/
[root@Nginx sbin]# nginx -V
[root@Nginx sbin]# ls
[root@Nginx sbin]# cp nginx nginx.old
[root@Nginx sbin]# \cp -f /root/nginx-1.29.4/objs/nginx /usr/local/nginx/sbin/nginx
[root@Nginx sbin]# ls

[root@Nginx sbin]# nginx -V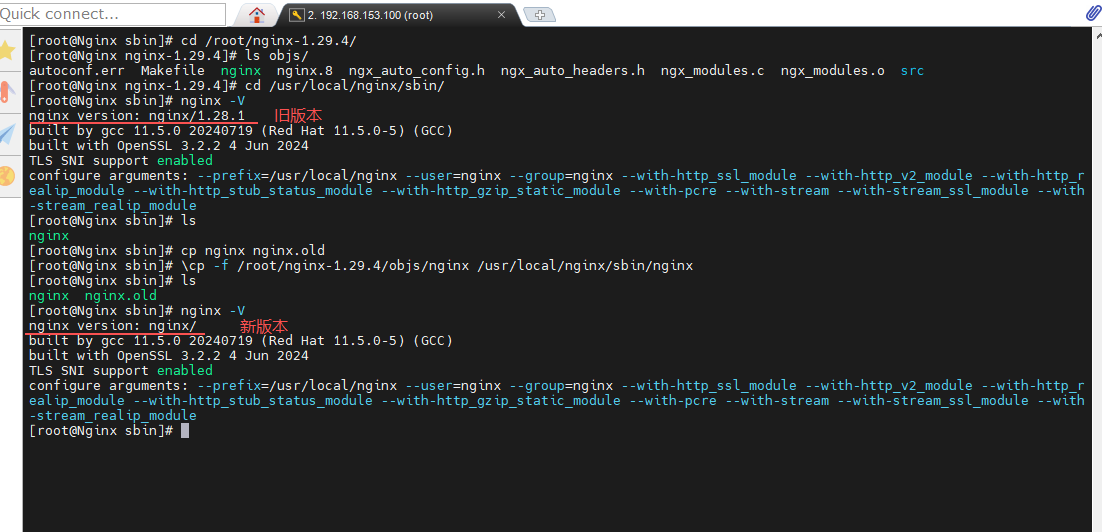
# 开启 nginx 新版本进程,回收旧版本进程
# -USR2——平滑升级,将旧版本的主进程 PID 的文件重命名为 nginx.pid.oldbin ,并启动新的nginx
# PID 文件在 /usr/local/nginx/logs/ 下
# 当两个 master 进程都在运行时,旧的master不监听,由新的master监听
# 所以旧的 master 进程需要回收(-WINCH)
[root@Nginx sbin]# ls /usr/local/nginx/logs/
[root@Nginx sbin]# ps aux | grep nginx
[root@Nginx sbin]# kill -USR2 46548
[root@Nginx sbin]# ps aux | grep nginx
[root@Nginx sbin]# ls /usr/local/nginx/logs/
[root@Nginx sbin]# kill -WINCH 46548
[root@Nginx sbin]# ps aux | grep nginx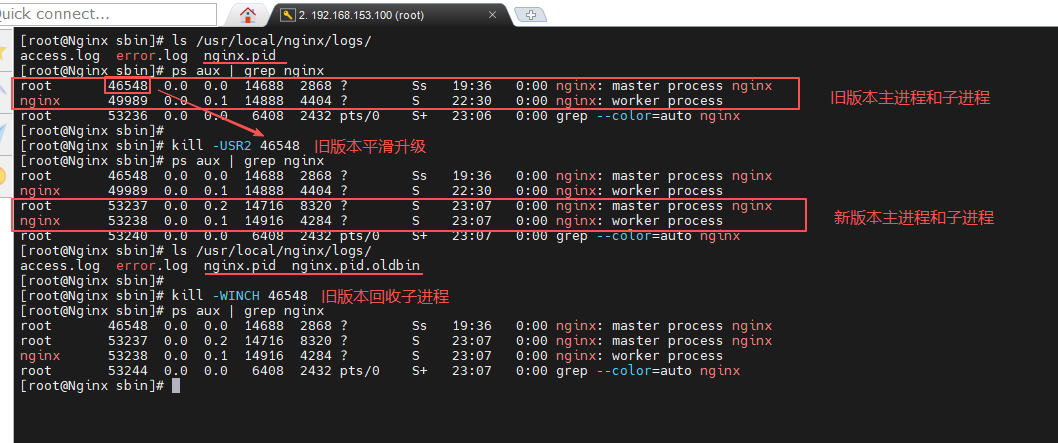
(3)版本回滚
# 备份 nginx 新版本的软件,将旧版本的软件覆盖掉nginx
[root@Nginx sbin]# pwd
/usr/local/nginx/sbin
[root@Nginx sbin]# ls
nginx  nginx.old
[root@Nginx sbin]# cp -p nginx nginx.new
[root@Nginx sbin]# \cp -pf nginx.old nginx
[root@Nginx sbin]# ls
nginx  nginx.new  nginx.old
# 激活(-HUP)旧版本进程,回收(-WINCH)新版本进程
[root@Nginx sbin]# ps aux | grep nginx
[root@Nginx sbin]# kill -HUP 46548
[root@Nginx sbin]# kill -WINCH 53237
[root@Nginx sbin]# ps aux | grep nginx
[root@Nginx sbin]# nginx -V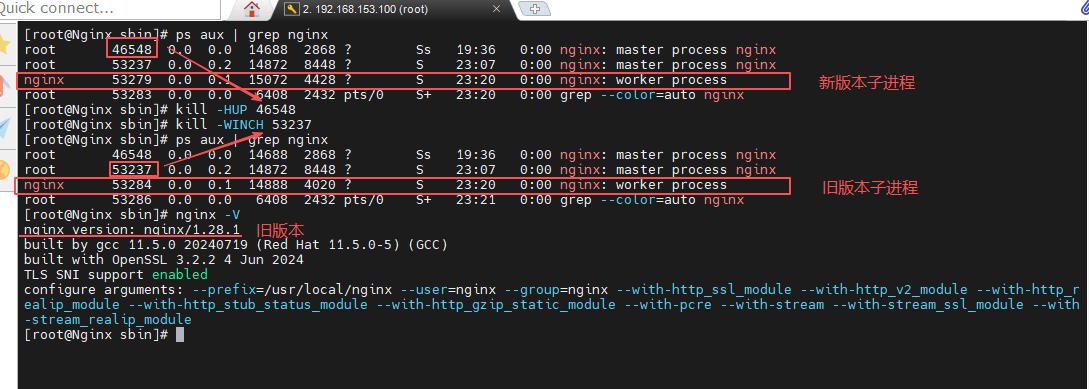
# 不需要新版本的主进程可以删掉(-9)
[root@Nginx sbin]# ps aux | grep nginx
[root@Nginx sbin]# kill -9 49944
[root@Nginx sbin]# ps aux | grep nginx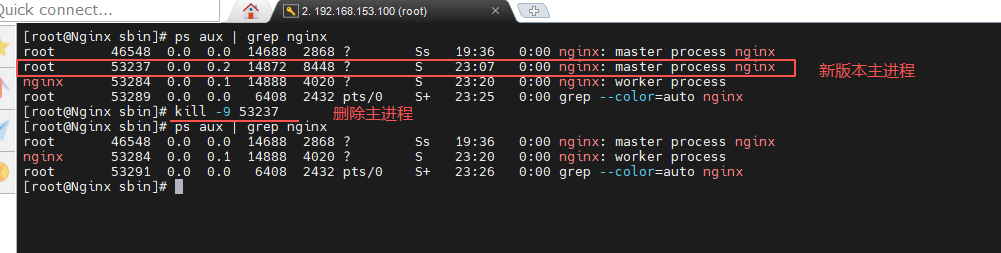
3. nginx 的参数
# 查看 nginx 命令如何用
[root@Nginx ~]# nginx -h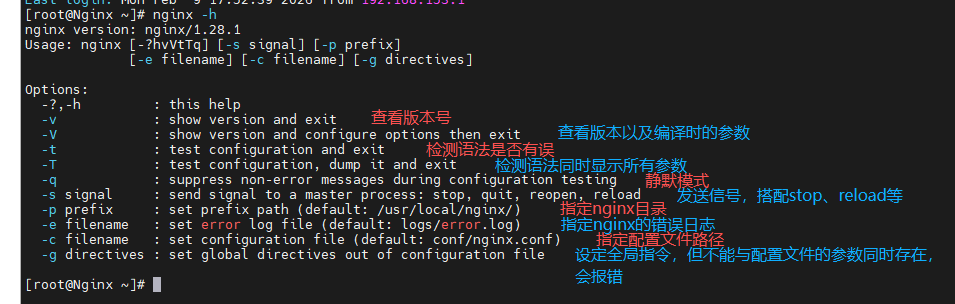
四、Nginx 核心配置
1.参数调优
(1)用户身份及子进程
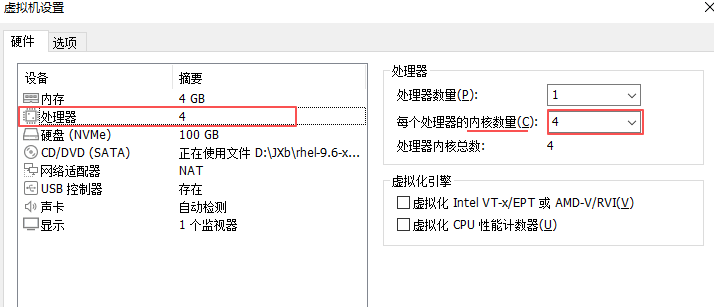
# 进入 nginx 主配置文件,设置用户身份和子进程数量,重载后观察进程子进程数量
[root@Nginx ~]# vim /usr/local/nginx/conf/nginx.conf
[root@Nginx ~]# nginx -s reload
[root@Nginx ~]# ps aux | grep nginx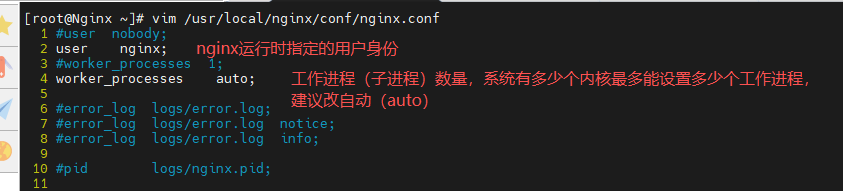
# 查看 CPU 详细信息
[root@Nginx ~]# cat /proc/cpuinfo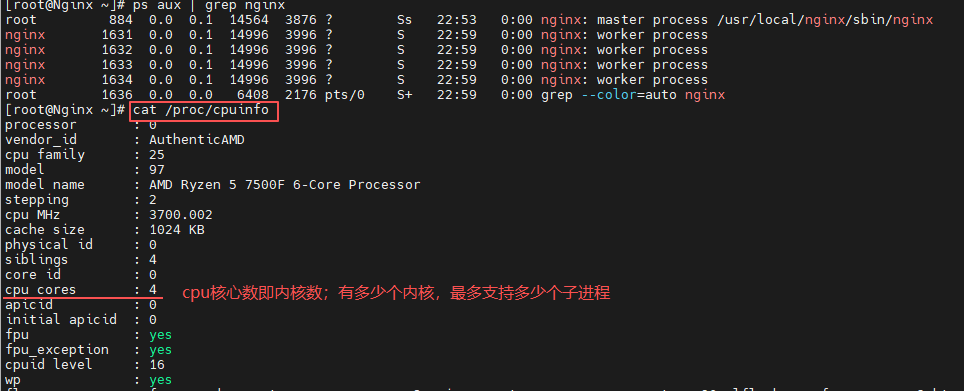
# 绑定内核,防止进程互抢内核;pid——进程 id,cmd——完整命令,psr——processor 即 cpu 核心编号
[root@Nginx ~]# vim /usr/local/nginx/conf/nginx.conf
[root@Nginx ~]# nginx -s reload
[root@Nginx ~]# cat /usr/local/nginx/conf/nginx.conf | head -10
[root@Nginx ~]# ps axo pid,cmd,psr | grep nginx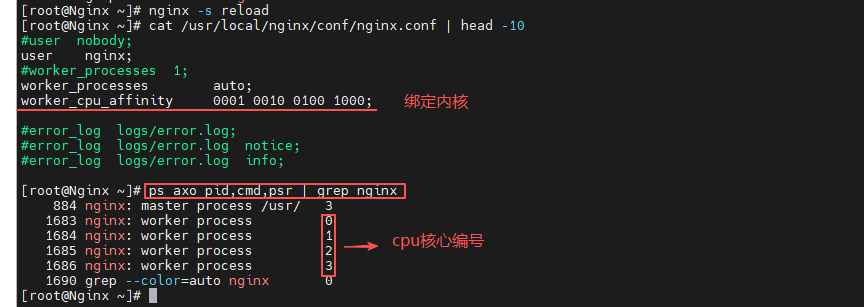
(2)events 模型
# 优化参数
- events 模型默认是阻塞型模型,添加 epoll 为异步非阻塞模型
- 添加 accept_mutex 参数,防止因为处理单个请求同时唤醒所有 worker,操作 cpu 资源浪费(默认为 off,添加设置为 on)
- 添加 multi_accpet 参数,默认为 off,即一个工作进程只能一次接受一个网络连接(I/O),设置为 on 后可以接受多个网络连接(即多路复用)
- 设置 worker_connections 参数为10000个,原并发量是1024个,服务器性能不足,修改并发量提到10000个
[root@Nginx ~]# vim /usr/local/nginx/conf/nginx.conf
[root@Nginx ~]# nginx -s reload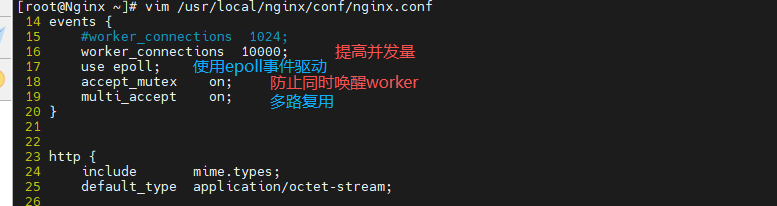
(3)高并发
# 安装 httpd-tools,通过'ab'命令来测试并发效果
# 'ulimit -n'查看硬件支持进程同时打开最大文件数量
# 访问失败是因为程序虽然支持10000个并发量,但文件系统不支持(硬盘打开1024个文件)
[root@Nginx ~]# ulimit -n
[root@Nginx ~]# dnf install httpd-tools -y
[root@Nginx ~]# ab -n 100000 -c 1000 http://192.168.153.100/index.html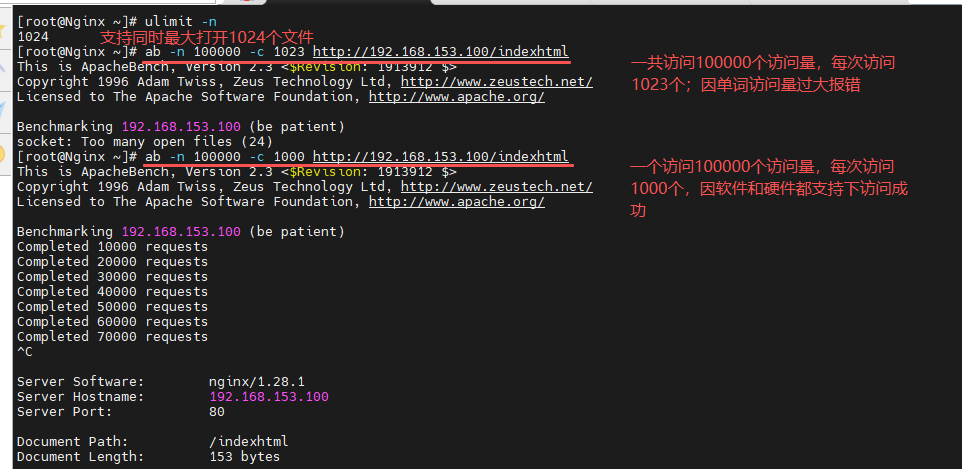
# 编辑 /etc/security/limits.conf,添加 nofile 和 noproc,用来解决并发量问题
# '*'——所有用户,'-'——软件和硬件,'nofile'——支持打开文件数量,'noproc'——支持打开程序数量
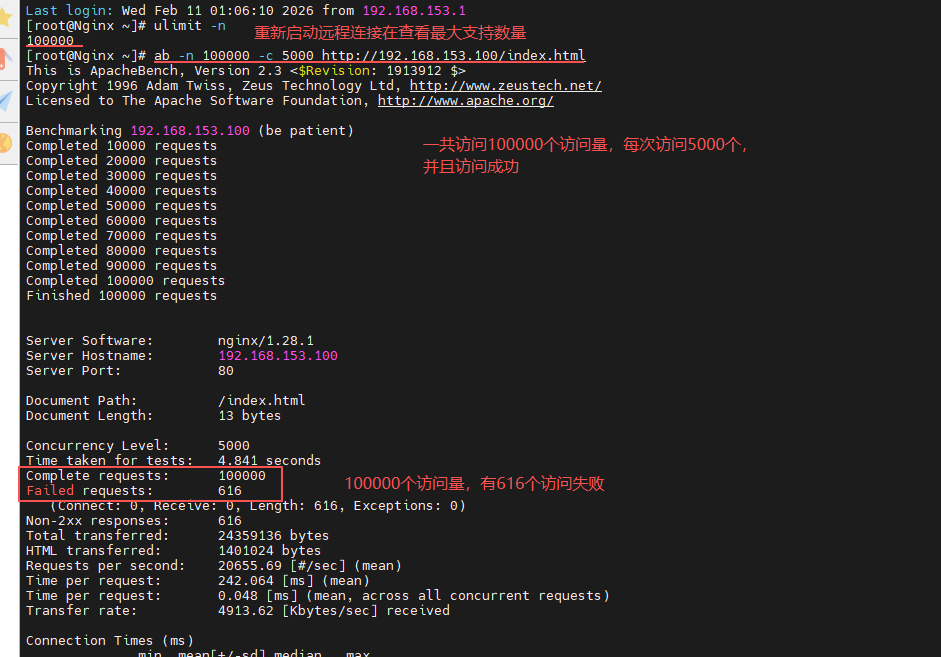
# 注意:添加完参数后再重启 shell 脚本即远程连接,然后再去使用'ulimit -n'命令并测试并发量
[root@Nginx ~]# vim /etc/security/limits.conf

###重启远程连接
[root@Nginx ~]# ulimit -n
[root@Nginx ~]# ab -n 100000 -c 5000 http://192.168.153.100/index.html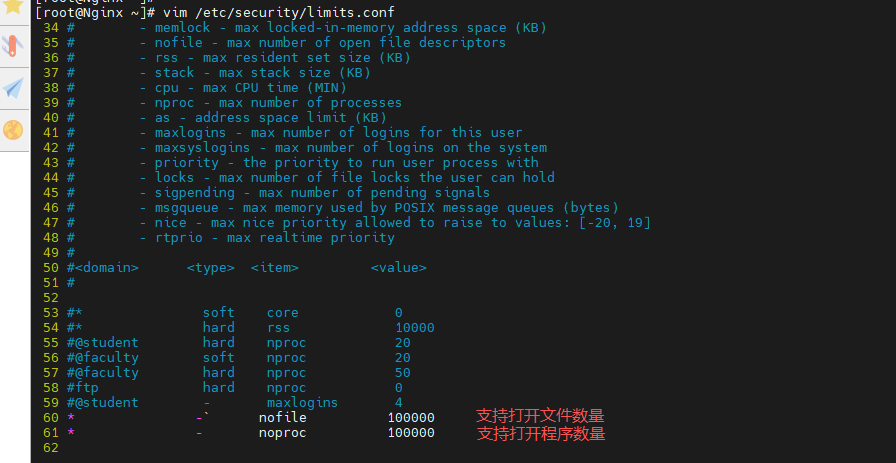
2. Nginx 下构建PC站点
(1)location 的 root
# 通过 ngx_http_core_module 模块以基于不同的 IP、不同的端口以及不用得域名实现不同的虚拟主机
# 搭建站点或做其他配置时,为了防止主配置文件内容过多、看不清楚等问题,我们需要建立一个子配置文件
# 宣告子配置文件 /usr/local/nginx/conf/conf.d/*.conf,写在 http 里的首个 server 下,否则不生效
[root@Nginx ~]# cd /usr/local/nginx/conf/
[root@Nginx conf]# mkdir conf.d
[root@Nginx conf]# vim nginx.conf
 81         #location ~ /\.ht {
 82         #    deny  all;
 83         #}
 84     }
 86     include         "/usr/local/nginx/conf/conf.d/*.conf";
 88     # another virtual host using mix of IP-, name-, and port-based configuration
 89     #
 90     #server {

[root@Nginx conf]# nginx -s reload
# 创建虚拟主机,创建编辑子配置文件 vhosts.conf,添加虚拟主机的配置
# 将 lee.timinglee.org 写到 /webdata/nginx/timinglee.org/lee/html/index.html 默认访问文件里,用于测试;并给虚拟主机名添加域名解析;然后进行测试
[root@Nginx conf]# vim conf.d/vhosts.conf

[root@Nginx conf]# mkdir /webdata/nginx/timinglee.org/lee/html -p
[root@Nginx conf]# echo lee.timinglee.org > /webdata/nginx/timinglee.org/lee/html/index.html
[root@Nginx conf]# vim /etc/hosts
  3 192.168.153.100     Nginx lee.timinglee.org

[root@Nginx conf]# nginx -s reload
[root@Nginx conf]# curl lee.timinglee.org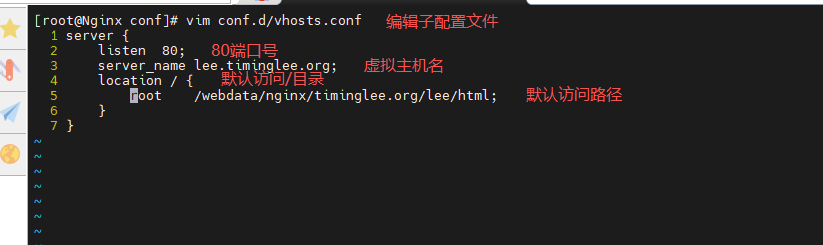
# location 后的参数
# 创建访问默认路径下的 /lee 目录,将 lee 写到 /lee 目录下的 index.html 文件
# 测试访问目录时,必须在结尾加'/';有'/'表示目录,没有表示文件
[root@Nginx conf]# mkdir /webdata/nginx/timinglee.org/lee/html/lee -p
[root@Nginx conf]# echo lee > /webdata/nginx/timinglee.org/lee/html/lee/index.html
[root@Nginx conf]# curl lee.timinglee.org/lee/
lee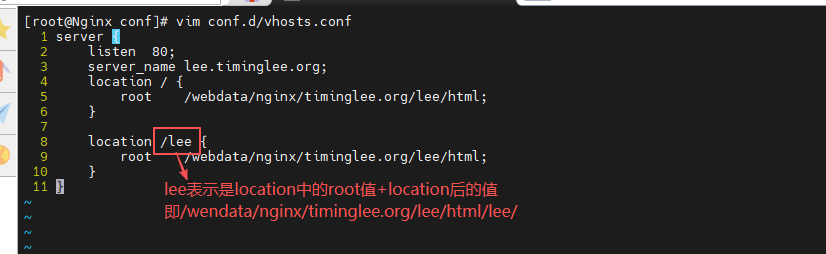
(2)location 的 alias
# 在 alias 参数中,location 后的值后缀不带'/'表示访问文件即显示文件信息;带后缀'/'表示访问目录即显示目录下默认访问文件信息
# root 与 alias 不同,无论 location 后的值的后缀带不带'/'都标识目录
[root@Nginx conf]# vim conf.d/vhosts.conf
[root@Nginx conf]# echo passwd > /mnt/passwd
[root@Nginx conf]# echo mnt > /mnt/index.html
[root@Nginx conf]# nginx -s reload

[root@Nginx conf]# curl lee.timinglee.org/passwd
passwd
[root@Nginx conf]# curl lee.timinglee.org/passwd/
mnt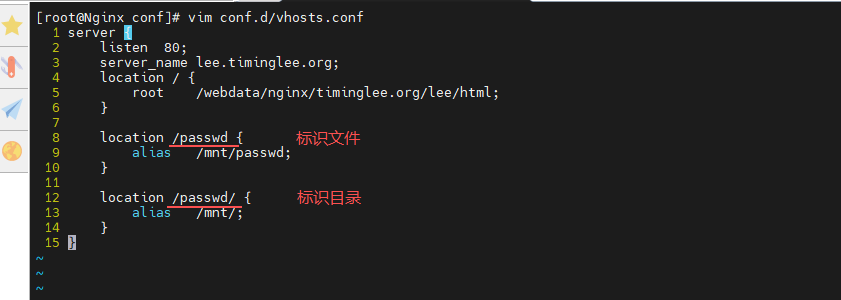
3. 长链接配置
(1)长链接时长
# 设定长链接时长为5s进行测试,安装 telnet
[root@Nginx ~]# vim /usr/local/nginx/conf/nginx.conf
[root@Nginx ~]# nginx -s reload
[root@Nginx ~]# dnf install telnet -y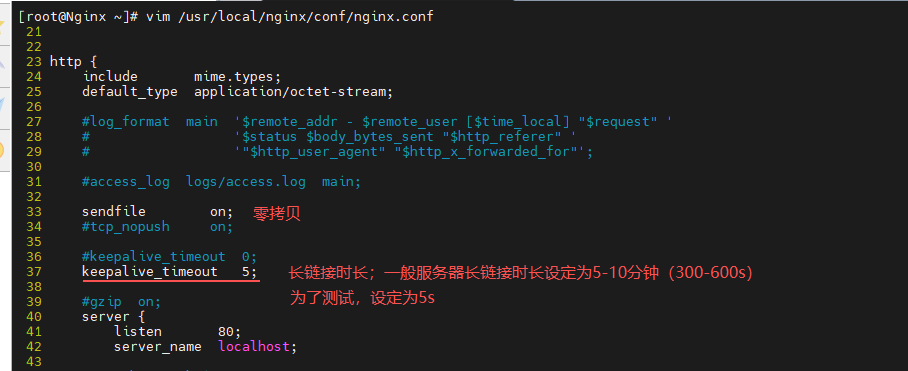
# 测试长链接时长
[root@Nginx ~]# curl -v  lee.timinglee.org
[root@Nginx ~]# telnet lee.timinglee.org 80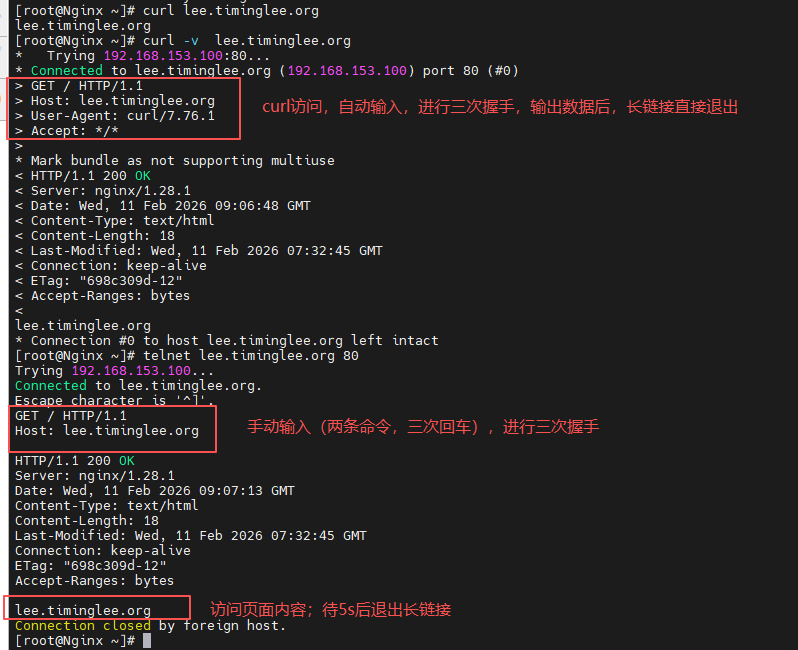
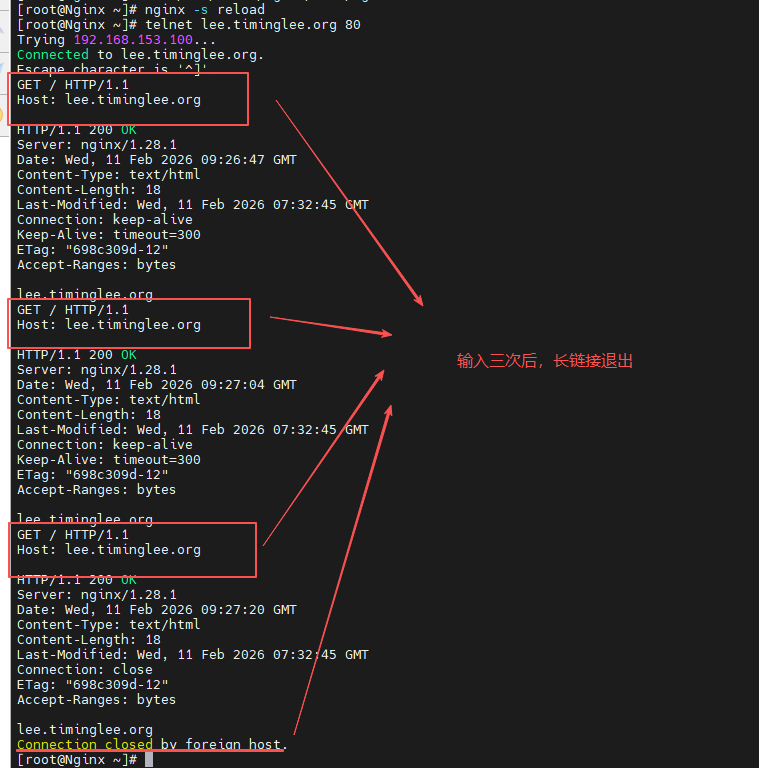
(2)长链接次数
# 设定长链接次数为3次进行测试
[root@Nginx ~]# vim /usr/local/nginx/conf/nginx.conf
[root@Nginx ~]# nginx -s reload
[root@Nginx ~]# telnet lee.timinglee.org 80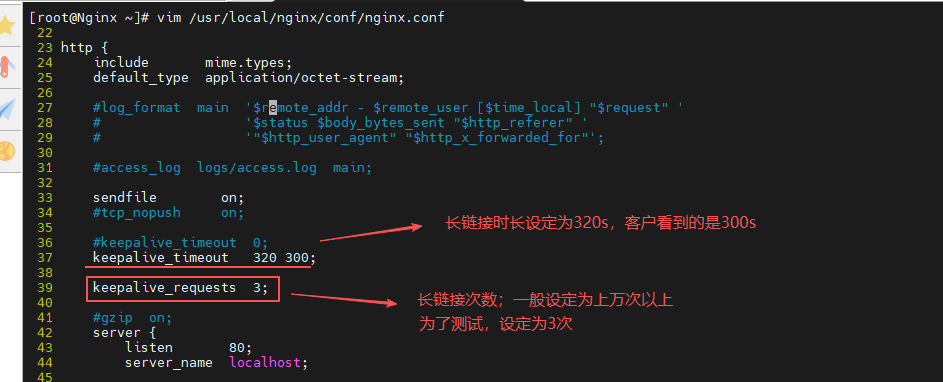
4. location 字符匹配
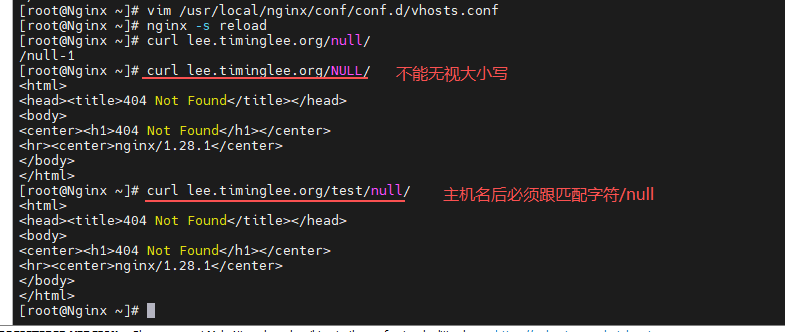
(1)location 后什么都不带
# location 后面什么都不带直接指定目录
[root@Nginx ~]# vim /usr/local/nginx/conf/conf.d/vhosts.conf
[root@Nginx ~]# nginx -s reload
[root@Nginx ~]# curl lee.timinglee.org/null/
[root@Nginx ~]# curl lee.timinglee.org/NULL/
[root@Nginx ~]# curl lee.timinglee.org/test/null/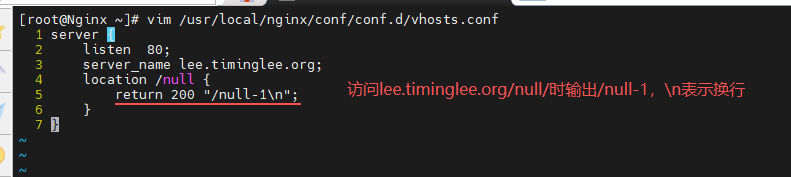
(2)location 后用"="
# 精确匹配文件
[root@Nginx ~]# vim /usr/local/nginx/conf/conf.d/vhosts.conf
[root@Nginx ~]# nginx -s reload
[root@Nginx ~]# curl lee.timinglee.org/null
/null-2
[root@Nginx ~]# curl lee.timinglee.org/null/
/null-1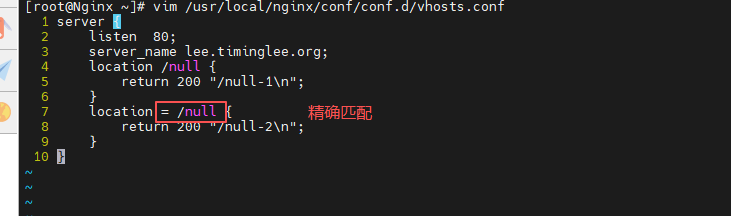
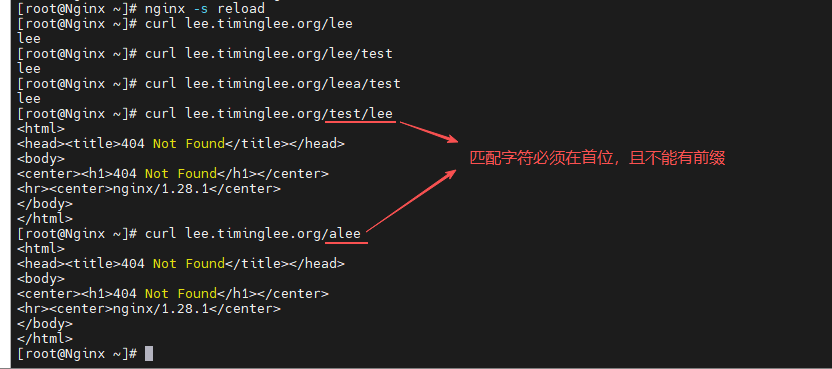
(3)location 后用"~"
# 正则匹配
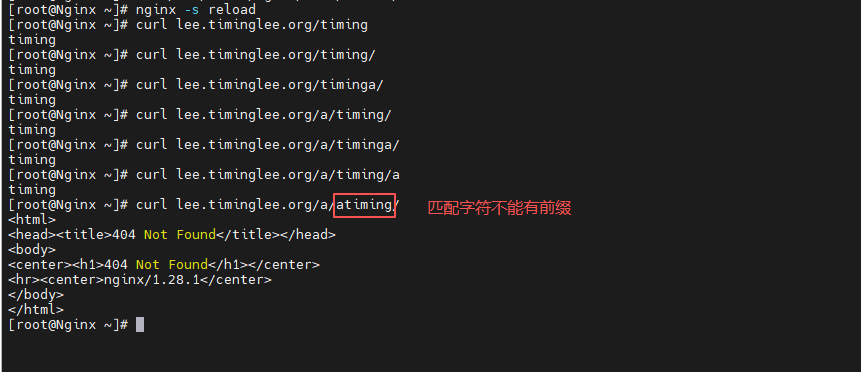
- 区分大小写
- 不是必须紧跟主机名
- 可以有后缀,但不能有前缀
[root@Nginx ~]# vim /usr/local/nginx/conf/conf.d/vhosts.conf
[root@Nginx ~]# nginx -s reload
[root@Nginx ~]# curl lee.timinglee.org/lee
lee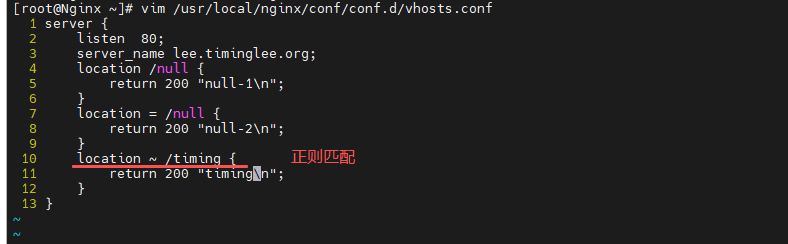
(4)location 后用"^~"
# 优先前缀匹配
[root@Nginx ~]# vim /usr/local/nginx/conf/conf.d/vhosts.conf
[root@Nginx ~]# nginx -s reload
[root@Nginx ~]# curl lee.timinglee.org/lee
lee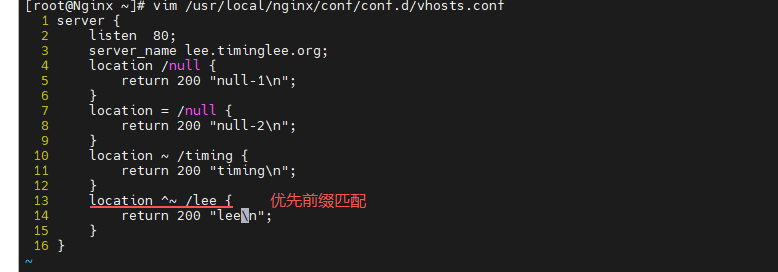
(5)location 后用"~*"
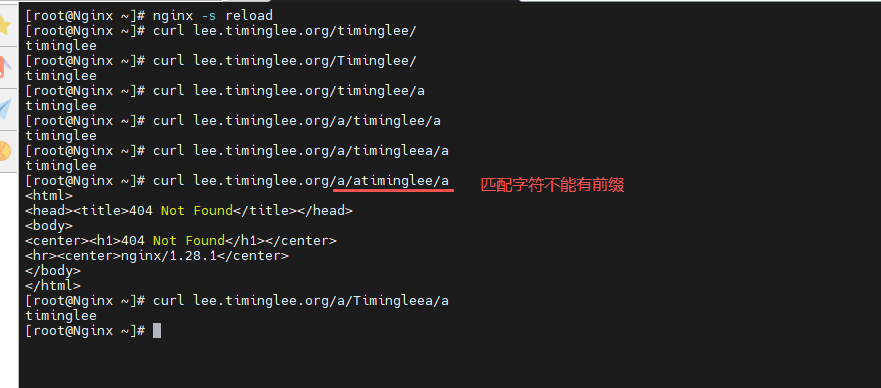
# 无视大小写正则匹配
[root@Nginx ~]# vim /usr/local/nginx/conf/conf.d/vhosts.conf
[root@Nginx ~]# nginx -s reload
[root@Nginx ~]# curl lee.timinglee.org/timinglee/
timinglee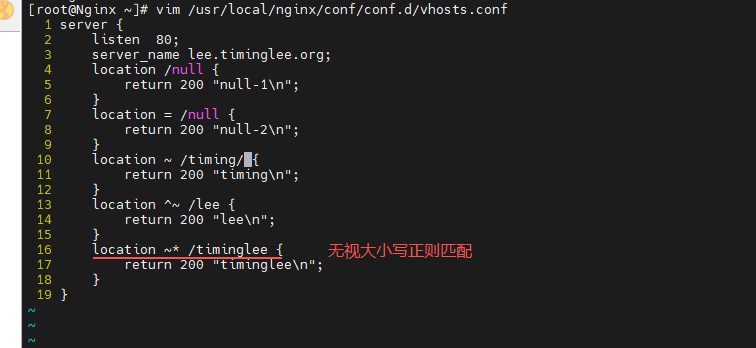
(6)location 后用'\'
# 在无视大小写正则匹配上,捕获以'.img'、'.php'、'.jsp'结尾字符
# 无论主机名后面是什么,只要字符是以'.img'、'.php'、'.jsp'结尾的都进行匹配
[root@Nginx ~]# vim /usr/local/nginx/conf/conf.d/vhosts.conf
[root@Nginx ~]# nginx -s reload
[root@Nginx ~]# curl lee.timinglee.org/test.img
app
[root@Nginx ~]# curl lee.timinglee.org/askduhak/zugye.php
app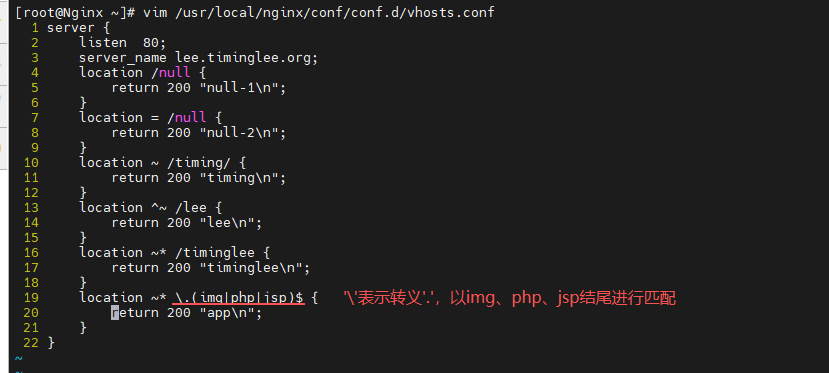
5. 用户认证
# 先创建 admin
[root@Nginx ~]# vim /usr/local/nginx/conf/conf.d/vhosts.conf

[root@Nginx ~]# mkdir -p /usr/local/nginx/html/admin
[root@Nginx ~]# echo admin > /usr/local/nginx/html/admin/index.html
[root@Nginx ~]# nginx -s reload
[root@Nginx ~]# curl lee.timinglee.org/admin/
admin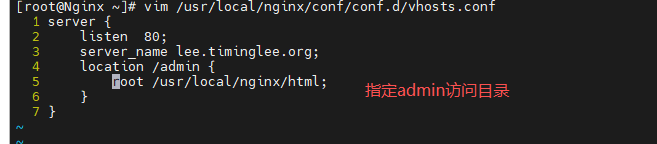
# 为防止 admin 会随意就能被查看,则需要设置用户认证
# 创建用户、密码,生成认证文件;并指定认证文件
# -c——创建,m——MD5加密,b——不提示输入密码
[root@Nginx ~]# htpasswd -cmb /usr/local/nginx/conf/.htpasswd admin lee
[root@Nginx ~]# vim /usr/local/nginx/conf/conf.d/vhosts.conf
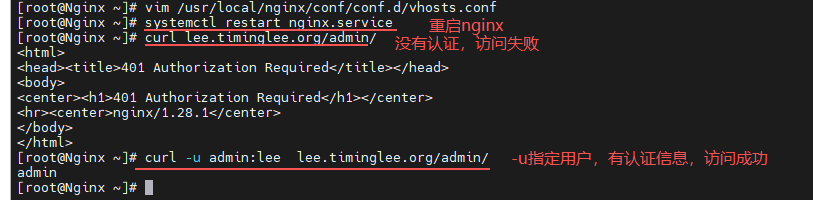
[root@Nginx ~]# systemctl restart nginx.service
[root@Nginx ~]# curl lee.timinglee.org/admin/
[root@Nginx ~]# curl -u admin:lee  lee.timinglee.org/admin/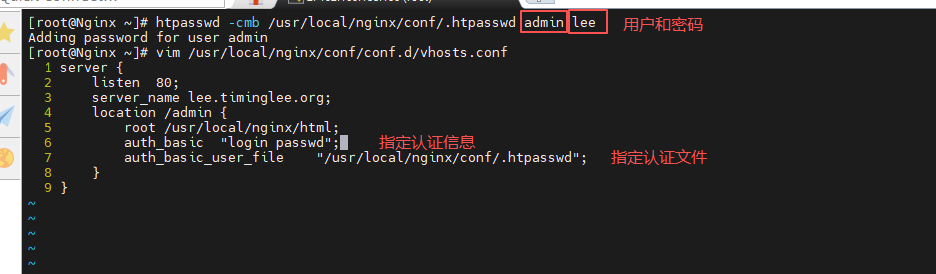
6. 自定义错误页面
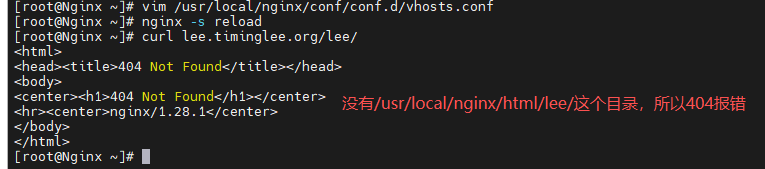
# 现指定一个不存在的目录使其访问报错
[root@Nginx ~]# vim /usr/local/nginx/conf/conf.d/vhosts.conf
[root@Nginx ~]# nginx -s reload
[root@Nginx ~]# curl lee.timinglee.org/lee/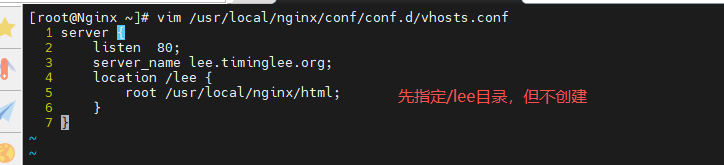
# 因报错页面不好看,不够人性化,所以我们可以自定义一个报错页面
[root@Nginx ~]# mkdir -p /usr/local/nginx/errorpage
[root@Nginx ~]# echo "不好意思,你要访问的页面下班了!!" > /usr/local/nginx/errorpage/errormessage
[root@Nginx ~]# vim /usr/local/nginx/conf/conf.d/vhosts.conf
[root@Nginx ~]# nginx -s reload
[root@Nginx ~]# curl lee.timinglee.org/lee/
不好意思,你要访问的页面下班了!!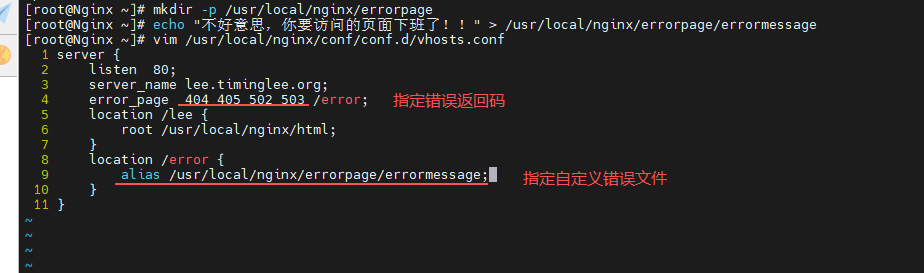
7. 自定义错误日志
# 创建存放错误日志文件
[root@Nginx ~]# vim /usr/local/nginx/conf/conf.d/vhosts.conf
[root@Nginx ~]# mkdir -p /usr/local/nginx/logs/timinglee.org
[root@Nginx ~]# nginx -s reload
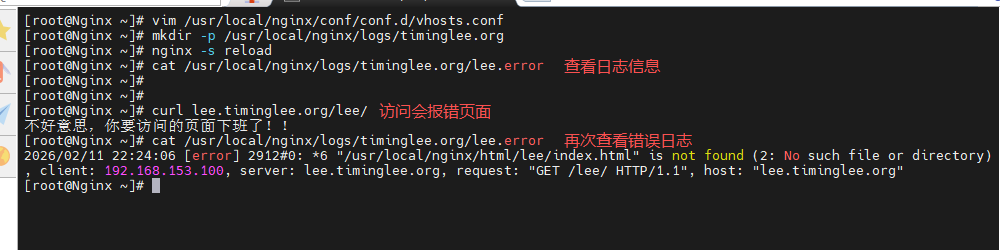
[root@Nginx ~]# cat /usr/local/nginx/logs/timinglee.org/lee.error
[root@Nginx ~]# curl lee.timinglee.org/lee/
[root@Nginx ~]# cat /usr/local/nginx/logs/timinglee.org/lee.error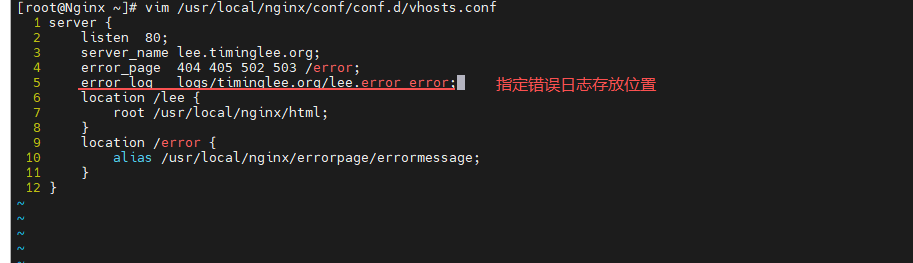
8. 文件检测
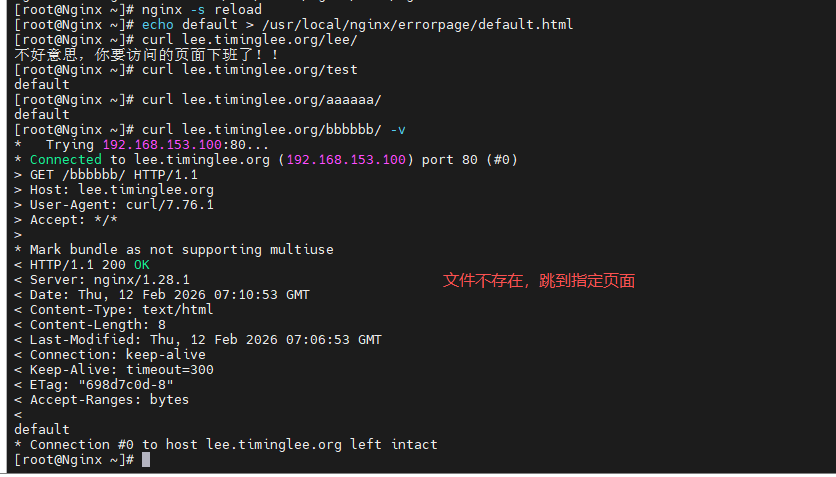
# 访问时检测文件是否存在,文件存在则直接返回文件内容;文件不存在则调到指定的内容
# 与自定义报错页面不同,报错页面是文件不存在返回报错值
[root@Nginx ~]# vim /usr/local/nginx/conf/conf.d/vhosts.conf
[root@Nginx ~]# nginx -s reload
[root@Nginx ~]# echo default > /usr/local/nginx/errorpage/default.html
[root@Nginx ~]# curl lee.timinglee.org/lee/
[root@Nginx ~]# curl lee.timinglee.org/test
[root@Nginx ~]# curl lee.timinglee.org/aaaaaa/
[root@Nginx ~]# curl lee.timinglee.org/bbbbbb/ -v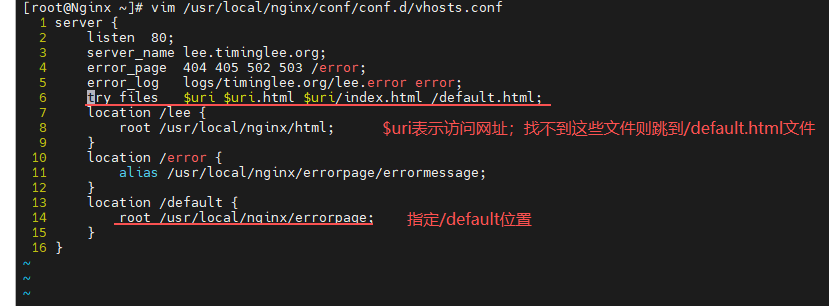
9. 自定义下载服务器
(1)制作下载服务器
# 创建下载的目录和测试文件,指定下载路径
[root@Nginx ~]# mkdir -p /usr/local/nginx/download
[root@Nginx ~]# cp /etc/passwd /usr/local/nginx/download/
[root@Nginx ~]# dd if=/dev/zero  of=/usr/local/nginx/download/bigfile bs=1M count=100
[root@Nginx ~]# nginx -s reload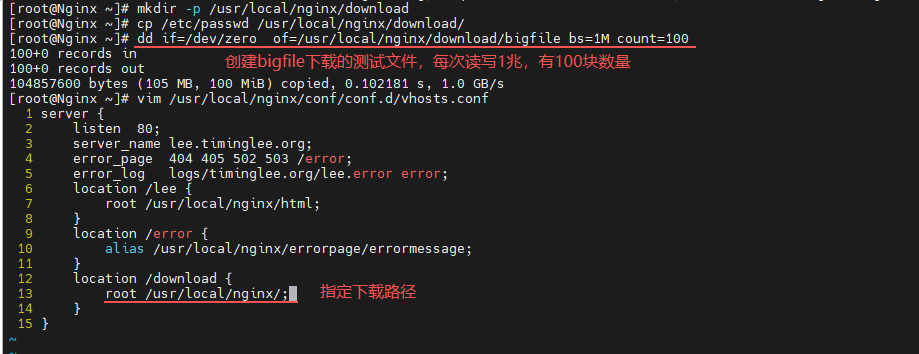
# 在测试环境时,我们需要给测试主机做域名解析
# Windows 主机做域名解析
- 一:那么在本主机(Windows)上需要到C:\Windows\System32\drivers\etc\hosts做域名解析
- 二:我们经常用的远程连接软件 MobaXterm,可以通过管理员启动 MobaXterm 后点击'Start local terminal'或右键点击'Bash shell'进入本地主机,编写/etc/hosts来做域名解析
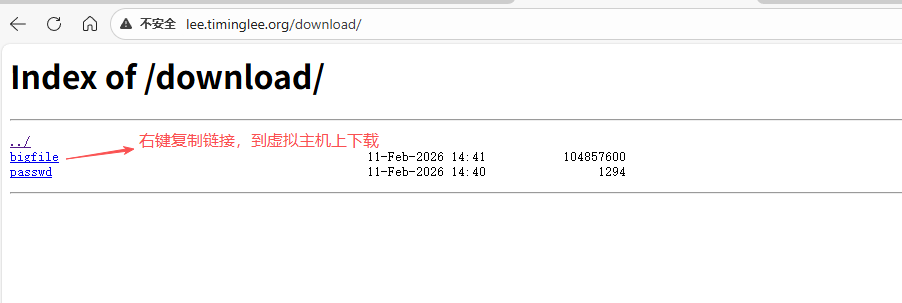
# 通过 Windows 主机浏览器来访问:lee.timinglee.org/download/

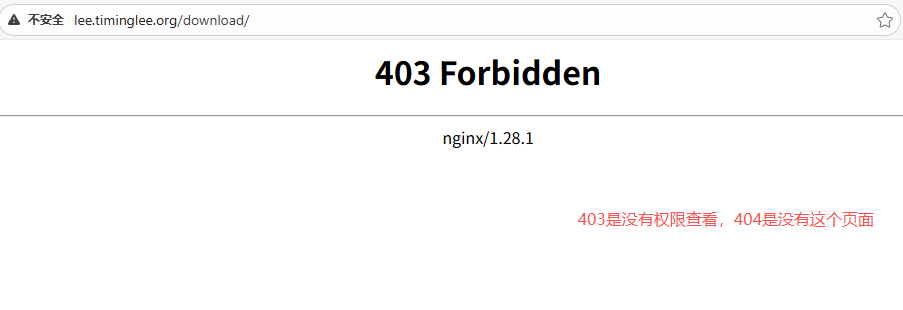
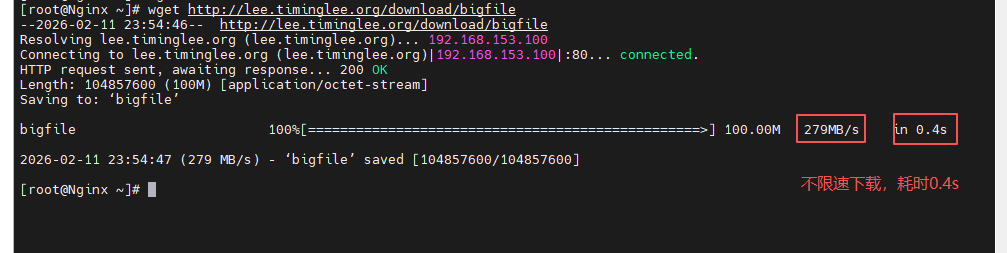
# 开启索引功能,能文件以列表的形式呈现出来;然后再次访问并下载
[root@Nginx ~]# vim /usr/local/nginx/conf/conf.d/vhosts.conf
[root@Nginx ~]# nginx -s reload
[root@Nginx ~]# wget http://lee.timinglee.org/download/bigfile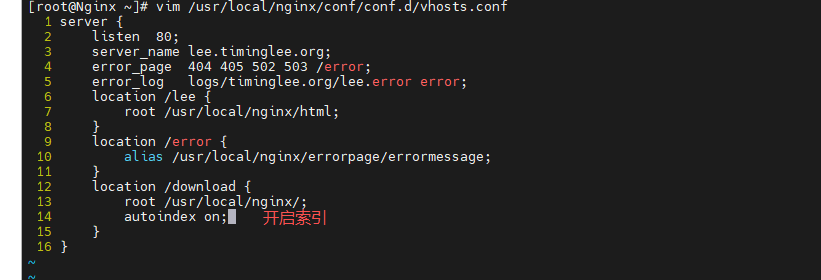
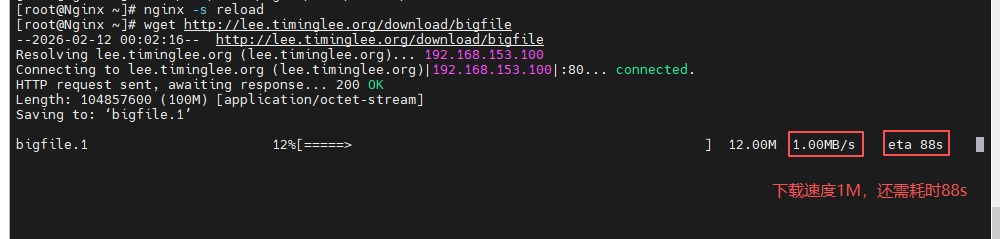
(2)限速下载
# 如果不限速下载,容易导致服务器的硬盘损坏
[root@Nginx ~]# vim /usr/local/nginx/conf/conf.d/vhosts.conf
[root@Nginx ~]# nginx -s reload
[root@Nginx ~]# wget http://lee.timinglee.org/download/bigfile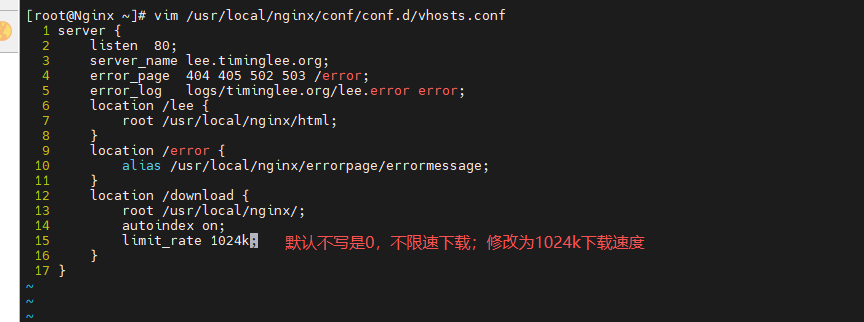
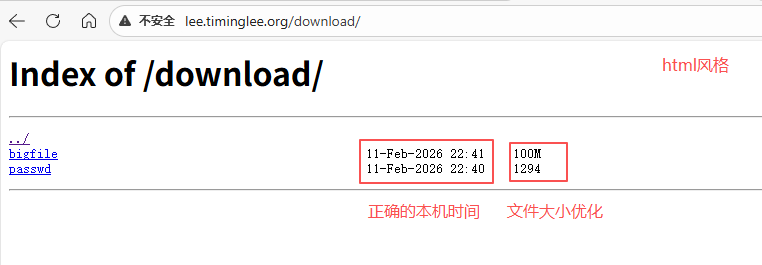
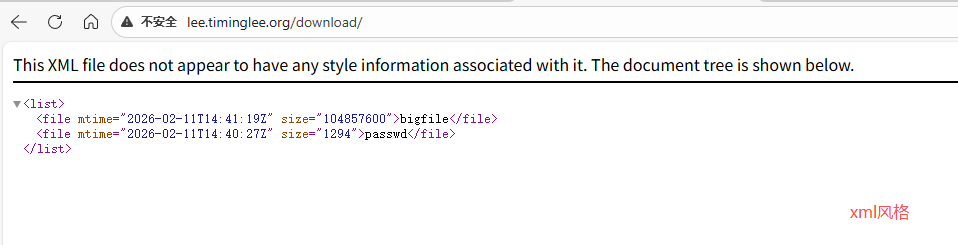
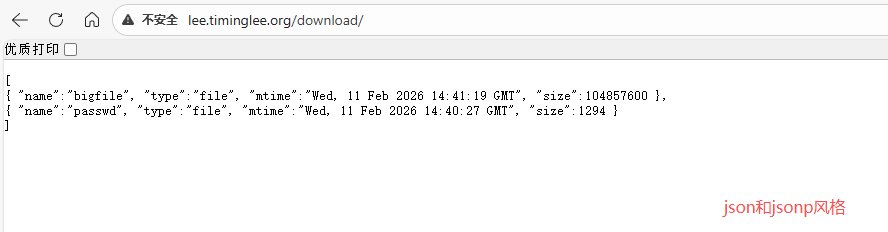
(3)文件大小、时间和页面风格
# 优化显示文件大小,调整正确的时间,以及设定不同的页面风格
[root@Nginx ~]# vim /usr/local/nginx/conf/conf.d/vhosts.conf
[root@Nginx ~]# nginx -s reload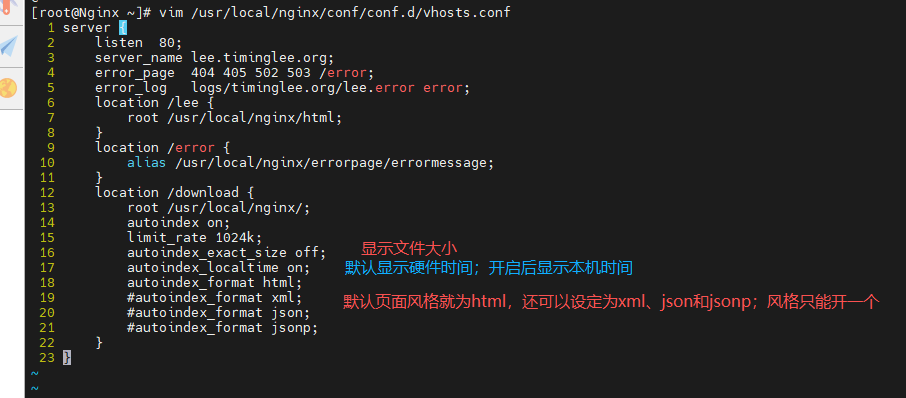
五、Nginx的高级配置
1. 状态页
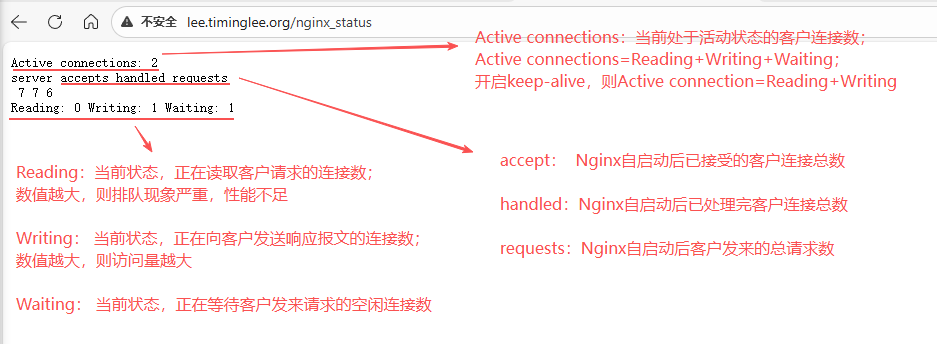
# Nginx 状态页就是可以通过网页来查看 Nginx 的负载情况,由 with-http_stub_status_module 模块来实现
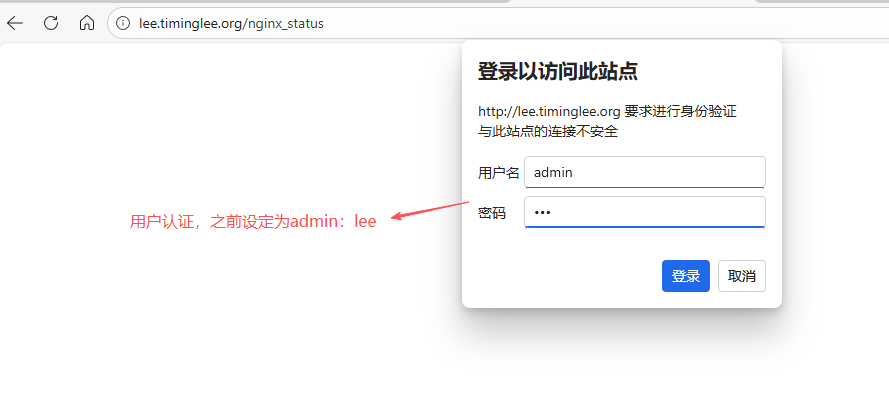
# 因为 Nginx 的负载情况不易公开,所以也要设定用户认证
[root@Nginx ~]# vim /usr/local/nginx/conf/conf.d/vhosts.conf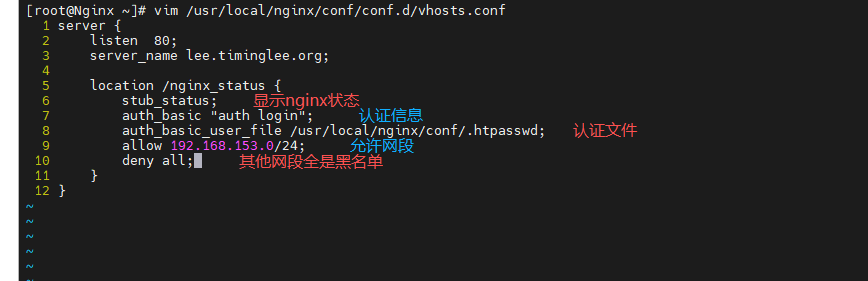
2. 压缩功能
# 客户发送请求时,如果 Nginx 构建的响应报文过大,则返回客户请求速率就很慢;所以对大文件进行压缩,来提高性能
# Nginx 的压缩功能由 with-http_gzip_static_module 模块来实现
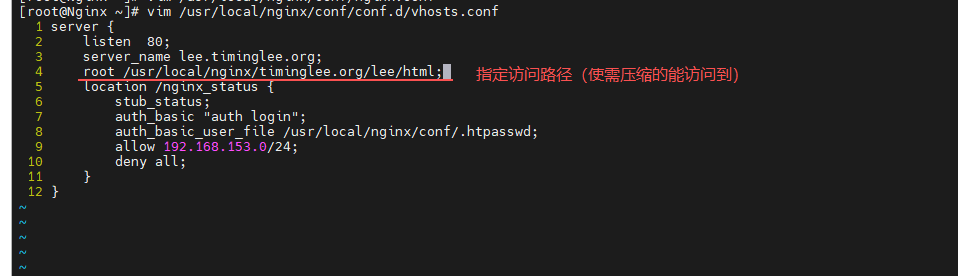
# 在主配置文件添加压缩参数,在子配置文件添加路径
[root@Nginx ~]# vim /usr/local/nginx/conf/nginx.conf
[root@Nginx ~]# vim /usr/local/nginx/conf/conf.d/vhosts.conf
[root@Nginx ~]# nginx -s reload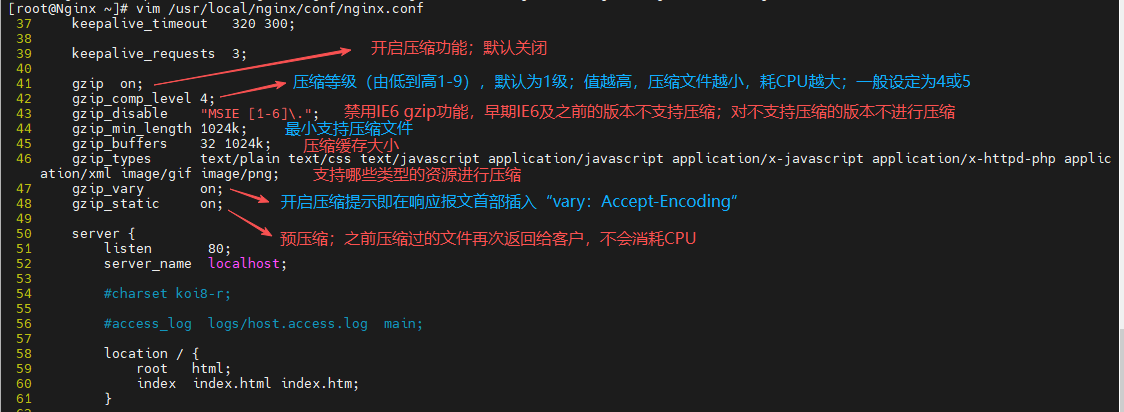
# 创建压缩目录,将两个大小文件放入其中进行测试
# 注意支持压缩资源,大文件 bigfile 不是纯文本,可能压缩不得,所以复制大文件为纯文本bigfile.txt
[root@Nginx ~]# mkdir /usr/local/nginx/timinglee.org/lee/html -p
[root@Nginx ~]# echo hello lee > /usr/local/nginx/timinglee.org/lee/html/index.html
[root@Nginx ~]# du -sh /usr/local/nginx/logs/access.log
[root@Nginx ~]# cp /usr/local/nginx/logs/access.log /usr/local/nginx/timinglee.org/lee/html/bigfile.txt

[root@Nginx ~]# curl --head --compressed lee.timinglee.org/index.html
[root@Nginx ~]# curl --head --compressed lee.timinglee.org/bigfile.txt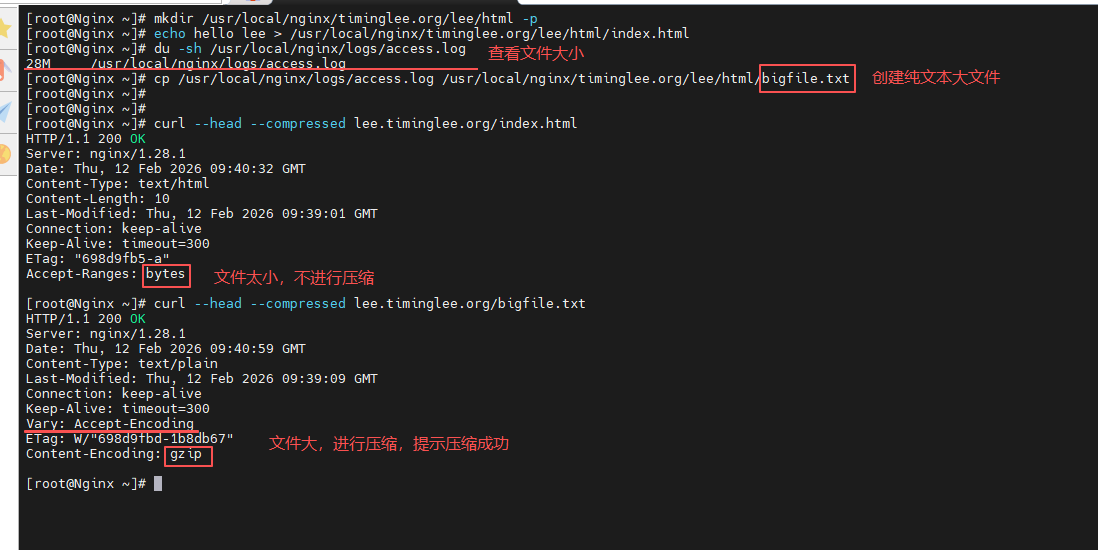
3. 版本隐藏
# 防止版本泄露,所以隐藏版本
# 第一种:修改主配置文件,添加 server_tokens 参数,隐藏版本号
[root@Nginx ~]# vim /usr/local/nginx/conf/nginx.conf
[root@Nginx ~]# nginx -s reload
[root@Nginx ~]# curl -v lee.timinglee.org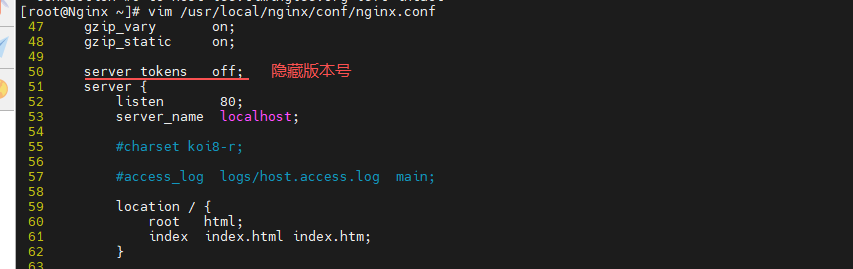
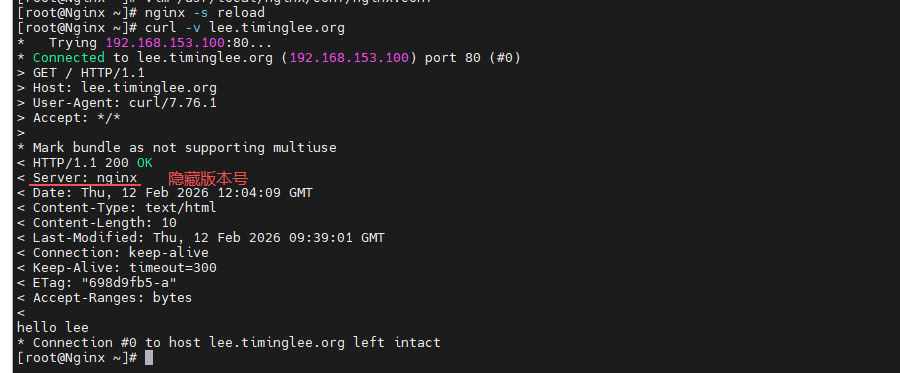
# 第二种:在安装 Nginx 源码编译时修改 nginx.h 文件(重新编译会覆盖原来的配置文件)
[root@Nginx ~]# ls
[root@Nginx ~]# nginx -v
[root@Nginx ~]# vim nginx-1.28.1/src/core/nginx.h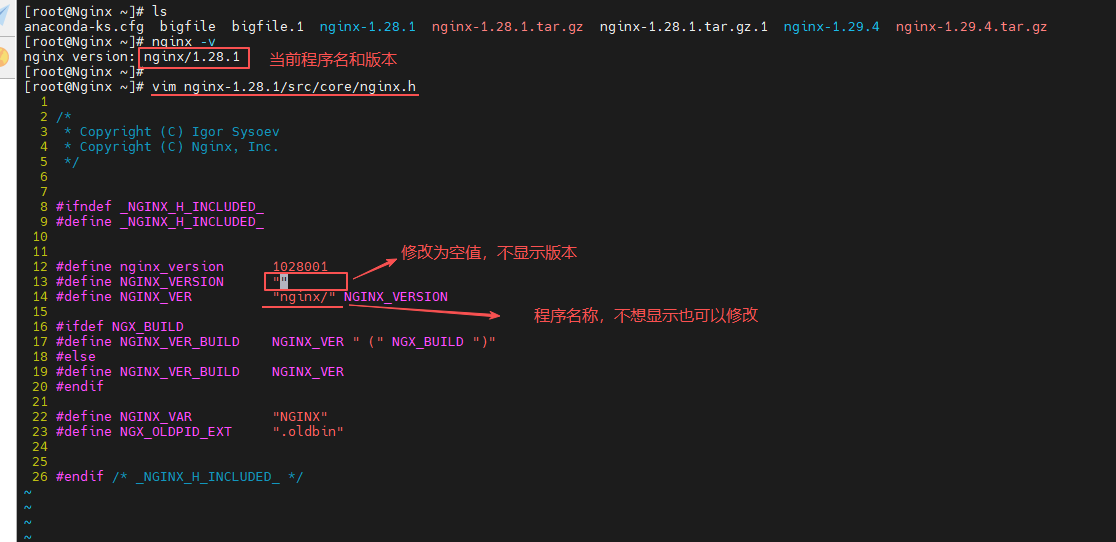
4. 内建变量
(1)下载 echo
# 内建变量是 Nginx 配置里的参数,需要 echo 来设定输出;与系统的 echo 不一样
- 系统的 echo 是 /bin/echo 执行文件,执行结果是屏幕打印的
- Nginx 的 echo 是 ngx_http_echo_module 模块,执行结果是访问网站输出的
# 下载链接:Tags · openresty/echo-nginx-module
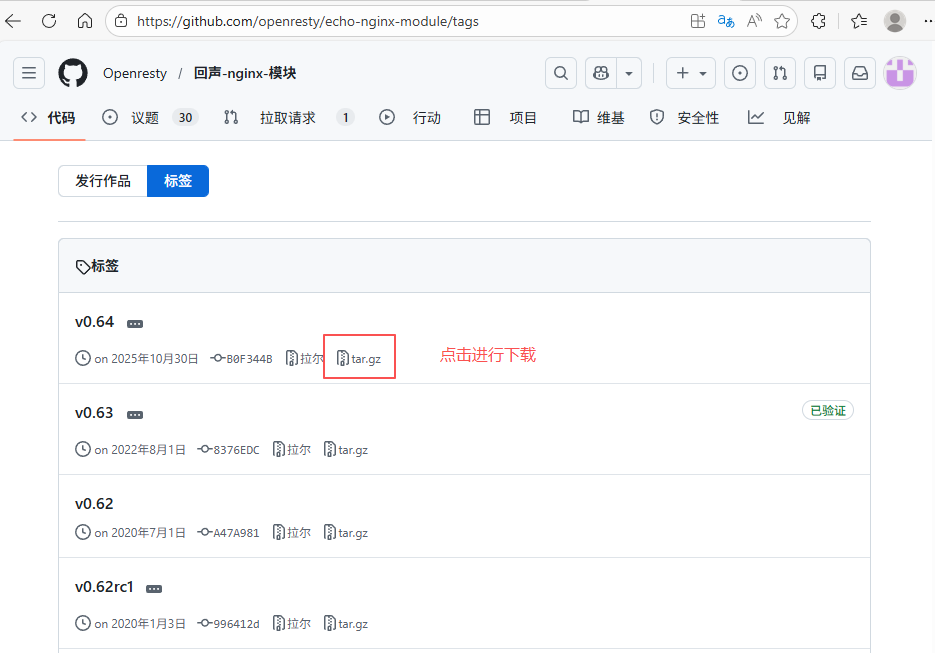
# 下载好后,在远程虚拟机 MobaXterm 上传入进去
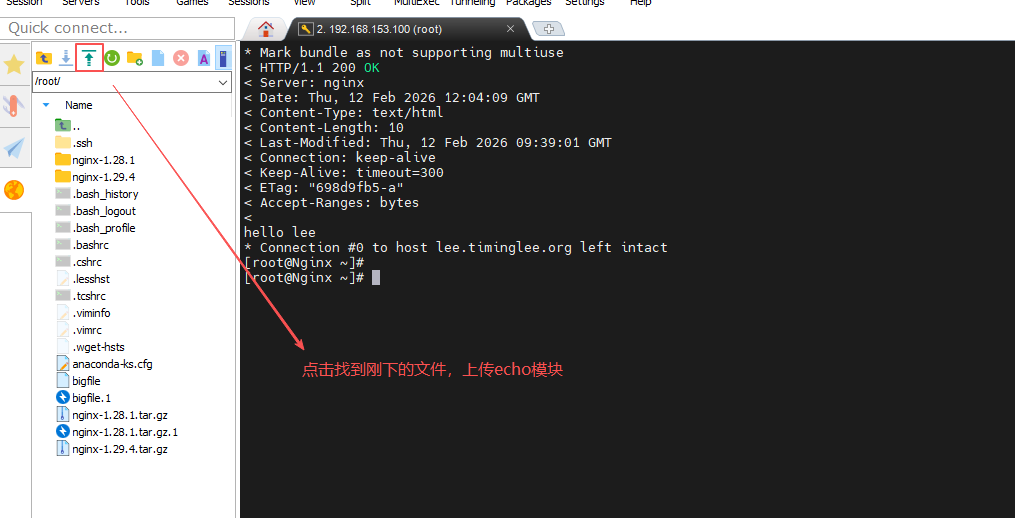
# 要添加新模块需要关闭 nginx 服务,进行重新编译
# 重新编译需要删除原编译文件,不然编译不成功
[root@Nginx ~]# ls
[root@Nginx ~]# tar zxf echo-nginx-module-0.64.tar.gz
[root@Nginx ~]# systemctl stop nginx.service
[root@Nginx ~]# ps aux | grep nginx
[root@Nginx ~]# cd nginx-1.28.1/
[root@Nginx nginx-1.28.1]# ls
[root@Nginx nginx-1.28.1]# make clean
[root@Nginx nginx-1.28.1]# ls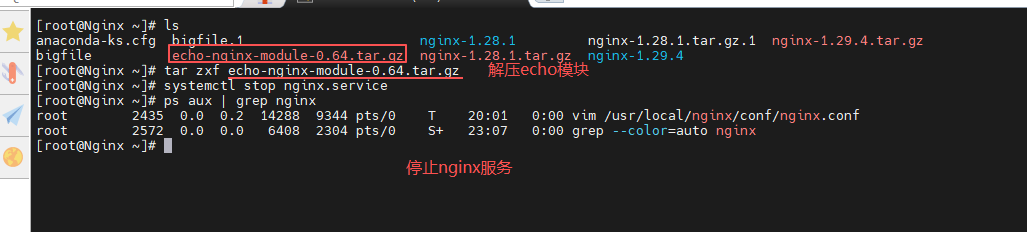

# 添加 echo 模块,进行检查
[root@Nginx nginx-1.28.1]# ./configure --help | grep add
[root@Nginx nginx-1.28.1]# ll /root/echo-nginx-module-0.64
[root@Nginx nginx-1.28.1]# nginx -V
[root@Nginx nginx-1.28.1]# ./configure --prefix=/usr/local/nginx --user=nginx --group=nginx --with-http_ssl_module --with-http_v2_module --with-http_realip_module --with-http_stub_status_module --with-http_gzip_static_module --with-pcre --with-stream --with-stream_ssl_module --with-stream_realip_module --add-module=/root/echo-nginx-module-0.64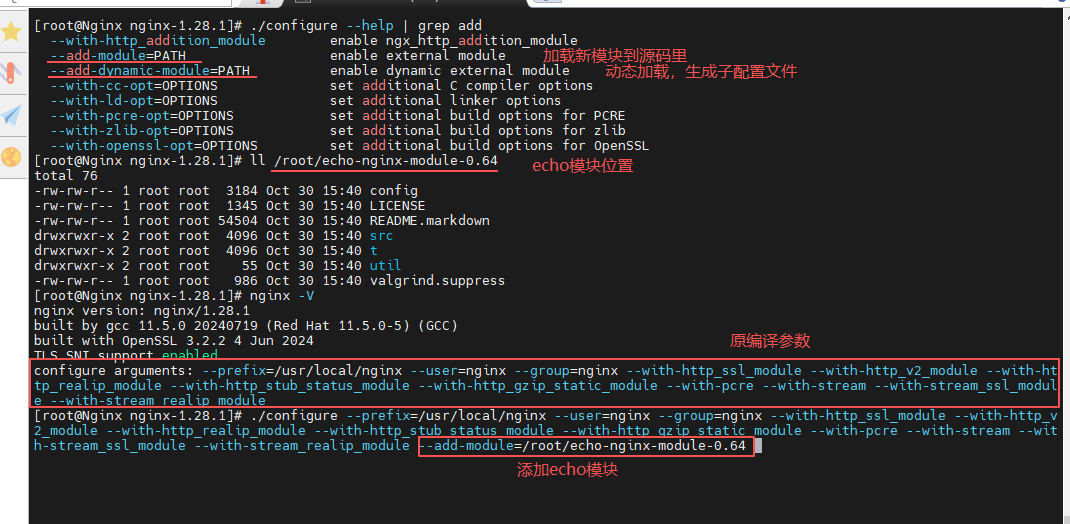
# 进行编译 make,但不能 make install,这会覆盖原来的配置信息
# 可以通过删除原 nginx 程序,拷贝新 nginx 程序到于运行目录下,从而实现添加新模块
[root@Nginx nginx-1.28.1]# rm -rf /usr/local/nginx/sbin/nginx
[root@Nginx nginx-1.28.1]# ls objs
[root@Nginx nginx-1.28.1]# cp objs/nginx /usr/local/nginx/sbin/ -p
[root@Nginx nginx-1.28.1]# nginx -V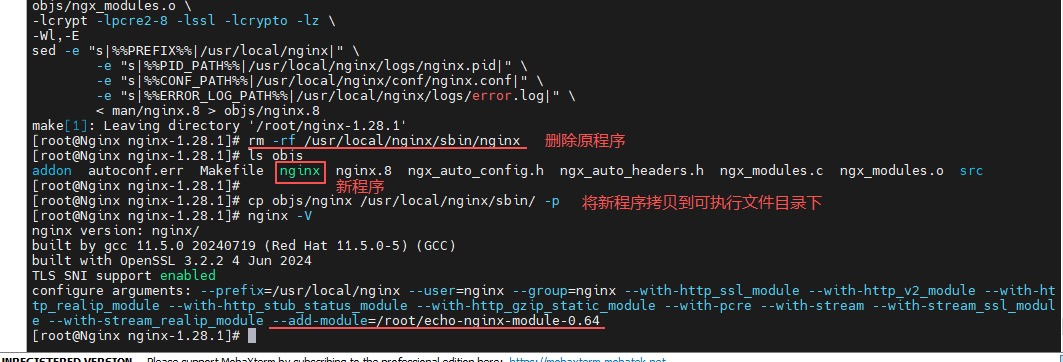
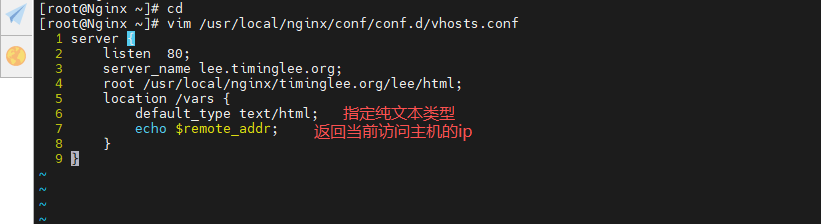
# 测试 echo

(2)内建参数
# 内建变量是访问时返回值,是系统自身有的值
# 在自配置文件里添加内建变量
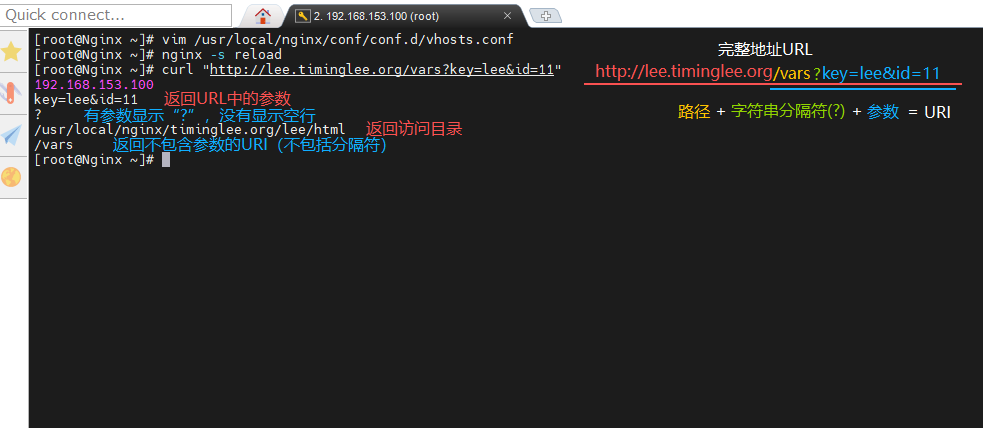
# 内建变量:$remote_addr、$args、$is_args、$document_root、$document_uri
[root@Nginx ~]# vim /usr/local/nginx/conf/conf.d/vhosts.conf
  6         default_type text/html;
  7         echo $remote_addr;
  8         echo $args;
  9         echo $is_args;
 10         echo $document_root;
 11         echo $document_uri;

[root@Nginx ~]# nginx -s reload
[root@Nginx ~]# curl "http://lee.timinglee.org/vars?key=lee&id=11"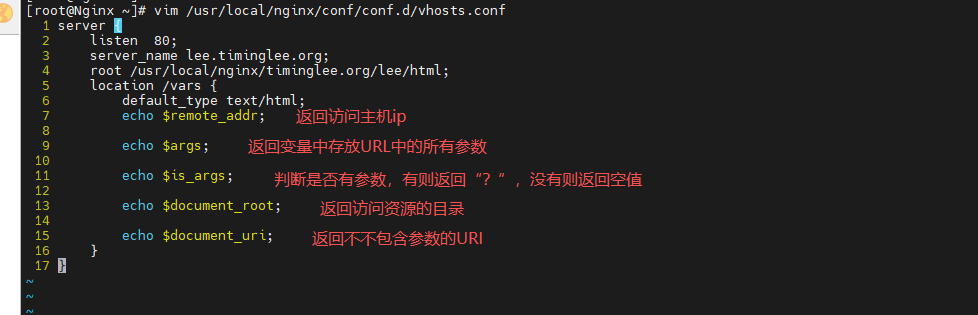
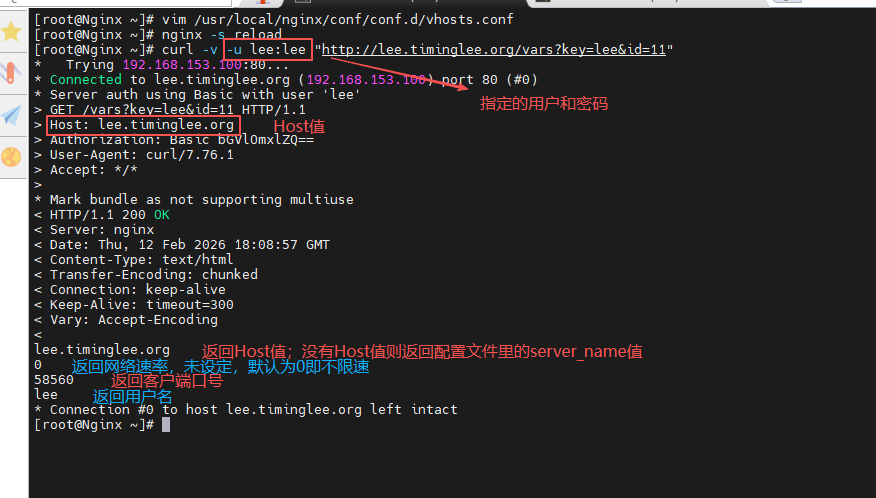
# 内建变量:$host、$limit_rate、$remote_port、$remote_user、$request_body_file
[root@Nginx ~]# vim /usr/local/nginx/conf/conf.d/vhosts.conf
 12         echo $host;
 13         echo $limit_rate;
 14         echo $remote_port;
 15         echo $remote_user;
 16         #echo $request_body_file;

[root@Nginx ~]# nginx -s reload
[root@Nginx ~]# curl -u lee:lee "http://lee.timinglee.org/vars?key=lee&id=11"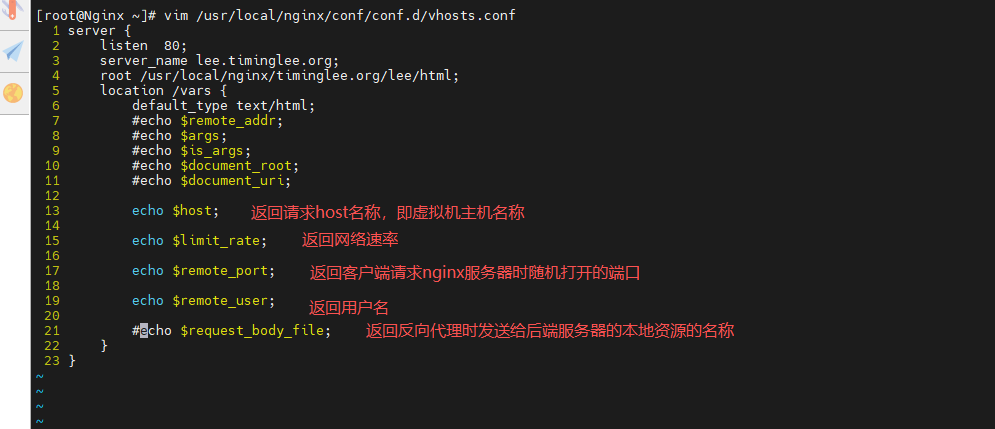
# 内建变量:$request_method、$requset_filename、$request_uri、$scheme、$server_protocol、$server_addr
[root@Nginx ~]# vim /usr/local/nginx/conf/conf.d/vhosts.conf
  7         echo $request_method;
  8         echo $request_filename;
  9         echo $request_uri;
 10         echo $scheme;
 11         echo $server_protocol;
 12         echo $server_addr;

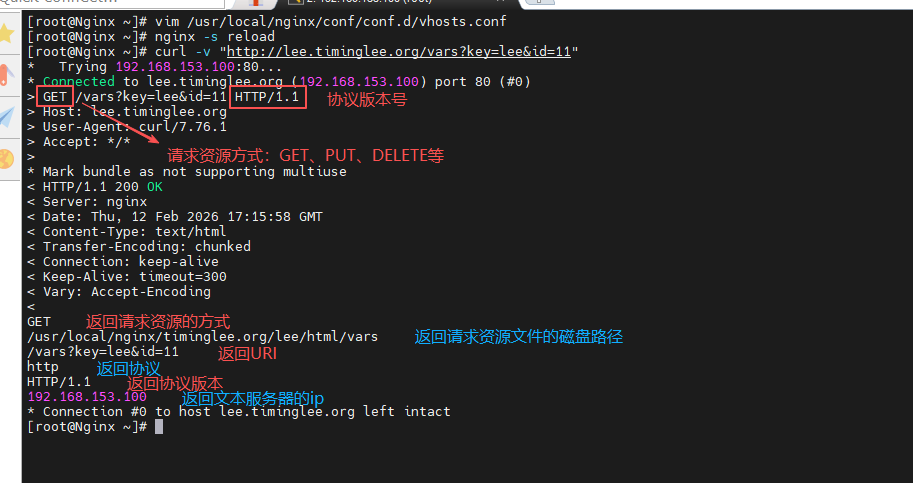
[root@Nginx ~]# nginx -s reload
[root@Nginx ~]# curl -v "http://lee.timinglee.org/vars?key=lee&id=11"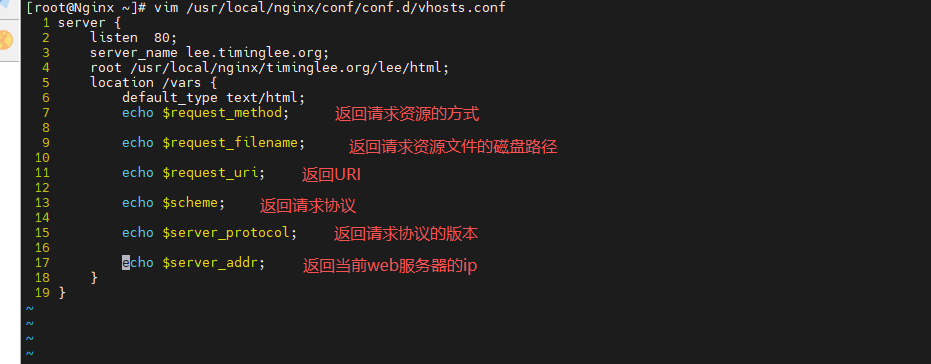
# 内建变量:$server_name、$server_port、$http_user_agent、$cookie_key2、$sent_http_content_type
[root@Nginx ~]# vim /usr/local/nginx/conf/conf.d/vhosts.conf
 13         echo $server_name;
 14         echo $server_port;
 15         echo $http_user_agent;
 16         echo $cookie_key2;
 17         echo $sent_http_content_type;

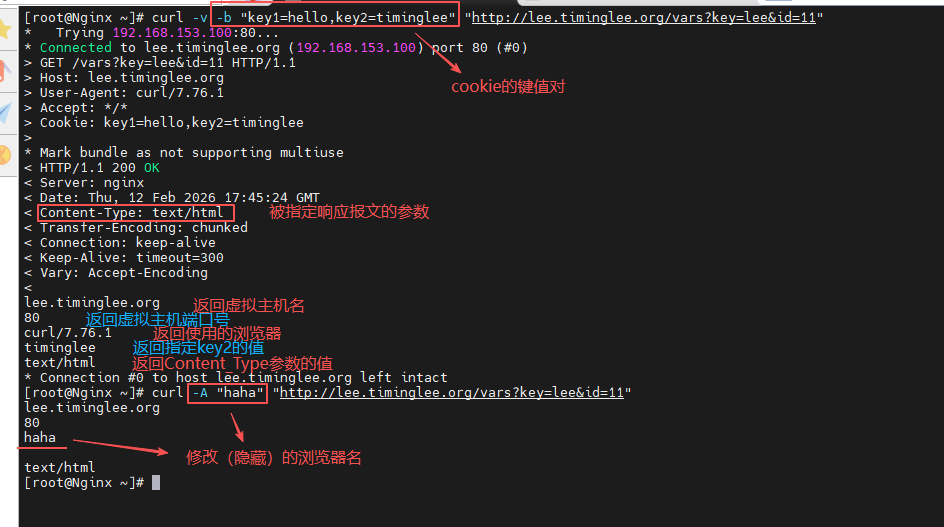
[root@Nginx ~]# nginx -s reload
[root@Nginx ~]# curl -v -b "key1=hello,key2=timinglee" "http://lee.timinglee.org/vars?key=lee&id=11"
[root@Nginx ~]# curl -A "haha" "http://lee.timinglee.org/vars?key=lee&id=11"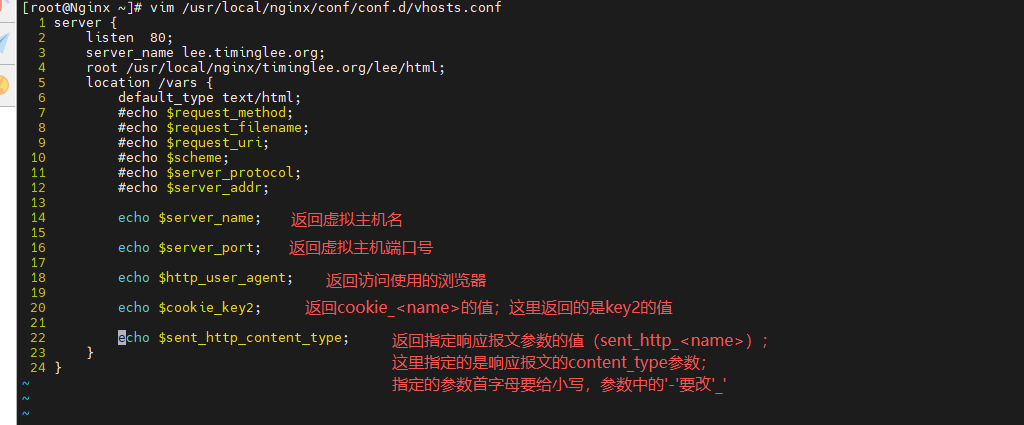
(3)自定义变量
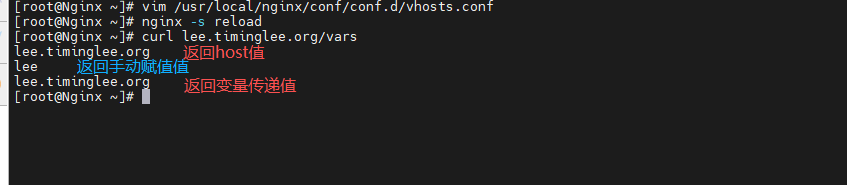
# 自定义变量可以手动赋值,也可以将 nginx 的内建变量的值传递给自定义变量
[root@Nginx ~]# vim /usr/local/nginx/conf/conf.d/vhosts.conf
  7         echo $host;
  8         set $test lee;
  9         echo $test;
 10         set $name $host;
 11         echo $name;

[root@Nginx ~]# nginx -s reload
[root@Nginx ~]# curl lee.timinglee.org/vars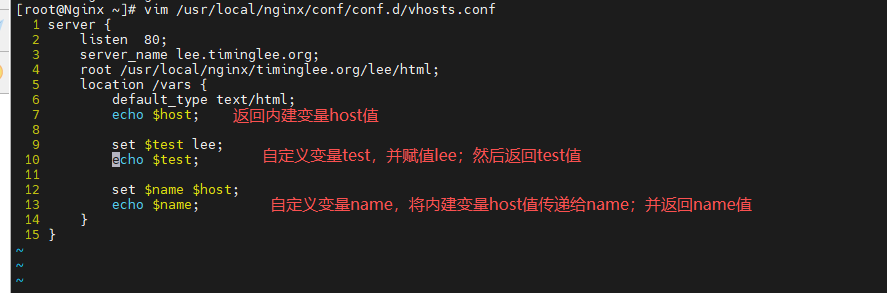
六、Nginx Rewrite 功能
- Nginx 服务器利用 ngx_http_rewrite_module 模块解析和处理 rewrite 请求
- 此功能依靠 PCRE(perl compatible regular expression),因此编译之前要安装 PCRE 库
- rewrite 是 nginx 服务器的重要功能之一,用于实现 URL 的重写,URL 的重写是非常有用的功能
- 比如它可以在我们改变网站结构之后,不需要客户端修改原来的书签,也无需其他网站修改我们的链接,就可以设置为访问
- 另外还可以在一定程度上提高网站的安全性
1. ngx_http_rewrite_module 模块
# 官方文档:https://nginx.org/en/docs/http/ngx_http_rewrite_module.html
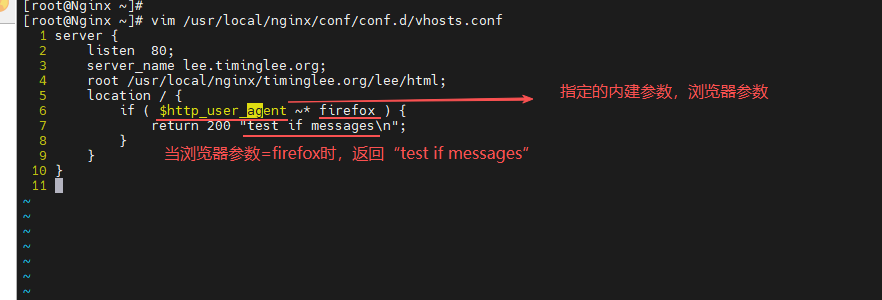
(1)if 指令
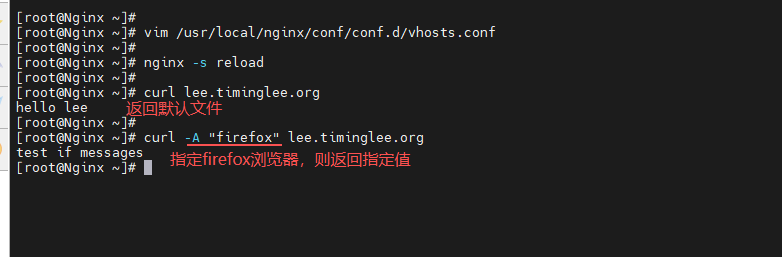
# 用于条件匹配判断,并根据条件判断结果选择不同的 Nginx 配置,可以配置在 server 或 location块中进行配置,Nginx 的 if 语法仅能使用 if 做单次判断,不支持使用“if else”或者“if elif”这样的多重判断
[root@Nginx ~]# vim /usr/local/nginx/conf/conf.d/vhosts.conf
  1 server {
  2     listen  80;
  3     server_name lee.timinglee.org;
  4     root /usr/local/nginx/timinglee.org/lee/html;
  5     location / {
  6         if ( $http_user_agent ~* firefox ) {
  7             return 200 "test if messages\n";
  8         }
  9     }
 10 }
[root@Nginx ~]# nginx -s reload
[root@Nginx ~]# curl lee.timinglee.org
[root@Nginx ~]# curl -A "firefox" lee.timinglee.org
(2)set 指令
# 自定义变量
- 指定 key 并给其定义一个变量,变量可以调用 Nginx 内置变量赋值给 key
- 另外 set 定义格式为 set $key value,value 可以是 text, variables 和两者的组合
[root@Nginx ~]# vim /usr/local/nginx/conf/conf.d/vhosts.conf
  1 server {
  2     listen  80;
  3     server_name lee.timinglee.org;
  4     root /usr/local/nginx/timinglee.org/lee/html;
  5     location / {
  6         set $testname timinglee;
  7         echo $testname;
  8     }
  9 }
[root@Nginx ~]# nginx -s reload
[root@Nginx ~]# curl lee.timinglee.org
timinglee
(3)break 指令
- 用于中断当前相同作用域(location)中的其他 Nginx 配置
- 与该指令处于同一作用域的 Nginx 配置中,位于它前面的配置生效
- 位于后面的 ngx_http_rewrite_module 模块中指令就不再执行
- Nginx 服务器在根据配置处理请求的过程中遇到该指令的时候,回到上一层作用域继续向下读取配置
- 该指令可以在 server 块和 locationif 块中使用
- 如果 break 指令在 location 块中后续指令还会继续执行,只是不执行 ngx_http_rewrite_module 模块的指令,其它指令还会执行
[root@Nginx ~]# vim /usr/local/nginx/conf/conf.d/vhosts.conf
  1 server {
  2     listen  80;
  3     server_name lee.timinglee.org;
  4     root /usr/local/nginx/timinglee.org/lee/html;
  5     location / {
  6         set $test1 lee1;
  7         set $test2 lee2;
  8         if ( $http_user_agent = firefox ){
  9             break;
 10         }
 11         set $test3 lee3;
 12         echo $test1 $test2 $test3;
 13     }
 14 }
[root@Nginx ~]# nginx -s reload
[root@Nginx ~]# curl  lee.timinglee.org
[root@Nginx ~]# curl -A "firefox" lee.timinglee.org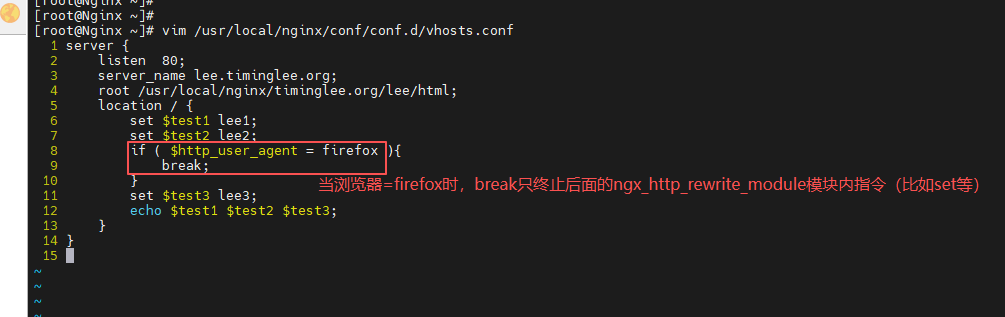
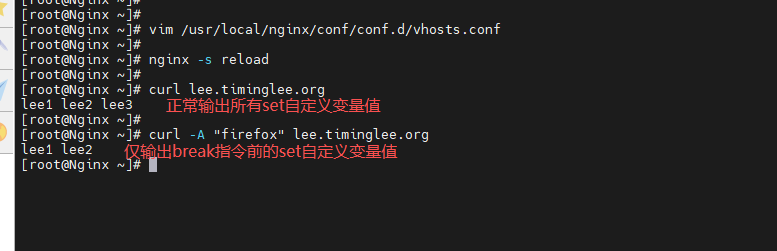
(4)return 指令
# return 用于完成对请求的处理,并直接向客户端返回响应状态码
- 比如:可以指定重定向 URL (对于特殊重 定向状态码,301/302等) 或者是指定提示文本内容(对于特殊状态码403/500等),处于此指令后的所有配置都将不被执行
- return 可以在 server、if 和 location 块进行配置
[root@Nginx ~]# vim /usr/local/nginx/conf/conf.d/vhosts.conf
  1 server {
  2     listen  80;
  3     server_name lee.timinglee.org;
  4     root /usr/local/nginx/timinglee.org/lee/html;
  5     location / {
  6         return 200 "How are you?\n";
  7     }
  8 }
[root@Nginx ~]# nginx -s reload
[root@Nginx ~]# curl  lee.timinglee.org
How are you?
2. rewrite指令
# 通过正则表达式的匹配来改变URI,可以同时存在一个或多个指令,按照顺序依次对URI进行匹配, rewrite主要是针对用户请求的URL或者是URI做具体处理
# rewrite将用户请求的URI基于regex所描述的模式进行检查,匹配到时将其替换为表达式指定的新的URI
(1)rewrite flag指令
# 利用nginx的rewrite的指令,可以实现url的重新跳转,rewrite有四种不同的flag
# 跳转型flag
- 跳转型指由客户端浏览器重新对新地址进行请求
- redirect(临时重定向302)
- permanent(永久重定向301)
# 代理型flag
- 代理型是在WEB服务器内部实现跳转
- break
- last
(2)redirect临时重定向
# 域名临时重定向,告诉浏览器域名不是固定重定向到当前目标域名,后期可能随时会更改,因此浏览器 不会缓存当前域名的解析记录,而浏览器会缓存永久重定向的DNS解析记录,这也是临时重定向与永久 重定向最大的本质区别。
# 即当nginx服务器无法访问时,浏览器不能利用缓存,而导致重定向失败
#redirect;
[root@Nginx ~]# vim /usr/local/nginx/conf/conf.d/vhosts.conf

server {
    listen 80;
    server_name lee.timinglee.org;
    root /webdir/timinglee.org/lee/html;
    location /vars {
        echo $remote_user;
        echo $request_method;
        echo $request_filename;
        echo $request_uri;
        echo $scheme;
    }

    location / {
        rewrite / http://www.baidu.com redirect;
    }
}
[root@Nginx ~]# nginx -s reload

[root@Nginx ~]# curl -I lee.timinglee.org
HTTP/1.1 302 Moved Temporarily			#定向方式返回值
Server: nginx/1.28.1
Date: Tue, 03 Feb 2026 02:43:47 GMT
Content-Type: text/html
Content-Length: 145
Connection: keep-alive
Keep-Alive: timeout=100
Location: http://www.baidu.com			#定向效果
(3)permanent永久重定向
# 域名永久型调整,即域名永远跳转至另外一个新的域名,之前的域名再也不使用,跳转记录可以缓存到 客户端浏览器
# 永久重定向会缓存DNS解析记录, 浏览器中有 from disk cache 信息,即使nginx服务器无法访问,浏览器也 会利用缓存进行重定向
#permanent
[root@Nginx ~]# vim /usr/local/nginx/conf/conf.d/vhosts.conf

server {
    listen 80;
    server_name lee.timinglee.org;
    root /webdir/timinglee.org/lee/html;
    location /vars {
        echo $remote_user;
        echo $request_method;
        echo $request_filename;
        echo $request_uri;
        echo $scheme;
    }

    location / {
        rewrite / http://www.baidu.com permanent;
    }
}
[root@Nginx ~]# nginx -s reload


[root@Nginx ~]# curl  -I lee.timinglee.org
HTTP/1.1 301 Moved Permanently
Server: nginx/1.28.1
Date: Tue, 03 Feb 2026 02:45:38 GMT
Content-Type: text/html
Content-Length: 169
Connection: keep-alive
Keep-Alive: timeout=100
Location: http://www.baidu.com
(4)break与last
# 访问break请求被rewrite至test1,而访问test1转递请求再次被rewrite发送至test2
#break 和 last
[root@Nginx ~]# mkdir  -p /webdir/timinglee.org/lee/html/{break,last,test1,test2}
[root@Nginx ~]# echo break > /webdir/timinglee.org/lee/html/break/index.html
[root@Nginx ~]# echo last > /webdir/timinglee.org/lee/html/last/index.html
[root@Nginx ~]# echo test1 > /webdir/timinglee.org/lee/html/test1/index.html
[root@Nginx ~]# echo test2 > /webdir/timinglee.org/lee/html/test2/index.html

#break
[root@Nginx ~]# vim /usr/local/nginx/conf/conf.d/vhosts.conf
server {
    listen 80;
    server_name lee.timinglee.org;
    root /webdir/timinglee.org/lee/html;
    location /vars {
        echo $remote_user;
        echo $request_method;
        echo $request_filename;
        echo $request_uri;
        echo $scheme;
    }

    location /break {
        rewrite /break/(.*) /test1/$1 break;
        rewrite /test1 /test2;
    }
    location /test1 {
        return 200 "test1 end page";
    }
    location /test2 {
        return 200 "TEST2 END PAGE";
    }

}

root@Nginx ~]# nginx -s reload
[root@Nginx ~]# curl  -L lee.timinglee.org/break/index.html
test1


#last
[root@Nginx ~]# vim /usr/local/nginx/conf/conf.d/vhosts.conf
server {
    listen 80;
    server_name lee.timinglee.org;
    root /webdir/timinglee.org/lee/html;
    location /vars {
        echo $remote_user;
        echo $request_method;
        echo $request_filename;
        echo $request_uri;
        echo $scheme;
    }

    location /break {
        rewrite /break/(.*) /test1/$1 last;
        rewrite /test1 /test2;
    }
    location /test1 {
        return 200 "test1 end page";
    }
    location /test2 {
        return 200 "TEST2 END PAGE";
    }

}

root@Nginx ~]# nginx -s reload
[root@Nginx ~]# curl  -L lee.timinglee.org/break/index.html
test1 end page
3. Nginx利用网页重写实现全站加密
(1)制作key
[root@Nginx ~]# openssl req -newkey rsa:2048 -nodes -sha256 -keyout /usr/local/nginx/certs/timinglee.org.key -x509 -days 365 -out /usr/local/nginx/certs/timinglee.org.crt(2)编辑加密配置文件
[root@Nginx ~]# vim /usr/local/nginx/conf/conf.d/vhosts.conf
server {
    listen 80;
    listen 443 ssl;
    ssl_certificate /usr/local/nginx/certs/timinglee.org.crt;
    ssl_certificate_key /usr/local/nginx/certs/timinglee.org.key;
    ssl_session_cache shared:sslcache:20m;
    ssl_session_timeout 10m;
    server_name lee.timinglee.org;
    root /webdir/timinglee.org/lee/html;
    location / {
        if ($scheme = http ){
            rewrite /(.*) https://$host/$1 redirect;
        }
    }

}

[root@Nginx ~]# systemctl restart nginx.service

#测试
[root@Nginx ~]# curl  -I  http://lee.timinglee.org/test1/
HTTP/1.1 302 Moved Temporarily
Server: nginx/1.28.1
Date: Tue, 03 Feb 2026 03:21:22 GMT
Content-Type: text/html
Content-Length: 145
Connection: keep-alive
Keep-Alive: timeout=100
Location: https://lee.timinglee.org/test1/
4. 防盗链
# 防盗链基于客户端携带的referer实现,referer是记录打开一个页面之前记录是从哪个页面跳转过来的标 记信息,如果别人只链接了自己网站图片或某个单独的资源,而不是打开了网站的整个页面,这就是盗链,referer就是之前的那个网站域名
[root@Nginx ~]# mkdir /webdir/timinglee.org/lee/html/{daolian,img} -p
[root@Nginx ~]# mv lee.png /webdir/timinglee.org/lee/html/img/
[root@Nginx ~]# mv daolian.png /webdir/timinglee.org/lee/html/daolian/

#另外的web服务器
[root@RS1 ~]# dnf install httpd -y
[root@rs1 ~]# systemctl enable --now httpd
[root@RS1 ~]# vim /var/www/html/index.html
<html>

  <head>
    <meta http-equiv=Content-Type content="text/html;charset=utf-8">
    <title>盗链</title>
</head>

  <body>
    <img src="http://lee.timinglee.org/img/lee.png" >
    <h1 style="color:red">欢迎大家</h1>
    <p><a href=http://lee.timinglee.org>狂点老李</a>出门见喜</p>
  </body>

</html>

[root@rs1 ~]# vim /etc/hosts
  1 127.0.0.1   localhost localhost.localdomain localhost4 localhost4.localdomain4
  2 ::1         localhost localhost.localdomain localhost6 localhost6.localdomain6
  3 192.168.153.10     rs1
  4 192.168.153.100 lee.timinglee.org

[root@RS1 ~]# systemctl restart httpd.service

#先在浏览器访问192.168.153.10

#设置防盗链
[root@Nginx ~]# vim /usr/local/nginx/conf/conf.d/vhosts.conf

server {
    listen 80;
    server_name lee.timinglee.org;
    root /webdir/timinglee.org/lee/html;
    location / {
        valid_referers none blocked server_names *.timinglee.org ~/.baidu/.;
        if ($invalid_referer){
            return 404;
        }
    }
    location /img {
        valid_referers none blocked server_names *.timinglee.org ~/.baidu/.;
        if ($invalid_referer){
            rewrite ^/ http://lee.timinglee.org/daolian/daolian.png;
        }
    }

}

[root@Nginx ~]# nginx -s reload
七、Nginx的反向代理
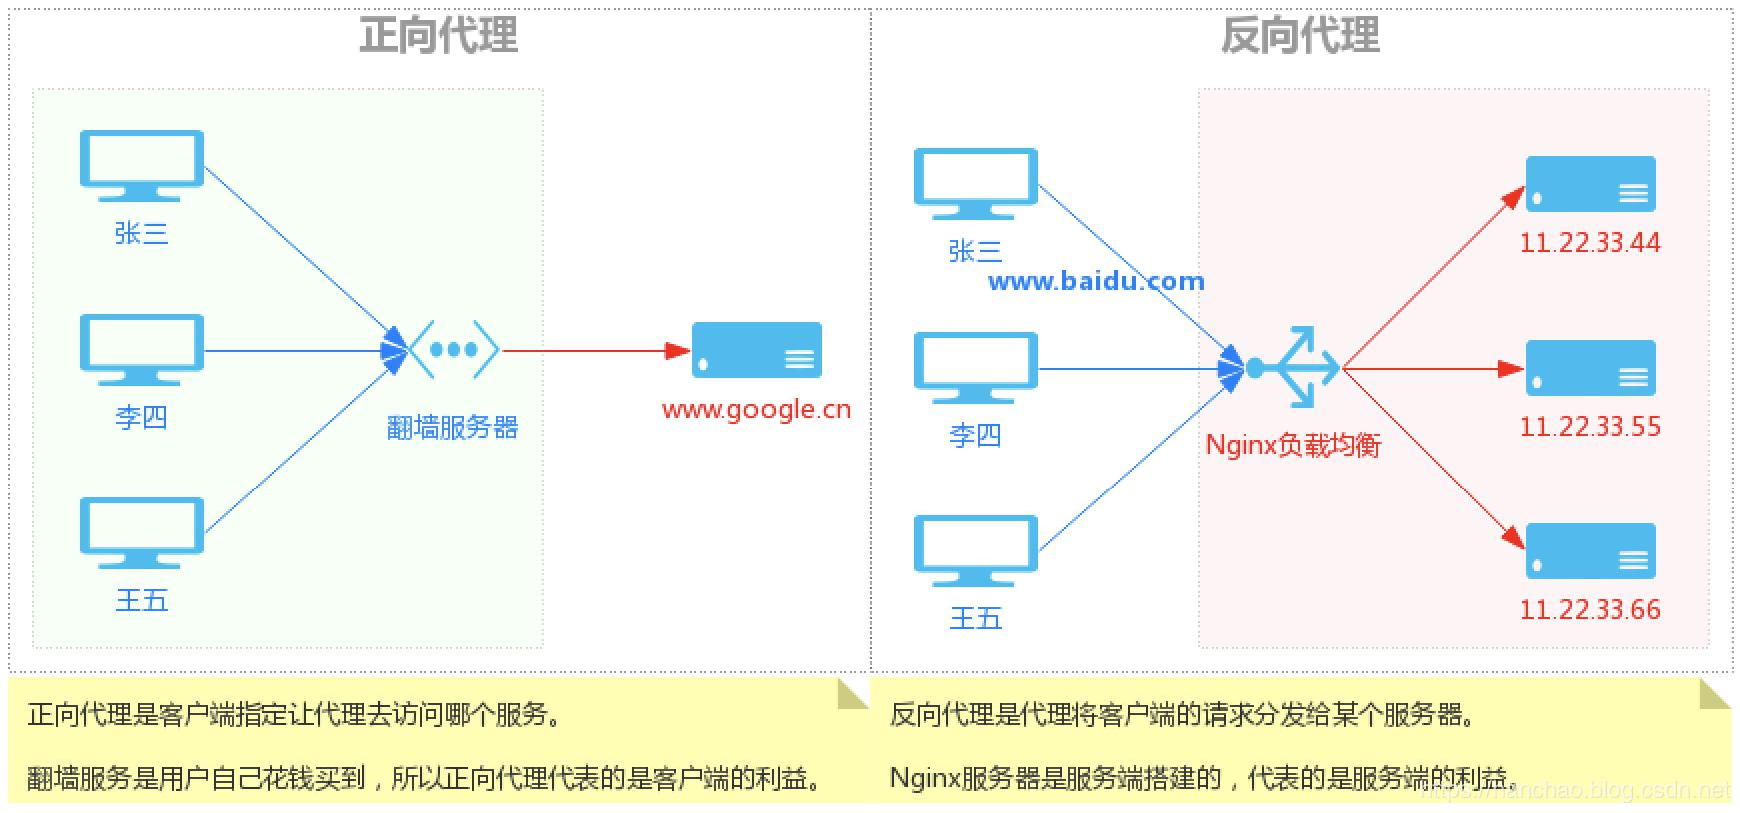
# 反向代理:reverse proxy,指的是代理外网用户的请求到内部的指定的服务器,并将数据返回给用户的 一种方式,这是用的比较多的一种方式
# Nginx 除了可以在企业提供高性能的web服务之外,另外还可以将 nginx 本身不具备的请求通过某种预 定义的协议转发至其它服务器处理,不同的协议就是Nginx服务器与其他服务器进行通信的一种规范,主 要在不同的场景使用以下模块实现不同的功能
1. 实现反向代理
(1)实验环境
#172.25.254.10 RS1	172.25.254.20 RS2


[root@RSX ~]# dnf install httpd -y
[root@RSX ~]# systemctl enable --now httpd
[root@RSX ~]# echo 172.25.254.20 > /var/www/html/index.html


#测试 在Nginx主机中
[root@Nginx ~]# curl  172.25.254.10
172.25.254.10
[root@Nginx ~]# curl  172.25.254.20
172.25.254.20
(2)简单代理
[root@RS2 ~]# mkdir  /var/www/html/web
[root@RS2 ~]# echo 172.25.254.20 web > /var/www/html/web/index.html


[root@Nginx ~]# vim /usr/local/nginx/conf/conf.d/vhosts.conf
server {
    listen 80;
    server_name lee.timinglee.org;
    location / {
        proxy_pass http://172.25.254.10:80;
    }

    location /web {
        proxy_pass http://172.25.254.20:80;
    }

}


[root@Nginx ~]# nginx -s reload

#测试
[root@Nginx ~]# curl  172.25.254.20/web/
172.25.254.20 web
[root@Nginx ~]# curl  172.25.254.10
172.25.254.10
(3)proxy_hide_header filed
[Administrator.DESKTOP-VJ307M3] ➤ curl -v lee.timinglee.org
*   Trying 172.25.254.100:80...
* TCP_NODELAY set
* Connected to lee.timinglee.org (172.25.254.100) port 80 (#0)
> GET / HTTP/1.1
> Host: lee.timinglee.org
> User-Agent: curl/7.65.0
> Accept: */*
>
* Mark bundle as not supporting multiuse
< HTTP/1.1 200 OK
< Server: nginx/1.28.1
< Date: Tue, 03 Feb 2026 06:31:03 GMT
< Content-Type: text/html; charset=UTF-8
< Content-Length: 14
< Connection: keep-alive
< Keep-Alive: timeout=100
< Last-Modified: Tue, 03 Feb 2026 06:20:50 GMT
< ETag: "e-649e570e8a49f"					#可以看到ETAG信息
< Accept-Ranges: bytes
<
172.25.254.10
* Connection #0 to host lee.timinglee.org left intact

[root@Nginx ~]# vim /usr/local/nginx/conf/conf.d/vhosts.conf
server {
    listen 80;
    server_name lee.timinglee.org;
    location / {
        proxy_pass http://172.25.254.10:80;
        proxy_hide_header ETag;
    }

    location /web {
        proxy_pass http://172.25.254.20:80;
    }

}
[root@Nginx ~]# nginx -s reload

#测试
[Administrator.DESKTOP-VJ307M3] ➤ curl -v lee.timinglee.org
*   Trying 172.25.254.100:80...
* TCP_NODELAY set
* Connected to lee.timinglee.org (172.25.254.100) port 80 (#0)
> GET / HTTP/1.1
> Host: lee.timinglee.org
> User-Agent: curl/7.65.0
> Accept: */*
>
* Mark bundle as not supporting multiuse
< HTTP/1.1 200 OK
< Server: nginx/1.28.1
< Date: Tue, 03 Feb 2026 06:33:11 GMT
< Content-Type: text/html; charset=UTF-8
< Content-Length: 14
< Connection: keep-alive
< Keep-Alive: timeout=100
< Last-Modified: Tue, 03 Feb 2026 06:20:50 GMT
< Accept-Ranges: bytes
<
172.25.254.10
(4)proxy_pass_header
[Administrator.DESKTOP-VJ307M3] ➤ curl -v lee.timinglee.org
*   Trying 172.25.254.100:80...
* TCP_NODELAY set
* Connected to lee.timinglee.org (172.25.254.100) port 80 (#0)
> GET / HTTP/1.1
> Host: lee.timinglee.org
> User-Agent: curl/7.65.0
> Accept: */*
>
* Mark bundle as not supporting multiuse
< HTTP/1.1 200 OK
< Server: nginx/1.28.1						#默认访问不透传server信息
< Date: Tue, 03 Feb 2026 06:35:35 GMT
< Content-Type: text/html; charset=UTF-8
< Content-Length: 14
< Connection: keep-alive
< Keep-Alive: timeout=100
< Last-Modified: Tue, 03 Feb 2026 06:20:50 GMT
< Accept-Ranges: bytes
<
172.25.254.10
* Connection #0 to host lee.timinglee.org left intact

[root@Nginx ~]# vim /usr/local/nginx/conf/conf.d/vhosts.conf
server {
    listen 80;
    server_name lee.timinglee.org;
    location / {
        proxy_pass http://172.25.254.10:80;
        proxy_pass_header Server;
    }

    location /web {
        proxy_pass http://172.25.254.20:80;
    }

}

[root@Nginx ~]# nginx -s reload
Administrator.DESKTOP-VJ307M3] ➤ curl -v lee.timinglee.org
*   Trying 172.25.254.100:80...
* TCP_NODELAY set
* Connected to lee.timinglee.org (172.25.254.100) port 80 (#0)
> GET / HTTP/1.1
> Host: lee.timinglee.org
> User-Agent: curl/7.65.0
> Accept: */*
>
* Mark bundle as not supporting multiuse
< HTTP/1.1 200 OK
< Date: Tue, 03 Feb 2026 06:37:25 GMT
< Content-Type: text/html; charset=UTF-8
< Content-Length: 14
< Connection: keep-alive
< Keep-Alive: timeout=100
< Server: Apache/2.4.62 (Red Hat Enterprise Linux)			#透传结果
< Last-Modified: Tue, 03 Feb 2026 06:20:50 GMT
< Accept-Ranges: bytes
<
172.25.254.10
* Connection #0 to host lee.timinglee.org left intact
(5)透传信息
[root@RS1 ~]# vim /etc/httpd/conf/httpd.conf
    LogFormat "%h %l %u %t \"%r\" %>s %b \"%{Referer}i\" \"%{User-Agent}i\" \"%{X-Forwarded-For}i\"" combined


[root@RS1 ~]# systemctl restart httpd

[root@Nginx ~]# vim /usr/local/nginx/conf/conf.d/vhosts.conf
server {
    listen 80;
    server_name lee.timinglee.org;
    location / {
        proxy_pass http://172.25.254.10:80;
        proxy_set_header X-Forwarded-For $remote_addr;

    }

    location /web {
        proxy_pass http://172.25.254.20:80;
    }

[root@Nginx ~]# nginx -s reload

[Administrator.DESKTOP-VJ307M3] ➤ curl  lee.timinglee.org
172.25.254.10


[root@RS1 ~]# cat /etc/httpd/logs/access_log
172.25.254.100 - - [03/Feb/2026:14:47:37 +0800] "GET / HTTP/1.0" 200 14 "-" "curl/7.65.0" "172.25.254.1"
2. 利用反向代理实现动静分离
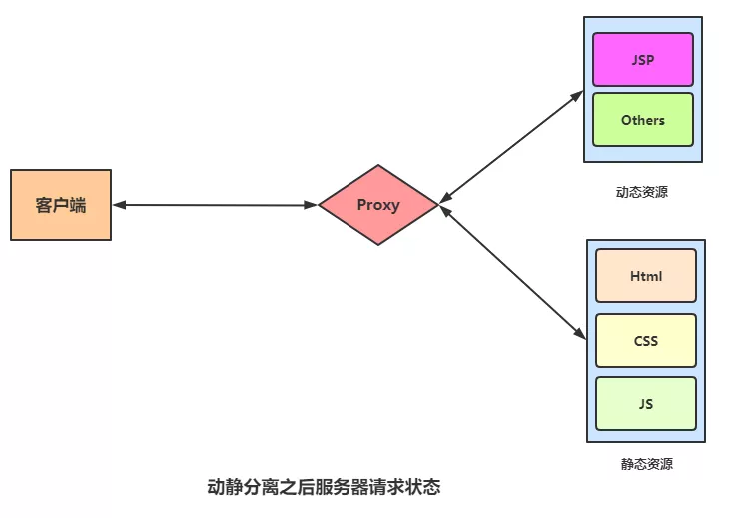
(1)实验环境
#在10中
[root@RS1 ~]# dnf install php -y
[root@RS1 ~]# systemctl restart httpd

[root@RS1 ~]# vim /var/www/html/index.php
<?php
    echo "<h2>172.25.254.10</h2>";
    phpinfo();
?>
(2)实现动静分离
[root@Nginx ~]# vim /usr/local/nginx/conf/conf.d/vhosts.conf
server {
    listen 80;
    server_name lee.timinglee.org;
    location / {
        proxy_pass http://172.25.254.20:80;

    }

    location ~* \.(php|js)$ {
        proxy_pass http://172.25.254.10:80;
    }

}
[root@Nginx ~]# nginx -s reload
3. 缓存加速
# 缓存功能默认关闭状态,需要先动配置才能启用
(1)当未启用缓存时进行压测
[Administrator.DESKTOP-VJ307M3] ➤ apt-get install httpd-tools
[Administrator.DESKTOP-VJ307M3] ➤ ab -n 10000 -c 50 lee.timinglee.org/index.html
······
Complete requests:      10000
Failed requests:        0
······

[Administrator.DESKTOP-VJ307M3] ➤ ab -n 10000 -c 50 lee.timinglee.org/index.php
This is ApacheBench, Version 2.3 <$Revision: 1807734 $>
Copyright 1996 Adam Twiss, Zeus Technology Ltd, http://www.zeustech.net/
Licensed to The Apache Software Foundation, http://www.apache.org/

Benchmarking lee.timinglee.org (be patient)
Completed 1000 requests
Completed 2000 requests
Completed 3000 requests
Completed 4000 requests
Completed 5000 requests
Completed 6000 requests
Completed 7000 requests
Completed 8000 requests
Completed 9000 requests
Completed 10000 requests
Finished 10000 requests


Server Software:        nginx/1.28.1
Server Hostname:        lee.timinglee.org
Server Port:            80

Document Path:          /index.php
Document Length:        72921 bytes

Concurrency Level:      50
Time taken for tests:   13.678 seconds
Complete requests:      10000
Failed requests:        9963				#失败的
   (Connect: 0, Receive: 0, Length: 9963, Exceptions: 0)
Total transferred:      731097819 bytes
HTML transferred:       729237819 bytes
Requests per second:    731.10 [#/sec] (mean)
Time per request:       68.390 [ms] (mean)
Time per request:       1.368 [ms] (mean, across all concurrent requests)
Transfer rate:          52197.72 [Kbytes/sec] received

Connection Times (ms)
              min  mean[+/-sd] median   max
Connect:        0    7   4.0      6      26
Processing:     4   61 168.8     44    3405
Waiting:        2   38 129.9     26    3316
Total:          5   68 168.7     51    3405

Percentage of the requests served within a certain time (ms)
  50%     51
  66%     61
  75%     68
  80%     71
  90%     83
  95%     92
  98%    105
  99%    506
 100%   3405 (longest request)
(2)设定缓存加速
[root@Nginx ~]# vim /usr/local/nginx/conf/nginx.conf
proxy_cache_path /usr/local/nginx/proxy_cache levels=1:2:2 keys_zone=proxycache:20m inactive=120s max_size=1g;

[root@Nginx ~]# vim /usr/local/nginx/conf/conf.d/vhosts.conf
server {
    listen 80;
    server_name lee.timinglee.org;
    location / {
        proxy_pass http://172.25.254.20:80;

    }

    location ~* \.(php|js)$ {
        proxy_pass http://172.25.254.10:80;
        proxy_cache proxycache;
        proxy_cache_key $request_uri;
        proxy_cache_valid 200 302 301 10m;
        proxy_cache_valid any 1m;
    }

}


[root@Nginx ~]# systemctl restart nginx.service
[root@Nginx ~]# tree  /usr/local/nginx/proxy_cache/
/usr/local/nginx/proxy_cache/

0 directories, 0 files

#测试
[Administrator.DESKTOP-VJ307M3] ➤ ab -n 10000 -c 50 lee.timinglee.org/index.php
This is ApacheBench, Version 2.3 <$Revision: 1807734 $>
Copyright 1996 Adam Twiss, Zeus Technology Ltd, http://www.zeustech.net/
Licensed to The Apache Software Foundation, http://www.apache.org/

Benchmarking lee.timinglee.org (be patient)
Completed 1000 requests
Completed 2000 requests
Completed 3000 requests
Completed 4000 requests
Completed 5000 requests
Completed 6000 requests
Completed 7000 requests
Completed 8000 requests
Completed 9000 requests
Completed 10000 requests
Finished 10000 requests


Server Software:        nginx/1.28.1
Server Hostname:        lee.timinglee.org
Server Port:            80

Document Path:          /index.php
Document Length:        72925 bytes

Concurrency Level:      50
Time taken for tests:   4.365 seconds
Complete requests:      10000
Failed requests:        0
Total transferred:      731110000 bytes
HTML transferred:       729250000 bytes
Requests per second:    2290.76 [#/sec] (mean)
Time per request:       21.827 [ms] (mean)
Time per request:       0.437 [ms] (mean, across all concurrent requests)
Transfer rate:          163554.31 [Kbytes/sec] received

Connection Times (ms)
              min  mean[+/-sd] median   max
Connect:        0    4   1.8      4      11
Processing:     4   18  31.3     15     734
Waiting:        1    9  30.7      5     726
Total:          6   22  31.2     20     734

Percentage of the requests served within a certain time (ms)
  50%     20
  66%     21
  75%     21
  80%     22
  90%     27
  95%     32
  98%     41
  99%     46
 100%    734 (longest request)


[root@Nginx ~]# tree  /usr/local/nginx/proxy_cache/
/usr/local/nginx/proxy_cache/
└── 1
    └── af
        └── 15
            └── e251273eb74a8ee3f661a7af00915af1

3 directories, 1 file
4. 反向代理负载均衡
# 在上一个节中Nginx可以将客户端的请求转发至单台后端服务器但是无法转发至特定的一组的服务器,而且不能对后端服务器提供相应的服务器状态监测,Nginx可以基于ngx_http_upstream_module模块提供服务器分组转发、权重分配、状态监测、调度算法等高级功能
(1)实验环境
172.25.254.100 #Nginx 代理服务器
172.25.254.10 #后端web A,Apache部署
172.25.254.20 #后端web B,Apache部署
(2)实现负载均衡
[root@Nginx ~]# mkdir  /usr/local/nginx/conf/upstream/
[root@Nginx ~]# vim /usr/local/nginx/conf/nginx.conf
events {
    worker_connections  10000;
    use epoll;
    accept_mutex on;
    multi_accept on;
}

http {
    include       mime.types;
    include "/usr/local/nginx/conf/conf.d/*.conf";
    default_type  application/octet-stream;
	include "/usr/local/nginx/conf/upstream/*.conf";		#子配置目录


[root@Nginx ~]# vim /usr/local/nginx/conf/upstream/loadbalance.conf
upstream webserver {
    server 172.25.254.10:80 weight=1 fail_timeout=15s max_fails=3;
    server 172.25.254.20:80 weight=1 fail_timeout=15s max_fails=3;
    server 172.25.254.100:8888 backup;

}
server {
    listen 80;
    server_name www.timinglee.org;

    location ~ / {
        proxy_pass http://webserver;
    }
}


[root@Nginx ~]# mkdir  /webdir/timinglee.org/error/html -p
[root@Nginx ~]# echo error > /webdir/timinglee.org/error/html/index.html

[root@Nginx ~]# vim /usr/local/nginx/conf/conf.d/vhosts.conf
server {
    listen 8888;
    root /webdir/timinglee.org/error/html;
}

[root@Nginx ~]# systemctl restart nginx.service


#测试:
[root@Nginx ~]# curl www.timinglee.org
172.25.254.10
[root@Nginx ~]# curl www.timinglee.org
172.25.254.20
[root@Nginx ~]# curl www.timinglee.org
172.25.254.10
[root@Nginx ~]# curl www.timinglee.org
172.25.254.20
[root@Nginx ~]# curl www.timinglee.org
172.25.254.20
[root@Nginx ~]# curl www.timinglee.org
172.25.254.20


[root@RS1+2 ~]# systemctl stop httpd

[root@Nginx ~]# curl www.timinglee.org
error
(3)负载均衡算法
[root@Nginx ~]# vim /usr/local/nginx/conf/upstream/loadbalance.conf
upstream webserver {
    #ip_hash;
    #hash $request_uri consistent;
    #least_conn;
    hash $cookie_lee;
    server 172.25.254.10:80 weight=1 fail_timeout=15s max_fails=3;
    server 172.25.254.20:80 weight=1 fail_timeout=15s max_fails=3;
    #server 172.25.254.100:8888 backup;

}
server {
    listen 80;
    server_name www.timinglee.org;

    location ~ / {
        proxy_pass http://webserver;
    }
}


#
[root@Nginx ~]# curl  -b lee=20 www.timinglee.org
[root@Nginx ~]# curl   www.timinglee.org/web1/index.html
[root@Nginx ~]# curl   www.timinglee.org/
5. Nginx四层负载均衡
# Nginx在1.9.0版本开始支持tcp模式的负载均衡,在1.9.13版本开始支持udp协议的负载,udp主要用于 DNS的域名解析,其配置方式和指令和http 代理类似,其基于ngx_stream_proxy_module模块实现tcp 负载,另外基于模块ngx_stream_upstream_module实现后端服务器分组转发、权重分配、状态监测、 调度算法等高级功能。
# 如果编译安装,需要指定 --with-stream 选项才能支持ngx_stream_proxy_module模块
(1)mysql实验环境
[root@RS1 ~]# dnf install mariadb-server -y
[root@RS2 ~]#  dnf install mariadb-server -y

[root@RS1 ~]# vim /etc/my.cnf.d/mariadb-server.cnf
server-id=10

[root@RS2 ~]# vim /etc/my.cnf.d/mariadb-server.cnf
server-id=20
[root@RS1 ~]# systemctl enable --now mariadb
[root@RS2 ~]# systemctl enable --now mariadb

[root@RS1 ~]# mysql
Welcome to the MariaDB monitor.  Commands end with ; or \g.
Your MariaDB connection id is 3
Server version: 10.5.27-MariaDB MariaDB Server

Copyright (c) 2000, 2018, Oracle, MariaDB Corporation Ab and others.

Type 'help;' or '\h' for help. Type '\c' to clear the current input statement.

MariaDB [(none)]> CREATE USER lee@'%' IDENTIFIED BY 'lee';
Query OK, 0 rows affected (0.001 sec)

MariaDB [(none)]> GRANT ALL ON *.* TO lee@'%';
Query OK, 0 rows affected (0.001 sec)

MariaDB [(none)]>

[root@RS2 ~]# mysql
Welcome to the MariaDB monitor.  Commands end with ; or \g.
Your MariaDB connection id is 3
Server version: 10.5.27-MariaDB MariaDB Server

Copyright (c) 2000, 2018, Oracle, MariaDB Corporation Ab and others.

Type 'help;' or '\h' for help. Type '\c' to clear the current input statement.

MariaDB [(none)]>  CREATE USER lee@'%' IDENTIFIED BY 'lee';
Query OK, 0 rows affected (0.001 sec)

MariaDB [(none)]> GRANT ALL ON *.* TO lee@'%';
Query OK, 0 rows affected (0.001 sec)
(2)dns实验环境
[root@RS1 ~]# dnf install bind -y
[root@RS2 ~]# dnf install bind -y

[root@RS1 ~]# vim /etc/named.conf
[root@RS2 ~]# vim /etc/named.conf

options {
//      listen-on port 53 { 127.0.0.1; };
//      listen-on-v6 port 53 { ::1; };
        directory       "/var/named";
        dump-file       "/var/named/data/cache_dump.db";
        statistics-file "/var/named/data/named_stats.txt";
        memstatistics-file "/var/named/data/named_mem_stats.txt";
        secroots-file   "/var/named/data/named.secroots";
        recursing-file  "/var/named/data/named.recursing";
//      allow-query     { localhost; };
        dnssec-validation no;

[root@RS1 ~]# vim /etc/named.rfc1912.zones
[root@RS2 ~]# vim /etc/named.rfc1912.zones

zone "timinglee.org" IN {
        type master;
        file "timinglee.org.zone";
        allow-update { none; };
};

[root@RS1 ~]# cd /var/named/
[root@RS2 ~]# cd /var/named/
[root@RS1 named]# cp -p named.localhost  timinglee.org.zone
[root@RS2 named]# cp -p named.localhost  timinglee.org.zone


[root@RS1 named]# vim timinglee.org.zone
$TTL 1D
@       IN SOA  dns.timingle.org. rname.invalid. (
                                        0       ; serial
                                        1D      ; refresh
                                        1H      ; retry
                                        1W      ; expire
                                        3H )    ; minimum
        NS      dns.timinglee.org.
dns     A       172.25.254.10

[root@RS2 named]# vim timinglee.org.zone
$TTL 1D
@       IN SOA  dns.timingle.org. rname.invalid. (
                                        0       ; serial
                                        1D      ; refresh
                                        1H      ; retry
                                        1W      ; expire
                                        3H )    ; minimum
        NS      dns.timinglee.org.
dns     A       172.25.254.20


[root@RS2 named]# systemctl enable --now named

#测试
[root@RS1 named]# dig dns.timinglee.org @172.25.254.10

; <<>> DiG 9.16.23-RH <<>> dns.timinglee.org @172.25.254.10
;; global options: +cmd
;; Got answer:
;; ->>HEADER<<- opcode: QUERY, status: NOERROR, id: 24486
;; flags: qr aa rd ra; QUERY: 1, ANSWER: 1, AUTHORITY: 0, ADDITIONAL: 1

;; OPT PSEUDOSECTION:
; EDNS: version: 0, flags:; udp: 1232
; COOKIE: 4bb88849cac36aa4010000006982fef4676bf81574ab80b7 (good)
;; QUESTION SECTION:
;dns.timinglee.org.             IN      A

;; ANSWER SECTION:
dns.timinglee.org.      86400   IN      A       172.25.254.10

;; Query time: 3 msec
;; SERVER: 172.25.254.10#53(172.25.254.10)
;; WHEN: Wed Feb 04 16:10:28 CST 2026
;; MSG SIZE  rcvd: 90

[root@RS1 named]# dig dns.timinglee.org @172.25.254.20

; <<>> DiG 9.16.23-RH <<>> dns.timinglee.org @172.25.254.20
;; global options: +cmd
;; Got answer:
;; ->>HEADER<<- opcode: QUERY, status: NOERROR, id: 42456
;; flags: qr aa rd ra; QUERY: 1, ANSWER: 1, AUTHORITY: 0, ADDITIONAL: 1

;; OPT PSEUDOSECTION:
; EDNS: version: 0, flags:; udp: 1232
; COOKIE: 7c088d4822b8f1c1010000006982fef9047f3812bdaf7c0e (good)
;; QUESTION SECTION:
;dns.timinglee.org.             IN      A

;; ANSWER SECTION:
dns.timinglee.org.      86400   IN      A       172.25.254.20

;; Query time: 1 msec
;; SERVER: 172.25.254.20#53(172.25.254.20)
;; WHEN: Wed Feb 04 16:10:33 CST 2026
;; MSG SIZE  rcvd: 90
(3)tcp四层负载
[root@Nginx conf]# mkdir  /usr/local/nginx/conf/tcp -p
[root@Nginx conf]# mkdir  /usr/local/nginx/conf/udp -p
[root@Nginx conf]# vim /usr/local/nginx/conf/nginx.conf
 20     include       "/usr/local/nginx/conf/tcp/*.conf";

[root@Nginx conf]# vim /usr/local/nginx/conf/tcp/mariadb.conf
stream {
  upstream mysql_server {
    server 172.25.254.10:3306  max_fails=3 fail_timeout=30s;
    server 172.25.254.20:3306  max_fails=3 fail_timeout=30s;
  }

  server {
    listen 172.25.254.100:3306;
    proxy_pass mysql_server;
    proxy_connect_timeout 30s;
    proxy_timeout 300s;
  }

}
[root@Nginx conf]# nginx  -s reload
[root@Nginx ~]# dnf install mysql -y


#检测
[root@Nginx ~]# mysql -ulee -plee -h172.25.254.100
Welcome to the MariaDB monitor.  Commands end with ; or \g.
Your MariaDB connection id is 4
Server version: 10.5.27-MariaDB MariaDB Server

Copyright (c) 2000, 2018, Oracle, MariaDB Corporation Ab and others.

Type 'help;' or '\h' for help. Type '\c' to clear the current input statement.

MariaDB [(none)]> SELECT @@server_id;
+-------------+
| @@server_id |
+-------------+
|          10 |
+-------------+
1 row in set (0.001 sec)

MariaDB [(none)]> quit
Bye
[root@Nginx ~]# mysql -ulee -plee -h172.25.254.100
Welcome to the MariaDB monitor.  Commands end with ; or \g.
Your MariaDB connection id is 4
Server version: 10.5.27-MariaDB MariaDB Server

Copyright (c) 2000, 2018, Oracle, MariaDB Corporation Ab and others.

Type 'help;' or '\h' for help. Type '\c' to clear the current input statement.

MariaDB [(none)]> SELECT @@server_id;
+-------------+
| @@server_id |
+-------------+
|          20 |
+-------------+
1 row in set (0.001 sec)
(4)udp四层负载
[root@Nginx ~]# vim /usr/local/nginx/conf/tcp/mariadb.conf
stream {
  upstream mysql_server {
    server 172.25.254.10:3306  max_fails=3 fail_timeout=30s;
    server 172.25.254.20:3306  max_fails=3 fail_timeout=30s;
  }

  upstream dns_server{
    server 172.25.254.10:53 max_fails=3 fail_timeout=30s;
    server 172.25.254.20:53 max_fails=3 fail_timeout=30s;
  }

  server {
    listen 172.25.254.100:3306;
    proxy_pass mysql_server;
    proxy_connect_timeout 30s;
    proxy_timeout 300s;
  }

  server {
        listen 172.25.254.100:53 udp;
        proxy_pass dns_server;
        proxy_timeout 1s;
        proxy_responses 1;
        error_log logs/dns.log;
    }
}
[root@Nginx ~]# nginx  -s reload


#测试

[root@Nginx ~]# dig dns.timinglee.org @172.25.254.100

; <<>> DiG 9.16.23-RH <<>> dns.timinglee.org @172.25.254.100
;; global options: +cmd
;; Got answer:
;; ->>HEADER<<- opcode: QUERY, status: NOERROR, id: 32224
;; flags: qr aa rd ra; QUERY: 1, ANSWER: 1, AUTHORITY: 0, ADDITIONAL: 1

;; OPT PSEUDOSECTION:
; EDNS: version: 0, flags:; udp: 1232
; COOKIE: 9ac742ccc566d4450100000069830452db8dce1f1b224c9f (good)
;; QUESTION SECTION:
;dns.timinglee.org.             IN      A

;; ANSWER SECTION:
dns.timinglee.org.      86400   IN      A       172.25.254.10

;; Query time: 2 msec
;; SERVER: 172.25.254.100#53(172.25.254.100)
;; WHEN: Wed Feb 04 16:33:22 CST 2026
;; MSG SIZE  rcvd: 90

[root@Nginx ~]# dig dns.timinglee.org @172.25.254.100

; <<>> DiG 9.16.23-RH <<>> dns.timinglee.org @172.25.254.100
;; global options: +cmd
;; Got answer:
;; ->>HEADER<<- opcode: QUERY, status: NOERROR, id: 2259
;; flags: qr aa rd ra; QUERY: 1, ANSWER: 1, AUTHORITY: 0, ADDITIONAL: 1

;; OPT PSEUDOSECTION:
; EDNS: version: 0, flags:; udp: 1232
; COOKIE: 7f9ffa4884c0b685010000006983045565fd892fc72c5514 (good)
;; QUESTION SECTION:
;dns.timinglee.org.             IN      A

;; ANSWER SECTION:
dns.timinglee.org.      86400   IN      A       172.25.254.20

;; Query time: 2 msec
;; SERVER: 172.25.254.100#53(172.25.254.100)
;; WHEN: Wed Feb 04 16:33:25 CST 2026
;; MSG SIZE  rcvd: 90
八、实现FastCGI
# PHP-FPM(FastCGI Process Manager)
- FastCGI进程管理器是一个实现了Fastcgi的程序,并且提供进程管理的功能
- 进程包括master进程和worker进程。master进程只有一个,负责监听端口,接受来自web server 的请求
- worker进程一般会有多个,每个进程中会嵌入一个PHP解析器,进行PHP代码的处理
# Nginx基于模块ngx_http_fastcgi_module实现通过fastcgi协议将指定的客户端请求转发至php-fpm处理
1. PHP源码编译
(1)源码编译PHP
[root@Nginx ~]# wget https://www.php.net/distributions/php-8.3.30.tar.gz
[root@Nginx ~]# wget https://mirrors.aliyun.com/rockylinux/9.7/devel/x86_64/os/Packages/o/oniguruma-devel-6.9.6-1.el9.6.x86_64.rpm     #依赖
[root@Nginx ~]# tar zxf php-8.3.30.tar.gz
[root@Nginx ~]# ls
anaconda-ks.cfg                lee.png              nginx-1.29.4.tar.gz  test.c
daolian.png                    nginx-1.28.1         php-8.3.30
echo-nginx-module-0.64         nginx-1.28.1.tar.gz  php-8.3.30.tar.gz
echo-nginx-module-0.64.tar.gz  nginx-1.29.4         test
[root@Nginx ~]# cd php-8.3.30
[root@Nginx ~]# dnf install gcc systemd-devel-252-51.el9.x86_64 libxml2-devel.x86_64 sqlite-devel.x86_64  libcurl-devel.x86_64  libpng-devel.x86_64 oniguruma-devel-6.9.6-1.el9.6.x86_64.rpm -y

[root@Nginx ~]# cd php-8.3.30/
[root@Nginx php-8.3.30]# ./configure \
--prefix=/usr/local/php \		#安装路径
--with-config-file-path=/usr/local/php/etc \	#指定配置路径
--enable-fpm \			#用cgi方式启动程序
--with-fpm-user=nginx \	#指定运行用户身份
--with-fpm-group=nginx \
--with-curl \			#打开curl浏览器支持
--with-iconv \			#启用iconv函数,转换字符编码
--with-mhash \			#mhash加密方式扩展库
--with-zlib \			#支持zlib库,用于压缩http压缩传输
--with-openssl \		#支持ssl加密
--enable-mysqlnd \		#mysql数据库
--with-mysqli \
--with-pdo-mysql \
--disable-debug \		#关闭debug功能
--enable-sockets \		#支持套接字访问
--enable-soap \			#支持soap扩展协议
--enable-xml \			#支持xml
--enable-ftp \			#支持ftp
--enable-gd \			#支持gd库
--enable-exif \			#支持图片元数据
--enable-mbstring \		#支持多字节字符串
--enable-bcmath \		#打开图片大小调整,用到zabbix监控的时候用到了这个模块
--with-fpm-systemd		#支持systemctl 管理cgi

[root@Nginx php-8.3.30]# make && make instsall
(2)配置PHP
[root@Nginx php-8.3.30]# cd /usr/local/php/etc
[root@Nginx etc]# cp -p php-fpm.conf.default  php-fpm.conf

[root@Nginx etc]# vim php-fpm.conf
[global]
; Pid file
; Note: the default prefix is /usr/local/php/var
; Default Value: none
pid = run/php-fpm.pid


[root@Nginx etc]# cd php-fpm.d/
[root@Nginx php-fpm.d]# cp www.conf.default www.conf
[root@Nginx php-fpm.d]# vim www.conf
41 listen = 0.0.0.0:9000

[root@Nginx php-fpm.d]# cp /root/php-8.3.30/php.ini-production  /usr/local/php/etc/php.ini

[root@Nginx php-fpm.d]# vim /usr/local/php/etc/php.ini
989 date.timezone = Asia/Shangha

[root@Nginx ~]# cp /root/php-8.3.30/sapi/fpm/php-fpm.service /lib/systemd/system/
[root@Nginx ~]# vim /lib/systemd/system/php-fpm.service
 20 # Mounts the /usr, /boot, and /etc directories read-only for processes invoked by this unit.
 21 #ProtectSystem=full		#注释此参数
[root@Nginx ~]# systemctl daemon-reload
[root@Nginx ~]# systemctl enable --now php-fpm

[root@Nginx ~]# netstat -antlupe | grep php
tcp        0      0 0.0.0.0:9000            0.0.0.0:*               LISTEN      0          329917     165562/php-fpm: mas

[root@Nginx ~]# vim ~/.bash_profile
export PATH=$PATH:/usr/local/nginx/sbin:/usr/local/php/sbin:/usr/local/php/bin

[root@Nginx ~]# source   ~/.bash_profile
[root@Nginx ~]# php -m
(3)Nginx整合PHP
# Nginx安装完成之后默认生成了与fastcgi的相关配置文件,一般保存在nginx的安装路径的conf目录当 中,比如/apps/nginx/conf/fastcgi.conf、/apps/nginx/conf/fastcgi_params
[root@Nginx conf.d]# mkdir /webdir/timinglee.org/php/html -p
[root@Nginx conf.d]# vim /webdir/timinglee.org/php/html/index.html
php.timinglee.org
[root@Nginx conf.d]# vim /webdir/timinglee.org/php/html/index.php
<?php
phpinfo();
?>
[root@Nginx ~]# cd /usr/local/nginx/conf/conf.d/
[root@Nginx conf.d]# vim php.conf
server {
listen 80;
server_name php.timinglee.org;
root /webdir/timinglee.org/php/html;
location ~ \.php$ {
fastcgi_pass 127.0.0.1:9000;
fastcgi_index index.php;
include fastcgi.conf;
}
}
[root@Nginx conf.d]# nginx -s reload
2026-02-04 10:04.08 /home/mobaxterm vim /etc/hosts
127.0.0.1 localhost
::1 localhost
192.168.153.100 www.timinglee.org lee.timinglee.org bbs.timinglee.org login.timinglee.org www.lee.org www.lee.com php.timinglee.org
#测试
http://php.timinglee.org
http://php.timinglee.org/index.php2. 利用memcache实现php的缓存加速
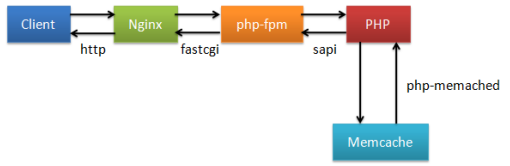
# memcache下载:https://pecl.php.net/package/memcache
(1)安装配置memcache
[root@Nginx ~]# dnf install memcached.x86_64 -y
[root@Nginx ~]# vim /etc/sysconfig/memcached
PORT="11211"
USER="memcached"
MAXCONN="1024"
CACHESIZE="64"
OPTIONS="-l 0.0.0.0,::1"

[root@Nginx ~]# systemctl enable --now memcached.service

[root@Nginx ~]# netstat -antlupe | grep memcache
tcp        0      0 0.0.0.0:11211           0.0.0.0:*               LISTEN      991        437305     166169/memcached
tcp6       0      0 ::1:11211               :::*                    LISTEN      991        437306     166169/memcached
(2)升级php对memcache支持
[root@Nginx ~]# echo 'export PATH=/usr/local/php/bin:$PATH' >> ~/.bashrc
[root@Nginx ~]# source ~/.bashrc

[root@Nginx ~]# php -m	#查看php支持的插件

[root@Nginx ~]# tar zxf memcache-8.2.tgz
[root@Nginx ~]# cd memcache-8.2/
[root@Nginx memcache-8.2]# dnf install autoconf -y
[root@Nginx memcache-8.2]# phpize
[root@Nginx memcache-8.2]# ./configure  && make && make install

[root@Nginx memcache-8.2]# ls /usr/local/php/lib/php/extensions/no-debug-non-zts-20230831/
memcache.so  opcache.so

[root@Nginx memcache-8.2]# vim /usr/local/php/etc/php.ini
939  extension=memcache

[root@Nginx memcache-8.2]# systemctl restart php-fpm.service
[root@Nginx memcache-8.2]# php -m  | grep memcache
memcache
(3)测试
[root@Nginx memcache-8.2]# vim memcache.php
define('ADMIN_USERNAME','admin');   // Admin Username
define('ADMIN_PASSWORD','lee');     // Admin Password
$MEMCACHE_SERVERS[] = '172.25.254.100:11211'; // add more as an array
#$MEMCACHE_SERVERS[] = 'mymemcache-server2:11211'; // add more as an array

[root@Nginx memcache-8.2]# cp -p memcache.php  /webdir/timinglee.org/php/html/
[root@Nginx memcache-8.2]# cp -p example.php /webdir/timinglee.org/php/html/

[root@Nginx memcache-8.2]# vim /etc/hosts
  1 127.0.0.1   localhost localhost.localdomain localhost4 localhost4.localdomain4
  2 ::1         localhost localhost.localdomain localhost6 localhost6.localdomain6
  3 192.168.153.100     Nginx www.timinglee.org lee.timinglee.org php.timinglee.org


#测试
http://php.timinglee.org/memcache.php			#数据页面,在浏览器中可以直接访问
[root@Nginx memcache-8.2]# ab -n 1000 -c 300  php.timinglee.org/example.php
3. nginx+memcache实现高速缓存解
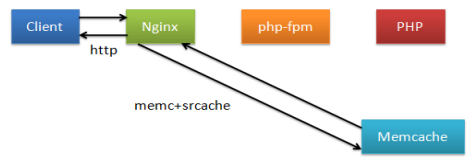
# 部署方式:在我们安装的nginx中默认不支持memc和srcache功能,需要借助第三方模块来让nginx支持此功能,所以nginx需要重新编译
(1)重新编译nginx
[root@Nginx ~]# systemctl stop nginx.service
[root@Nginx ~]# cp /usr/local/nginx/conf/    /mnt/ -r
[root@Nginx ~]# rm -fr /usr/local/nginx/

[root@Nginx ~]# rm -rf nginx-1.29.4 nginx-1.28.1

[root@Nginx ~]# tar zxf nginx-1.28.1.tar.gz
[root@Nginx ~]# cd nginx-1.28.1/

[root@Nginx ~]# tar zxf srcache-nginx-module-0.33.tar.gz
[root@Nginx ~]# tar zxf memc-nginx-module-0.20.tar.gz

[root@Nginx ~]# cd nginx-1.28.1/
[root@Nginx nginx-1.28.1]# ./configure  --prefix=/usr/local/nginx --user=nginx --group=nginx --with-http_ssl_module --with-http_v2_module --with-http_realip_module --with-http_stub_status_module --with-http_gzip_static_module --with-pcre --with-stream --with-stream_ssl_module --with-stream_realip_module --add-module=/root/echo-nginx-module-0.64  --add-module=/root/memc-nginx-module-0.20 --add-module=/root/srcache-nginx-module-0.33
[root@Nginx nginx-1.28.1]# make && make install

[root@Nginx ~]# cd /usr/local/nginx/conf
[root@Nginx conf]# rm -fr nginx.conf
[root@Nginx conf]# cp /mnt/conf/nginx.conf /mnt/conf/conf.d/ . -r
[root@Nginx conf]# systemctl start nginx.service
(2)整合memcache
[root@Nginx conf]# vim /usr/local/nginx/conf/conf.d/php.conf
upstream memcache {
   server 127.0.0.1:11211;
   keepalive 512;
}
server {
    listen 80;
    server_name php.timinglee.org;
    root /webdir/timinglee.org/php/html;
    index index.php index.html;

    location /memc {
        internal;
        memc_connect_timeout 100ms;
        memc_send_timeout 100ms;
        memc_read_timeout 100ms;
        set $memc_key $query_string;
        set $memc_exptime 300;
        memc_pass memcache;
    }
    location ~ \.php$ {
        set $key $uri$args;
        srcache_fetch GET /memc $key;
        srcache_store PUT /memc $key;
        fastcgi_pass 127.0.0.1:9000;
        fastcgi_index index.php;
        include fastcgi.conf;
  }
}

[root@Nginx conf]# nginx  -s reload
#测试
[root@Nginx conf]# ab -n 10000 -c500 http://php.timinglee.org/example.php
九、Nginx 二次开发
1. openresty简介

# OpenResty® 是一个基于 Nginx 与 Lua 的高性能 Web 平台,其内部集成了大量精良的 Lua 库、第三方模块以及大多数的依赖项。用于方便地搭建能够处理超高并发、扩展性极高的动态 Web 应用、Web 服 务和动态网关。
# OpenResty® 通过汇聚各种设计精良的 Nginx 模块(主要由 OpenResty 团队自主开发),从而将 Nginx 有效地变成一个强大的通用 Web 应用平台。这样Web开发人员和系统工程师可以使用 Lua 脚本语言调动 Nginx 支持的各种 C 以及 Lua 模块,快速构造出足以胜任 10K 乃至 1000K 以上单机并发连接的高性能 Web 应用系统。
2. 编译安装 openresty
[root@Nginx src]#wget https://openresty.org/download/openresty-1.27.1.2.tar.gz
[root@Nginx ~]#dnf -yq install gcc pcre-devel openssl-devel perl zlib-devel
[root@Nginx ~]#useradd -r -s /sbin/nologin nginx
[root@Nginx ~]#tar zxf openresty-1.27.1.2
[root@webserver ~]# cd openresty-1.27.1.2/
[root@Nginx openresty-1.17.8.2]#./configure \
--prefix=/usr/local/openresty \
--user=nginx --group=nginx \
--with-http_ssl_module \
--with-http_v2_module \
--with-http_stub_status_module \
--with-http_gzip_static_module \
--with-pcre --with-stream \
--with-stream_ssl_module \
--with-stream_realip_module

[root@Nginx openresty-1.17.8.2]#gmake && gmake install

[root@webserver openresty]# vim ~/.bash_profile
export PATH=$PATH:/usr/local/openresty/bin

source  ~/.bash_profile


[root@Nginx openresty-1.17.8.2]#openresty -v
nginx version: openresty/1.17.8.2

[root@Nginx openresty-1.17.8.2]#openresty

[root@Nginx openresty-1.17.8.2]#ps -ef |grep nginx

[root@webserver openresty]# echo hello test > /usr/local/openresty/nginx/html/index.html
[root@webserver openresty]# curl  172.25.254.200
hello test

AtomGit 是由开放原子开源基金会联合 CSDN 等生态伙伴共同推出的新一代开源与人工智能协作平台。平台坚持“开放、中立、公益”的理念,把代码托管、模型共享、数据集托管、智能体开发体验和算力服务整合在一起,为开发者提供从开发、训练到部署的一站式体验。
更多推荐



 9
9 0
0- 0


 已为社区贡献1条内容

所有评论(0)