Unity3D连接MySQL
今天刚装了MySQL服务器版本8.0.44(Win64),Unity3D使用的版本为2022.3.14f1c1,使用的是Mono脚本后端,许可证类型为Personal(个人版)。结果安装了MySQL Connector/NET9.6.0版本,也试过MySqlConnector2.0.0和2.1.0,发现都无法让Unity3D和MySQL进行通信,提示都是不兼容。比如:
Assembly ‘Assets/Plugins/MySQL/MySqlConnector.dll’ will not be loaded due to errors:
Unable to resolve reference ‘Microsoft.Extensions.Logging.Abstractions’. Is the assembly missing or incompatible with the current platform?
Reference validation can be disabled in the Plugin Inspector.
Unable to resolve reference ‘System.Diagnostics.DiagnosticSource’. Is the assembly missing or incompatible with the current platform?
Reference validation can be disabled in the Plugin Inspector.
Unable to resolve reference ‘System.Runtime.CompilerServices.Unsafe’. Is the assembly missing or incompatible with the current platform?
Reference validation can be disabled in the Plugin Inspector.
最后问了AI版本兼容性,最终还是使用了MySQL Connector/NET 6.10.9解决了这个问题。原因就是:较早的版本依赖少,比较好兼容。
具体过程梳理如下:
1.安装MySQL
1.1下载
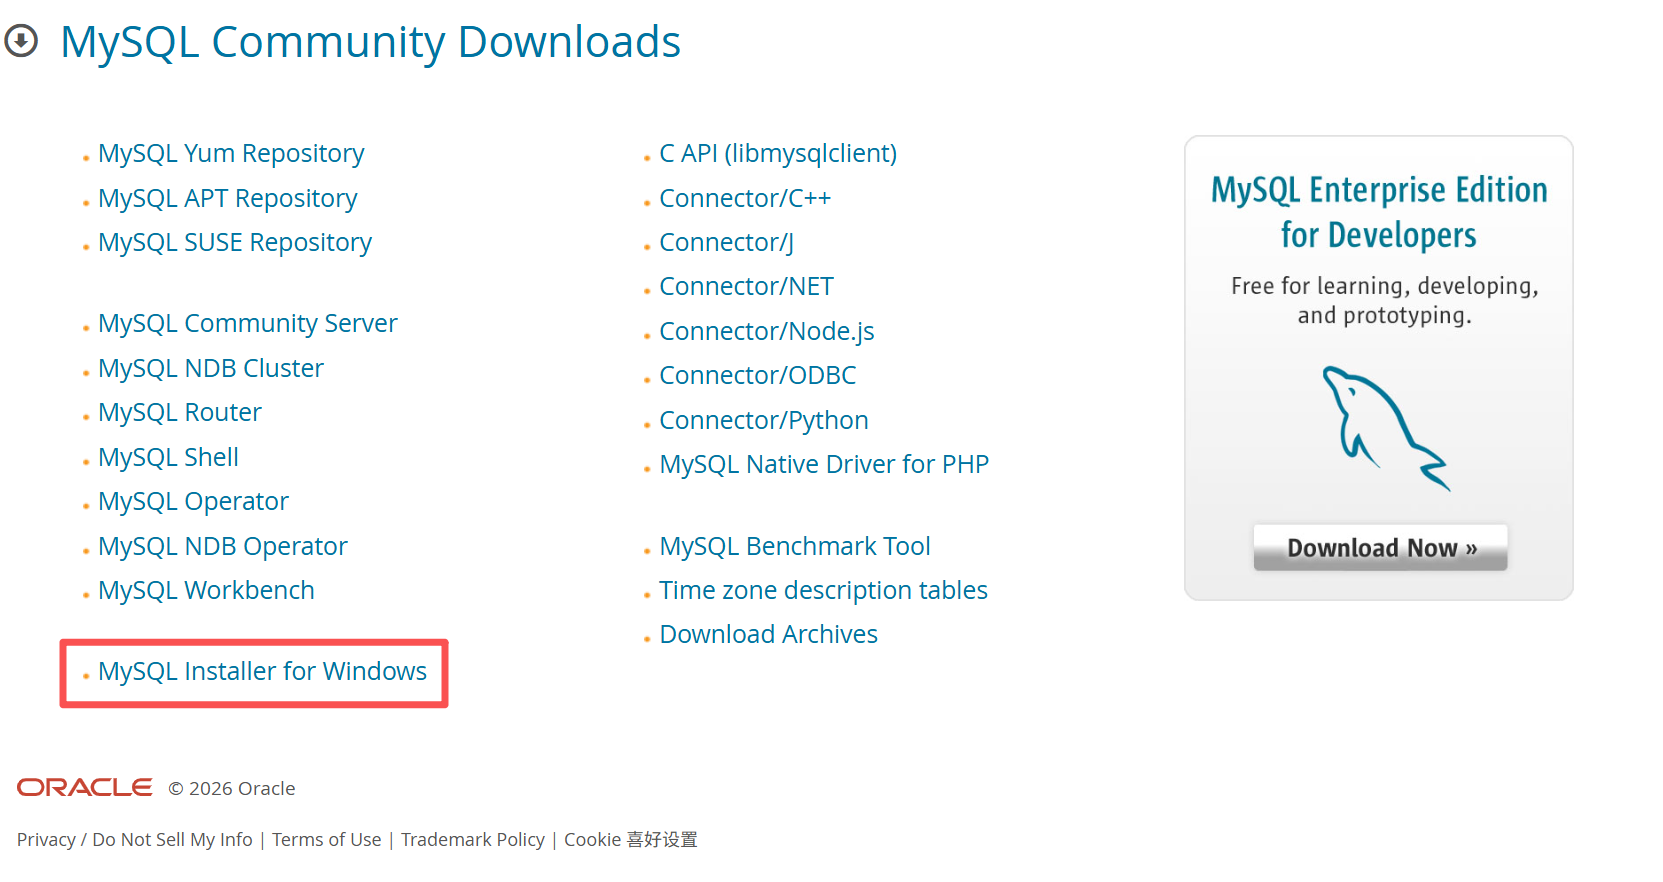
到官网:https://dev.mysql.com/downloads/ 点击“MySQL Installer for Windows”
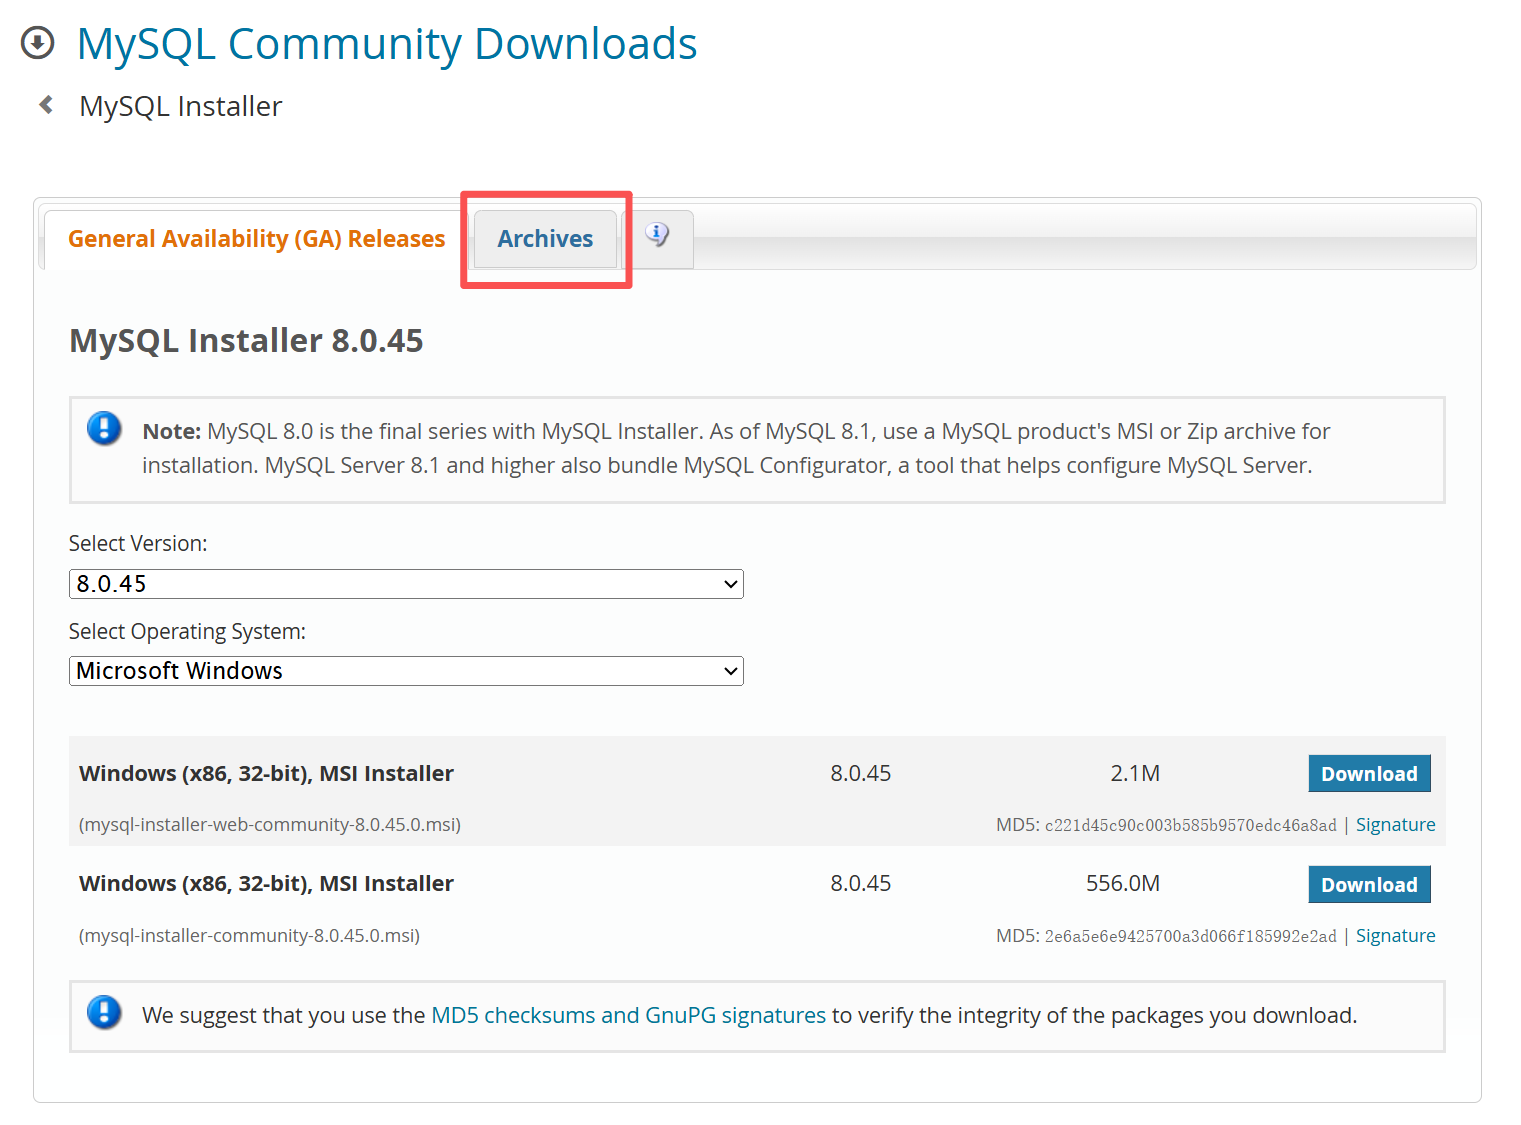
然后点击“Archives”
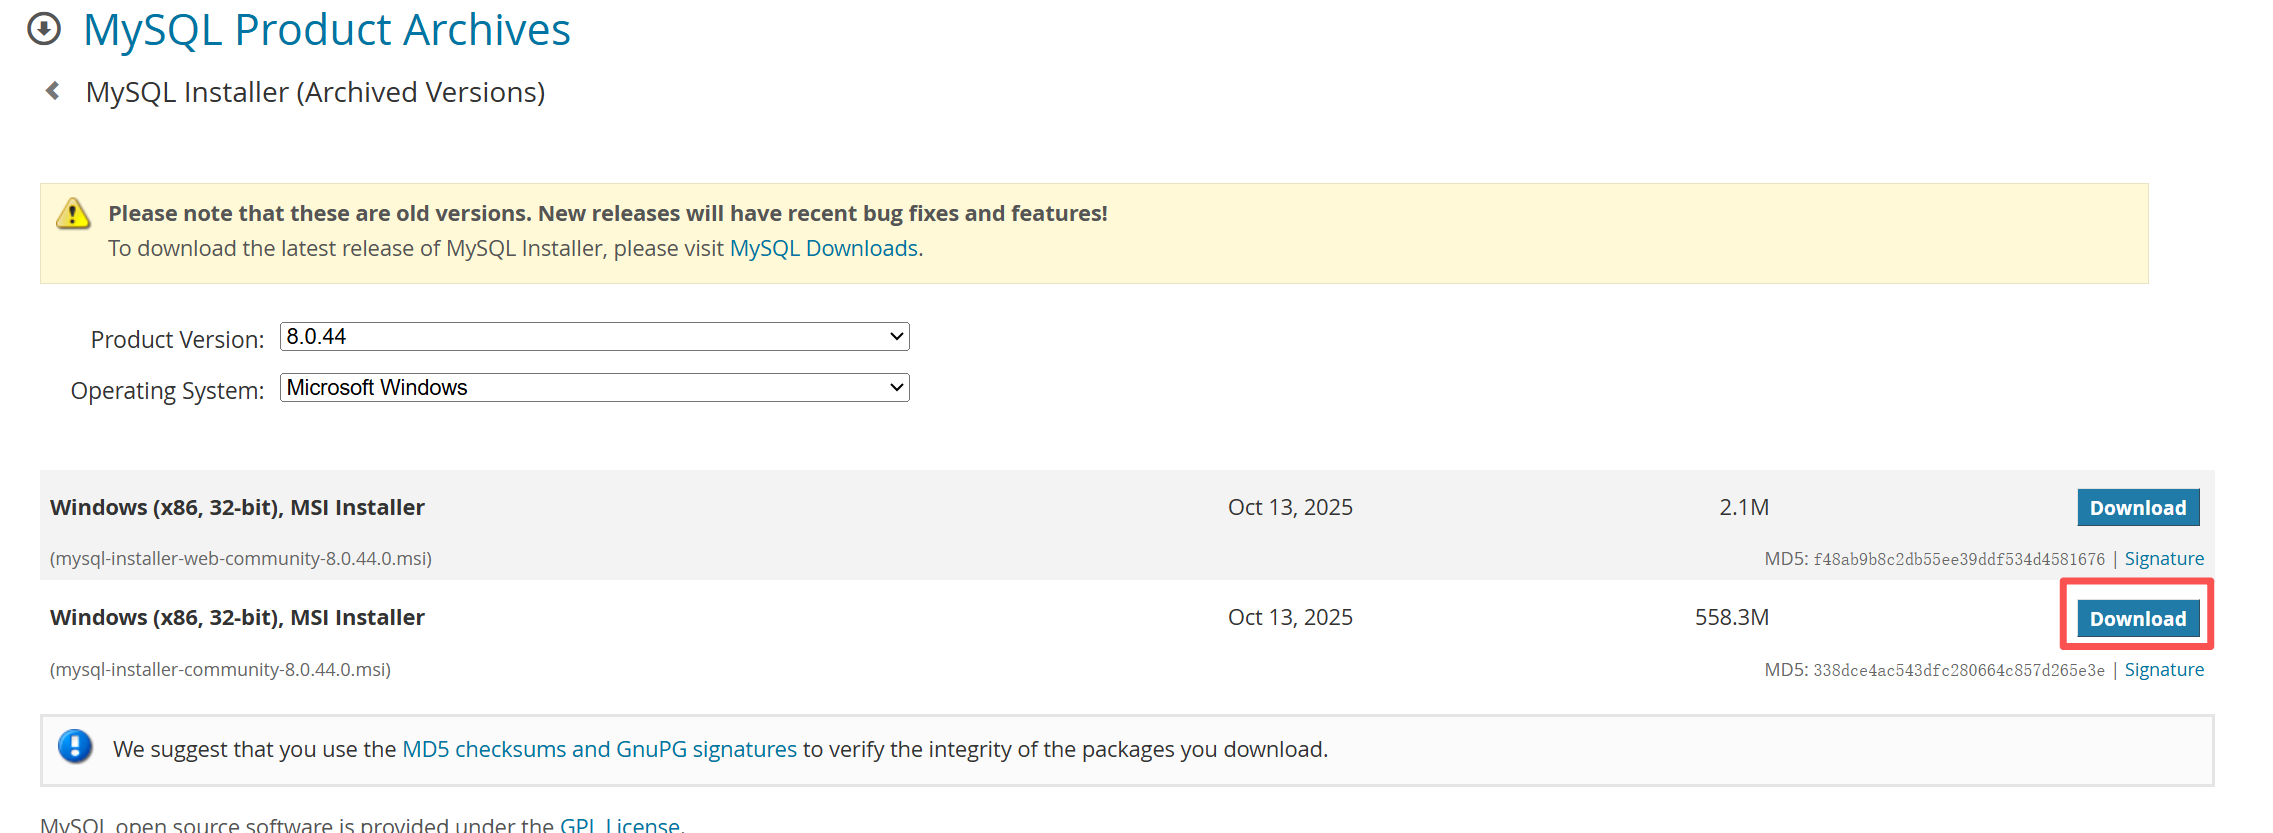
然后点击图中红框按钮下载:
2.2安装
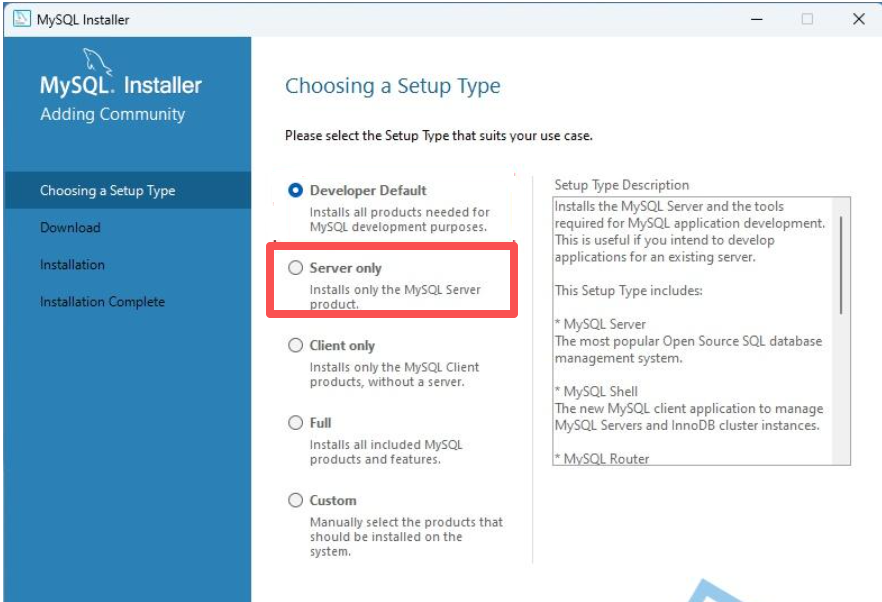
双击下载回来的mysql-installer-community-8.0.44.0.msi。我们只作为服务器安装,
所以下面的这个图片,我们选择Server only
密码建议选择传统模式:
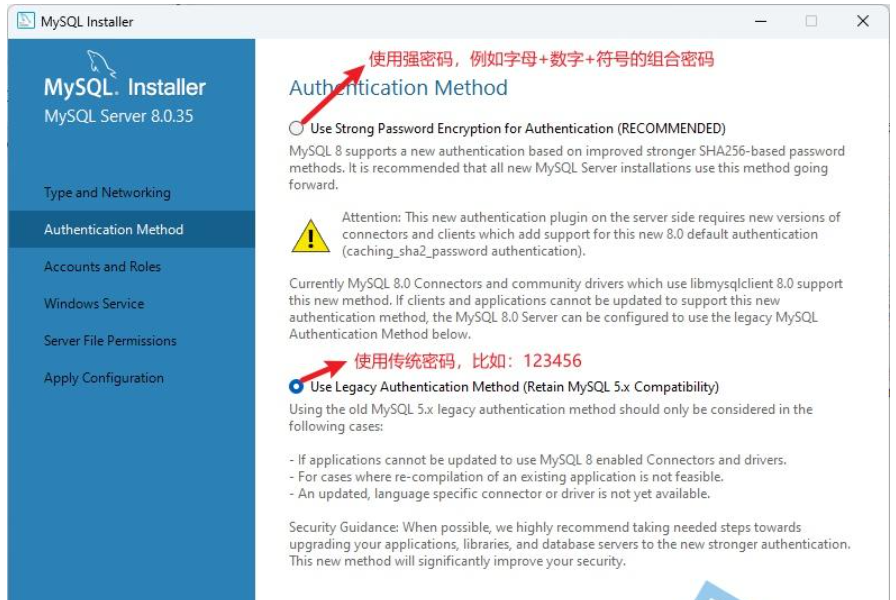
设置密码时,初学者建议直接123456,防止忘记。后续可以修改。
然后,就等待安装完毕即可。
安装完毕后还要这只一下环境变量:
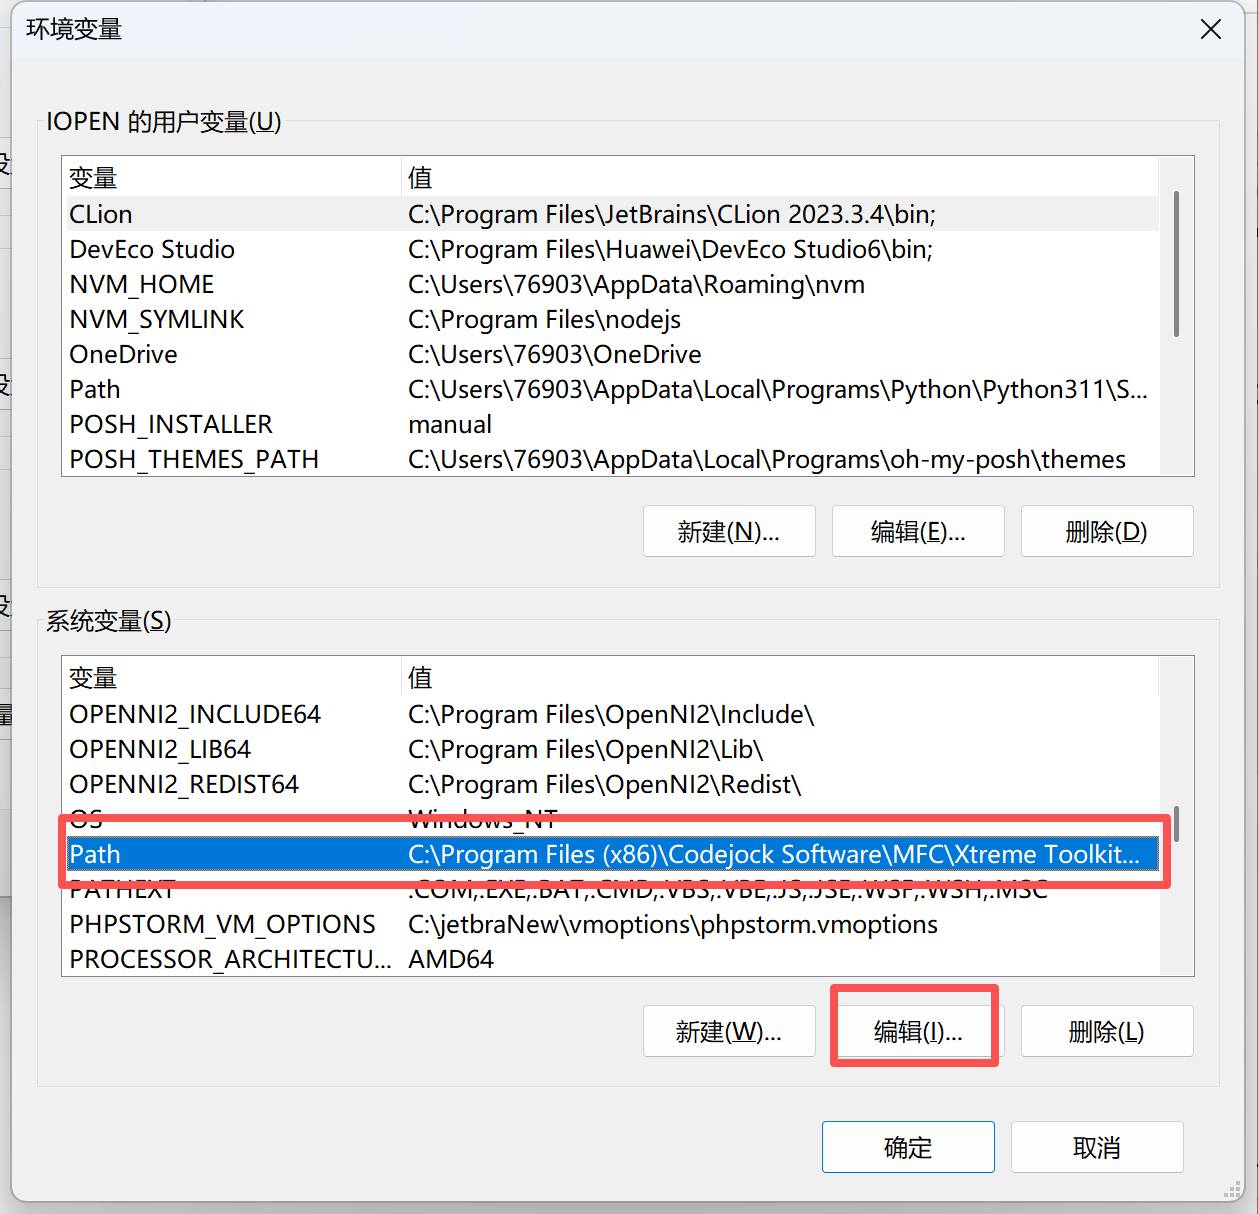
新建C:\Program Files\MySQL\MySQL Server 8.0\bin
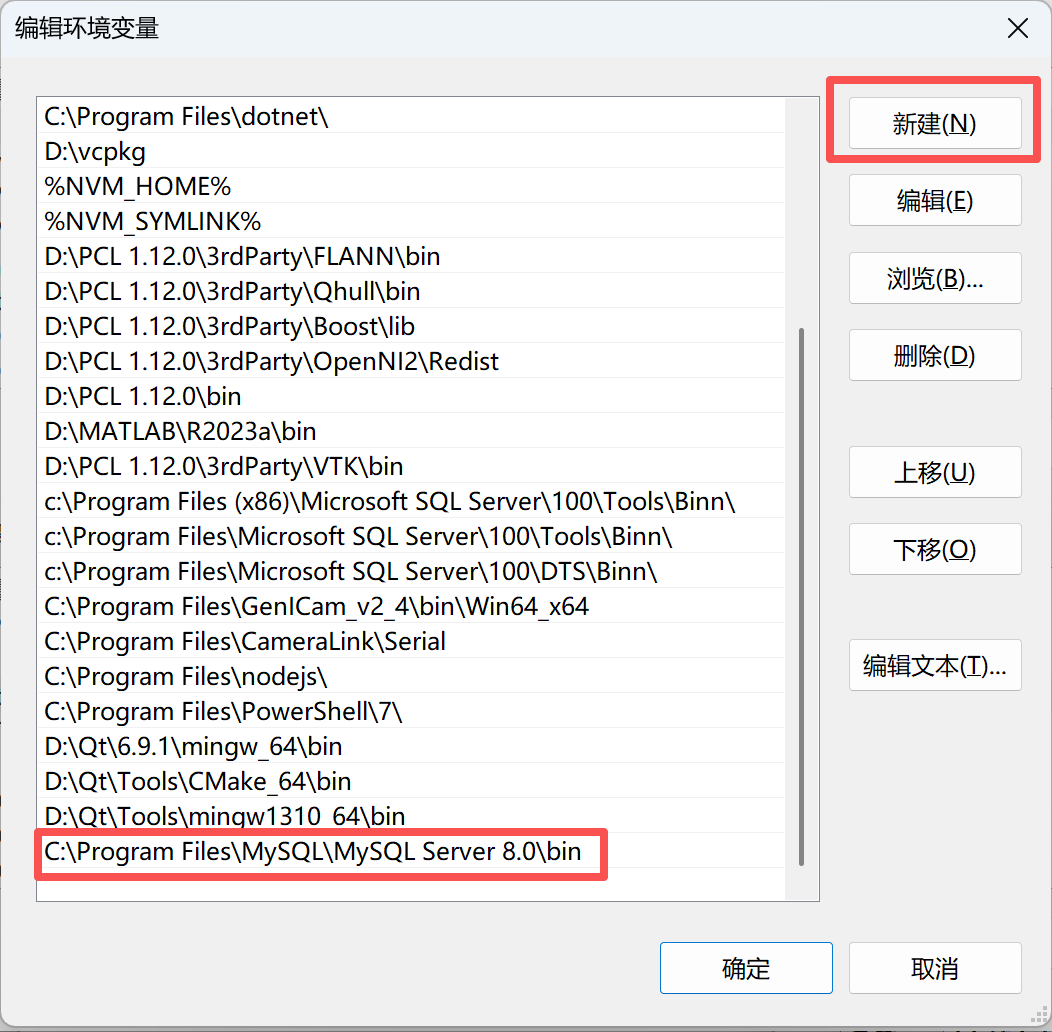
1.3 验证是否成功
打开cmd,输入mysql -uroot -p
需要输入安装的时候设置的密码。
如若出现了版本等信息说明成功了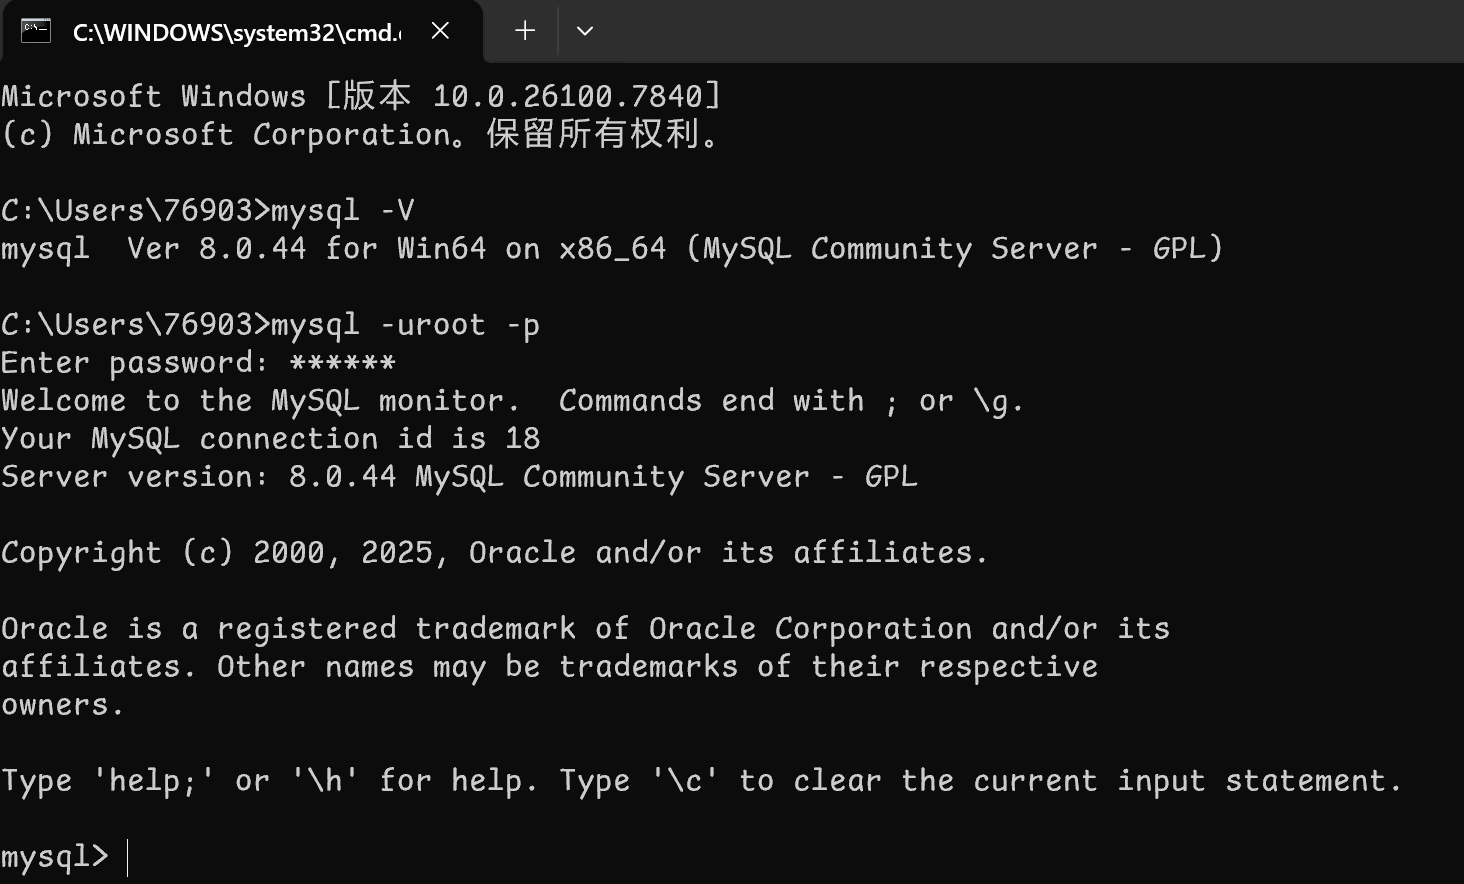
到这里MySQL全部安装配置完成,可以正常使用MySQL了。
2.安装 MySQL Connector/NET
2.1 Connector/NET9.6.0
在Visual Studio 2019中(我用的版本是2019),选择工具-》NuGet包管理器-》管理解决方案的NuGet程序包。搜索mysql
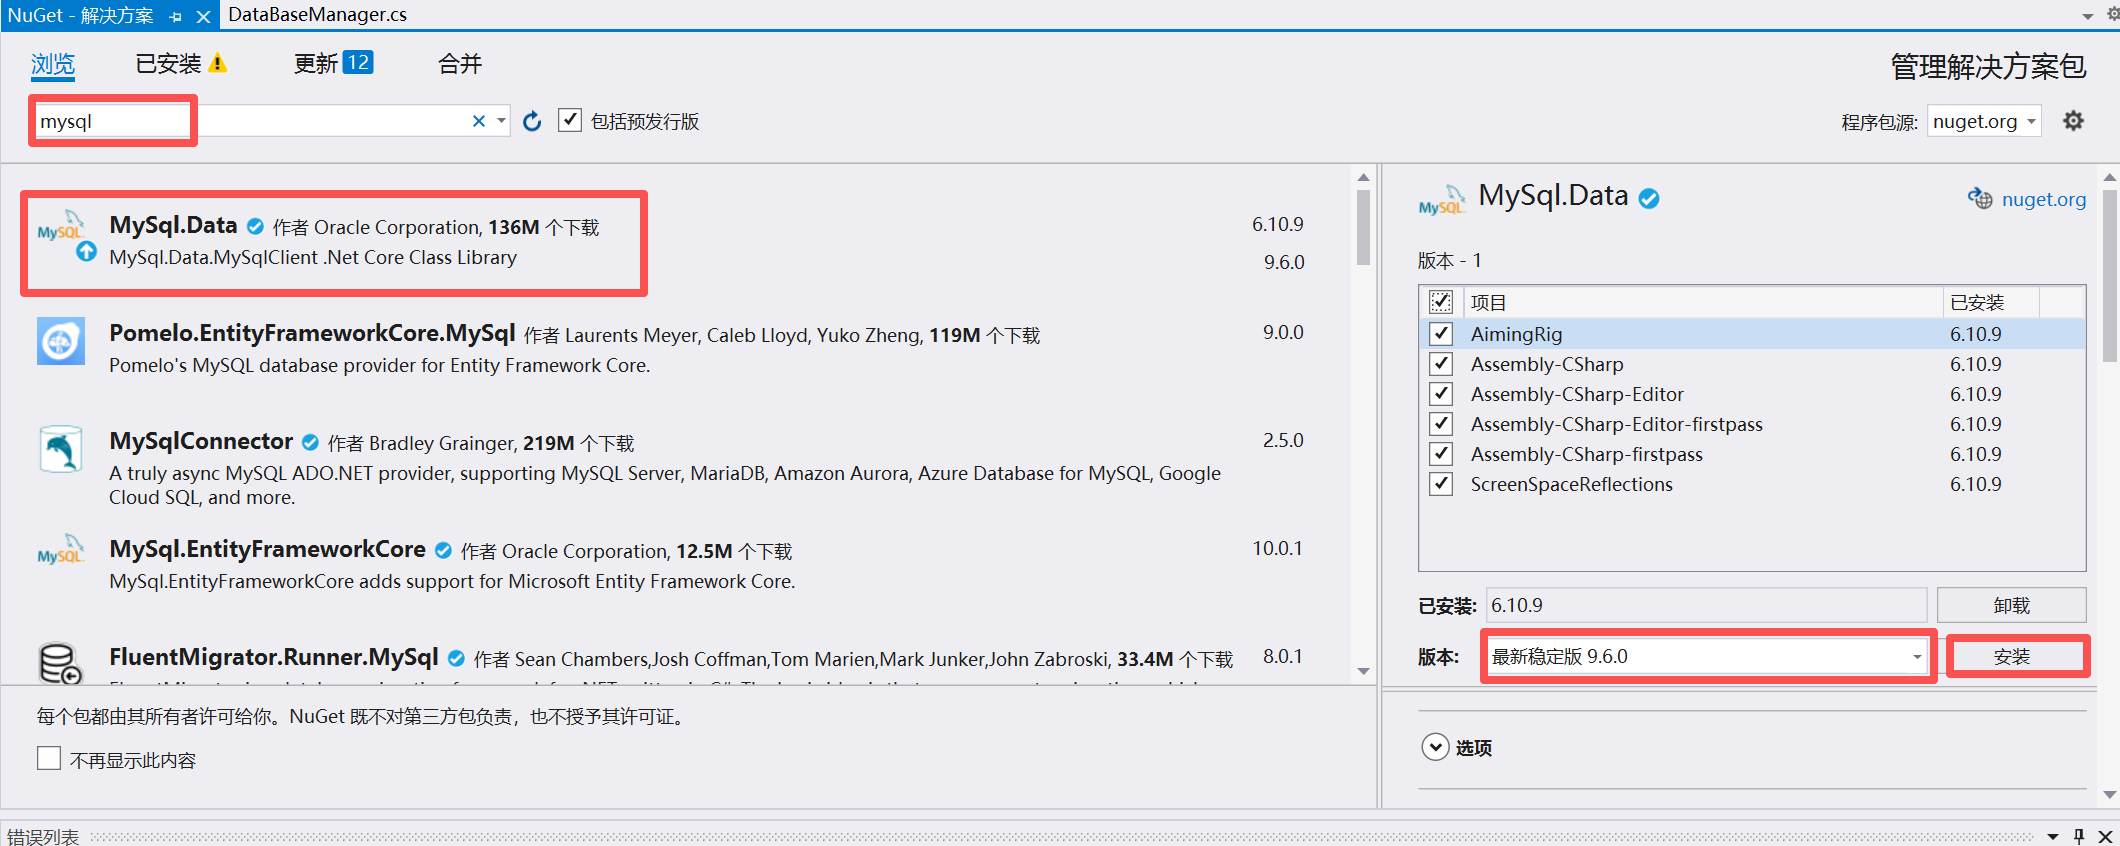
选择 MySQL.Data,选择右侧版本选择为9.6.0版本,然后安装。
2.2 Unity中使用MySQLConnector/NET
在本地电脑上搜索刚安装好的MySql.Data.dll,找到已经安装好的9.6.0版本下的,net462。中的MySql.Data.dll。
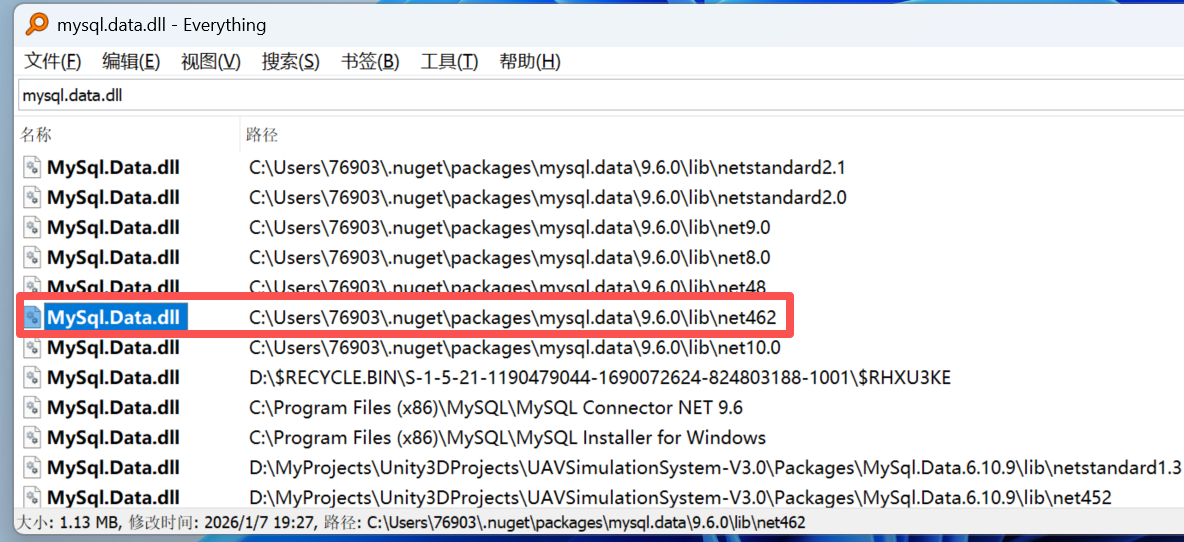
将这个MySql.Data.dll放到Unity中的Assets文件夹下的Plugins文件夹下建一个MySQL文件夹,将MySql.Data.dll放进去。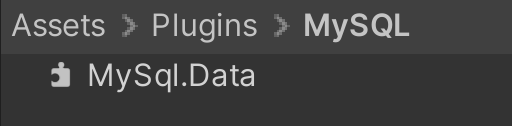
2.3 数据库连接
测试代码如下:
using System.Collections;
using System.Collections.Generic;
using UnityEngine;
using System;
using MySql.Data.MySqlClient;
//using MySqlConnector;
public class DataBaseManager : MonoBehaviour
{
// 数据库连接配置
[Header(“数据库配置”)]
[SerializeField] private string server = “localhost”;
[SerializeField] private string database = “—”;
[SerializeField] private string uid = “root”;
[SerializeField] private string password = “****”;
//连接数据库的连接器
private MySqlConnection connection;
string connectionString;
// Start is called before the first frame update
void Start()
{
Debug.Log(“数据库开始!!!”);
// 构建连接字符串
connectionString = $“Server={server};Database={database};Uid={uid};Pwd={password};”;
    try
    {
        connection = new MySqlConnection(connectionString);
        connection.Open();
        Debug.Log("数据库连接成功!");
    }
    catch (MySqlException ex)
    {
        Debug.LogError($"数据库连接失败: {ex.Message}");
    }

    GetAllTaskTypeDetails();
}

// Update is called once per frame
void Update()
{

}
private void OnDestroy()
{
    if (connection != null)
    {
        connection.Close();
        Debug.Log("Database connection closed.");
    }
}
public class TaskTypeInfo
{
    public int Id { get; set; }
    public string Name { get; set; }
    public string Description { get; set; }
}

public List<TaskTypeInfo> GetAllTaskTypeDetails()
{
    List<TaskTypeInfo> taskTypes = new List<TaskTypeInfo>();

    if (connection == null || connection.State != System.Data.ConnectionState.Open)
    {
        Debug.LogError("数据库未连接!");
        return taskTypes;
    }

    try
    {
        // 查询所有列
        string query = "SELECT id, name, description FROM task_types";

        using (MySqlCommand command = new MySqlCommand(query, connection))
        {
            using (MySqlDataReader reader = command.ExecuteReader())
            {
                while (reader.Read())
                {
                    TaskTypeInfo info = new TaskTypeInfo
                    {
                        Id = reader.GetInt32("id"),
                        Name = reader.GetString("name"),
                        Description = reader.IsDBNull(reader.GetOrdinal("description"))
                                    ? string.Empty
                                    : reader.GetString("description")
                    };

                    taskTypes.Add(info);

                    // 在控制台输出
                    Debug.Log($"任务类型: {info.Name} (ID: {info.Id})");
                    if (!string.IsNullOrEmpty(info.Description))
                    {
                        Debug.Log($"描述: {info.Description}");
                    }
                }
            }
        }
    }
    catch (MySqlException ex)
    {
        Debug.LogError($"查询失败: {ex.Message}");
    }

    return taskTypes;
}
}

AtomGit 是由开放原子开源基金会联合 CSDN 等生态伙伴共同推出的新一代开源与人工智能协作平台。平台坚持“开放、中立、公益”的理念,把代码托管、模型共享、数据集托管、智能体开发体验和算力服务整合在一起,为开发者提供从开发、训练到部署的一站式体验。
更多推荐



 10
10 0
0- 0


 已为社区贡献1条内容

所有评论(0)