clonos control-pane: FreeBSD下的CBSD的web管理版
repo:https://github.com/clonos/control-pane
ClonOS是一个适用于网络附加存储(NAS)和虚拟环境的免费开源平台发行版。
ClonOS是作为CBSD项目的一部分开发的,该项目是一个用于管理虚拟环境的Linux和FreeBSD框架。
安装使用
先配置时钟
service ntpd onestop
ntpdate 0.cn.pool.ntp.org
service ntpd enable
service ntpd start
安装依赖库
pkg update -f

pkg install -y lang/python311 lang/php85 net/libvncserver security/gnutls sqlite3 shells/bash www/npm-node24 www/nginx \
    sysutils/cbsd security/ca_root_nss www/node24 security/sudo net/beanstalkd git devel/pkgconf tmux py311-numpy lang/go \
    php85-session php85-zip php85-sqlite3 php85-pdo_sqlite php85-filter php85-ctype php85-curl php85-intl php85-mbstring php85-phar php85-zlib
更新后需要更新pcre2,否则git会报错
sudo pkg upgrade pcre2更新FreeBSD的ports库
git clone --depth 1 --branch main https://git.freebsd.org/ports.git /usr/ports后期经常定期更新ports
sudo git -C /usr/ports pull # 简化更新命令下载ClonOs的源代码
这是放到root账户下:
git clone https://github.com/clonos/clonos-ports-wip.git /root/clonos-ports
# 如果抽风,用镜像
#git clone https://githubfast.com/clonos/clonos-ports-wip.git /root/clonos-ports
我是习惯放到普通账户的github目录
git clone https://github.com/clonos/clonos-ports-wip.git  ~/github/clonos-ports
# 如果抽风,用加速镜像
#git clone https://githubfast.com/clonos/clonos-ports-wip.git  ~/github/clonos-ports
但是因为要修改make参数,暂时就按照手册里面的放在root账户下吧。
编译安装
使用root账户
向FreeBSD的ports系统全局配置文件/etc/make.conf追加变量定义
echo 'OVERLAYS=/root/clonos-ports' >> /etc/make.conf- 实现与官方ports的并行开发/测试,避免污染主端口树
编译和安装
env BATCH=no make -C /root/clonos-ports/www/clonos install配置
RACCT is enabled
Check for RACCT is enabled on the host, please add kern.racct.enable="1" into /boot/loader.conf:
echo 'kern.racct.enable="1"' >> /boot/loader.conf安装CBSD并初始化
前面依赖库那里已经安装了CBSD
env workdir=/usr/jails /usr/local/cbsd/sudoexec/initenv对于我这台机器,我对应的地址是/usr/local/jails,所以这样初始化
sudo env workdir=/usr/local/jails /usr/local/cbsd/sudoexec/initenv初始化完成,提示
  Now your can run:
  service cbsdd start
  to run CBSD services.

  For change initenv settings in next time, use:
  cbsd initenv-tui

  Also don't forget to execute:
  cbsd initenv
  every time when you upgrade CBSD version.

  For an easy start:
  cbsd help

  General information:
  cbsd summary

  To start with jail:
  cbsd jcreate --help
  or: cbsd jconstruct-tui

  To start with bhyve:
  cbsd bcreate --help
  or: cbsd bconstruct-tui

  To start with XEN:
  cbsd xcreate --help
  or: cbsd xconstruct-tui

  To start with QEMU/NVMM:
  cbsd qcreate --help
  or: cbsd qconstruct-tui

  Enjoy CBSD!
查看状态
sudo service cbsdd status如果没有启动,就手工启动它
配置和启动beanstalkd
sysrc beanstalkd_enable=YES beanstalkd_flags="-l 127.0.0.1 -p 11300 -z 104856"
service beanstalkd restart
看看状态
sudo service beanstalkd status
beanstalkd is running as pid 31754.
修改 PHP-FPM 配置
切换事件机制(BSD系统专用)
编辑 /usr/local/etc/php-fpm.conf,取消注释并修改:
events.mechanism = kqueue/usr/local/etc/php-fpm.conf文件里可以看到选项
; Specify the event mechanism FPM will use. The following is available:
; - select     (any POSIX os)
; - poll       (any POSIX os)
; - epoll      (linux >= 2.5.44)
; - kqueue     (FreeBSD >= 4.1, OpenBSD >= 2.9, NetBSD >= 2.0)
; - port       (Solaris >= 10)
; Default Value: not set (auto detection)
;events.mechanism = epoll修改监听方式(从端口改为Unix套接字)
编辑 /usr/local/etc/php-fpm.d/www.conf,修改以下内容:
…
listen = /tmp/php-fpm.sock
…
listen.backlog = -1
…
listen.owner = www
listen.group = www
listen.mode = 0660
…
用户权限配置
将 www 用户加入 cbsd 组:
pw groupmod cbsd -M www允许 www 用户通过 sudo 执行 CBSD 命令:
编辑 /usr/local/etc/sudoers.d/10_www,添加以下内容:
Defaults     env_keep += "workdir DIALOG NOCOLOR CBSD_RNODE"
Cmnd_Alias   WEB_CMD = /usr/local/bin/cbsd
www   ALL=(ALL) NOPASSWD:SETENV: WEB_CMD
发现这个文件里面已经加入了这些内容。
设置安全权限
chown root:wheel /usr/local/etc/sudoers.d/10_www
chmod 0440 /usr/local/etc/sudoers.d/10_www
发现默认也已经符合要求
ls -la /usr/local/etc/sudoers.d/10_www
-r--r-----  1 root wheel 145 Jan 25 10:20 /usr/local/etc/sudoers.d/10_www
启动 WebSocket 和节点服务
启用和启动服务
service clonos-ws enable
service clonos-ws restart
service clonos-node-ws enable
service clonos-node-ws restart
修改 PHP 配置
编辑 /usr/local/etc/php.ini,调整以下参数:
memory_limit = 256M
post_max_size = 12G
upload_tmp_dir = /tmp
upload_max_filesize = 16G
opcache.enable=1
发现默认已经修改成这样了。
配置 NGINX
编辑 /usr/local/etc/nginx/nginx.conf,确保包含以下内容
user www;
load_module /usr/local/libexec/nginx/ngx_stream_module.so;
events {
        use kqueue;
}
http {
        include       /usr/local/etc/nginx/mime.types;
        default_type  application/octet-stream;
        client_max_body_size    1m;
        include /usr/local/etc/nginx/sites-enabled/*.conf;
}
stream {
        include /usr/local/etc/nginx/conf.stream.d/*.conf;
        include /usr/local/etc/nginx/streams-enabled/*;
}
我的习惯做法是这样,cp nginx.conf.clonos.sample nginx.conf.clonos.conf创建nginx.conf.clonos.conf文件,然后在/usr/local/etc/nginx/nginx.conf文件中加入这句:
include nginx.conf.clonos.confnginx.conf.clonos.conf文件内容为:
user www;

load_module /usr/local/libexec/nginx/ngx_stream_module.so;

events {
        use kqueue;
}

http {
        include       /usr/local/etc/nginx/mime.types;
        default_type  application/octet-stream;

        client_max_body_size    1m;
        include /usr/local/etc/nginx/sites-enabled/*.conf;
}

stream {
        include /usr/local/etc/nginx/conf.stream.d/*.conf;
        include /usr/local/etc/nginx/streams-enabled/*;
}
启用服务并加载内核模块
运行以下命令启用服务:
sysrc nginx_enable="YES" php_fpm_enable="YES" supervisord_enable="YES" clonos_vnc2wss_enable="YES"
sysrc kld_list+="vmm if_tuntap if_bridge nmdm"
重启服务
service nginx restart
service php_fpm restart
service kld restart
这里service kld restart 有点报错...,不知道是否有问题。
配置 CBSD
安装模块Install and compile vncterm module
cbsd module mode=install vncterm
make -C /usr/local/cbsd/modules/vncterm.d
这里可能碰到github抽风的问题,要小心解决。
make倒是挺快,2秒搞定。
安装convectix模块
cbsd module mode=install convectix若失败可能需要手工
git clone --depth=1 --single-branch https://githubfast.com/cbsd/modules-convectix.git /usr/local/cbsd/modules/convectix.dcbsd module mode=upgrade convectix安装puppet
cbsd module mode=install puppet安装不成就手动:
git clone --depth=1 --single-branch https://githubfast.com/cbsd/modules-puppet.git /usr/local/cbsd/modules/puppet.dcbsd module mode=upgrade puppet安装clonosdb数据库模块
cbsd module mode=install clonosdb有问题就手动
git clone --depth=1 --single-branch https://githubfast.com/cbsd/modules-clonosdb.git /usr/local/cbsd/modules/clonosdb.dcbsd module mode=upgrade clonosdbcopy文件
cp -a /usr/local/cbsd/modules/cbsd_queue.d/etc-sample/cbsd_queue.conf ~cbsd/etc/复制queue配置文件到目录~cbsd/etc/
copy文件,这条 cp 命令把文件复制到了 CBSD 用户的主目录下的 etc/ 子目录中
cp -a /usr/local/cbsd/modules/cbsd_queue.d/etc-sample/cbsd_queue.conf ~cbsd/etc/把安装的模块名字写入 ~cbsd/etc/modules
编辑模块列表:
创建或修改 ~cbsd/etc/modules.conf,内容如下:
cat > ~cbsd/etc/modules.conf <<EOF
pkg.d
bsdconf.d
zfsinstall.d
puppet.d
convectix.d
cbsd_queue.d
vncterm.d
clonosdb.d
EOF
初始化
再次初始化CBSD
cbsd initenv
几秒后初始化完毕
初始化数据库
cbsd clonosdb # 初始化Web用户数据库提示:
cbsd clonosdb
clonosdb: added new admin login/password (salt: YR5XkAz0ypOkPWjZIY57Az12F+fKkdtvDFx8Fwcb): admin/admin
启动资源统计服务
sysrc cbsd_statsd_hoster_enable=YES cbsd_statsd_jail_enable=YES cbsd_statsd_bhyve_enable=YES
service cbsd-statsd-hoster restart
service cbsd-statsd-jail restart
service cbsd-statsd-bhyve restart
创建python符号链接
ln -sf /usr/local/bin/python3.11 /usr/local/bin/python3访问 ClonOS 界面
在浏览器中打开 http://<服务器IP>,使用默认账号登录:
- 用户名:
admin - 密码:
admin
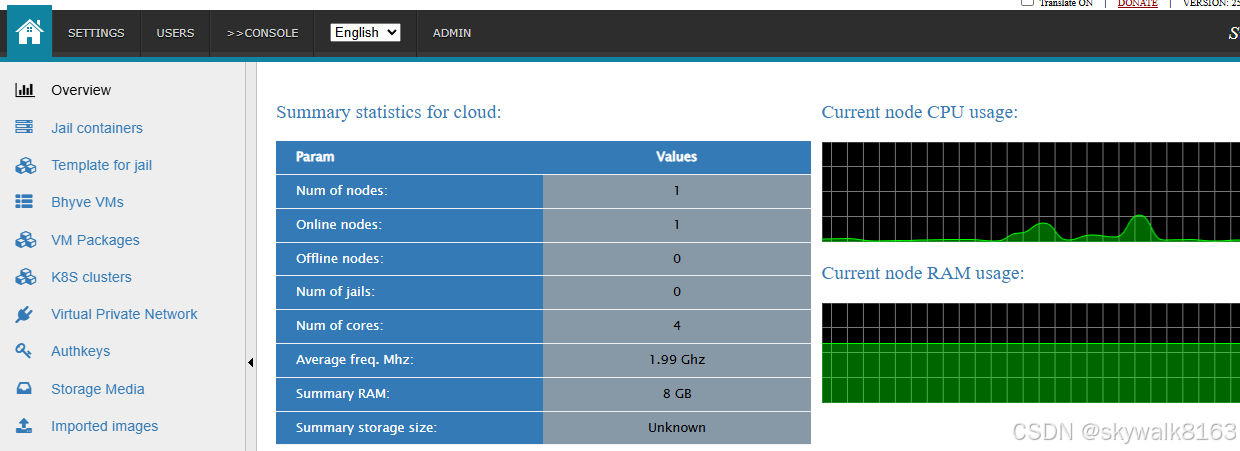
打开页面http://192.168.1.5后,显示

看来还有点问题...解决问题后,首页这样:
停止和卸载
停止服务
sysrc cbsdd_enable=NO

sysrc beanstalkd_enable=NO
停止服务
#

service clonos-ws disable
service clonos-ws stop
#Enable and start ClonOS node daemon:

service clonos-node-ws disable
service clonos-node-ws stop
停止nginx服务
service nginx stop
service php_fpm stop
service kld restart
尝试make uninstall,但是显然该软件不支持。
编辑/etc/rc.conf文件,把安装时候配置的变量全部改成NO或者注释掉:
ntpd_enable="YES"
#beanstalkd_flags="-l 127.0.0.1 -p 11300"
beanstalkd_enable="NO"
clonos_ws_enable="NO"
clonos_node_ws_enable="NO"
php_fpm_enable="NO"
#supervisord_enable="YES"
#clonos_vnc2wss_enable="YES"
#cbsd_statsd_hoster_enable="YES"
#cbsd_statsd_jail_enable="YES"
#cbsd_statsd_bhyve_enable="YES"
总结
挺好的东西,就是安装略微有些繁琐。
调试
执行报错sudo git clone --depth 1 --branch main https://git.freebsd.org/ports.git /usr/ports
skywalk@fb5:~ $ sudo git clone --depth 1 --branch main https://git.freebsd.org/ports.git /usr/ports
Password:
fatal: destination path '/usr/ports' already exists and is not an empty directory.
skywalk@fb5:~ $ cd /usr/ports/
skywalk@fb5:/usr/ports $ git pull
fatal: not a git repository (or any parent up to mount point /usr)
Stopping at filesystem boundary (GIT_DISCOVERY_ACROSS_FILESYSTEM not set).
清理目录,然后重新执行
sudo rm -rf /usr/ports实际情况下ports目录是删除不掉的,
skywalk@fb5:~ $ sudo rm -rf /usr/ports
rm: /usr/ports: Device busy
可以把目录里面的其它目录删除,就可以更新ports库了。
后期经常定期更新ports
sudo git -C /usr/ports pull # 简化更新命令安装依赖库后的一些提示信息
Message from samba416-4.16.11_10:
--
How to start: http://wiki.samba.org/index.php/Samba4/HOWTO
* Your configuration is: /usr/local/etc/smb4.conf
* All the relevant databases are under: /var/db/samba4
* All the logs are under: /var/log/samba4
* Provisioning script is: /usr/local/bin/samba-tool
For the working DNS updates you will need to either build dns/bind9*
with the enabled GSSAPI(GSSAPI_MIT5 is recommended) or install
dns/samba-nsupdate package, which is preconfigured with such a support.
You will need to specify location of the 'nsupdate' command in the
smb4.conf file:
nsupdate command = /usr/local/bin/samba-nsupdate -g
For additional documentation check: https://wiki.samba.org/index.php/User_Documentation
Port related bug reports can go to the https://gitlab.com/samba-freebsd/ports/-/issues or
to the FreeBSD Bugzilla https://bugs.freebsd.org/
All Samba related bug reports should go to the: https://bugzilla.samba.org/
--
===> NOTICE:
This port is deprecated; you may wish to reconsider installing it:
Discontinued upstream; transition to a supported versions of Samba (refer to https://wiki.samba.org/index.php/Samba_Release_Planning).
=====
Message from sssd2-2.9.6_6:
--
================================================================================
Copy /usr/local/etc/sssd/sssd.conf.sample to /usr/local/etc/sssd/sssd.conf
and edit /usr/local/etc/sssd/sssd.conf (see man sssd.conf for details)
To load sssd at startup, add sssd_enable="YES" to /etc/rc.conf
To enable pam integration, add a line similar to the following to
/etc/pam.d/system:
login auth sufficient /usr/local/lib/pam_sss.so
To enable NSS integration, update /etc/nsswitch.conf as follows:
group: sss files
passwd: sss files
For additional details, please see the man pages for pam.conf and nsswitch.conf
An sssd HOWTO is also available:
https://fedorahosted.org/sssd/wiki/HOWTO_Configure_1_0_2
================================================================================
=====
Message from node24-24.12.0:
--
Note: If you need npm (Node Package Manager), please install www/npm-node24.
安装依赖库后git启动报错
sudo git clone --depth 1 --branch main https://git.freebsd.org/ports.git /usr/ports
ld-elf.so.1: /usr/local/lib/libpcre2-8.so.0: version PCRE2_10.47 required by /usr/local/bin/git not defined
升级pcre2
sudo pkg upgrade pcre2问题解决
编译安装之后的提示存档
Installing clonos-25.10.01...
ClonOS post installation setup:
[*] Check for RACCT is enabled on the host, please add kern.racct.enable
into /boot/loader.conf (and reboot the host):
echo 'kern.racct.enable="1"' >> /boot/loader.conf
[*] Init CBSD workdir
See https://www.bsdstore.ru/en/installing_cbsd.html#initenv for details:
env workdir=/usr/jails /usr/local/cbsd/sudoexec/initenv
[*] Ensure CBSD is started:
sysrc cbsdd_enable=YES
service cbsdd status || service cbsdd start
[*] Configure and run beanstalkd:
sysrc beanstalkd_flags="-l 127.0.0.1 -p 11300"
sysrc beanstalkd_enable=YES
service beanstalkd restart
[*] Change in /usr/local/etc/php-fpm.conf events mechanism to BSD-specific.
To do this, uncomment and edit the events.mechanism parameter to:
vi /usr/local/etc/php-fpm.conf:
..
events.mechanism = kqueue
..
Or copy: cp /usr/local/etc/php-fpm.conf.clonos.sample /usr/local/etc/php-fpm.conf
[*] Uncomment and change in /usr/local/etc/php-fpm.d/www.conf port to Unix socket and
set's correct access permission:
..
listen = /tmp/php-fpm.sock
..
listen.backlog = -1
..
listen.owner = www
listen.group = www
listen.mode = 0660
..
Or copy: cp /usr/local/etc/php-fpm.d/www-php-fpm.conf.clonos.sample /usr/local/etc/php-fpm.d/www.conf
[*] Add "www" user to "cbsd" group:
pw groupmod cbsd -M www
[*] To execute CBSD commands, let the www user run CBSD through sudo. Please make
sure you have /usr/local/etc/sudoers.d/10_www with follow content:
Defaults env_keep += "workdir DIALOG NOCOLOR CBSD_RNODE"
Cmnd_Alias WEB_CMD = /usr/local/bin/cbsd
www ALL=(ALL) NOPASSWD:SETENV: WEB_CMD
And make sure the file permissions are safe:
chown root:wheel /usr/local/etc/sudoers.d/10_www
chmod 0440 /usr/local/etc/sudoers.d/10_www
Or copy: install -o root -g wheel -m 0440 /usr/local/etc/sudoers_10_www.clonos.sample /usr/local/etc/sudoers.d/10_www
[*] Enable and start websocket daemon:
service clonos-ws enable
service clonos-ws restart
[*] Enable and start ClonOS node daemon:
service clonos-node-ws enable
service clonos-node-ws restart
[*] Change /usr/local/etc/php.ini params:
max_execution_time = 1200
..
memory_limit = 256M
..
post_max_size = 12G
..
upload_tmp_dir = /tmp
..
upload_max_filesize = 16G
..
opcache.enable=1
Or copy: cp /usr/local/etc/php.ini.clonos.sample /usr/local/etc/php.ini
[*] Configure NGINX. Make sure/merge this settings into
/usr/local/etc/nginx/nginx.conf:
user www;
load_module /usr/local/libexec/nginx/ngx_stream_module.so;
events {
use kqueue;
}
http {
include /usr/local/etc/nginx/mime.types;
default_type application/octet-stream;
client_max_body_size 1m;
include /usr/local/etc/nginx/sites-enabled/*.conf;
}
stream {
include /usr/local/etc/nginx/conf.stream.d/*.conf;
include /usr/local/etc/nginx/streams-enabled/*;
}
Or copy: cp /usr/local/etc/nginx/nginx.conf.clonos.sample /usr/local/etc/nginx/nginx.conf
[*] Make sure /usr/local/etc/nginx/sites-enabled/cbsdweb.conf
have correct path to CBSD workdir. Please check that line "fastcgi_param WORKDIR.."
in /usr/local/etc/nginx/sites-enabled/cbsdweb.conf pointed to ~cbsd path:
fastcgi_param WORKDIR /usr/jails;
^^^^^^^^^^
[*] Enable nginx, php-fpm and clonos_vnc2wss to run at system startup:
sysrc nginx_enable="YES"
sysrc php_fpm_enable="YES"
sysrc supervisord_enable="YES"
sysrc clonos_vnc2wss_enable="YES"
[*] Start nginx and php-fpm:
service nginx restart
service php-fpm restart
[*] Configure CBSD:
1) Install and compile vncterm module:
cbsd module mode=install vncterm
make -C /usr/local/cbsd/modules/vncterm.d
2) Install additional ConvectIX scripts module
cbsd module mode=install convectix
3) Install Puppet module
cbsd module mode=install puppet
4) Install ClonOS database module
cbsd module mode=install clonosdb
5) Copy queue config file:
cp -a /usr/local/cbsd/modules/cbsd_queue.d/etc-sample/cbsd_queue.conf ~cbsd/etc/
6) Add additional module name into ~cbsd/etc/modules,
e.g. complete ~cbsd/etc/modules.conf must have:
pkg.d
bsdconf.d
zfsinstall.d
puppet.d
convectix.d
cbsd_queue.d
vncterm.d
Or copy: cp /usr/local/etc/cbsd-modules.conf.clonos.sample ~cbsd/etc/modules.conf
7) Re-run CBSD initenv to init modules:
cbsd initenv
8) Init web user database:
cbsd clonosdb
9) Configure and run CBSD RACCT stats daemon:
sysrc cbsd_statsd_hoster_enable=YES
sysrc cbsd_statsd_jail_enable=YES
sysrc cbsd_statsd_bhyve_enable=YES
service cbsd-statsd-hoster restart
service cbsd-statsd-jail restart
service cbsd-statsd-bhyve restart
10) Create symlink from python3 to valid python bin:
ln -sf /usr/local/bin/python3.9 /usr/local/bin/python3
[*] Open the ClonOS UI in your web browser.
Default login: 'admin', default password: 'admin'
[*] Enjoy the ClonOS !
CBSD更新到15后初始化,初始化报错
初始化命令:
env workdir=/usr/jails /usr/local/cbsd/sudoexec/initenv报错:
Error: on ZFS-based systems, the CBSD requires a separate dataset different from the root one (zroot/ROOT/default).
Please create a separate dataset first, e.g.:

 /sbin/zfs create -o mountpoint=/usr/jails -o atime=off zroot/jails

Then re-run: env workdir=/usr/jails /usr/local/cbsd/sudoexec/initenv
因为是zfs文件系统,所以需要这样。按照提示操作,有新的报错
执行zfs create报错:cannot create 'zroot/jails': dataset already exists
/sbin/zfs create -o mountpoint=/usr/jails -o atime=off zroot/jails

env workdir=/usr/jails /usr/local/cbsd/sudoexec/initenv
初始化失败,
/sbin/zfs create -o mountpoint=/usr/jails -o atime=off zroot/jails
cannot create 'zroot/jails': dataset already exists
考虑是不是在/usr/local/jails啊? 明白了,果然是/usr/local/jails,所以初始化应该这样写
sudo env workdir=/usr/local/jails /usr/local/cbsd/sudoexec/initenvservice kld restart报错:kldload: can't load if_tuntap: module already loaded or in kernel
service kld restart
Loading kernel modules: vmm if_tuntap if_bridge nmdm
kldload: can't load if_tuntap: module already loaded or in kernel
/etc/rc.d/kld: WARNING: Unable to load kernel module if_tuntap
cbsd module mode=install vncterm问题error: RPC failed; curl 28 Failed to connect to github.com port 443
cbsd module mode=install vncterm
Size: 0 Mb
% Total % Received % Xferd Average Speed Time Time Time Current
Dload Upload Total Spent Left Speed
100 102 100 102 0 0 106 0 --:--:-- --:--:-- --:--:-- 0
module: clonning: /usr/local/bin/git clone --depth=1 --single-branch https://github.com/cbsd/modules-vncterm.git /usr/local/cbsd/modules/vncterm.d
Cloning into '/usr/local/cbsd/modules/vncterm.d'...
error: RPC failed; curl 28 Failed to connect to github.com port 443 after 75037 ms: Could not connect to server
fatal: expected 'packfile'
module: clone error
再重试一下....还是不行
试试手动下载
git clone --depth=1 https://githubfast.com/cbsd/modules-vncterm.git /usr/local/cbsd/modules/vncterm.d
不行,后来发现,好像行了,提示:
module: MODULE_DIR already exist: /usr/local/cbsd/modules/vncterm.d. Maybe you want to upgrade: cbsd module mode=upgrade vncterm
按照提示执行:
cbsd module mode=upgrade vncterm发现ok
cbsd module mode=upgrade vncterm
Size: 0 Mb
  % Total    % Received % Xferd  Average Speed   Time    Time     Time  Current
                                 Dload  Upload   Total   Spent    Left  Speed
100   102  100   102    0     0    491      0 --:--:-- --:--:-- --:--:--   491
Already up to date.
这样问题就解决了。
还有一种方法,先下载那个配置文件,然后再放到目录
curl -o /tmp/metadata.conf https://raw.githubusercontent.com/cbsd/modules-vncterm/main/metadata.conf
# 或使用 ghproxy.com
curl -o /tmp/metadata.conf https://ghproxy.com/https://raw.githubusercontent.com/cbsd/modules-vncterm/main/metadata.conf
总结下
如果安装失败
cbsd module mode=install convectix那么就这么手工操作:
git clone --depth=1 --single-branch https://githubfast.com/cbsd/modules-convectix.git /usr/local/cbsd/modules/convectix.dcbsd module mode=upgrade convectix这样就ok了。
github这里坑特别多,只能一步步排除问题。可以问文心等AI,现在它们提供的调试思路越来越靠谱了。
cbsd clonosdb命令报错
说没有这个命令
cbsd clonosdb
cbsd: clonosdb: not found
确认安装clonosdb
cbsd module mode=install clonosdb
Size: 0 Mb
  % Total    % Received % Xferd  Average Speed   Time    Time     Time  Current
                                 Dload  Upload   Total   Spent    Left  Speed
100   102  100   102    0     0    411      0 --:--:-- --:--:-- --:--:--   411
module: clonning: /usr/local/bin/git clone --depth=1 --single-branch https://github.com/cbsd/modules-clonosdb.git /usr/local/cbsd/modules/clonosdb.d
Cloning into '/usr/local/cbsd/modules/clonosdb.d'...
remote: Enumerating objects: 10, done.
remote: Counting objects: 100% (10/10), done.
remote: Compressing objects: 100% (10/10), done.
remote: Total 10 (delta 0), reused 8 (delta 0), pack-reused 0 (from 0)
Receiving objects: 100% (10/10), 4.26 KiB | 4.26 MiB/s, done.
module: module installed: clonosdb
初始化cbsd
cbsd initenv
-------[CBSD v.15.0.0]-------
 This is install/upgrade scripts for CBSD.
 Don't forget to backup.
-----------------------------
Do you want prepare or upgrade hier environment for CBSD now?
[yes(1) or no(0)]
1
再次执行就行了
cbsd clonosdb
clonosdb: added new admin login/password (salt: B2aGQu6mhi5dSUmLoyDWdCjVjjuZvTdcr4la8gI8): admin/admin

AtomGit 是由开放原子开源基金会联合 CSDN 等生态伙伴共同推出的新一代开源与人工智能协作平台。平台坚持“开放、中立、公益”的理念,把代码托管、模型共享、数据集托管、智能体开发体验和算力服务整合在一起,为开发者提供从开发、训练到部署的一站式体验。
更多推荐
 20
20 0
0- 0


 已为社区贡献6条内容

所有评论(0)