Linux入门:常用命令实战笔记
目录
如果新手刚开始接触Linux,面对终端可能会感到无从下手。这是每个人的必经之路。
本文将为你精挑细选出Linux里最实用、最高频的命令。不追求大而全的字典式罗列,而是通过实际的场景和例子,让你看完就能上手操作。无需死记硬背,只要经常去用,自然就能记住。
Linux下的基本指令
1 pwd命令
pwd命令是打印当前所处的路径
举例:
[as@VM-0-2-centos ~]$ pwd
/home/as
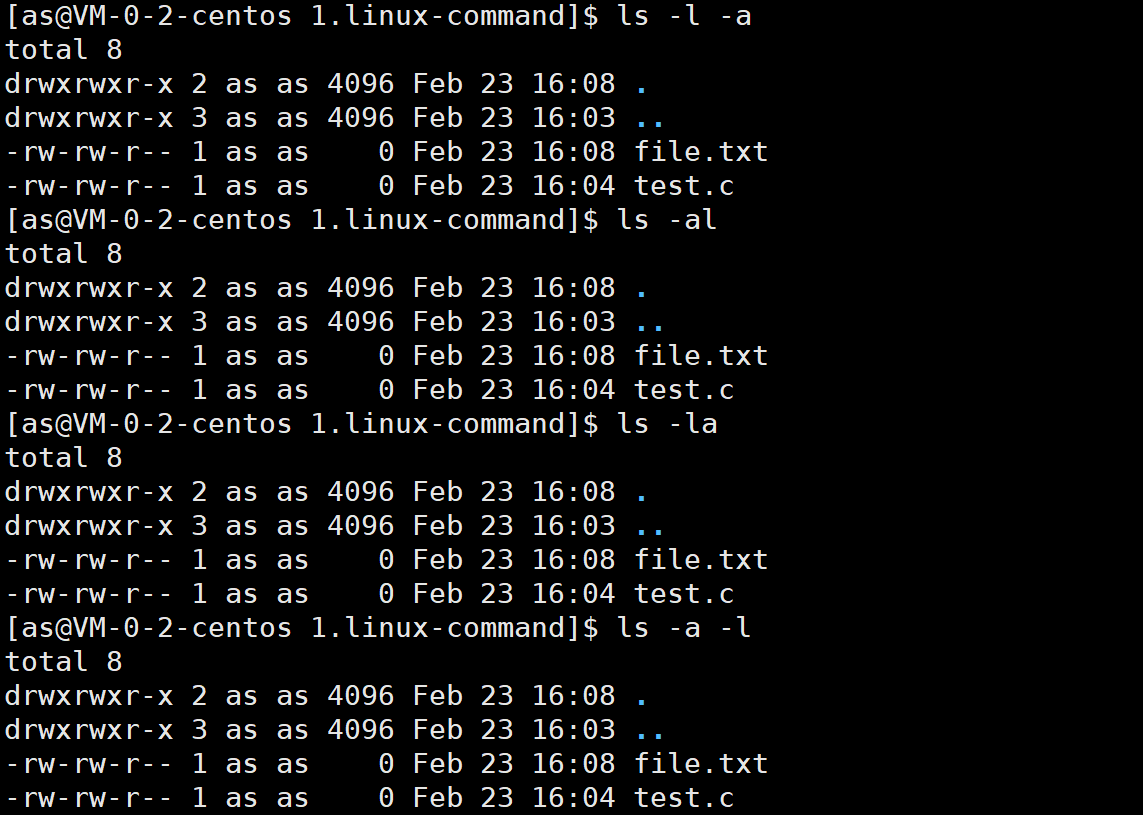
2 ls命令
ls命令对于目录,使用该命令列出该目录下的所有子目录与文件;对于文件,ls命令列出文件名以及其他信息。
语法:ls [选项] [目录或文件]
[as@VM-0-2-centos 1.linux-command]$ ls
test.c
常用的命令行选项:
-a列出目录下的所有文件,包括以.开头的隐藏文件。在linux中,以.开头的文件,是隐藏文件,任何一个目录,即使是一个空目录,默认系统都会自带.和..目录。

-l列出文件的详细信息,ls -l默认查看当前路径下的目录,ls -l空格+指定目录,是查看指定目录里的内容。

这里显示的从后向前分别是文件名,时间,日期,文件大小(单位是字节)等。剩余的等写Linux权限时再说明。
在linux指令中,选项可以自由组合。绝大部分指令,带的选项是否连着写、分开写、交换顺序,效果都是一样的。
比如下面的例子,都是显示当前路径文件名和详细信息。
3 mkdir命令
mkdir命令是在当前路径下创建一个目录。
语法:mkdir [选项] 目录名字
举例:

常用选项:-p,后面可以接一个路径名称,此时若路径中的某些目录尚不存在,加上此选项后,系统将自动建立好那些尚不存在的目录,即一次可以建立多个目录。
这里有个知识点:目录==文件夹。当前目录指的是当前我这个用户所处的目录。那么有一个问题,如果建立了一个空文件,这个文件要不要占据磁盘空间呢?答案是要。因为一个文件即使内容为空,它还有它的文件名,创建和修改日期,文件类型,大小......等属性,这些也要占据磁盘空间。
所以文件=内容+属性。对文件进行操作,要么是对内容操作,要么是对属性操作。
ls命令的本质是显示文件的属性,只有ls,就只显示文件名罢了。而ls -l是用来显示该文件更多的属性。
4 touch命令
语法:touch [选项] 文件名
touch命令参数可以新建一个不存在的文件,或者更改文档或目录的时间,包括存取时间和更改时间。

常用选项:
-a:修改文件Access时间。
-m:修改文件Modify时间。
[as@VM-0-2-centos 1.linux-command]$ stat newfile.txt
  File: ‘newfile.txt’
  Size: 0         	Blocks: 0          IO Block: 4096   regular empty file
Device: fd01h/64769d	Inode: 1050462     Links: 1
Access: (0664/-rw-rw-r--)  Uid: ( 1002/      as)   Gid: ( 1002/      as)
Access: 2026-02-23 17:01:35.403959796 +0800
Modify: 2026-02-23 17:01:35.403959796 +0800
Change: 2026-02-23 17:01:35.403959796 +0800
 Birth: -

//只修改access时间
[as@VM-0-2-centos 1.linux-command]$ touch -a newfile.txt
[as@VM-0-2-centos 1.linux-command]$ stat newfile.txt
  File: ‘newfile.txt’
  Size: 0         	Blocks: 0          IO Block: 4096   regular empty file
Device: fd01h/64769d	Inode: 1050462     Links: 1
Access: (0664/-rw-rw-r--)  Uid: ( 1002/      as)   Gid: ( 1002/      as)
Access: 2026-02-23 17:08:52.724752699 +0800
Modify: 2026-02-23 17:01:35.403959796 +0800
Change: 2026-02-23 17:08:52.724752699 +0800
 Birth: -

//只修改Modify时间
[as@VM-0-2-centos 1.linux-command]$ touch -m newfile.txt
[as@VM-0-2-centos 1.linux-command]$ stat newfile.txt
  File: ‘newfile.txt’
  Size: 0         	Blocks: 0          IO Block: 4096   regular empty file
Device: fd01h/64769d	Inode: 1050462     Links: 1
Access: (0664/-rw-rw-r--)  Uid: ( 1002/      as)   Gid: ( 1002/      as)
Access: 2026-02-23 17:08:52.724752699 +0800
Modify: 2026-02-23 17:09:05.814776484 +0800
Change: 2026-02-23 17:09:05.814776484 +0800
 Birth: -
5 cd命令
语法:cd 目录名
改变工作目录,将当前工作目录改变到指定目录下。
在linux中,.表示当前目录,..表示上级目录。
cd . 无变化,从当前路径到当前路径
cd .. 从当前目录到上一级目录
cd ~ 进入当前用户自己的家目录
cd - 进入最近所处的路径
//进入上一级目录
[as@VM-0-2-centos ~]$ pwd
/home/as
[as@VM-0-2-centos ~]$ cd ..
[as@VM-0-2-centos home]$ pwd
/home


//使用绝对路径定位目录或者文件
[as@VM-0-2-centos home]$ pwd
/home
[as@VM-0-2-centos home]$ cd /home/as/linux-learning
[as@VM-0-2-centos linux-learning]$ pwd
/home/as/linux-learning


//使用相对路径定位目录或者文件
[as@VM-0-2-centos linux-learning]$ pwd
/home/as/linux-learning
[as@VM-0-2-centos linux-learning]$ cd ./1.linux-command/
[as@VM-0-2-centos 1.linux-command]$ pwd
/home/as/linux-learning/1.linux-command


//快速进入自己的家目录
[as@VM-0-2-centos 1.linux-command]$ whoami
as
[as@VM-0-2-centos 1.linux-command]$ pwd
/home/as/linux-learning/1.linux-command
[as@VM-0-2-centos 1.linux-command]$ cd ~
[as@VM-0-2-centos ~]$ pwd
/home/as


//返回到最近的访问目录
[as@VM-0-2-centos ~]$ pwd
/home/as
[as@VM-0-2-centos ~]$ cd -
/home/as/linux-learning/1.linux-command
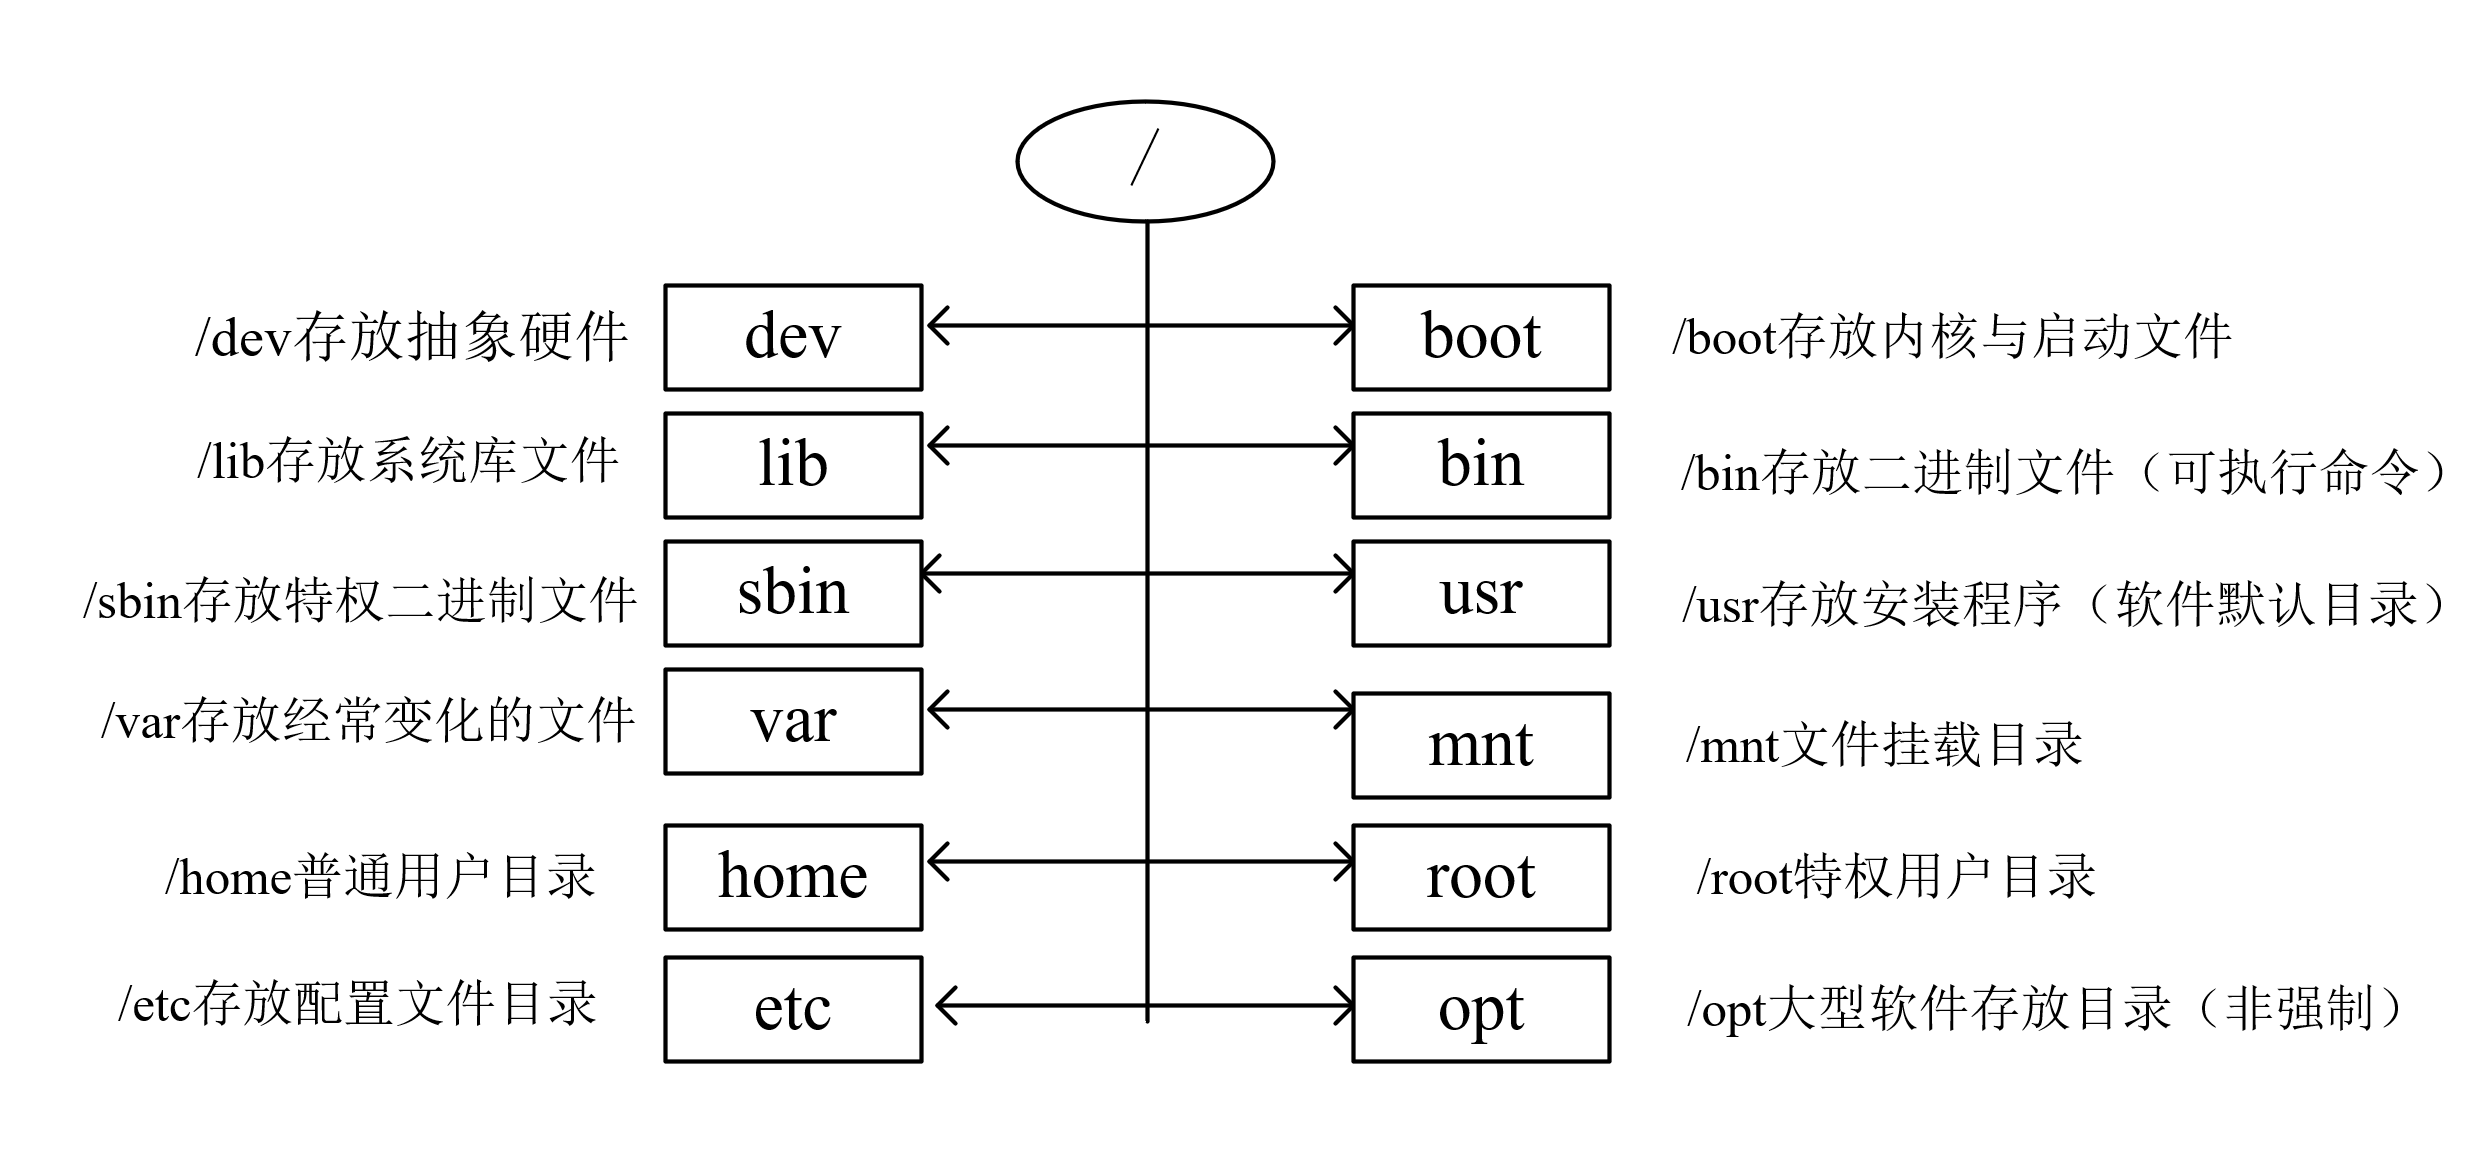
知识点:关于路径的认识
- 在linux中的文件结构,本质是一颗从根目录/开始的一个多叉树。每个节点都是目录或文件。
- 普通文件一定是目录树的叶子节点
- 目录可能是叶子节点(空目录),也可能是路上节点。
- 绝对路径:一般从/开始,不依赖其他目录的定位文件的形式
- 相对路径:相对于当前用户所处目录,定位文件的路径方式
- 绝对路径一般不会随着用户的路径变化而丧失唯一性,一般在特定服务的配置文件中经常被使用。
- 相对路径因为它的便携性,一般在命令行中使用较多。
路径存在的意义是什么呢?首先树状组织方式,都是为了保证快速快速定位查找到指定的文件,这样就需要一个唯一性的方案来定位文件,任何一个节点,都只有一个父节点,所以从根目录开始,定位指定文件,路径具有唯一性。
Linux目录结构:
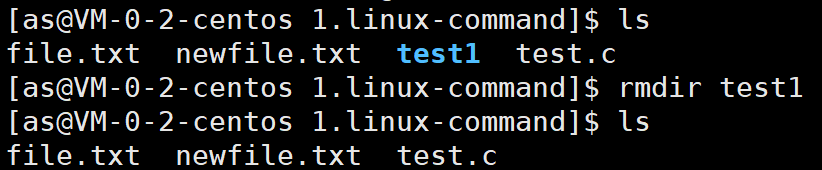
6 rmdir命令&&rm命令
rmdir是删除目录的命令。
rmdir 目录名 只能删除空目录。
常用选项-p:当子目录被删除后如果父目录也变成空目录的话,就连带父目录一起删除。
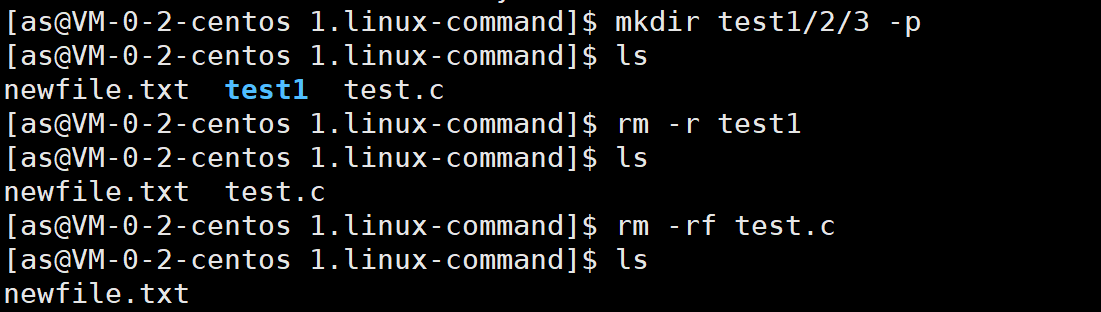
rm命令可以同时删除文件或目录。
常用选项:
-r:删除目录及其下所有文件
-i:删除前逐一询问是否删除
-f:删除目录及其下所有文件,无需询问
7 man命令
Linux中的命令有很多参数,不可能全记住,可以通过查看联机手册获取帮助。
语法:man [选项] 命令
常用选项:
- -k:根据关键字搜索联机帮助
- num(数字):只在第num章节查找
- -a:将所有章节的都显示出来
man手册分为9章(不同系统可能会有差别)
| 章节 | 内容 | 说明 |
|---|---|---|
| 1 | 用户命令 | 普通用户在终端执行的命令,如 ls、cp、man 本身 |
| 2 | 系统调用 | 内核提供的函数接口,如 open()、read()、write() |
| 3 | 库函数 | C 标准库函数,如 printf()、malloc()、fopen() |
| 4 | 特殊文件 | /dev 目录下的设备文件,如 null、zero、tty |
| 5 | 文件格式 | 配置文件和系统文件的格式说明,如 /etc/passwd、/etc/fstab |
| 6 | 游戏 | 游戏和娱乐程序 |
| 7 | 杂项 | 宏包、协议、约定等,如 environ(环境变量)、tcp 协议 |
| 8 | 系统管理命令 | 只有 root 可以使用的命令,如 ifconfig、fdisk、mount |
| 9 | 内核例程 | Linux 内核内部接口,普通开发者几乎用不到 |
举例:
[as@VM-0-2-centos ~]$ man printf//查看printf命令(printf也是一个命令)
[as@VM-0-2-centos ~]$ man fork//查看系统调用,默认没有指定章节,man就自动去2号手册查找
[as@VM-0-2-centos ~]$ man 2 fork
[as@VM-0-2-centos ~]$ man 3 printf//查看库函数
[as@VM-0-2-centos ~]$ man man//查看man手册自己
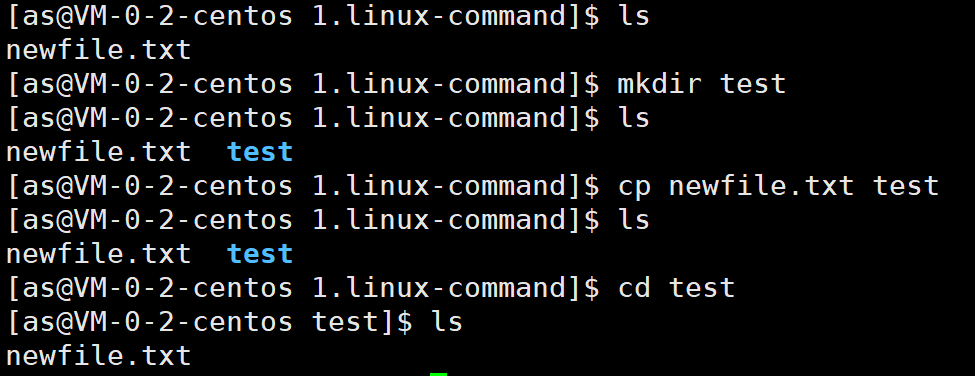
8 cp命令
cp用于复制文件或目录,会将前面指定的所有文件或目录复制到此目录中
语法:cp [选项] 源文件或目录 目标文件或目录
常用选项:
- -f:强行复制文件或目录,不论目的文件或目录是否已经存在
- -i:覆盖文件之前先询问用户
- -r:递归处理,将指定目录下的文件与子目录⼀并处理。若源文件或目录的形态,不属于目录或符号链接,则⼀律视为普通文件处理
9 mv命令
mv命令是可以用来移动文件或者将文件改名,经常用来备份文件或者目录。
语法:mv [选项] 源文件或目录 目标文件或目录
- 视mv命令中第二个参数类型的不同(是目标文件还是目标目录),mv命令将文件重命名或将其移至⼀个新的目录中。
- 当二个参数类型是⽂件时,mv命令完成⽂件重命名,此时,源文件只能有⼀个(也可以是源目录名),它将所给的源文件或目录重命名为给定的目标文件名。
- 当第二个参数是已存在的⽬录名称时,源⽂件或⽬录参数可以有多个,mv命令将各参数指定的源文件均移至⽬标⽬录中。
常用选项:
- -f:如果目标文件已经存在,不会询问而直接覆盖
- -i:若目标文件已经存在时,就会询问是否覆盖!
//更改名称
[as@VM-0-2-centos 1.linux-command]$ ls
myfile.txt  newfile.txt  test
[as@VM-0-2-centos 1.linux-command]$ mv myfile.txt yourfile.txt
[as@VM-0-2-centos 1.linux-command]$ ls
newfile.txt  test  yourfile.txt


//如果当前路径存在同名文件,改名即覆盖
[as@VM-0-2-centos 1.linux-command]$ mv yourfile.txt newfile.txt
[as@VM-0-2-centos 1.linux-command]$ ls
newfile.txt  test


//如果当前路径存在同名文件,改名前可以添加-i选项,让系统提出警告供用户做选择
[as@VM-0-2-centos 1.linux-command]$ mv yourfile.txt newfile.txt -i
[as@VM-0-2-centos 1.linux-command]$ ls
newfile.txt  test


//mv整个目录
[as@VM-0-2-centos 1.linux-command]$ ls
newfile.txt  test
[as@VM-0-2-centos 1.linux-command]$ mv newfile.txt test
[as@VM-0-2-centos 1.linux-command]$ ls
test
[as@VM-0-2-centos 1.linux-command]$ mv test ../
[as@VM-0-2-centos 1.linux-command]$ ls
[as@VM-0-2-centos 1.linux-command]$ cd ..
[as@VM-0-2-centos linux-learning]$ ls
1.linux-command  test
10 cat、echo命令
语法:cat [选项] [文件]
cat指令是将目标文件的内容打印在屏幕上
常用选项:
-b:对非空输出行编号,空行不做编号
-n:对输出的所有行编号
-s:不输出多行空行
[as@VM-0-2-centos 1.linux-command]$ echo "hello world">test.txt
[as@VM-0-2-centos 1.linux-command]$ cat test.txt
hello world


[as@VM-0-2-centos 1.linux-command]$ cat -n test.txt
     1	hello world
echo "内容":将内容以字符串形式打印出来,cat是显示指定文件内部的内容。
[as@VM-0-2-centos 1.linux-command]$ echo hello world
hello world
[as@VM-0-2-centos 1.linux-command]$ cat test.txt
hello world
知识点:
在Linux系统中,一切接文件,这些文件有自己建的文件,也有包括磁盘、网卡、显示器在系统层面也以文件形成。我们写C程序调用的printf/scanf,亦或是C++中的cout/cin,输入和输出时,系统帮助我们打开键盘显示器等文件。文件必须先被打开才能操作,所以运行C程序时,系统在main函数之前帮我们加了fopen打开三个文件的代码,分别是stdin(标准输入,对应键盘),stdout(标准输出,对应显示器)、stdout(标准错误,也可以理解成显示器)。当你调用printf(“hello world”);它其实是在向stdout这个已经打开的文件里写入数据;而scanf则是从stdin这个文件里读取数据。
| 文件流 | 名称 | 对应设备 | 说明 |
|---|---|---|---|
stdin |
标准输入 | 键盘 | 程序从这里读取输入(如 scanf) |
stdout |
标准输出 | 显示器 | 程序从这里输出正常结果(如 printf) |
stderr |
标准错误 | 显示器 | 程序从这里输出错误信息(和 stdout 通常是同一个屏幕) |
所以,你平时自己用 touch创建的文件是文件,但你可能没想到:磁盘、网卡、显示器,甚至键盘,在系统眼里也都是文件。只不过它们是一些特殊的设备文件。通常在 /dev/ 目录下。当我们写 C 程序时,调用的 printf 和 scanf,或者 C++ 里的 cout 和 cin,本质上都是在对文件进行读写操作。
如何理解系统“帮我们打开呢”?为什么要帮我们打开,怎么不打开其他的?答案是为了能够让用户方便地在默认情况下直接输入,直接显示。默认情况下只打开三个就够了,用其他的自己再打开。
重定向操作
输出重定向>接文件,a.如果后续文件不存在,新建之。b.将之前的文件内部先清空,再写入
[as@VM-0-2-centos 1.linux-command]$ ls
test.txt
[as@VM-0-2-centos 1.linux-command]$ echo "hello world"> myfile.txt
[as@VM-0-2-centos 1.linux-command]$ ls
myfile.txt  test.txt
[as@VM-0-2-centos 1.linux-command]$ cat myfile.txt
hello world
追加重定向>>接文件,不清空,在后面继续写入
[as@VM-0-2-centos 1.linux-command]$ echo "hello world">> myfile.txt
[as@VM-0-2-centos 1.linux-command]$ cat myfile.txt
hello world
hello world
输入重定向<
//将myfile.txt中内容显示出来
[as@VM-0-2-centos 1.linux-command]$ cat < myfile.txt
hello world
hello world
现在做一个实验验证一下Linux下一切皆文件这个黄金法则:
打开两个终端,因为一切皆文件,终端也是文件,以0,1,2......表示,在路径/dev/pts路径下
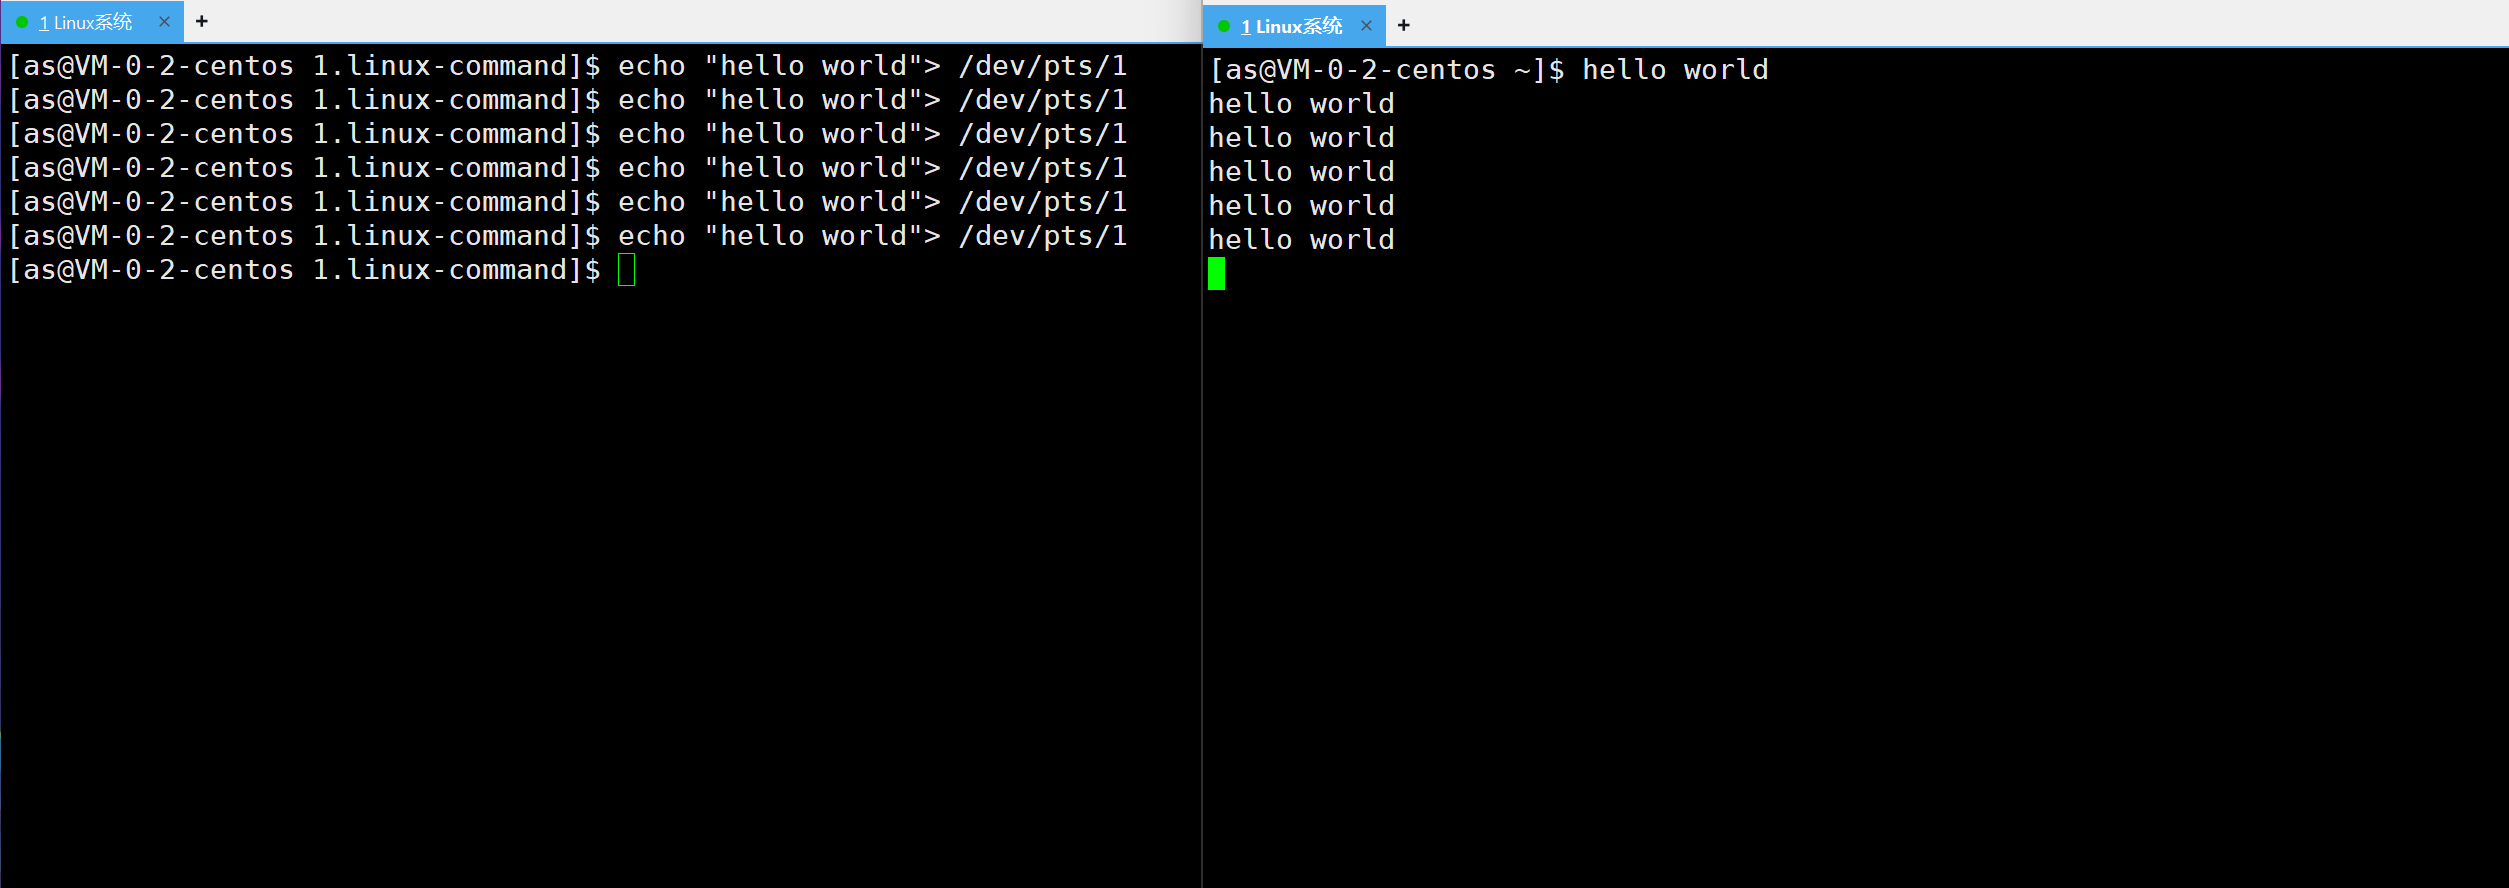
可以看到在第一个终端利用输入内容重定向到另一个终端,可以验证linux下一切接文件。
11 more命令
语法:more [选项]
more命令,功能类似cat,先打印一屏幕内容,回车键进行下翻。
常用选项:
-n:指定输出行数
q:退出more
[as@VM-0-2-centos 1.linux-command]$ more test.txt
hello world
12 less命令
less工具是对文件或其它输出进行分页显示的工具,是linux正统查看文件内容的工具,比more更推荐。 less可以上翻和下翻。more只能下翻
语法:less [参数] 文件
常用选项:
- -i:忽略搜索时的大小写
- -N:显示每行的行号
- /字符串:向下搜索“字符串”的功能
- ?字符串:向上搜索“字符串”的功能
- n:重复前一个搜索(与/或?有关)
- N:反向重复前一个搜索(与/或?有关)
- q:退出
13 head命令
head是用来显示开头或结尾某个数量的文字区块,head用来显示档案的开头至标准输出中
语法:
head [参数] [文件]
选项:
-n:显示的行数
[as@VM-0-2-centos 1.linux-command]$ head test.txt
hello world 1
hello world 2
hello world 3
hello world 4
hello world 5
hello world 6
hello world 7
hello world 8
hello world 9
hello world 10
[as@VM-0-2-centos 1.linux-command]$ head -5 test.txt
hello world 1
hello world 2
hello world 3
hello world 4
hello world 5
14 tail命令
tail命令从指令点开始将文件写到标准输出。用于显示指定文件末尾内容,不指定文件时,作为输入信息进行处理。常用查看日志文件。
语法:tail [参数] [文件]
选项:
-f 循环读取
-n<行数> 显示行数
[as@VM-0-2-centos 1.linux-command]$ tail -5 test.txt
hello world 8
hello world 9
hello world 10
hello world 11
hello world 12
15 cal指令
cal命令可以用来显示日历。如果只有一个参数,则表示年份,如有两个参数,则表示月份和年份。
常用选项:
- -3:显示系统前一个月,当前月,下一个月的月历
- -j:显示在当年中的第几天
- -y:显示当前年份的月历
[as@VM-0-2-centos 1.linux-command]$ cal
    February 2026
Su Mo Tu We Th Fr Sa
 1  2  3  4  5  6  7
 8  9 10 11 12 13 14
15 16 17 18 19 20 21
22 23 24 25 26 27 28

[as@VM-0-2-centos 1.linux-command]$ cal 2025
                               2025

       January               February                 March
Su Mo Tu We Th Fr Sa   Su Mo Tu We Th Fr Sa   Su Mo Tu We Th Fr Sa
          1  2  3  4                      1                      1
 5  6  7  8  9 10 11    2  3  4  5  6  7  8    2  3  4  5  6  7  8
12 13 14 15 16 17 18    9 10 11 12 13 14 15    9 10 11 12 13 14 15
19 20 21 22 23 24 25   16 17 18 19 20 21 22   16 17 18 19 20 21 22
26 27 28 29 30 31      23 24 25 26 27 28      23 24 25 26 27 28 29
                                              30 31
        April                   May                   June
Su Mo Tu We Th Fr Sa   Su Mo Tu We Th Fr Sa   Su Mo Tu We Th Fr Sa
       1  2  3  4  5                1  2  3    1  2  3  4  5  6  7
 6  7  8  9 10 11 12    4  5  6  7  8  9 10    8  9 10 11 12 13 14
13 14 15 16 17 18 19   11 12 13 14 15 16 17   15 16 17 18 19 20 21
20 21 22 23 24 25 26   18 19 20 21 22 23 24   22 23 24 25 26 27 28
27 28 29 30            25 26 27 28 29 30 31   29 30

        July                  August                September
Su Mo Tu We Th Fr Sa   Su Mo Tu We Th Fr Sa   Su Mo Tu We Th Fr Sa
       1  2  3  4  5                   1  2       1  2  3  4  5  6
 6  7  8  9 10 11 12    3  4  5  6  7  8  9    7  8  9 10 11 12 13
13 14 15 16 17 18 19   10 11 12 13 14 15 16   14 15 16 17 18 19 20
20 21 22 23 24 25 26   17 18 19 20 21 22 23   21 22 23 24 25 26 27
27 28 29 30 31         24 25 26 27 28 29 30   28 29 30
                       31
       October               November               December
Su Mo Tu We Th Fr Sa   Su Mo Tu We Th Fr Sa   Su Mo Tu We Th Fr Sa
          1  2  3  4                      1       1  2  3  4  5  6
 5  6  7  8  9 10 11    2  3  4  5  6  7  8    7  8  9 10 11 12 13
12 13 14 15 16 17 18    9 10 11 12 13 14 15   14 15 16 17 18 19 20
19 20 21 22 23 24 25   16 17 18 19 20 21 22   21 22 23 24 25 26 27
26 27 28 29 30 31      23 24 25 26 27 28 29   28 29 30 31
                       30

[as@VM-0-2-centos 1.linux-command]$ cal -3
    January 2026          February 2026          March 2026
Su Mo Tu We Th Fr Sa  Su Mo Tu We Th Fr Sa  Su Mo Tu We Th Fr Sa
             1  2  3   1  2  3  4  5  6  7   1  2  3  4  5  6  7
 4  5  6  7  8  9 10   8  9 10 11 12 13 14   8  9 10 11 12 13 14
11 12 13 14 15 16 17  15 16 17 18 19 20 21  15 16 17 18 19 20 21
18 19 20 21 22 23 24  22 23 24 25 26 27 28  22 23 24 25 26 27 28
25 26 27 28 29 30 31                        29 30 31
16 which命令
which是搜索系统指定的指令
[as@VM-0-2-centos ~]$ which ls
alias ls='ls --color=auto'
	/usr/bin/ls

[as@VM-0-2-centos ~]$ which ll
alias ll='ls -l --color=auto'
	/usr/bin/ls
alias命令的作用是给其他命令起别名,所以ll其实是ls -l带个--color=auto选项
[as@VM-0-2-centos ~]$ which pwd
/usr/bin/pwd
可见命令的本质就是文件,指令在/usr/bin目录下。命令的本质==可执行文件==我们写的C/C++程序。
17 whereis 命令
功能:用于找到程序的源、二进制文件或手册
[as@VM-0-2-centos ~]$ whereis ls
ls: /usr/bin/ls /usr/share/man/man1/ls.1.gz /usr/share/man/man1p/ls.1p.gz
[as@VM-0-2-centos ~]$ whereis libc.so
libc: /usr/lib64/libc.so /usr/share/man/man7/libc.7.gz
18 alias命令
功能:设置命令的别名
[as@VM-0-2-centos ~]$ alias hello='ls'
[as@VM-0-2-centos ~]$ which hello
alias hello='ls'
	/usr/bin/ls
[as@VM-0-2-centos ~]$ hello
install.sh  linux-learning
19 grep命令
grep是将文件中搜索字符串,将找到的行打印出来。
语法:grep [选项] 搜寻字符串 文件
常用选项:
- -i:忽略大小写的不同
- -n:顺便输出行号
- -v:反向选择,显示出没有“搜寻字符串”内容的那一行
[as@VM-0-2-centos 1.linux-command]$ cat test.txt
hello world 1
hello world 2
hello world 3
hello world 4
hello world 5
hello world 6
hello world 7
hello world 8
hello world 9
hello world 10
hello world 11
hello world 12
[as@VM-0-2-centos 1.linux-command]$ grep "1" test.txt
hello world 1
hello world 10
hello world 11
hello world 12
20 zip/unzip命令
zip和unzip是打包和压缩指令。如果没有安装可以使用yum指令安装:yum install -y zip unzip
语法:zip 压缩文件.zip 目录或文件
常用选项:
-r:递归处理,将指定目录下的所有文件和子目录一并处理。
[as@VM-0-2-centos 1.linux-command]$ mkdir -p 1/2/3/4
[as@VM-0-2-centos 1.linux-command]$ ls
1  myfile.txt  test.txt
[as@VM-0-2-centos 1.linux-command]$ zip -r 1.zip 1
  adding: 1/ (stored 0%)
  adding: 1/2/ (stored 0%)
  adding: 1/2/3/ (stored 0%)
  adding: 1/2/3/4/ (stored 0%)
[as@VM-0-2-centos 1.linux-command]$ ls
1  1.zip  myfile.txt  test.txt
[as@VM-0-2-centos 1.linux-command]$ rm -rf 1
[as@VM-0-2-centos 1.linux-command]$ ls
1.zip  myfile.txt  test.txt
[as@VM-0-2-centos 1.linux-command]$ unzip 1.zip
Archive:  1.zip
   creating: 1/
   creating: 1/2/
   creating: 1/2/3/
   creating: 1/2/3/4/
[as@VM-0-2-centos 1.linux-command]$ ls
1  1.zip  myfile.txt  test.txt
[as@VM-0-2-centos 1.linux-command]$ tree 1
1
`-- 2
    `-- 3
        `-- 4

3 directories, 0 files
知识点:打包压缩是什么?
打包:文件合并;压缩:减少体积
为什么要打包压缩?打包是为了防止文件丢失,压缩是为了减少体积,节省存储空间,压缩也可以有效的减少网络传送的时间的。
21 tar命令
tar命令是打包和解包指令。
语法:tar [选项] 文件与目录
| 选项 | 英文含义 | 中文含义 | 使用场景 |
|---|---|---|---|
-c |
Create | 创建 | 打包文件(tar -cvf) |
-x |
Extract | 解包 | 解开打包文件(tar -xvf) |
-t |
List | 查看 | 查看包里的内容(tar -tvf) |
-z |
gZip | gzip压缩 | 通过 gzip 压缩/解压(生成 .tar.gz) |
-j |
bZip2 | bzip2压缩 | 通过 bzip2 压缩/解压(生成 .tar.bz2) |
-v |
Verbose | 显示详情 | 显示正在处理的文件 |
-f |
File | 指定文件名 | 后面必须紧跟文件名 |
-C |
Directory | 指定目录 | 解压到指定目录 |
[as@VM-0-2-centos 1.linux-command]$ ls
1  1.zip  myfile.txt  test.txt
[as@VM-0-2-centos 1.linux-command]$ tar czf 1.tgz 1
[as@VM-0-2-centos 1.linux-command]$ ls
1  1.tgz  1.zip  myfile.txt  test.txt
[as@VM-0-2-centos 1.linux-command]$ rm -rf 1
[as@VM-0-2-centos 1.linux-command]$ tar xzf 1.tgz
[as@VM-0-2-centos 1.linux-command]$ ls
1  1.tgz  1.zip  myfile.txt  test.txt
22 uname指令
uname是用来查看体系结构和系统内核版本
语法:uname [选项]
常用选项:
-a:查看完整信息,依次为内核名称,主机名,内核版本号,内核版本,硬件名,处理器类型,硬件平台类型,操作系统名称。
-r:查看内核版本和体系结构
[as@VM-0-2-centos ~]$ uname -r
3.10.0-1160.119.1.el7.x86_64
希望这份命令清单能成为你Linux之旅的得力助手,如果这篇文章对你有用,可以点点赞哦,你的支持就是我写下去的动力,后续会继续更新其他知识。

AtomGit 是由开放原子开源基金会联合 CSDN 等生态伙伴共同推出的新一代开源与人工智能协作平台。平台坚持“开放、中立、公益”的理念,把代码托管、模型共享、数据集托管、智能体开发体验和算力服务整合在一起,为开发者提供从开发、训练到部署的一站式体验。
更多推荐

 9
9 0
0- 0


 已为社区贡献1条内容

所有评论(0)