Flutter-OH SMS Autofill 插件完整使用教程
Flutter-OH SMS Autofill 插件完整使用教程
一、插件介绍
一直以来,大家在Flutter开发鸿蒙应用的过程中,其中一个热点就是三方库的使用,
今天我们来看一下如何在鸿蒙平台上使用sms_autofill
sms_autofill 是一个强大的 Flutter 插件,用于自动读取和填充短信验证码(OTP)。它支持 Android 和 iOS 平台,能够自动监听短信并提取验证码,大大提升用户体验。
主要特性
-
✅ 自动读取短信验证码:无需手动输入,自动识别并填充验证码
-
✅ 多种输入组件:提供
PinFieldAutoFill、TextFieldPinAutoFill等多种样式 -
✅ 应用签名支持:Android 平台支持应用签名验证,确保安全性
-
✅ Mixin 支持:提供
CodeAutoFillmixin,简化代码实现 -
✅ 跨平台支持:同时支持 Android 和 iOS
适用场景
-
用户登录/注册时的短信验证码输入
-
密码重置验证
-
支付确认验证
-
任何需要短信验证码的场景
二、安装步骤
2.1 添加依赖
在项目的 pubspec.yaml 文件中添加 sms_autofill 依赖:
dependencies:
  flutter:
    sdk: flutter
  sms_autofill: ^2.4.1
2.2 安装包
在终端中运行以下命令安装依赖:
flutter pub get
安装完成后,你会看到类似以下的输出:
Resolving dependencies...
+ pin_input_text_field 4.5.2
+ sms_autofill 2.4.1
Changed 2 dependencies!
三、平台配置
3.1 Android 配置
步骤 1:添加权限
在 android/app/src/main/AndroidManifest.xml 文件中添加短信读取权限:
<manifest xmlns:android="http://schemas.android.com/apk/res/android">
    <!-- 添加短信读取权限 -->
    <uses-permission android:name="android.permission.RECEIVE_SMS"/>
    <uses-permission android:name="android.permission.READ_SMS"/>

    <application>
        <!-- 其他配置 -->
    </application>
</manifest>
步骤 2:运行时权限申请
在 Android 6.0 (API 23) 及以上版本,需要在运行时动态申请权限。可以使用 permission_handler 插件:
dependencies:
  permission_handler: ^11.0.0
步骤 3:获取应用签名(可选但推荐)
Android 的 SMS Retriever API 需要应用签名来验证短信来源。获取应用签名的方法:
方法一:使用插件提供的 API
String signature = await SmsAutoFill().getAppSignature;
print("App Signature: $signature");
方法二:使用命令行工具
# 对于 debug 版本 keytool -exportcert -alias androiddebugkey -keystore ~/.android/debug.keystore -storepass android -keypass android | xxd -p | tr -d "[:space:]" | echo -n "com.example.app $(cat)" | sha256sum | tr -d "[:space:]-" | xxd -r -p | base64 | cut -c1-11 # 对于 release 版本 keytool -exportcert -alias your-key-alias -keystore path/to/your/keystore.jks | xxd -p | tr -d "[:space:]" | echo -n "com.example.app $(cat)" | sha256sum | tr -d "[:space:]-" | xxd -r -p | base64 | cut -c1-11
方法三:使用在线工具
访问 Google Play Console 或使用其他在线签名工具。
3.2 iOS 配置
步骤 1:添加权限说明
在 ios/Runner/Info.plist 文件中添加短信权限说明:
<key>NSUserTrackingUsageDescription</key>
<string>我们需要访问您的短信以自动填充验证码</string>
步骤 2:启用短信自动填充
iOS 的短信自动填充功能需要满足以下条件:
-
短信格式必须符合特定规范
-
短信必须来自可信来源
-
应用需要正确配置 Associated Domains(可选)
短信格式示例:
您的验证码是:123456,请在5分钟内使用。【应用名称】
或者使用标准格式:
<#> 您的验证码是:123456
ABC123XYZ
其中 ABC123XYZ 是应用签名哈希。
四、基本使用
4.1 导入包
在需要使用短信自动填充功能的文件中导入:
import 'package:sms_autofill/sms_autofill.dart';
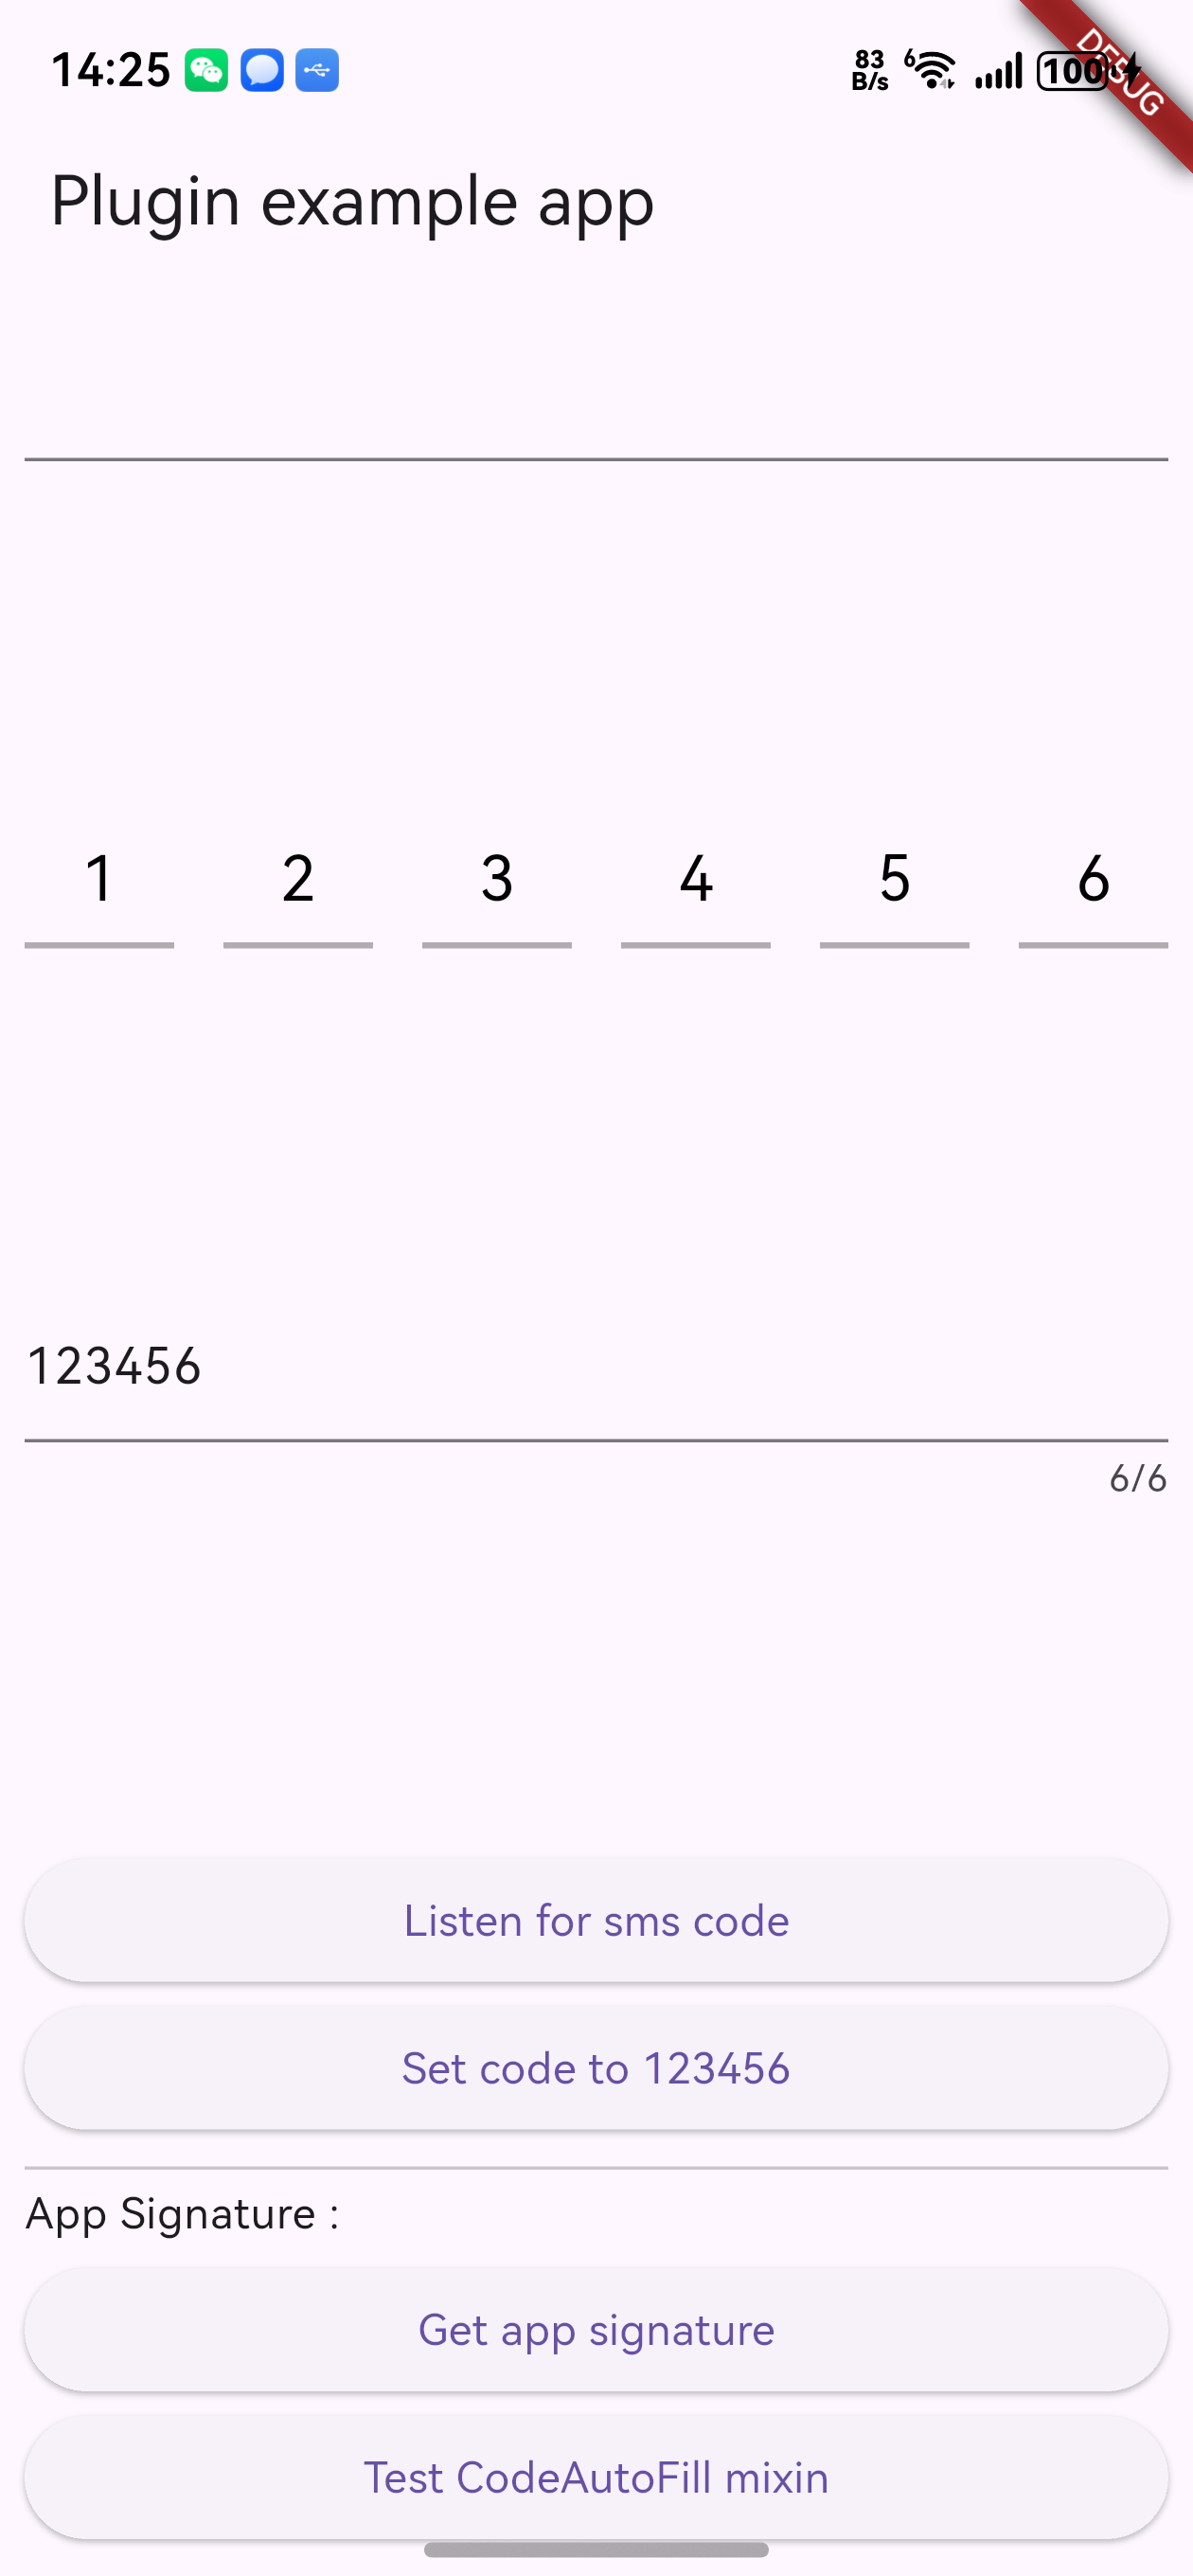
4.2 使用 PinFieldAutoFill(推荐)
PinFieldAutoFill 是一个专门用于验证码输入的组件,支持多种装饰样式:
class VerificationPage extends StatefulWidget {
@override
_VerificationPageState createState() => _VerificationPageState();
}
class _VerificationPageState extends State<VerificationPage> {
String _code = "";
@override
Widget build(BuildContext context) {
return Scaffold(
appBar: AppBar(title: Text('验证码输入')),
body: Padding(
padding: EdgeInsets.all(16.0),
child: Column(
children: [
// 下划线样式
PinFieldAutoFill(
decoration: UnderlineDecoration(
textStyle: TextStyle(fontSize: 20, color: Colors.black),
colorBuilder: FixedColorBuilder(Colors.black.withOpacity(0.3)),
),
currentCode: _code,
codeLength: 6, // 验证码长度
onCodeSubmitted: (code) {
// 验证码提交时的回调
print("验证码: $code");
// 这里可以调用验证接口
},
onCodeChanged: (code) {
setState(() {
_code = code ?? "";
});
// 当输入完成时自动提交
if (code != null && code.length == 6) {
// 自动提交或隐藏键盘
FocusScope.of(context).unfocus();
}
},
),
],
),
),
);
}
@override
void dispose() {
SmsAutoFill().unregisterListener();
super.dispose();
}
}
装饰样式选项
1. 下划线样式(UnderlineDecoration)
PinFieldAutoFill(
  decoration: UnderlineDecoration(
    textStyle: TextStyle(fontSize: 20, color: Colors.black),
    colorBuilder: FixedColorBuilder(Colors.black.withOpacity(0.3)),
  ),
  // ...
)
2. 方框样式(BoxLooseDecoration)
PinFieldAutoFill(
  decoration: BoxLooseDecoration(
    strokeColor: Colors.blue,
    bgColorBuilder: FixedColorBuilder(Colors.grey.withOpacity(0.1)),
    textStyle: TextStyle(fontSize: 20, color: Colors.black),
  ),
  // ...
)
3. 圆角方框样式(BoxTightDecoration)
PinFieldAutoFill(
  decoration: BoxTightDecoration(
    strokeColor: Colors.blue,
    radius: Radius.circular(8),
    textStyle: TextStyle(fontSize: 20, color: Colors.black),
  ),
  // ...
)
4.3 使用 TextFieldPinAutoFill
如果你更喜欢使用标准的 TextField,可以使用 TextFieldPinAutoFill:
TextFieldPinAutoFill(
  currentCode: _code,
  onCodeSubmitted: (code) {
    print("验证码: $code");
  },
  decoration: InputDecoration(
    labelText: '请输入验证码',
    border: OutlineInputBorder(),
  ),
)
4.4 手动监听短信
如果需要手动控制短信监听:
// 开始监听 await SmsAutoFill().listenForCode(); // 停止监听 SmsAutoFill().unregisterListener();
4.5 获取应用签名
String signature = await SmsAutoFill().getAppSignature;
print("App Signature: $signature");
五、高级功能
5.1 使用 CodeAutoFill Mixin
CodeAutoFill mixin 提供了更简洁的方式来处理短信验证码:
class VerificationPage extends StatefulWidget {
@override
_VerificationPageState createState() => _VerificationPageState();
}
class _VerificationPageState extends State<VerificationPage> with CodeAutoFill {
String? appSignature;
String? otpCode;
@override
void codeUpdated() {
// 当收到验证码时自动调用
setState(() {
otpCode = code;
});
// 可以在这里自动提交验证码
if (code != null && code!.length == 6) {
_verifyCode(code!);
}
}
@override
void initState() {
super.initState();
// 开始监听
listenForCode();
// 获取应用签名
SmsAutoFill().getAppSignature.then((signature) {
setState(() {
appSignature = signature;
});
});
}
@override
void dispose() {
// 取消监听
cancel();
super.dispose();
}
void _verifyCode(String code) {
// 验证验证码的逻辑
print("验证码: $code");
}
@override
Widget build(BuildContext context) {
return Scaffold(
appBar: AppBar(title: Text('验证码验证')),
body: Column(
children: [
if (otpCode != null)
Text("收到的验证码: $otpCode"),
if (appSignature != null)
Text("应用签名: $appSignature"),
],
),
);
}
}
5.2 显示手机号提示
PhoneFieldHint 组件可以显示用户的手机号,帮助用户确认:
PhoneFieldHint(
  child: Text("我们将向 +86 138****8888 发送验证码"),
)
5.3 自定义验证码格式
如果需要自定义验证码的提取规则,可以使用正则表达式:
// 在监听时指定验证码格式
await SmsAutoFill().listenForCode(
  codeLength: 6,
  // 可以添加自定义的验证码提取逻辑
);
六、完整示例代码
以下是一个完整的短信验证码输入页面示例:
import 'package:flutter/material.dart';
import 'package:sms_autofill/sms_autofill.dart';
void main() => runApp(const MyApp());
class MyApp extends StatelessWidget {
const MyApp({Key? key}) : super(key: key);
@override
Widget build(BuildContext context) {
return MaterialApp(
theme: ThemeData.light(),
home: const HomePage(),
);
}
}
class HomePage extends StatefulWidget {
const HomePage({Key? key}) : super(key: key);
@override
State<HomePage> createState() => _HomePageState();
}
class _HomePageState extends State<HomePage> {
String _code = "";
String signature = "{{ app signature }}";
@override
void initState() {
super.initState();
}
@override
void dispose() {
SmsAutoFill().unregisterListener();
super.dispose();
}
@override
Widget build(BuildContext context) {
return Scaffold(
appBar: AppBar(
title: const Text('短信验证码示例'),
),
body: Padding(
padding: const EdgeInsets.all(16.0),
child: Column(
mainAxisSize: MainAxisSize.max,
mainAxisAlignment: MainAxisAlignment.center,
crossAxisAlignment: CrossAxisAlignment.stretch,
children: <Widget>[
// 手机号提示
const PhoneFieldHint(),
const SizedBox(height: 32),
// 下划线样式的验证码输入框
const Text(
'验证码输入(下划线样式)',
style: TextStyle(fontSize: 16, fontWeight: FontWeight.bold),
),
const SizedBox(height: 16),
PinFieldAutoFill(
decoration: UnderlineDecoration(
textStyle: const TextStyle(fontSize: 20, color: Colors.black),
colorBuilder: FixedColorBuilder(Colors.black.withOpacity(0.3)),
),
currentCode: _code,
codeLength: 6,
onCodeSubmitted: (code) {
_handleCodeSubmitted(code);
},
onCodeChanged: (code) {
setState(() {
_code = code ?? "";
});
if (code != null && code.length == 6) {
FocusScope.of(context).requestFocus(FocusNode());
}
},
),
const SizedBox(height: 32),
// 文本输入框样式的验证码输入
const Text(
'验证码输入(文本输入框样式)',
style: TextStyle(fontSize: 16, fontWeight: FontWeight.bold),
),
const SizedBox(height: 16),
TextFieldPinAutoFill(
currentCode: _code,
onCodeSubmitted: (code) {
_handleCodeSubmitted(code);
},
),
const Spacer(),
// 操作按钮
ElevatedButton(
child: const Text('开始监听短信验证码'),
onPressed: () async {
await SmsAutoFill().listenForCode();
ScaffoldMessenger.of(context).showSnackBar(
const SnackBar(content: Text('已开始监听短信验证码')),
);
},
),
const SizedBox(height: 8),
ElevatedButton(
child: const Text('获取应用签名'),
onPressed: () async {
signature = await SmsAutoFill().getAppSignature;
setState(() {});
ScaffoldMessenger.of(context).showSnackBar(
SnackBar(content: Text('应用签名: $signature')),
);
},
),
const SizedBox(height: 8),
Text("应用签名: $signature"),
const SizedBox(height: 16),
ElevatedButton(
onPressed: () {
Navigator.of(context).push(
MaterialPageRoute(
builder: (_) => const CodeAutoFillTestPage(),
),
);
},
child: const Text("使用 CodeAutoFill Mixin 示例"),
),
],
),
),
);
}
void _handleCodeSubmitted(String code) {
print("提交的验证码: $code");
// 这里可以调用验证接口
ScaffoldMessenger.of(context).showSnackBar(
SnackBar(content: Text('验证码: $code')),
);
}
}
// 使用 CodeAutoFill Mixin 的示例页面
class CodeAutoFillTestPage extends StatefulWidget {
const CodeAutoFillTestPage({Key? key}) : super(key: key);
@override
State<CodeAutoFillTestPage> createState() => _CodeAutoFillTestPageState();
}
class _CodeAutoFillTestPageState extends State<CodeAutoFillTestPage> with CodeAutoFill {
String? appSignature;
String? otpCode;
@override
void codeUpdated() {
setState(() {
otpCode = code;
});
if (code != null && code!.length == 6) {
_verifyCode(code!);
}
}
@override
void initState() {
super.initState();
listenForCode();
SmsAutoFill().getAppSignature.then((signature) {
setState(() {
appSignature = signature;
});
});
}
@override
void dispose() {
super.dispose();
cancel();
}
void _verifyCode(String code) {
print("验证码: $code");
ScaffoldMessenger.of(context).showSnackBar(
SnackBar(content: Text('收到验证码: $code')),
);
}
@override
Widget build(BuildContext context) {
const textStyle = TextStyle(fontSize: 18);
return Scaffold(
appBar: AppBar(
title: const Text("CodeAutoFill Mixin 示例"),
),
body: Column(
crossAxisAlignment: CrossAxisAlignment.center,
children: <Widget>[
Padding(
padding: const EdgeInsets.fromLTRB(32, 32, 32, 0),
child: Text(
"应用签名: ${appSignature ?? '获取中...'}",
style: textStyle,
),
),
const Spacer(),
Padding(
padding: const EdgeInsets.symmetric(horizontal: 32),
child: Builder(
builder: (_) {
if (otpCode == null) {
return const Text("正在监听验证码...", style: textStyle);
}
return Text("收到的验证码: $otpCode", style: textStyle);
},
),
),
const Spacer(),
],
),
);
}
}
七、常见问题与解决方案
7.1 Android 平台问题
问题 1:无法自动读取验证码
解决方案:
-
确保已添加短信读取权限
-
检查应用签名是否正确配置
-
确保短信格式符合 SMS Retriever API 的要求
-
验证码短信必须包含应用签名哈希
问题 2:应用签名获取失败
解决方案:
-
确保应用已经签名(debug 或 release)
-
使用正确的 keystore 文件
-
检查包名是否正确
问题 3:权限被拒绝
解决方案:
-
在运行时动态申请权限
-
引导用户到设置页面手动开启权限
-
使用
permission_handler插件管理权限
7.2 iOS 平台问题
问题 1:iOS 无法自动填充
解决方案:
-
确保短信格式正确
-
短信必须来自可信来源
-
检查是否启用了短信自动填充功能(设置 > 信息 > 验证码自动填充)
问题 2:验证码格式不匹配
解决方案:
-
确保短信中的验证码格式清晰
-
使用标准的验证码格式(如:6位数字)
-
避免在验证码前后添加特殊字符
7.3 通用问题
问题 1:监听器未正确释放
解决方案:
-
确保在
dispose()方法中调用unregisterListener()或cancel() -
使用
CodeAutoFillmixin 时,确保调用cancel()
问题 2:验证码输入框不显示
解决方案:
-
检查是否正确导入了包
-
确保
currentCode参数已初始化 -
检查装饰样式配置是否正确
问题 3:验证码自动填充延迟
解决方案:
-
这是正常现象,短信接收和解析需要时间
-
通常延迟在 1-3 秒内
-
可以添加加载提示提升用户体验
八、最佳实践
8.1 用户体验优化
-
提供手动输入选项:即使有自动填充,也要允许用户手动输入
-
显示倒计时:验证码通常有时效性,显示倒计时提醒用户
-
错误提示:验证码错误时给出清晰的提示
-
重发验证码:提供重新发送验证码的功能
8.2 安全性考虑
-
验证码有效期:设置合理的验证码有效期(通常 5-10 分钟)
-
验证码格式:使用足够复杂的验证码(推荐 6 位数字)
-
防暴力破解:限制验证码尝试次数
-
应用签名验证:Android 平台务必使用应用签名验证
8.3 性能优化
-
及时释放资源:在页面销毁时及时释放监听器
-
避免重复监听:不要同时创建多个监听器
-
合理使用 Mixin:使用
CodeAutoFillmixin 简化代码
总结
sms_autofill 插件为 Flutter 应用提供了强大的短信验证码自动填充功能。通过本教程,你应该能够:
-
✅ 正确安装和配置插件
-
✅ 使用各种输入组件
-
✅ 实现短信自动监听和填充
-
✅ 处理常见问题和异常情况
-
✅ 优化用户体验和安全性
关键要点
-
平台配置很重要:Android 需要权限和签名,iOS 需要正确的短信格式
-
资源管理:记得在
dispose()中释放监听器 -
用户体验:提供手动输入选项,不要完全依赖自动填充
-
安全性:使用应用签名验证,设置合理的验证码有效期
下一步
-
查看 官方文档
-
探索更多自定义选项
-
集成到你的实际项目中
欢迎大家加入开源鸿蒙跨平台开发者社区:汇聚全球开发者,提供清晰的贡献路径与激励体系,你的每一行代码都可能成为产业升级的基石!

AtomGit 是由开放原子开源基金会联合 CSDN 等生态伙伴共同推出的新一代开源与人工智能协作平台。平台坚持“开放、中立、公益”的理念,把代码托管、模型共享、数据集托管、智能体开发体验和算力服务整合在一起,为开发者提供从开发、训练到部署的一站式体验。
更多推荐

 22
22 0
0- 0


 已为社区贡献6条内容

所有评论(0)