
区块链以太坊学习笔记
以太坊物联网区块链(一)
Web3js 与 java 连接区块链可以参考我github上的两个小demo
Ethereum-java
Ethereum-javascript
搭建私有链, 利用以太坊平台完成数据上链
如何搭建?
用Geth搭建一个区块链节点,本地主机就和区块链网络中主机一致了,(可以连接main链,和其它测试链,还有自定义链)。注:可以通过赋予chainid和networkid不同的值让本机成为连接在main链chainid(1),测试链chanid(2-4)或者自定义链chainid(其它,暂设置为666)
chainid 与 networkid 具体用途,建议设置成一样,后面省心
安装geth
一台新机器 Ubuntu 20.04LTS (虚拟机)
#新机器需要做以下两步
#更换清华的源,参考网上
#安装vim,参考网上
#执行下列命令
sudo apt-get update
sudo apt-get install software-properties-common
sudo add-apt-repository -y ppa:ethereum/ethereum
sudo add-apt-repository -y ppa:ethereum/ethereum-dev
sudo apt-get update
sudo apt-get install ethereum
创世块文件
#在桌面创建 mkdir privateblock && cd privateblock
#创建创世块文件genesis.json,并将下列内容放入genesis.json文件中
{
"config": {
"chainId": 666,
"homesteadBlock": 0,
"eip150Block": 0,
"eip150Hash": "0x0000000000000000000000000000000000000000000000000000000000000000",
"eip155Block": 0,
"eip158Block": 0,
"byzantiumBlock": 0,
"constantinopleBlock": 0,
"petersburgBlock": 0,
"istanbulBlock": 0,
"ethash": {}
},
"nonce": "0x0",
"timestamp": "0x5ddf8f3e",
"extraData": "0x0000000000000000000000000000000000000000000000000000000000000000",
"gasLimit": "0x47b760",
"difficulty": "0x00002",
"mixHash": "0x0000000000000000000000000000000000000000000000000000000000000000",
"coinbase": "0x0000000000000000000000000000000000000000",
"alloc": {
"bc9a3ece02d7cb31cf63dfdfc48db0b82770d014": {
"balance": "8000000000000000000000000000000"
}
},
"number": "0x0",
"gasUsed": "0x0",
"parentHash": "0x0000000000000000000000000000000000000000000000000000000000000000"
}
#打开geth之前一定要进入privateblock目录,初始化创世块文件,每台主机只需要初始化一次
geth --datadir data init genesis.json
打开Geth客户端
Geth版本:
Welcome to the Geth JavaScript console!
instance: Geth/v1.10.8-stable-26675454/linux-amd64/go1.16.4
#下面是我编写的开启geth脚本
root@blockchain1:/home/chenhui/privateblock# cat frist_start_2.sh
#!/bin/bash
nohup geth --datadir data --networkid 666 --http --http.corsdomain="*" --http.port 8545 --http.addr "0.0.0.0" --http.api db,web3,eth,debug,personal,net,miner,admin --allow-insecure-unlock --rpc.allow-unprotected-txs --port 30303 --dev --dev.period 1 2>./console.log &
Geth操作命令
#创建账户 123为账户密码
personal.newAccount("12345678")
#查看第一个账户
eth.accounts[0]
#查看用户
eth.accounts
#查看矿工账户,若节点中有多个账户,默认第一个账户为矿工账户
eth.coinbase
#查看区块数量
eth.blockNumber
#通过区块号,查看区块信息
eth.getBlock(i)
#给账户地址取别名
user1=eth.accounts[0]
#通过别名获取金额
eth.getBalance(user1)
#转账之前需要解锁密码,直接回车,默认账号锁定密码为空,返回true成功
personal.unlockAccount(user1)
#账户之间转账,提交交易,但是还未经区块链网络确认
//可以在geth运行期间一直解锁账户
personal.unlockAccount(eth.accounts[0],"123",0)
"enode://238dec8d985d6959f8b99e94e8d343be4a3d0f6737972531b226ea154212d3cf315b536bd3f4463d29096a6c3853ab783f2e78faeb6a787259e888d782dec88c@115.29.67.40:30303"
eth.sendTransaction({from:user1,to:user2,value:web3.toWei(3,"ether")})
挖矿命令
#若本机挖矿成功,矿工地址就会有就会有一笔收益,可以通过eth.coinbase查看
eth.coinbase
#设置矿工地址
miner.setEtherbase(eth.coinbase)
#设置矿工
miner.setEtherbase(user3)
#挖矿,开启1个线程挖矿
miner.start(1)
#查看是否在挖矿
eth.mining
#结束挖矿
miner.stop()
# 挖出新区块后,立马停止
miner.start(1);admin.sleepBlocks(1);miner.stop();
查看交易指令
#查看本地交易池,待提交的交易
txpool.status
eth.getBlock("pending", true).transactions
#查看用户的以太币个数,用以太币表示,而不是Wei
web3.fromWei(eth.getBalance(eth.accounts[1]),'ether')
#通过交易链接,查看交易
eth.getTransaction("0x9f5e61f3d686f793e2df6378d1633d7a9d1df8ec8c597441e1355112d102a6ce")
将区块链数据同步到其它 peer 节点
当 peer 连接好了的时候,就自动完成同步了
#查看其它节点信息
admin.peers
#查看node信息
admin.nodeInfo
admin.nodeInfo.enode
区块链中,节点是p2p模式网络
#通过admin.addPeer()添加peer节点,添加节点1
admin.addPeer("enode://917e60c31d4cac6eb1af97fd971c96f172f386d5de04fadaf01b0e1ff38c49877e4a1fcd3275659e6fd19c9fb09fc5a93a50597ff9b87d261ca216706106923b@192.168.188.133:30303")
#查看是否有其它的peer
net.peerCount
#单位换算
web3.fromWei(100000000,'ether')
#跨节点转账: 如果报错可能安装web3的版本太高
eth.sendTransaction({from:address1,to:address2,value:web3.toWei(3,"ether")})
如何验证区块链节点,同步了?
可以将BlockChain2和BlockChain3,分别在Geth的控制台下,使用admin.addpeer()连接到Cluster节点(第一个节点)。可以开启一个节点的挖矿程序,在别的系统中,查看区块,发现,另一台主机也在进行同步。
如何通过产生的交易地址,来查看交易内容?
开发框架Truffle
开发框架Truffle介绍
truffle 是一个部署合约的框架,提高效率
安装方式
1 添加 node 源
$ curl -sL https://deb.nodesource.com/setup_14.x | sudo -E bash -
2 安装 nodejs
$ sudo apt-get install -y nodejs
3 安装区块链测试环境
$ npm install -g ganache-cli
$ ganache-cli --version
Ganache CLI v6.12.2 (ganache-core: 2.13.2)
$ npm install -g ethereumjs-testrpc
4 安装truffle
$ sudo npm install -g truffle
5 终端创建一个目录
mkdir test
cd test
6 下载初始项目
truffle init
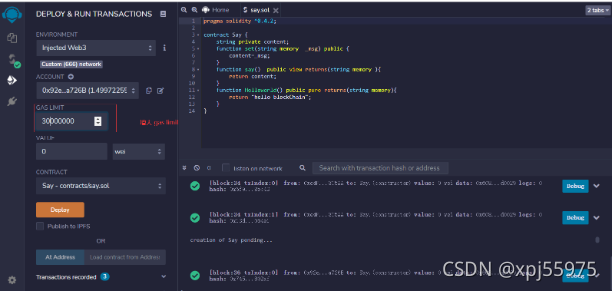
7 在contract 目录下编写智能合约Say.sol
pragma solidity ^0.5.0;
contract Say {
string private content;
function set(string memory _msg) public {
content=_msg;
}
function say() public view returns(string memory ){
return content;;
}
}
~
8 增加合约部署文件
#在目录migrations下新建2_deploy_contracts.js(1开头的文件不能删除,否则就会报错)
var Say = artifacts.require("./Say.sol");
module.exports = function(deployer) {
deployer.deploy(Say);
};
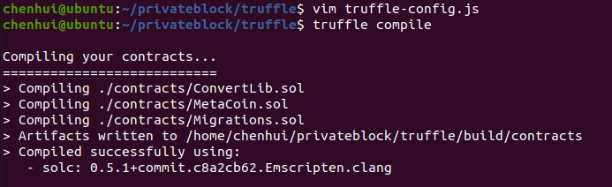
9 编译合约 执行命令(应该在truffle目录下)
truffle compile
//此时执行编译时,
✔ Fetching solc version list from solc-bin. Attempt #3
卡在这卡了很久?
解决办法:见bug
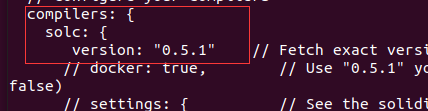
10 修改目录下的文件truffle-config.js 如下(host和port要根据自己的配置来定)部署合约到区块链上
module.exports = {
networks:{
development:{
host:"localhost",
port:8545,
network_id:"20210821",
gas:3000000
}
}
};
11 部署前先解锁账号,并启动挖矿
>personal.unlockAccount(user1)
>miner.start()
12 然后执行部署,应该是在truffle目录下
truffle migrate
此处报错,解决见bug5
truffle 开发 ,使用开发模式的前提是,之前一定要安装第三步,区块链测试环境
$ truffle Develop
started at http://127.0.0.1:9545/
Accounts:
(0) 0x55cc26a61e5ed0946aee50e7895f1064ccd01da4
(1) 0x17f53146ab4ecb78fa9c9c3795ee84e77b46a7a9
(2) 0x37110b76c6951c94ced4b4d46ef99013b60652cf
(3) 0xc7910dc26d37ff4cc3b855527c4074ddb36f8942
(4) 0x70aac68de9e77ec836f431e048d287a8f9330a55
...
⚠️ Important ⚠️ : This mnemonic was created for you by Truffle. It is not secure.
Ensure you do not use it on production blockchains, or else you risk losing funds.
$ truffle(develop)> compile
Compiling your contracts...
===========================
> Everything is up to date, there is nothing to compile.
truffle(develop)> truffle migrate
Compiling your contracts...
===========================
> Everything is up to date, there is nothing to compile.
Starting migrations...
======================
> Network name: 'develop'
> Network id: 5777
> Block gas limit: 6721975 (0x6691b7)
1_initial_migration.js
======================
Deploying 'Migrations'
----------------------
> transaction hash: 0xf6dbd0e3400fc70664a6b60fa922377ee2b5f3ac6bb630ae20d951d05791c442
> Blocks: 0 Seconds: 0
> contract address: 0xE612CF8f9DDCCfB89D5aED08E9cDeFFb3711ABc6
> block number: 1
> block timestamp: 1630758669
> account: 0x55Cc26A61E5eD0946aEe50e7895f1064cCD01dA4
> balance: 99.999616114
> gas used: 191943 (0x2edc7)
> gas price: 2 gwei
> value sent: 0 ETH
> total cost: 0.000383886 ETH
> Saving migration to chain.
> Saving artifacts
-------------------------------------
> Total cost: 0.000383886 ETH
2_deploy_contracts.js
=====================
Deploying 'Say'
---------------
> transaction hash: 0x35fed518448b51036dd245c5f180d6af7c3e7050e5c166bff94f9360479e3ce2
> Blocks: 0 Seconds: 0
> contract address: 0x02db26E5099Ae13ad8282A82A7bD818e3030bC27
> block number: 3
> block timestamp: 1630758669
> account: 0x55Cc26A61E5eD0946aEe50e7895f1064cCD01dA4
> balance: 99.99908693
> gas used: 222254 (0x3642e)
> gas price: 2 gwei
> value sent: 0 ETH
> total cost: 0.000444508 ETH
> Saving migration to chain.
> Saving artifacts
-------------------------------------
> Total cost: 0.000444508 ETH
Summary
=======
> Total deployments: 2
> Final cost: 0.000828394 ETH
- Blocks: 0 Seconds: 0
- Saving migration to chain.
- Blocks: 0 Seconds: 0
- Saving migration to chain.
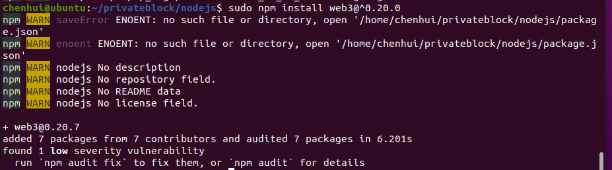
安装nodejs
//新建一个文件夹,然后初始化
$ mkdir nodejs && cd nodejs
$ npm init -f //此处的-f会自动给你配好配置文件
$ npm install web3@^0.20.0
//若想 安装最新版web3 npm install web3
安装报错,见bug6
查看,node内嵌web3版本的方式
chenhui@ubuntu:~/privateblock/nodejs$ node
> web3.version.api
Thrown:
ReferenceError: web3 is not defined
> var Web3 = require('web3')
undefined
> var web3 = new Web3(new Web.providers.HttpProvider("http://localhost:8545"))
Thrown:
ReferenceError: Web is not defined
> var web3 = new Web3(new Web3.providers.HttpProvider("http://localhost:8545"))
undefined
> web3.version.api
'0.20.7'
nodejs 在命令行输入参数
var arguments = process.argv.splice(2)
arguments[0] arguments[1]
Bug 笔记
1. Fatal: Error starting protocol stack: listen tcp :30303: bind: address already in use
ps ax | grep geth
kill -9 <pid>
2.personal.unlockAccount(user1,“12345678”)
解锁失败,报错如下
GoError: Error: could not decrypt key with given password at web3.js:6357:37(47)
at native
at :1:30(4)
解决方案:可能是密码出错了,也可能是
尝试新建一个用户
eth.newAccount("123")
并将这个用户立马使用
personal.unlockAccount(eth.accounts[2])
输入密码:123
3.Error: etherbase must be explicitly specified
at web3.js:6357:37(47)
at get (web3.js:6257:66(14))
可能首次,没有创建用户
4.truffle compile编译这部分,可能需要弄很久
http://www.manongjc.com/detail/19-sczhvzvgfkmlgse.html
解决方案:https://learnblockchain.cn/question/1568
将 compiler 用别的方式下载下来,放到下面的目录~。
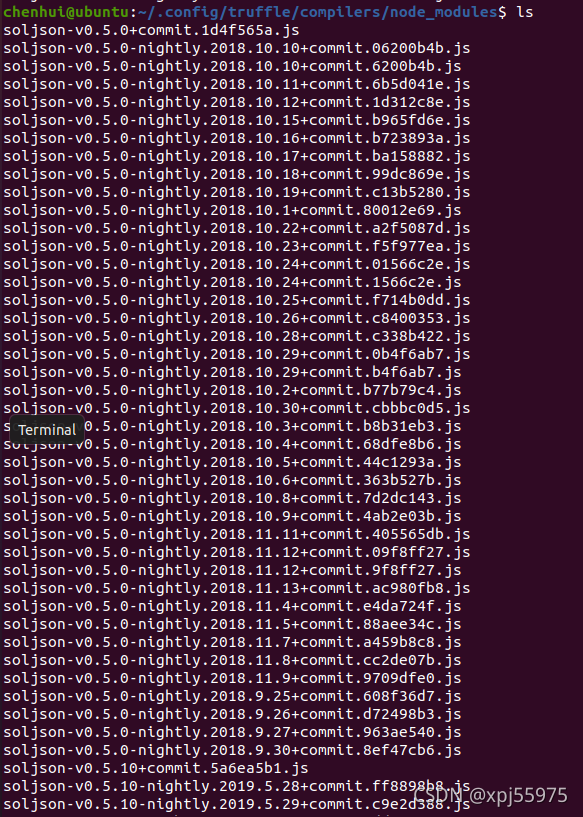
修改truffle-config.js中的去掉version注释
5.报错如下
undefined:1
b0VIM 8.1
^
SyntaxError: Unexpected token b in JSON at position 0
at JSON.parse ()
chenhui@ubuntu:~/privateblock/truffle$ truffle migrate
Compiling your contracts...
===========================
> Everything is up to date, there is nothing to compile.
Starting migrations...
======================
> Network name: 'development'
> Network id: 20210821
> Block gas limit: 4787948 (0x490eec)
1_initial_migration.js
======================
undefined:1
b0VIM 8.1
^
SyntaxError: Unexpected token b in JSON at position 0
at JSON.parse (<anonymous>)
at FS.getContractName (/usr/lib/node_modules/truffle/build/webpack:/packages/resolver/dist/lib/sources/fs.js:44:1)
at FS.require (/usr/lib/node_modules/truffle/build/webpack:/packages/resolver/dist/lib/sources/fs.js:25:1)
at /usr/lib/node_modules/truffle/build/webpack:/packages/resolver/dist/lib/resolver.js:53:1
at Array.forEach (<anonymous>)
at Resolver.require (/usr/lib/node_modules/truffle/build/webpack:/packages/resolver/dist/lib/resolver.js:52:1)
at Object.require (/usr/lib/node_modules/truffle/build/webpack:/packages/migrate/index.js:172:1)
at ResolverIntercept.require (/usr/lib/node_modules/truffle/build/webpack:/packages/migrate/ResolverIntercept.js:22:1)
at /home/chenhui/privateblock/truffle/migrations/1_initial_migration.js:1:30
at Script.runInContext (vm.js:144:12)
at Script.runInNewContext (vm.js:149:17)
at Object.file (/usr/lib/node_modules/truffle/build/webpack:/packages/require/require.js:94:1)
at Migration._load (/usr/lib/node_modules/truffle/build/webpack:/packages/migrate/Migration.js:44:1)
at processTicksAndRejections (internal/process/task_queues.js:95:5)
at Migration.run (/usr/lib/node_modules/truffle/build/webpack:/packages/migrate/Migration.js:217:1)
at Object.runMigrations (/usr/lib/node_modules/truffle/build/webpack:/packages/migrate/index.js:150:1)
Truffle v5.4.9 (core: 5.4.9)
Node v14.17.6
解决:
1_initial_migration.js 这个文件是重要文件,不能删除,删除就会报上面的错误
6:chenhui@ubuntu:~/privateblock/nodejs$ npm install web3@0.20.0
npm ERR! code ENOENT
npm ERR! syscall spawn git
npm ERR! path git
npm ERR! errno ENOENT
npm ERR! enoent Error while executing:
npm ERR! enoent undefined ls-remote -h -t https://github.com/frozeman/bignumber.js-nolookahead.git
npm ERR! enoent
npm ERR! enoent
npm ERR! enoent spawn git ENOENT
npm ERR! enoent This is related to npm not being able to find a file.
npm ERR! enoent
npm ERR! A complete log of this run can be found in:
npm ERR! /home/chenhui/.npm/_logs/2021-09-05T08_29_15_774Z-debug.log
错误原因,没有安装git
解决办法: 用管理员权限安装git
sudo apt install git
此错误好了,出现下列错误
chenhui@ubuntu:~/privateblock/nodejs$ npm install web3@0.20.0
npm ERR! code 128
npm ERR! Command failed: git clone --mirror -q https://github.com/frozeman/bignumber.js-nolookahead.git /home/chenhui/.npm/_cacache/tmp/git-clone-40a3a4f4/.git
npm ERR! warning: templates not found in /tmp/pacote-git-template-tmp/git-clone-921abd23
npm ERR! fatal: unable to access 'https://github.com/frozeman/bignumber.js-nolookahead.git/': GnuTLS recv error (-54): Error in the pull function.
npm ERR!
npm ERR! A complete log of this run can be found in:
npm ERR! /home/chenhui/.npm/_logs/2021-09-05T08_33_49_217Z-debug.log
错误原因:尝试
git config --global url.“https://”.insteadOf git://
再进行安装,没有成功,再尝试,报错
npm ERR! Error while executing:
npm ERR! /usr/bin/git ls-remote -h -t https://github.com/frozeman/bignumber.js-nolookahead.git
npm ERR!
npm ERR! fatal: unable to access 'https://github.com/frozeman/bignumber.js-nolookahead.git/': GnuTLS recv error (-54): Error in the pull function.
npm ERR!
npm ERR! exited with error code: 128
npm ERR! A complete log of this run can be found in:
npm ERR! /root/.npm/_logs/2021-09-06T07_09_43_403Z-debug.log
执行:
git config --global url.git://github.com/.insteadOf https://github.com/
解决办法
执行:
git config --global url.git://github.com/.insteadOf https://github.com/
结果
7.连接MetaMask报错
报错问题:无法获取链 IC,您的 RPC URL 地址是正确的么?
原因是少了–http.port 8545 和 --http.addr “0.0.0.0”
下面是我开启geth的命令
#!/bin/bash
nohup geth --datadir data --networkid 666 --http --http.corsdomain="*" --http.port 8545 --http.addr "0.0.0.0" --http.api db,web3,eth,debug,personal,net,miner,admin --allow-insecure-unlock --rpc.allow-unprotected-txs --port 30303 --dev --dev.period 1 2>./console.log &
连接成功图:
注意:链id 为genesis.json文件中的chainid ,而不是运行geth时的 networkid
如果上述错误,请确认,通过上述开启的 geth 的参数都没有遗漏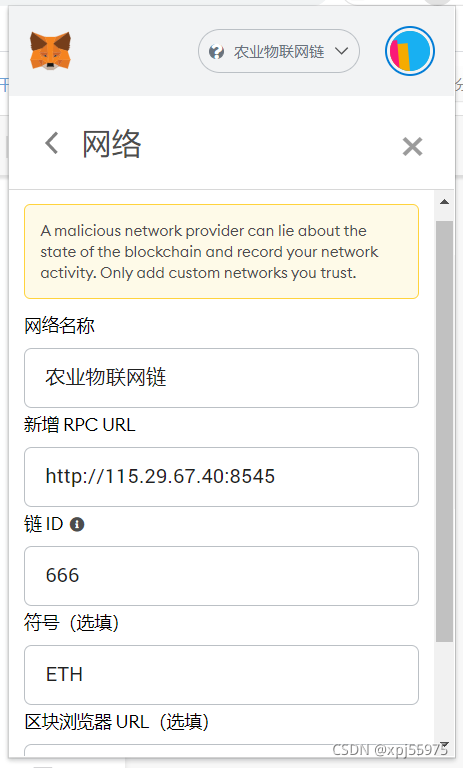
8.remix 部署合约上不了链,或者转账无法数据无法上链
解决方式:
1.将链id 和 网络id更换为相同的
2.把metamask卸载重新安装
3 .增大 gas limit
9.区块链编程,想通过调用区块链上的函数时,出现了跨域问题
test.html:1
Access to XMLHttpRequest at 'http://10.69.177.223:8545/' from origin 'http://localhost:8080' has been blocked by CORS policy: Request header field content-type is not allowed by Access-Control-Allow-Headers in preflight response.
index.js:106
POST http://10.69.177.223:8545/ net::ERR_FAILED
errors.js:43
Uncaught (in promise) Error: Invalid JSON RPC response: ""
at Object.InvalidResponse (errors.js:43)
at XMLHttpRequest.i.onreadystatechange (index.js:95)
错误原因,跨域的时候,之前只指定了http://remix.etherum.org,导致出现跨域问题, 后面将-http.corsdomain="" 改为 “”成功解决
下面是我开启geth的命令行指令
nohup geth --datadir data --networkid 666 --ipcdisable --rpc --rpccorsdomain "*" --port 30303 --rpcport 8545 --rpcaddr "0.0.0.0" --http --http.corsdomain="*" --http.api db,web3,eth,debug,personal,net,miner,admin --vmdebug --rpcapi "db,eth,net,web3,admin,personal,miner" --allow-insecure-unlock 2>./console.log &
10.当使用idea开发java时,使用
E:\Ethereum-java>mvn web3j:generate-sources
出现下列需要等待很久
Solidity version 0.4.25 is not installed. Downloading and installing it to ~/.web3j/solc/0.4.25
解决办法:开启科学上网工具,等待一下就会自己下载完毕
11 . java.lang.RuntimeException: java.lang.RuntimeException: Error processing transaction request: only replay-protected (EIP-155) transactions allowed over RPC
at org.web3j.tx.Contract.deploy(Contract.java:460)
at org.web3j.tx.Contract.deploy(Contract.java:506)
at org.web3j.tx.Contract.lambda$deployRemoteCall$5(Contract.java:549)
at org.web3j.protocol.core.RemoteCall.send(RemoteCall.java:42)
at com.nwpu.eth.sol.SaySample.deploy(SaySample.java:42)
at com.nwpu.eth.sol.SaySample.main(SaySample.java:30)
解决办法在打geth时,-加入参数--rpc.allow-unprotected-txs

旨在为数千万中国开发者提供一个无缝且高效的云端环境,以支持学习、使用和贡献开源项目。
更多推荐


 3
3 0
0- 0


 已为社区贡献1条内容


所有评论(0)