linux(3) 权限
前言:
好久不见!!!最近事情比较多,所以一直没来得及写,不过今天总算可以腾出时间来写写啦~
今天我们要讲的是关于权限的知识,包括权限的精炼理解,权限为何呈现出我们所见的样子,权限
在使用时的注意事项,如何修改权限等等...
正文:
权限的理解:
权限=人+事物属性
但在linux中,一切皆文件,所以我们也可以理解为:
权限=人+文件属性
所以呢,接下来我们将分为人和文件属性来分别讨论
权限的修改:
人:
首先,人分为两种

① :root(基本不受权限的限制,在绝大多数情况下)
② :普通用户
这是人本身的划分,但在文件看来,人又分为三类:
①. 文件拥有者
②. 所属组成员
③. others
正是这两种划分,形成了“人”。
那么,如何改变自己的身份?
一. root,普通用户,这两种身份的转换
这里要简要分为几种情况来讨论:
①. 我是普通用户,想变成root
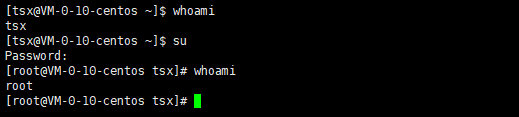
我可以输入su命令,或者(su root),没写参数默认我要变成root
然后我们只需输入root的密码,就可以变成root
但是:我们发现,当我们使用pwd时,会发现我们当前的工作目录不会改变!!!,可能会导致命令找不到的问题,所以我们可以使用su -
[root@VM-0-10-centos tsx]# whoami
root
[root@VM-0-10-centos tsx]# pwd
/home/tsx
此时可以发现,当我们使用su - 后,我们的工作目录发生了改变发生了完整的登录切换
所以,在切换时候,推荐带上 -
[tsx@VM-0-10-centos ~]$ whoami
tsx
[tsx@VM-0-10-centos ~]$ pwd
/home/tsx
[tsx@VM-0-10-centos ~]$ su -
Password:
Last login: Thu Jul 23 09:09:13 CST 2026 on pts/0
Last failed login: Thu Jul 23 09:10:54 CST 2026 from 121.237.180.222 on ssh:notty
There was 1 failed login attempt since the last successful login.
[root@VM-0-10-centos ~]# whoami
root
[root@VM-0-10-centos ~]# pwd
/root
②. 我是root,想切换成普通用户
我们还是使用su,但我们发现,在root切换普通用户时候,不用输入密码!!!所以在管理员面前,普通用户其实没什么隐私
[root@VM-0-10-centos ~]# whoami
root
[root@VM-0-10-centos ~]# pwd
/root
[root@VM-0-10-centos ~]# su tsx
[tsx@VM-0-10-centos root]$ pwd
/root
[tsx@VM-0-10-centos root]$ whoami
tsx
③.我是普通用户,想切换成别人
这是我su 别人名字
然后输入要变成的人的密码,就可以登录ta的账号
[tsx@VM-0-10-centos ~]$ whoami
tsx
[tsx@VM-0-10-centos ~]$ pwd
/home/tsx
[tsx@VM-0-10-centos ~]$ su mei
Password:
[mei@VM-0-10-centos tsx]$ whoami
mei
[mei@VM-0-10-centos tsx]$ pwd
/home/tsx
二. 改变文件的所属组,拥有者
①. 改变文件拥有者:
这个操作只有root可以进行!!!
文件的拥有者也不能把文件转让给别人
语法: chown (参数) 用户名 文件名
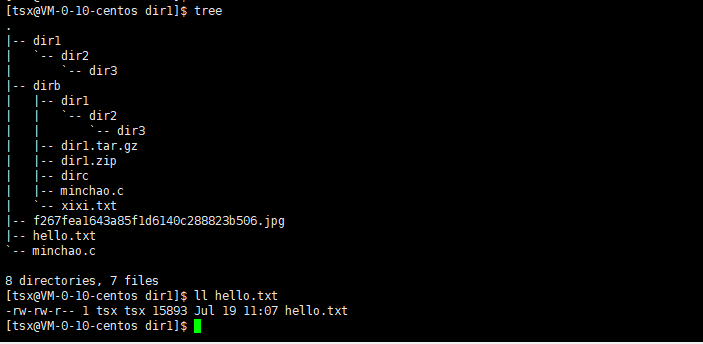
这里我登陆了普通用户tsx,并且创建了一个文件,hello.txt
[tsx@VM-0-10-centos dir1]$ su
Password:
[root@VM-0-10-centos dir1]# whoami
root
[root@VM-0-10-centos dir1]# chown root hello.txt
[root@VM-0-10-centos dir1]# ll hello.txt
-rw-rw-r-- 1 root tsx 15893 Jul 19 11:07 hello.txt
然后我切换到root账号,并且修改文件的拥有者,此时这个文件的拥有者就变成了root
②. 改变文件所属组
语法: chgrp (参数) ⽤⼾组名 ⽂件名
紧跟上面的例子
-rw-rw-r-- 1 root tsx 15893 Jul 19 11:07 hello.txt
[root@VM-0-10-centos dir1]# chgrp root hello.txt
[root@VM-0-10-centos dir1]# ll hello.txt
-rw-rw-r-- 1 root root 15893 Jul 19 11:07 hello.txt
这里文件的所属组也变成了root
文件属性的修改:
[root@VM-0-10-centos dir1]# ll hello.txt
-rw-rw-r-- 1 root root 15893 Jul 19 11:07 hello.txt
这里列出了文件的属性,前十列使我们今天要重点讨论的
第一列是文件类型不看,就剩下了九列:
rw-rw-r--
我们把它们三三分为一组,即为
rw- rw- r--
拥有者 所属组 others
这里的r是读权限,w是写权限,x代表执行权限,而 - 代表无该权限
那么如何修改文件属性呢?
我们这里给出两种方法:
方法一:符号权限法
符号:u(拥有者) g(所属组 ) o(others) a(所有人)
语法: chmod (身份)(+-)(rwx) 文件
例子:
[root@VM-0-10-centos dir1]# ll hello.txt
-rw-rw-r-- 1 root root 15893 Jul 19 11:07 hello.txt
[root@VM-0-10-centos dir1]# chmod u+x hello.txt
[root@VM-0-10-centos dir1]# ll hello.txt
-rwxrw-r-- 1 root root 15893 Jul 19 11:07 hello.txt
[root@VM-0-10-centos dir1]# chmod g+w hello.txt
[root@VM-0-10-centos dir1]# ll hello.txt
-rwxrw-r-- 1 root root 15893 Jul 19 11:07 hello.txt
注意:在这里的x权限指的是,如果这个文件要执行,需要进过我的同意(即有x才能执行),但如果文件本来就不是可执行文件,即使加上x,也不能执行
方法二:八进制数字法(写起来方便)
r w x 我们可以把有对应的权限看做1,若是没有,则看做0
那么rwx就相当于111(数值为7)
---就相当于000(数值为0)
那么:rwx rwx r-x
我们就可以写作775
例子如下:
[root@VM-0-10-centos dir1]# ll hello.txt
-rwxrw-r-- 1 root root 15893 Jul 19 11:07 hello.txt
[root@VM-0-10-centos dir1]# chmod 666 hello.txt
[root@VM-0-10-centos dir1]# ll hello.txt
-rw-rw-rw- 1 root root 15893 Jul 19 11:07 hello.txt
创建文件或者目录时,权限如何来?
先说一个结论:
权限=默认权限&(~umask)
其中:一个文件它的默认权限是666
一个目录的默认权限是777
[root@VM-0-10-centos dir2]# touch hello.txt
[root@VM-0-10-centos dir2]# mkdir xixi
[root@VM-0-10-centos dir2]# ll
total 8
drwxrwxr-x 2 tsx  tsx  4096 Jul 19 13:38 dir3
-rw-r--r-- 1 root root    0 Jul 23 09:59 hello.txt
drwxr-xr-x 2 root root 4096 Jul 23 09:59 xixi
但是我们发现,实际权限和默认权限不同,这是为什么?
[root@VM-0-10-centos dir2]# umask
0022
2对应的是w权限,所以我们可以发现,无论是hello.txt 还是 xixi,它们的所属组和others都是没有写权限的
但是这里又有一个问题,那就是为什么目录要比文件多一个x权限?
目录中不同权限的意义:
先说结论:
r: 可以列出目录内的文件名
w:可以在目录中新建,删除,重命名文件/子目录
x: 可以进入目录
同时:如果一个人同时有多个身份(例如既是拥有者,又是所属组),那么在确定这个人的权限时,会按照拥有者---所属组---others的顺序来比对,(假如他是拥有者,那么剩下的就不看了),一旦匹配,就不会再去后面继续比对,即使后面的权限大于前面的(例如拥有者没有某权限,而所属组有的情况)
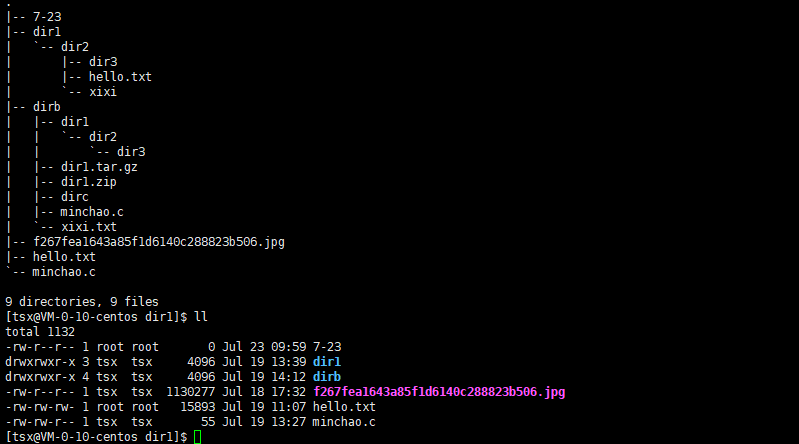 接下来我们用dirb来演示:
[tsx@VM-0-10-centos dir1]$ chmod u-r dirb
[tsx@VM-0-10-centos dir1]$ ll
total 1132
-rw-r--r-- 1 root root       0 Jul 23 09:59 7-23
drwxrwxr-x 3 tsx  tsx     4096 Jul 19 13:39 dir1
d-wxrwxr-x 4 tsx  tsx     4096 Jul 19 14:12 dirb
-rw-r--r-- 1 tsx  tsx  1130277 Jul 18 17:32 f267fea1643a85f1d6140c288823b506.jpg
-rw-rw-rw- 1 root root   15893 Jul 19 11:07 hello.txt
-rw-rw-r-- 1 tsx  tsx       55 Jul 19 13:27 minchao.c
[tsx@VM-0-10-centos dir1]$ cd dirb
[tsx@VM-0-10-centos dirb]$ ll
ls: cannot open directory .: Permission denied
[tsx@VM-0-10-centos dirb]$ rm -rf dir1
[tsx@VM-0-10-centos dirb]$ cd ..
[tsx@VM-0-10-centos dir1]$ chmod u+r dirb
[tsx@VM-0-10-centos dir1]$ tree
.
|-- 7-23
|-- dir1
|   `-- dir2
|       |-- dir3
|       |-- hello.txt
|       `-- xixi
|-- dirb
|   |-- dir1.tar.gz
|   |-- dir1.zip
|   |-- dirc
|   |-- minchao.c
|   `-- xixi.txt
|-- f267fea1643a85f1d6140c288823b506.jpg
|-- hello.txt
`-- minchao.c
我们发现,没了r虽然不可以读,但是还是可以删除该目录里面文件
如果我们加上r,去掉w呢?
[tsx@VM-0-10-centos dir1]$ chmod u-w dirb
[tsx@VM-0-10-centos dir1]$ cd dirb
[tsx@VM-0-10-centos dirb]$ ll
total 16
-rw-rw-r-- 1 tsx tsx  146 Jul 19 14:08 dir1.tar.gz
-rw-rw-r-- 1 tsx tsx  466 Jul 19 13:45 dir1.zip
drwxrwxr-x 2 tsx tsx 4096 Jul 14 15:26 dirc
-rw-rw-r-- 1 tsx tsx   55 Jul 19 13:27 minchao.c
-rw-rw-r-- 1 tsx tsx    0 Jul 19 12:02 xixi.txt
[tsx@VM-0-10-centos dirb]$ rm -rf dirc
rm: cannot remove ‘dirc’: Permission denied
那么我们就不可以删除文件了,当然,增加文件也不行
那如果我们有rw,没有x呢?
[tsx@VM-0-10-centos dir1]$ chmod u+w-x dirb
[tsx@VM-0-10-centos dir1]$ ll
total 1132
-rw-r--r-- 1 root root       0 Jul 23 09:59 7-23
drwxrwxr-x 3 tsx  tsx     4096 Jul 19 13:39 dir1
drw-rwxr-x 3 tsx  tsx     4096 Jul 23 10:12 dirb
-rw-r--r-- 1 tsx  tsx  1130277 Jul 18 17:32 f267fea1643a85f1d6140c288823b506.jpg
-rw-rw-rw- 1 root root   15893 Jul 19 11:07 hello.txt
-rw-rw-r-- 1 tsx  tsx       55 Jul 19 13:27 minchao.c
[tsx@VM-0-10-centos dir1]$ cd dirb
-bash: cd: dirb: Permission denied
这时,我们就无法进入文件了
但是这又引出一个问题,我们是否可以删除文件,看的是目录的w权限,而非文件本身的属性,那么如果在共享文件的时候,别人岂不是想删就删?那这就很有问题啊,所以我们就引入了粘滞位的概念
粘滞位:
首先:
当一个目录被设置为粘滞位时,那么其中的文件只能由:
①. root 删除
②. 该目录的所有者删除
③. 该文件的所有者删除
语法:chmod +t 目录名

AtomGit 是由开放原子开源基金会联合 CSDN 等生态伙伴共同推出的新一代开源与人工智能协作平台。平台坚持“开放、中立、公益”的理念,把代码托管、模型共享、数据集托管、智能体开发体验和算力服务整合在一起,为开发者提供从开发、训练到部署的一站式体验。
更多推荐



 23
23 0
0- 0


 已为社区贡献2条内容

所有评论(0)