HarmonyOS NEXT(API20)从零到一:手把手教你写一个屏幕使用时间 App
一、写在前面
HarmonyOS NEXT 开发中,很多新手面临一个问题:API20 版本限制多,很多网上的示例代码跑不起来。
今天我用一个屏幕使用时间追踪器的真实项目,带你走完 HarmonyOS NEXT 开发的完整流程。这篇文章不只有代码,更有为什么这样写的思考过程和每一个踩坑的解决思路。
适用人群:HarmonyOS 初级→中级开发者 项目名称:ScreenTimeTracker SDK 版本:HarmonyOS 4.0 / API20(Stage 模型) 开发环境:DevEco Studio 最新版 预估耗时:从新建项目到跑通,15分钟
二、项目设计与数据分析
2.1 需求拆解
在写代码之前,先想清楚我们要做什么:
需求 优先级 说明
展示今日总使用时长 P0 核心指标,大字体展示
显示解锁次数 P0 辅助指标
显示拿起次数 P1 辅助指标
列出各 App 使用时长 P0 明细数据
进度条可视化对比 P0 直观展示占比
支持数据刷新 P1 模拟不同日期的数据
页面可滚动 P2 内容超出屏幕时
2.2 数据结构定义
typescript
复制
interface AppUsageItem {
appName: string; // 应用名称,如"微信"
icon: string; // Emoji 图标,如"💬"
minutes: number; // 使用分钟数
color: string; // 品牌色十六进制,如"#07C160"
}
选择 interface 而不是 class 是因为 ArkTS 推荐接口描述纯数据结构,组件只消费数据不做复杂逻辑。
三、完整项目代码(可直接运行)
在 DevEco Studio 中新建 Empty Ability 项目,项目名 ScreenTimeTracker,将 Index.ets 内容替换为以下代码:
typescript
// ============================================================
// 文件: Index.ets
// 项目: ScreenTimeTracker - 屏幕使用时间追踪器
// SDK:  HarmonyOS 4.x / API20
// 注意: 接口定义必须放在文件最顶部,@Entry 之前
// ============================================================

// App 使用数据模型
interface AppUsageItem {
  appName: string;
  icon: string;
  minutes: number;
  color: string;
}

@Entry
@Component
struct ScreenTimeTracker {

  /* ── 状态数据(修改后自动刷新 UI) ── */
  @State totalMinutes: number = 187;
  @State unlockCount: number = 46;
  @State pickups: number = 62;
  @State appList: AppUsageItem[] = [
    { appName: '微信',     icon: '💬', minutes: 52, color: '#07C160' },
    { appName: '抖音',     icon: '🎵', minutes: 38, color: '#333333' },
    { appName: '浏览器',   icon: '🌐', minutes: 27, color: '#4285F4' },
    { appName: '小红书',   icon: '📕', minutes: 22, color: '#FF2442' },
    { appName: '哔哩哔哩', icon: '📺', minutes: 18, color: '#FB7299' },
    { appName: '其他',     icon: '📱', minutes: 30, color: '#94A3B8' }
  ];

  /* ── 计算逻辑(纯函数,无副作用) ── */

  /** 将分钟数格式化为"X小时Y分钟" */
  getTotalHours(): string {
    const h = Math.floor(this.totalMinutes / 60);
    const m = this.totalMinutes % 60;
    return h + '小时' + m + '分钟';
  }

  /** 找出列表中的最大分钟数(作为进度条 100% 基准) */
  getMaxMinutes(): number {
    let max: number = 0;
    for (let i: number = 0; i < this.appList.length; i++) {
      if (this.appList[i].minutes > max) {
        max = this.appList[i].minutes;
      }
    }
    return max;
  }

  /** 将百分比转为样式宽度字符串,限制 100% 封顶 */
  getBarWidth(percent: number): string {
    if (percent > 100) { percent = 100; }
    return '' + percent + '%';
  }

  /** 模拟数据刷新(生产环境应接入系统 API) */
  refreshData(): void {
    // 随机生成总时长(2~4.5小时)
    this.totalMinutes = 120 + Math.floor(Math.random() * 150);
    this.unlockCount = 20 + Math.floor(Math.random() * 50);
    this.pickups = 30 + Math.floor(Math.random() * 60);

    // 固定数据源(保持数据名称一致)
    const names: string[]  = ['微信', '抖音', '浏览器', '小红书', '哔哩哔哩', '其他'];
    const icons: string[]  = ['💬', '🎵', '🌐', '📕', '📺', '📱'];
    const colors: string[] = ['#07C160', '#333333', '#4285F4', '#FF2442', '#FB7299', '#94A3B8'];
    const newList: AppUsageItem[] = [];
    let remaining: number = this.totalMinutes;

    // 前5个 App 随机分配,最后一个拿剩余
    for (let i: number = 0; i < 5; i++) {
      const m: number = Math.min(
        remaining - 5,
        5 + Math.floor(Math.random() * (remaining - 5) / 3)
      );
      newList.push({ appName: names[i], icon: icons[i], minutes: m, color: colors[i] });
      remaining = remaining - m;
    }
    newList.push({ appName: names[5], icon: icons[5], minutes: remaining, color: colors[5] });

    // 赋值新数组 → @State 自动触发 UI 刷新
    this.appList = newList;
  }

  /* ── UI 构建 ── */

  build() {
    Scroll() {
      Column() {

        /* ═══ 标题栏 ═══ */
        titleBar()

        /* ═══ 今日总时长卡片 ═══ */
        statsCard()

        /* ═══ App 明细标题 ═══ */
        sectionTitle()

        /* ═══ App 使用列表 ═══ */
        appUsageList()

        /* ═══ 底部提示 ═══ */
        footerNote()

      }
      .width('100%')
      .alignItems(HorizontalAlign.Center)
    }
    .scrollable(ScrollDirection.Vertical)
  }

  /* ── UI 子构建函数(减少 build() 嵌套深度,提升可读性) ── */

  @Builder
  titleBar(): void {
    Row() {
      Text('📱 屏幕使用时间')
        .fontSize(24)
        .fontWeight(FontWeight.Bold)

      Blank()

      // 更新时间戳(模拟)
      Text('今日')
        .fontSize(12)
        .fontColor('#94A3B8')
        .margin({ right: 8 })

      // 刷新按钮
      Button('🔄')
        .width(40).height(40).borderRadius(20)
        .backgroundColor('#F1F5F9')
        .fontSize(18).fontColor('#333')
        .onClick(() => this.refreshData())
    }
    .width('92%')
    .margin({ top: 20, bottom: 16 })
  }

  @Builder
  statsCard(): void {
    Column() {
      Text('今日屏幕使用')
        .fontSize(14)
        .fontColor('#94A3B8')

      // 大字体
      Text(this.getTotalHours())
        .fontSize(48)
        .fontWeight(FontWeight.Bold)
        .fontColor('#1E293B')
        .margin({ top: 8, bottom: 8 })

      // 底部指标行
      Row() {
        Column() {
          Text('' + this.unlockCount)
            .fontSize(20).fontWeight(FontWeight.Bold).fontColor('#3B82F6')
          Text('解锁次数')
            .fontSize(12).fontColor('#94A3B8')
        }
        .layoutWeight(1)

        Column() {
          Text('' + this.pickups)
            .fontSize(20).fontWeight(FontWeight.Bold).fontColor('#F59E0B')
          Text('拿起次数')
            .fontSize(12).fontColor('#94A3B8')
        }
        .layoutWeight(1)
      }
      .padding({ top: 12 })
    }
    .width('92%')
    .padding(20)
    .backgroundColor('#FFFFFF')
    .borderRadius(16)
    .shadow({ radius: 8, color: '#10000000', offsetY: 2 })
    .margin({ bottom: 16 })
    .alignItems(HorizontalAlign.Center)
  }

  @Builder
  sectionTitle(): void {
    Row() {
      Text('应用使用明细')
        .fontSize(18)
        .fontWeight(FontWeight.Bold)
    }
    .width('92%')
    .margin({ bottom: 10 })
  }

  @Builder
  appUsageList(): void {
    Column() {
      ForEach(this.appList, (item: AppUsageItem) => {
        appRow(item)
      })
    }
    .width('92%')
    .padding({ left: 16, right: 16, top: 8, bottom: 8 })
    .backgroundColor('#FFFFFF')
    .borderRadius(16)
    .shadow({ radius: 8, color: '#10000000', offsetY: 2 })
    .margin({ bottom: 16 })
  }

  @Builder
  appRow(item: AppUsageItem): void {
    Column() {
      Row() {
        // 图标
        Text(item.icon)
          .fontSize(22)
          .margin({ right: 10 })

        // 名称 + 分钟
        Column() {
          Text(item.appName)
            .fontSize(16).fontWeight(FontWeight.Medium).fontColor('#1E293B')
          Text(item.minutes + '分钟')
            .fontSize(12).fontColor('#94A3B8')
        }
        .layoutWeight(1)
        .alignItems(HorizontalAlign.Start)

        // 右侧分钟数
        Text(item.minutes + 'min')
          .fontSize(14).fontWeight(FontWeight.Bold).fontColor(item.color)
      }
      .width('100%')
      .margin({ bottom: 6 })

      // 彩色进度条
      Row() {
        Row()
          .width(this.getBarWidth(item.minutes / this.getMaxMinutes() * 100))
          .height(6)
          .backgroundColor(item.color)
          .borderRadius(3)
      }
      .width('100%')
      .backgroundColor('#F1F5F9')
      .borderRadius(3)
    }
    .width('100%')
    .padding({ top: 8, bottom: 8 })
  }

  @Builder
  footerNote(): void {
    Text('🔄 点击右上角刷新按钮可模拟不同日期的数据变化')
      .fontSize(12)
      .fontColor('#CBD5E1')
      .margin({ bottom: 20 })
  }
}
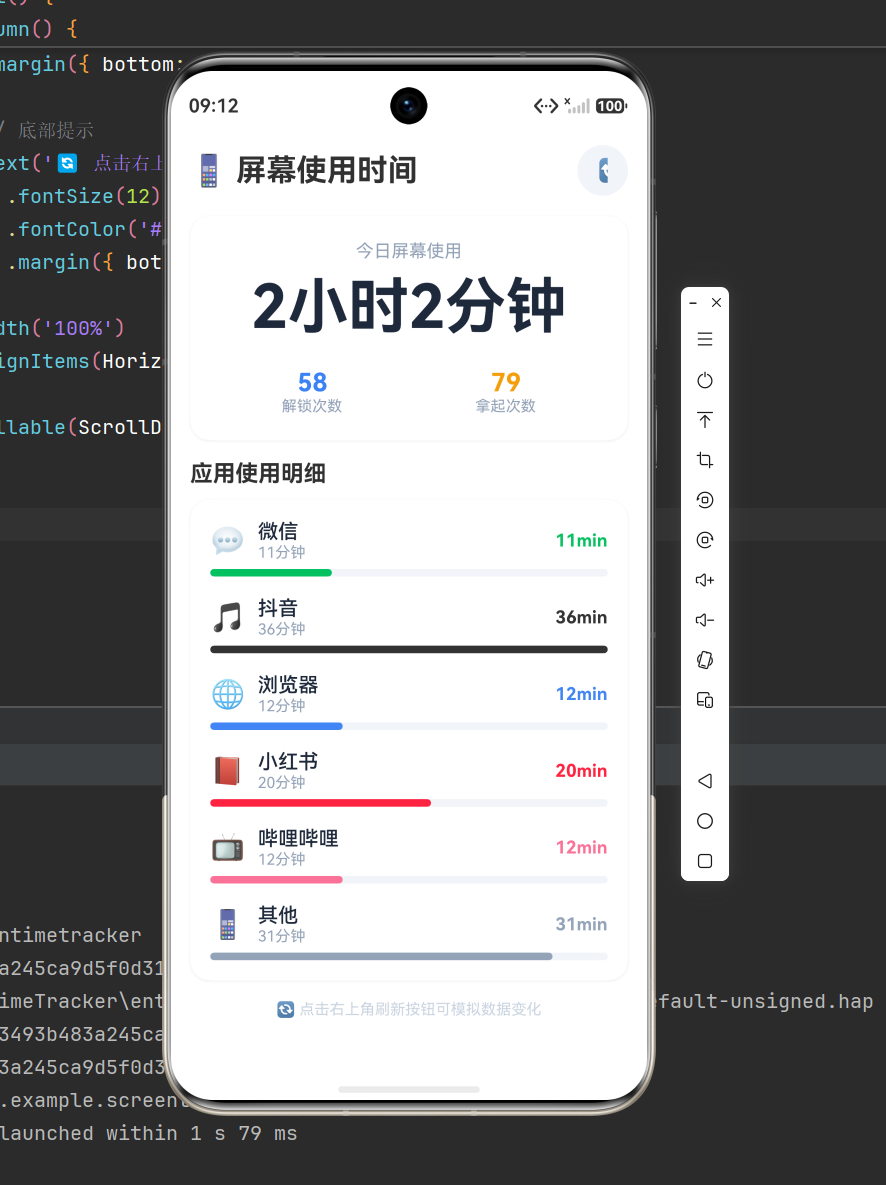
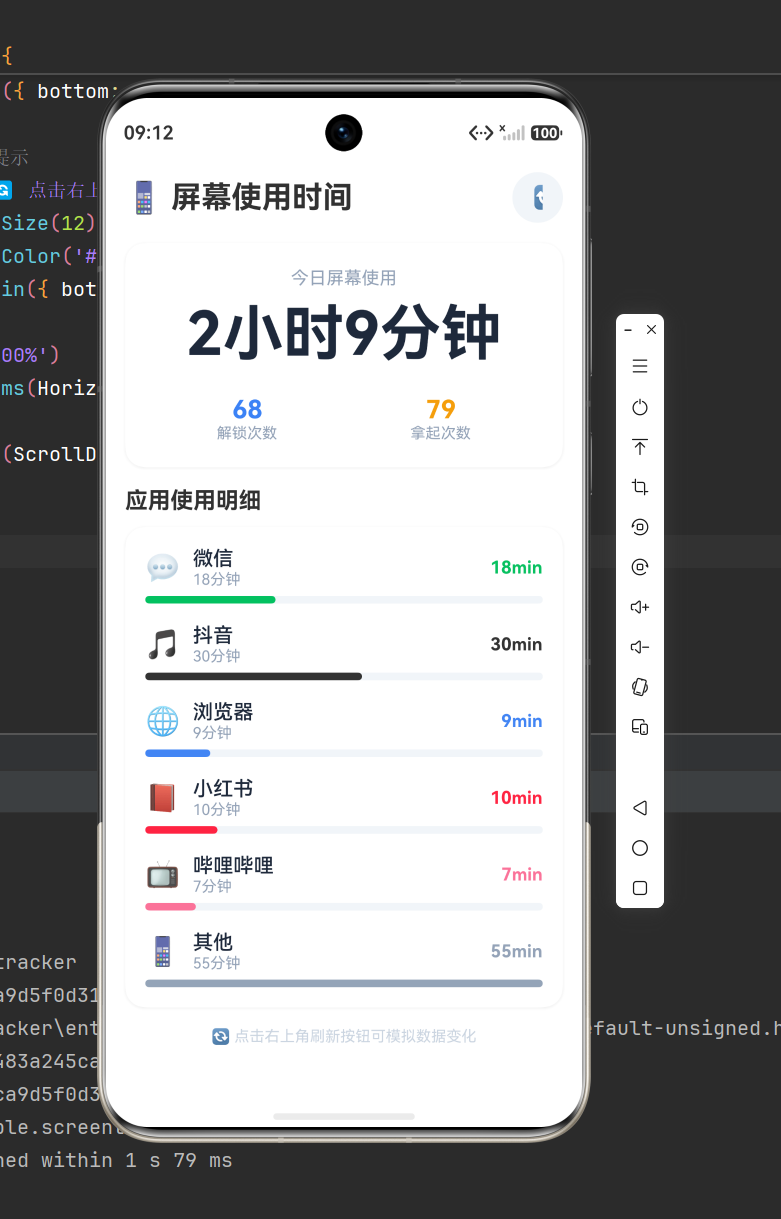
注意:由于 ArkTS 对 @Builder 的入参类型检查严格,如果编译时报 item 类型问题,可以将 appRow 内的逻辑直接写在 ForEach 里(本文第五节提供了备选写法)。
四、代码架构解析
4.1 为什么用 @Builder 拆分 UI?
直接把所有 UI 写在一个 build() 里会变得非常长(本文代码约200行)。用 @Builder 拆分成独立函数后:
code
复制
build()
├── titleBar() → 标题栏
├── statsCard() → 统计卡片
├── sectionTitle() → 分区标题
├── appUsageList() → App 列表
│ └── appRow() → 单行 App
└── footerNote() → 底部文案
好处:
每个函数不超过30行
一眼看清页面结构
后续增删组件只需增删 @Builder
4.2 状态驱动 vs 事件驱动
本项目中:
模式 触发方式 说明
状态驱动 @State 变量变化 → UI 自动重绘 refreshData() 修改 appList 后 UI 自动更新
事件驱动 用户交互 → 回调函数 点击刷新按钮触发 refreshData()
核心原则:修改 @State 变量 = 通知 UI 刷新。这比手动操作 DOM 要优雅得多。
4.3 进度条的原理
code
复制
外层 Row(灰色背景)
┌────────────────────────────────────────────┐
│ 内层 Row(彩色填充) │
│ ┌────────────────────┐ │
│ │ .width(‘65%’) │ │
│ │ .backgroundColor │ │
│ └────────────────────┘ │
└────────────────────────────────────────────┘
通过 宽度占比 = 当前值 / 最大值 × 100% 实现动态进度条。
五、@Builder 传参问题(备选方案)
部分 API20 版本对 @Builder 函数参数类型检查较严格,如果在 appRow(item: AppUsageItem) 时报类型错误,直接把内容写回 ForEach 中:
typescript
ForEach(this.appList, (item: AppUsageItem) => {
  Column() {
    Row() {
      Text(item.icon).fontSize(22).margin({ right: 10 })
      Column() {
        Text(item.appName)
          .fontSize(16).fontWeight(FontWeight.Medium).fontColor('#1E293B')
        Text(item.minutes + '分钟').fontSize(12).fontColor('#94A3B8')
      }.layoutWeight(1).alignItems(HorizontalAlign.Start)
      Text(item.minutes + 'min')
        .fontSize(14).fontWeight(FontWeight.Bold).fontColor(item.color)
    }.width('100%').margin({ bottom: 6 })
    Row() {
      Row()
        .width(this.getBarWidth(item.minutes / this.getMaxMinutes() * 100))
        .height(6).backgroundColor(item.color).borderRadius(3)
    }.width('100%').backgroundColor('#F1F5F9').borderRadius(3)
  }.width('100%').padding({ top: 8, bottom: 8 })
})
两种写法功能完全一致,选择编译能通过的那一种即可。
六、踩坑清单(不看后悔)
🕳️ 坑1:interface 放错位置
typescript
// ❌ 放在 @Entry 后面 — 编译报错 Cannot find name ‘AppUsageItem’
@Entry @Component struct MyApp {
interface AppUsageItem { … } // 错误!
}
// ✅ 放在文件最顶部,任何组件之前
interface AppUsageItem { … }
@Entry @Component struct MyApp { … }
🕳️ 坑2:修改了数组但 UI 不刷新
typescript
// ❌ @State appList 引用没变,UI 不会刷新
this.appList[0] = newItem;
this.appList.push(newItem);
// ✅ 必须赋值全新的数组引用
const newList = this.appList.concat([newItem]);
this.appList = newList;
🕳️ 坑3:模板字符串不能用
typescript
// ❌ 编译报错
Text(总时长: ${this.getTotalHours()})
// ✅ 字符串拼接
Text('总时长: ’ + this.getTotalHours())
🕳️ 坑4:Column 上不能直接 .scrollable()
typescript
// ❌ Property ‘scrollable’ does not exist on type ‘ColumnAttribute’
Column() { … }.scrollable(ScrollDirection.Vertical)
// ✅ Scroll 包裹 Column
Scroll() { Column() { … } }.scrollable(ScrollDirection.Vertical)
🕳️ 坑5:Button 的 { stateEffect: true } 参数
typescript
// ❌ API20 不支持第二个构造参数
Button(‘文案’, { stateEffect: true })
// ✅ 只传字符串
Button(‘文案’)
🕳️ 坑6:TextInput 的 .value() 方法不存在
typescript
// ❌ Property ‘value’ does not exist
TextInput({ placeholder: ‘…’ }).value(‘xxx’)
// ✅ 在构造参数中设置 text
TextInput({ text: ‘xxx’, placeholder: ‘…’ })
七、效果预览
在模拟器中运行后,你将看到:
加载完成 → 顶部显示"📱 屏幕使用时间"
白色卡片 → “3小时7分钟” 大字体 + 解锁46次 + 拿起62次
App 列表 → 微信(52分钟,绿色进度条)、抖音(38分钟)、浏览器(27分钟)…
点击🔄 → 所有数据随机变化,进度条同步更新
八、扩展思路
如果想让这个 Demo 更进一步:
方向 实现方案
📊 折线图趋势 Canvas 绘制最近7天的使用趋势
🎨 深色模式 定义两套颜色变量,用 @State isDark 切换
🔔 超额提醒 设置每日限额,超时弹窗提示
📁 数据持久化 使用 Preferences 存储跨日数据
🖼️ 自定义背景 让用户从相册选择背景图
九、总结
通过这个项目,你掌握了:
知识点 对应代码
@State 状态管理 6个 @State 变量驱动 UI
Scroll 滚动容器 Scroll() { Column() { … } }
ForEach 列表渲染 遍历 appList 渲染每行
进度条实现 内层 Row 宽度 = 占比%
@Builder 组件拆分 titleBar() statsCard() 等
按钮事件绑定 .onClick(() => this.refreshData())
数据模拟刷新 Math.random() 随机生成新数据
文末福利:把这6个坑点截图保存到手机相册,下次写 ArkTS 代码前看一遍,能省下半天调试时间 🎯
如果这篇文章帮到了你,点赞收藏是对作者最大的鼓励!有问题欢迎评论区留言。
附录:DevEco Studio 版本信息
配置项 版本
DevEco Studio 4.0+
SDK API 20 (HarmonyOS 4.x)
ArkTS 版本 3.x
项目模板 Empty Ability
编译模式 debug

AtomGit 是由开放原子开源基金会联合 CSDN 等生态伙伴共同推出的新一代开源与人工智能协作平台。平台坚持“开放、中立、公益”的理念,把代码托管、模型共享、数据集托管、智能体开发体验和算力服务整合在一起,为开发者提供从开发、训练到部署的一站式体验。
更多推荐



 9
9 0
0- 0


 已为社区贡献1条内容

所有评论(0)