【2026前端转 AI 全栈指南】第 3 章:Nestjs框架全解(一)
之前的系列:
【2026前端转 AI 全栈指南】第 1 章:前言 · 后端架构 · 章节导览 我们讲了 为什么要做这套教程、v1 要跑通哪条链路。
【2026前端转 AI 全栈指南】第 2 章(上):开发环境准备
【2026前端转 AI 全栈指南】第 2 章(下):NestJS 项目创建 · MongoDB 配置 · 项目启动与调试
大家好,我又来了。
从 本章 开始,我们正式进入 NestJS 的学习。我会带大家 从 0 到 1 认识、理解并使用这个 Node.js 后端框架,为后面的 面试帮(AI 求职助手) 项目打下坚实基础。
【2026前端转 AI 全栈指南】第 2 章(下):NestJS 项目创建 · MongoDB 配置 · 项目启动与调试 我们已经把开发环境配好、项目跑起来了;本章的第一节我们不着急进入核心的概念,我们来观察一下全局,专注回答一件事:
NestJS 是怎么工作的?一次请求进来,代码按什么顺序执行?
本章内容较多,我会拆成 21 篇小文(3.0~3.20)逐步发布,每篇对应一个知识点,方便跟练、复习和检索。
学习建议:
- 通读一遍 NestJS 官方文档(中英文均可)—— 官网当「字典」,教程当「路线 + 实战」
说明: 本教程 全程免费,代码 开源。若对你有帮助,欢迎 点赞、收藏、关注,你的支持是我持续更新的动力,谢谢!
前置要求: 已完成 【2026前端转 AI 全栈指南】第 2 章(下):NestJS 项目创建 · MongoDB 配置 · 项目启动与调试(NestJS 项目创建 + MongoDB 连接)。
本篇结构:
- 先建立全景(启动 + 请求两条线)—— 本章核心
- 再融合官网第一步(文件说明、
main.ts、平台、运行、lint) - 最后把请求生命周期拆层讲透
后面 3.1~3.20 每一节,都是在请求链路或启动链路上的 某一个环节 挖深。
章节目录(3.0~3.20)
| 节 | 标题 | 一句话说明 |
|---|---|---|
| 3.0 | 第一步与 NestJS 全景 · 请求生命周期 | 启动流程 + 请求链路总图(本章开篇,必读) |
| 3.1 | 控制器 Controllers | 路由、@Get / @Post、请求参数 |
| 3.2 | 服务 Services | 业务逻辑层、Controller 与 Service 分工 |
| 3.3 | 模块与项目架构 | Module 拆分、Feature Module 目录规范 |
| 3.4 | 提供者 Providers | 依赖注入、@Injectable() 基础 |
| 3.5 | 中间件 Middleware | 请求进入路由前的最外层处理 |
| 3.6 | 拦截器 Interceptors | 统一响应、计时、序列化入口 |
| 3.7 | 管道与数据验证 Pipes | DTO、ValidationPipe、入参校验 |
| 3.8 | 守卫与权限控制 Guards | 鉴权原理(JWT 完整实现见第 6 章) |
| 3.9 | 异常过滤器 Exception Filters | 统一 400 / 401 / 500 错误格式 |
| 3.10 | 配置管理 Configuration | .env、@nestjs/config |
| 3.11 | 异步编程与 RxJS | Promise / async 与 Observable 基础 |
| 3.12 | NestJS 最佳实践 | 代码规范、目录约定、常见反模式 |
| 3.13 | 自定义装饰器 Custom Decorators | @Public()、@CurrentUser() 等 |
| 3.14 | Swagger 与 API 文档 | @nestjs/swagger 自动生成接口文档 |
| 3.15 | 单元测试与 E2E | Jest、@nestjs/testing、supertest |
| 3.16 | 文件上传与 Multer | 单文件 / 多文件上传(为 PDF 章铺路) |
| 3.17 | 基础深化 · 动态模块与 DI 进阶 | forRootAsync、作用域、生命周期钩子 |
| 3.18 | 技术精选 · SSE · 日志 · CORS | 流式响应、版本控制、跨域 |
| 3.19 | main.ts 全局装配 | 全局 Pipe / Filter / 前缀 / 优雅关闭 |
| 3.20 | 第三章总结与知识点梳理 | 全章回顾 + 面试追问 20 题 |
3.0.1 NestJS 如何工作(全景,本章最重要)
NestJS 的工作可以分成 两条互不混淆的线:
| 阶段 | 什么时候发生 | 你在想什么 |
|---|---|---|
| A. 应用启动 | 执行pnpm run start:dev 一次 | Module 怎么装配?Mongo 怎么连? |
| B. 处理请求 | 用户 / 前端每次 调 API | Guard → Pipe → Controller 谁先谁后? |
全景图 A:应用启动(还没有 HTTP 请求)
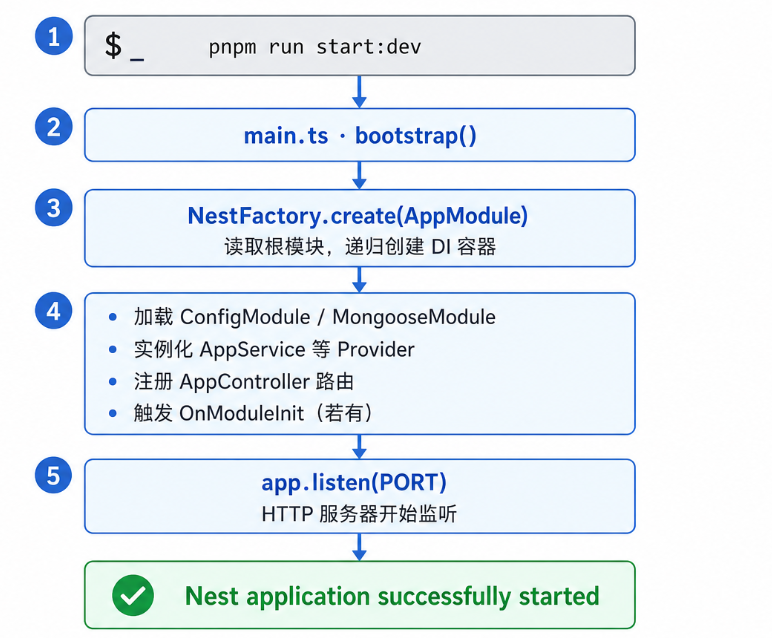
这一阶段做完,服务器在等请求;还没有 Guard / Pipe 参与。
全景图 B:一次 HTTP 请求(本章最要记牢)
客户端例如 GET http://localhost:3001/health:
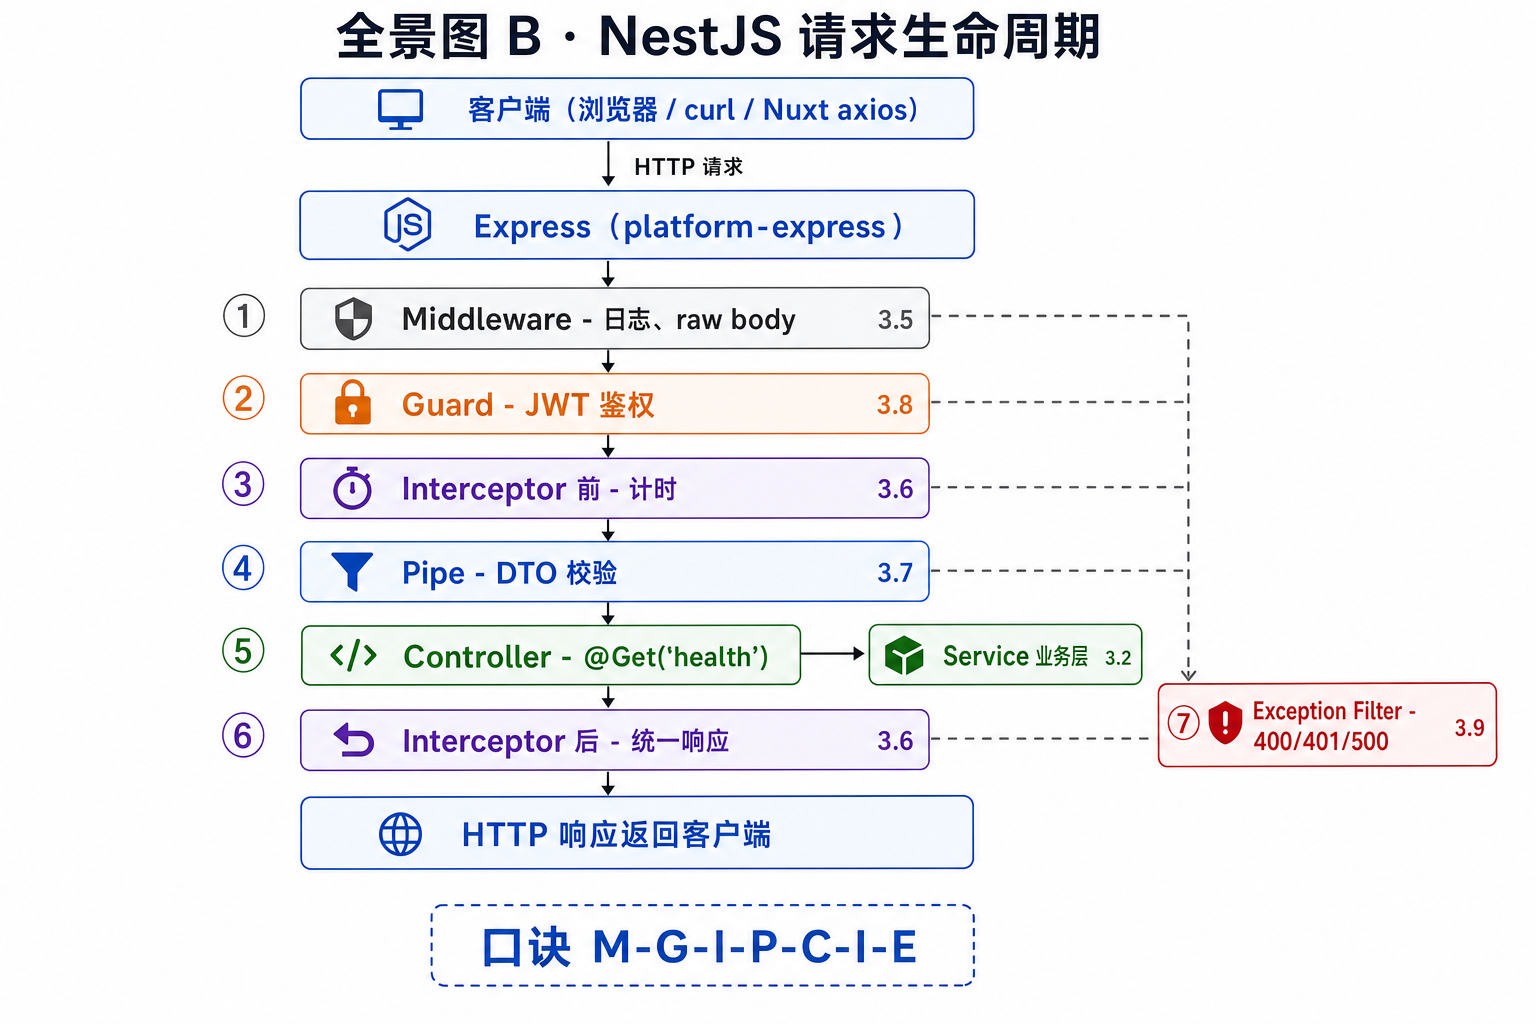
Express → Nest 路由匹配 → AppController.health() → JSON 响应
第 3 章后续会 一层层把 ①~⑦ 加上,链路会从「缩短版」长成「完整版」。
一张表记住执行顺序(面试必背)
| 顺序 | 组件 | 一句话 |
|---|---|---|
| 1 | Middleware | 最外层,还不知道具体 Handler |
| 2 | Guard | 鉴权:让不让进 |
| 3 | Interceptor(前) | 进方法前 |
| 4 | Pipe | 校验/转换参数 |
| 5 | Controller | 路由 handler,可调 Service |
| 6 | Interceptor(后) | 出方法后,改响应 |
| 7 | Exception Filter | 有异常时统一处理(可打断上面任一步) |
口诀:「M-G-I-P-C-I-E」 → Middleware · Guard · Interceptor · Pipe · Controller · Interceptor · Exception Filter。
和前端类比
| Nest 请求链路 | 前端近似 |
|---|---|
| Middleware | Nuxt 全局middleware/ |
| Guard | 路由beforeEnter / 登录判断 |
| Pipe | zod / 表单 validator |
| Controller | API Route handler |
| Interceptor | axios 响应拦截器 |
| Exception Filter | 全局errorHandler |
3.0.2 初始文件是干什么的
Nest CLI 创建的项目会生成一套 约定俗成的初始结构。官网第一步列出了这些文件——我们的 project/nestjs-demo/ 在此基础上多了 Config / Mongoose(第 2 章已加)。
官网文件对照表
| 文件名 | 描述(官网) | 在本教程中 |
|---|---|---|
main.ts | 应用入口,用NestFactory 创建 Nest 实例 | 监听端口,后续加全局 Pipe 等 |
app.module.ts | 根模块,应用的装配中心 | 注册 Config、MongoDB、Controller、Service |
app.controller.ts | 基本控制器,至少一条路由 | /、/health |
app.service.ts | 基本服务,至少一个方法 | getHello() |
app.controller.spec.ts | 控制器的单元测试 | Jest,3.15 详讲 |
CLI 鼓励 每个功能模块放在独立目录(如后来的 user/、resume/)。面试帮生产项目就是这样拆的;第 3 章前期仍用根目录几个文件打基础。
目录速览
project/nestjs-demo/
├── src/
│   ├── main.ts
│   ├── app.module.ts
│   ├── app.controller.ts
│   ├── app.controller.spec.ts
│   └── app.service.ts
├── test/                    # E2E 测试(官网也有)
├── .env
├── package.json             # scripts: start / start:dev / lint / format
└── nest-cli.json
3.0.3 main.ts 与 NestFactory 启动应用
官网 main.ts 核心如下(我们端口用 .env 里的 3001,与第 2 章一致):
import { NestFactory } from '@nestjs/core';
import { AppModule } from './app.module';

async function bootstrap() {
  const app = await NestFactory.create(AppModule);
  await app.listen(process.env.PORT ?? 3001);
}
bootstrap();
NestFactory 在做什么?
| 步骤 | 说明 |
|---|---|
NestFactory.create(AppModule) | 以根模块 为入口,创建实现 INestApplication 的应用实例 |
| 内部过程 | 解析@Module → 构建 依赖注入容器 → 实例化 Provider → 注册 Controller 路由 → 执行 OnModuleInit |
app.listen(port) | 启动 HTTP 监听,此后 才进入 3.0.1 全景图 B |
INestApplication 还提供 useGlobalPipes、setGlobalPrefix、enableCors 等方法——3.19 main.ts 全局装配 专讲。
官网提示:启动失败时的行为
默认情况下,创建应用若发生错误,进程以 退出码 1 结束。若希望抛出错误而不是静默退出:
const app = await NestFactory.create(AppModule, { abortOnError: false });
本地开发一般保持默认即可;CI 里常用退出码判断构建是否成功。
3.0.4 五个文件如何协作(以 GET / 为例)
把 启动 和 一次请求 连起来看。访问 GET http://localhost:3001/ 时:
1. app.module.ts —— 装配(启动阶段)
@Module({
  imports: [
    ConfigModule.forRoot({ isGlobal: true }),
    MongooseModule.forRootAsync({
      imports: [ConfigModule],
      inject: [ConfigService],
      useFactory: (config: ConfigService) => ({
        uri: config.get<string>('MONGODB_URI'),
      }),
    }),
  ],
  controllers: [AppController],   // 注册路由
  providers: [AppService],        // 注册可注入的服务
})
export class AppModule {}
Module = 声明「这个应用有哪些 Controller、Service、imports 子模块」。
2. app.controller.ts —— 接 HTTP(请求阶段 · 第 ⑤ 步)
@Controller()
export class AppController {
  constructor(private readonly appService: AppService) {}

  @Get()
  getHello(): string {
    return this.appService.getHello();
  }

  @Get('health')
  health() {
    return {
      service: 'ai-interview-lab-api',
      ok: true,
      ts: Date.now(),
    };
  }
}
@Controller()→ 该类处理 HTTP@Get()/@Get('health')→ 路径/与/healthconstructor注入AppService→ 不用new AppService()
3. app.service.ts —— 业务(被 Controller 调用)
@Injectable()
export class AppService {
  getHello(): string {
    return 'Hello World!';
  }
}
原则: Controller 薄,Service 厚。/health 暂时直接写在 Controller 里是为了简单;以后 Mongo / AI 逻辑都进 Service。
4. app.controller.spec.ts —— 单元测试(开发阶段,非运行时)
describe('AppController', () => {
  it('should return "Hello World!"', () => {
    expect(appController.getHello()).toBe('Hello World!');
  });
});
测试 不走 HTTP 链路,直接测 Controller 方法;请求生命周期里的 Guard / Pipe 在 3.15 单独 mock。
协作关系图
3.0.5 运行应用 · 热重载 · lint / format
官网运行方式如下;本教程用 pnpm(与第 2 章一致)。
启动
cd project/api

# 普通启动
pnpm run start

# 开发推荐:文件变更自动重新编译 + 重启
pnpm run start:dev
终端出现类似 Nest application successfully started 后,浏览器访问:
http://localhost:3001/→ 应看到Hello World!http://localhost:3001/health→ JSON
官网提示:SWC 加速构建(可选)
若觉得编译慢,可尝试 SWC 构建器(需自行配置,非教程必需):
pnpm run start -- -b swc
代码检查与格式化
CLI 脚手架自带 ESLint + Prettier,适合 CI 与 Git hooks:
# ESLint 检查并自动修复
pnpm run lint

# Prettier 格式化
pnpm run format
| 工具 | 作用 |
|---|---|
| ESLint | 查逻辑/风格问题(未使用变量、错误写法) |
| Prettier | 统一缩进、引号、换行 |
不确定区别时:Prettier 管 长什么样,ESLint 管 对不对。
3.0.6 平台:Express 与 Fastify
Nest 设计为 平台无关:核心业务(Controller / Guard / Pipe)可复用,底层 HTTP 引擎可换。

| 平台 | 包 | 说明 |
|---|---|---|
| Express(默认) | @nestjs/platform-express | 生态最大,本教程与面试帮默认使用,无需额外配置 |
| Fastify | @nestjs/platform-fastify | 更高性能,需FastifyAdapter |
指定 Express 类型时,可访问平台专有 API(一般不必):
import { NestExpressApplication } from '@nestjs/platform-express';

const app = await NestFactory.create<NestExpressApplication>(AppModule);
// app.useStaticAssets(...) 等 Express 专属方法
Fastify 换法见官网;本教程 不换,知道即可。
3.0.7 请求生命周期:各层职责与执行顺序
3.0.1 已给全景图,这里 按层展开,并标明教程对应节。
| 顺序 | 组件 | 干什么 | 典型场景 | 教程 |
|---|---|---|---|---|
| 1 | Middleware | 路由匹配前,最外层 | 请求日志、原始 body | 3.5 |
| 2 | Guard | 能否 执行 handler | JWT、@Roles() | 3.8 |
| 3 | Interceptor 前 | 进入 handler 前 | 计时、改入参 | 3.6 |
| 4 | Pipe | 校验/转换入参 | ValidationPipe、DTO | 3.7 |
| 5 | Controller | 路由方法 | @Get / @Post | 3.1 |
| 6 | Interceptor 后 | 离开 handler 后 | 统一{ code, data } | 3.6 |
| 7 | Exception Filter | 捕获异常 | 401/400/500 统一 JSON | 3.9 |
Interceptor 分前后两段;Exception Filter 在抛错时插入,打断正常流程。
面试帮生产项目走了哪些层?
| 层级 | 面试帮 | 教程project/api 现状 |
|---|---|---|
| Guard | JWT 保护简历、押题等 | 第 6 章加入 |
| Pipe | 注册/登录 DTO 校验 | 3.7 加入 |
| Interceptor / Filter | 统一响应与错误 | 3.6 / 3.9 加入 |
| Middleware | 按需 | 3.5 加入 |
3.0.8 动手走一遍:/ 与 /health
启动
cd project/api
pnpm run start:dev
测试根路由(走 Controller → Service)
curl http://localhost:3001/
期望:Hello World!
链路(当前缩短版):
Express → 匹配 @Get() → AppController.getHello() → AppService.getHello() → 文本响应
测试 health(仅 Controller)
curl http://localhost:3001/health
期望 JSON:
{
  "service": "ai-interview-lab-api",
  "ok": true,
  "ts": 1710000000000
}
链路: Express → @Get('health') → health() 直接 return 对象 → Nest 序列化为 JSON
尚未经过 Guard / Pipe——这正是「最小 Nest 项目」的正常状态。
可选:跑单元测试
pnpm run test
验证 app.controller.spec.ts 通过,建立「测试也是 Nest 工作流一部分」的意识。
3.0.9 补充:模块生命周期钩子(别和请求链路混了)
官网 Fundamentals · Lifecycle events 里的 OnModuleInit 等,属于 启动线(全景 A),不是 请求线(全景 B)。
| 请求生命周期 | 模块钩子OnModuleInit | |
|---|---|---|
| 触发 | 每次 HTTP | 启动时一次 |
| 用途 | 鉴权、校验、路由 | seed 数据、初始化配置 |
决策:
每次请求要做的事 → Guard / Pipe / Service 方法
只在启动做一次   → OnModuleInit
3.0.10 后续章节对照
| 问题 | 读哪一节 |
|---|---|
@Get、@Body、路由参数 | 3.1 控制器 |
| 业务逻辑放哪 | 3.2 服务 |
拆UserModule / ResumeModule | 3.3 模块 |
| 依赖注入进阶 | 3.4 → 3.17 |
| 请求链路 ①~⑦ 逐层实现 | 3.5~3.9 |
全局main.ts 装配 | 3.19 |
常见坑
- 把启动和请求混为一谈
NestFactory.create只在启动跑;Guard / Pipe 在 每次请求 跑。 - 背错顺序
Guard 在 Pipe 之前(先鉴权,再校验 body)。 - 在 Controller 写 Mongo / AI
应放 Service(3.2)。 - 端口不一致
本教程默认 3001(.env);官网示例是 3000,以你项目为准。 OnModuleInit当请求拦截器
每次请求 不会 进onModuleInit。
面试 1 分钟版
Nest 启动时
main.ts用NestFactory.create(AppModule)装配 Module、实例化 Provider、注册路由,再listen监听端口。
每次请求依次经过 Middleware、Guard、Interceptor、Pipe、Controller,异常由 Exception Filter 处理;当前最小项目只有 Express → Controller。
默认底层 Express,可换 Fastify。OnModuleInit是启动钩子,不是请求链路的一环。
本章面试追问
1. 说清 Nest 的两条「工作线」。
启动线:main.ts → NestFactory → Module 装配 → listen。请求线:Middleware → Guard → Interceptor → Pipe → Controller → 响应 / Exception Filter。
2. 一次请求的完整顺序?
Middleware → Guard → Interceptor(前)→ Pipe → Controller → Interceptor(后);异常 → Exception Filter。
3. NestFactory.create 和 app.listen 分别做什么?
前者创建应用、DI、注册路由;后者开始接受 HTTP 请求。
4. Guard 和 Middleware 区别?
Middleware 不知道具体 Handler;Guard 知道要访问哪个 Controller,适合 JWT 和 @Public()。
5. 官网五个初始文件各干什么?
main.ts 入口;app.module 根模块;app.controller 路由;app.service 业务;*.spec.ts 单元测试。
本章完成清单
- 能口述 启动全景 与 请求全景
- 能背出请求顺序 M-G-I-P-C-I-E
- 对照官网说清五个初始文件
-
pnpm run start:dev成功 -
curl /与curl /health符合预期 - 可选:
pnpm run lint/pnpm run test跑通
本章小结
- 本章最重要: Nest 怎么启动 + 请求进来各层顺序——两张全景图。
- 官网第一步 的文件、
NestFactory、平台、运行、lint/format 已融合进教程,并统一到project/api+ pnpm。 - 当前项目只有 缩短版请求链路;3.5~3.9 会补全 Middleware → Filter。
- 下一节从请求链路第 ⑤ 步展开:3.1 · 控制器 Controllers。
上一节:【2026前端转 AI 全栈指南】第 2 章(下):NestJS 项目创建 · MongoDB 配置 · 项目启动与调试
下一节: 敬请期待

AtomGit 是由开放原子开源基金会联合 CSDN 等生态伙伴共同推出的新一代开源与人工智能协作平台。平台坚持“开放、中立、公益”的理念,把代码托管、模型共享、数据集托管、智能体开发体验和算力服务整合在一起,为开发者提供从开发、训练到部署的一站式体验。
更多推荐


 7
7 0
0- 0


 已为社区贡献6条内容

所有评论(0)