基于A2A + AgentScope + Nacos 构建分布式高可用异构 Agent 方案
一、A2A + AgentScope + Nacos
随着现在 Agent 的需求爆发,一个现实问题浮出水面,智能体们各自为政,难以协同。如一个典型的企业环境中,核心业务团队可能喜欢使用Java来开发服务,算法团队则偏爱Python来实现算法,不同的技术栈天然形成了协作壁垒。更棘手的是,各类Agent框架如:LangChain、AutoGPT、AgentScope等,各有各的接口规范和通信协议。当一个智能体需要调用另一个智能体时,开发者往往需要编写大量适配代码来处理协议转换、参数映射和错误处理,导致集成成本升高且维护困难。
而 A2A(Agent-to-Agent)协议,便可以很好的解决该问题,A2A 是 Google 提出的面向分布式智能体互联的开放标准协议,它的核心价值就是抹平不同智能体之间的差异。该协议定义了统一的消息格式、交互规则与能力描述规范,不依赖底层代码共享,也无需改造原有技术架构。
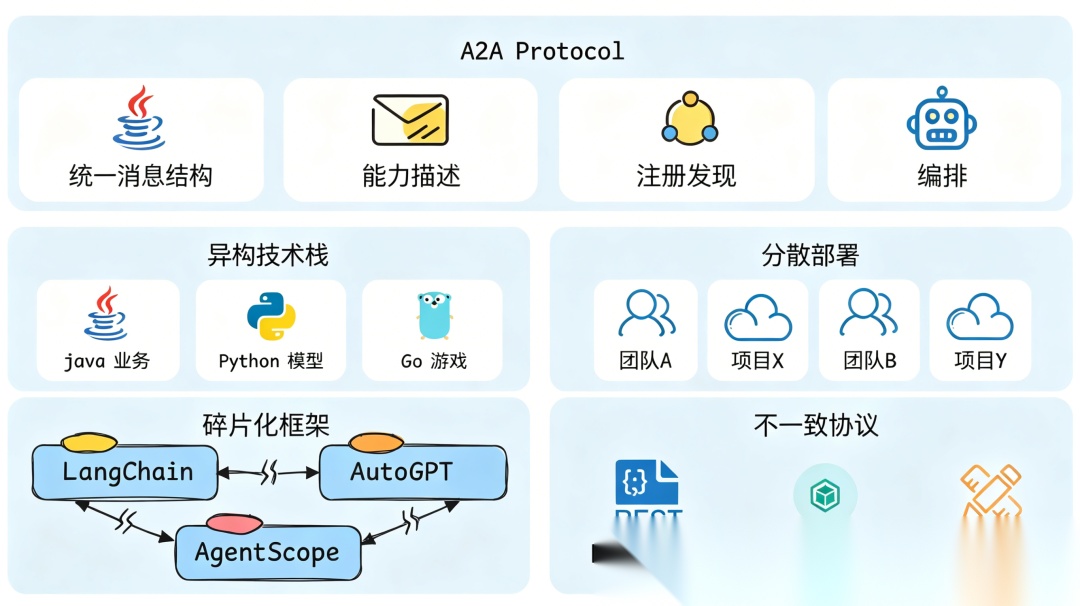
但仅有通信标准还远远不够,分布式场景下还需要一套可靠的服务发现与治理体系,在传统微服务架构下,我们会采用 Nacos、Eureka 等中间件作为注册中心,保证服务之间的注册、管理、发现的可靠性,在分布式 Agent 的场景下,也同样需要一个注册中心来注册、管理和发现不同来源的 Agent 。
对于上述问题,现在已经无需担心,阿里开源的 AgentScope 已经为我们提供整套的开箱即用的封装。
AgentScope 是阿里推出的一款以开发者为核心,专注于多 Agent 开发的开源框架。目前 AgentScope 最新版本中,已经全面支持 A2A 协议,提供客户端 + 服务端完整支持,并集成 Nacos 3 作为 A2A Registry 的默认实现,核心组件有:
- •
AgentCard:A2A协议的核心数据结构,用于描述一个Agent的身份、能力与接入方式。 - •
NacosRegistry:AgentScope提供的A2A服务注册器,基于Nacos实现服务注册与发现。 - •
AgentApp:AgentScope Runtime提供的应用封装容器,封装FastAPI,用于快速把智能体包装成可部署、可访问、支持A2A的服务。 - •
NacosAgentCardResolver:AgentScope客户端组件,用于从Nacos注册中心自动获取远程智能体的AgentCard。 - •
A2AAgent: 客户端代理类,可以根据一个远程AgentCard构建像本地Agent一样调用方式的远程A2A智能体。

注意:Nacos 中对于 A2A 的支持必须大于等于 3.0 的版本, 已经具备服务发现、健康检查、命名空间隔离等成熟能力。
下面实验首先基于 AgentScope 对 A2A 的封装,结合 Nacos 构建分布式异构 Agent 方案,采用 Python 端模拟构建 Agent 服务集群,客户端通过 Nacos 动态发现并负载调用 Agent 服务,当服务端部分 Agent 宕机时,而不影响客户端的使用。
然后实验对 LangChain 格式的智能体包装为 A2A 服务的实现,并注册到 Nacos 中,客户端以同样的方式进行调用。
最后实验使用JAVA``SpringBoot 调用 Nacos 上的远程 A2A 服务。
实验模型,均采用 ModelScope 上提供的免费模型 Qwen3.5-27B 实现。
开始前请提前安装好 Nacos 服务, 安装过程可参考官方文档:
https://nacos.io/docs/latest/quickstart/quick-start/
下面是实验核心依赖版本说明:
agentscope==1.0.21agentscope-runtime==1.1.6.post2nacos-sdk-python==3.2.0langchain==1.3.4
二、构建 Agent 封装为 A2A 服务,并注册到 Nacos 中
智能体实现,这里采用 AgentScope 原生的 ReActAgent 来实现(后面提供了 LangChain 格式的实现),工具实现一个伪天气工具,以展现智能体的交互过程。
完整实现过程如下:
from agentscope.agent import ReActAgentfrom agentscope.model import OpenAIChatModelfrom agentscope.formatter import DashScopeChatFormatterfrom agentscope.memory import InMemoryMemoryfrom agentscope.pipeline import stream_printing_messagesfrom agentscope_runtime.engine.app import AgentAppfrom agentscope_runtime.engine.schemas.agent_schemas import AgentRequestfrom agentscope_runtime.engine.deployers.adapter.a2a import AgentCardWithRuntimeConfigfrom agentscope_runtime.engine.deployers.adapter.a2a.nacos_a2a_registry import NacosRegistryfrom v2.nacos import ClientConfigBuilderfrom a2a.types import AgentCard, AgentCapabilitiesfrom agentscope.tool import Toolkit, ToolResponsefrom agentscope.message import TextBlock, ToolUseBlock## Agent端口port = 8090## 定义测试工具def weather(local: str) -> ToolResponse: '''查看某个地区的最新天气情况 Args: local(str):完整的地区名称 ''' return ToolResponse( content=[ TextBlock( type="text", text=f"{local},地区的最新天气为多云转晴,30-35摄氏度。" ) ] )## 注册工具toolkit = Toolkit()toolkit.register_tool_function(weather)## 创建智能体my_agent = ReActAgent( name="xiaobichao", sys_prompt="你叫小毕超,是一个天气智能助手", model=OpenAIChatModel( model_name="Qwen/Qwen3.5-27B", stream=True, enable_thinking=False ), formatter=DashScopeChatFormatter(), toolkit=toolkit, memory=InMemoryMemory(),)## 创建 Nacos Registryregistry = NacosRegistry( nacos_client_config=ClientConfigBuilder() .server_address("localhost:8848") ## Nacos地址 .build())## 声明AgentCardagent_card = AgentCard( name="xiaobichao", description="小毕超天气智能助手", version="1.0.0", url=f"http://localhost:{port}", capabilities=AgentCapabilities( push_notifications=False, state_transition_history=True, streaming=True ), default_input_modes=["text/plain"], default_output_modes=["text/plain"], skills=[])## 创建AgentAppapp = AgentApp( app_name="xiaobichao", app_description="小毕超天气智能助手", a2a_config=AgentCardWithRuntimeConfig( port=port, registry=registry, agent_card=agent_card, ),)#定义执行逻辑@app.query(framework="agentscope")async def query_func(self, msgs, request: AgentRequest = None, **kwargs): session_id = request.session_id user_id = request.user_id async for msg, last in stream_printing_messages(agents=[my_agent], coroutine_task=my_agent(msgs), ): yield msg, lastif __name__ == "__main__": app.run(host="0.0.0.0", port=port)
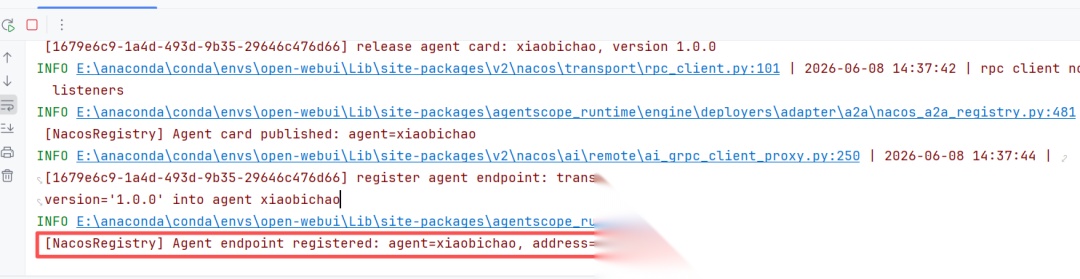
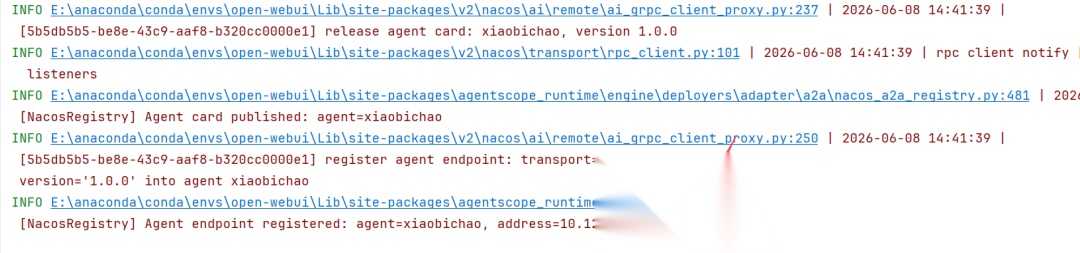
运行启动后,可以通过日志看到A2A服务已经注册到 Nacos 中了:
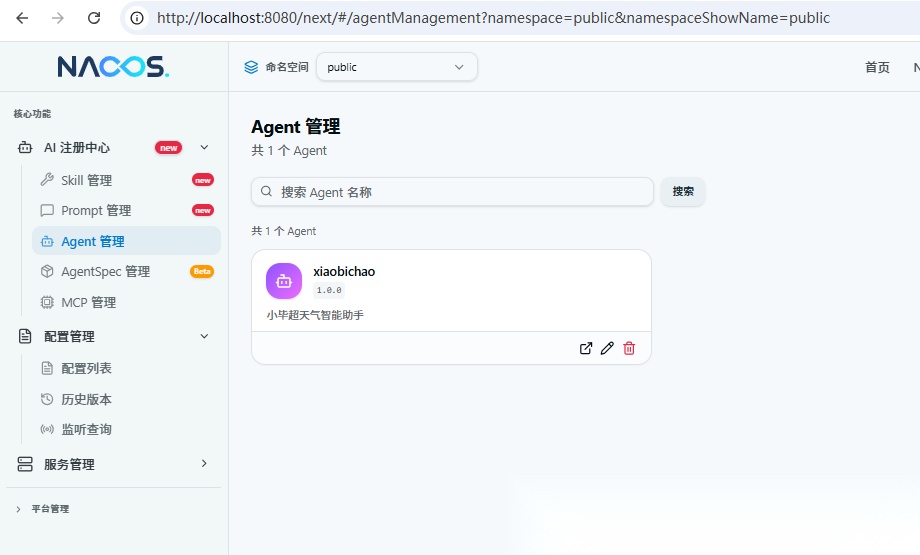
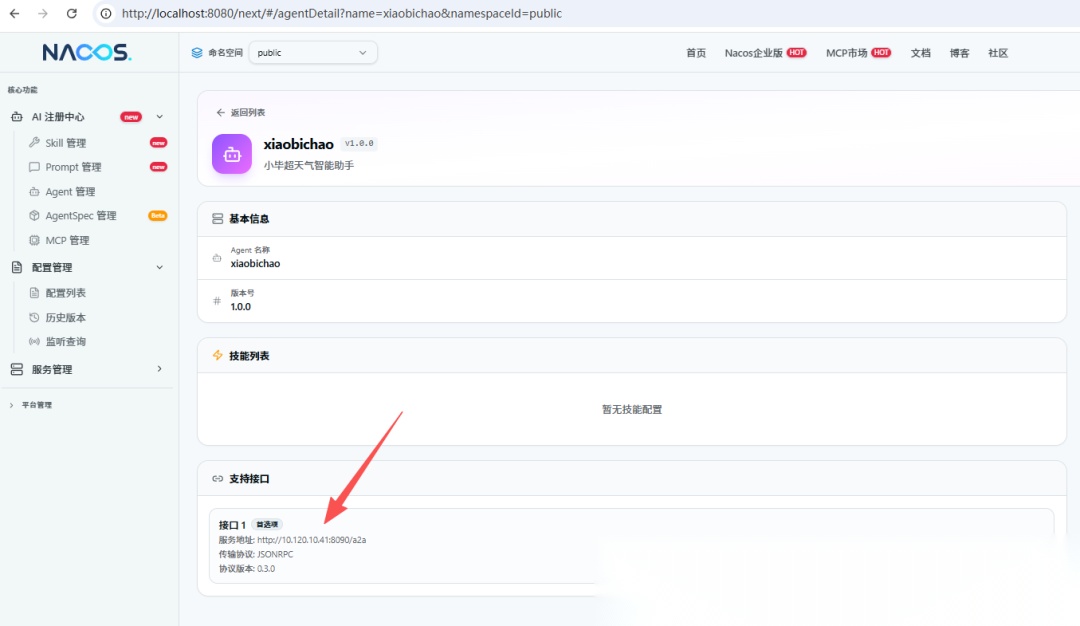
此时在 Nacos 的 Agent 管理下应该能看到名为 xiaobichao 的智能体:
点进入详情可以看到,具体注册的地址:
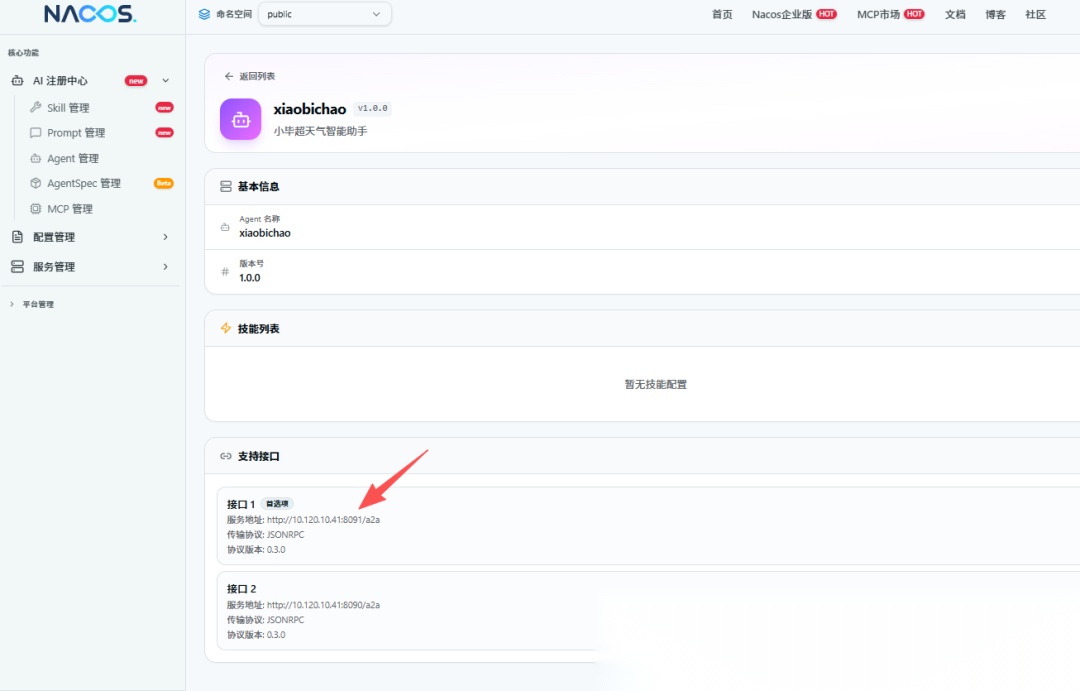
此时,再将上面服务端的端口修改成 8091,然后再启动一个新服务,再观察 Nacos 里的注册信息:
Nacos 上信息:
到这里先保持两个 A2A 服务的注册,下面需要验证服务负载情况。
三、客户端调用 Nacos 中的 A2A 服务
客户端调用直接使用 NacosAgentCardResolver 即可,指定一个远程 Agent 的名称和 Nacos 的地址即可,完全无需关注 Agent 的具体实现。
3.1 验证服务负载情况
通过获取远程 AgentCard ,并根据 AgentCard 中描述的 URl 判断当前获取的 是哪一个 A2A 服务:
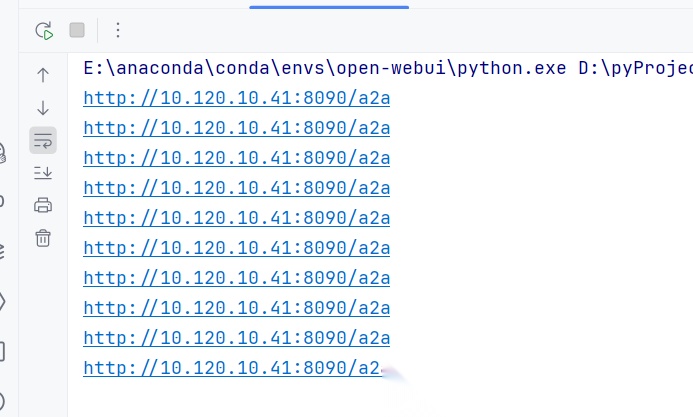
import asynciofrom v2.nacos import ClientConfigfrom agentscope.a2a import NacosAgentCardResolverasync def main(): ## 初始化 Nacos 客户端 nacos_resolver = NacosAgentCardResolver( remote_agent_name="xiaobichao", ## Nacos 中注册的智能体名称 nacos_client_config=ClientConfig( server_addresses="http://localhost:8848", ## Nacos地址 ) ) for i in range(10): agent_card = await nacos_resolver.get_agent_card() print(agent_card.url)if __name__ == "__main__": asyncio.run(main())
这里我循环十次分别从 Nacos 上获取远程 AgentCard 并打印出每次 AgentCard 的 url
输入内容如下所示:
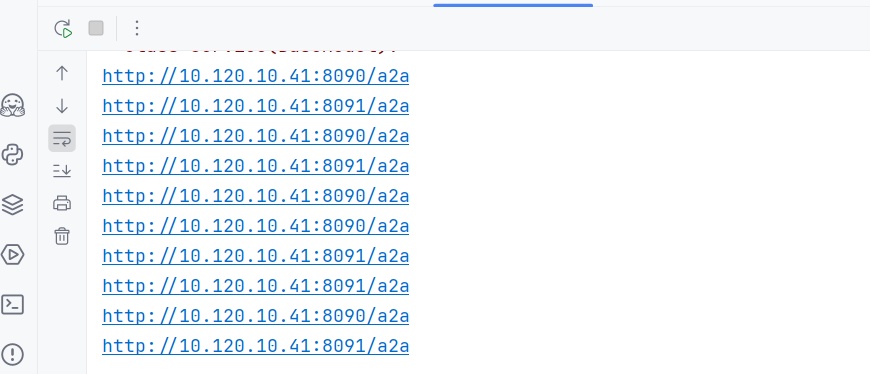
可以看出,成功出现负载均衡的效果,在 8090 和 8091 端口之间进行负载。
如果此时,将 8091 端口的服务停掉,再次调用上面代码:
可以看出客户端已经无感切换至了 8090 服务上。
3.2 客户端调用远程 Agent
客户端调用远程 Agent,只需使用 A2AAgent 即可,可以将远程 AgentCard 抽象成和本地 Agent 一样的智能体。
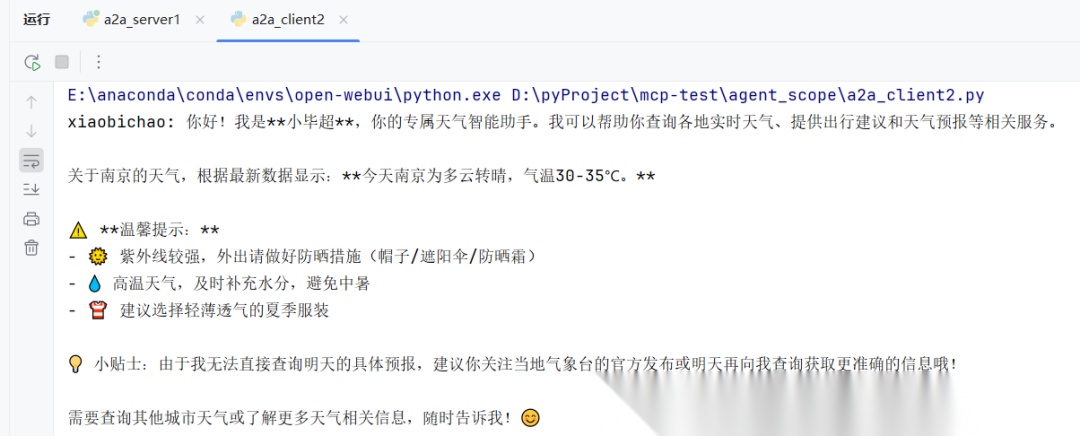
import asynciofrom v2.nacos import ClientConfigfrom agentscope.a2a import NacosAgentCardResolverfrom agentscope.agent import A2AAgentfrom agentscope.message import Msgasync def main(): ## 初始化 Nacos 客户端 nacos_resolver = NacosAgentCardResolver( remote_agent_name="xiaobichao", ## Nacos 中注册的智能体名称 nacos_client_config=ClientConfig( server_addresses="http://localhost:8848", ## Nacos地址 ) ) agent_card = await nacos_resolver.get_agent_card() agent = A2AAgent(agent_card=agent_card) msg = Msg(name="user", content="你是谁?明天南京的天气如何?", role="user") response = await agent(msg)if __name__ == "__main__": asyncio.run(main())
运行结果:
四、将 LangChain 格式 Agent 封装为 A2A 服务,并注册到Nacos中
将 LangChain 格式的 Agent 封装为 A2A 服务,整体实现过程和上述基本一致,核心将智能体的实现替换为 LangChain 的方式,并在最后定义执行逻辑时,注解中将 framework 指定为 "langgraph" 即可。
完整的实现逻辑如下:
from uuid import uuid4from agentscope_runtime.engine.app import AgentAppfrom agentscope_runtime.engine.schemas.agent_schemas import AgentRequestfrom agentscope_runtime.engine.deployers.adapter.a2a import AgentCardWithRuntimeConfigfrom agentscope_runtime.engine.deployers.adapter.a2a.nacos_a2a_registry import NacosRegistryfrom agentscope.message import Msgfrom v2.nacos import ClientConfigBuilderfrom a2a.types import AgentCard, AgentCapabilitiesfrom langchain.agents import create_agent## Agent端口port = 8093## 定义测试工具def weather(local: str) -> str: '''查看某个地区的最新天气情况 Args: local(str):完整的地区名称 ''' return f"{local},地区的最新天气为多云转晴,30-35摄氏度。"## 创建LangChain智能体agent = create_agent( model="openai:Qwen/Qwen3.5-27B", tools=[weather], system_prompt="你叫小毕超,是一个天气智能助手",)## 创建 Nacos Registryregistry = NacosRegistry( nacos_client_config=ClientConfigBuilder() .server_address("localhost:8848") .build())## 声明AgentCardagent_card = AgentCard( name="xiaobichao", description="小毕超天气智能助手", version="1.0.0", url=f"http://localhost:{port}", capabilities=AgentCapabilities( push_notifications=False, state_transition_history=True, streaming=True ), default_input_modes=["text/plain"], default_output_modes=["text/plain"], skills=[])## 创建AgentAppapp = AgentApp( app_name="xiaobichao", app_description="小毕超天气智能助手", a2a_config=AgentCardWithRuntimeConfig( port=port, registry=registry, agent_card=agent_card ),)#定义执行逻辑config = {"configurable": {"thread_id": str(uuid4())}}@app.query(framework="langgraph") ## 指定为 langgraph 格式async def query_func(self, msgs, request: AgentRequest = None, **kwargs): '''AgentScope 会自动将 msgs 转化为 LangChain 的格式''' session_id = request.session_id user_id = request.user_id llm_content = "" async for type, chunk in agent.astream( input={"messages": msgs}, config=config, stream_mode=["updates"] ): if "model" in chunk: message = chunk["model"]["messages"][0] content = message.content tool_calls = message.tool_calls if content: llm_content += content+"\n" if tool_calls: for t in tool_calls: llm_content += f"执行工具: {t['name']} , Args: {t['args']}\n" ## 将结果用Msg抛出即可 yield Msg(name="xiaobichao", content=llm_content, role="assistant"), False yield Msg(name="xiaobichao", content=llm_content, role="assistant"), Trueif __name__ == "__main__": app.run(host="0.0.0.0", port=port)
```
`Nacos` 注册信息:

客户端的逻辑保持不变,直接调用即可正常获取结果:
```plaintext
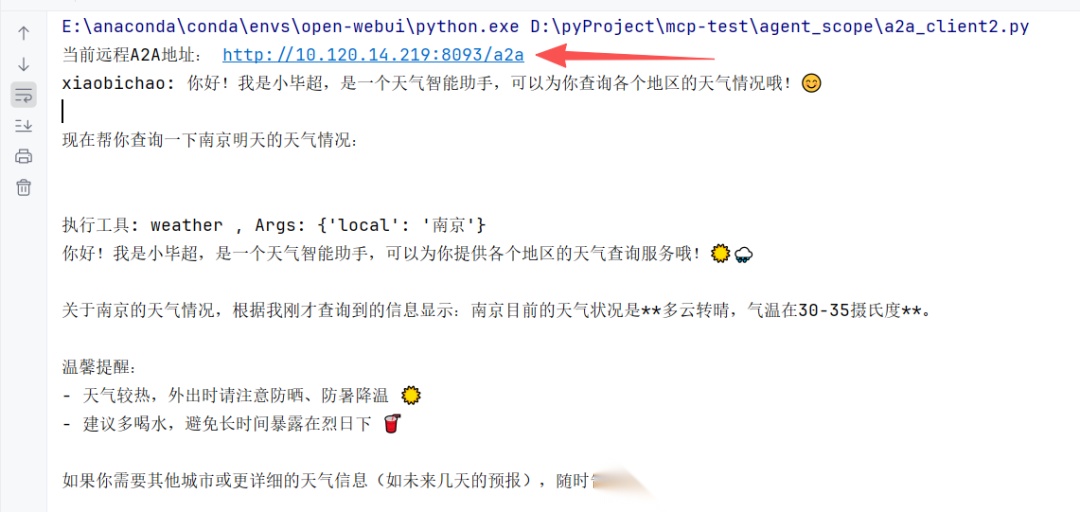
import asynciofrom v2.nacos import ClientConfigfrom agentscope.a2a import NacosAgentCardResolverfrom agentscope.agent import A2AAgentfrom agentscope.message import Msgasync def main(): ## 初始化 Nacos 客户端 nacos_resolver = NacosAgentCardResolver( remote_agent_name="xiaobichao", ## Nacos 中注册的智能体名称 nacos_client_config=ClientConfig( server_addresses="http://localhost:8848", ## Nacos地址 ) ) agent_card = await nacos_resolver.get_agent_card() print("当前远程A2A地址:", agent_card.url) agent = A2AAgent(agent_card=agent_card) msg = Msg(name="user", content="你是谁?明天南京的天气如何?", role="user") response = await agent(msg)if __name__ == "__main__": asyncio.run(main())
运行结果:
五、JAVA SpringBoot 调用 Nacos 中的远程 A2A 服务
新建 SpringBoot 项目,版本需要大于等于 3.4.0, 并引入相关依赖,完整的 POM 内容如下:
<?xml version="1.0" encoding="UTF-8"?><project xmlns="http://maven.apache.org/POM/4.0.0" xmlns:xsi="http://www.w3.org/2001/XMLSchema-instance" xsi:schemaLocation="http://maven.apache.org/POM/4.0.0 https://maven.apache.org/xsd/maven-4.0.0.xsd"> <modelVersion>4.0.0</modelVersion> <parent> <groupId>org.springframework.boot</groupId> <artifactId>spring-boot-starter-parent</artifactId> <version>3.4.0</version> <relativePath/> </parent> <groupId>com.example</groupId> <artifactId>a2a-demo</artifactId> <version>0.0.1-SNAPSHOT</version> <name>a2a-demo</name> <description>a2a-demo</description> <properties> <java.version>17</java.version> <project.build.sourceEncoding>UTF-8</project.build.sourceEncoding> <project.reporting.outputEncoding>UTF-8</project.reporting.outputEncoding> <!-- Spring AI Alibaba版本1.0.0.4及以上 --> <spring.ai.alibaba.version>1.0.0.4</spring.ai.alibaba.version> </properties> <dependencies> <dependency> <groupId>org.springframework.boot</groupId> <artifactId>spring-boot-starter-webflux</artifactId> </dependency> <dependency> <groupId>org.springframework.boot</groupId> <artifactId>spring-boot-starter-test</artifactId> <scope>test</scope> </dependency> <!-- 引入A2A Client starter --> <dependency> <groupId>com.alibaba.cloud.ai</groupId> <artifactId>spring-ai-alibaba-starter-a2a-client</artifactId> <version>${spring.ai.alibaba.version}</version> </dependency> <!-- 引入A2A Nacos 注册中心 --> <dependency> <groupId>com.alibaba.cloud.ai</groupId> <artifactId>spring-ai-alibaba-starter-a2a-registry</artifactId> <version>${spring.ai.alibaba.version}</version> </dependency> </dependencies> <build> <plugins> <plugin> <groupId>org.apache.maven.plugins</groupId> <artifactId>maven-compiler-plugin</artifactId> <version>3.8.1</version> <configuration> <source>17</source> <target>17</target> <encoding>UTF-8</encoding> </configuration> </plugin> <plugin> <groupId>org.springframework.boot</groupId> <artifactId>spring-boot-maven-plugin</artifactId> <configuration> <mainClass>com.example.a2ademo.A2aDemoApplication</mainClass> <skip>true</skip> </configuration> <executions> <execution> <id>repackage</id> <goals> <goal>repackage</goal> </goals> </execution> </executions> </plugin> </plugins> </build></project>
application.yml 配置信息,主要指定Nacos的地址:
server: port: 8086spring: application: name: a2s-client-example ai: alibaba: a2a: nacos: # 开启从Nacos中自动发现Agent discovery: enabled: true server-addr: ${NACOS_ADDRESS:localhost:8848} username: ${NACOS_USERNAME:nacos} password: ${NACOS_PASSWORD:123456}
构建远程Agent:
@Configurationpublic class RootAgentConfiguration { @Bean public BaseAgent rootAgent(AgentCardProvider agentCardProvider) throws GraphStateException { return A2aRemoteAgent.builder() .agentCardProvider(agentCardProvider) .name("xiaobichao").description("小毕超天气智能助手").build(); }}
创建测试接口:
@RestController@RequestMapping("/")public class TestController { private final BaseAgent rootAgent; public TestController(BaseAgent rootAgent) { this.rootAgent = rootAgent; } @GetMapping(value = "stream", produces = "text/event-stream;charset=UTF-8") public Flux<String> stream(@RequestParam("question") String question) throws GraphStateException, GraphRunnerException { return rootAgent.stream(Map.of("input", List.of(new UserMessage(question)))) .mapNotNull(output -> { System.out.println("stream agent invoke : " + output.toString()); if (output.isSTART() || output.isEND()) { return null; } Object result = output.state().data().get("output"); return result != null ? result.toString() : null; }); }}
启动服务,调用测试接口:
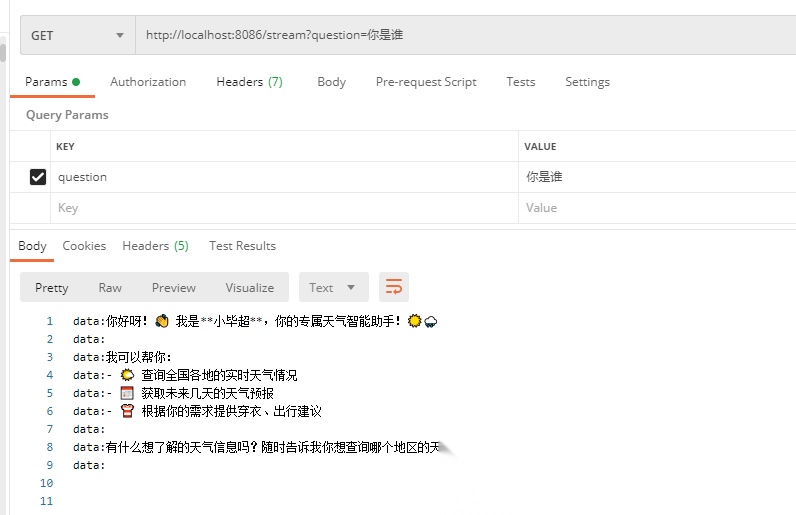
已成功在 Java 端调用 Python 端的 Agent 服务。
学AI大模型的正确顺序,千万不要搞错了
🤔2026年AI风口已来!各行各业的AI渗透肉眼可见,超多公司要么转型做AI相关产品,要么高薪挖AI技术人才,机遇直接摆在眼前!
有往AI方向发展,或者本身有后端编程基础的朋友,直接冲AI大模型应用开发转岗超合适!
就算暂时不打算转岗,了解大模型、RAG、Prompt、Agent这些热门概念,能上手做简单项目,也绝对是求职加分王🔋
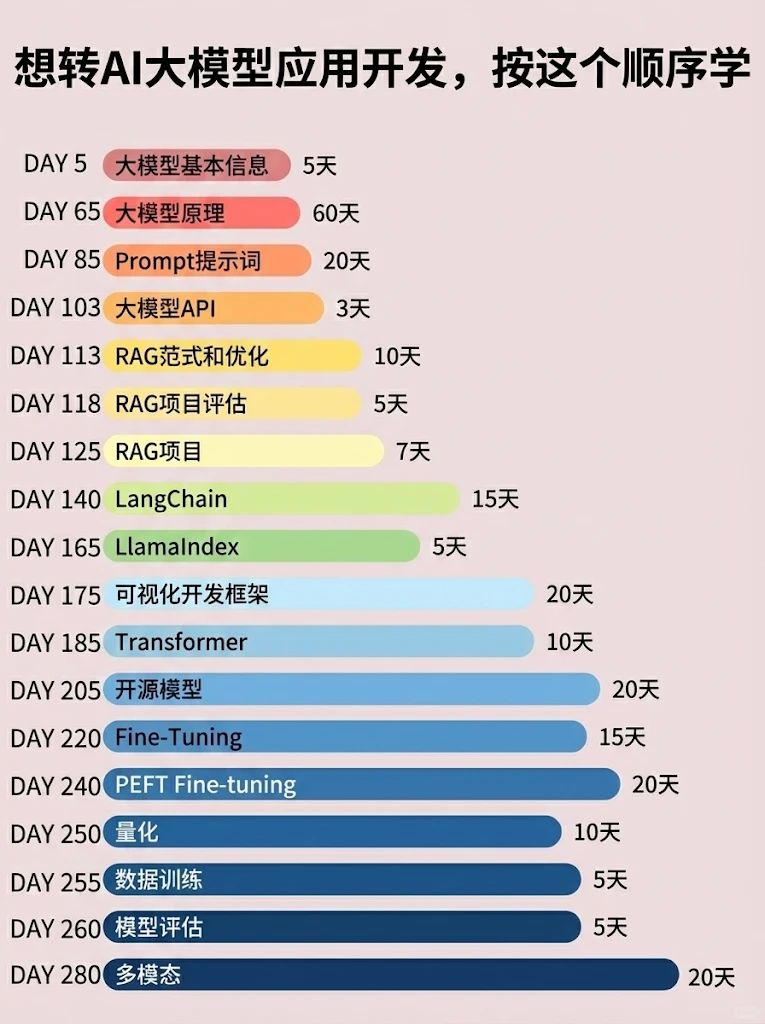
📝给大家整理了超全最新的AI大模型应用开发学习清单和资料,手把手帮你快速入门!👇👇
学习路线:
✅大模型基础认知—大模型核心原理、发展历程、主流模型(GPT、文心一言等)特点解析
✅核心技术模块—RAG检索增强生成、Prompt工程实战、Agent智能体开发逻辑
✅开发基础能力—Python进阶、API接口调用、大模型开发框架(LangChain等)实操
✅应用场景开发—智能问答系统、企业知识库、AIGC内容生成工具、行业定制化大模型应用
✅项目落地流程—需求拆解、技术选型、模型调优、测试上线、运维迭代
✅面试求职冲刺—岗位JD解析、简历AI项目包装、高频面试题汇总、模拟面经
以上6大模块,看似清晰好上手,实则每个部分都有扎实的核心内容需要吃透!
我把大模型的学习全流程已经整理📚好了!抓住AI时代风口,轻松解锁职业新可能,希望大家都能把握机遇,实现薪资/职业跃迁~
这份完整版的大模型 AI 学习资料已经上传CSDN,朋友们如果需要可以微信扫描下方CSDN官方认证二维码免费领取【保证100%免费】


AtomGit 是由开放原子开源基金会联合 CSDN 等生态伙伴共同推出的新一代开源与人工智能协作平台。平台坚持“开放、中立、公益”的理念,把代码托管、模型共享、数据集托管、智能体开发体验和算力服务整合在一起,为开发者提供从开发、训练到部署的一站式体验。
更多推荐


 5
5 0
0- 0


 已为社区贡献224条内容

所有评论(0)