ComfyUI 快速文生图模型生成
·
ComfyUI 快速文生图(基于 z_image.json)
目标:最快速度部署 ComfyUI + Lumina2 Turbo 模型,支持通过
z_image.json工作流一键生成图片。
1. 环境要求
- Python 3.12+
- CUDA 12.4+(驱动版本 ≥ 535)
- 已安装 Conda
2. 安装 ComfyUI
cd /opt/ml/conf
git clone https://github.com/comfyanonymous/ComfyUI.git
cd ComfyUI

conda create -n comfyui python=3.12 -y
conda activate comfyui

pip install --upgrade pip
pip install torch torchvision torchaudio --index-url https://download.pytorch.org/whl/cu121

# 修复 NVIDIA 驱动兼容性(驱动版本 12080 需指定 cuBLAS 版本)
pip install --no-deps nvidia-cublas-cu12==12.4.5.8

pip install -r requirements.txt
pip install sqlalchemy alembic blake3 filelock --upgrade
3. 下载模型(关键)
将以下模型放入对应目录:
| 模型文件 | 存放路径 | 来源 |
|---|---|---|
z_image_turbo_bf16.safetensors |
models/unet/ |
自定义模型 |
qwen_3_4b.safetensors |
models/clip/ |
Qwen CLIP |
ae.safetensors |
models/vae/acevsok/ae___safetensors/ |
VAE |
目录结构示例:
/opt/ml/conf/ComfyUI/models/
├── unet/
│   └── z_image_turbo_bf16.safetensors
├── clip/
│   └── qwen_3_4b.safetensors
└── vae/
    └── acevsok/
        └── ae___safetensors/
            └── ae.safetensors
4. 安装必要 Custom Nodes
cd /opt/ml/conf/ComfyUI/custom_nodes

git clone https://github.com/ltdrdata/ComfyUI-Manager.git

cd /opt/ml/conf/ComfyUI
conda activate comfyui
pip install -r custom_nodes/ComfyUI-Manager/requirements.txt
5. 启动 ComfyUI
cd /opt/ml/conf/ComfyUI
conda activate comfyui

python main.py --listen 0.0.0.0 --port 8188 --disable-auto-launch
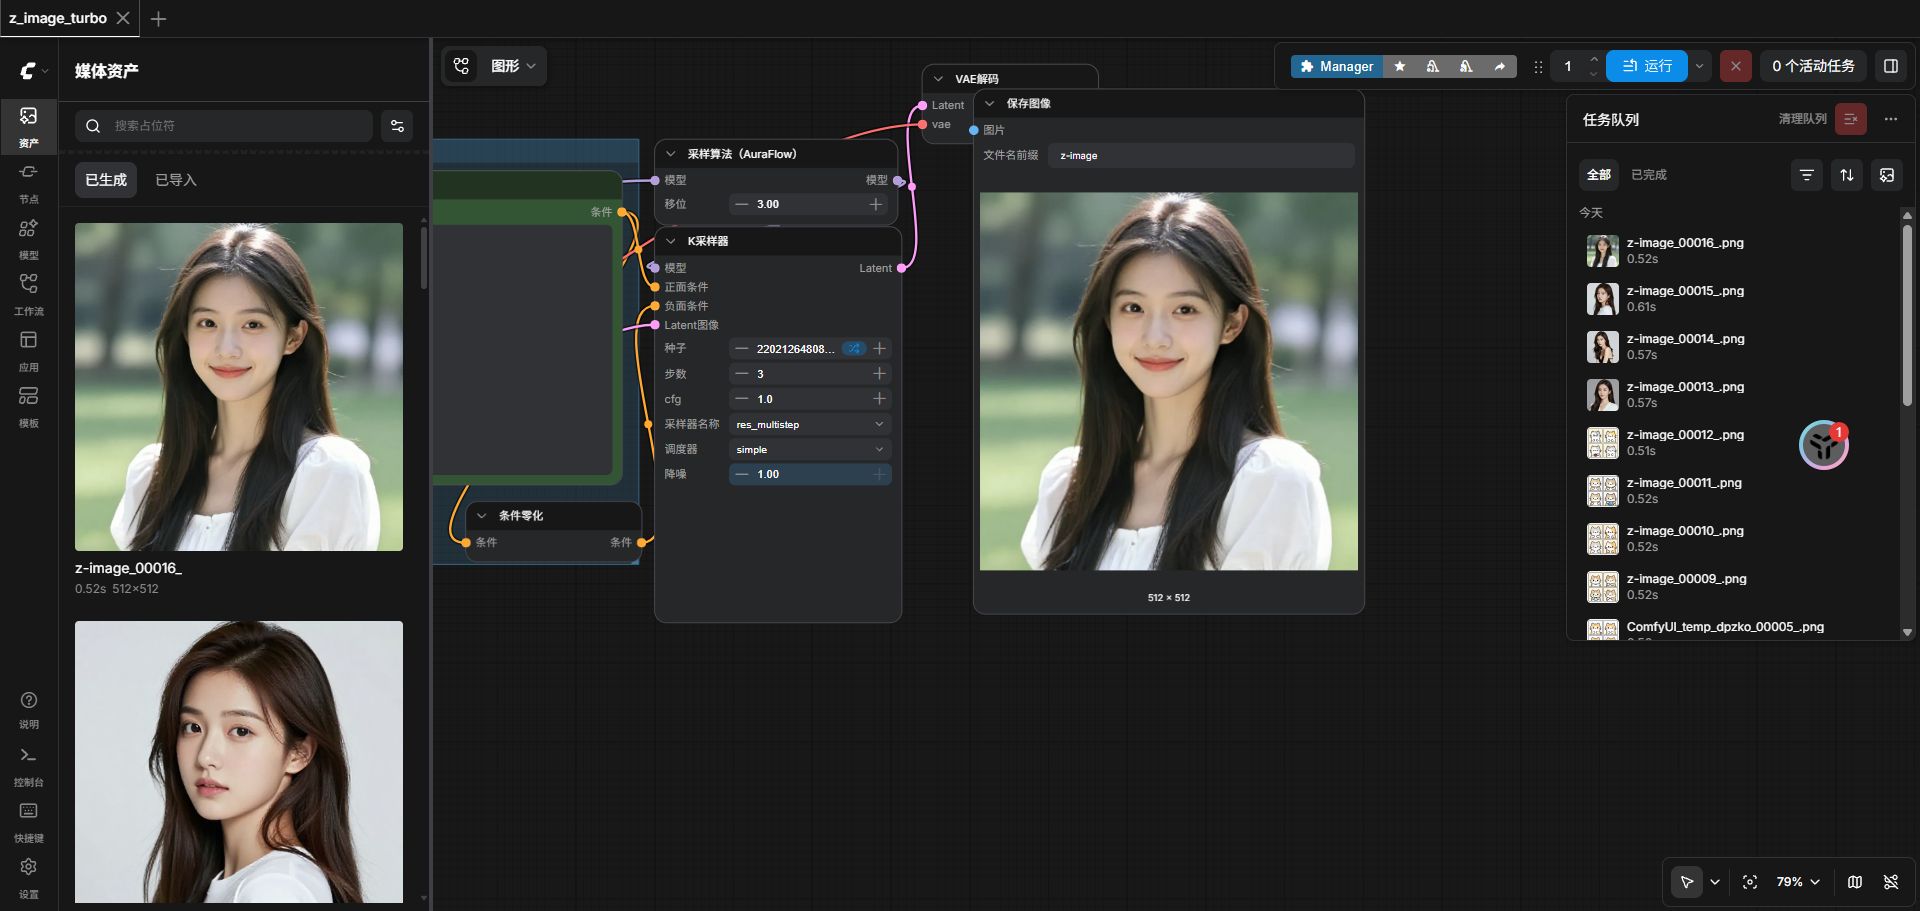
6. 导入并使用 z_image.json 工作流
- 浏览器打开 ComfyUI(
http://服务器IP:8188或平台子路径)。 - 点击右上角 「Load」 按钮。
- 选择并上传
z_image.json文件。 - 工作流会自动加载以下节点:
UNETLoader→ 自动选择z_image_turbo_bf16.safetensorsCLIPLoader→ 自动选择qwen_3_4b.safetensorsVAELoader→ 自动选择ae.safetensors
- 在
CLIP Text Encode节点修改提示词(默认:“诸葛来来”)。 - 点击 「Queue Prompt」 即可生成图片(仅需 3 步)。
7. 后台快速启动脚本
在 /opt/ml/conf/wuhui 目录下创建 start_comfyui.sh:
cat > /opt/ml/conf/wuhui/start_comfyui.sh << 'EOF'
#!/bin/bash
set -e
COMFYUI_DIR="/opt/ml/conf/ComfyUI"
CONDA_ENV="comfyui"
LOG_FILE="/opt/ml/conf/wuhui/comfyui.log"
PID_FILE="/opt/ml/conf/wuhui/comfyui.pid"

cd "$COMFYUI_DIR"
source ~/miniconda3/etc/profile.d/conda.sh
conda activate "$CONDA_ENV"

echo "[$(date '+%Y-%m-%d %H:%M:%S')] 启动 ComfyUI ..."
nohup python main.py --listen 0.0.0.0 --port 8188 --disable-auto-launch > "$LOG_FILE" 2>&1 &
echo $! > "$PID_FILE"
echo "ComfyUI 已启动,PID: $(cat $PID_FILE)"
EOF

chmod +x /opt/ml/conf/wuhui/start_comfyui.sh
启动命令:
bash /opt/ml/conf/wuhui/start_comfyui.sh
8. 一键生成图片(推荐流程)
- 启动 ComfyUI 后导入
z_image.json - 修改提示词 → 点击 Queue Prompt
- 生成的图片默认保存在
output/z-image/目录下
性能参考(3 步出图):
- 单张生成时间:约 0.5~1 秒(A100/H20)
- 显存占用:约 8~12GB
9. API 调用与多提示词批量生成
ComfyUI 原生支持通过 HTTP API 调用工作流。以下脚本可实现多提示词批量生成,无需修改 z_image.json。
9.1 安装依赖
conda activate comfyui
pip install requests
9.2 批量生成脚本(batch_generate.py)
在 /opt/ml/conf/wuhui 目录下创建脚本:
#!/usr/bin/env python3
"""
ComfyUI 批量文生图脚本(基于 z_image.json)
支持多提示词自动生成,图片保存到 output/z-image/
"""

import json
import time
import requests
import os
from typing import List

# ================== 配置 ==================
COMFYUI_URL = "http://127.0.0.1:8188"
WORKFLOW_PATH = "/opt/ml/conf/ComfyUI/z_image.json"
OUTPUT_DIR = "/opt/ml/conf/ComfyUI/output/z-image"
PROMPTS = [
    "诸葛来来",
    "a beautiful landscape",
    "cyberpunk city at night",
    "cute cat wearing sunglasses",
]

os.makedirs(OUTPUT_DIR, exist_ok=True)

# ================== 核心函数 ==================
def load_workflow() -> dict:
    with open(WORKFLOW_PATH, "r", encoding="utf-8") as f:
        return json.load(f)

def submit_prompt(workflow: dict, prompt_text: str) -> str:
    """提交工作流到 ComfyUI,返回 prompt_id"""
    wf = json.loads(json.dumps(workflow))  # 深拷贝
    # z_image.json 中 node 45 是提示词节点
    wf["45"]["inputs"]["text"] = prompt_text

    resp = requests.post(f"{COMFYUI_URL}/prompt", json={"prompt": wf})
    if resp.status_code != 200:
        raise Exception(f"提交失败: {resp.text}")
    return resp.json()["prompt_id"]

def wait_for_result(prompt_id: str, timeout: int = 120) -> dict:
    """轮询任务结果"""
    start = time.time()
    while time.time() - start < timeout:
        resp = requests.get(f"{COMFYUI_URL}/history/{prompt_id}")
        if resp.status_code == 200:
            data = resp.json()
            if prompt_id in data and data[prompt_id].get("outputs"):
                return data[prompt_id]
        time.sleep(0.5)
    raise TimeoutError(f"任务 {prompt_id} 超时")

def download_images(result: dict, prompt_text: str, idx: int):
    """下载生成的图片"""
    if "9" not in result.get("outputs", {}):
        print(f"[{idx}] 未找到输出节点 9")
        return

    for i, img_info in enumerate(result["outputs"]["9"].get("images", [])):
        filename = img_info["filename"]
        url = f"{COMFYUI_URL}/view?filename={filename}&type=output"
        save_name = f"{idx:03d}_{prompt_text[:20].replace(' ', '_')}.png"
        save_path = os.path.join(OUTPUT_DIR, save_name)

        r = requests.get(url, stream=True)
        with open(save_path, "wb") as f:
            for chunk in r.iter_content(chunk_size=8192):
                f.write(chunk)
        print(f"[{idx}] 已保存: {save_path}")

# ================== 主流程 ==================
def main():
    print("加载工作流...")
    workflow = load_workflow()

    for idx, prompt in enumerate(PROMPTS):
        print(f"\n[{idx}] 生成提示词: {prompt}")
        try:
            prompt_id = submit_prompt(workflow, prompt)
            result = wait_for_result(prompt_id)
            download_images(result, prompt, idx)
        except Exception as e:
            print(f"[{idx}] 失败: {e}")

    print("\n批量生成完成!")

if __name__ == "__main__":
    main()
9.3 使用方法
# 1. 确保 ComfyUI 已启动
bash /opt/ml/conf/wuhui/start_comfyui.sh

# 2. 运行批量生成脚本
cd /opt/ml/conf/wuhui
python batch_generate.py
输出示例:
[0] 生成提示词: 诸葛来来
[0] 已保存: /opt/ml/conf/ComfyUI/output/z-image/000_诸葛来来.png

[1] 生成提示词: a beautiful landscape
[1] 已保存: /opt/ml/conf/ComfyUI/output/z-image/001_a_beautiful_landscape.png
...
批量生成完成!
10. 注意事项
- 该工作流使用 Lumina2 Turbo 架构,
cfg必须保持为1,steps建议为3。 - 首次加载模型较慢,后续生成速度极快。
- 如提示词需要中文支持,请确保
qwen_3_4b.safetensors已正确加载。 - 批量脚本默认使用
node 45作为提示词节点,如工作流结构变化请修改对应节点 ID。
11、z-image.json工作流
{
  "9": {
    "inputs": {
      "filename_prefix": "z-image",
      "images": [
        "43",
        0
      ]
    },
    "class_type": "SaveImage",
    "_meta": {
      "title": "保存图像"
    }
  },
  "39": {
    "inputs": {
      "clip_name": "qwen_3_4b.safetensors",
      "type": "lumina2",
      "device": "default"
    },
    "class_type": "CLIPLoader",
    "_meta": {
      "title": "加载CLIP"
    }
  },
  "40": {
    "inputs": {
      "vae_name": "acevsok/ae___safetensors/ae.safetensors"
    },
    "class_type": "VAELoader",
    "_meta": {
      "title": "加载VAE"
    }
  },
  "41": {
    "inputs": {
      "width": 512,
      "height": 512,
      "batch_size": 1
    },
    "class_type": "EmptySD3LatentImage",
    "_meta": {
      "title": "空Latent图像(SD3)"
    }
  },
  "42": {
    "inputs": {
      "conditioning": [
        "45",
        0
      ]
    },
    "class_type": "ConditioningZeroOut",
    "_meta": {
      "title": "条件零化"
    }
  },
  "43": {
    "inputs": {
      "samples": [
        "44",
        0
      ],
      "vae": [
        "40",
        0
      ]
    },
    "class_type": "VAEDecode",
    "_meta": {
      "title": "VAE解码"
    }
  },
  "44": {
    "inputs": {
      "seed": 291475514551654,
      "steps": 3,
      "cfg": 1,
      "sampler_name": "res_multistep",
      "scheduler": "simple",
      "denoise": 1,
      "model": [
        "47",
        0
      ],
      "positive": [
        "45",
        0
      ],
      "negative": [
        "42",
        0
      ],
      "latent_image": [
        "41",
        0
      ]
    },
    "class_type": "KSampler",
    "_meta": {
      "title": "K采样器"
    }
  },
  "45": {
    "inputs": {
      "text": "诸葛来来",
      "clip": [
        "39",
        0
      ]
    },
    "class_type": "CLIPTextEncode",
    "_meta": {
      "title": "CLIP文本编码"
    }
  },
  "46": {
    "inputs": {
      "unet_name": "z_image_turbo_bf16.safetensors",
      "weight_dtype": "default"
    },
    "class_type": "UNETLoader",
    "_meta": {
      "title": "UNet加载器"
    }
  },
  "47": {
    "inputs": {
      "shift": 3,
      "model": [
        "46",
        0
      ]
    },
    "class_type": "ModelSamplingAuraFlow",
    "_meta": {
      "title": "采样算法(AuraFlow)"
    }
  }
}


AtomGit 是由开放原子开源基金会联合 CSDN 等生态伙伴共同推出的新一代开源与人工智能协作平台。平台坚持“开放、中立、公益”的理念,把代码托管、模型共享、数据集托管、智能体开发体验和算力服务整合在一起,为开发者提供从开发、训练到部署的一站式体验。
更多推荐

 6
6 0
0- 0


 已为社区贡献1条内容

所有评论(0)