SpringAI+MCPServer实战-StreamableHTTP协议打造企业级AI工具服务
文章目录
一、前言
各位好,最近在公司项目里折腾 Spring AI 的 MCP(Model Context Protocol)协议,踩了不少坑,也总结了一些经验。今天先把 MCP Server 端的内容单独拎出来写一篇,聊聊怎么用 Streamable HTTP 协议打造企业级的 AI 工具服务。
为什么单独写 Server 端?因为在实际企业架构中,MCP Server 和 MCP Client 往往是两个独立的团队在维护。工具提供方(Server)需要关注如何把业务能力标准化暴露出去,而 AI 应用方(Client)则关注如何高效调用这些工具。把这两件事拆开来看,思路会更清晰。
本文结构:
- MCP 协议与传输方式演进
- MCP Server 技术架构设计
- 基于 Streamable HTTP 的完整实战代码
- 企业级多服务部署方案
废话不多说,直接上干货!
二、MCP 协议核心概念
2.1 MCP 是什么?
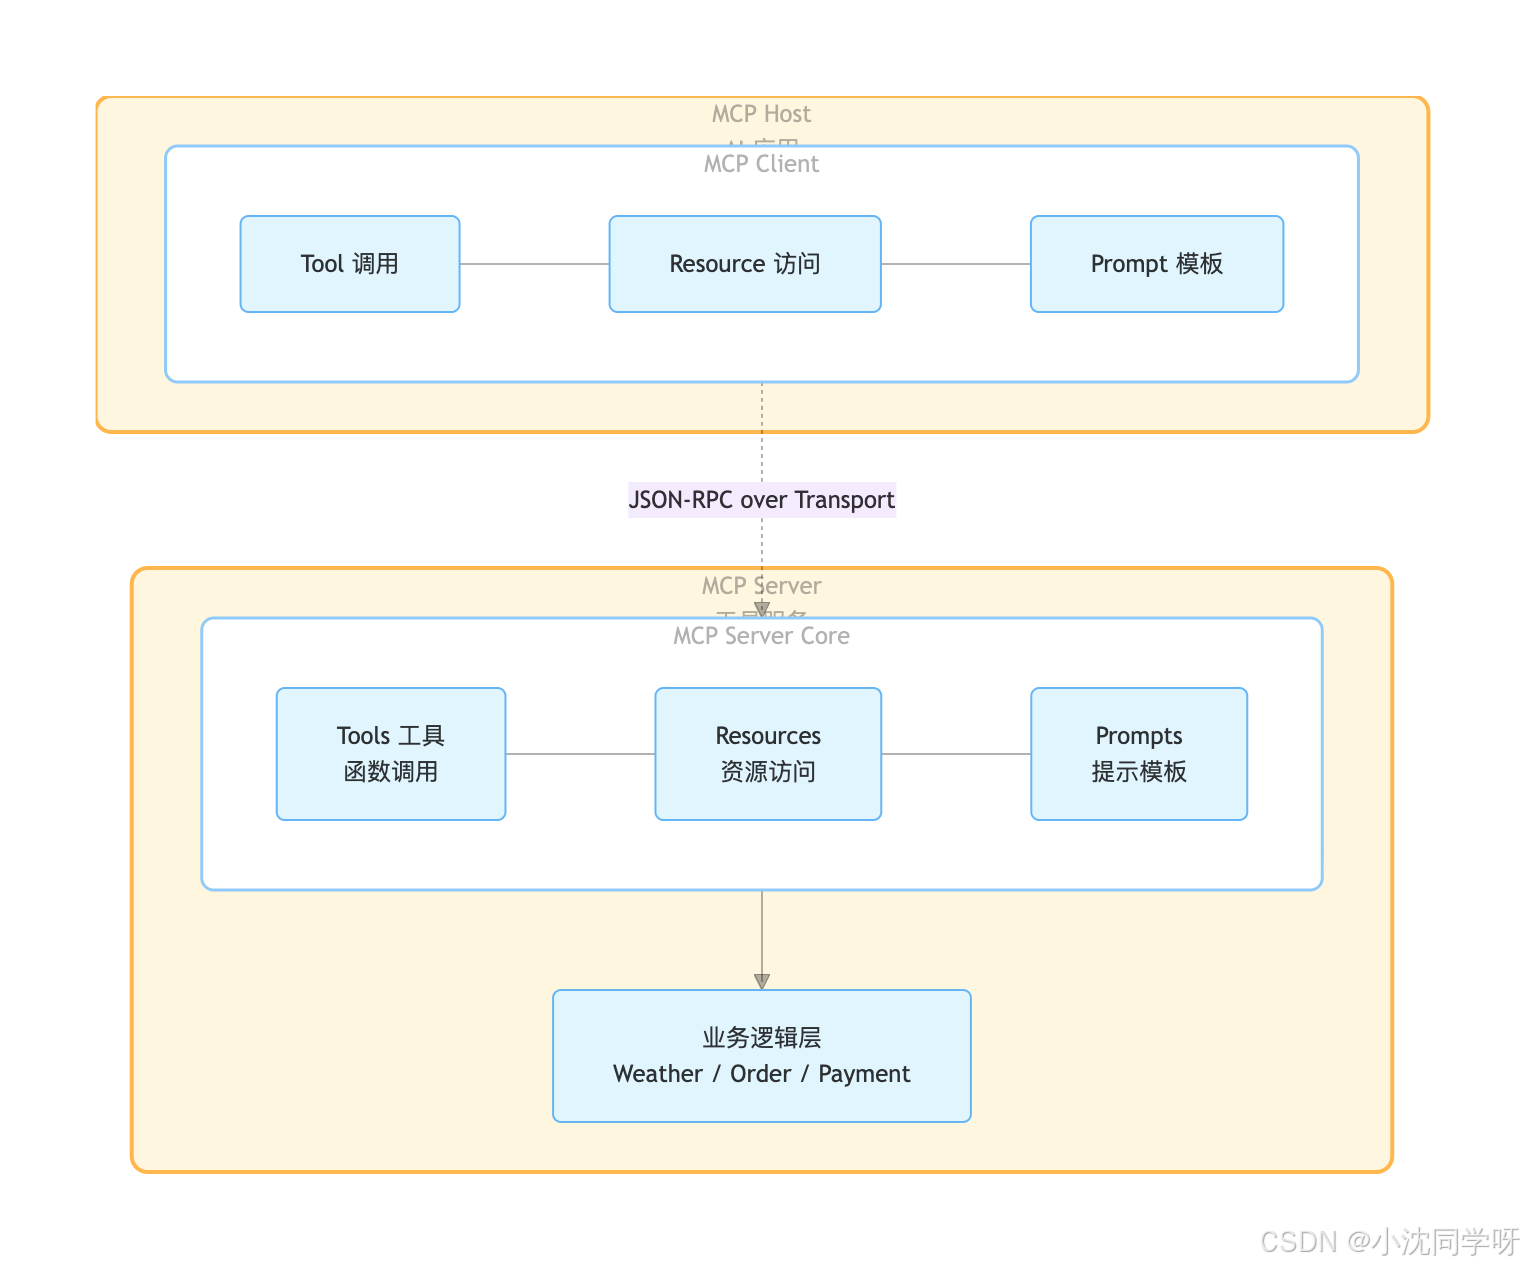
MCP(Model Context Protocol,模型上下文协议)是 Anthropic 主导、多家厂商共同维护的开放协议,定义了 AI 模型与外部工具之间交互的标准方式。你可以把它理解为——给 AI 用的 USB 接口标准:只要工具实现了 MCP 协议,任何支持 MCP 的 AI 客户端都能直接调用,不需要重写适配代码。
2.2 MCP 架构全景
2.3 MCP 传输协议演进
MCP 协议经历了几个重要的传输方式演进:
| 传输方式 | 协议版本 | 通信模式 | 特点 | 现状 |
|---|---|---|---|---|
| STDIO | 基础版本 | 本地进程 | 标准输入输出,简单安全 | 适合本地工具 |
| SSE | 2024-11-05 | 单向推送 | 服务端推送事件,断线无法恢复 | 逐步弃用 |
| Streamable HTTP | 2025-03-26 | 双向通信 | 统一端点,会话管理,断线重连 | 当前推荐 |
| Stateless Streamable HTTP | 2025-06-18 | 无状态请求 | 无会话状态,适合水平扩展 | 云原生推荐 |
我们项目使用的 Spring AI 1.1.5 版本已经全面支持以上所有传输方式。
三、为什么 MCP Server 要转向 Streamable HTTP?
3.1 解决连接不可恢复问题
SSE 的致命缺陷:连接一旦中断,客户端无法从中断点恢复,只能重新建立连接,导致上下文丢失和用户体验下降。
Streamable HTTP 改进:支持会话状态管理,允许客户端在断线后重新连接并恢复之前的会话,保障了通信的连续性。
3.2 降低服务器资源压力
SSE 每个客户端都需要维持一个长期的 SSE 长连接,高并发场景下导致 TCP 连接数激增,服务器资源消耗巨大,且难以横向扩展。
Streamable HTTP 改进:采用按需流式传输,无需为每个客户端维持长连接,连接可复用,显著降低了服务器的负载和资源占用。
3.3 简化架构与提升兼容性
SSE 需要维护 /sse 专用端点,增加了系统复杂性,且部分网络基础设施(如防火墙)可能干扰长期 SSE 连接。
Streamable HTTP 改进:移除了专用端点,所有通信整合到统一端点(如 /mcp),架构更简洁,并且能更好地兼容现有网络基础设施。
3.4 支持更灵活的通信模式
Streamable HTTP 允许服务器在需要时将响应升级为 SSE 流,实现流式传输,同时保留标准 HTTP 通信能力,满足了"既是传统 API 又能流式推送"的混合需求。
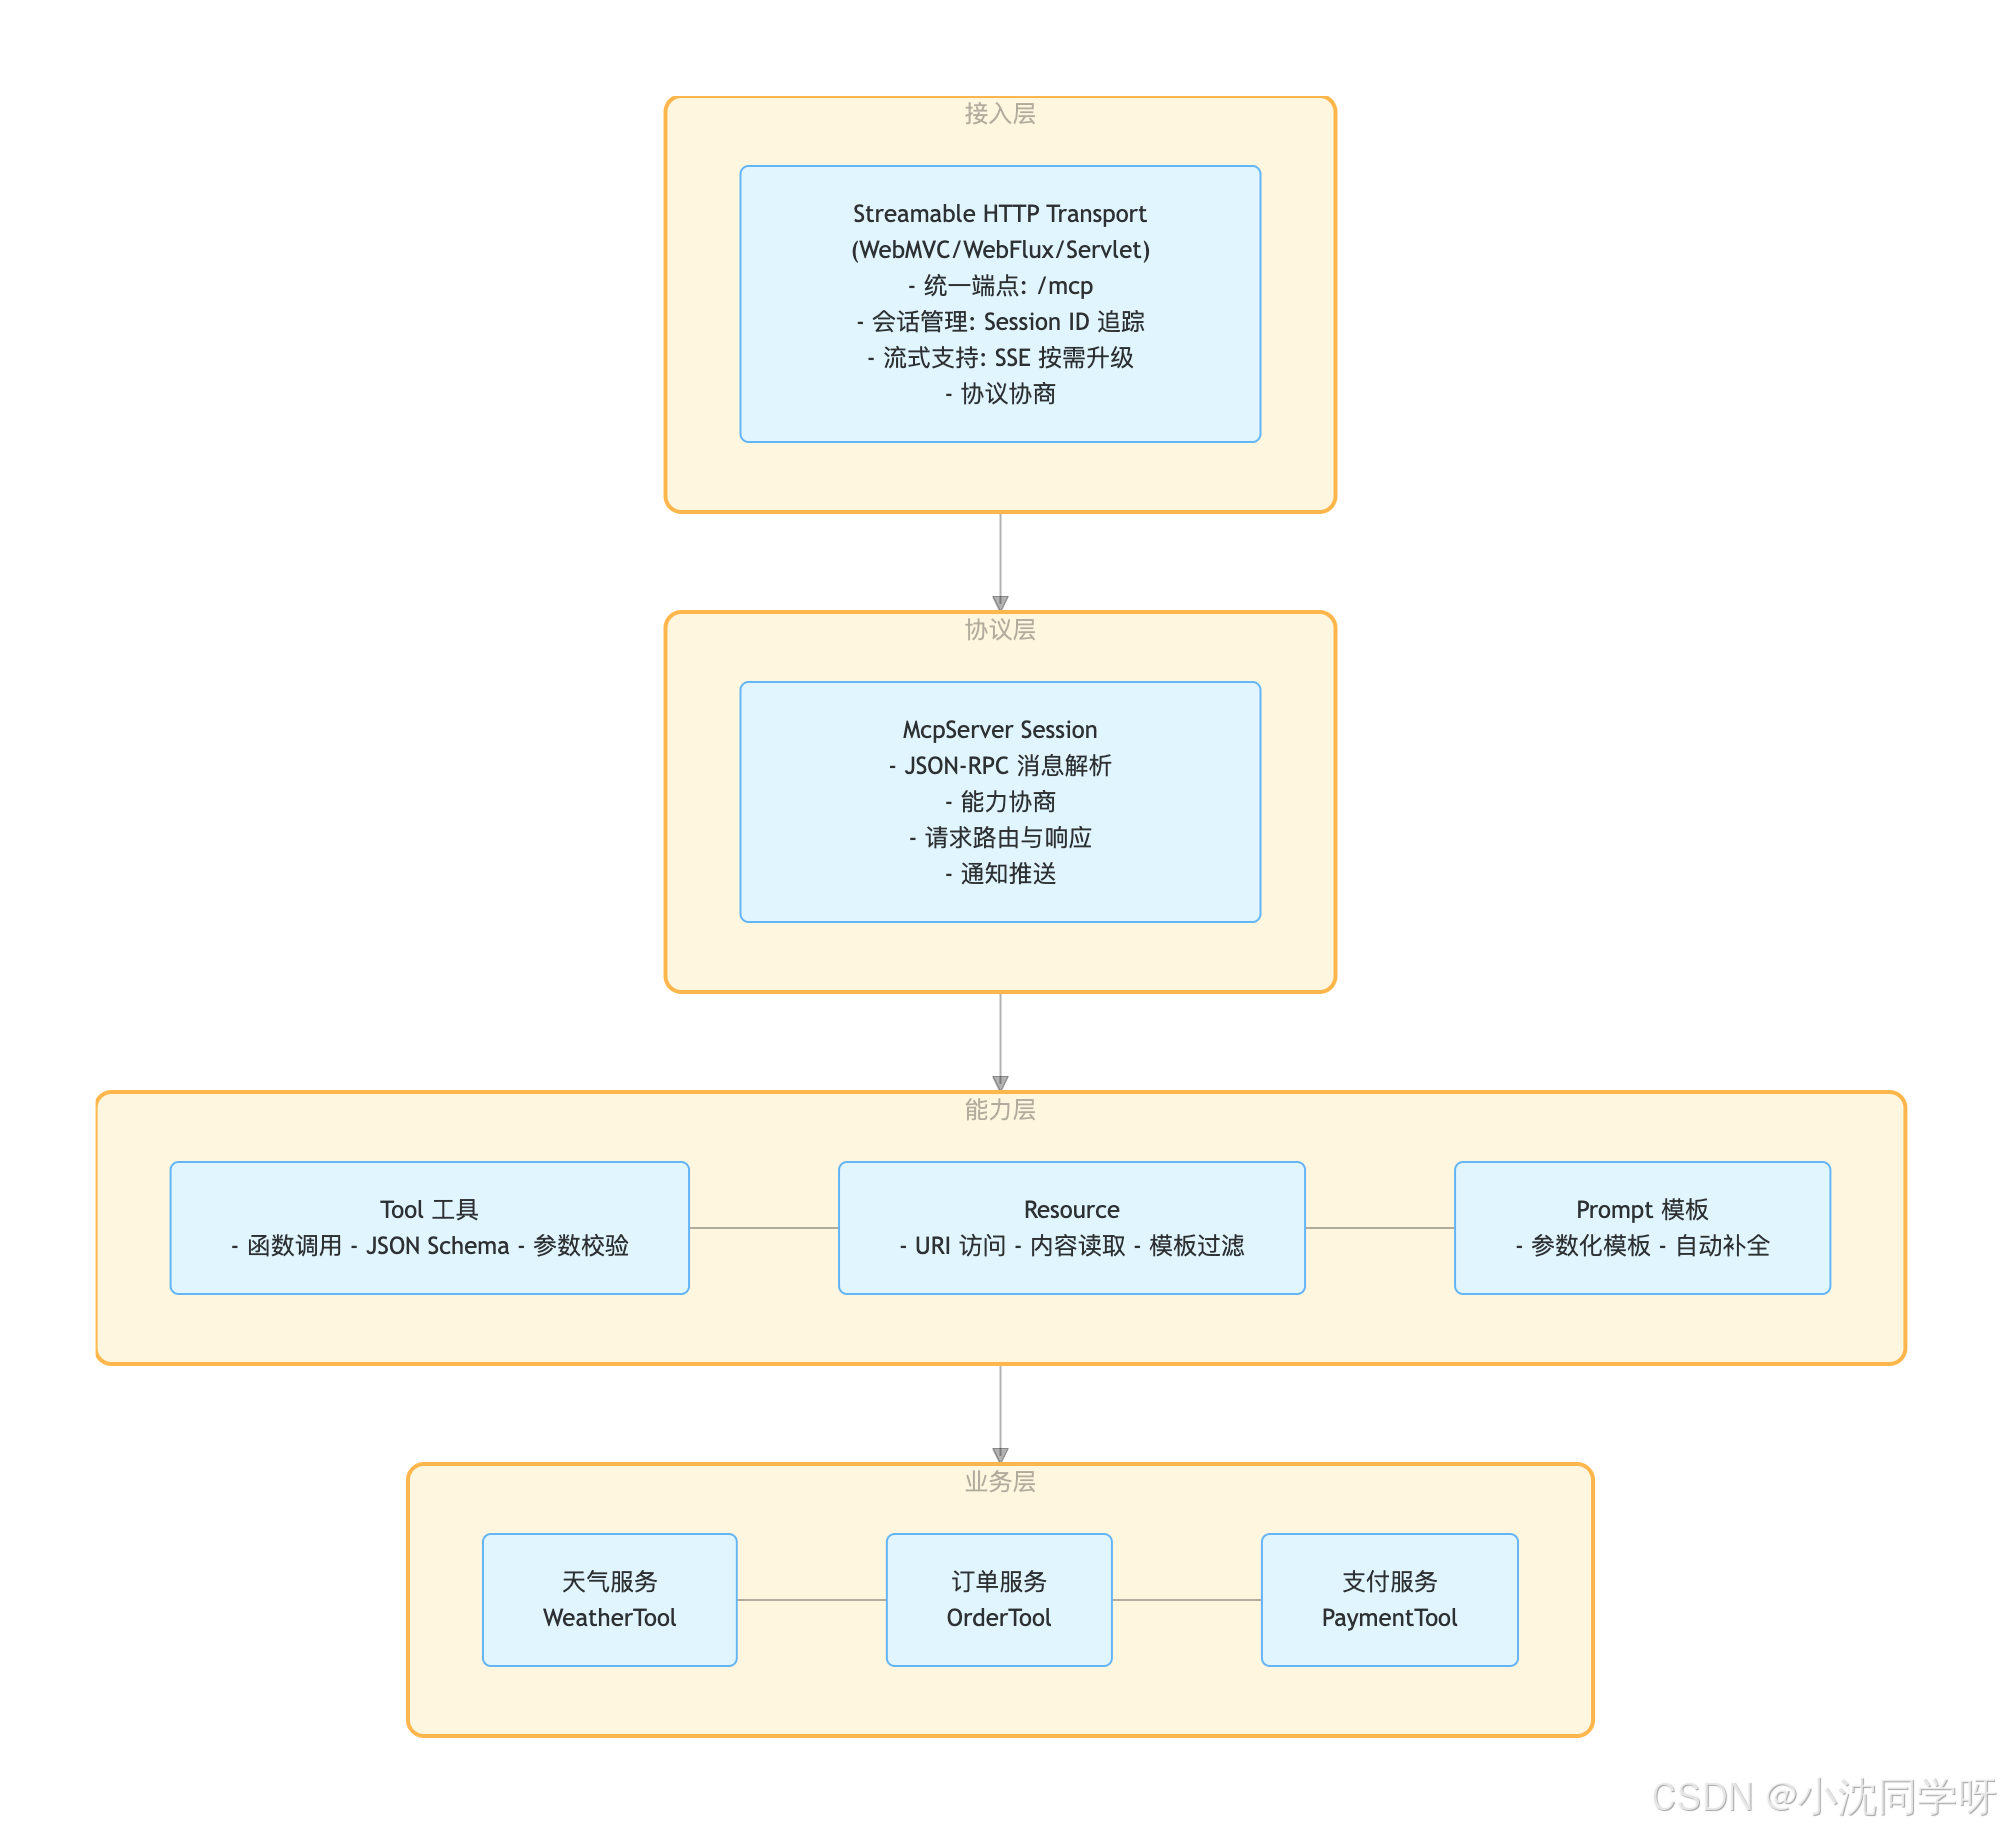
四、MCP Server 技术架构设计
4.1 整体架构分层
4.2 核心组件说明
| 组件 | 职责 | 关键类 |
|---|---|---|
| Transport | 负责底层传输协议实现,处理 HTTP 请求/响应 | McpTransport, StreamableHttpTransport |
| Session | 管理客户端连接会话,维护会话状态 | McpServerSession |
| Server | MCP 服务器核心,处理协议协商、能力注册 | McpSyncServer, McpAsyncServer |
| ToolCallback | 将 Java 方法注册为 MCP 可调用的工具 | MethodToolCallbackProvider |
| Tool | 业务工具实现,通过 @Tool 注解声明 |
自定义业务类 |
4.3 一次工具调用的完整流程
AI Client                              MCP Server
    │                                      │
    │  1. HTTP POST /mcp (initialize)      │
    │─────────────────────────────────────>│
    │  2. 协议版本协商 + 能力声明           │
    │<─────────────────────────────────────│
    │                                      │
    │  3. HTTP POST /mcp (tools/list)      │
    │─────────────────────────────────────>│
    │  4. 返回可用工具列表 + JSON Schema    │
    │<─────────────────────────────────────│
    │                                      │
    │  5. HTTP POST /mcp (tools/call)      │
    │     {name: "getWeather", args: {...}}│
    │─────────────────────────────────────>│
    │                                      │  6. 路由到 WeatherTool.getWeather()
    │                                      │  7. 执行业务逻辑
    │                                      │  8. 返回结构化结果
    │  9. JSON-RPC Response                │
    │<─────────────────────────────────────│
    │                                      │
    │  10. (可选) SSE 流式推送通知          │
    │<─────────────────────────────────────│
4.4 多 MCP Server 部署架构
                    ┌─────────────┐
                    │  API Gateway │
                    │  (负载均衡)   │
                    └──────┬──────┘
                           │
          ┌────────────────┼────────────────┐
          ▼                ▼                ▼
    ┌───────────┐    ┌───────────┐    ┌───────────┐
    │ Weather   │    │  Order    │    │  Payment  │
    │ MCP Server│    │ MCP Server│    │ MCP Server│
    │  :8080    │    │  :8081    │    │  :8082    │
    └───────────┘    └───────────┘    └───────────┘
          │                │                │
          ▼                ▼                ▼
    ┌───────────┐    ┌───────────┐    ┌───────────┐
    │ 天气 API   │    │ 订单 DB    │    │ 支付网关   │
    │ (第三方)   │    │ (MySQL)   │    │ (支付宝)   │
    └───────────┘    └───────────┘    └───────────┘
每个 MCP Server 独立部署、独立扩缩容,通过 Streamable HTTP 协议对外暴露工具。AI 应用通过 MCP Client 连接多个 Server,自动发现并调用所有可用工具。
五、实战:MCP Server 端完整代码
5.1 项目结构
mcp-server/
├── pom.xml
└── src/main/
    ├── java/com/example/mcpserver/
    │   ├── McpServerApplication.java
    │   ├── config/
    │   │   └── McpAuthFilter.java
    │   ├── tool/
    │   │   ├── WeatherTool.java
    │   │   ├── OrderTool.java
    │   │   ├── NotificationTool.java
    │   │   └── DocumentTool.java
    │   └── resource/
    │       └── DocumentResource.java
    └── resources/
        └── application.yml
说明:Spring AI 1.1.5 会自动扫描带有
@McpTool、@McpResource等注解的 Bean 并注册为 MCP 能力,无需额外的配置类。
5.2 依赖配置
<?xml version="1.0" encoding="UTF-8"?>
<project xmlns="http://maven.apache.org/POM/4.0.0"
         xmlns:xsi="http://www.w3.org/2001/XMLSchema-instance"
         xsi:schemaLocation="http://maven.apache.org/POM/4.0.0
         http://maven.apache.org/xsd/maven-4.0.0.xsd">
    <modelVersion>4.0.0</modelVersion>

    <parent>
        <groupId>org.springframework.boot</groupId>
        <artifactId>spring-boot-starter-parent</artifactId>
        <version>3.5.5</version>
    </parent>

    <groupId>com.example</groupId>
    <artifactId>mcp-server-demo</artifactId>
    <version>1.0.0</version>

    <properties>
        <java.version>17</java.version>
        <spring-ai.version>1.1.5</spring-ai.version>
    </properties>

    <dependencyManagement>
        <dependencies>
            <dependency>
                <groupId>org.springframework.ai</groupId>
                <artifactId>spring-ai-bom</artifactId>
                <version>${spring-ai.version}</version>
                <type>pom</type>
                <scope>import</scope>
            </dependency>
        </dependencies>
    </dependencyManagement>

    <dependencies>
        <!-- Web 相关 -->
        <dependency>
            <groupId>org.springframework.boot</groupId>
            <artifactId>spring-boot-starter-web</artifactId>
        </dependency>

        <!-- MCP Server - WebMVC + Streamable HTTP -->
        <dependency>
            <groupId>org.springframework.ai</groupId>
            <artifactId>spring-ai-starter-mcp-server-webmvc</artifactId>
        </dependency>

        <dependency>
            <groupId>org.projectlombok</groupId>
            <artifactId>lombok</artifactId>
            <optional>true</optional>
        </dependency>
    </dependencies>
</project>
5.3 配置文件(application.yml)
server:
  port: 8080

spring:
  ai:
    mcp:
      server:
        name: mini-mcp-server
        version: 1.0.0
        type: sync
        # 使用 Streamable HTTP 协议(2025-03-26 版本)
        protocol: STREAMABLE
        streamable-http:
          mcp-endpoint: /mcp
          keep-alive-interval: 30s

# 日志配置(调试时开启)
logging:
  level:
    io.modelcontextprotocol: debug
5.4 天气查询工具 - WeatherTool.java
package com.example.mcpserver.tool;

import lombok.extern.slf4j.Slf4j;
import org.springaicommunity.mcp.annotation.McpTool;
import org.springaicommunity.mcp.annotation.McpToolParam;
import org.springframework.stereotype.Service;

import java.util.Map;
import java.util.Random;

/**
 * 天气查询 MCP 工具
 * 提供城市天气查询能力,支持温度、湿度、风速等信息
 */
@Service
@Slf4j
public class WeatherTool {

    private static final String[] CONDITIONS = {"晴朗", "多云", "阴天", "小雨", "大雨", "雷雨"};
    private final Random random = new Random();

    @McpTool(description = "根据城市名称获取当前天气信息,包括温度、湿度、天气状况等")
    public Map<String, Object> getWeather(
            @McpToolParam(description = "城市名称,例如:北京、上海、广州") String cityName) {

        log.info("查询城市天气: {}", cityName);

        int temperature = random.nextInt(35) - 5; // -5 ~ 30
        int humidity = random.nextInt(80) + 20;   // 20 ~ 100
        int windSpeed = random.nextInt(30) + 1;   // 1 ~ 30
        String condition = CONDITIONS[random.nextInt(CONDITIONS.length)];

        return Map.of(
                "city", cityName,
                "temperature", temperature + "°C",
                "humidity", humidity + "%",
                "windSpeed", windSpeed + " km/h",
                "condition", condition,
                "advice", getAdvice(condition, temperature)
        );
    }

    private String getAdvice(String condition, int temperature) {
        if (temperature < 0) {
            return "天气寒冷,注意保暖";
        }
        if ("大雨".equals(condition) || "雷雨".equals(condition)) {
            return "有雨,建议携带雨伞";
        }
        return "天气不错,适合外出";
    }
}
5.5 订单查询工具 - OrderTool.java
package com.example.mcpserver.tool;

import lombok.extern.slf4j.Slf4j;
import org.springaicommunity.mcp.annotation.McpTool;
import org.springaicommunity.mcp.annotation.McpToolParam;
import org.springframework.stereotype.Service;

import java.time.LocalDate;
import java.util.HashMap;
import java.util.List;
import java.util.Map;
import java.util.stream.Collectors;

/**
 * 订单查询 MCP 工具
 * 提供订单状态查询和历史订单列表功能
 */
@Service
@Slf4j
public class OrderTool {

    // 模拟订单数据
    private static final Map<String, Order> ORDERS = new HashMap<>();

    static {
        ORDERS.put("ORD-1001", new Order("ORD-1001", "iPhone 16 Pro", "已发货",
                LocalDate.now().plusDays(2), 8999.00));
        ORDERS.put("ORD-1002", new Order("ORD-1002", "MacBook Air M3", "处理中",
                LocalDate.now().plusDays(5), 9499.00));
        ORDERS.put("ORD-1003", new Order("ORD-1003", "AirPods Pro 2", "已完成",
                LocalDate.now().minusDays(3), 1899.00));
    }

    @McpTool(description = "根据订单 ID 查询订单状态和详细信息")
    public Map<String, Object> getOrderStatus(
            @McpToolParam(description = "订单编号,例如:ORD-1001") String orderId) {

        log.info("查询订单状态: {}", orderId);

        Order order = ORDERS.get(orderId);
        if (order == null) {
            return Map.of("error", "订单不存在: " + orderId);
        }

        return Map.of(
                "orderId", order.orderId(),
                "productName", order.productName(),
                "status", order.status(),
                "estimatedDelivery", order.estimatedDelivery().toString(),
                "price", order.price()
        );
    }

    @McpTool(description = "查询用户的所有历史订单列表")
    public List<Map<String, Object>> getOrderHistory(
            @McpToolParam(description = "用户 ID") String userId) {

        log.info("查询用户订单历史: {}", userId);

        return ORDERS.values().stream()
                .map(order -> Map.<String, Object>of(
                        "orderId", order.orderId(),
                        "productName", order.productName(),
                        "status", order.status(),
                        "price", order.price()
                ))
                .collect(Collectors.toList());
    }

    record Order(String orderId, String productName, String status,
                 LocalDate estimatedDelivery, Double price) {}
}
5.6 二次确认工具 - NotificationTool.java
MCP Notification 机制的典型用例:工具执行前需要用户二次确认。
package com.example.mcpserver.tool;

import io.modelcontextprotocol.server.McpSyncServerExchange;
import io.modelcontextprotocol.spec.McpSchema;
import lombok.extern.slf4j.Slf4j;
import org.springaicommunity.mcp.annotation.McpTool;
import org.springaicommunity.mcp.annotation.McpToolParam;
import org.springframework.stereotype.Service;

import java.util.Map;
import java.util.UUID;
import java.util.concurrent.CompletableFuture;
import java.util.concurrent.ConcurrentHashMap;
import java.util.concurrent.TimeUnit;
import java.util.concurrent.TimeoutException;
import java.util.stream.Collectors;

/**
 * 二次确认工具
 * 用于需要用户审批的敏感操作(如删除数据、支付、修改配置等)
 *
 * 使用流程:
 * 1. 调用 executeWithApproval 发起需要审批的操作
 * 2. 系统会通过通知向用户发送确认请求
 * 3. 用户确认后,操作自动执行;用户拒绝或超时,操作取消
 *
 * 注意事项:
 * - 此工具会阻塞等待用户响应,最长等待 5 分钟
 * - 用户需要通过 respondToApproval 工具返回确认结果
 */
@Service
@Slf4j
public class NotificationTool {

    // 存储待确认的请求,key 为 approvalId,value 为等待用户决策的 Future
    private final Map<String, CompletableFuture<String>> pendingApprovals = new ConcurrentHashMap<>();

    /**
     * 执行需要用户审批的敏感操作
     *
     * 调用此工具后,系统会根据操作类型自动生成审批提示信息,并向用户发送确认请求。
     * 用户批准后,操作才会真正执行。
     *
     * 适用场景:
     * - 删除重要数据
     * - 执行支付或转账
     * - 修改系统配置
     * - 其他不可逆或高风险操作
     *
     * @param exchange MCP Server 交换对象,用于发送通知(由框架自动注入)
     * @param operationName 操作名称,用于标识要执行的操作类型,例如:deleteUser、transferFunds、updateConfig
     * @param operationParams 操作参数的 JSON 字符串,包含执行操作所需的具体参数
     * @return 操作执行结果,包括:批准并执行成功、用户拒绝、超时取消、执行异常
     */
    @McpTool(description = "执行需要用户审批的敏感操作。调用后系统会自动生成审批提示并向用户发送确认请求,等待用户批准或拒绝后才继续执行。适用于删除数据、支付、修改配置等高风险操作。")
    public String executeWithApproval(
            McpSyncServerExchange exchange,
            @McpToolParam(description = "操作名称,用于标识操作类型。例如:deleteUser、transferFunds、updateConfig、deleteOrder", required = true) String operationName,
            @McpToolParam(description = "操作参数的 JSON 字符串,包含执行操作所需的具体参数。例如:{\"userId\": 123, \"reason\": \"违规账号\"}", required = true) String operationParams) {

        String approvalId = UUID.randomUUID().toString();
        CompletableFuture<String> future = new CompletableFuture<>();
        pendingApprovals.put(approvalId, future);

        // 根据操作类型自动生成审批提示信息
        String approvalMessage = generateApprovalMessage(operationName, operationParams);

        log.info("发起审批请求,ID: {}, 操作: {}, 提示: {}", approvalId, operationName, approvalMessage);

        // 通过 MCP 通知向用户发送确认请求
        exchange.loggingNotification(McpSchema.LoggingMessageNotification.builder()
            .level(McpSchema.LoggingLevel.WARNING)
            .data("APPROVAL_REQUEST:" + approvalId + ":" + approvalMessage)
            .build());

        try {
            // 阻塞等待用户审批(最长等待 5 分钟)
            String userDecision = future.get(5, TimeUnit.MINUTES);

            if ("APPROVED".equals(userDecision)) {
                log.info("用户已批准,执行操作: {}", operationName);
                return executeOperation(operationName, operationParams);
            } else {
                log.info("用户已拒绝操作: {}", operationName);
                return "操作已被用户拒绝。拒绝原因:用户认为此操作不需要或不应该执行。";
            }
        } catch (TimeoutException e) {
            log.warn("审批超时,取消操作: {}", operationName);
            return "操作已取消。原因:用户在 5 分钟内未响应审批请求。";
        } catch (Exception e) {
            log.error("审批过程出错: {}", operationName, e);
            return "操作执行失败:审批过程出现异常," + e.getMessage();
        } finally {
            pendingApprovals.remove(approvalId);
        }
    }

    /**
     * 用户响应审批请求
     *
     * 当用户收到审批通知后,调用此工具返回审批结果。
     *
     * @param approvalId 审批请求 ID,从审批通知中获取
     * @param decision 用户的审批决策,只能是以下两个值之一:
     *                 - "APPROVED":批准执行操作
     *                 - "REJECTED":拒绝执行操作
     * @return 响应结果
     */
    @McpTool(description = "用户响应审批请求。当收到审批通知后,调用此工具返回审批结果。decision 参数只能是 'APPROVED'(批准)或 'REJECTED'(拒绝)。")
    public String respondToApproval(
            @McpToolParam(description = "审批请求 ID,从审批通知数据中获取。格式如:APPROVAL_REQUEST:xxxxxxxx-xxxx-xxxx-xxxx-xxxxxxxxxxxx:提示信息") String approvalId,
            @McpToolParam(description = "审批决策,只能是 'APPROVED'(批准执行)或 'REJECTED'(拒绝执行)") String decision) {

        CompletableFuture<String> future = pendingApprovals.get(approvalId);
        if (future == null) {
            return "审批请求不存在或已过期。请检查 approvalId 是否正确,或该审批是否已超时。";
        }

        future.complete(decision);
        log.info("用户已响应审批请求,ID: {}, 决策: {}", approvalId, decision);
        return "审批已提交,操作将继续执行或取消。";
    }

    /**
     * 查询当前所有待审批的请求
     *
     * @return 待审批请求列表,如果没有待审批的请求则返回提示信息
     */
    @McpTool(description = "查询当前所有待审批的请求列表。返回每个审批请求的 ID。")
    public String listPendingApprovals() {
        if (pendingApprovals.isEmpty()) {
            return "当前没有待审批的请求。";
        }

        String approvalList = pendingApprovals.keySet().stream()
            .map(id -> "- 审批ID: " + id)
            .collect(Collectors.joining("\n"));

        return "当前待审批请求:\n" + approvalList;
    }

    /**
     * 根据操作类型自动生成审批提示信息
     *
     * @param operationName 操作名称
     * @param operationParams 操作参数
     * @return 自动生成的审批提示信息
     */
    private String generateApprovalMessage(String operationName, String operationParams) {
        if (operationName == null) {
            return "确定要执行此操作吗?此操作需要审批。操作参数: " + (operationParams != null ? operationParams : "无");
        }

        switch (operationName) {
            case "deleteUser":
            case "deleteData":
                return "确定要执行删除操作吗?此操作不可恢复。操作参数: " + (operationParams != null ? operationParams : "无");
            case "transferFunds":
            case "executePayment":
                return "确定要执行支付操作吗?涉及资金变动。操作参数: " + (operationParams != null ? operationParams : "无");
            case "updateConfig":
                return "确定要修改系统配置吗?可能影响系统运行。操作参数: " + (operationParams != null ? operationParams : "无");
            default:
                return "确定要执行操作 [" + operationName + "] 吗?此操作需要审批。操作参数: " + (operationParams != null ? operationParams : "无");
        }
    }

    /**
     * 执行实际操作
     *
     * @param operationName 操作名称
     * @param operationParams 操作参数
     * @return 执行结果
     */
    private String executeOperation(String operationName, String operationParams) {
        // 这里模拟实际操作,实际项目中应该根据 operationName 调用对应的业务逻辑
        switch (operationName) {
            case "deleteUser":
            case "deleteData":
                return "数据删除成功。操作参数: " + operationParams;
            case "transferFunds":
            case "executePayment":
                return "支付执行成功。操作参数: " + operationParams;
            case "updateConfig":
                return "配置更新成功。操作参数: " + operationParams;
            default:
                return "操作执行成功。操作名称: " + operationName + ", 操作参数: " + operationParams;
        }
    }
}
工作流程图:
┌─────────────┐         ┌─────────────┐         ┌─────────────┐
│   Agent     │         │ MCP Server  │         │   用户       │
└──────┬──────┘         └──────┬──────┘         └──────┬──────┘
       │                       │                       │
       │  tools/call           │                       │
       │  (删除数据)            │                       │
       ├──────────────────────►│                       │
       │                       │                       │
       │                       │  notifications/message │
       │                       │  (确认提示)             │
       │                       ├──────────────────────►│
       │                       │                       │
       │                       │     用户点击确认        │
       │                       │◄──────────────────────┤
       │                       │                       │
       │  tools/call           │                       │
       │  (respondToConfirmation)                      │
       ├──────────────────────►│                       │
       │                       │                       │
       │  继续执行并返回结果     │                       │
       │◄──────────────────────┤                       │
       │                       │                       │
测试示例:
# 1. 调用需要审批的操作(operationName 和 operationParams 为必填参数)
curl -X POST http://localhost:8080/mcp \
  -H "Authorization: Bearer your-api-key" \
  -H "Mcp-Session-Id: xxxxxxxx-xxxx-xxxx-xxxx-xxxxxxxxxxxx" \
  -H "Content-Type: application/json" \
  -d '{
    "jsonrpc":"2.0",
    "method":"tools/call",
    "params":{
      "name":"executeWithApproval",
      "arguments":{
        "operationName":"deleteUser",
        "operationParams":"{\"userId\": 123, \"reason\": \"违规账号\"}"
      }
    },
    "id":3
  }'

# 2. Server 会通过 Notification 发送审批请求(在 SSE 流中)
# 通知数据格式:APPROVAL_REQUEST:xxxxxxxx-xxxx-xxxx-xxxx-xxxxxxxxxxxx:确定要执行删除操作吗?此操作不可恢复。操作参数: {"userId": 123, "reason": "违规账号"}
# 客户端收到后展示审批 UI

# 3. 用户审批后,调用 respondToApproval 返回审批结果
curl -X POST http://localhost:8080/mcp \
  -H "Authorization: Bearer your-api-key" \
  -H "Mcp-Session-Id: xxxxxxxx-xxxx-xxxx-xxxx-xxxxxxxxxxxx" \
  -H "Content-Type: application/json" \
  -d '{
    "jsonrpc":"2.0",
    "method":"tools/call",
    "params":{
      "name":"respondToApproval",
      "arguments":{
        "approvalId":"xxxxxxxx-xxxx-xxxx-xxxx-xxxxxxxxxxxx",
        "decision":"APPROVED"
      }
    },
    "id":4
  }'

# 4. 返回操作结果
# {"content":[{"type":"text","text":"数据删除成功。操作参数: {\"userId\": 123, \"reason\": \"违规账号\"}"}]}
5.7 文档查询工具 - DocumentTool.java
package com.example.mcpserver.tool;

import lombok.extern.slf4j.Slf4j;
import org.springaicommunity.mcp.annotation.McpTool;
import org.springaicommunity.mcp.annotation.McpToolParam;
import org.springframework.stereotype.Service;

/**
 * 文档查询 MCP 工具
 * 提供城市天气文档查询能力
 */
@Service
@Slf4j
public class DocumentTool {

    @McpTool(description = "获取城市天气文档,包含气候特征、最佳旅游季节等信息")
    public String getWeatherDocument(
            @McpToolParam(description = "城市名称,例如:北京、上海") String city) {

        log.info("查询城市天气文档: {}", city);

        return "# " + city + " 天气文档\n\n" +
               "## 气候特征\n" +
               city + "属于亚热带季风气候...\n\n" +
               "## 最佳旅游季节\n" +
               "春秋两季是最佳旅游时间...";
    }
}
5.8 文档资源 - DocumentResource.java
package com.example.mcpserver.resource;

import org.springaicommunity.mcp.annotation.McpResource;
import org.springaicommunity.mcp.annotation.McpArg;
import org.springframework.stereotype.Service;

/**
 * 天气文档资源
 * 通过 URI 模板访问城市天气文档
 */
@Service
public class DocumentResource {

    @McpResource(
        uri = "docs://weather/{city}",
        description = "获取城市天气文档,包含气候特征、最佳旅游季节等信息"
    )
    public String getWeatherDocument(
            @McpArg(description = "城市名称,例如:北京、上海") String city) {
        return "# " + city + " 天气文档\n\n" +
               "## 气候特征\n" +
               city + "属于亚热带季风气候...\n\n" +
               "## 最佳旅游季节\n" +
               "春秋两季是最佳旅游时间...";
    }
}
5.9 启动类
package com.example.mcpserver;

import org.springframework.boot.SpringApplication;
import org.springframework.boot.autoconfigure.SpringBootApplication;

/**
 * MCP Server 启动类
 * Spring AI 会自动扫描带有 @McpTool、@McpResource 等注解的 Bean 并注册为 MCP 能力
 */
@SpringBootApplication
public class McpServerApplication {

    public static void main(String[] args) {
        SpringApplication.run(McpServerApplication.class, args);
    }
}
六、企业级安全配置
在实际项目中,MCP Server 通常需要集成到已有的安全框架中。以下是我们项目中的安全配置实践:
6.1 权限发现机制:如何让调用方知道需要权限?
MCP 协议在 initialize 阶段 就支持能力协商(Capabilities Negotiation),Server 可以在此阶段声明自己需要哪些认证方式。调用方通过解析 Server 返回的能力信息,就能知道需要提供什么凭证。
Server 端返回的能力声明示例:
{
  "jsonrpc": "2.0",
  "id": 1,
  "result": {
    "protocolVersion": "2025-03-26",
    "capabilities": {
      "tools": {
        "listChanged": true
      },
      "authentication": {
        "schemes": ["api-key", "bearer-token"],
        "required": true,
        "description": "此 MCP Server 需要认证,请在请求头中提供 X-API-Key 或 Authorization: Bearer <token>"
      }
    },
    "serverInfo": {
      "name": "mini-mcp-server",
      "version": "1.0.0"
    }
  }
}
调用方如何感知:
- 协议层面:Client 在 initialize 阶段读取
capabilities.authentication字段,知道需要提供认证信息 - HTTP 层面:如果未提供认证信息,Server 返回
401 Unauthorized+WWW-Authenticate响应头 - 文档层面:在
capabilities.authentication.description中提供人类可读的说明
实际项目中的做法:
package com.example.mcpserver.config;

import jakarta.servlet.FilterChain;
import jakarta.servlet.ServletException;
import jakarta.servlet.http.HttpServletRequest;
import jakarta.servlet.http.HttpServletResponse;
import org.springframework.stereotype.Component;
import org.springframework.web.filter.OncePerRequestFilter;

import java.io.IOException;

/**
 * MCP 请求鉴权拦截器
 * 验证 API Key 或 Token,并在未认证时返回标准 WWW-Authenticate 响应头
 */
@Component
public class McpAuthFilter extends OncePerRequestFilter {

    @Override
    protected void doFilterInternal(HttpServletRequest request,
                                     HttpServletResponse response,
                                     FilterChain filterChain)
            throws ServletException, IOException {

        // 仅对 MCP 端点进行鉴权
        if (request.getRequestURI().startsWith("/mcp")) {
            String apiKey = request.getHeader("X-API-Key");
            String bearerToken = request.getHeader("Authorization");

            if (!isAuthenticated(apiKey, bearerToken)) {
                // 返回 401 并告知调用方需要的认证方式
                response.setStatus(HttpServletResponse.SC_UNAUTHORIZED);
                // WWW-Authenticate 响应头:标准 HTTP 认证发现机制
                response.setHeader("WWW-Authenticate",
                    "ApiKey realm=\"MCP Server\", header=\"X-API-Key\"");
                response.setHeader("X-Auth-Required", "true");
                response.setHeader("X-Auth-Schemes", "api-key, bearer-token");
                response.setHeader("X-Auth-Description",
                    "此 MCP Server 需要认证,请在请求头中提供 X-API-Key 或 Authorization: Bearer <token>");
                response.setContentType("application/json");
                response.setCharacterEncoding("UTF-8");
                response.getWriter().write(
                    "{\"error\": \"Unauthorized\", \"message\": \"需要提供 API Key 或 Bearer Token\"}"
                );
                return;
            }
        }

        filterChain.doFilter(request, response);
    }

    private boolean isAuthenticated(String apiKey, String bearerToken) {
        if (apiKey != null && isValidApiKey(apiKey)) {
            return true;
        }
        if (bearerToken != null && bearerToken.startsWith("Bearer ") &&
            isValidBearerToken(bearerToken.substring(7))) {
            return true;
        }
        return false;
    }

    private boolean isValidApiKey(String apiKey) {
        // 实际项目中应该从数据库或配置中心验证
        return "your-secret-api-key".equals(apiKey);
    }

    private boolean isValidBearerToken(String token) {
        // 验证 JWT 或 OAuth2 Token
        return "valid-bearer-token".equals(token);
    }
}
调用方收到 401 后的处理示例:
# 第一次请求(未带认证信息)
curl -X POST http://localhost:8080/mcp \
  -H "Content-Type: application/json" \
  -d '{"jsonrpc": "2.0", "id": 1, "method": "initialize", ...}'

# 响应:
# HTTP/1.1 401 Unauthorized
# WWW-Authenticate: ApiKey realm="MCP Server", header="X-API-Key"
# X-Auth-Required: true
# X-Auth-Schemes: api-key, bearer-token
# X-Auth-Description: 此 MCP Server 需要认证...

# 第二次请求(带上 API Key)
curl -X POST http://localhost:8080/mcp \
  -H "Content-Type: application/json" \
  -H "X-API-Key: your-secret-api-key" \
  -d '{"jsonrpc": "2.0", "id": 1, "method": "initialize", ...}'

# 响应:200 OK,正常初始化
6.2 Spring Security 集成
package com.example.mcpserver.config;

import org.springframework.ai.mcp.server.common.autoconfigure.properties.McpServerSseProperties;
import org.springframework.ai.mcp.server.common.autoconfigure.properties.McpServerStreamableHttpProperties;
import org.springframework.context.annotation.Bean;
import org.springframework.context.annotation.Configuration;
import org.springframework.security.config.annotation.web.builders.HttpSecurity;
import org.springframework.security.config.annotation.web.configurers.AuthorizeHttpRequestsConfigurer;

import java.util.Optional;

/**
 * MCP Server 安全配置
 * 将 MCP 端点配置为公开访问(由自定义拦截器处理鉴权)
 */
@Configuration
public class SecurityConfiguration {

    private Optional<McpServerSseProperties> mcpServerSseProperties;
    private Optional<McpServerStreamableHttpProperties> mcpServerStreamableHttpProperties;

    @Bean
    public AuthorizeRequestsCustomizer authorizeRequestsCustomizer() {
        return new AuthorizeRequestsCustomizer() {
            @Override
            public void customize(
                AuthorizeHttpRequestsConfigurer<HttpSecurity>
                    .AuthorizationManagerRequestMatcherRegistry registry) {

                // SSE 端点公开访问(兼容旧版本客户端,由 McpAuthFilter 处理鉴权)
                mcpServerSseProperties.ifPresent(properties -> {
                    registry.requestMatchers(properties.getSseEndpoint()).permitAll();
                    registry.requestMatchers(properties.getSseMessageEndpoint()).permitAll();
                });

                // Streamable HTTP 端点公开访问(由 McpAuthFilter 处理鉴权)
                mcpServerStreamableHttpProperties.ifPresent(properties ->
                    registry.requestMatchers(properties.getMcpEndpoint()).permitAll());
            }
        };
    }
}
七、MCP 注解参考
Spring AI 1.1.5 通过 spring-ai-mcp-annotations 提供了一套声明式注解,让开发者用简单的 Java 类即可实现 MCP 能力。所有注解位于 org.springaicommunity.mcp.annotation 包中。
7.1 服务端注解
| 注解 | 用途 | 参数注解 |
|---|---|---|
@McpTool |
声明可被 AI 模型调用的工具 | @McpToolParam |
@McpResource |
声明可通过 URI 访问的资源 | @McpArg |
@McpPrompt |
声明可参数化的提示模板 | @McpArg |
@McpComplete |
声明参数自动补全功能 | — |
@McpTool 示例:
@McpTool(description = "根据城市名称获取当前天气信息", name = "get_weather")
public Map<String, Object> getWeather(
    @McpToolParam(description = "城市名称,例如:北京、上海", required = true) String cityName) {
    // ...
}
@McpResource 示例:
@McpResource(uri = "docs://weather/{city}", description = "获取城市天气文档")
public String getWeatherDocument(
    @McpArg(description = "城市名称,例如:北京") String city) {
    // ...
}
7.2 客户端注解
| 注解 | 用途 |
|---|---|
@McpLogging |
处理服务端日志通知 |
@McpSampling |
处理 LLM 采样请求 |
@McpElicitation |
处理模型补全所需的用户输入 |
@McpProgress |
处理服务端进度通知 |
@McpToolListChanged |
处理工具列表变更事件 |
@McpResourceListChanged |
处理资源列表变更事件 |
@McpPromptListChanged |
处理提示模板列表变更事件 |
7.3 特殊参数类型
| 类型 | 用途 |
|---|---|
McpSyncRequestContext |
同步操作的统一上下文,提供日志、进度、采样、 elicitation 等能力 |
McpAsyncRequestContext |
异步操作的统一上下文(Mono 返回类型) |
McpTransportContext |
无状态操作的轻量级传输上下文 |
McpMeta |
访问 MCP 请求的元数据 |
八、测试验证
8.1 启动服务
# 编译项目
mvn clean package -DskipTests

# 启动服务
java -jar target/mcp-server-1.0.0.jar
启动后访问 http://localhost:8080/mcp 可以看到 MCP Server 已就绪。
8.2 使用 curl 测试
Streamable HTTP 协议需要先建立会话获取 Session-ID,后续请求必须携带该 Session-ID。
# 第一步:初始化连接(建立会话)
curl -v -X POST http://localhost:8080/mcp \
  -H "Content-Type: application/json" \
  -H "Accept: text/event-stream, application/json" \
  -H "X-API-Key: demo-api-key" \
  -d '{
    "jsonrpc": "2.0",
    "id": 1,
    "method": "initialize",
    "params": {
      "protocolVersion": "2025-03-26",
      "capabilities": {},
      "clientInfo": {"name": "test-client", "version": "1.0.0"}
    }
  }'

# 响应头中会包含 MCP-Session-Id:
# Mcp-Session-Id: 71650396-4d56-4062-bd6a-0640c5892817

# 第二步:列出可用工具(必须携带 Session-ID)
curl -X POST http://localhost:8080/mcp \
  -H "Content-Type: application/json" \
  -H "Accept: text/event-stream, application/json" \
  -H "X-API-Key: demo-api-key" \
  -H "MCP-Session-Id: 71650396-4d56-4062-bd6a-0640c5892817" \
  -d '{
    "jsonrpc": "2.0",
    "id": 2,
    "method": "tools/list",
    "params": {}
  }'

# 第三步:调用天气工具(必须携带 MCP-Session-Id)
curl -X POST http://localhost:8080/mcp \
  -H "Content-Type: application/json" \
  -H "Accept: text/event-stream, application/json" \
  -H "X-API-Key: demo-api-key" \
  -H "MCP-Session-Id: 71650396-4d56-4062-bd6a-0640c5892817" \
  -d '{
    "jsonrpc": "2.0",
    "id": 3,
    "method": "tools/call",
    "params": {
      "name": "getWeather",
      "arguments": {"cityName": "北京"}
    }
  }'
注意事项:
- 第一次请求(initialize)会建立会话并返回
MCP-Session-Id - 后续所有请求都必须携带
MCP-Session-Id请求头,否则会报Session ID missing错误 - 如果 Session 过期或无效,需要重新发起 initialize 请求建立新会话
8.3 使用 Cherry Studio 等客户端测试
在 Cherry Studio 等支持 MCP 的客户端中配置:
名称: mini-mcp-server
URL: http://localhost:8080/mcp
传输方式: Streamable HTTP
然后直接对话:“北京今天天气怎么样?”,客户端会自动调用 MCP 工具获取天气信息。
九、部署方案
9.1 Docker 部署
FROM eclipse-temurin:17-jre-alpine

WORKDIR /app

COPY target/mcp-server-1.0.0.jar app.jar

EXPOSE 8080

ENTRYPOINT ["java", "-jar", "app.jar"]
# 构建镜像
docker build -t mcp-server:1.0.0 .

# 运行容器
docker run -d -p 8080:8080 --name mcp-server mcp-server:1.0.0
9.2 Kubernetes 部署
apiVersion: apps/v1
kind: Deployment
metadata:
  name: mcp-server
spec:
  replicas: 3
  selector:
    matchLabels:
      app: mcp-server
  template:
    metadata:
      labels:
        app: mcp-server
    spec:
      containers:
      - name: mcp-server
        image: mcp-server:1.0.0
        ports:
        - containerPort: 8080
        env:
        - name: SPRING_AI_MCP_SERVER_NAME
          value: "mcp-server-cluster"
---
apiVersion: v1
kind: Service
metadata:
  name: mcp-server
spec:
  selector:
    app: mcp-server
  ports:
  - port: 80
    targetPort: 8080
  type: ClusterIP
十、总结
通过本文的实战,我们完成了:
- MCP Server 架构设计:从传输层到业务层的完整分层架构
- Streamable HTTP 协议实战:使用最新的 2025-03-26 版本协议
- 完整可运行代码:天气查询 + 订单查询工具
- 企业级安全配置:Spring Security 集成 + 自定义鉴权
- 部署方案:Docker + Kubernetes 部署实践
关键要点回顾
| 要点 | 说明 |
|---|---|
| 协议选择 | 优先使用 Streamable HTTP(2025-03-26),支持断线重连 |
| 依赖版本 | Spring AI 1.1.5,使用 spring-ai-bom 统一管理版本 |
| Server 依赖 | spring-ai-starter-mcp-server-webmvc + spring-ai-mcp-annotations |
| 协议配置 | protocol: STREAMABLE |
| 工具注册 | @McpTool + @McpToolParam 注解自动注册,无需手动配置 |
| 资源注册 | @McpResource + @McpArg 注解自动注册 |
| 端点路径 | 默认 /mcp,可通过 streamable-http.mcp-endpoint 自定义 |
适用场景建议
- 企业内部工具集成:将现有业务系统封装为 MCP Server,对外标准化暴露
- 微服务架构:每个工具独立部署为 MCP Server,通过 Streamable HTTP 协议通信
- 多团队协作:工具提供方和 AI 应用方解耦,各自独立迭代
感谢各位看官的一路陪伴,大家都再接再厉!
下一篇预告:《Spring AI MCP Client 实战:用 MiniMax 模型打造智能 AI Agent》,敬请期待!

AtomGit 是由开放原子开源基金会联合 CSDN 等生态伙伴共同推出的新一代开源与人工智能协作平台。平台坚持“开放、中立、公益”的理念,把代码托管、模型共享、数据集托管、智能体开发体验和算力服务整合在一起,为开发者提供从开发、训练到部署的一站式体验。
更多推荐

 2
2 0
0- 0


 已为社区贡献6条内容

所有评论(0)