论新手跟着百万博主学习开发番茄钟应用全过程
🍅 零基础学 ArkUI05:手把手教你开发一个番茄钟应用
📱 应用场景
番茄工作法(Pomodoro Technique)是时间管理界的经典工具:专注 25 分钟 → 休息 5 分钟 → 每 4 个循环后长休息 15 分钟。我们要开发的番茄钟 App 会实现:
- 倒计时核心功能(25 分钟工作 / 5 分钟休息)
- 开始 / 暂停 / 重置控制
- 工作与休息状态的自动切换
- 美观的圆形进度指示器
- 状态提示和番茄计数
⚙️ 运行环境要求
| 项目 | 版本要求 |
|---|---|
| 操作系统 | Windows 10/11、macOS 13+ 或 Ubuntu 22.04+ |
| DevEco Studio | 5.0.3.800 及以上 |
| HarmonyOS SDK | API 12(HarmonyOS 5.0.0)及以上 |
| 应用模型 | Stage 模型 |
| 开发语言 | ArkTS(TypeScript 的超集) |
环境配置截图示意

🛠️ 实战:从零搭建番茄钟
Step 1:理解 ArkUI 的「声明式思维」
在传统开发中,我们这样写 UI:
// 伪代码 — 命令式
Button btn = new Button("开始");
btn.setOnClickListener(() -> { /* 处理点击 */ });
container.add(btn);
在 ArkUI 中完全不同 — 你只需要 描述 UI 应该长什么样,框架自己去更新:
// ArkTS — 声明式
Button('开始')
  .onClick(() => { /* 处理点击 */ })
核心思想:UI 是状态(State)的函数 — 状态变了,UI 自动重新渲染。
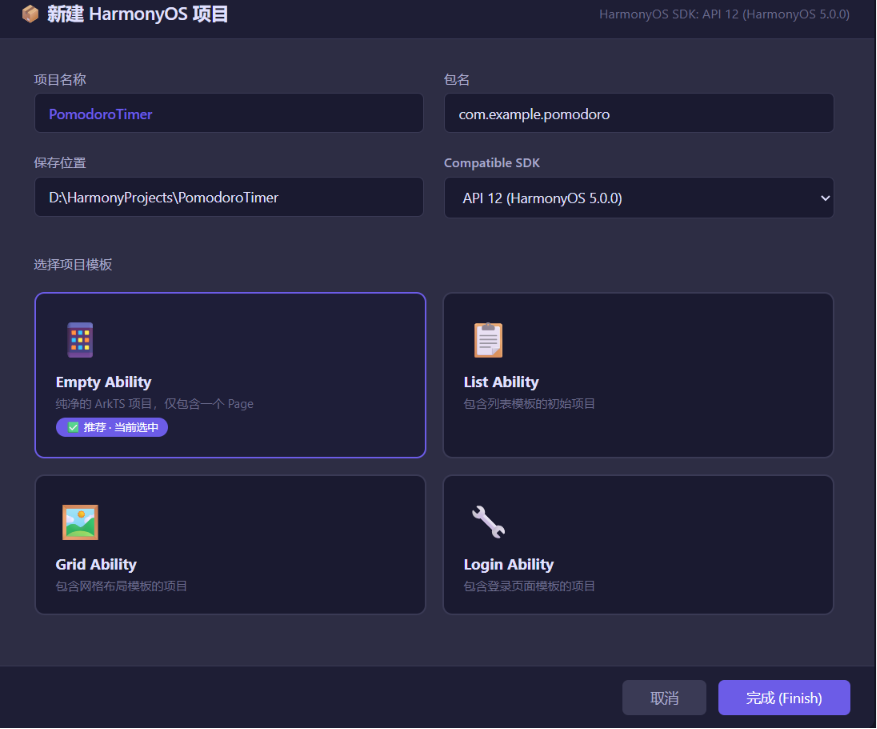
Step 2:项目结构与入口文件
我们的项目结构如下:
com.example.pomodoro/
├── entry/src/main/ets/
│   ├── entryability/
│   │   └── EntryAbility.ts      // Ability 生命周期
│   └── pages/
│       └── Index.ets            // 主页面 — 番茄钟就在这里!
打开 Index.ets,删掉默认代码,我们来写番茄钟。
Step 3:定义番茄钟的状态
在 ArkUI 中,用 @State 装饰器标记「可观察状态」:
// Index.ets — 番茄钟核心代码
@Entry
@Component
struct PomodoroTimer {
  // ========== 核心状态 ==========
  @State private remainingSeconds: number = 25 * 60;  // 剩余秒数(初始25分钟)
  @State private isRunning: boolean = false;            // 是否正在运行
  @State private isWorkPhase: boolean = true;           // true=工作 / false=休息
  @State private tomatoCount: number = 0;               // 完成的番茄数
  @State private phaseText: string = '🍅 专注工作中';

  // ========== 常量配置 ==========
  private readonly WORK_TIME: number = 25 * 60;         // 25分钟
  private readonly BREAK_TIME: number = 5 * 60;         // 5分钟
  private readonly LONG_BREAK_TIME: number = 15 * 60;   // 15分钟
  private timerId: number = -1;                         // 定时器ID

  // ========== 计算属性 ==========
  get progress(): number {
    // 当前进度百分比(用于圆形进度条)
    const total = this.isWorkPhase ? this.WORK_TIME : this.BREAK_TIME;
    return 1 - this.remainingSeconds / total;
  }
📌 @State 详解 — 新手最容易懵的地方
| 概念 | 一句话解释 |
|---|---|
@State |
告诉 ArkUI:“这个变量变了,UI 要重新画” |
private |
状态仅在当前组件内部使用 |
remainingSeconds: number = 25*60 |
TypeScript 的类型声明 + 初始值 |
避坑指南①: @State 必须是 简单类型或可以直接比较的对象。不要放复杂嵌套对象 — 想更新嵌套字段时 UI 不会刷新,你得用 @ObjectLink 或深拷贝。
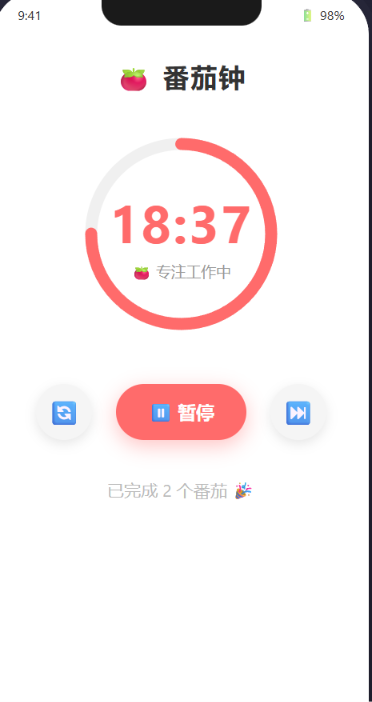
Step 4:构建 UI 层 — 圆形进度 + 控制按钮
ArkUI 的 UI 是 嵌套的组件树,就像搭积木:
  // ========== UI 构建 ==========
  build() {
    Column({ space: 20 }) {
      // 🏷️ 标题区域
      Text('🍅 番茄钟')
        .fontSize(28)
        .fontWeight(FontWeight.Bold)
        .margin({ top: 30 })

      // 📊 圆形进度 + 倒计时
      Stack() {
        // 背景圆环
        Circle()
          .width(220)
          .height(220)
          .stroke('#E8E8E8')
          .strokeWidth(12)
          .fill(Color.Transparent)

        // 前景进度弧
        Circle()
          .width(220)
          .height(220)
          .stroke(this.isWorkPhase ? '#FF6B6B' : '#4ECDC4')
          .strokeWidth(12)
          .fill(Color.Transparent)
          .strokeLineCap(LineCapStyle.Round)  // 圆角端点
          .progress({ value: this.progress, total: 1 })

        // 中间倒计时数字 + 状态文字
        Column({ space: 8 }) {
          Text(this.formatTime(this.remainingSeconds))
            .fontSize(56)
            .fontWeight(FontWeight.Bold)
            .fontColor(this.isWorkPhase ? '#FF6B6B' : '#4ECDC4')

          Text(this.phaseText)
            .fontSize(16)
            .fontColor('#666666')
        }
      }
      .width(240)
      .height(240)

      // 🎮 控制按钮
      Row({ space: 20 }) {
        // 重置按钮
        Button() {
          Image($r('app.media.ic_reset'))  // 需要用图片资源
            .width(24).height(24)
        }
        .width(56).height(56)
        .backgroundColor('#F0F0F0')
        .borderRadius(28)
        .onClick(() => this.resetTimer())

        // 开始/暂停按钮(核心交互)
        Button() {
          Text(this.isRunning ? '⏸️ 暂停' : '▶️ 开始')
            .fontSize(20)
            .fontColor(Color.White)
        }
        .width(130).height(56)
        .backgroundColor(this.isRunning ? '#FFA726' : '#FF6B6B')
        .borderRadius(28)
        .onClick(() => this.toggleTimer())

        // 跳过按钮
        Button() {
          Image($r('app.media.ic_skip'))
            .width(24).height(24)
        }
        .width(56).height(56)
        .backgroundColor('#F0F0F0')
        .borderRadius(28)
        .onClick(() => this.skipPhase())
      }

      // 📋 番茄计数
      Text(`已完成 ${this.tomatoCount} 个番茄 🎉`)
        .fontSize(18)
        .fontColor('#999999')
        .margin({ top: 20 })
    }
    .width('100%')
    .height('100%')
    .padding(20)
  }
📌 布局原理解析
| 组件 | 作用 |
|---|---|
Column |
垂直排列 — 像 HTML 的 flex-direction: column |
Row |
水平排列 — 像 flex-direction: row |
Stack |
层叠排列 — 子组件重叠,像 position: absolute |
.space(20) |
子组件之间的间距 |
.width('100%') |
撑满父容器宽度 |
避坑指南②: Stack 中的子组件默认 水平居中 + 垂直居中。如果你想让某个子组件靠边,用 .align()。
Step 5:核心逻辑 — 倒计时 + 状态切换
  // ========== 核心方法 ==========

  // 格式化时间:秒 → "25:00"
  formatTime(totalSeconds: number): string {
    const min = Math.floor(totalSeconds / 60);
    const sec = totalSeconds % 60;
    return `${String(min).padStart(2, '0')}:${String(sec).padStart(2, '0')}`;
  }

  // 切换 开始/暂停
  toggleTimer(): void {
    if (this.isRunning) {
      // ⏸️ 暂停:清除定时器
      clearInterval(this.timerId);
      this.isRunning = false;
    } else {
      // ▶️ 开始:启动定时器,每秒减1
      this.isRunning = true;
      this.timerId = setInterval(() => {
        if (this.remainingSeconds <= 1) {
          // ⏰ 时间到!
          this.onTimerComplete();
        } else {
          // 正常倒计时
          this.remainingSeconds--;
        }
      }, 1000);
    }
  }

  // ⏰ 当前阶段结束
  onTimerComplete(): void {
    // 停止定时器
    clearInterval(this.timerId);
    this.isRunning = false;

    if (this.isWorkPhase) {
      // 工作结束 → 进入休息
      this.tomatoCount++;
      this.isWorkPhase = false;
      this.remainingSeconds = (this.tomatoCount % 4 === 0)
        ? this.LONG_BREAK_TIME    // 每4个番茄,长休息15分钟
        : this.BREAK_TIME;        // 否则短休息5分钟
      this.phaseText = '☕ 休息一下';
    } else {
      // 休息结束 → 进入工作
      this.isWorkPhase = true;
      this.remainingSeconds = this.WORK_TIME;
      this.phaseText = '🍅 专注工作中';
    }
  }

  // 🔄 重置计时器
  resetTimer(): void {
    clearInterval(this.timerId);
    this.isRunning = false;
    this.isWorkPhase = true;
    this.remainingSeconds = this.WORK_TIME;
    this.phaseText = '🍅 专注工作中';
  }

  // ⏭️ 跳过当前阶段
  skipPhase(): void {
    clearInterval(this.timerId);
    this.isRunning = false;
    this.onTimerComplete();  // 复用「时间到」的处理逻辑
  }
Step 6:完整代码汇总
完整的 Index.ets 代码:
@Entry
@Component
struct PomodoroTimer {
  @State private remainingSeconds: number = 25 * 60;
  @State private isRunning: boolean = false;
  @State private isWorkPhase: boolean = true;
  @State private tomatoCount: number = 0;
  @State private phaseText: string = '🍅 专注工作中';

  private readonly WORK_TIME: number = 25 * 60;
  private readonly BREAK_TIME: number = 5 * 60;
  private readonly LONG_BREAK_TIME: number = 15 * 60;
  private timerId: number = -1;

  get progress(): number {
    const total = this.isWorkPhase ? this.WORK_TIME : this.BREAK_TIME;
    return 1 - this.remainingSeconds / total;
  }

  aboutToDisappear(): void {
    clearInterval(this.timerId);
  }

  build() {
    Column({ space: 20 }) {
      Text('🍅 番茄钟')
        .fontSize(28)
        .fontWeight(FontWeight.Bold)
        .margin({ top: 30 })

      Stack() {
        Circle()
          .width(220).height(220)
          .stroke('#E8E8E8').strokeWidth(12)
          .fill(Color.Transparent)

        Circle()
          .width(220).height(220)
          .stroke(this.isWorkPhase ? '#FF6B6B' : '#4ECDC4')
          .strokeWidth(12).fill(Color.Transparent)
          .strokeLineCap(LineCapStyle.Round)
          .progress({ value: this.progress, total: 1 })

        Column({ space: 8 }) {
          Text(this.formatTime(this.remainingSeconds))
            .fontSize(56).fontWeight(FontWeight.Bold)
            .fontColor(this.isWorkPhase ? '#FF6B6B' : '#4ECDC4')

          Text(this.phaseText)
            .fontSize(16).fontColor('#666666')
        }
      }
      .width(240).height(240)

      Row({ space: 20 }) {
        Button() { Text('🔄').fontSize(24) }
          .width(56).height(56)
          .backgroundColor('#F0F0F0')
          .borderRadius(28)
          .onClick(() => this.resetTimer())

        Button() {
          Text(this.isRunning ? '⏸️ 暂停' : '▶️ 开始')
            .fontSize(20).fontColor(Color.White)
        }
        .width(130).height(56)
        .backgroundColor(this.isRunning ? '#FFA726' : '#FF6B6B')
        .borderRadius(28)
        .onClick(() => this.toggleTimer())

        Button() { Text('⏭️').fontSize(24) }
          .width(56).height(56)
          .backgroundColor('#F0F0F0')
          .borderRadius(28)
          .onClick(() => this.skipPhase())
      }

      Text(`已完成 ${this.tomatoCount} 个番茄 🎉`)
        .fontSize(18).fontColor('#999999')
        .margin({ top: 20 })
    }
    .width('100%').height('100%')
    .padding(20)
  }

  formatTime(totalSeconds: number): string {
    const min = Math.floor(totalSeconds / 60);
    const sec = totalSeconds % 60;
    return `${String(min).padStart(2, '0')}:${String(sec).padStart(2, '0')}`;
  }

  toggleTimer(): void {
    if (this.isRunning) {
      clearInterval(this.timerId);
      this.isRunning = false;
    } else {
      this.isRunning = true;
      this.timerId = setInterval(() => {
        if (this.remainingSeconds <= 1) {
          this.onTimerComplete();
        } else {
          this.remainingSeconds--;
        }
      }, 1000);
    }
  }

  onTimerComplete(): void {
    clearInterval(this.timerId);
    this.isRunning = false;
    if (this.isWorkPhase) {
      this.tomatoCount++;
      this.isWorkPhase = false;
      this.remainingSeconds = (this.tomatoCount % 4 === 0)
        ? this.LONG_BREAK_TIME
        : this.BREAK_TIME;
      this.phaseText = '☕ 休息一下';
    } else {
      this.isWorkPhase = true;
      this.remainingSeconds = this.WORK_TIME;
      this.phaseText = '🍅 专注工作中';
    }
  }

  resetTimer(): void {
    clearInterval(this.timerId);
    this.isRunning = false;
    this.isWorkPhase = true;
    this.remainingSeconds = this.WORK_TIME;
    this.phaseText = '🍅 专注工作中';
  }

  skipPhase(): void {
    clearInterval(this.timerId);
    this.isRunning = false;
    this.onTimerComplete();
  }
}
🚨 避坑指南(新手必看)
❌ 坑1:定时器不释放 → 应用崩溃
// ❌ 错误:页面销毁时定时器还在跑
private timerId = setInterval(() => { /* ... */ }, 1000);

// ✅ 正确:在 aboutToDisappear 生命周期中清理
aboutToDisappear(): void {
  clearInterval(this.timerId);
}
aboutToDisappear 是 ArkUI 组件销毁前的钩子 — 相当于 Android 的 onDestroy。
❌ 坑2:setInterval 精度问题
setInterval 的 1000ms 并不精确!如果用户在后台挂起应用,恢复后可能看到跳跃。生产环境建议用 @ohos.util.Timer 或系统时间差来计算。
// 更精确的方案:记录开始时间,计算差值
private startTimestamp: number = 0;

toggleTimer(): void {
  if (!this.isRunning) {
    this.startTimestamp = Date.now();
    this.timerId = setInterval(() => {
      const elapsed = Math.floor((Date.now() - this.startTimestamp) / 1000);
      this.remainingSeconds = this.WORK_TIME - elapsed;
    }, 200); // 用 200ms 间隔更平滑
  }
}
❌ 坑3:@State 与 get 的循环依赖
不要在 @State 变量的 getter 中修改其他 @State 变量!这会触发 无限渲染循环。
💡 最佳实践
- 常量提取:工作/休息时间定义为
readonly常量,不要硬编码在业务逻辑中。 - 单一职责:
toggleTimer()只做「切换」这件事,onTimerComplete()只做「阶段完成」的处理 — 不要在按钮点击回调里写一大坨逻辑。 - 命名规范:布尔变量用
is前缀(isRunning,isWorkPhase),方法用动宾结构(resetTimer,skipPhase)。 - 使用 getter:
progress用get定义而不是每次都调用函数 — ArkUI 会自动追踪依赖,更高效。 - 资源引用:如果用图标资源,存放在
resources/base/media/目录中,用$r('app.media.xxx')引用。
📚 本章小结
通过番茄钟项目,你学会了:
| 知识点 | 掌握程度 |
|---|---|
| ✅ ArkUI 声明式语法(build 函数) | ⭐⭐⭐ |
| ✅ @State 状态管理 | ⭐⭐⭐⭐⭐ |
| ✅ Column / Row / Stack 布局 | ⭐⭐⭐⭐ |
| ✅ Circle 组件 + progress 属性 | ⭐⭐⭐ |
| ✅ setInterval 定时器 + 生命周期 | ⭐⭐⭐⭐ |
| ✅ 条件渲染(三元表达式) | ⭐⭐⭐⭐⭐ |
🔗 参考资源
- 官方文档:HarmonyOS 应用开发文档
- 开发者社区:华为开发者论坛
- 欢迎加入开源鸿蒙跨平台社区:https://openharmonycrossplatform.csdn.net/

AtomGit 是由开放原子开源基金会联合 CSDN 等生态伙伴共同推出的新一代开源与人工智能协作平台。平台坚持“开放、中立、公益”的理念,把代码托管、模型共享、数据集托管、智能体开发体验和算力服务整合在一起,为开发者提供从开发、训练到部署的一站式体验。
更多推荐
 6
6 0
0- 0


 已为社区贡献6条内容

所有评论(0)