抓住 AI 人工智能的风口之第 4 章 —— SpringAI Alibaba(SAA)阿里云百炼平台 DashScope 开发电商智能客服项目
1、导语
本篇博客基于上一篇已经开发好的 SpringAI 电商客服系统的基础上继续研究阿里云百炼平台如何开发 AI 智能应用,上一篇博客地址:
https://blog.csdn.net/BiandanLoveyou/article/details/161004907
上一篇博客主要讲解使用本地部署大模型的方式,本章讲解调用云端大模型的方式。本地部署大模型最大的好处是数据安全不外泄,可进行私有化部署,缺点是需要算力服务器,对硬件要求较高。使用云端大模型最大的好处是大模型可以使用最新、更强大、思考能力更强的模型,缺点是数据存放依赖云端服务器以及 Token 费用较高。
2、本篇博客代码地址
本篇博客讲解的是使用阿里云百炼平台开发的 AI 智能体电商购物系统,代码仓库地址:
https://gitee.com/biandanLoveyou/customer-service/tree/alibaba-dashscope/
3、获取阿里云百炼平台 API Key
3.1 注册成为阿里云百炼平台用户
官网地址:https://bailian.console.aliyun.com/ 自行注册成为百炼平台用户。
官方 API 文档地址:https://help.aliyun.com/zh/model-studio/qwen-api-reference/
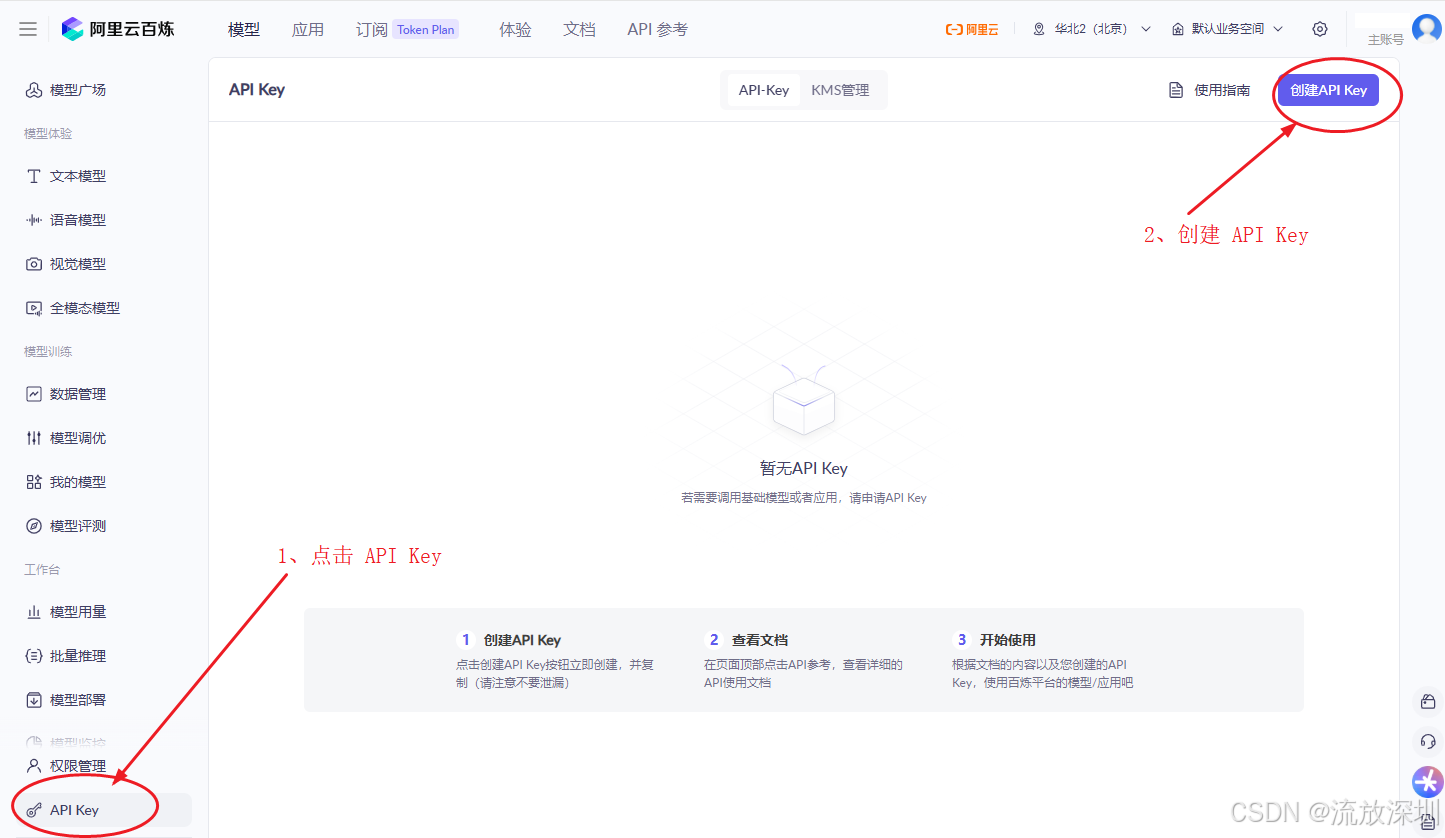
3.2 创建和获取 API Key
在控制台左边菜单找到【API Key】,创建 API Key,如图:

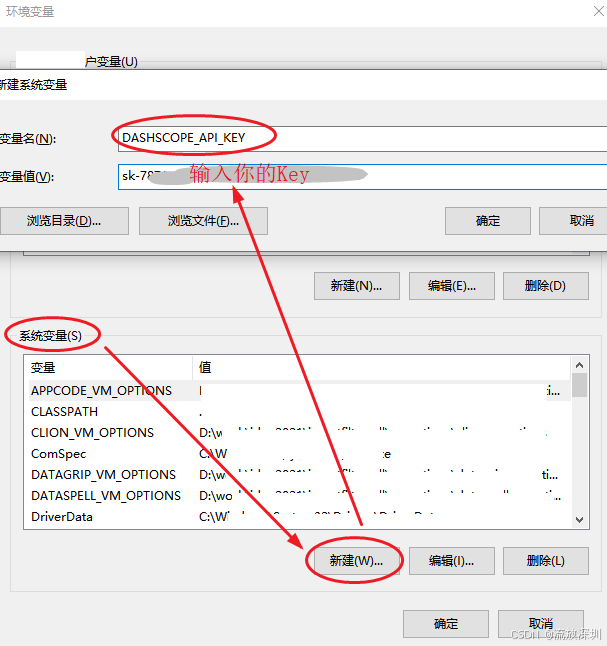
3.3 将 API Key 设置到电脑环境变量
在使用SpringAI Alibaba 时,在构建 DashScopeApi 对象时会获取 API Key,官方建议把 API Key 设置到电脑环境变量中,官方建议文档地址:https://help.aliyun.com/zh/model-studio/configure-api-key-through-environment-variables
🔒 为什么要用环境变量?
| 方案 | 安全性 | 灵活性 | 推荐度 |
|---|---|---|---|
| 硬编码在代码中 | ❌ 极差(会泄露到Git) | ❌ 差 | 不推荐 |
| 写在 application.yml | ⚠️ 一般(仍可能提交) | ⚠️ 一般 | 开发测试可用 |
| 环境变量 | ✅ 安全(不进代码库) | ✅ 好(不同环境不同值) | 强烈推荐 |
| 配置中心(如Nacos) | ✅ 最安全 | ✅ 最好 | 生产环境推荐 |
System.getenv("DASHSCOPE_API_KEY")✅ 读取本地电脑的操作系统环境变量这是保护敏感信息(如API密钥)的最佳实践
避免了将密钥提交到Git仓库的风险
方便在不同环境(开发/测试/生产)使用不同的密钥
3.4 重启 IDEA
设置完 API Key 到电脑环境变量后,需要重启 IDEA。否则会无法读取到 API Key,根本原因在于:环境变量是在进程启动时继承的,而不是实时读取的。
操作系统启动
    └── 系统环境变量(永久设置)
         └── IDEA进程启动(继承系统环境变量)
              └── Java程序进程(继承IDEA的环境变量)
每个进程在启动的那一刻,会从父进程中复制一份环境变量的快照
之后修改系统环境变量,不会影响任何已经运行的进程
只有新启动的进程才会获取到最新的环境变量
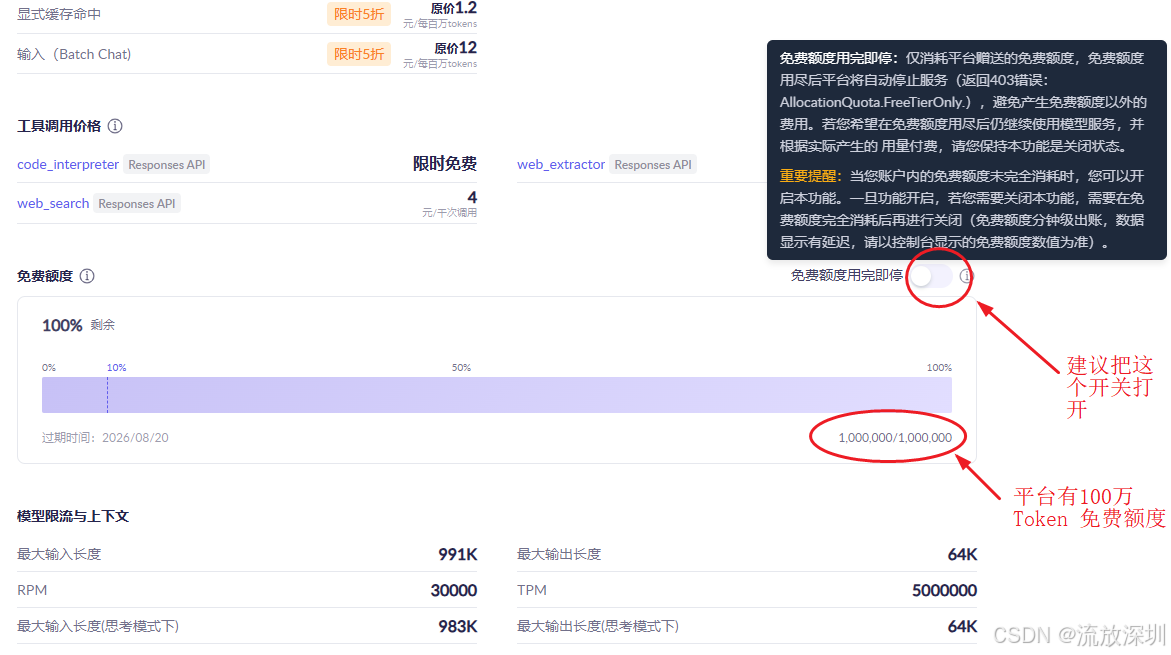
3.5 百炼平台提供100万Token免费调用额度
百炼平台提供100万免费的 Token 额度调用,建议把【免费额度用完即停】这个开关打开。
4、阿里云上搭建知识库
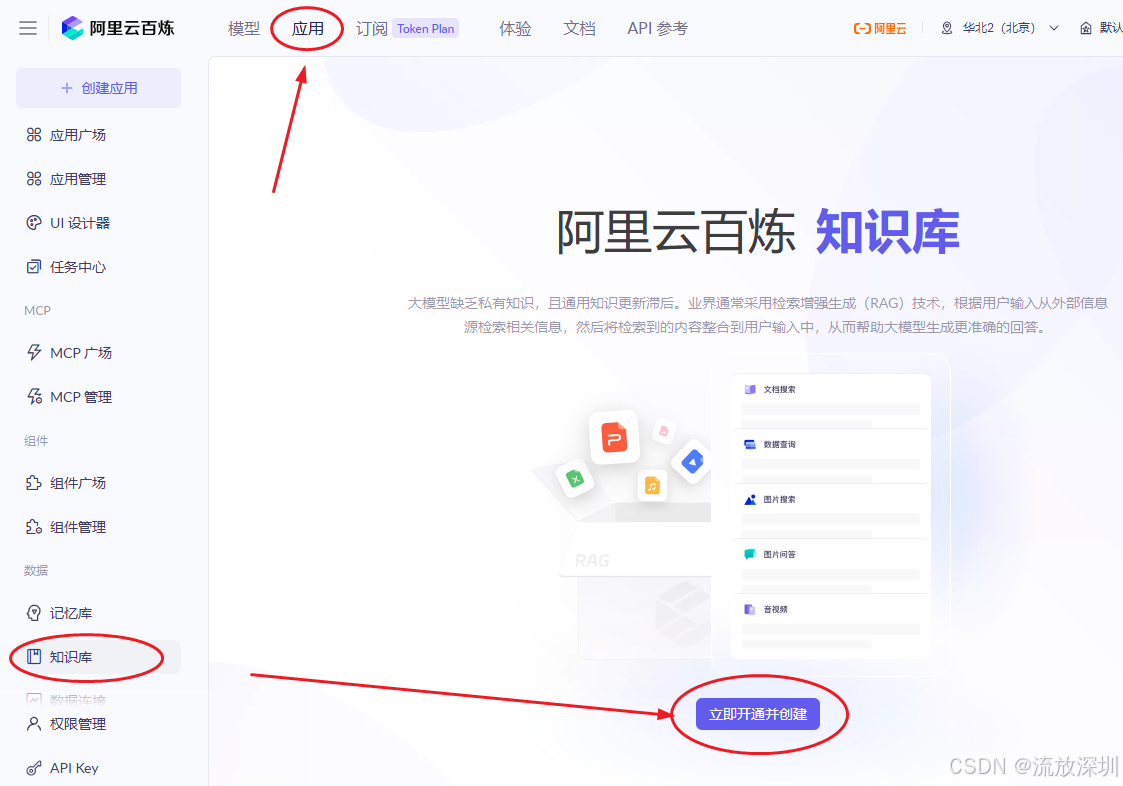
4.1 知识库管理
在百炼平台【应用】-【知识库】可以管理我们的知识库。大模型缺乏私有知识,且通用知识更新滞后。业界通常采用检索增强生成(RAG)技术,根据用户输入从外部信息源检索相关信息,然后将检索到的内容整合到用户输入中,从而帮助大模型生成更准确的回答。
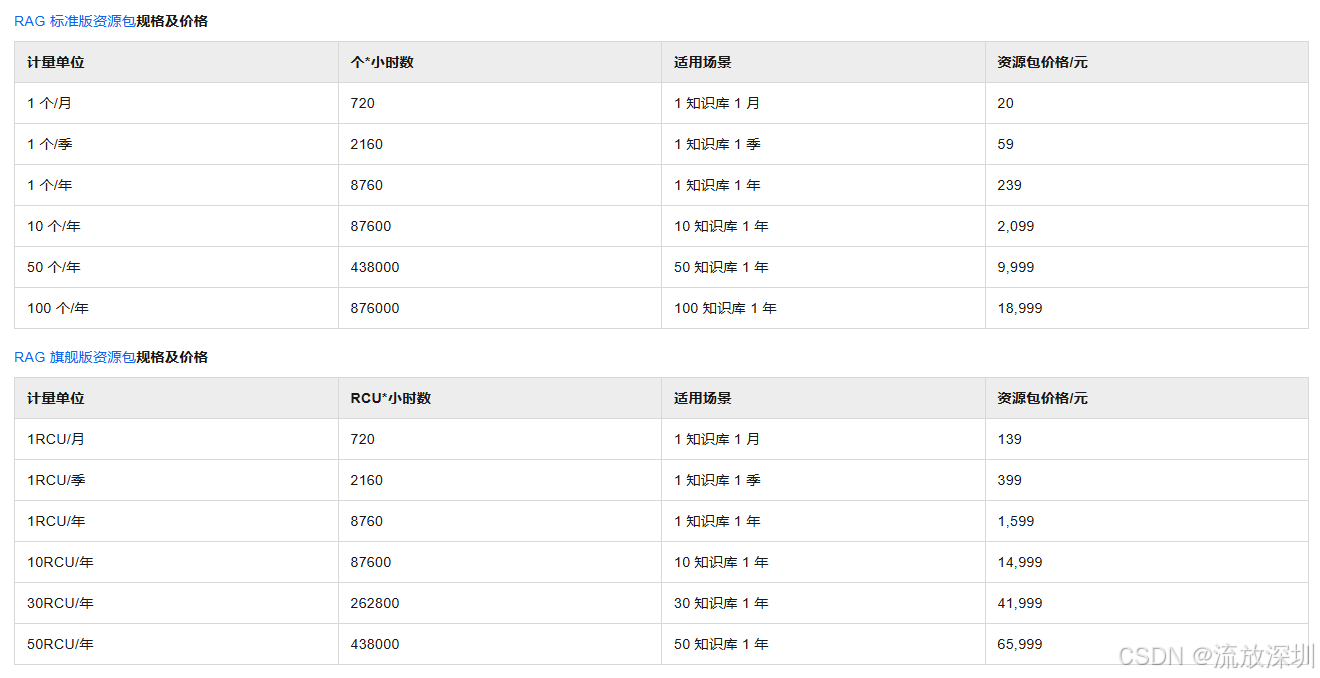
阿里云百炼知识库服务自 2026 年 1 月 4 日起正式开始计费。
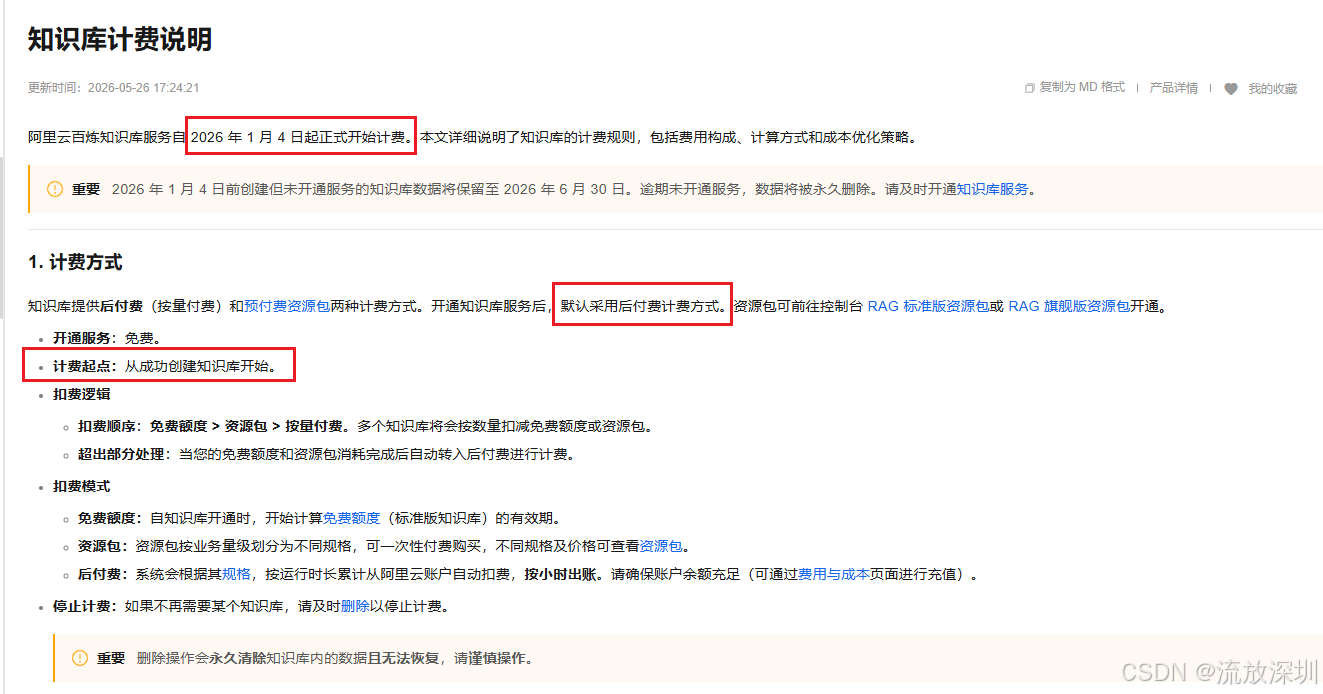
已经开通付费权限的同学可以在评论区聊聊怎么使用阿里云的知识库,这里直接选择跳过该内容,不使用 RAG 技术。
5、调整代码
5.1 pom.xml 依赖修改
把原来依赖 Spring AI 和 Ollama 的依赖全部删除,新增 spring-ai-alibaba-starter-dashscope:
<?xml version="1.0" encoding="UTF-8"?>
<project xmlns="http://maven.apache.org/POM/4.0.0"
         xmlns:xsi="http://www.w3.org/2001/XMLSchema-instance"
         xsi:schemaLocation="http://maven.apache.org/POM/4.0.0 http://maven.apache.org/xsd/maven-4.0.0.xsd">
    <modelVersion>4.0.0</modelVersion>

    <groupId>com.customer</groupId>
    <artifactId>customer-service</artifactId>
    <description>电商客服系统</description>
    <version>1.0.0.RELEASE</version>

    <properties>
        <maven.compiler.source>17</maven.compiler.source>
        <maven.compiler.target>17</maven.compiler.target>
    </properties>

    <parent>
        <groupId>org.springframework.boot</groupId>
        <artifactId>spring-boot-starter-parent</artifactId>
        <version>3.5.5</version>
    </parent>

    <dependencies>
        <!-- 测试依赖-->
        <dependency>
            <groupId>org.springframework.boot</groupId>
            <artifactId>spring-boot-starter-test</artifactId>
            <scope>compile</scope>
        </dependency>
        <dependency>
            <groupId>org.springframework.boot</groupId>
            <artifactId>spring-boot-starter-web</artifactId>
        </dependency>
        <!-- 参数校验依赖 使用 Spring Boot 的 starter -->
        <dependency>
            <groupId>org.springframework.boot</groupId>
            <artifactId>spring-boot-starter-validation</artifactId>
        </dependency>
        <!-- 阿里云 Spring AI Redis 记忆存储 https://mvnrepository.com/artifact/com.alibaba.cloud.ai/spring-ai-alibaba-starter-memory-redis -->
        <dependency>
            <groupId>com.alibaba.cloud.ai</groupId>
            <artifactId>spring-ai-alibaba-starter-memory-redis</artifactId>
            <version>1.1.2.2</version>
            <scope>compile</scope>
        </dependency>
        <dependency>
            <groupId>redis.clients</groupId>
            <artifactId>jedis</artifactId>
            <version>5.2.0</version>
            <scope>compile</scope>
        </dependency>
        <!-- mybatis-plus 持久层框架。Spring Boot 的版本是 3.5.5(属于 Spring Boot 3.x 系列)要求使用 mybatis-plus-spring-boot3-starter -->
        <dependency>
            <groupId>com.baomidou</groupId>
            <artifactId>mybatis-plus-spring-boot3-starter</artifactId>
            <version>3.5.15</version>
            <scope>compile</scope>
        </dependency>
        <!-- 阿里巴巴 mysql 数据库驱动 -->
        <dependency>
            <groupId>com.alibaba</groupId>
            <artifactId>druid-spring-boot-starter</artifactId>
            <version>1.2.28</version>
            <scope>compile</scope>
        </dependency>
        <!-- mysql 数据库连接驱动,这里使用的是 8.0 版本,兼容5.0版本。但是需要强制配置 serverTimezone 和 useSSL -->
        <dependency>
            <groupId>mysql</groupId>
            <artifactId>mysql-connector-java</artifactId>
            <version>8.0.16</version>
        </dependency>
        <!-- jwt 签名 -->
        <dependency>
            <groupId>com.auth0</groupId>
            <artifactId>java-jwt</artifactId>
            <version>4.5.1</version>
            <scope>compile</scope>
        </dependency>
        <!-- hutool 工具包 -->
        <dependency>
            <groupId>cn.hutool</groupId>
            <artifactId>hutool-all</artifactId>
            <version>5.8.43</version>
            <scope>compile</scope>
        </dependency>
        <!-- lombok 插件 -->
        <dependency>
            <groupId>org.projectlombok</groupId>
            <artifactId>lombok</artifactId>
            <version>1.18.12</version>
        </dependency>
        <!-- 阿里巴巴 fastjson 插件 -->
        <dependency>
            <groupId>com.alibaba</groupId>
            <artifactId>fastjson</artifactId>
            <version>2.0.60</version>
            <scope>compile</scope>
        </dependency>

        <!-- ******************  以下是 Spring AI Alibaba 依赖  ********************** -->
        <dependency>
            <groupId>com.alibaba.cloud.ai</groupId>
            <artifactId>spring-ai-alibaba-starter-dashscope</artifactId>
            <version>1.1.2.0</version>
            <scope>compile</scope>
        </dependency>


    </dependencies>

    <!-- 构建工具 -->
    <build>
        <plugins>
            <!-- 打包插件 -->
            <plugin>
                <groupId>org.springframework.boot</groupId>
                <artifactId>spring-boot-maven-plugin</artifactId>
            </plugin>
        </plugins>
    </build>

</project>
5.2 yml 配置 dashscope 节点信息
application.yml 删除 Ollama 配置,同时配置 DashScope 的信息,因为引入了 spring-ai-alibaba-starter-dashscope 依赖,系统在启动时会自动注册 ChatClient,且同时会判断 API Key 是否存在。application.yml 调整后如下:
# 服务器配置
server:
port: 80
# spring 相关数据源配置,如 Redis、MySql 等
spring:
ai:
dashscope:
# 从电脑环境变量中读取 API Key
api-key: ${DASHSCOPE_API_KEY}
# chatClient 对话模型配置
chat:
options:
# 模型名称。qwen-max 这个字符串会被放在 API 请求的 model 字段中,阿里云百炼平台看到这个参数,就知道要调用 Qwen-Max 模型来处理你的请求。
model: qwen-max
# 最大token
max-tokens: 2048
# 模型温度
temperature: 0.7
application:
name: customer-service
data:
redis:
host: 192.168.3.69
port: 6379
password: 123456
database: 0 #连接的库,不指定默认是db0
timeout: 5000 #连接超时时间
lettuce:
pool:
max-active: 50 #最大连接数,默认是8
max-idle: 50 #最大空闲连接,默认是8
min-idle: 5 #最小空闲连接,默认是0
#在关闭客户端连接之前等待任务处理完成的最长时间,在这之后,无论任务是否执行完成,都会被执行器关闭,默认100ms
shutdown-timeout: 5000
# 数据源配置
datasource:
# 使用阿里巴巴的 druid 数据源
type: com.alibaba.druid.pool.DruidDataSource
# 驱动类名,MySQL 5.x 驱动用【com.mysql.jdbc.Driver】,MySQL 8.x 驱动用【com.mysql.cj.jdbc.Driver】
driver-class-name: com.mysql.cj.jdbc.Driver
# MYSQL8.0 serverTimezone=Asia/Shanghai:用于指定时区,避免时间字段读写错误,这是8.0驱动的强制要求。useSSL=false:如果你的MySQL 5.x没有配置SSL证书,必须显式关闭SSL连接功能,否则会报错。
url: jdbc:mysql://127.0.0.1:3306/shopping_center?allowMultiQueries=true&useUnicode=true&characterEncoding=UTF-8&serverTimezone=Asia/Shanghai&useSSL=false
username: root
password: root
max-active: 30
initial-size: 10
max-wait: 10000
validation-query: select 1 from dual
pool-prepared-statements: true
filter: config,stat,wall,log4j
# 存入emoji表情符号的配置
connection-init-sqls: SET NAMES utf8mb4;
# mybatis-plus 配置
mybatis-plus:
# 配置 mapper 位置,/*/* 表示下一级的所有目录
mapper-locations: classpath:mapper/*.xml,classpath:mapper/*/*.xml
configuration:
# 开启 SQL 日志
log-impl: org.apache.ibatis.logging.stdout.StdOutImpl
#开启驼峰转换
map-underscore-to-camel-case: true
# jwt 配置
jwt:
# 加解密的秘钥
jwtPassword: wonderful666
# 失效时间:168 小时=7天
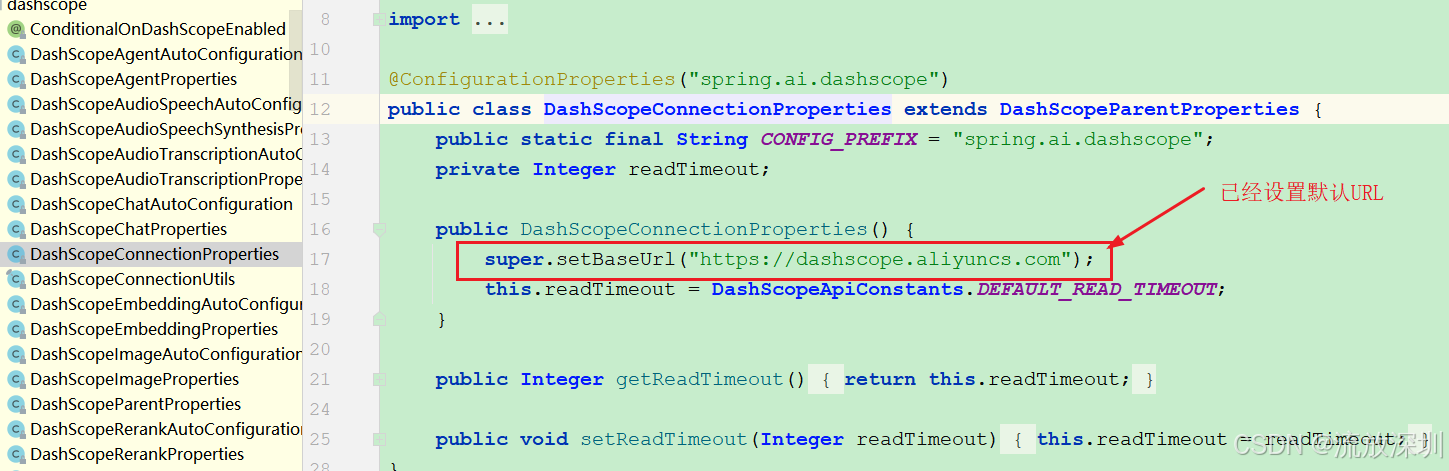
expireTime: 168注意:这里有同学不明白为什么不设置模型的接口地址 URL。因为在使用Alibaba DashScope 这套框架已经默认设置了 BaseURL 指向的是:
https://dashscope.aliyuncs.com
另外一个关键点:qwen-max 这个字符串会被放在 API 请求的 model 字段中,阿里云百炼平台看到这个参数,就知道要调用 Qwen-Max 模型来处理你的请求。
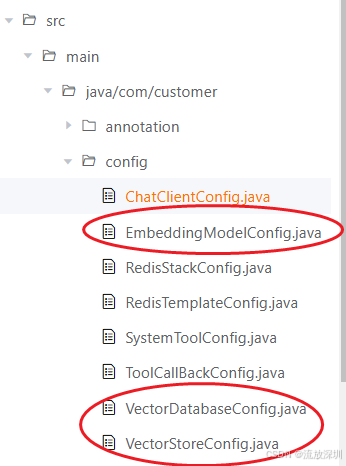
5.3 把向量存储部分删除
使用阿里云百炼平台,我们仅使用云端千问大模型。因知识库收费,不使用 RAG、文本嵌入模型等内容,把如下配置代码类删除:
另外,ChatClient 配置修改如下:
package com.customer.config;

import com.alibaba.cloud.ai.memory.redis.JedisRedisChatMemoryRepository;
import org.springframework.ai.chat.client.ChatClient;
import org.springframework.ai.chat.client.advisor.MessageChatMemoryAdvisor;
import org.springframework.ai.chat.client.advisor.api.Advisor;
import org.springframework.ai.chat.memory.MessageWindowChatMemory;
import org.springframework.ai.tool.ToolCallbackProvider;
import org.springframework.beans.factory.annotation.Value;
import org.springframework.context.annotation.Bean;
import org.springframework.context.annotation.Configuration;
import org.springframework.core.io.Resource;

import java.nio.charset.StandardCharsets;
import java.util.ArrayList;
import java.util.List;

/**
 * @author CSDN流放深圳
 * @description 模型配置类
 * @create 2026-05-15 18:17
 * @since 1.0.0
 */
@Configuration
public class ChatClientConfig {

    /**
     * 系统角色说明,从 classpath 加载资源文件,也可以通过 URL 加载
     */
    @Value("classpath:system-role-wording.txt")
    private Resource resource;

    /**
     * 创建 qwenChatClient
     * @param chatClientBuilder
     * @return
     */
    @Bean
    public ChatClient qwenChatClient(ChatClient.Builder chatClientBuilder,
                                     JedisRedisChatMemoryRepository repository,
                                     ToolCallbackProvider toolCallbackProvider) {
        // 顾问集合
        List<Advisor> advisors = new ArrayList<>();
        // 创建消息窗口顾问
        MessageChatMemoryAdvisor messageChatMemoryAdvisor = MessageChatMemoryAdvisor.builder(
                MessageWindowChatMemory.builder().chatMemoryRepository(repository)
                        .maxMessages(20) // 最多保存20条消息(默认也是20条)
                        .build()).build();
        advisors.add(messageChatMemoryAdvisor);//添加消息窗口顾问

        // 创建 ChatClient
        return chatClientBuilder
                .defaultSystem(resource, StandardCharsets.UTF_8)//系统角色设定内容
                .defaultAdvisors(advisors)// 添加顾问集合
                .defaultToolCallbacks(toolCallbackProvider.getToolCallbacks())// 工具回调
                .build();
    }

}
由于已经在
application.yml中正确配置了 API Key 和模型参数,Spring AI Alibaba 的自动装配机制会自动创建一个ChatClient.Builder的 Bean。你只需要在配置类中直接注入这个 Builder 即可。这种方式的好处是,你的
ChatModel和ChatClient都将由框架统一管理,配置也最为简洁。关键点:
你不再需要手动创建
ChatModel的 Bean,它由spring-ai-alibaba-starter自动创建。直接在你的方法参数中添加
ChatClient.Builder,Spring 会自动注入一个已配置好的实例。这个实例已经读取了你在application.yml中的配置(如model、temperature等)。你在方法内通过
chatClientBuilder.defaultSystem(...).build()创建的是一个特定的、带有自定义配置(系统提示词、记忆、工具)的ChatClient实例。
6、启动系统,测试
6.1 启动前端页面
直接双击打开前端页面【小淘智能客服.html】即可
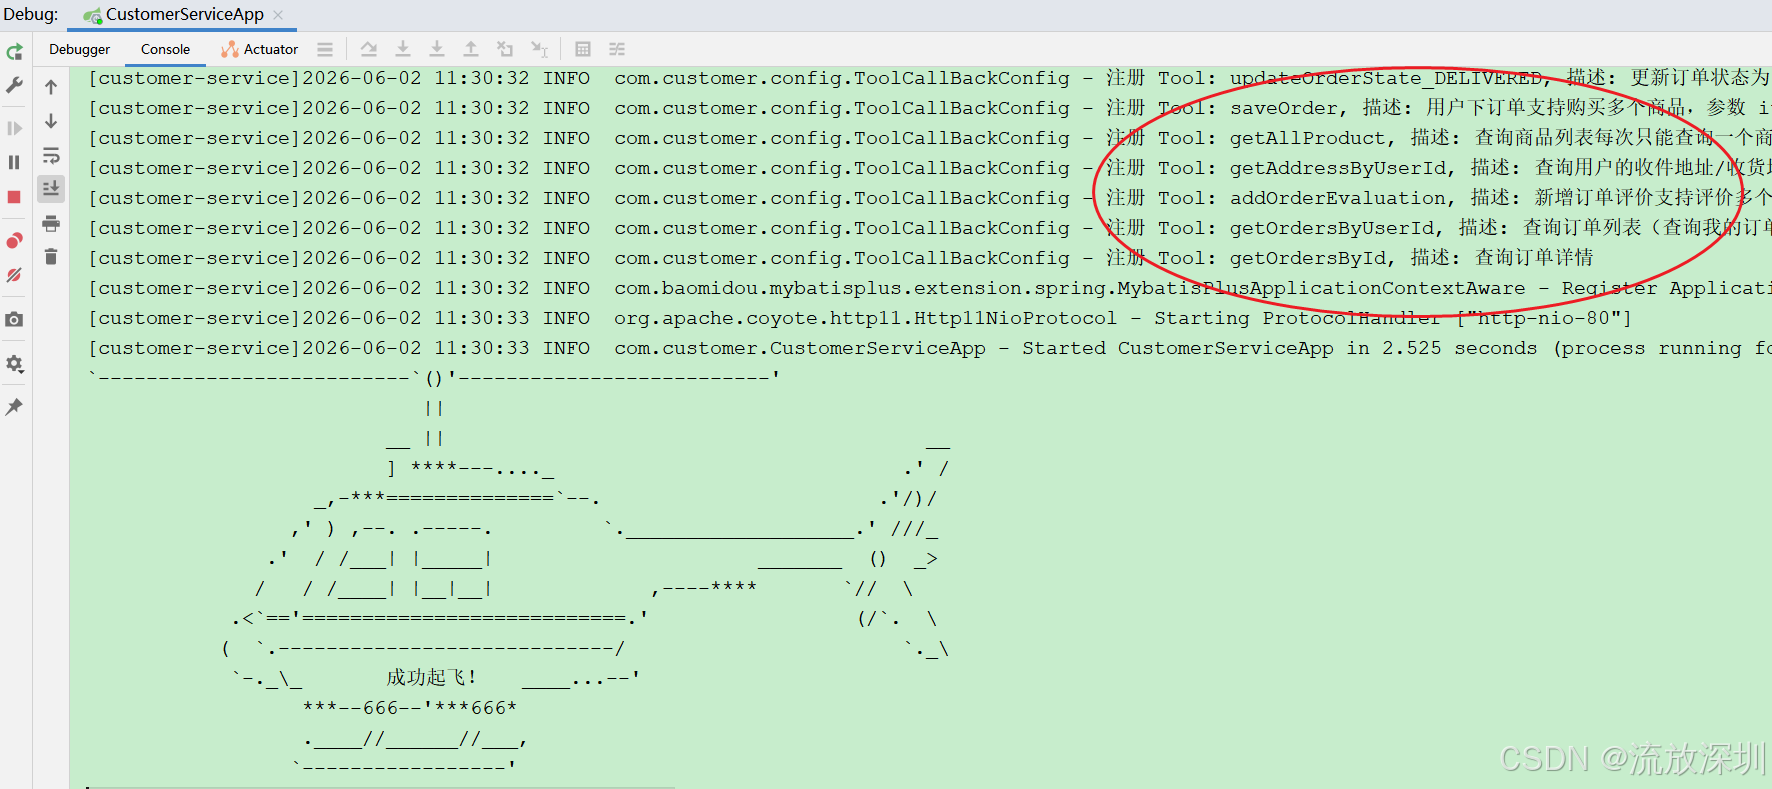
6.2 后端服务
6.3 测试系统
6.3.1 让大模型自我介绍
6.3.2 询问商品
6.3.3 购买商品
6.3.4 变更订单状态
6.3.5 查询订单信息
6.3.6 给订单好评
查询数据库发现订单已好评:

(end)

AtomGit 是由开放原子开源基金会联合 CSDN 等生态伙伴共同推出的新一代开源与人工智能协作平台。平台坚持“开放、中立、公益”的理念,把代码托管、模型共享、数据集托管、智能体开发体验和算力服务整合在一起,为开发者提供从开发、训练到部署的一站式体验。
更多推荐


 5
5 0
0- 0


 已为社区贡献5条内容

所有评论(0)