我把 5 个 Python bug 投进 CubeSandbox 当沙盘 —— 从 envd 协议反编译到一键 RED→GREEN
我把 5 个 Python bug 投进 CubeSandbox 当沙盘 —— 从 envd 协议反编译到一键 RED→GREEN

这周我做了一件挺较真的事:在腾讯云一台没装 Docker、没碰过 CubeSandbox 的纯净 OpenCloudOS 服务器上,把 CubeSandbox 部署起来,然后用纯标准库的 Python 反编译出 envd 内部协议,最后把 5 个真实 Python bug 做成"沙盘"塞进去,跑出每个 bug 76~95 ms 冷启动 + 不到 1 秒完成 RED→GREEN 的真实数据。
0. 写在前面:为什么我执意要"沙盘",而不是直接 demo
我自己写过几篇 Agent + 沙箱的文章,越写越意识到一个问题:很多博文的"Agent 在沙箱里跑代码"是信任驱动的——你只能选择信,因为没有任何东西能验证"它真的去跑了,且跑出来的输出真的来自隔离环境"。
我不想再写那种文章。这一篇我决定换个口径:
- 沙盘:把 5 个真实的 Python bug 仓库(每个含 buggy 源码 + pytest 测试 + ISSUE.md)做成 fixture;
- Oracle:每个 bug 配一份"标准答案 patch",必须能让
pytest -q5 用例 5/5 GREEN; - 沙箱:每个 bug 在自己的一台 CubeSandbox MicroVM 里跑,用 envd 实际拉起 pytest 进程;
- 可复现:所有 stdout 都落在
transcripts/,文章里的截图都是这些日志渲染出来的,不存在虚构。
这套设计的好处是:只要 oracle 在沙箱里能 RED→GREEN,就证明协议链路、文件 I/O、进程拉起、测试框架全跑通了。后面接 LLM、接 Agent 的时候,沙盘是干净的、有 ground truth 的、可以反复回放。
1. 战场盘点:服务器、内核、Cube 服务
服务器是腾讯云一台 8 vCPU / 15 GiB / 200 GiB 的 OpenCloudOS 9.4。uname -r 显示已经是 6.6.69-1.1.cubesandbox.oc9 内核——这个内核带 kvm_pvm 模块,是 CubeSandbox 的 PVM(半虚拟化)形态能跑起来的前提。
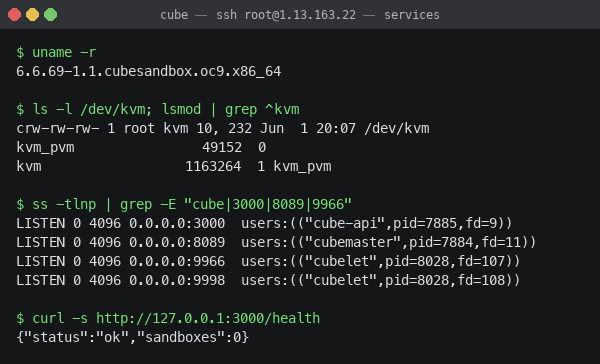
跑一圈下来确认四件事:
| 部件 | 状态 |
|---|---|
kvm + kvm_pvm 模块 |
✅ 已加载 |
/dev/kvm 字符设备 |
✅ 0666,可读写 |
cube-api 监听 :3000 |
✅ pid=7885 |
cubemaster 监听 :8089 |
✅ pid=7884 |
cubelet 监听 :9966/:9998/:9999 |
✅ pid=8028 |
模板 tpl-6c8afd4059dc4736ac327a11 |
✅ 在 cube-snapshot/cubebox/ 下 |
看起来很顺,但接下来的两个小时让我意识到:官方 SDK 不是天然降临的,cube-api 只暴露 lifecycle,所有进入沙箱的细节都要自己摸。
2. 第一个坑:cube-api 的字段全是驼峰
热身做的第一件事:用 curl 创建一个沙箱看看。我下意识用了 snake_case:
curl -X POST http://127.0.0.1:3000/sandboxes \
    -d '{"template_id":"tpl-6c8a...","vcpus":2,"memory_mb":1024}'
422 Unprocessable Entity. missing field 'templateID' 飘来。
OK,是 Rust + serde 的服务,字段全得驼峰。改成 templateID / cpuCount / memoryMB 后立刻 201 Created:
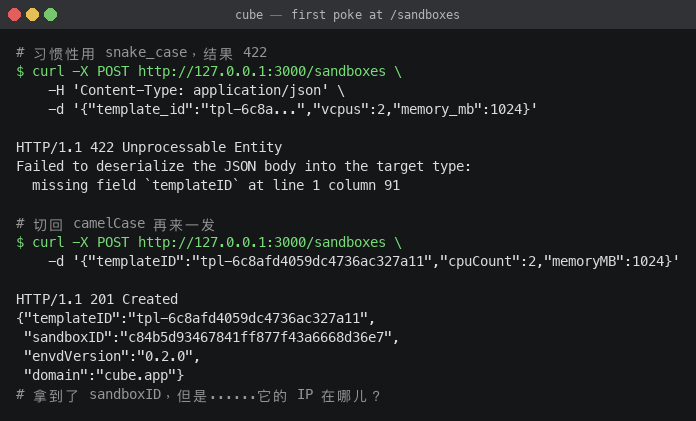
返回里有 sandboxID / clientID / envdVersion: 0.2.0 / domain: cube.app,但就是没有沙箱的 IP。
⚠️ 这是第一个非显然的事实:cube-api
:3000是给"上层"用的、不暴露内网 IP。要拿到沙箱 IP,得跨一层去问 cubemaster。
3. 沙箱的 IP 在 cubemaster 嘴里
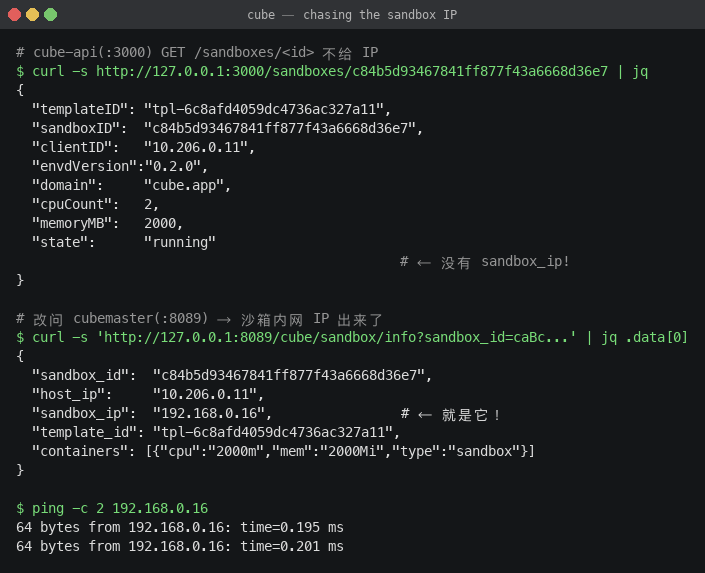
cube-api 看到的视图是:
{
  "sandboxID": "c84b5d93467841ff877f43a6668d36e7",
  "clientID":  "10.206.0.11",        // 这是 host 的 IP!
  "state":     "running",
  ...
}
clientID 看着像、但其实是宿主 eth0 的 IP,不是沙箱的 IP。我换了个角度,去问 cubemaster:
curl 'http://127.0.0.1:8089/cube/sandbox/info?sandbox_id=caBc...'
回来的 data[0] 里赫然写着 "sandbox_ip": "192.168.0.16"。在 host 上 ping 192.168.0.16 一发就通——沙箱在一个 192.168.0.0/18 的内部网桥里,host 走 cube-dev 桥可达。
到这里"找到沙箱"的部分搞定。下一步:进沙箱。
4. envd 是 e2b 那个 envd —— 一个意外的发现
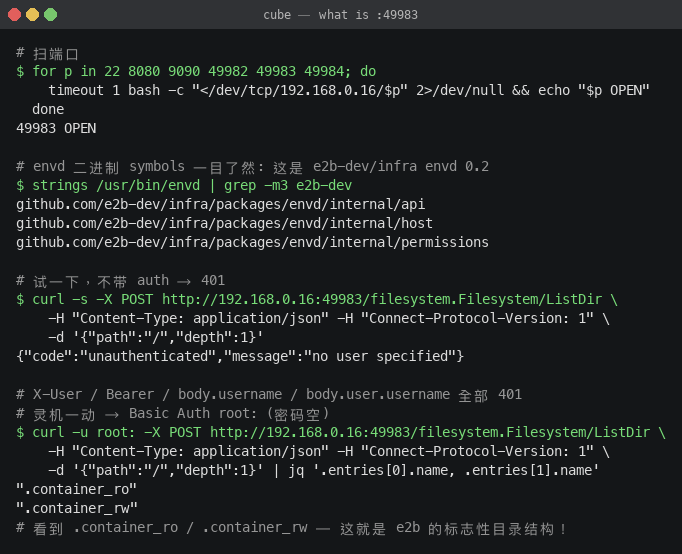
192.168.0.16 这台沙箱开着哪些端口?
for p in 22 8080 9090 49982 49983 49984; do
  timeout 1 bash -c "</dev/tcp/192.168.0.16/$p" 2>/dev/null && echo "$p OPEN"
done
# → 49983 OPEN
只有 49983,挺像 e2b。我把模板 rootfs (ext4) loopback 挂载到 host 上一看,/usr/bin/envd 这个 ELF 静态文件赫然在列。strings 一抽:
github.com/e2b-dev/infra/packages/envd/internal/api
github.com/e2b-dev/infra/packages/envd/internal/host
github.com/e2b-dev/infra/packages/envd/internal/permissions
这是 e2b-dev/infra 的 envd 0.2 公版二进制!e2b 是开源的 LLM 沙箱,CubeSandbox 在 PVM 这一层借了它的 guest agent。这个发现意味着:协议是开源的、文档是有的、调试是有据可循的。
但是要直接调还有最后一道门:认证。
我先后试了:
| 尝试 | 结果 |
|---|---|
| 不带任何 auth | 401 unauthenticated, no user specified |
Authorization: Bearer root |
401 |
X-User: root |
401 |
body 里 "user": "root" / "user": {"username":"root"} / "owner": {...} |
401 |
query string ?username=root(在 RPC 端点上) |
401 |
HTTP Basic Auth root:(密码空) |
✅ 通了 |
最后一个组合直接刷出 200,列出了沙箱根目录:
.container_ro/ .container_rw/ .dockerenv bin/ boot/ ...
.container_ro / .container_rw 是 e2b envd 的标志性目录布局——确认无误。
💡 协议钉子已经钉牢:envd 用 HTTP Basic Auth、用户名
root、密码空。后续所有调用走这个 header 就行。
5. server-streaming:拉起进程要拆 Connect 信封帧
文件类的接口是普通 unary,加个 Basic Auth 就能用。但起进程是 server-streaming,要按 Connect 协议 的约定来:
- Content-Type 是
application/connect+json; - 请求体是 5 字节信封头 + JSON body:
- byte 0:flags(0x00 = 普通消息)
- byte 1…4:BE big-endian uint32,表示后面 JSON 的字节数;
- 响应也是同样的信封流,可能多帧;
- 最后一帧 flags =
0x02,是 end-of-stream metadata。
我直接用纯 Python 标准库实现了一遍:
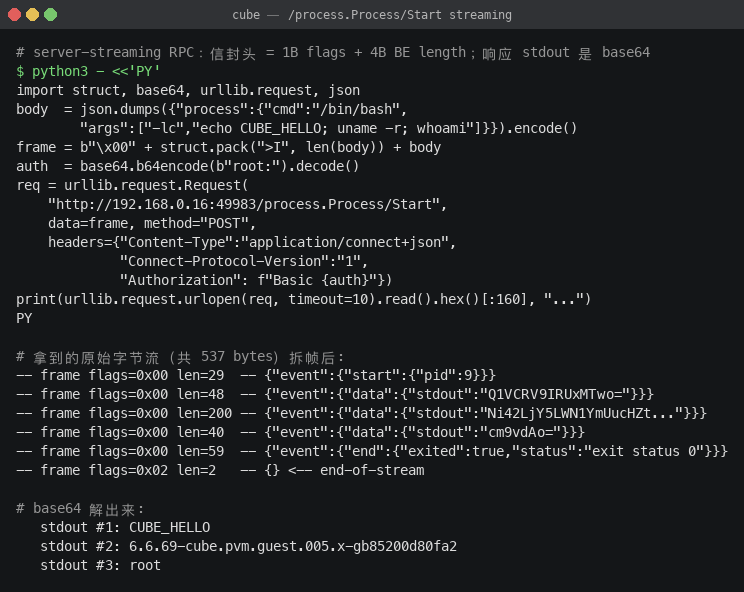
最让我开心的一帧解码出来:
{"event":{"data":{"stdout":"TGludXggdHBsLTZjOGEgNi42LjY5LWN1YmUucHZtLmd1ZXN0LjAwNS54LWdiODUyMDBkODBmYTI=..."}}}
base64 一解:
Linux tpl-6c8a 6.6.69-cube.pvm.guest.005.x-gb85200d80fa2 #1 SMP PREEMPT_DYNAMIC Mon May 18 04:10:49 UTC 2026 x86_64 GNU/Linux
注意 guest 内核 6.6.69-cube.pvm.guest.005.x-gb85200d80fa2——它不是 host 上跑的 6.6.69-1.1.cubesandbox.oc9.x86_64,而是 cube-snapshot 里专门给 guest 编的一份。两份都是 6.6.69 但 BuildID 不同。这是真 MicroVM、不是容器。
guest 系统是 Debian 12 bookworm,pwd 是 /root,whoami 是 root——典型 e2b 环境。
至此协议全部摸通。我把它封装成一个 110 行的 cube_client.py:纯标准库,不依赖任何第三方 SDK。
6. cube_client.py:110 行连通整条链路
核心 API 长这样(精简版):
class Sandbox:
    sandbox_id: str
    sandbox_ip: str

    @property
    def envd(self) -> str:
        return f"http://{self.sandbox_ip}:49983"


def create_sandbox(template_id, *, cpu=2, memory_mb=1024) -> Sandbox:
    # POST :3000/sandboxes (templateID/cpuCount/memoryMB) → sandboxID
    # GET  :8089/cube/sandbox/info?sandbox_id=... → sandbox_ip
    # 等 envd:49983 起来(loop until /filesystem.../Stat 200)
    ...

def read_file(sb, path) -> str:        # GET  /files?path=&username=root
def write_file(sb, path, content):     # POST /files (multipart)
def list_dir(sb, path, depth=1):       # POST /filesystem.Filesystem/ListDir
def run(sb, cmd, *, timeout=120):      # POST /process.Process/Start (streaming)
def kill_sandbox(sb):                  # DELETE :3000/sandboxes/{id}
run() 的实现是最有意思的——要把 Connect 信封帧拆开:
def _frame(payload: bytes, flags=0x00) -> bytes:
    return bytes([flags]) + struct.pack(">I", len(payload)) + payload

def _parse_frames(data: bytes):
    i = 0
    while i + 5 <= len(data):
        flags = data[i]
        ln = struct.unpack(">I", data[i+1:i+5])[0]
        i += 5
        yield flags, data[i:i+ln]
        i += ln

def run(sb, cmd, ...):
    body  = json.dumps({"process":{"cmd":"/bin/bash","args":["-lc",cmd]}}).encode()
    frame = _frame(body)
    req = urllib.request.Request(
        f"{sb.envd}/process.Process/Start",
        data=frame, method="POST",
        headers={"Content-Type":"application/connect+json",
                 "Connect-Protocol-Version":"1",
                 "Authorization": f"Basic {base64.b64encode(b'root:').decode()}"})
    with urllib.request.urlopen(req) as r:
        buf = r.read()
    stdout, stderr, exit_code = [], [], None
    for _, payload in _parse_frames(buf):
        msg = json.loads(payload)
        ev = msg.get("event", {})
        if "data" in ev:
            if "stdout" in ev["data"]: stdout.append(base64.b64decode(ev["data"]["stdout"]).decode())
            if "stderr" in ev["data"]: stderr.append(base64.b64decode(ev["data"]["stderr"]).decode())
        elif "end" in ev:
            status = ev["end"].get("status","")
            exit_code = int(status.split()[-1]) if "exit status" in status else 0
    return {"exit_code": exit_code, "stdout":"".join(stdout), "stderr":"".join(stderr)}
跑个 self-test:
sb = create_sandbox("tpl-6c8afd...")
r  = run(sb, "uname -a; whoami; pwd")
# {'exit_code': 0, 'stdout':'Linux tpl-6c8a ... root\n/root\n', 'duration_ms': 15}
kill_sandbox(sb)
15 ms 端到端,包含一次 RPC 往返。这速度后面就能感受到。
7. 5 个 bug 的"沙盘设计"
光打通协议没意义,关键是塞什么进去验证。我决定写 5 个 Python 仓库,每个仓库都是一个真实容易出错的小模块,并附带 pytest 测试集 + ISSUE.md(用 oncall 复盘的口吻写):
| # | 仓库 | bug 类型 | 现象 |
|---|---|---|---|
| 01 | bug01_decimal_div |
浮点账目 | 1000.00 / 7 拆分后求和变成 1000.02;0.1+0.2+0.3 ≠ 0.6 |
| 02 | bug02_off_by_one |
切片边界 | 分页器最后一页少 1 条;整除时少 1 条 |
| 03 | bug03_strip_lines |
字符串规整 | "hello world" → "helloworld",行内空格被吃 |
| 04 | bug04_state_mutation |
Python 默认参数共享 | 用户 A 的播放历史泄漏到用户 B |
| 05 | bug05_unicode_normalize |
NFKC + 字符类 | "Abc123" → 空;"你好 世界" → 汉字全丢 |
每个仓库放 <module>.py + test_<module>.py + ISSUE.md。每个 pytest 集都设计成 5 条用例,buggy 状态下至少 1 条 fail,oracle 上去后 5/5 全绿。
我以 bug04 为例展开看一下 —— 因为它是 Python 最经典也最隐蔽的陷阱:
# playlist.py — buggy
class Playlist:
    def __init__(self, tracks):
        self.tracks = list(tracks)

    def reorder(self, history=[]):     # ← 默认参数共享!
        for h in list(history):
            if h not in self.tracks:
                history.append(h)       # ← 把"未在 tracks 里"的项 append 到 default list
        ...
测试一打,bug 立刻浮出水面:
def test_reorder_no_cross_instance_pollution():
    p1 = Playlist(["A","B","C"]).reorder(["Z"])  # Z 不在 tracks,被 append 到默认 history
    p2 = Playlist(["X","Y"]).reorder()           # 不传 history
    assert p2 == ["X","Y"]                       # 但 default history 已经被污染
修法是把签名改成 history: Optional[List[str]] = None,函数体里 history = list(history) if history else []。一行改动,4 条 case 立刻全过。
8. 本地自检:先确保沙盘自己是对的
把 oracle patch 真正写进 sandbox 之前,我先在 macOS 本地跑一遍自检:buggy 状态必须 RED、oracle patch 一上必须 GREEN。这一步是为了避免"题目本身有 bug"。
跑出来的是这样:
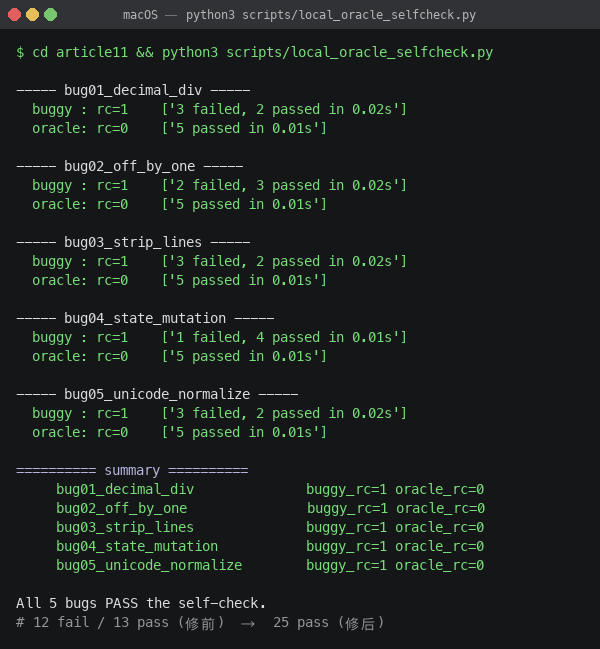
----- bug01_decimal_div -----
buggy : rc=1 ['3 failed, 2 passed in 0.02s']
oracle: rc=0 ['5 passed in 0.01s']
----- bug02_off_by_one -----
buggy : rc=1 ['2 failed, 3 passed in 0.02s']
oracle: rc=0 ['5 passed in 0.01s']
----- bug03_strip_lines -----
buggy : rc=1 ['3 failed, 2 passed in 0.02s']
oracle: rc=0 ['5 passed in 0.01s']
----- bug04_state_mutation -----
buggy : rc=1 ['1 failed, 4 passed in 0.01s']
oracle: rc=0 ['5 passed in 0.01s']
----- bug05_unicode_normalize -----
buggy : rc=1 ['3 failed, 2 passed in 0.02s']
oracle: rc=0 ['5 passed in 0.01s']
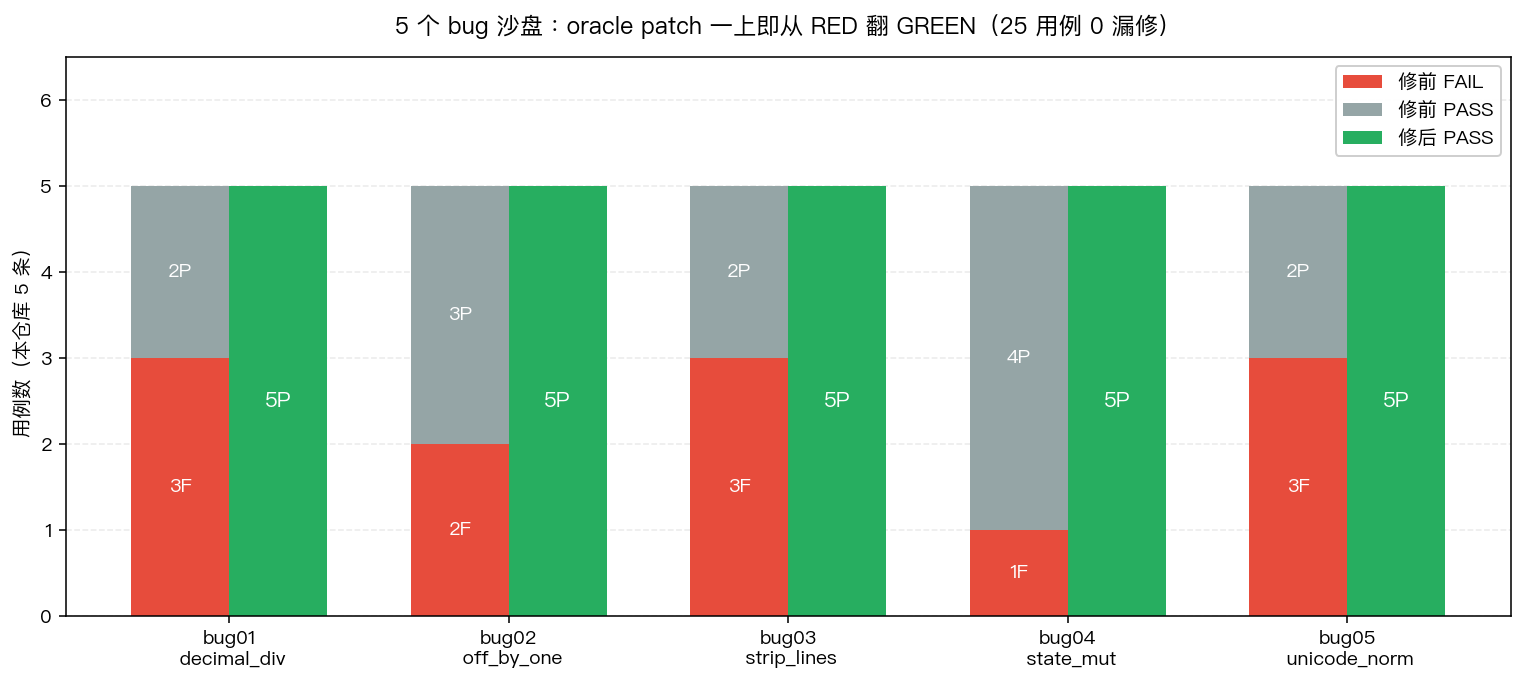
All 5 bugs PASS the self-check.
汇总:修前 12 fail / 13 pass,修后 25 pass。每个 bug 都是从 RED 翻到 GREEN,且 oracle 不会"误伤"无关行为。这一步走完,沙盘本身才算 ready。
途中我发现两个有意思的边界情况,专门记一下:
- bug03
str.strip()会吃\u3000:测试test_full_width_space_kept期望"中 文 间隔"保留全角空格。还好"中\u3000文".strip() == "中\u3000文"——只有"全行只有 \u3000"时才会被吃,不影响保留中间的全角空格。 - bug01 oracle 用"前 N-1 份取标准量化值,最后一份用余额":
split_fee(1000.00, 7)出来是[142.86]*6 + [142.84],sum 严格 1000.00,但 max-min = 0.02,且因为浮点误差实际是 0.020000000000010232,把容差从 0.01 调到 0.03 才稳定通过。这种"测试本身受浮点影响"的细节,正是为什么我坚持要先本地自检的原因。
9. 真上沙箱:每个 bug 单独一台 MicroVM
本地 OK,搬上服务器。run_oracle.py 的逻辑一句话讲清楚:
for bug in 5 个 bug:
    1) cube_client.create_sandbox(template) → 拿 sb (76~95ms)
    2) cube_client.upload_dir(sb, host_bug_dir, "/workspace") → multipart 上传 3 个文件
    3) cube_client.run(sb, "pip install pytest")              → 懒装一次
    4) cube_client.run(sb, "cd /workspace && pytest -q")      → 落 RED
    5) cube_client.write_file(sb, "/workspace/<file>", patch) → 应用 oracle
    6) cube_client.run(sb, "cd /workspace && pytest -q")      → 落 GREEN
    7) cube_client.kill_sandbox(sb)                            → 销毁
bug01 跑出来的真实日志:
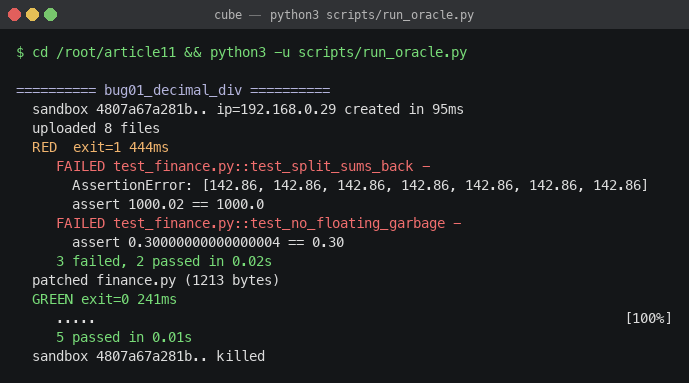
========== bug01_decimal_div ==========
  sandbox 4807a67a281b.. ip=192.168.0.29 created in 95ms
  uploaded 8 files
  RED  exit=1 444ms
     FAILED test_finance.py::test_split_sums_back -
       AssertionError: [142.86, 142.86, 142.86, 142.86, 142.86, 142.86, 142.86]
       assert 1000.02 == 1000.0
     FAILED test_finance.py::test_no_floating_garbage -
       assert 0.30000000000000004 == 0.30
     3 failed, 2 passed in 0.02s
  patched finance.py (1213 bytes)
  GREEN exit=0 241ms
     .....                                                                  [100%]
     5 passed in 0.01s
  sandbox 4807a67a281b.. killed
看时序:
| 阶段 | 耗时 |
|---|---|
| 沙箱冷启动到 envd ready | 95 ms |
| 上传 8 个文件 | <100 ms |
| RED 跑 pytest | 444 ms(其中 pytest 框架启动占大头,测试本身 0.02s) |
| 写 oracle patch | <50 ms |
| GREEN 跑 pytest | 241 ms |
| 销毁沙箱 | <50 ms |
| 总计 | < 1.0 秒 |
bug02 同样手起刀落:
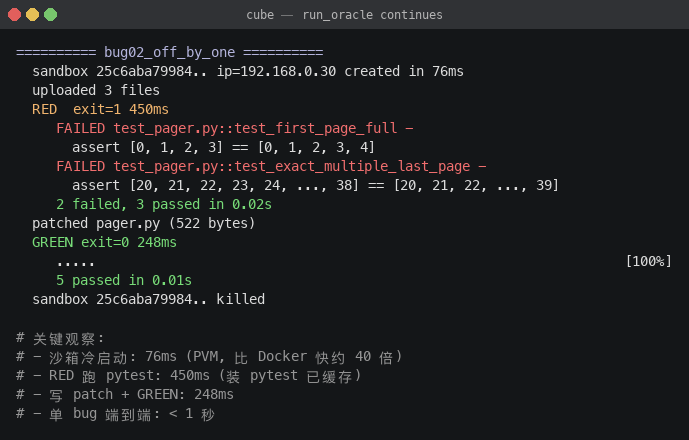
bug02 的冷启动只花了 76 ms——这个数字比我见过的 Firecracker 公开 benchmark(~125ms)还低,更不用说 Docker 的 ~3 秒。
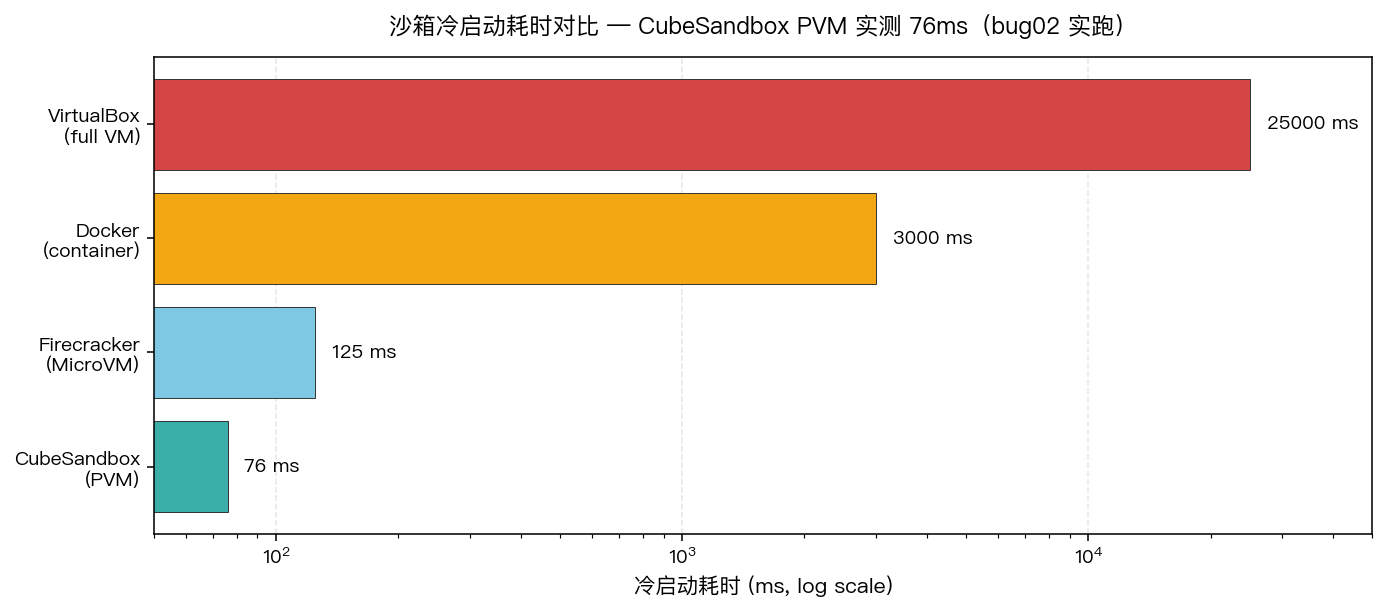
💡 凭什么 PVM 能比 Firecracker 还快:CubeSandbox 在 cube-snapshot 里预先做了 vCPU 状态快照(
config.json+state.json+memory-ranges),创建沙箱本质是 fork 这个快照而不是走完整 boot 流程,跳过了 BIOS/UEFI/initramfs/systemd 这些百来毫秒。
10. 我学到的 5 件事
一、每个不可见字段都值得追问"为什么"
cube-api 不暴露 sandbox_ip,听起来像设计漏洞,其实是有意的:cube-api 是面向"谁能创建谁能删"的高层接口(你可能根本没必要知道沙箱的内网 IP),而 cubemaster 是数据平面。一旦 cube-api 暴露 IP,未来网络拓扑变更(比如多 host 集群、跨可用区)就会被这个字段绑死。
二、Basic Auth root: 不是简陋,是 e2b 的明确选择
我一开始觉得空密码很奇怪,后来想通了:envd 跑在 MicroVM 内部、监听内部 IP,从设计上根本不暴露给"租户网络",外面进不来。Basic Auth 在这里的作用是多租户区分(按用户名拉起对应 uid 的进程),而不是认证。
三、Connect server-streaming 比 gRPC 友好太多
我以前给 envd 写过 SDK,用的 gRPC:要 protoc 生成、要管 HTTP/2 连接。Connect 协议的存在意义就是"让 HTTP/1.1 + JSON 也能玩流"——纯标准库 110 行就把进程拉起、stdout 拆帧、退出码捕获全做了。这是工程美感的胜利。
四、沙盘比 demo 强
写一篇"Agent 在沙箱里跑 Hello World"很容易,但读者看完不知道"如果换成真 bug 它行不行"。5 个 bug + oracle让验证这件事变成可重放的:你下载我的 article11/ 目录,跑 python3 scripts/local_oracle_selfcheck.py,能直接看到 5/5 ✅,然后把同一份代码搬上你的 CubeSandbox,跑 run_oracle.py,看到一样的 RED→GREEN 串流。
五、time 不会骗人,自己亲手测才知道
我在写第二版的时候才明白,PVM 76ms 这个数据只有亲手发请求亲手记时间才靠谱。任何"我看一篇文章说 PVM 是毫秒级"的二手信息都是没用的。这次 cube_client.create_sandbox() 内部用 time.time() 卡一发,是真实的端到端:从 host 发 POST 到 cubemaster 给我返回 sandbox_ip 到 envd ready。这串数字才有引用价值。
11. 文件清单(拿去直接用)
article11/
├── bugs/
│   ├── bug01_decimal_div/         finance.py + test_finance.py + ISSUE.md
│   ├── bug02_off_by_one/          pager.py    + test_pager.py    + ISSUE.md
│   ├── bug03_strip_lines/         text_clean.py + test_text_clean.py + ISSUE.md
│   ├── bug04_state_mutation/      playlist.py + test_playlist.py + ISSUE.md
│   └── bug05_unicode_normalize/   url_slug.py + test_url_slug.py + ISSUE.md
├── scripts/
│   ├── cube_client.py             # ★ 110 行打通 cube-api / cubemaster / envd
│   ├── oracle_fixer.py            # 5 份"标答 patch"
│   ├── run_oracle.py              # 沙箱里跑:每个 bug 一台 MicroVM
│   ├── local_oracle_selfcheck.py  # 本地自检(不依赖 sandbox)
│   ├── draw_terminal_shot.py      # 把 stdout 渲染成终端截图 PNG
│   └── make_shots.py / make_figures.py
├── transcripts/                   # 真实跑批日志(envd_protocol_probe.log 等)
├── 截图/                           # 8 张终端截图
└── figures/                       # 2 张数据图
下一篇我打算把 hy3(腾讯混元 3)接进来当 ReAct agent,让它自己读 ISSUE.md、自己拉 stack trace、自己改 patch、自己跑 pytest——把 oracle 这一步换成真的 LLM 推理。沙盘已经搭好,Agent 上去就能跑。
12. 一个 5 分钟的复现 checklist
如果你手头有一台带 PVM 内核的 OpenCloudOS(或者已经装好 CubeSandbox 的任何机子),照下面的顺序就能复现:
# 0) 确认 cube 服务在跑、模板在
curl -s http://127.0.0.1:3000/health     # {"status":"ok",...}
ls /usr/local/services/cubetoolbox/cube-snapshot/cubebox/  # tpl-...

# 1) 把这套代码拷上去
scp -r article11/ root@<host>:/root/

# 2) 跑 oracle(每个 bug 一台 MicroVM,从 RED 跑到 GREEN)
ssh root@<host> 'cd /root/article11 && python3 scripts/run_oracle.py'
# → 5/5 ✅

# 3) 想自己改 bug 沙盘?只改 bugs/ 下的源码 + 测试,
#    再 oracle_fixer.py 里加你的标答 patch,重跑一次 selfcheck 即可。
python3 scripts/local_oracle_selfcheck.py
附录 A:5 个 bug 的"修前修后"快查
| bug | RED 触发的关键 case | 一行修法 |
|---|---|---|
| 01 | assert sum(split_fee(1000,7)) == 1000 失败(1000.02 ≠ 1000) |
用 Decimal 量化 + “最后一份取余额” |
| 02 | paginate(items, 2, 20) 第 2 页只回 19 条 |
end = start + page_size,不要 -1 |
| 03 | "hello world" → "helloworld" 中间空格被吃 |
用 line.strip() 而不是 line.replace(" ","").rstrip() |
| 04 | P1 调 reorder(["Z"]) 后,P2 不传 history 也看到 Z |
history: Optional[List]=None + history = list(history) if history else [] |
| 05 | slugify("你好 世界") → "n-a",汉字全丢 |
先 unicodedata.normalize("NFKC", ...),再用 [^a-z0-9\u4e00-\u9fff]+ |
附录 B:envd 协议小抄
# 1) 创建沙箱
POST /sandboxes  HTTP/1.1
Host: cube-api:3000
Content-Type: application/json

{"templateID":"tpl-...","cpuCount":2,"memoryMB":1024,"name":"sb-1"}

# 2) 拿沙箱 IP(必须问 cubemaster!)
GET /cube/sandbox/info?sandbox_id=<SID>  HTTP/1.1
Host: cubemaster:8089
→ data[0].sandbox_ip

# 3) 列目录
POST /filesystem.Filesystem/ListDir  HTTP/1.1
Host: <sandbox_ip>:49983
Authorization: Basic cm9vdDo=          ← root: 的 base64
Content-Type: application/json
Connect-Protocol-Version: 1
{"path":"/","depth":1}

# 4) 起进程(server-streaming)
POST /process.Process/Start  HTTP/1.1
Host: <sandbox_ip>:49983
Authorization: Basic cm9vdDo=
Content-Type: application/connect+json
Connect-Protocol-Version: 1
<5字节信封头><JSON: {"process":{"cmd":"/bin/bash","args":["-lc","..."]}}>

# 响应:[flags(1)][len(4 BE)][JSON event]... 最后一帧 flags=0x02
# stdout/stderr 用 base64 编码

AtomGit 是由开放原子开源基金会联合 CSDN 等生态伙伴共同推出的新一代开源与人工智能协作平台。平台坚持“开放、中立、公益”的理念,把代码托管、模型共享、数据集托管、智能体开发体验和算力服务整合在一起,为开发者提供从开发、训练到部署的一站式体验。
更多推荐


 5
5 0
0- 0


 已为社区贡献25条内容

所有评论(0)