部署Wan 2.2文生视频并通过拼接生成长视频的实践
本地化视频生成有几个绕不过的问题,闭源 API(Seedance、Sora)拿不到权重,开源里 SkyReels-V2 等模型版本兼容差、无官方蒸馏、慢且不稳;单次推理超过训练窗口(约 120 帧)画面就崩。
本文记录在 L40S 48 GB GPU 上做的事:部署 Wan 2.2 14B FP8 + LightX2V 文生视频,用同一套栈跑出 5/10/30 秒单段,再用 12 个 5 秒分镜 + ffmpeg 拼接做出一段 60 秒番茄炒蛋做菜过程短片。过程中踩到的坑(VAE 通道用错、concat 路径解析、批量任务首段加载税)与背后原理(MoE 双专家、步数蒸馏、O(N²) attention 扩展性)交叉讲清楚。
2026 年中能本地跑的开源视频模型梯队:
试过 SkyReels-V2 后(多个版本兼容性问题、无官方蒸馏生成慢,单帧美学略胜,但综合速度、稳定性、可量产性不合适),选定 Wan 2.2 14B + LightX2V
- Apache-2.0 协议可商用、可微调
- ComfyUI native 节点直接支持 且 diffusers 一线维护
- 官方LightX2V 4 步可用,实测单卡 32s 出 5s,5/10/30s 全跑通,30s 尾帧不崩
核心概念与理论
理解后面的报错和参数,必须先建立这几个心智模型。
Wan 2.2 的 MoE 双专家架构
Wan 2.2 14B 全称 T2V-A14B,是 MoE 两专家、总参 27B、每步只激活 14B:
- 切换时机由信噪比 SNR 决定。去噪早期(噪声大、SNR 低)用高噪声专家管大结构;后期(SNR 高)切到低噪声专家精修细节
- 两个 14B 专家都要载入(FP8 各 ~14 GB,合计 ~28 GB),但每个采样步只跑其中一个,所以单步显存 ≈ 14B,总显存占用却是两份
LightX2V:步数蒸馏的魔法
使用LightX2V我们能 4 步出 5s 视频而原版要 50 步,因为步数蒸馏 LoRA*。
原始扩散采样需要 50 步 × cfg 6.0(cfg 意味着每步跑两次 forward:正向 + 负向),即 100 次 forward。蒸馏 LoRA 训练一个学生,让它用 4 步 × cfg 1.0(单 forward)逼近老师50 步的输出:
              步数   CFG   单步forward   总forward   相对速度
原版 Wan 2.2    50    6.0      2           100         1×
+ LightX2V       4    1.0      1            4          ~25×
LightX2V由ModelTC 出品,专为 Wan 2.1/2.2 的步数蒸馏 LoRA,4 步可用。几百 MB 的 LoRA记住了如何少步快速到达高质量轨迹,质量损失可接受。同类还有Wan22-Lightning、FastVideo、TeaCache(后者是跳步缓存,非 LoRA)
注意:蒸馏 LoRA 必须配套改采样参数,步数降到 4-8、cfg 降到 1.0**。如果还用 cfg 6.0 + 50 步,LoRA 不但不加速反而画面过曝崩坏。
VAE 通道数与帧数约束
VAE可以理解为把视频压扁再还原的网络。整个采样过程不在原始像素空间做(81 帧 832×480 RGB 视频 = 9700 万个数字,计算量大),而是在 VAE 压扁后的 latent 空间做,出片前再用 VAE 解回视频帧
21 × 60 × 104 × 16 就是 latent 张量的形状:21 是时间帧(VAE 把 81 帧压成 21 个 latent 时间步)、60×104 是空间分辨率(VAE 把 480×832 在每个维度压缩 8×)、16 就是通道数(latent 每个时空位置上是个 16 维向量)。
先澄清两个视频基础概念:
- 帧(frame):视频本质是一连串快速播放的静态图片,每张图叫一帧。一段视频的帧数就是它总共包含多少张图
- fps(frames per second,帧率):每秒播放几帧。
@16fps= 每秒 16 张图,@24fps= 每秒 24 张。fps 越高画面越流畅 - 时长换算:
时长 = 帧数 / fps。比如 81 帧 @16fps = 81 ÷ 16 ≈ 5.06 秒;121 帧 @24fps = 121 ÷ 24 ≈ 5.04 秒
这里的帧数必须是 4n + 1。回头看 latent 形状那个 21,81 帧视频压成 21 个 latent 时间步。这不是随便选的,VAE 在时间维度做了 4× 压缩,再加一个不参与压缩的起始帧,公式如下
latent 时间步 = (video 帧数 - 1) / 4 + 1

video 帧数必须是 4n + 1, 否则除不尽:
  n=20 → video 81 帧  → latent 21 步
  n=30 → video 121 帧 → latent 31 步
  n=60 → video 241 帧 → latent 61 步
不满足 4n+1(比如想要 80 帧、100 帧、200 帧)会报错或对不齐。常用合法值:
帧数        81       121        161        241        481        721
@16fps      5.06s    7.56s      10.06s     15.06s     30.06s     45.06s
@24fps      3.38s    5.04s      6.71s      10.04s     20.04s     30.04s
环境搭建
进入实例后先确认 GPU、driver、Python、torch 是否就位:
nvidia-smi --query-gpu=name,memory.total,driver_version --format=csv,noheader
# NVIDIA L40S, 46068 MiB, 580.159.04

python3 --version
# Python 3.10.12
安装 ComfyUI(comfy-cli)
sudo apt-get install -y python3-pip python3-venv pipx git ffmpeg aria2
pipx install comfy-cli
comfy --skip-prompt tracking disable
comfy --skip-prompt --workspace /opt/comfy/ComfyUI install --nvidia --fast-deps
comfy set-default /opt/comfy/ComfyUI
安装成功日志:
ComfyUI is installed at: /opt/comfy/ComfyUI
torch 2.12.0+cu130  L40S detected
comfyui_version 0.22.0
自定义节点
cd /opt/comfy/ComfyUI/custom_nodes
git clone --depth 1 https://github.com/kijai/ComfyUI-KJNodes.git
git clone --depth 1 https://github.com/Kosinkadink/ComfyUI-VideoHelperSuite.git
git clone --depth 1 https://github.com/rgthree/rgthree-comfy.git
git clone --depth 1 https://github.com/Fannovel16/ComfyUI-Frame-Interpolation.git
# 各自 pip install -r requirements.txt
启动时的告警(无害):
WARNING: Could not load sageattention: No module named 'sageattention'
注意:没装 sageattention/flash-attn 时 ComfyUI fallback 到
pytorch attention。能跑但比 FlashAttn-3 慢。生产环境建议装 sageattention 进一步提速(需 Hopper+ GPU)。
启动
cd /opt/comfy/ComfyUI
/opt/comfy/ComfyUI/.venv/bin/python /opt/comfy/ComfyUI/main.py --listen 0.0.0.0 --port 8188
启动耗时 ~1.5 分钟(custom nodes 加载完才监听 8188)。健康检查:
curl -s http://127.0.0.1:8188/system_stats
模型下载文件清单如下
注意:高/低噪声两个 14B 都要下,缺一个 MoE 切换时报错;两个 LightX2V LoRA 也分别对应高/低专家,混用强度会怪。
diffusion_models/
  wan2.2_t2v_high_noise_14B_fp8_scaled.safetensors   14.29 GB  (Comfy-Org)
  wan2.2_t2v_low_noise_14B_fp8_scaled.safetensors    14.29 GB  (Comfy-Org)
text_encoders/
  umt5_xxl_fp8_e4m3fn_scaled.safetensors              6.74 GB  (Comfy-Org)
vae/
  wan_2.1_vae.safetensors                             0.25 GB  (16ch, 14B 用)
loras/
  wan2.2_t2v_lightx2v_4steps_lora_v1.1_high_noise     1.23 GB
  wan2.2_t2v_lightx2v_4steps_lora_v1.1_low_noise      1.23 GB
使用Python hf_hub_download 多线程并行:
import threading, os
from huggingface_hub import hf_hub_download

def grab(idx, repo, fpath, subfolder):
    p = hf_hub_download(repo_id=repo, filename=fpath, local_dir=f"/tmp/hfdl_{idx}")
    os.rename(p, f"/opt/comfy/ComfyUI/models/{subfolder}/{os.path.basename(fpath)}")

JOBS = [
    ("Comfy-Org/Wan_2.2_ComfyUI_Repackaged",
     "split_files/diffusion_models/wan2.2_t2v_high_noise_14B_fp8_scaled.safetensors",
     "diffusion_models"),
    # ... 其余 5 个
]
threads = [threading.Thread(target=grab, args=(i, *j)) for i, j in enumerate(JOBS)]
[t.start() for t in threads]; [t.join() for t in threads]
Wan 2.2 实测
workflow配置如下:
双 UNETLoader(高/低噪声)→ 各挂 LightX2V LoRA → ModelSamplingSD3(shift=8) → 双 KSamplerAdvanced(高噪声 step 0-2,低噪声 step 2-4)→ VAEDecode → VHS_VideoCombine。
{
  "1": {"class_type": "UNETLoader", "inputs": {"unet_name": "wan2.2_t2v_high_noise_14B_fp8_scaled.safetensors", "weight_dtype": "default"}},
  "2": {"class_type": "UNETLoader", "inputs": {"unet_name": "wan2.2_t2v_low_noise_14B_fp8_scaled.safetensors", "weight_dtype": "default"}},
  "3": {"class_type": "LoraLoaderModelOnly", "inputs": {"model": ["1",0], "lora_name": "wan2.2_t2v_lightx2v_4steps_lora_v1.1_high_noise.safetensors", "strength_model": 1.0}},
  "4": {"class_type": "LoraLoaderModelOnly", "inputs": {"model": ["2",0], "lora_name": "wan2.2_t2v_lightx2v_4steps_lora_v1.1_low_noise.safetensors", "strength_model": 1.0}},
  "5": {"class_type": "ModelSamplingSD3", "inputs": {"model": ["3",0], "shift": 8.0}},
  "6": {"class_type": "ModelSamplingSD3", "inputs": {"model": ["4",0], "shift": 8.0}},
  "7": {"class_type": "CLIPLoader", "inputs": {"clip_name": "umt5_xxl_fp8_e4m3fn_scaled.safetensors", "type": "wan", "device": "default"}},
  "10": {"class_type": "EmptyHunyuanLatentVideo", "inputs": {"width": 832, "height": 480, "length": 81, "batch_size": 1}},
  "11": {"class_type": "KSamplerAdvanced", "inputs": {"model": ["5",0], "add_noise": "enable", "steps": 4, "cfg": 1.0, "sampler_name": "euler", "scheduler": "simple", "start_at_step": 0, "end_at_step": 2, "return_with_leftover_noise": "enable", "latent_image": ["10",0]}},
  "12": {"class_type": "KSamplerAdvanced", "inputs": {"model": ["6",0], "add_noise": "disable", "steps": 4, "cfg": 1.0, "sampler_name": "euler", "scheduler": "simple", "start_at_step": 2, "end_at_step": 4, "return_with_leftover_noise": "disable", "latent_image": ["11",0]}},
  "13": {"class_type": "VAELoader", "inputs": {"vae_name": "wan_2.1_vae.safetensors"}},
  "14": {"class_type": "VAEDecode", "inputs": {"samples": ["12",0], "vae": ["13",0]}},
  "15": {"class_type": "VHS_VideoCombine", "inputs": {"images": ["14",0], "frame_rate": 16, "format": "video/h264-mp4", "save_output": true}}
}
改时长只需改节点 10 的 length(81/161/481)。
VAE 通道不匹配文图。注意:Wan 系有两套不兼容的 VAE
| VAE 文件 | latent 通道 | 配套模型 |
|---|---|---|
wan_2.1_vae |
16 | Wan 2.2 14B(T2V/I2V-A14B)(本文使用) |
wan2.2_vae |
48 | Wan 2.2 TI2V-5B |
第一次跑用了 wan2.2_vae(48ch),采样跑通但 VAE decode 错误:
RuntimeError: Given groups=1, weight of size [48, 48, 1, 1, 1],
expected input[1, 16, 21, 60, 104] to have 48 channels, but got 16 channels instead
[INFO] Prompt executed in 586.30 seconds
14B 的 latent 是 16 通道(Wan 2.1 VAE),加载了 48 通道的 wan2.2_vae(那是 TI2V-5B 专用),需要改 VAELoader 为 wan_2.1_vae.safetensors 。
官方workflow示例如下
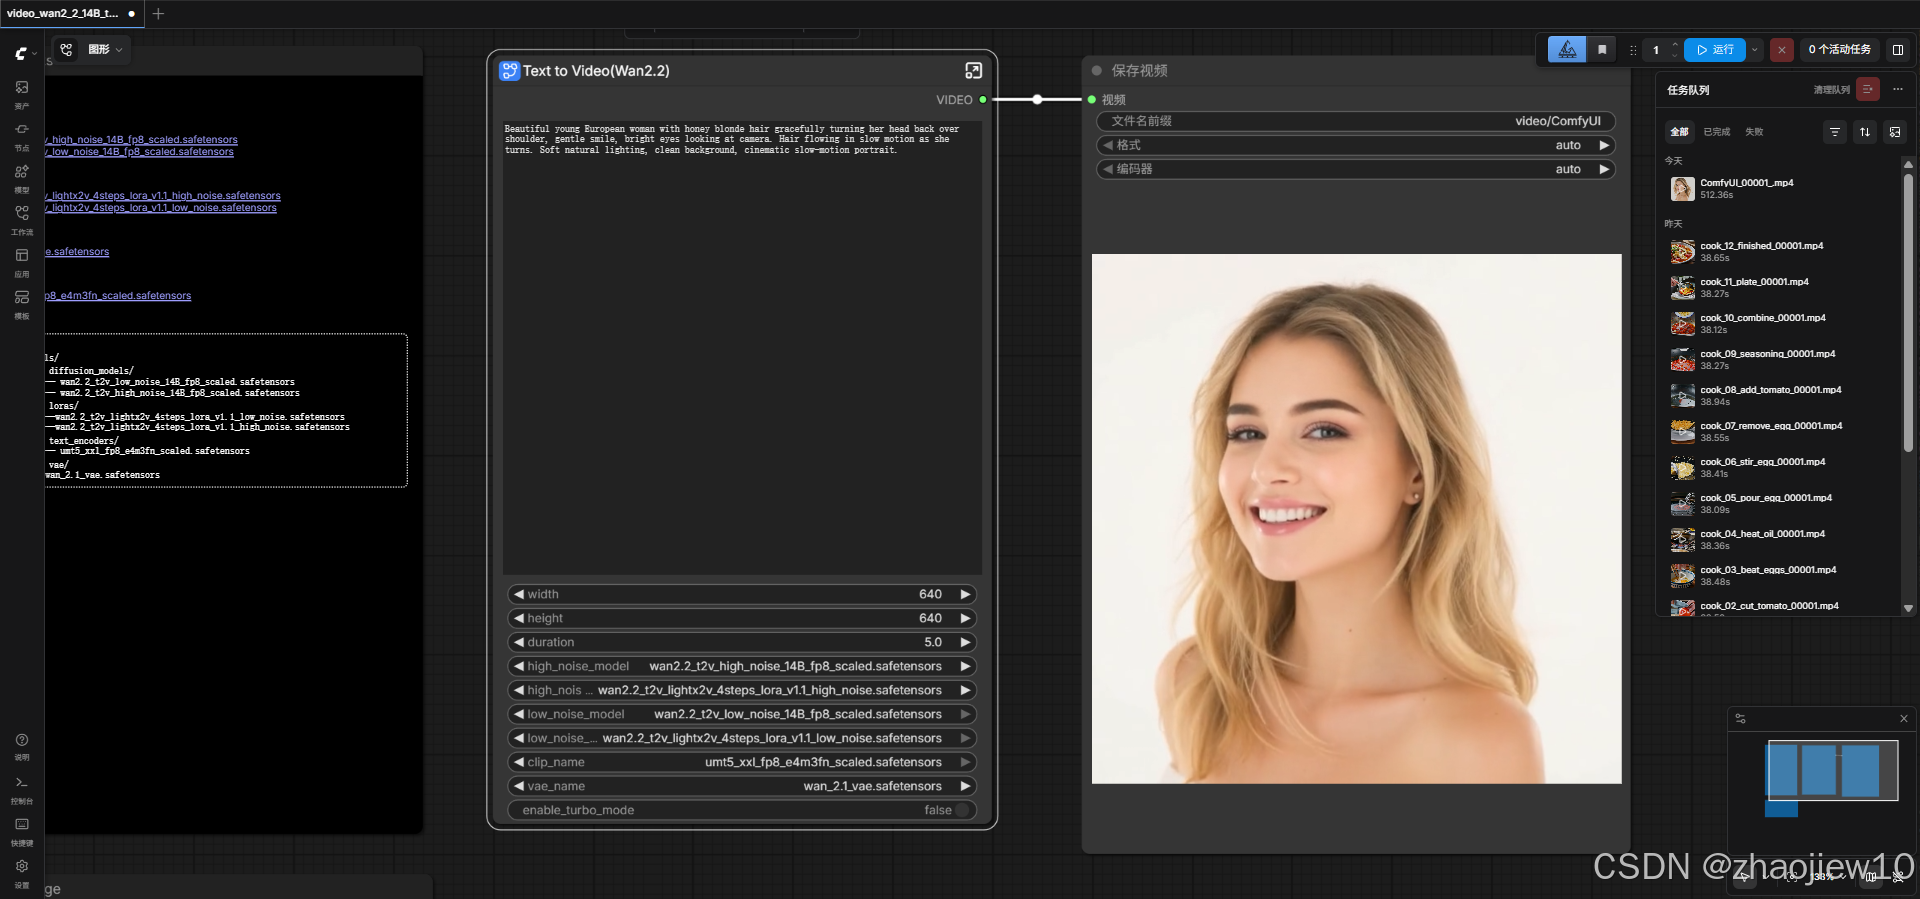
生成视频内容(GIF画质有损)

三个长度的生成时间和质量对比
| 长度 | 帧数 | 耗时 | 单步速度 | 备注 |
|---|---|---|---|---|
| 5s | 81 | 32s | ~8s/it | 推荐工作点 |
| 10s | 161 | 114s | ~25s/it | attention 随帧数增长 |
| 30s | 481 | 728s (12min) | ~170s/it | O(N²) over 481 帧,画质保持 |
注意:30s(481 帧)单次推能跑且峰值 42/48 GB 未 OOM,静态场景尾帧质量保持。生产长视频仍建议多分镜拼接。
长视频拼接
本次制作一个**番茄炒蛋中国家常菜全过程
拼接长视频有两种工程路径:多分镜 vs I2V 链式
选 B 的理由如下:
- 叙事内容本身适合多分镜:做一道菜天然由食材→切→打蛋→热锅→翻炒→装盘等不连续镜头组成,强行 I2V 接续反而违反美食视频的快切节奏。开箱、旅游、产品展示、教程类大部分长视频都是多镜头叙事
- 避开链式衰减:I2V 接续每一段都用上一段末帧作输入,VAE 编码 → 采样 → VAE 解码每过一遍都引入轻微噪声/色彩漂移,链 6 次后画质明显劣化。多分镜每段从纯噪声开始,12 段都达到 5s 单段最佳质量
- 工程复杂度低 N 倍:只用 T2V 模型 / 复用 5s workflow / 错一段只重跑一段
注意:不适用于同一物体连续运动 30 秒类需求(比如一个人跳舞从头到尾)那种场景必须 I2V 链式。
分镜脚本设计
好分镜 = 场景具体可视化 × 风格统一 × seed 隔离。按「准备→烹饪→出锅」三幕、12 镜头展开:
幕一·准备(15s)        幕二·烹饪(30s)         幕三·出锅(15s)
01 食材摆台           04 热锅倒油            10 鸡蛋回锅
02 切番茄             05 倒蛋液              11 装盘撒葱
03 打鸡蛋             06 翻炒鸡蛋             12 成品特写
                     07 盛出鸡蛋
                     08 番茄入锅
                     09 加盐糖
单段 prompt 模板:<场景描述, 主体动作, 颜色对比, 镜头景别> + <统一风格后缀>。
风格后缀(12 段共用):
warm kitchen lighting, cinematic close-up, shallow depth of field,
photorealistic food photography, 4k detail
12 段场景描述实例(节选 3 段):
SHOTS = [
    ("01_ingredients", "Top-down view of fresh red tomatoes, white eggs in a bowl, "
                       "chopped green onions on a wooden cutting board, glass bottle "
                       "of cooking oil and small dish of salt arranged neatly on a "
                       "kitchen counter"),
    ("06_stir_egg",    "Close-up of a metal spatula stirring fluffy golden scrambled "
                       "eggs in a wok, the eggs forming soft chunks, steam rising "
                       "from the hot pan"),
    ("12_finished",    "Top-down close-up of the finished Chinese tomato scrambled "
                       "egg dish on a white plate, vibrant red tomatoes and golden "
                       "eggs glistening, fresh green onion garnish, steam rising, "
                       "served on a wooden table"),
]
三个设计要点:
- 主体动作必须可视化。
"chef cooks"太抽象模型会糊弄。"a hand holding a knife slowly slicing a ripe red tomato in half on a wooden board"才能出片 - 镜头景别明示(
top-down view/close-up/side angle),否则模型乱给视角,12 段拼起来视角跳脱 - seed 必须每段不同。同 seed + 同模型 + 相似 prompt → 12 段构图重复,叙事感丢失。本次用
seed = 100 + idx(101…112),每段独立构图
注意:风格后缀越长越精准、风格漂移风险越大。我用了 5 个修饰短语,再多模型容易过拟合到专业摄影感反而失去厨房真实感。
批处理脚本
整体流程如下
使用 ComfyUI API ,因为workflow JSON 已经在 ComfyUI 上调通过了,复用零成本。完整脚本如下:
- 单卡 GPU,并行只会让多个 prompt 互抢 VRAM 反而总耗时更久,这里串行让模型常驻 VRAM,每段稳定 40s
#!/usr/bin/env python3
"""60s 番茄炒蛋 — Wan 2.2 14B FP8 + LightX2V 串行 12 段"""
import json, time, urllib.request

SERVER = "http://127.0.0.1:8188"
WF = "/tmp/wan22_t2v_5s.json"
SUFFIX = (", warm kitchen lighting, cinematic close-up, shallow depth of field, "
          "photorealistic food photography, 4k detail")
SHOTS = [
    ("01_ingredients", "Top-down view of fresh red tomatoes, white eggs..."),
    # ... 12 个分镜(完整列表见 §6.2)
]

WF_TEMPLATE = json.load(open(WF))
results = []

for idx, (name, base_prompt) in enumerate(SHOTS, 1):
    # 1) 注入参数到 workflow 副本(深拷贝,避免污染下次循环)
    wf = json.loads(json.dumps(WF_TEMPLATE))
    seed = 100 + idx
    for nid, n in wf.items():
        inp = n.get("inputs", {}); ct = n.get("class_type", "")
        if inp.get("text") == "PROMPT_PLACEHOLDER":
            inp["text"] = base_prompt + SUFFIX
        if "noise_seed" in inp:
            inp["noise_seed"] = seed
        if ct == "EmptyHunyuanLatentVideo":
            inp["length"] = 81           # 81 帧 @ 16fps = 5.06s
        if "filename_prefix" in inp:
            inp["filename_prefix"] = f"cook_{name}"

    # 2) 提交并取 prompt_id
    data = json.dumps({"prompt": wf, "client_id": "cook"}).encode()
    req = urllib.request.Request(f"{SERVER}/prompt", data=data, method="POST",
                                 headers={"Content-Type": "application/json"})
    res = json.loads(urllib.request.urlopen(req, timeout=30).read())
    pid = res["prompt_id"]
    print(f"[{idx:02d}/12] {name} submitted {pid[:8]}", flush=True)

    # 3) 轮询 /history/<pid> 直到 completed
    t0 = time.time()
    while True:
        h = json.loads(urllib.request.urlopen(f"{SERVER}/history/{pid}").read())
        if pid in h and h[pid].get("status", {}).get("completed"):
            fname = next((g["filename"] for o in h[pid].get("outputs", {}).values()
                                          for g in o.get("gifs", [])), None)
            print(f"[{idx:02d}/12] DONE {fname} gen={time.time()-t0:.0f}s", flush=True)
            results.append((idx, name, fname, time.time()-t0))
            break
        time.sleep(5)
12 段时序与首段 290s成本。为什么首段 ~250s 加载?两个 14B FP8 专家共 ~28 GB 权重要从磁盘流入 GPU,期间 ComfyUI 还要做 patch 注入(LightX2V LoRA × 2、ModelSamplingSD3 × 2)。所有后续段都驻留显存,因为 12 段都用同一个模型组合。
[15:01:55] [01/12] 01_ingredients submitted 51246f99
[15:06:45] [01/12] DONE cook_01_ingredients_00001.mp4 gen=290s   # 含模型加载
[15:07:25] [02/12] DONE cook_02_cut_tomato_00001.mp4   gen=40s
[15:08:05] [03/12] DONE cook_03_beat_eggs_00001.mp4    gen=40s
... (每段稳定 40s)
[15:14:06] [12/12] DONE cook_12_finished_00001.mp4     gen=40s
GPU 占用情况如下。LightX2V 让我们只用 4 步、cfg=1.0(单 forward),激活内存只是普通 30 步 cfg 6.0 的 1/15。蒸馏 LoRA 既省时又省显存。
峰值 VRAM         ~34 GB / 46 GB  (28 GB 权重 + 6 GB 激活)
峰值 GPU 利用率   100% (采样阶段)
首次以后 idle    ~9-15 GB         (权重保留, 激活释放)
ffmpeg 拼接
这里使用交叉淡入淡出xfade,适合电影感/抒情类,过渡柔和。代价是必须重编码且总长缩短
ffmpeg -y \
  -i cook_01_ingredients_00001.mp4 \
  -i cook_02_cut_tomato_00001.mp4 \
  ... -i cook_12_finished_00001.mp4 \
  -filter_complex "
    [0:v][1:v]xfade=transition=fade:duration=0.3:offset=4.76[v1];
    [v1][2:v]xfade=transition=fade:duration=0.3:offset=9.52[v2];
    ... (11 个 xfade 链式)
    [v10][11:v]xfade=transition=fade:duration=0.3:offset=52.36[v11]
  " \
  -map "[v11]" -c:v libx264 -preset fast -crf 19 -pix_fmt yuv420p \
  cooking_60s_xfade.mp4
总时长12 × 5.06 - 11 × 0.3 = 57.44s`。自动生成 filter 链:
复用模板
换主题怎么改只需改三处:
SHOTS列表:替换为新主题的 12 段(name, prompt)SUFFIX:风格后缀按主题调(菜品/旅行/科技用词不同)- seed 起点:换个 base,避开旧主题的「记忆」
举例:冲一杯手冲咖啡12 分镜模板:
SHOTS = [
    ("01_beans",     "Top-down view of fresh roasted coffee beans..."),
    ("02_grind",     "Close-up of a manual coffee grinder grinding beans..."),
    ("03_filter",    "Hands placing a paper filter into a V60 dripper..."),
    # ... 共 12 段
]
SUFFIX = ", soft morning light, third-wave coffee aesthetic, shallow depth of field, 4k"
注意:换主题时风格后缀的场景常识词要对应——拍菜用
kitchen lighting、拍咖啡用morning light、拍科技产品用studio lighting,错配会导致风格冲突(比如 kitchen lighting 渲染 iPhone 会把环境染成黄色)。

AtomGit 是由开放原子开源基金会联合 CSDN 等生态伙伴共同推出的新一代开源与人工智能协作平台。平台坚持“开放、中立、公益”的理念,把代码托管、模型共享、数据集托管、智能体开发体验和算力服务整合在一起,为开发者提供从开发、训练到部署的一站式体验。
更多推荐
 2
2 0
0- 0


 已为社区贡献23条内容

所有评论(0)