【AI-RAN】基于GH200 进行 Aerial的部署
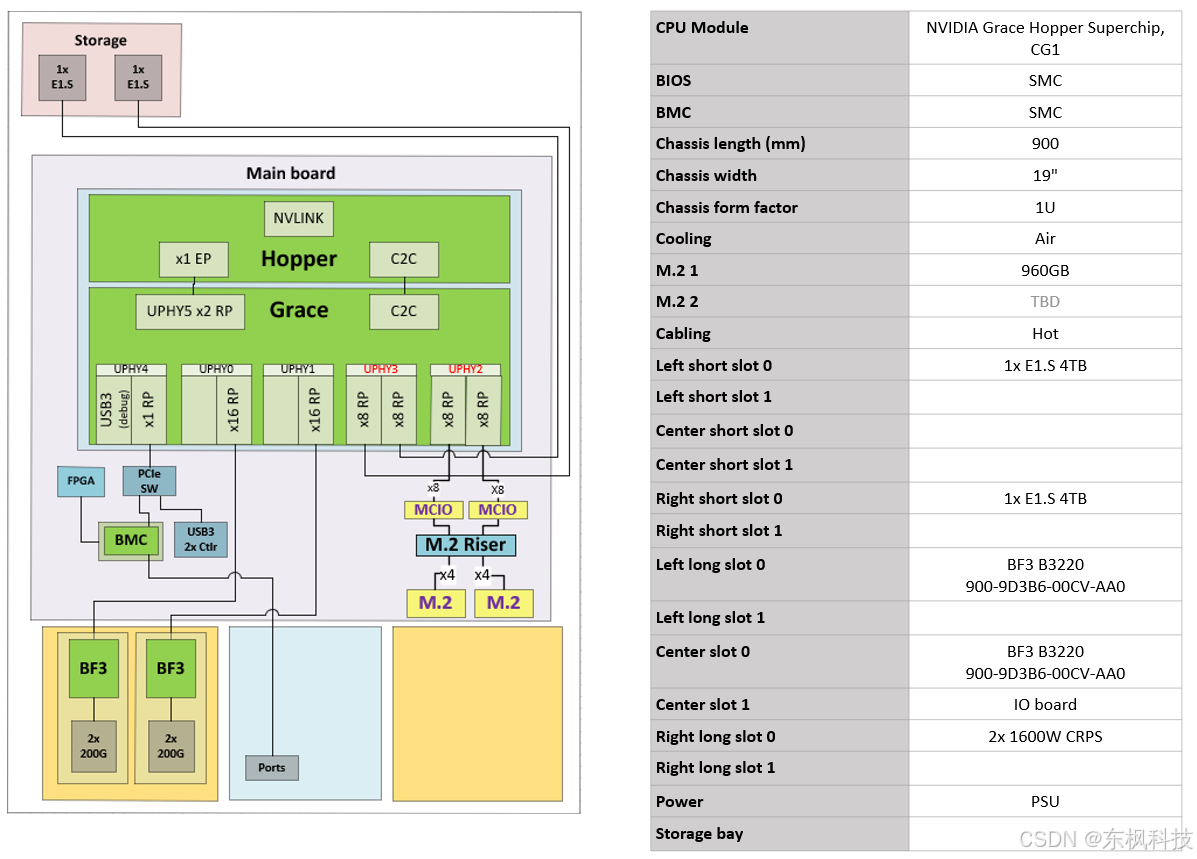
Supermicro Grace Hopper MGX 配置
Supermicro 服务器 SKU:ARS-111GL-NHR,里面的H100目前属于合规产品,支持合规客户进行使用。
俯视图:
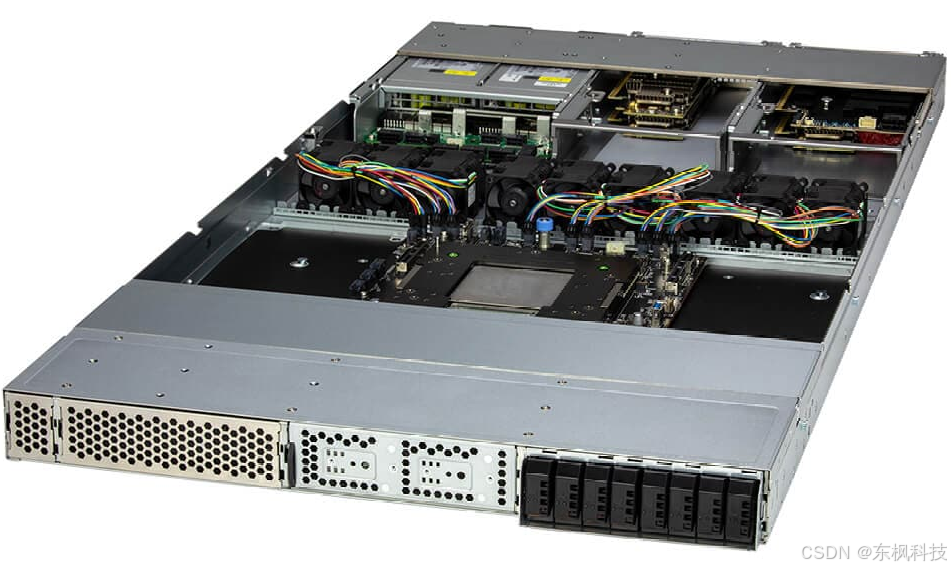
背面视图:

电缆连接
主机操作系统互联网连接
BF3 网卡专用于前传和回传连接,建议使用 USB 转以太网适配器连接到后 USB 端口,以实现主机操作系统的互联网连接。
端到端测试连接
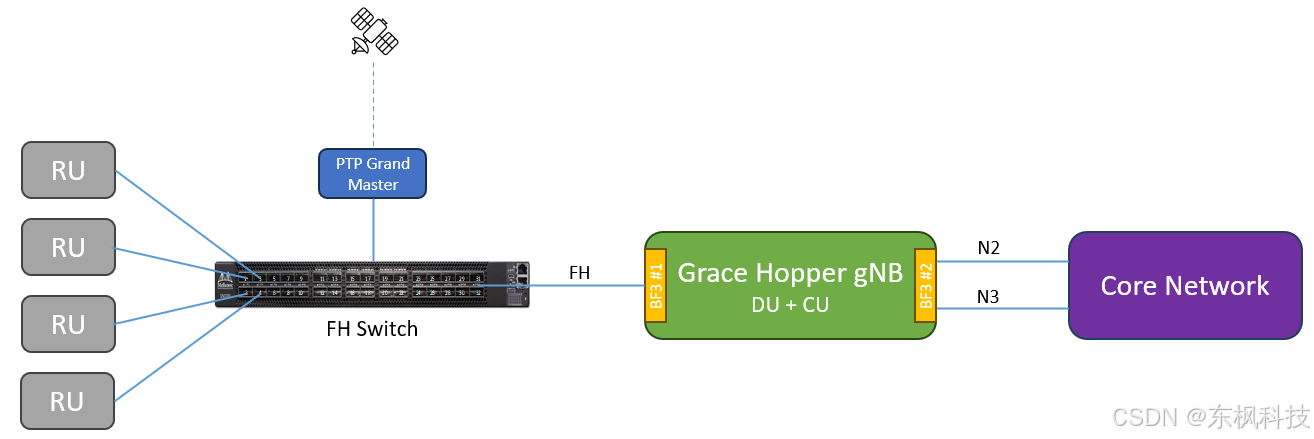
要使用 O-RU 进行端到端测试,BF3 前传端口 0 或端口 1 必须连接到前传交换机。请确保 PTP 配置为使用连接到前传交换机的端口。下图显示了 O-RAN LLS-C3 拓扑中的典型端到端连接。
cuBB 测试连接
要使用 TestMAC 和 RU 模拟器运行 cuBB 端到端测试,建议将 R750 RU 模拟器与 Grace Hopper MGX 系统搭配使用。BF3 网卡(部件号:900-9D3B6-00CV-AA0)应安装在 R750 服务器的第 7 个插槽中,如下图所示。

要配置 R750 RU 模拟器,请按照 Dell R750 上的“安装工具”中的说明进行操作。由于 R750 RU 模拟器没有 GPU,因此 可以跳过“安装 CUDA 驱动程序”步骤 。请注意,R750 RU 模拟器上 BF3 端口的 PCI 地址为 ca:00.0 和 ca:00.1。
lshw -c network -businfo
结果
Bus info          Device        Class          Description
==========================================================
pci@0000:04:00.0  eno8303       network        NetXtreme BCM5720 Gigabit Etherne
pci@0000:04:00.1  eno8403       network        NetXtreme BCM5720 Gigabit Etherne
pci@0000:ca:00.0  aerial00      network        MT43244 BlueField-3 integrated Co
pci@0000:ca:00.1  aerial01      network        MT43244 BlueField-3 integrated Co
要连接 Grace Hopper MGX 和 R750 RU 仿真器以运行超过 10 个小区,需要使用 Mellanox 200GbE 直连铜缆。100GbE 直连铜缆可以支持 10C 59c BFP9 协议,但无法支持 20C 60c BFP9 协议。

要在 R750 + BF3 上运行 RU 模拟器,请按如下方式更新 RU 模拟器 yaml 文件:
# For RU Emulator on R750 system
sed -i "s/ul_core_list.*/ul_core_list: [5,7,9,11,13,15,17,19,21,23,25,27,29,31,33,35,37,39,41,43]/" $RU_YAML
sed -i "s/dl_core_list.*/dl_core_list: [4,6,8,10,12,14,16,18,20,22,24,26,28,30,32,34,36,38,40,42]/" $RU_YAML
sed -i "s/aerial_fh_split_rx_tx_mempool.*/aerial_fh_split_rx_tx_mempool: 1/" $RU_YAML
sed -i "s/low_priority_core.*/low_priority_core: 45/" $RU_YAML
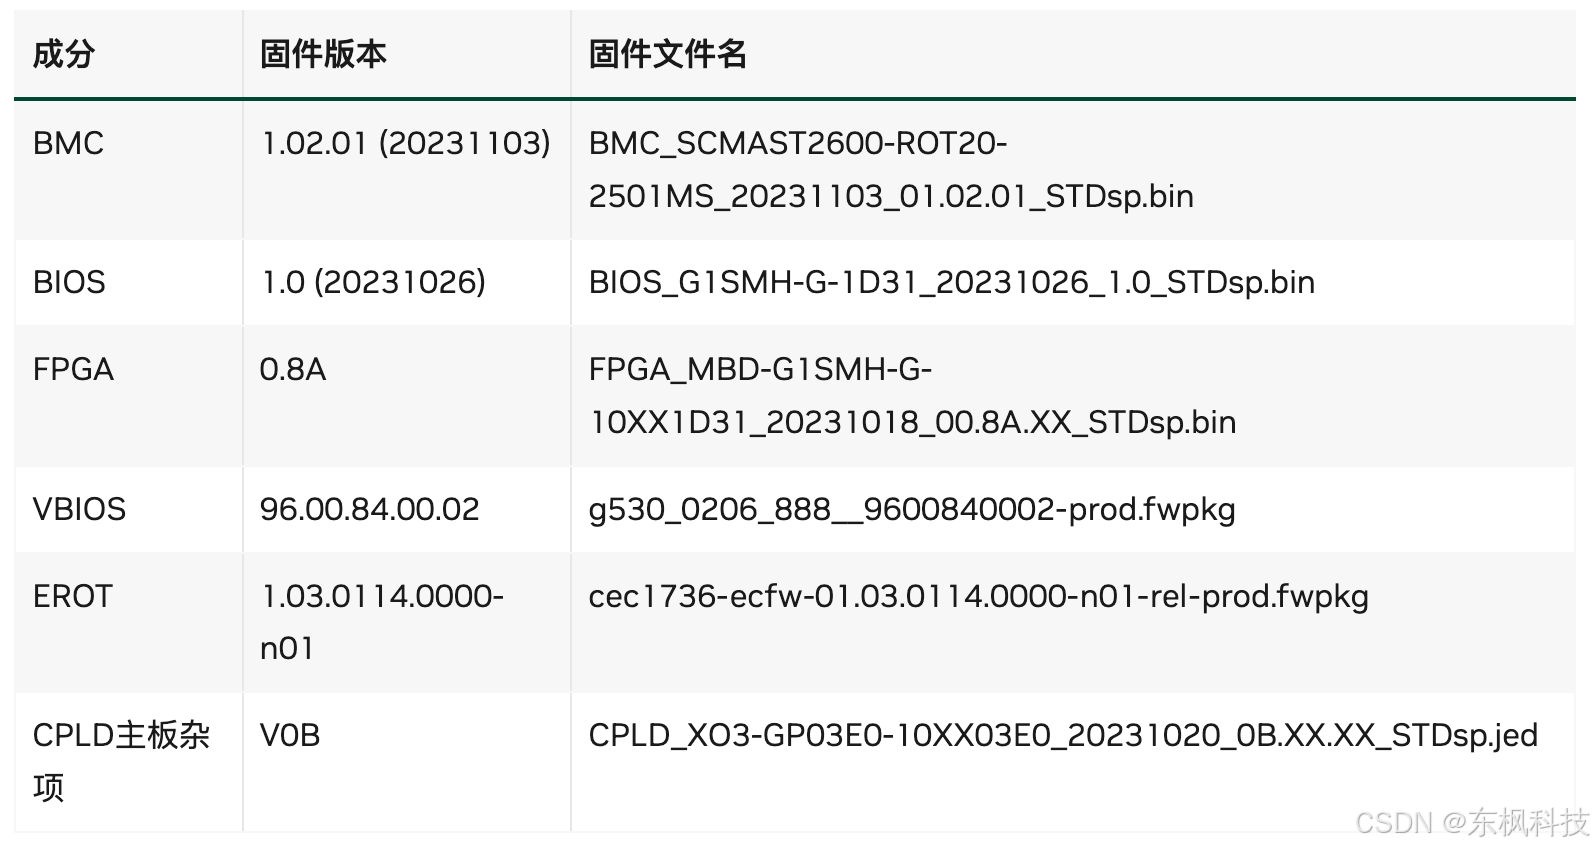
系统固件升级
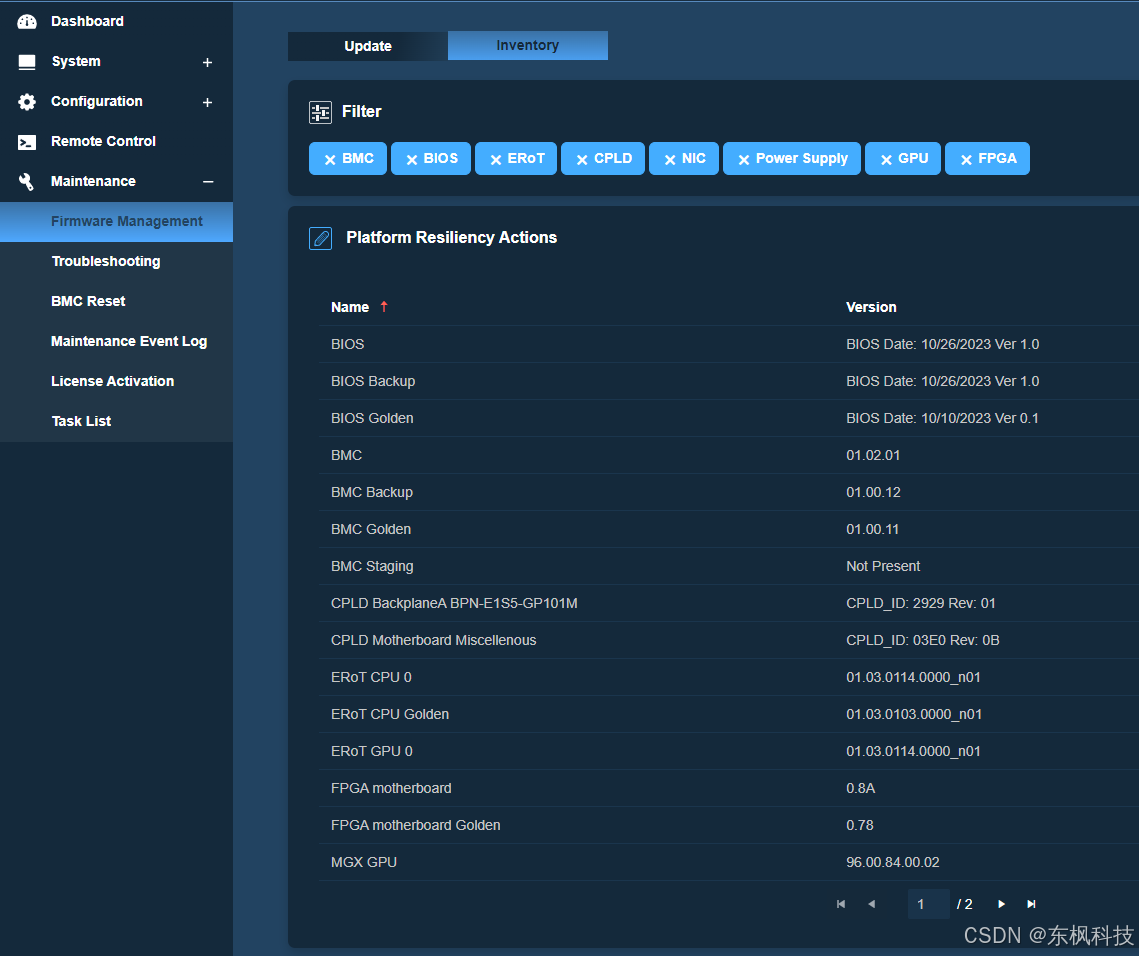
首次启动时,登录BMC检查固件清单。依次进入“控制面板” -> “维护” -> “固件管理” -> “清单”查看当前固件版本。
以下是最低版本要求列表。如果您的系统固件版本较低,请升级到以下版本或更新版本。
建议的固件更新顺序如下:
-
关闭主机电源
-
更新 BMC
-
更新CPLD主板杂项
-
更新 CPU ERoT
-
更新FPGA
-
交流电源循环
-
更新BIOS
-
更新 VBIOS
-
重启或断电
要更新特定组件的固件,请转到“控制面板” -> “维护” -> “固件管理” -> “更新” ,然后选择组件图标 -> “下一步” -> “选择文件” -> “上传” -> “更新”。例如,按如下方式选择 BMC 及其固件文件: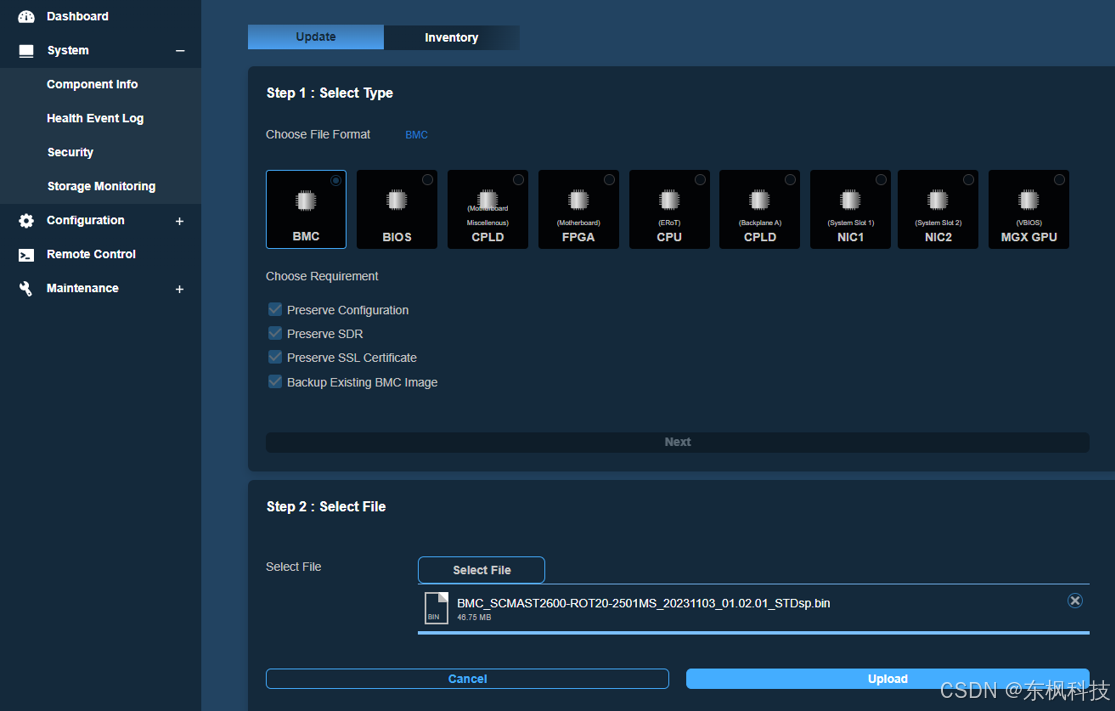
对于非 BMC 固件更新,它会被添加到任务列表中,以便在下次启动时进行更新。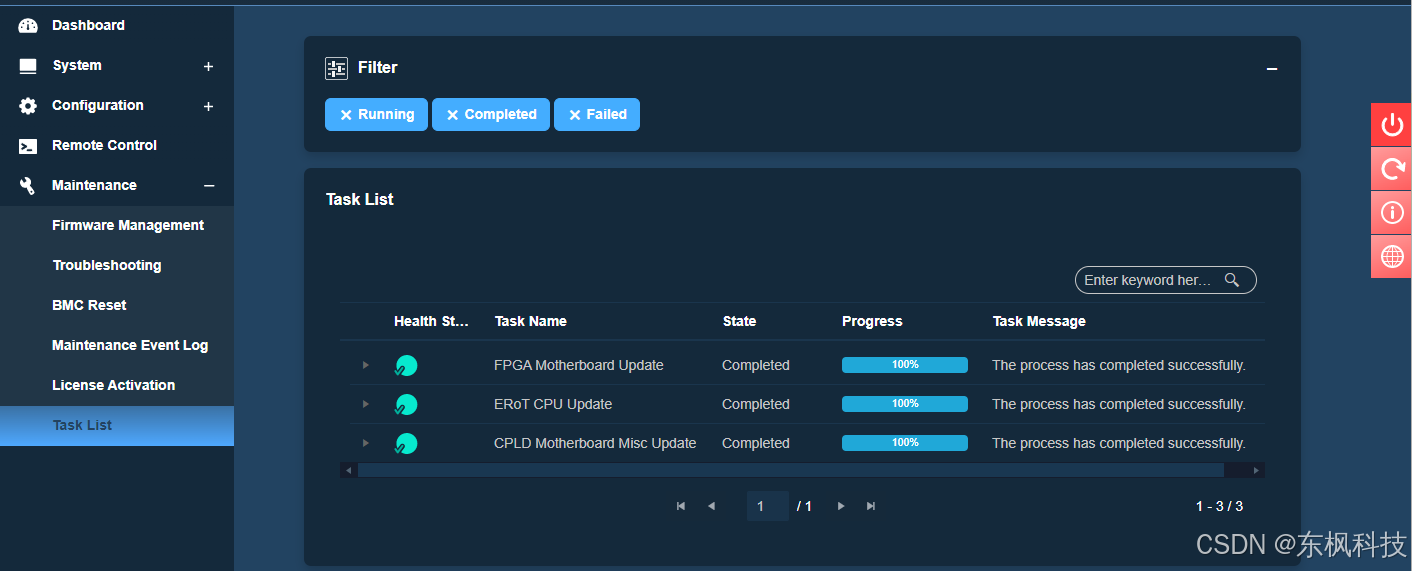
安装 Ubuntu 22.04 服务器版
从https://ubuntu.com/download/server/arm下载适用于 ARM 架构的 Ubuntu Server 22.04 ISO 镜像。安装系统操作系统之前,请准备一个包含该镜像的启动 U 盘,或者在 BMC 中配置虚拟介质以进行远程安装。此外,请确保已将 USB 转以太网适配器连接到主机背面的 USB 端口,以便主机能够访问互联网。
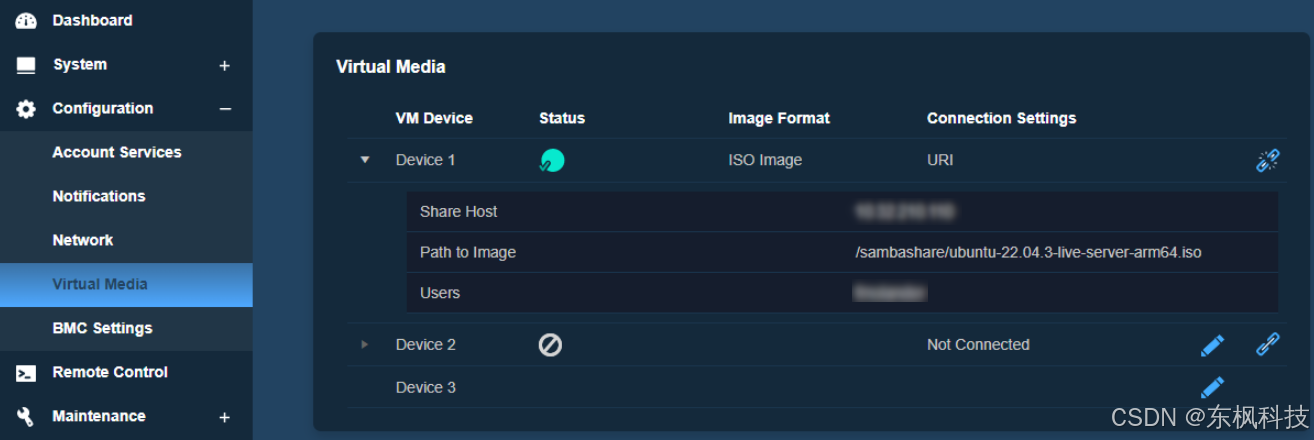
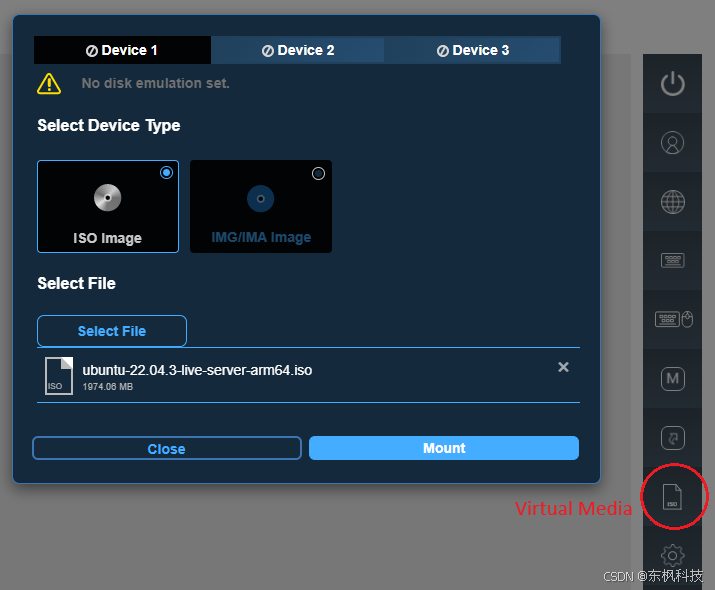
配置虚拟介质有两种方法。一种是通过 Windows 网络共享或 Linux 上的 Samba 共享来共享操作系统 ISO 镜像。然后,转到 BMC控制面板-> 配置->虚拟介质,输入虚拟介质连接信息,包括共享主机 IP 地址、镜像路径、用户名和密码。保存连接信息后,单击“链接”图标进行连接。
配置虚拟媒体的另一种方法是从远程控制台选择虚拟媒体图标,然后将操作系统 ISO 映像挂载到虚拟 CD/DVD 驱动器。
虚拟介质配置并连接完成后,重启系统。按F11进入 BIOS 启动菜单,选择UEFI: USB CD/DVD 驱动器, 从虚拟介质启动。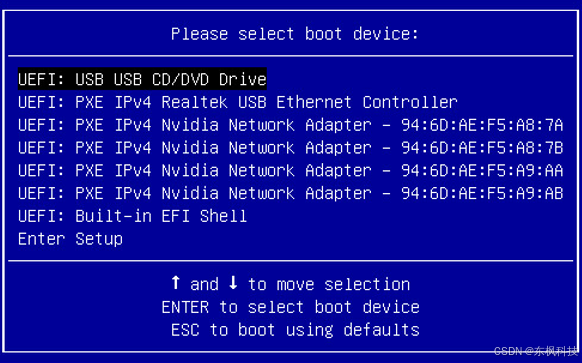
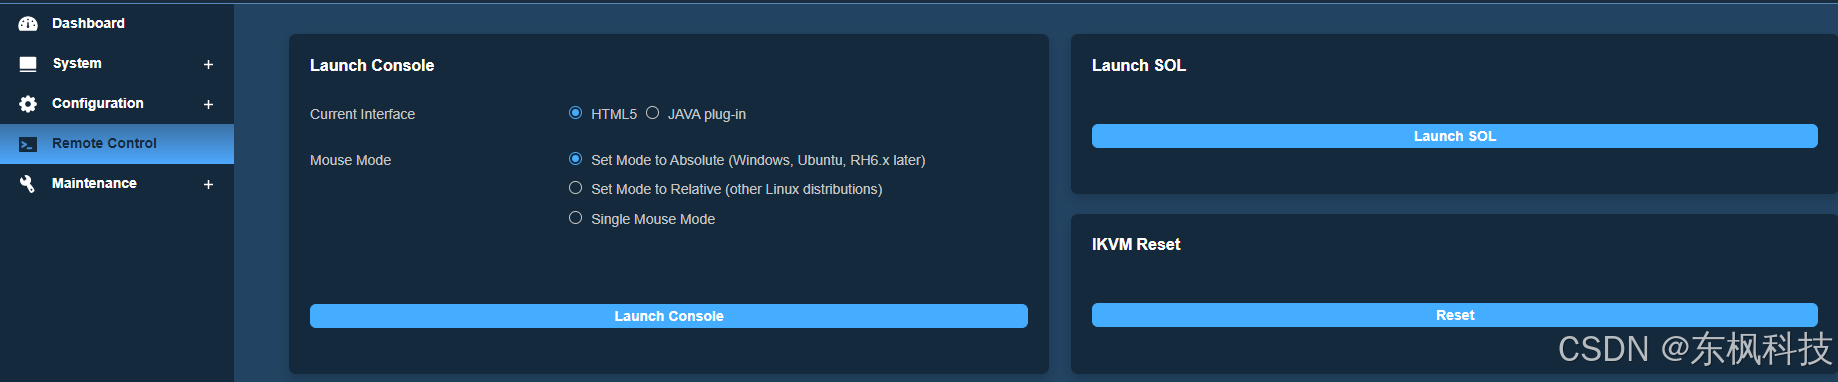
从 BMC 远程控制菜单启动 SOL 控制台。安装 Ubuntu 操作系统需要使用 SOL 控制台。
Ubuntu 22.04.3 安装介质缺少一个用于解决ast驱动程序问题的必要补丁。ast驱动程序用于与 BMC 进行交互。缺少此补丁会导致板载显示端口和远程控制台的输出失真。因此,必须在SOL 控制台上进行操作系统安装。NVIDIA 优化的 Ubuntu 内核中包含此修复程序。安装 NVIDIA 优化的 Ubuntu 内核后,板载显示器和 BMC 远程控制台的输出将恢复正常。
按照以下步骤进行Ubuntu安装:
-
继续以富文本模式
-
继续而不更新
-
Ubuntu 服务器
-
安装 OpenSSH 服务器
安装完成后,控制台会显示“安装完成”和“立即重启”。重启系统后,请检查以下内容:
- 检查系统时间是否正确,以避免apt更新错误。
运行以下命令通过 NTP 设置日期和时间(此操作不会启用 NTP 服务):
sudo apt-get install ntpdate
sudo ntpdate -s pool.ntp.org
- 检查操作系统是否检测到GPU和网卡。
使用以下命令确定操作系统是否检测到 GPU 和网卡:
lspci | grep -i nvidia

lspci | grep -i mellanox
结果
$ lspci | grep -i nvidia
# GH200 GPU
0009:01:00.0 3D controller: NVIDIA Corporation Device 2342 (rev a1)

$ lspci | grep -i mellanox
# The first BF3 NIC (Fronthaul NIC)
0000:01:00.0 Ethernet controller: Mellanox Technologies MT43244 BlueField-3 integrated ConnectX-7 network controller (rev 01)
0000:01:00.1 Ethernet controller: Mellanox Technologies MT43244 BlueField-3 integrated ConnectX-7 network controller (rev 01)
0000:01:00.2 DMA controller: Mellanox Technologies MT43244 BlueField-3 SoC Management Interface (rev 01)
# The second BF3 NIC (Backhaul NIC)
0002:01:00.0 Ethernet controller: Mellanox Technologies MT43244 BlueField-3 integrated ConnectX-7 network controller (rev 01)
0002:01:00.1 Ethernet controller: Mellanox Technologies MT43244 BlueField-3 integrated ConnectX-7 network controller (rev 01)
0002:01:00.2 DMA controller: Mellanox Technologies MT43244 BlueField-3 SoC Management Interface (rev 01)
使用以下命令更改主机名:
sudo hostnamectl set-hostname NEW_HOSTNAME
要在启动时显示 GRUB 菜单,请创建/etc/default/grub.d/menu.cfg 文件,并添加以下内容:
 $ cat <<"EOF" | sudo tee /etc/default/grub.d/menu.cfg
 GRUB_TIMEOUT_STYLE=menu
 GRUB_TIMEOUT=5
 GRUB_TERMINAL="console serial"
 GRUB_CMDLINE_LINUX_DEFAULT=""
 GRUB_SERIAL_COMMAND="$GRUB_SERIAL_COMMAND serial --unit=0 --speed=115200 --word=8 --parity=no --stop=1"
 EOF
配置网络接口
以下安装步骤需要连接互联网。请确保您的本地网络已正确配置 netplan。
重启后网络接口名称可能会发生变化。为确保重启后网络接口名称保持不变,请在 /etc/systemd/network 目录下创建持久化的 net link 文件,每个接口对应一个文件。
要查找 BlueField-3 网卡的 MAC 地址,请运行命令lshw检查网络设备并查找ConnectX-7相关条目。
sudo apt-get install jq -y
sudo lshw -json -C network | jq '.[] | "\(.product), MAC: \(.serial)"' | grep "ConnectX-7"
结果
$ sudo apt-get install jq -y
$ sudo lshw -json -C network | jq '.[] | "\(.product), MAC: \(.serial)"' | grep "ConnectX-7"
"MT43244 BlueField-3 integrated ConnectX-7 network controller, MAC: 94:6d:ae:ww:ww:ww"
"MT43244 BlueField-3 integrated ConnectX-7 network controller, MAC: 94:6d:ae:xx:xx:xx"
"MT43244 BlueField-3 integrated ConnectX-7 network controller, MAC: 94:6d:ae:yy:yy:yy"
"MT43244 BlueField-3 integrated ConnectX-7 network controller, MAC: 94:6d:ae:zz:zz:zz"
在 /etc/systemd/network/ 目录下创建文件,文件名称为接口的所需名称,MAC 地址为上一步中找到的地址。
本文档的其余部分将假设 aerial00 和 aerial01 接口是连接到 cuBB 测试的 RU 模拟器或 E2E 测试的前端交换机的接口,并且 aerial00 是用于 PTP 的接口。
$ sudo nano /etc/systemd/network/20-aerial00.link

[Match]
MACAddress=94:6d:ae:ww:ww:ww

[Link]
Name=aerial00

$ sudo nano /etc/systemd/network/20-aerial01.link

[Match]
MACAddress=94:6d:ae:xx:xx:xx

[Link]
Name=aerial01

$ sudo nano /etc/systemd/network/20-aerial02.link

[Match]
MACAddress=94:6d:ae:yy:yy:yy

[Link]
Name=aerial02

$ sudo nano /etc/systemd/network/20-aerial03.link

[Match]
MACAddress=94:6d:ae:zz:zz:zz

[Link]
Name=aerial03
要应用此更改:
sudo netplan apply
禁用自动升级
编辑/etc/apt/apt.conf.d/20auto-upgrades系统文件,将两行中的“1”都改为“0”。这样可以防止后续软件升级时意外更改已安装的低延迟内核版本。
sudo nano /etc/apt/apt.conf.d/20auto-upgrades
结果
$ sudo nano /etc/apt/apt.conf.d/20auto-upgrades
APT::Periodic::Update-Package-Lists "0";
APT::Periodic::Unattended-Upgrade "0";
禁用 fwupd-refresh 定时器,以防止 fwupdmgr 自动检查任何更新。
sudo systemctl mask fwupd-refresh.timer
安装 NVIDIA 优化版 Ubuntu 内核
运行以下命令安装 NVIDIA 优化的 Ubuntu 内核。
sudo apt update
sudo apt install -y linux-image-6.8.0-1025-nvidia-64k
然后,更新 GRUB 以更改默认启动内核。此处要使用的版本取决于之前命令安装的最新版本:
sudo sed -i 's/^GRUB_DEFAULT=.*/GRUB_DEFAULT="Advanced options for Ubuntu>Ubuntu, with Linux 6.8.0-1025-nvidia-64k"/' /etc/default/grub
配置 Linux 内核命令行
请确保内核中未传递iommu.passthrough=y内核参数。此参数会阻止 GPU 驱动程序加载,因此如果存在,必须将其移除。
运行以下命令验证参数是否存在:
grep iommu.passthrough=y /proc/cmdline
如果存在该参数,请找到包含该参数的文件并将其删除。例如:
grep -rns iommu.passthrough /etc/default/grub*

sudo sed -i 's/ iommu.passthrough=y//' /etc/default/<found file>
要设置内核命令行参数,请编辑GRUB_CMDLINE_LINUXgrub 文件中的相应参数/etc/default/grub.d/cmdline.cfg,并添加或更新以下参数。以下内核参数针对 GH200 进行了优化。要自动将这些参数添加到 grub 文件中,请输入以下命令:
 $ cat <<"EOF" | sudo tee /etc/default/grub.d/cmdline.cfg
 GRUB_CMDLINE_LINUX="$GRUB_CMDLINE_LINUX pci=realloc=off pci=pcie_bus_safe default_hugepagesz=512M hugepagesz=512M hugepages=48 tsc=reliable processor.max_cstate=0 audit=0 idle=poll rcu_nocb_poll nosoftlockup irqaffinity=0 isolcpus=managed_irq,domain,4-64 nohz_full=4-64 rcu_nocbs=4-64 earlycon module_blacklist=nouveau acpi_power_meter.force_cap_on=y numa_balancing=disable init_on_alloc=0 preempt=none"
 EOF
大页大小为 512MB,针对 ARM 上的 64k 页大小内核进行了优化。
应用更改并重启以加载内核
sudo update-grub
sudo reboot
重启后,输入以下命令以验证内核命令行参数是否配置正确:
uname -r

cat /proc/cmdline
结果:
$ uname -r
6.8.0-1025-nvidia-64k

$ cat /proc/cmdline
BOOT_IMAGE=/vmlinuz-6.8.0-1025-nvidia-64k root=/dev/mapper/ubuntu--vg-ubuntu--lv ro pci=realloc=off pci=pcie_bus_safe default_hugepagesz=512M hugepagesz=512M hugepages=48 tsc=reliable processor.max_cstate=0 audit=0 idle=poll rcu_nocb_poll nosoftlockup irqaffinity=0 isolcpus=managed_irq,domain,4-64 nohz_full=4-64 rcu_nocbs=4-64 earlycon module_blacklist=nouveau acpi_power_meter.force_cap_on=y numa_balancing=disable init_on_alloc=0 preempt=none
输入以下命令以验证是否启用了巨页模式:
grep -i huge /proc/meminfo
结果:
$ grep -i huge /proc/meminfo
AnonHugePages:         0 kB
ShmemHugePages:        0 kB
FileHugePages:         0 kB
HugePages_Total:      48
HugePages_Free:       48
HugePages_Rsvd:        0
HugePages_Surp:        0
Hugepagesize:     524288 kB
Hugetlb:        25165824 kB
安装依赖包
输入以下命令安装必备软件包:
sudo apt-get update
sudo apt-get install -y build-essential linux-headers-$(uname -r) dkms unzip linuxptp pv apt-utils net-tools
在主机上安装 DOCA OFED 和 Mellanox 固件工具
检查主机系统上是否已安装 MOFED。
ofed_info -s
结果
$ ofed_info -s
OFED-internal-24.04-0.6.6:
如果已安装 MOFED,请按照DOCA Linux 安装指南将其卸载。
for f in $( dpkg --list | grep -E 'doca|flexio|dpa-gdbserver|dpa-stats|dpaeumgmt' | awk '{print $2}' ); do echo $f ; sudo apt remove --purge $f -y ; done
sudo /usr/sbin/ofed_uninstall.sh --force
sudo apt-get autoremove
输入以下命令安装 DOCA OFED。
wget https://www.mellanox.com/downloads/DOCA/DOCA_v3.2.1/host/doca-host_3.2.1-044000-25.10-ubuntu2204_arm64.deb
sudo dpkg -i doca-host_3.2.1-044000-25.10-ubuntu2204_arm64.deb
sudo apt update
sudo apt install -y doca-tools doca-ofed  mlnx-fw-updater
sudo systemctl restart rshim


ofed_info -s
结果
# Install DOCA OFED
$ wget https://www.mellanox.com/downloads/DOCA/DOCA_v3.2.1/host/doca-host_3.2.1-044000-25.10-ubuntu2204_arm64.deb
$ sudo dpkg -i doca-host_3.2.1-044000-25.10-ubuntu2204_arm64.deb
$ sudo apt update
$ sudo apt install -y doca-tools doca-ofed  mlnx-fw-updater
$ sudo systemctl restart rshim

# The mlnx-fw-updater should update the NIC FW automatically if it detects the newer version is available.
Attempting to perform Firmware update...
Querying Mellanox devices firmware ...

# To check what version of OFED you have installed
$ ofed_info -s
OFED-internal-25.10-1.7.1:
重启系统以使网卡固件更新生效。
Mellanox固件工具已通过DOCA-HOST软件包安装。运行以下命令验证安装情况。
apt list --installed | grep mft

sudo mst version

sudo mst start

sudo mst status -v
结果
$ apt list --installed | grep mft
kernel-mft-dkms/DOCA-HOST-3.2.1,now 4.34.1.10-1 all [installed,automatic]
mft-mlx5/DOCA-HOST-3.2.1,now 4.34.1-10 arm64 [installed,automatic]
mft-nvredfish/DOCA-HOST-3.2.1,now 4.34.1-10 arm64 [installed,automatic]
mft/DOCA-HOST-3.2.1,now 4.34.1-10 arm64 [installed,automatic]

$ sudo mst version
mst, mft 4.34.1-10, Git SHA Hash: 69d534bb1

$ sudo mst start

# check NIC PCIe bus addresses and network interface names
$ sudo mst status -v
MST modules:
------------
    MST PCI module is not loaded
    MST PCI configuration module loaded
PCI devices:
------------
DEVICE_TYPE             MST                           PCI             RDMA            NET                                     NUMA
BlueField3(rev:1)       /dev/mst/mt41692_pciconf0     0000:01:00.0    mlx5_0          net-aerial00                            0
BlueField3(rev:1)       /dev/mst/mt41692_pciconf0.1   0000:01:00.1    mlx5_1          net-aerial01                            0
BlueField3(rev:1)       /dev/mst/mt41692_pciconf1     0002:01:00.0    mlx5_2          net-aerial02                            0
BlueField3(rev:1)       /dev/mst/mt41692_pciconf1.1   0002:01:00.1    mlx5_3          net-aerial03                            0
输入以下命令检查端口 0 的链路状态:
sudo mlxlink -d 0000:01:00.0
结果:
# Here is an example if the port 0 of fronthaul NIC is connected to another server or switch via a 200GbE DAC cable.
$ sudo mlxlink -d 0000:01:00.0

Operational Info
----------------
State                              : Active
Physical state                     : LinkUp
Speed                              : 200G
Width                              : 4x
FEC                                : Standard_RS-FEC - (544,514)
Loopback Mode                      : No Loopback
Auto Negotiation                   : ON

Supported Info
--------------
Enabled Link Speed (Ext.)          : 0x00003ff2 (200G_2X,200G_4X,100G_1X,100G_2X,100G_4X,50G_1X,50G_2X,40G,25G,10G,1G)
Supported Cable Speed (Ext.)       : 0x000017f2 (200G_4X,100G_2X,100G_4X,50G_1X,50G_2X,40G,25G,10G,1G)

Troubleshooting Info
--------------------
Status Opcode                      : 0
Group Opcode                       : N/A
Recommendation                     : No issue was observed

Tool Information
----------------
Firmware Version                   : 32.47.1088
amBER Version                      : 5.75
MFT Version                        : 4.34.1-10
请按照“配置 BF3 网卡”中的说明配置 BF3 网卡。
安装 CUDA 驱动程序
如果系统安装了旧版驱动程序,请使用以下命令卸载当前驱动程序模块并卸载旧驱动程序:
for m in $(lsmod | awk "/^[^[:space:]]*(nvidia|nv_|gdrdrv)/ {print \$1}"); do echo Unload $m...; sudo rmmod $m; done

sudo /usr/bin/nvidia-uninstall
请使用以下推荐设置创建驱动程序模块配置:
 $ cat <<EOF | sudo tee /etc/modprobe.d/nvidia.conf
 options nvidia NVreg_RegistryDwords="RMNvLinkDisableLinks=0x3FFFF;"
 EOF
运行以下命令安装NVIDIA 开源 GPU 内核驱动程序(OpenRM)。
wget https://developer.download.nvidia.com/compute/cuda/13.1.1/local_installers/cuda_13.1.1_590.48.01_linux_sbsa.run
sudo sh cuda_13.1.1_590.48.01_linux_sbsa.run --extract=/tmp/cuda_extract
sudo sh /tmp/cuda_extract/NVIDIA-Linux-aarch64-590.48.01.run --silent -m kernel-open

nvidia-smi
结果
# Install NVIDIA GPU driver
$ wget https://developer.download.nvidia.com/compute/cuda/13.1.1/local_installers/cuda_13.1.1_590.48.01_linux_sbsa.run
$ sudo sh cuda_13.1.1_590.48.01_linux_sbsa.run --extract=/tmp/cuda_extract
$ sudo sh /tmp/cuda_extract/NVIDIA-Linux-aarch64-590.48.01.run --silent -m kernel-open

# Verify that the driver is loaded successfully
$ nvidia-smi
+-----------------------------------------------------------------------------------------+
| NVIDIA-SMI 590.48.01              Driver Version: 590.48.01      CUDA Version: 13.1     |
+-----------------------------------------+------------------------+----------------------+
| GPU  Name                 Persistence-M | Bus-Id          Disp.A | Volatile Uncorr. ECC |
| Fan  Temp   Perf          Pwr:Usage/Cap |           Memory-Usage | GPU-Util  Compute M. |
|                                         |                        |               MIG M. |
|=========================================+========================+======================|
|   0  NVIDIA GH200 480GB             On  |   00000009:01:00.0 Off |                    0 |
| N/A   32C    P0            119W /  900W |       0MiB /  97871MiB |      0%      Default |
|                                         |                        |             Disabled |
+-----------------------------------------+------------------------+----------------------+

+-----------------------------------------------------------------------------------------+
| Processes:                                                                              |
|  GPU   GI   CI              PID   Type   Process name                        GPU Memory |
|        ID   ID                                                               Usage      |
|=========================================================================================|
|  No running processes found                                                             |
+-----------------------------------------------------------------------------------------+
安装 GDRCopy 驱动程序
运行以下命令安装 GDRCopy 驱动程序。如果系统已安装旧版本,请先卸载旧驱动程序。
GDRCopy 驱动程序必须在 CUDA 驱动程序之后安装。
apt list --installed | grep gdrdrv-dkms

sudo apt purge gdrdrv-dkms
sudo apt autoremove

wget https://developer.download.nvidia.com/compute/redist/gdrcopy/CUDA%2012.8/ubuntu22_04/aarch64/gdrdrv-dkms_2.5-1_arm64.Ubuntu22_04.deb
sudo dpkg -i gdrdrv-dkms_2.5-1_arm64.Ubuntu22_04.deb
安装 Docker CE
安装 Docker CE 的完整官方说明请参见:https://docs.docker.com/engine/install/ubuntu/#install-docker-engine。以下说明是安装 Docker CE 的一种受支持的方法:
为了确保正常工作,必须在安装 Docker CE 或 nvidia-container-toolkit 之前安装 CUDA 驱动程序。建议您在安装 Docker CE 或 nvidia-container-toolkit 之前安装 CUDA 驱动程序。
sudo apt-get update
sudo apt-get install -y ca-certificates curl gnupg
sudo install -m 0755 -d /etc/apt/keyrings
curl -fsSL https://download.docker.com/linux/ubuntu/gpg | sudo gpg --dearmor -o /etc/apt/keyrings/docker.gpg
sudo chmod a+r /etc/apt/keyrings/docker.gpg
echo \
sudo apt-get update
sudo apt-get install -y docker-ce docker-ce-cli containerd.io docker-buildx-plugin docker-compose-plugin
sudo docker run --rm hello-world
安装 Nvidia 容器工具包
找到并按照 nvidia-container-toolkit 的安装说明进行操作。
或者,您也可以使用以下说明来安装 nvidia-container-toolkit。
为了确保正常工作,必须在安装 Docker CE 或 nvidia-container-toolkit 之前安装 CUDA 驱动程序。建议您在安装 Docker CE 或 nvidia-container-toolkit 之前安装 CUDA 驱动程序。
curl -fsSL https://nvidia.github.io/libnvidia-container/gpgkey | sudo gpg --dearmor -o /usr/share/keyrings/nvidia-container-toolkit-keyring.gpg \

sudo apt-get install -y nvidia-container-toolkit
sudo nvidia-ctk runtime configure --runtime=docker
sudo systemctl restart docker
sudo docker run --rm --runtime=nvidia --gpus all ubuntu nvidia-smi
如果您的现有系统上已安装 nvidia-container-toolkit,请运行以下命令检查版本 。如果版本低于 1.17.4,请运行以下命令升级到最新版本:nvidia-ctk --version
nvidia-ctk --version

sudo apt update
sudo apt-get install -y nvidia-container-toolkit

nvidia-ctk --version
结果
$ nvidia-ctk --version
NVIDIA Container Toolkit CLI version 1.14.4
commit: d167812ce3a55ec04ae2582eff1654ec812f42e1

$ sudo apt update
$ sudo apt-get install -y nvidia-container-toolkit

$ nvidia-ctk --version
NVIDIA Container Toolkit CLI version 1.18.1
commit: efe99418ef87500dbe059cadc9ab418b2815b9d5
更新 BF3 BFB 镜像和网卡固件
-
以下说明专门针对 BF3 网卡(OPN:900-9D3B6-00CV-A;PSID:MT_0000000884)。
-
如果使用下面的 BFB 镜像,则无需切换到 DPU 模式。
-
此BFB镜像将自动更新网卡固件。
-
使用命令“sudo systemctl status rshim”检查RShim服务是否正在运行。如果未运行,请使用命令“sudo systemctl restart rshim”重启RShim服务。
sudo mst start
sudo mst status


wget https://content.mellanox.com/BlueField/FW-Bundle/bf-fwbundle-3.2.1-34_25.11-prod.bfb

sudo bfb-install -r rshim0 -b bf-fwbundle-3.2.1-34_25.11-prod.bfb
sudo bfb-install -r rshim1 -b bf-fwbundle-3.2.1-34_25.11-prod.bfb


sleep 600


sudo mst start
sudo flint -d /dev/mst/mt41692_pciconf0 q
结果
# Enable MST
$ sudo mst start
$ sudo mst status

MST modules:
------------
    MST PCI module is not loaded
    MST PCI configuration module loaded

MST devices:
------------
/dev/mst/mt41692_pciconf0        - PCI configuration cycles access.
                                domain:bus:dev.fn=0000:01:00.0 addr.reg=88 data.reg=92 cr_bar.gw_offset=-1
                                Chip revision is: 01
/dev/mst/mt41692_pciconf1        - PCI configuration cycles access.
                                domain:bus:dev.fn=0002:01:00.0 addr.reg=88 data.reg=92 cr_bar.gw_offset=-1
                                Chip revision is: 01


# Download the BF3 BFB image
$ wget https://content.mellanox.com/BlueField/FW-Bundle/bf-fwbundle-3.2.1-34_25.11-prod.bfb

# Update the BFB image of the 1st BF3
$ sudo bfb-install -r rshim0 -b bf-fwbundle-3.2.1-34_25.11-prod.bfb
# Update the BFB image of the 2nd BF3
$ sudo bfb-install -r rshim1 -b bf-fwbundle-3.2.1-34_25.11-prod.bfb

Pushing bfb
Collecting BlueField booting status. Press Ctrl+C to stop…
 INFO[PSC]: PSC BL1 START
 INFO[BL2]: start
 INFO[BL2]: boot mode (rshim)
 INFO[BL2]: VDD_CPU: 870 mV
 INFO[BL2]: VDDQ: 1120 mV
 INFO[BL2]: DDR POST passed
 INFO[BL2]: UEFI loaded
 INFO[BL31]: start
 INFO[BL31]: lifecycle GA Secured
 INFO[BL31]: runtime
 INFO[BL31]: MB ping success
 INFO[UEFI]: Partial NIC
 INFO[UEFI]: eMMC init
 INFO[UEFI]: eMMC probed
 INFO[UEFI]: UPVS valid
 INFO[UEFI]: PMI: updates started
 INFO[UEFI]: PMI: total updates: 1
 INFO[UEFI]: PMI: updates completed, status 0
 INFO[UEFI]: PCIe enum start
 INFO[UEFI]: PCIe enum end
 INFO[BL31]: Partial NIC
 INFO[BL31]: power capping disabled
 INFO[UEFI]: UEFI Secure Boot (disabled)
 INFO[UEFI]: PK configured
 INFO[UEFI]: Redfish enabled
 INFO[UEFI]: exit Boot Service
 INFO[MISC]: Erasing eMMC drive: /dev/mmcblk0
 INFO[MISC]: Erasing NVME drive: /dev/nvme0n1
 INFO[MISC]: Ubuntu installation started
 INFO[MISC]: Installing OS image
 INFO[MISC]: Ubuntu installation completed
 INFO[MISC]: Updating NIC firmware...
 INFO[MISC]: NIC firmware update done: 32.47.1088
 INFO[MISC]: Installation finished

# Wait 10 minutes to ensure the card initializes properly after the BFB installation
$ sleep 600

# NOTE: Requires a full power cycle from host with cold boot

# Verify NIC FW version after reboot
$ sudo mst start
$ sudo flint -d /dev/mst/mt41692_pciconf0 q
Image type:            FS4
FW Version:            32.47.1088
FW Release Date:       9.12.2025
Product Version:       32.47.1088
Rom Info:              type=UEFI Virtio net version=21.4.13 cpu=AMD64,AARCH64
                       type=UEFI Virtio blk version=22.4.14 cpu=AMD64,AARCH64
                       type=UEFI version=14.40.10 cpu=AMD64,AARCH64
                       type=PXE version=3.8.201 cpu=AMD64
Description:           UID                GuidsNumber
Base GUID:             9c63c00300f43726        38
Base MAC:              9c63c0f43726            38
Image VSD:             N/A
Device VSD:            N/A
PSID:                  MT_0000000884
Security Attributes:   secure-fw
运行以下命令配置 BF3 网卡:
sudo mlxconfig -d /dev/mst/mt41692_pciconf0 --yes set LINK_TYPE_P1=2
sudo mlxconfig -d /dev/mst/mt41692_pciconf0 --yes set LINK_TYPE_P2=2

sudo mlxconfig -d /dev/mst/mt41692_pciconf0 --yes set INTERNAL_CPU_MODEL=1
sudo mlxconfig -d /dev/mst/mt41692_pciconf0 --yes set INTERNAL_CPU_PAGE_SUPPLIER=EXT_HOST_PF
sudo mlxconfig -d /dev/mst/mt41692_pciconf0 --yes set INTERNAL_CPU_ESWITCH_MANAGER=EXT_HOST_PF
sudo mlxconfig -d /dev/mst/mt41692_pciconf0 --yes set INTERNAL_CPU_IB_VPORT0=EXT_HOST_PF
sudo mlxconfig -d /dev/mst/mt41692_pciconf0 --yes set INTERNAL_CPU_OFFLOAD_ENGINE=DISABLED

sudo mlxconfig -d /dev/mst/mt41692_pciconf0 --yes set CQE_COMPRESSION=1
sudo mlxconfig -d /dev/mst/mt41692_pciconf0 --yes set PROG_PARSE_GRAPH=1
sudo mlxconfig -d /dev/mst/mt41692_pciconf0 --yes set ACCURATE_TX_SCHEDULER=1
sudo mlxconfig -d /dev/mst/mt41692_pciconf0 --yes set FLEX_PARSER_PROFILE_ENABLE=4
sudo mlxconfig -d /dev/mst/mt41692_pciconf0 --yes set REAL_TIME_CLOCK_ENABLE=1

sudo mlxconfig -d /dev/mst/mt41692_pciconf0 --yes set EXP_ROM_VIRTIO_NET_PXE_ENABLE=0
sudo mlxconfig -d /dev/mst/mt41692_pciconf0 --yes set EXP_ROM_VIRTIO_NET_UEFI_ARM_ENABLE=0
sudo mlxconfig -d /dev/mst/mt41692_pciconf0 --yes set EXP_ROM_VIRTIO_NET_UEFI_x86_ENABLE=0
sudo mlxconfig -d /dev/mst/mt41692_pciconf0 --yes set EXP_ROM_VIRTIO_BLK_UEFI_ARM_ENABLE=0
sudo mlxconfig -d /dev/mst/mt41692_pciconf0 --yes set EXP_ROM_VIRTIO_BLK_UEFI_x86_ENABLE=0


sudo mlxconfig -d /dev/mst/mt41692_pciconf0 q | grep "CQE_COMPRESSION\|PROG_PARSE_GRAPH\|ACCURATE_TX_SCHEDULER\|FLEX_PARSER_PROFILE_ENABLE\|REAL_TIME_CLOCK_ENABLE\|INTERNAL_CPU_MODEL\|LINK_TYPE_P1\|LINK_TYPE_P2\|INTERNAL_CPU_PAGE_SUPPLIER\|INTERNAL_CPU_ESWITCH_MANAGER\|INTERNAL_CPU_IB_VPORT0\|INTERNAL_CPU_OFFLOAD_ENGINE"
结果
# Verify that the NIC FW changes have been applied
$ sudo mlxconfig -d /dev/mst/mt41692_pciconf0 q | grep "CQE_COMPRESSION\|PROG_PARSE_GRAPH\|ACCURATE_TX_SCHEDULER\|FLEX_PARSER_PROFILE_ENABLE\|REAL_TIME_CLOCK_ENABLE\|INTERNAL_CPU_MODEL\|LINK_TYPE_P1\|LINK_TYPE_P2\|INTERNAL_CPU_PAGE_SUPPLIER\|INTERNAL_CPU_ESWITCH_MANAGER\|INTERNAL_CPU_IB_VPORT0\|INTERNAL_CPU_OFFLOAD_ENGINE"
        INTERNAL_CPU_MODEL                  EMBEDDED_CPU(1)
        INTERNAL_CPU_PAGE_SUPPLIER          EXT_HOST_PF(1)
        INTERNAL_CPU_ESWITCH_MANAGER        EXT_HOST_PF(1)
        INTERNAL_CPU_IB_VPORT0              EXT_HOST_PF(1)
        INTERNAL_CPU_OFFLOAD_ENGINE         DISABLED(1)
        FLEX_PARSER_PROFILE_ENABLE          4
        PROG_PARSE_GRAPH                    True(1)
        ACCURATE_TX_SCHEDULER               True(1)
        CQE_COMPRESSION                     AGGRESSIVE(1)
        REAL_TIME_CLOCK_ENABLE              True(1)
        LINK_TYPE_P1                        ETH(2)
        LINK_TYPE_P2                        ETH(2)
安装 ptp4l 和 phc2sys
PTP4l 4.0 之前的版本不支持双端口 PTP。4.2 版本在 Ubuntu 24.04 上受支持,但与 Ubuntu 22.04 存在 glibc 不匹配的问题。因此,我们按照以下说明从源代码安装 PTP4l 4.2:
sudo apt remove linuxptp
wget https://github.com/richardcochran/linuxptp/archive/refs/tags/v4.2.tar.gz
tar -xzf v4.2.tar.gz
cd linuxptp-4.2/
make
sudo make install prefix=/usr sbindir=/usr/sbin
aerial00假设网卡接口用于 PTP ,请输入以下命令配置 PTP4L :
 $ cat <<EOF | sudo tee /etc/ptp.conf
 [global]
 dataset_comparison              G.8275.x
 G.8275.defaultDS.localPriority  128
 maxStepsRemoved                 255
 logAnnounceInterval             -3
 logSyncInterval                 -4
 logMinDelayReqInterval          -4
 G.8275.portDS.localPriority     128
 network_transport               L2
 domainNumber                    24
 tx_timestamp_timeout            30
 clientOnly                      1

 clock_servo pi
 step_threshold 1.0
 egressLatency 28
 pi_proportional_const 4.65
 pi_integral_const 0.1

 [aerial00]
 announceReceiptTimeout 3
 delay_mechanism E2E
 network_transport L2
 EOF

 $ cat <<EOF | sudo tee /etc/systemd/system/ptp4l.service
 [Unit]
 Description=Precision Time Protocol (PTP) service
 Documentation=man:ptp4l
 After=network.target

 [Service]
 Restart=always
 RestartSec=5s
 Type=simple
 ExecStartPre=ifconfig aerial00 up
 ExecStartPre=ethtool --set-priv-flags aerial00 tx_port_ts on
 ExecStartPre=ethtool -A aerial00 rx off tx off
 ExecStartPre=ifconfig aerial01 up
 ExecStartPre=ethtool --set-priv-flags aerial01 tx_port_ts on
 ExecStartPre=ethtool -A aerial01 rx off tx off
 ExecStart=/usr/sbin/ptp4l -f /etc/ptp.conf

 [Install]
 WantedBy=multi-user.target
 EOF

 $ sudo systemctl daemon-reload
 $ sudo systemctl restart ptp4l.service
 $ sudo systemctl enable ptp4l.service
其中一台服务器成为主时钟,如下图所示:
sudo systemctl status ptp4l.service
结果
$ sudo systemctl status ptp4l.service

● ptp4l.service - Precision Time Protocol (PTP) service
    Loaded: loaded (/etc/systemd/system/ptp4l.service; enabled; vendor preset: enabled)
    Active: active (running) since Fri 2024-08-30 01:25:57 UTC; 2min 16s ago
    Docs: man:ptp4l
Main PID: 3404 (ptp4l)
    Tasks: 1 (limit: 598789)
    Memory: 2.6M
        CPU: 126ms
    CGroup: /system.slice/ptp4l.service
            └─3404 /usr/sbin/ptp4l -f /etc/ptp.conf

Aug 30 01:25:57 r750-01 ptp4l[3404]: [14.291] port 0: INITIALIZING to LISTENING on INIT_COMPLETE
Aug 30 01:25:57 r750-01 ptp4l[3404]: [14.291] port 1: link down
Aug 30 01:25:57 r750-01 ptp4l[3404]: [14.291] port 1: LISTENING to FAULTY on FAULT_DETECTED (FT_UNSPECIFIED)
Aug 30 01:25:57 r750-01 ptp4l[3404]: [14.323] selected local clock a088c2.fffe.47be40 as best master
Aug 30 01:25:57 r750-01 ptp4l[3404]: [14.323] port 1: assuming the grand master role
Aug 30 01:26:56 r750-01 ptp4l[3404]: [73.338] port 1: link up
Aug 30 01:26:56 r750-01 ptp4l[3404]: [73.368] port 1: FAULTY to LISTENING on INIT_COMPLETE
Aug 30 01:26:57 r750-01 ptp4l[3404]: [73.860] port 1: LISTENING to MASTER on ANNOUNCE_RECEIPT_TIMEOUT_EXPIRES
Aug 30 01:26:57 r750-01 ptp4l[3404]: [73.860] selected local clock a088c2.fffe.47be40 as best master
Aug 30 01:26:57 r750-01 ptp4l[3404]: [73.860] port 1: assuming the grand master role
另一个时钟则成为辅助时钟,如下图所示:
sudo systemctl status ptp4l.service
结果
$ sudo systemctl status ptp4l.service

● ptp4l.service - Precision Time Protocol (PTP) service
    Loaded: loaded (/etc/systemd/system/ptp4l.service; enabled; vendor preset: enabled)
    Active: active (running) since Fri 2024-08-30 01:29:33 UTC; 47s ago
    Docs: man:ptp4l
    Process: 1509 ExecStartPre=ifconfig aerial00 up (code=exited, status=0/SUCCESS)
    Process: 3069 ExecStartPre=ethtool --set-priv-flags aerial00 tx_port_ts on (code=exited, status=0/SUCCESS)
    Process: 3755 ExecStartPre=ethtool -A aerial00 rx off tx off (code=exited, status=0/SUCCESS)
    Process: 3822 ExecStartPre=ifconfig aerial01 up (code=exited, status=0/SUCCESS)
    Process: 3827 ExecStartPre=ethtool --set-priv-flags aerial01 tx_port_ts on (code=exited, status=0/SUCCESS)
    Process: 3862 ExecStartPre=ethtool -A aerial01 rx off tx off (code=exited, status=0/SUCCESS)
Main PID: 3870 (ptp4l)
    Tasks: 1 (limit: 73247)
    Memory: 9.2M
        CPU: 183ms
    CGroup: /system.slice/ptp4l.service
            └─3870 /usr/sbin/ptp4l -f /etc/ptp.conf

Aug 30 01:30:12 aerial-mgx-cg1-01 ptp4l[3870]: [107.479] rms    3 max    6 freq  +9551 +/-  12 delay   -94 +/-   0
Aug 30 01:30:13 aerial-mgx-cg1-01 ptp4l[3870]: [108.479] rms    3 max    6 freq  +9556 +/-  10 delay   -94 +/-   0
Aug 30 01:30:14 aerial-mgx-cg1-01 ptp4l[3870]: [109.479] rms    3 max    4 freq  +9552 +/-  13 delay   -94 +/-   0
Aug 30 01:30:15 aerial-mgx-cg1-01 ptp4l[3870]: [110.479] rms    3 max    6 freq  +9556 +/-  12 delay   -94 +/-   1
Aug 30 01:30:16 aerial-mgx-cg1-01 ptp4l[3870]: [111.479] rms    3 max    7 freq  +9558 +/-  14 delay   -94 +/-   0
Aug 30 01:30:17 aerial-mgx-cg1-01 ptp4l[3870]: [112.479] rms    4 max    7 freq  +9567 +/-  12 delay   -94 +/-   0
Aug 30 01:30:18 aerial-mgx-cg1-01 ptp4l[3870]: [113.479] rms    3 max    5 freq  +9569 +/-   7 delay   -94 +/-   0
Aug 30 01:30:19 aerial-mgx-cg1-01 ptp4l[3870]: [114.479] rms    3 max    6 freq  +9574 +/-   8 delay   -94 +/-   1
Aug 30 01:30:20 aerial-mgx-cg1-01 ptp4l[3870]: [115.479] rms    3 max    5 freq  +9577 +/-   9 delay   -94 +/-   0
Aug 30 01:30:21 aerial-mgx-cg1-01 ptp4l[3870]: [116.479] rms    4 max    7 freq  +9583 +/-  12 delay   -94 +/-   0
输入以下命令关闭 NTP:
sudo timedatectl set-ntp false
timedatectl
结果
$ timedatectl
           Local time: Fri 2024-08-30 01:30:36 UTC
       Universal time: Fri 2024-08-30 01:30:36 UTC
             RTC time: Fri 2024-08-30 01:30:36
            Time zone: Etc/UTC (UTC, +0000)
System clock synchronized: no
          NTP service: inactive
      RTC in local TZ: no
以服务方式运行 PHC2SYS:
PHC2SYS 用于将系统时钟与网卡上的 PTP 硬件时钟 (PHC) 同步。
指定用于 PTP 的网络接口,并将系统时钟作为从时钟。
 # If more than one instance is already running, kill the existing
 # PHC2SYS sessions.

 # Command used can be found in /etc/systemd/system/phc2sys.service
 # Update the ExecStart line to the following
 $ cat <<EOF | sudo tee /etc/systemd/system/phc2sys.service
 [Unit]
 Description=Synchronize system clock or PTP hardware clock (PHC)
 Documentation=man:phc2sys
 Requires=ptp4l.service
 After=ptp4l.service

 [Service]
 Restart=always
 RestartSec=5s
 Type=simple
 # Gives ptp4l a chance to stabilize
 ExecStartPre=sleep 2
 # Sync system clock to TAI time scale
 ExecStart=/bin/sh -c "/usr/sbin/phc2sys -s aerial00 -c CLOCK_REALTIME -n 24 -O 0 -R 256 -u 256"
 # Sync system clock to UTC time scale
 #ExecStart=/bin/sh -c "/usr/sbin/phc2sys -s aerial00 -c CLOCK_REALTIME -n 24 -w -R 256 -u 256"

 [Install]
 WantedBy=multi-user.target
 EOF
PTP 基于 TAI 时间,系统时钟已通过上述 PHC2SYS 设置与 TAI 时间同步。目前 UTC 和 TAI 之间存在 37 秒的偏移量(闰秒),TAI 比 UTC 快 37 秒。如果需要在 DU 上将系统时钟更改为 UTC 时间,则应注释掉第一个 ExecStart 语句,并取消注释第二个 ExecStart 语句(前提是 PTP 和 GrandMaster 配置正确)。-O 0-w
PHC2SYS配置文件修改后,运行以下命令:
sudo systemctl daemon-reload
sudo systemctl restart phc2sys.service

sudo systemctl enable phc2sys.service

sudo systemctl status phc2sys.service
结果
$ sudo systemctl status phc2sys.service

● phc2sys.service - Synchronize system clock or PTP hardware clock (PHC)
    Loaded: loaded (/etc/systemd/system/phc2sys.service; enabled; vendor preset: enabled)
    Active: active (running) since Fri 2024-08-30 01:31:35 UTC; 18min ago
    Docs: man:phc2sys
    Process: 3871 ExecStartPre=sleep 2 (code=exited, status=0/SUCCESS)
Main PID: 4006 (sh)
    Tasks: 2 (limit: 73247)
    Memory: 6.0M
        CPU: 3.628s
    CGroup: /system.slice/phc2sys.service
            ├─4006 /bin/sh -c "/usr/sbin/phc2sys -s aerial00 -c CLOCK_REALTIME -n 24 -O 0 -R 256 -u 256"
            └─4012 /usr/sbin/phc2sys -s /dev/ptp2 -c CLOCK_REALTIME -n 24 -O 0 -R 256 -u 256

Aug 30 01:48:09 aerial-mgx-c1-01 phc2sys[4012]: [1184.489] CLOCK_REALTIME rms    8 max   22 freq  +5522 +/-  47 delay   480 +/-   0
Aug 30 01:48:10 aerial-mgx-c1-01 phc2sys[4012]: [1185.505] CLOCK_REALTIME rms    7 max   19 freq  +5542 +/-  30 delay   480 +/-   2
Aug 30 01:48:11 aerial-mgx-c1-01 phc2sys[4012]: [1186.521] CLOCK_REALTIME rms    7 max   19 freq  +5530 +/-  36 delay   480 +/-   0
Aug 30 01:48:12 aerial-mgx-c1-01 phc2sys[4012]: [1187.537] CLOCK_REALTIME rms    7 max   19 freq  +5534 +/-  43 delay   480 +/-   2
Aug 30 01:48:13 aerial-mgx-c1-01 phc2sys[4012]: [1188.553] CLOCK_REALTIME rms    9 max   22 freq  +5557 +/-  64 delay   480 +/-   0
Aug 30 01:48:14 aerial-mgx-c1-01 phc2sys[4012]: [1189.569] CLOCK_REALTIME rms    9 max   23 freq  +5516 +/-  52 delay   480 +/-   0
Aug 30 01:48:15 aerial-mgx-c1-01 phc2sys[4012]: [1190.586] CLOCK_REALTIME rms    7 max   19 freq  +5538 +/-  32 delay   480 +/-   0
Aug 30 01:48:16 aerial-mgx-c1-01 phc2sys[4012]: [1191.602] CLOCK_REALTIME rms    7 max   19 freq  +5534 +/-  27 delay   480 +/-   0
Aug 30 01:48:17 aerial-mgx-c1-01 phc2sys[4012]: [1192.618] CLOCK_REALTIME rms    8 max   18 freq  +5538 +/-  42 delay   480 +/-   0
Aug 30 01:48:18 aerial-mgx-c1-01 phc2sys[4012]: [1193.634] CLOCK_REALTIME rms    8 max   20 freq  +5547 +/-  47 delay   480 +/-   0
确认系统时钟已同步:
timedatectl
结果
$ timedatectl
           Local time: Fri 2024-08-30 01:48:25 UTC
       Universal time: Fri 2024-08-30 01:48:25 UTC
             RTC time: Fri 2024-08-30 01:48:25
            Time zone: Etc/UTC (UTC, +0000)
System clock synchronized: yes
          NTP service: inactive
      RTC in local TZ: no
双端口PTP
当两个 FH 端口(例如 aerial00 和 aerial01)都从时钟源(例如主参考时钟 (PRTC) 或主时钟)接收到 PTP 信号时,支持双端口 PTP。请按照上一节所述安装 linuxptp 4.2。
当配置双端口 PTP 并启用 PTP 服务时,linuxptp 会选择一个 FH 端口作为RS_SLAVE(首选时序参考),另一个作为RS_PASSIVE(备用时序参考)。如果RS_SLAVE端口丢失 PTP 信号,则RS_PASSIVE端口将接管RS_SLAVE 的角色。当首选时序参考上的 PTP 信号恢复时,该端口将恢复RS_SLAVE 的角色。
phc2sys 服务将RS_SLAVE端口的计时应用于Grace Hopper 服务器系统时钟。
启用双端口 PTP
将两个 FH 端口都添加到. RS_SLAVE和RS_PASSIVE/etc/ptp.conf的分配与端口的列出顺序无关。
以下是内容示例/etc/ptp.conf:
[global]
dataset_comparison              G.8275.x
G.8275.defaultDS.localPriority  128
maxStepsRemoved                 255
logAnnounceInterval             -3
logSyncInterval                 -4
logMinDelayReqInterval          -4
G.8275.portDS.localPriority     128
network_transport               L2
domainNumber                    24
tx_timestamp_timeout            30
clientOnly 1

clock_servo pi
step_threshold 1.0
egressLatency 28
pi_proportional_const 4.65
pi_integral_const 0.1

announceReceiptTimeout 3
delay_mechanism E2E
network_transport L2

[aerial01]
[aerial00]
/etc/systemd/system/phc2sys.service使用以下示例内容创建或编辑:
[Unit]
Description=Synchronize system clock or PTP hardware clock (PHC)
Documentation=man:phc2sys
Requires=ptp4l.service
After=ptp4l.service

[Service]
Restart=always
RestartSec=5s
Type=simple
# Gives ptp4l a chance to stabilize
ExecStartPre=sleep 2

# Dual Port PTP
ExecStart=/bin/sh -c "/usr/sbin/phc2sys -a -r -n 24 -R 256 -u 256 -l 7"

[Install]
WantedBy=multi-user.target
设置启动配置服务
创建目录/usr/local/bin并创建/usr/local/bin/nvidia.sh文件,以便每次重启时运行命令。
“nvidia-smi lgc”命令仅需要一个GPU设备(-i 0)。如果系统使用多个GPU,则需要修改此设置。对于GH200,必须将模式设置为1才能使其发挥最大时钟频率,否则在默认模式为0的情况下,其频率将被限制在1830MHz。
 $ cat <<"EOF" | sudo tee /usr/local/bin/nvidia.sh
 #!/bin/bash
 # Start Mellanox Software Tools
 mst start

 #Force max frequency on GPU 0
 nvidia-smi -i 0 -lgc $(nvidia-smi -i 0 --query-supported-clocks=graphics --format=csv,noheader,nounits | sort -h | tail -n 1) --mode=1

 # Disable MIG on GPU 0
 nvidia-smi -mig 0

 # Allow real-time tasks to take 100% CPU
 echo -1 > /proc/sys/kernel/sched_rt_runtime_us

 # Disable timer migration (important especially on tickless kernels)
 echo 0 | sudo tee /proc/sys/kernel/timer_migration

 #Pin all RCU processes we can to core 1
 /usr/local/bin/rcu_affinity_manager.sh -w -c 1

 # Enables DPDK mapping of GPU memory to enable GPU mbuf chaining
 modprobe nvidia-peermem
 EOF
创建 nvidia.sh 脚本中引用的 rcu_affinity_manager.sh 脚本。该文件位于NVIDIA/aerial-cuda-accelerated-ran 的Aerial CUDA 加速 RAN 源代码中。下载源代码后,请确保将 rcu_affinity_manager.sh 文件复制到指定位置/usr/local/bin/rcu_affinity_manager.sh。
wget raw.githubusercontent.com/NVIDIA/aerial-cuda-accelerated-ran/refs/heads/main/cubb_scripts/infra/rcu_affinity_manager.sh
sudo cp rcu_affinity_manager.sh /usr/local/bin/rcu_affinity_manager.sh
sudo chmod +x /usr/local/bin/rcu_affinity_manager.sh
创建一个系统服务文件,以便在网络接口启动后加载。
 $ cat <<EOF | sudo tee /etc/systemd/system/nvidia.service
 [Unit]
 After=network.target

 [Service]
 ExecStart=/usr/local/bin/nvidia.sh

 [Install]
 WantedBy=default.target
 EOF
创建一个系统服务文件,使 nvidia-persistenced 在启动时运行。
此文件是根据 /usr/share/doc/NVIDIA_GLX-1.0/samples/nvidia-persistenced-init.tar.bz2 中的示例创建的。
 $ cat <<EOF | sudo tee /etc/systemd/system/nvidia-persistenced.service
 [Unit]
 Description=NVIDIA Persistence Daemon
 Wants=syslog.target

 [Service]
 Type=forking
 ExecStart=/usr/bin/nvidia-persistenced
 ExecStopPost=/bin/rm -rf /var/run/nvidia-persistenced

 [Install]
 WantedBy=multi-user.target
 EOF
然后设置文件权限,重新加载 systemd 守护进程,启用服务,首次安装时重启服务,并检查状态
sudo chmod 744 /usr/local/bin/nvidia.sh
sudo chmod 664 /etc/systemd/system/nvidia.service
sudo chmod 664 /etc/systemd/system/nvidia-persistenced.service
sudo systemctl daemon-reload
sudo systemctl enable nvidia-persistenced.service
sudo systemctl enable nvidia.service
sudo systemctl restart nvidia.service
sudo systemctl restart nvidia-persistenced.service
sudo systemctl status nvidia.service
sudo systemctl status nvidia-persistenced.service
最后一条命令的输出结果应该如下所示:
sudo systemctl status nvidia.service


sudo systemctl status nvidia-persistenced.service
结果
$ sudo systemctl status nvidia.service
○ nvidia.service
    Loaded: loaded (/etc/systemd/system/nvidia.service; enabled; vendor preset: enabled)
    Active: inactive (dead) since Wed 2026-03-25 06:14:33 UTC; 1s ago
    Process: 261646 ExecStart=/usr/local/bin/nvidia.sh (code=exited, status=0/SUCCESS)
Main PID: 261646 (code=exited, status=0/SUCCESS)
        CPU: 3.560s

Mar 25 06:14:33 server nvidia.sh[265497]: CPU 3: : 1 RCU processes
Mar 25 06:14:33 server nvidia.sh[265497]: CPU 4: : 1 RCU processes
Mar 25 06:14:33 server nvidia.sh[265497]: CPU 66:: 1 RCU processes
Mar 25 06:14:33 server nvidia.sh[265497]: CPU 67:: 1 RCU processes
Mar 25 06:14:33 server nvidia.sh[265497]: CPU 69:: 1 RCU processes
Mar 25 06:14:33 server nvidia.sh[265497]: CPU 70:: 1 RCU processes
Mar 25 06:14:33 server nvidia.sh[265497]: CPU 71:: 1 RCU processes
Mar 25 06:14:33 server nvidia.sh[262191]: === End of RCU Process Affinity Information ===
Mar 25 06:14:33 server systemd[1]: nvidia.service: Deactivated successfully.
Mar 25 06:14:33 server systemd[1]: nvidia.service: Consumed 3.560s CPU time.

$ sudo systemctl status nvidia-persistenced.service
● nvidia-persistenced.service - NVIDIA Persistence Daemon
    Loaded: loaded (/etc/systemd/system/nvidia-persistenced.service; enabled; vendor preset: enabled)
    Active: active (running) since Wed 2026-03-25 06:17:41 UTC; 2s ago
    Process: 265541 ExecStart=/usr/bin/nvidia-persistenced (code=exited, status=0/SUCCESS)
Main PID: 265542 (nvidia-persiste)
    Tasks: 1 (limit: 146803)
    Memory: 1.3M
        CPU: 6ms
    CGroup: /system.slice/nvidia-persistenced.service
            └─265542 /usr/bin/nvidia-persistenced

Mar 25 06:17:41 server systemd[1]: Starting NVIDIA Persistence Daemon...
Mar 25 06:17:41 server nvidia-persistenced[265542]: Started (265542)
Mar 25 06:17:41 server systemd[1]: Started NVIDIA Persistence Daemon.
验证软件组件版本和系统配置
运行 Aerial 之前,请确保您的软件组件版本和系统配置符合要求。更多信息,请参阅系统配置验证脚本。
pip3 install psutil packaging paramiko
cd $cuBB_SDK/cuPHY/util/cuBB_system_checks
sudo -E python3 ./cuBB_system_checks.py
cuBB_system_checks.py在裸机、容器和基于 Kubernetes 的平台上,输出结果可能略有不同。该脚本用于检索软件组件版本和硬件配置。请参阅cuBB 发行说明中的发行清单,以确保安装了正确的软件组件版本。由于某些软件组件版本和硬件配置无法直接从 Aerial 容器中检索,因此如果从容器内部运行该脚本,则可以使用 SSH 从主机收集信息。以下是使用 SSH 和密码验证的示例:
python3 cuBB_system_checks.py --host <hostname or IP address> --username <username on the host>
如果您使用 Red Hat OpenShift 管理 Aerial,则该脚本可以使用oc命令检索信息:
oc get nodes  # check if you have already logged in a RHOCP cluster
python3 cuBB_system_checks.py --cli oc
以下是通过 SSH 访问主机的容器中脚本的输出示例:
python3 cuBB_system_checks.py --host <hostname or IP address> --username <username on the host>
结果
[+] Connecting to <hostname of IP address> with password auth.
Password for <username>@<hostname of IP address>:
[+] Caching sudo password...
[+] Sudo password cached successfully.
-----General--------------------------------------
Hostname                           : smc-gh-01
IP address                         : <IP address>
Linux distro                       : "Ubuntu 22.04.4 LTS"
Linux kernel version               : 6.5.0-1019-nvidia-64k
-----System---------------------------------------
FRU Device Description : Builtin FRU Device (ID 0)
Board Mfg Date        : Mon Jan  1 00:00:00 1996
Board Mfg             : Supermicro
Board Serial          :
Product Serial        :

FRU Device Description : BMC FRU (ID 2)
Board Mfg Date        : Mon Apr 17 10:40:00 2023
Board Mfg             : Supermicro
Board Product         : BMC Secure Control Module
Board Serial          :
Board Part Number     : AOM-SCM-NV
Product Manufacturer  : Supermicro
Product Name          : BMC Secure Control Module
Product Part Number   : AOM-SCM-NV
Product Version       : 1.00

FRU Device Description : AOC1 FRU (ID 4)
Board Mfg Date        : Wed Aug  2 20:41:00 2023
Board Mfg             : Nvidia
Board Product         : BlueField-3 SmartNIC Main Card
Board Serial          :
Board Part Number     : 900-9D3B6-00CV-AA0
Product Manufacturer  : Nvidia
Product Name          : BlueField-3 SmartNIC Main Card
Product Part Number   : 900-9D3B6-00CV-AA0
Product Version       : A9
Product Serial        :
Product Asset Tag     : 900-9D3B6-00CV-AA0

FRU Device Description : MB FRU (ID 1)
Invalid FRU size 0

FRU Device Description : CPU FRU (ID 3)
Board Mfg Date        : Wed Jul  5 21:53:00 2023
Board Mfg             : NVIDIA
Board Product         : PG530
Board Serial          :
Board Part Number     : 699-2G530-0206-QS1
Product Manufacturer  : NVIDIA
Product Name          : GH200 480GB
Product Part Number   : 900-2G530-0000-000
Product Version       : A-R00
Product Serial        :

FRU Device Description : AOC2 FRU (ID 5)
Board Mfg Date        : Thu Jul 27 02:16:00 2023
Board Mfg             : Nvidia
Board Product         : BlueField-3 SmartNIC Main Card
Board Serial          :
Board Part Number     : 900-9D3B6-00CV-AA0
Product Manufacturer  : Nvidia
Product Name          : BlueField-3 SmartNIC Main Card
Product Part Number   : 900-9D3B6-00CV-AA0
Product Version       : A9
Product Serial        :
Product Asset Tag     : 900-9D3B6-00CV-AA0
-----Kernel Command Line--------------------------
Audit subsystem                    : audit=0
Clock source                       : N/A
HugePage count                     : hugepages=48
HugePage size                      : hugepagesz=512M
CPU idle time management           : idle=poll
Max Intel C-state                  : N/A
Intel IOMMU                        : N/A
IOMMU                              : N/A
Isolated CPUs                      : isolcpus=managed_irq,domain,4-64
Corrected errors                   : N/A
Adaptive-tick CPUs                 : nohz_full=4-64
Soft-lockup detector disable       : nosoftlockup
Max processor C-state              : processor.max_cstate=0
RCU callback polling               : rcu_nocb_poll
No-RCU-callback CPUs               : rcu_nocbs=4-64
TSC stability checks               : tsc=reliable
IRQ affinity                       : irqaffinity=0
ACPI power meter cap forcely on    : acpi_power_meter.force_cap_on=y
NUMA balancing                     : numa_balancing=disable
Mem init on alloc                  : init_on_alloc=0
Preempt                            : preempt=none
Pressure Stall Information         : N/A  ("psi=0" is recommended)
-----CPU------------------------------------------
CPU cores                          : 72
Thread(s) per CPU core             : 1
CPU max MHz:                       : 3456.0000
CPU sockets                        : 1
-----Environment variables------------------------
CUDA_DEVICE_MAX_CONNECTIONS        : 8
cuBB_SDK                           : /opt/nvidia/cuBB
-----Memory---------------------------------------
HugePage count                     : 72
Free HugePages                     : 70
HugePage size                      : 524288 kB
Shared memory size                 : 240G
-----Nvidia GPUs----------------------------------
GPU driver version                 : 570.124.06
CUDA version                       : 12.8
GPU0
  GPU product name                 : NVIDIA GH200 480GB
  GPU persistence mode             : Enabled
  Current GPU temperature          : 34 C
  Max GPU clock frequency          : 1980 MHz
  GPU clock frequency              : 1980 MHz
  GPU PCIe bus id                  : 00000009:01:00.0
-----GPUDirect topology---------------------------
GPU0    NIC0    NIC1    NIC2    NIC3    CPU Affinity    NUMA Affinity   GPU NUMA ID
GPU0     X      NODE    NODE    NODE    NODE    0-71    0               1
NIC0    NODE     X      PIX     NODE    NODE
NIC1    NODE    PIX      X      NODE    NODE
NIC2    NODE    NODE    NODE     X      PIX
NIC3    NODE    NODE    NODE    PIX      X

Legend:

  X    = Self
  SYS  = Connection traversing PCIe as well as the SMP interconnect between NUMA nodes (e.g., QPI/UPI)
  NODE = Connection traversing PCIe as well as the interconnect between PCIe Host Bridges within a NUMA node
  PHB  = Connection traversing PCIe as well as a PCIe Host Bridge (typically the CPU)
  PXB  = Connection traversing multiple PCIe bridges (without traversing the PCIe Host Bridge)
  PIX  = Connection traversing at most a single PCIe bridge
  NV#  = Connection traversing a bonded set of # NVLinks

NIC Legend:

  NIC0: mlx5_0
  NIC1: mlx5_1
  NIC2: mlx5_2
  NIC3: mlx5_3
-----Loaded Kernel Modules------------------------
GDRCopy                            : gdrdrv
GPUDirect RDMA                     : N/A
Nvidia                             : nvidia
-----Non-persistent settings----------------------
VM swappiness                      : vm.swappiness = 0
VM zone reclaim mode               : vm.zone_reclaim_mode = 0
-----Kernel Parameters----------------------------
Real-time throttling               : -1
Transparent hugepage               : [madvise]
-----Software Packages----------------------------
docker      /usr/bin               : 27.3.1
NVIDIA Container Toolkit           : 1.17.4
OFED version                       : OFED-internal-24.04-0.6.6
ptp4l       /usr/sbin              : 3.1.1-3
-----Software Packages in the Container-----------
-----Linux PTP------------------------------------
● ptp4l.service - Precision Time Protocol (PTP) service
    Loaded: loaded (/etc/systemd/system/ptp4l.service; enabled; vendor preset: enabled)
    Active: active (running) since Wed 2024-11-27 01:58:59 UTC; 2 months 14 days ago
      Docs: man:ptp4l
  Main PID: 3903 (ptp4l)
      Tasks: 1 (limit: 146899)
    Memory: 7.3M
        CPU: 58min 50.438s
    CGroup: /system.slice/ptp4l.service
            └─3903 /usr/sbin/ptp4l -f /etc/ptp.conf

Feb 10 06:27:41 smc-gh-01 ptp4l[3903]: [6496263.224] rms    2 max    4 freq  -4911 +/-  12 delay   -92 +/-   0
Feb 10 06:27:42 smc-gh-01 ptp4l[3903]: [6496264.224] rms    2 max    4 freq  -4908 +/-   9 delay   -93 +/-   0
Feb 10 06:27:43 smc-gh-01 ptp4l[3903]: [6496265.224] rms    3 max    7 freq  -4912 +/-  13 delay   -93 +/-   0
Feb 10 06:27:44 smc-gh-01 ptp4l[3903]: [6496266.224] rms    2 max    5 freq  -4919 +/-   8 delay   -93 +/-   0
Feb 10 06:27:45 smc-gh-01 ptp4l[3903]: [6496267.225] rms    2 max    5 freq  -4910 +/-   9 delay   -93 +/-   0
Feb 10 06:27:46 smc-gh-01 ptp4l[3903]: [6496268.225] rms    2 max    5 freq  -4911 +/-  11 delay   -93 +/-   0
Feb 10 06:27:47 smc-gh-01 ptp4l[3903]: [6496269.225] rms    3 max    7 freq  -4908 +/-  15 delay   -93 +/-   0
Feb 10 06:27:48 smc-gh-01 ptp4l[3903]: [6496270.225] rms    2 max    3 freq  -4911 +/-   9 delay   -93 +/-   0
Feb 10 06:27:49 smc-gh-01 ptp4l[3903]: [6496271.225] rms    2 max    5 freq  -4919 +/-   9 delay   -93 +/-   0
Feb 10 06:27:50 smc-gh-01 ptp4l[3903]: [6496272.225] rms    2 max    3 freq  -4912 +/-   9 delay   -93 +/-   0
● phc2sys.service - Synchronize system clock or PTP hardware clock (PHC)
    Loaded: loaded (/etc/systemd/system/phc2sys.service; enabled; vendor preset: enabled)
    Active: active (running) since Wed 2024-11-27 01:59:01 UTC; 2 months 14 days ago
      Docs: man:phc2sys
  Main PID: 4304 (sh)
      Tasks: 2 (limit: 146899)
    Memory: 2.0M
        CPU: 5h 45min 34.886s
    CGroup: /system.slice/phc2sys.service
            ├─4304 /bin/sh -c "taskset -c 21 /usr/sbin/phc2sys -s /dev/ptp\$(ethtool -T aerial01 | grep PTP | awk '{print \$4}') -c CLOCK_REALTIME -n 24 -O 0 -R 256 -u 256"
            └─4309 /usr/sbin/phc2sys -s /dev/ptp1 -c CLOCK_REALTIME -n 24 -O 0 -R 256 -u 256

Feb 10 06:27:40 smc-gh-01 phc2sys[4309]: [6496262.994] CLOCK_REALTIME rms    7 max   19 freq   -934 +/-  14 delay   506 +/-  12
Feb 10 06:27:41 smc-gh-01 phc2sys[4309]: [6496264.010] CLOCK_REALTIME rms    8 max   19 freq   -934 +/-  18 delay   506 +/-  12
Feb 10 06:27:42 smc-gh-01 phc2sys[4309]: [6496265.026] CLOCK_REALTIME rms    7 max   19 freq   -942 +/-  19 delay   508 +/-  11
Feb 10 06:27:43 smc-gh-01 phc2sys[4309]: [6496266.042] CLOCK_REALTIME rms    8 max   19 freq   -935 +/-  30 delay   506 +/-  13
Feb 10 06:27:44 smc-gh-01 phc2sys[4309]: [6496267.058] CLOCK_REALTIME rms    7 max   17 freq   -933 +/-  11 delay   506 +/-  13
Feb 10 06:27:46 smc-gh-01 phc2sys[4309]: [6496268.074] CLOCK_REALTIME rms    7 max   17 freq   -929 +/-  10 delay   506 +/-  12
Feb 10 06:27:47 smc-gh-01 phc2sys[4309]: [6496269.091] CLOCK_REALTIME rms    7 max   18 freq   -941 +/-  15 delay   506 +/-  13
Feb 10 06:27:48 smc-gh-01 phc2sys[4309]: [6496270.107] CLOCK_REALTIME rms    8 max   18 freq   -938 +/-  10 delay   506 +/-  12
Feb 10 06:27:49 smc-gh-01 phc2sys[4309]: [6496271.123] CLOCK_REALTIME rms    8 max   19 freq   -937 +/-  21 delay   507 +/-  12
Feb 10 06:27:50 smc-gh-01 phc2sys[4309]: [6496272.139] CLOCK_REALTIME rms    7 max   18 freq   -932 +/-  16 delay   506 +/-  12
-----NTP------------------------------------------
NTP                                : inactive
-----Mellanox NIC Interfaces----------------------
Interface0
  Name                             : aerial00
  Network adapter                  : mlx5_0
  PCIe bus id                      : 0000:01:00.0
  Ethernet address                 : 94:6d:ae:f5:a9:12
  Operstate                        : up
  MTU                              : 1500
  RX flow control                  : off
  TX flow control                  : off
  PTP hardware clock               : 0
  QoS Priority trust state         : pcp
  PCIe MRRS                        : N/A
High-quality Tx timestamp          : on
Interface1
  Name                             : aerial01
  Network adapter                  : mlx5_0
  PCIe bus id                      : 0000:01:00.1
  Ethernet address                 : 94:6d:ae:f5:a9:13
  Operstate                        : up
  MTU                              : 1500
  RX flow control                  : off
  TX flow control                  : off
  PTP hardware clock               : 1
  QoS Priority trust state         : pcp
  PCIe MRRS                        : N/A
High-quality Tx timestamp          : on
Interface2
  Name                             : aerial02
  Network adapter                  : mlx5_1
  PCIe bus id                      : 0002:01:00.0
  Ethernet address                 : 94:6d:ae:f5:a0:e8
  Operstate                        : up
  MTU                              : 1500
  RX flow control                  : off
  TX flow control                  : off
  PTP hardware clock               : 2
  QoS Priority trust state         : pcp
  PCIe MRRS                        : N/A
High-quality Tx timestamp          : on
Interface3
  Name                             : aerial03
  Network adapter                  : mlx5_1
  PCIe bus id                      : 0002:01:00.1
  Ethernet address                 : 94:6d:ae:f5:a0:e9
  Operstate                        : down
  MTU                              : 1500
  RX flow control                  : off
  TX flow control                  : off
  PTP hardware clock               : 3
  QoS Priority trust state         : pcp
  PCIe MRRS                        : N/A
High-quality Tx timestamp          : on
-----Mellanox NICs--------------------------------
NIC1
  NIC product name                 : BlueField3
  NIC part number                  : 900-9D3B6-00CV-A_Ax
  NIC PCIe bus id                  : /dev/mst/mt41692_pciconf1
  NIC FW version                   : 32.41.1000
  INTERNAL_CPU_MODEL               : EMBEDDED_CPU(1)
  INTERNAL_CPU_PAGE_SUPPLIER       : EXT_HOST_PF(1)
  INTERNAL_CPU_ESWITCH_MANAGER     : EXT_HOST_PF(1)
  INTERNAL_CPU_IB_VPORT0           : EXT_HOST_PF(1)
  INTERNAL_CPU_OFFLOAD_ENGINE      : DISABLED(1)
  FLEX_PARSER_PROFILE_ENABLE       : 4
  PROG_PARSE_GRAPH                 : True(1)
  ACCURATE_TX_SCHEDULER            : True(1)
  CQE_COMPRESSION                  : AGGRESSIVE(1)
  REAL_TIME_CLOCK_ENABLE           : True(1)
  LINK_TYPE_P1                     : ETH(2)
  LINK_TYPE_P2                     : ETH(2)
NIC2
  NIC product name                 : BlueField3
  NIC part number                  : 900-9D3B6-00CV-A_Ax
  NIC PCIe bus id                  : /dev/mst/mt41692_pciconf0
  NIC FW version                   : 32.41.1000
  INTERNAL_CPU_MODEL               : EMBEDDED_CPU(1)
  INTERNAL_CPU_PAGE_SUPPLIER       : EXT_HOST_PF(1)
  INTERNAL_CPU_ESWITCH_MANAGER     : EXT_HOST_PF(1)
  INTERNAL_CPU_IB_VPORT0           : EXT_HOST_PF(1)
  INTERNAL_CPU_OFFLOAD_ENGINE      : DISABLED(1)
  FLEX_PARSER_PROFILE_ENABLE       : 4
  PROG_PARSE_GRAPH                 : True(1)
  ACCURATE_TX_SCHEDULER            : True(1)
  CQE_COMPRESSION                  : AGGRESSIVE(1)
  REAL_TIME_CLOCK_ENABLE           : True(1)
  LINK_TYPE_P1                     : ETH(2)
  LINK_TYPE_P2                     : ETH(2)

AtomGit 是由开放原子开源基金会联合 CSDN 等生态伙伴共同推出的新一代开源与人工智能协作平台。平台坚持“开放、中立、公益”的理念,把代码托管、模型共享、数据集托管、智能体开发体验和算力服务整合在一起,为开发者提供从开发、训练到部署的一站式体验。
更多推荐


 10
10 0
0- 0


 已为社区贡献1条内容

所有评论(0)