IdentityServer4学习笔记
基础概念
1. IdentityServer4核心概念解析
IdentityServer4 是基于 .NET Core 构建的开源身份认证与授权中间件,它实现了 OAuth2 和 OpenID Connect(OIDC)协议,用于统一管理多个应用程序之间的身份验证与访问控制。其核心组件包括认证服务、客户端、资源服务器和令牌服务。认证服务负责用户身份验证并颁发令牌,客户端通过授权流程请求访问权限,资源服务器则根据令牌验证访问合法性。
通过 IdentityServer4,开发者可以构建统一的身份中心,实现单点登录(SSO)和跨域授权访问。其灵活性支持多种授权模式,适应 Web、移动端和 API 服务等多场景需求。IdentityServer4 的核心协议:OAuth2 和 OpenID Connect。
2. OAuth2、OpenID、OpenID Connect协议基础
在现代分布式系统和微服务架构 中,认证与授权机制是保障系统安全性的核心。OAuth2 和 OpenID Connect(OIDC)作为当前最主流的身份认证与授权协议标准,广泛应用于Web、移动、API等多类场景中。本章将深入解析OAuth2的核心概念与OpenID Connect的扩展机制,并结合IdentityServer4的实际应用,帮助读者掌握协议的基本流程、实现方式及常见问题的解决策略。
2.1 OAuth2协议的核心概念
OAuth2 是一个开放标准,允许用户授权第三方应用访问其在某一服务上的资源,而无需共享其凭证。OAuth2的核心是“授权”,而非“认证”,其重点在于资源的访问控制。在实际开发中,理解OAuth2的不同授权模式、客户端类型以及流程差异,是构建安全系统的第一步。
2.1.1 授权模式与流程概述
OAuth2协议定义了四种主要的授权模式(Grant Types),每种模式适用于不同的客户端类型和使用场景:
| 授权模式 | 适用场景 | 安全性级别 |
| 授权码模式 | Web应用、后端服务 | 高 |
| 隐式模式 | 单页应用(SPA)、移动应用 | 中 |
| 客户端凭证模式 | 服务到服务的调用,无用户上下文 | 中 |
| 密码模式 | 可信客户端,如内部系统 | 低 |
以 授权码模式 为例,其完整流程如下:
sequenceDiagram
    用户->>客户端: 发起登录请求
    客户端->>授权服务器: 请求授权码(GET /authorize)
    授权服务器->>用户: 显示登录页面并请求授权
    用户->>授权服务器: 输入凭证并同意授权
    授权服务器->>客户端: 返回授权码(code)
    客户端->>授权服务器: 使用授权码换取Token(POST /token)
    授权服务器->>客户端: 返回Access Token
    客户端->>资源服务器: 携带Token访问资源
    资源服务器->>客户端: 返回受保护资源
该流程通过两次请求完成授权码的获取和令牌的交换,增强了安全性。其中, /authorize 和 /token 是OAuth2的关键端点。
2.2 OpenID协议的核心概念
OpenID 实际上制作一件事情,认证,只在意用户是谁
具体流程为:
用户=》网站a=》qq登录=》认证=》互联平台=》仅返回一个身份标识(用于证明qq有这个人)=》网站a注册用户或登录2.3 OpenID Connect (OIDC)
而OpenID Connect就是OpenID+OAuth2.0,同时进行了认证和授权
具体流程为:
用户=》网站a=》qq登录=》认证=》互联平台=》仅返回一个身份标识(用于证明qq有这个人)=》网站a注册用户或登录

在这个流程的基础上,多了第二个页面
第二个页面=》授权页面=》授权头像,昵称等信息-》授权给到网站a,用于登录注册
快速使用
一般来说,有一个专门的身份认证服务器,多个应用
文档参考:duende identity server文档 https://docs.duendesoftware.com/general/licensing/
老ui地址:IdentityServer4.Quickstart.UI:Starter UI for in-memory IdentityServer4 - AtomGit
1、构建IdentityServer4项目
有两种方法,一种是通过模板创建,另一种是创建一个空项目,然后引用IdentityServer4依赖
Duende.IdentityServer,我选择使用第二种
1、创建空白的web api项目
2、引入 Duende.IdentityServer依赖
3、添加Config文件
using Duende.IdentityServer.Models;

namespace ids4Server.config
{
    public static class Config
    {
        // 1. 定义受保护的API资源
        public static IEnumerable<ApiScope> ApiScopes =>
           new List<ApiScope>
           {
                new ApiScope{
                    Name = "api1",
                    DisplayName = "My API"
                }
           };

        // 2. 定义客户端(允许谁来请求Token)
        public static IEnumerable<Client> Clients =>
            new List<Client>
            {
                new Client
                {
                    // 客户端唯一标识
                    ClientId = "ids4.client",
                    // 客户端密钥(加密)
                    ClientSecrets = { new Secret("mysecret".Sha256()) },
                    // 授权模式:ClientCredentials(客户端凭证模式,适用于服务间调用)
                    AllowedGrantTypes = GrantTypes.ClientCredentials,
                    // 允许访问的作用域
                    AllowedScopes = { "api1" },
                     // Duende 需要显式允许明文密码传输
                    RequireClientSecret = true
                }
            };
    }
}
4、注册服务
添加代码
        builder.Services.AddOpenApi();

        builder.Services.AddIdentityServer() //添加IdentityServer
            .AddInMemoryApiScopes(Config.ApiScopes) //添加ApiScope
            .AddInMemoryClients(Config.Clients) //添加客户端
.AddDeveloperSigningCredential();//自动生成密钥app.UseIdentityServer();//添加IdentityServer完整代码如下:
using ids4Server.config;

namespace ids4Server
{
    public class Program
    {
        public static void Main(string[] args)
        {
            var builder = WebApplication.CreateBuilder(args);

            // Add services to the container.

            builder.Services.AddControllers();
            // Learn more about configuring OpenAPI at https://aka.ms/aspnet/openapi
            builder.Services.AddOpenApi();

            builder.Services.AddIdentityServer() //添加IdentityServer
                .AddInMemoryApiScopes(Config.ApiScopes) //添加ApiScope
                .AddInMemoryClients(Config.Clients) //添加客户端
                .AddDeveloperSigningCredential();//自动生成密钥


            var app = builder.Build();

            // Configure the HTTP request pipeline.
            if (app.Environment.IsDevelopment())
            {
                app.MapOpenApi();
            }

            app.UseHttpsRedirection();

            app.UseAuthorization();

            app.UseIdentityServer();//添加IdentityServer

            app.MapControllers();

            app.Run();
        }
    }
}
5、测试是否有效
运行项目,会自动生成文件
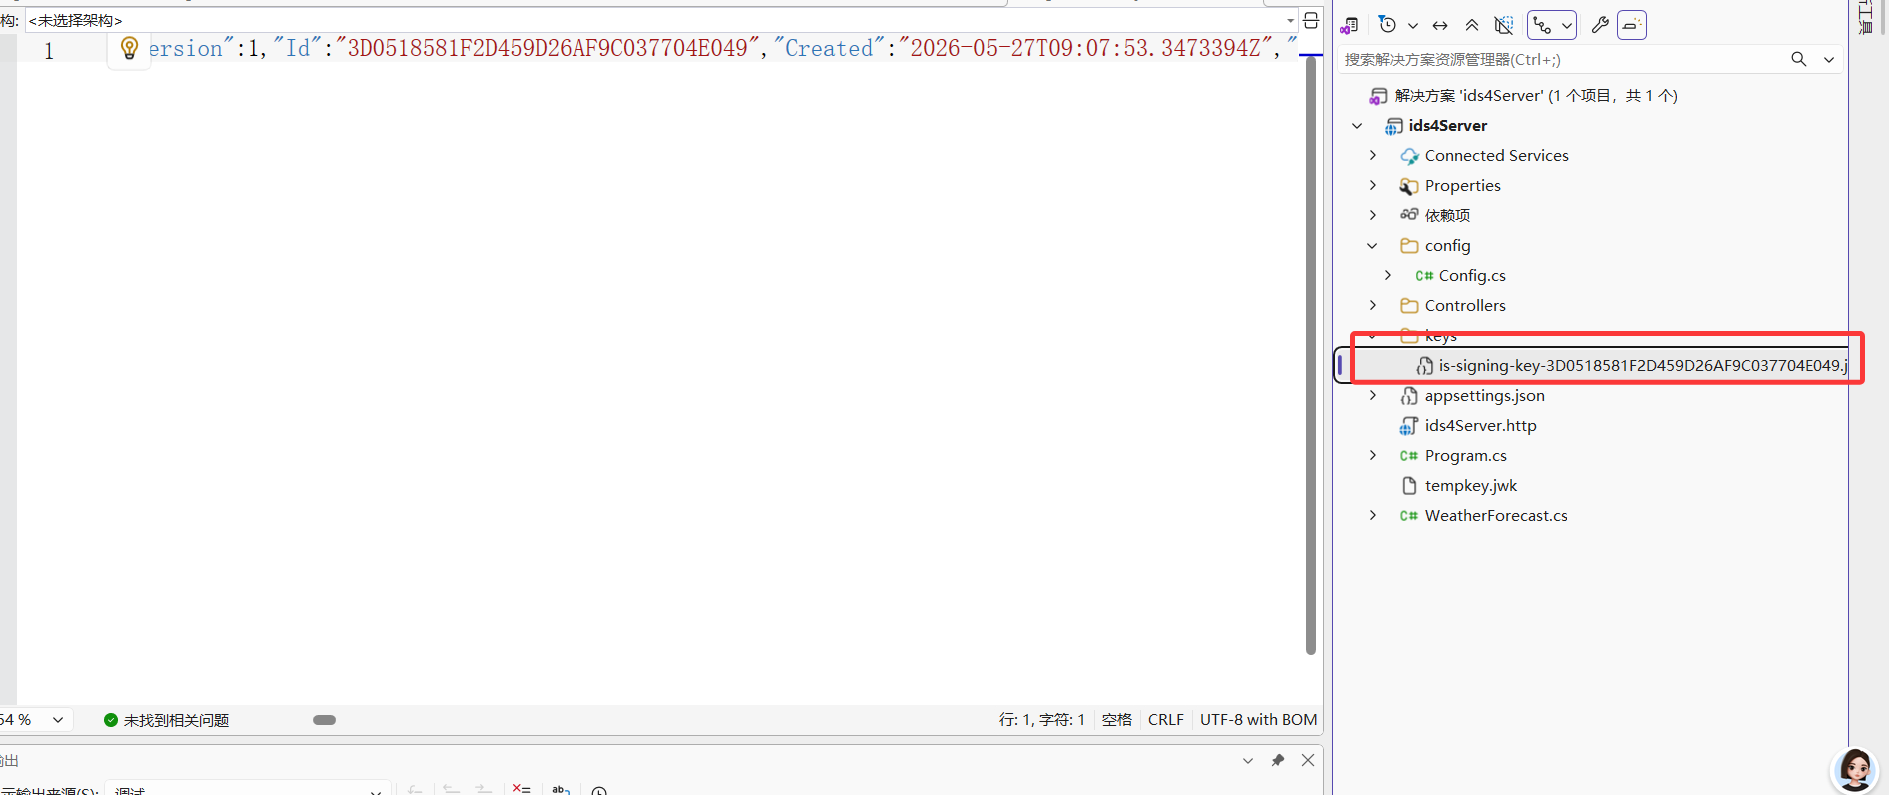
因为我们配置了.AddDeveloperSigningCredential();//自动生成密钥
通过
http://localhost:5096/.well-known/openid-configuration
获取到相应的信息
{
    "issuer": "https://localhost:7195",
    "jwks_uri": "https://localhost:7195/.well-known/openid-configuration/jwks",
    "authorization_endpoint": "https://localhost:7195/connect/authorize",
    "token_endpoint": "https://localhost:7195/connect/token",
    "userinfo_endpoint": "https://localhost:7195/connect/userinfo",
    "end_session_endpoint": "https://localhost:7195/connect/endsession",
    "check_session_iframe": "https://localhost:7195/connect/checksession",
    "revocation_endpoint": "https://localhost:7195/connect/revocation",
    "introspection_endpoint": "https://localhost:7195/connect/introspect",
    "device_authorization_endpoint": "https://localhost:7195/connect/deviceauthorization",
    "backchannel_authentication_endpoint": "https://localhost:7195/connect/ciba",
    "pushed_authorization_request_endpoint": "https://localhost:7195/connect/par",
    "require_pushed_authorization_requests": false,
    "frontchannel_logout_supported": true,
    "frontchannel_logout_session_supported": true,
    "backchannel_logout_supported": true,
    "backchannel_logout_session_supported": true,
    "scopes_supported": [
        "api1",
        "offline_access"
    ],
    "claims_supported": [],
    "grant_types_supported": [
        "authorization_code",
        "client_credentials",
        "refresh_token",
        "implicit",
        "urn:ietf:params:oauth:grant-type:device_code",
        "urn:openid:params:grant-type:ciba"
    ],
    "response_types_supported": [
        "code",
        "token",
        "id_token",
        "id_token token",
        "code id_token",
        "code token",
        "code id_token token"
    ],
    "response_modes_supported": [
        "form_post",
        "query",
        "fragment"
    ],
    "token_endpoint_auth_methods_supported": [
        "client_secret_basic",
        "client_secret_post"
    ],
    "revocation_endpoint_auth_methods_supported": [
        "client_secret_basic",
        "client_secret_post"
    ],
    "introspection_endpoint_auth_methods_supported": [
        "client_secret_basic",
        "client_secret_post"
    ],
    "id_token_signing_alg_values_supported": [
        "RS256"
    ],
    "userinfo_signing_alg_values_supported": [
        "RS256"
    ],
    "introspection_signing_alg_values_supported": [
        "RS256"
    ],
    "subject_types_supported": [
        "public"
    ],
    "code_challenge_methods_supported": [
        "plain",
        "S256"
    ],
    "request_parameter_supported": true,
    "request_object_signing_alg_values_supported": [
        "RS256",
        "RS384",
        "RS512",
        "PS256",
        "PS384",
        "PS512",
        "ES256",
        "ES384",
        "ES512"
    ],
    "prompt_values_supported": [
        "none",
        "login",
        "consent",
        "select_account"
    ],
    "authorization_response_iss_parameter_supported": true,
    "backchannel_token_delivery_modes_supported": [
        "poll"
    ],
    "backchannel_user_code_parameter_supported": true,
    "backchannel_authentication_request_signing_alg_values_supported": [
        "RS256",
        "RS384",
        "RS512",
        "PS256",
        "PS384",
        "PS512",
        "ES256",
        "ES384",
        "ES512"
    ],
    "dpop_signing_alg_values_supported": [
        "RS256",
        "RS384",
        "RS512",
        "PS256",
        "PS384",
        "PS512",
        "ES256",
        "ES384",
        "ES512"
    ]
}
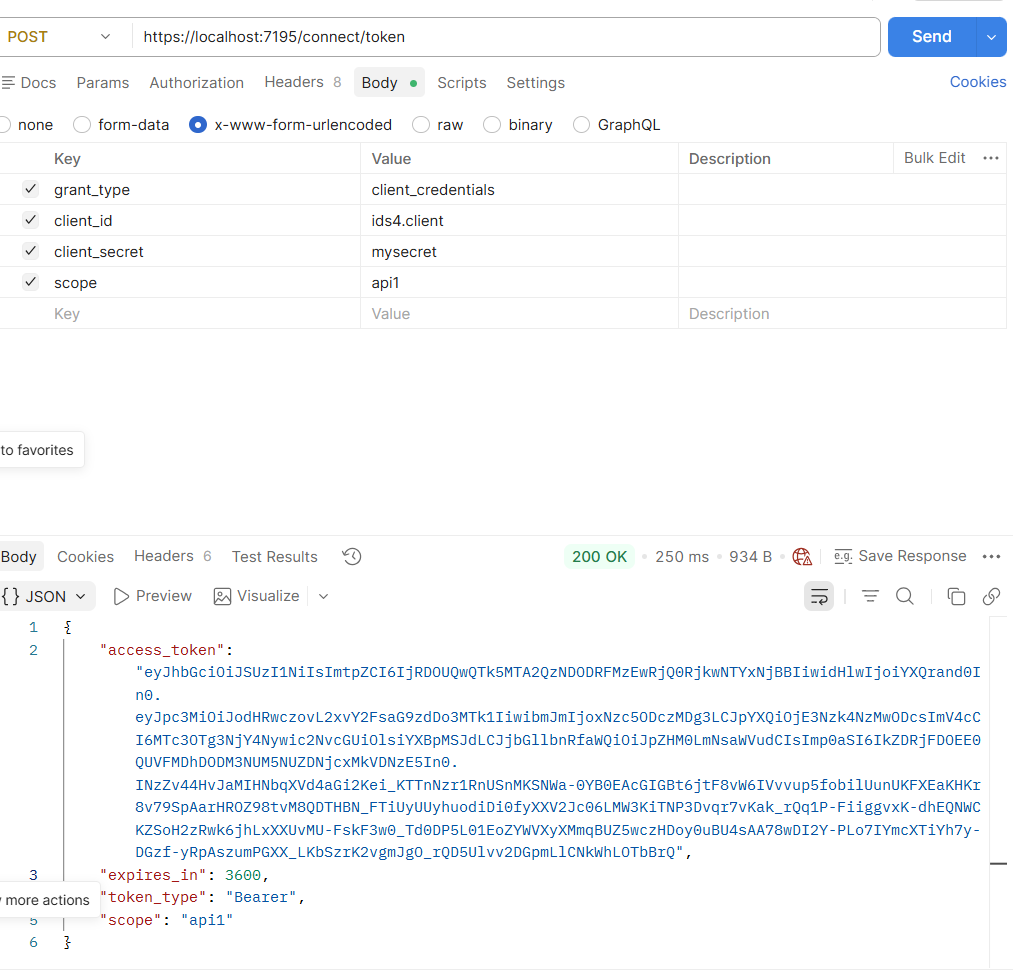
其中token_endpoint 是用来获取token令牌的
通过postman来进行测试
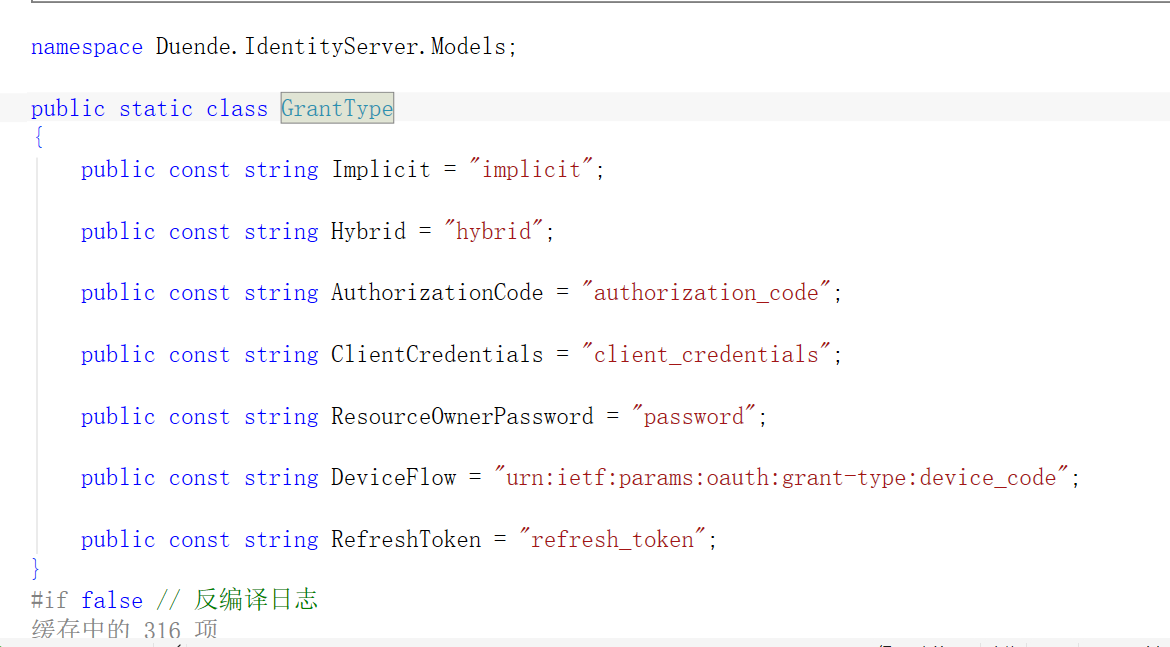
传参需要传这四个参数,因为我选择的是客户端模式,最简单的来做演示,grant_type可以反编译GrantType来查看有哪些
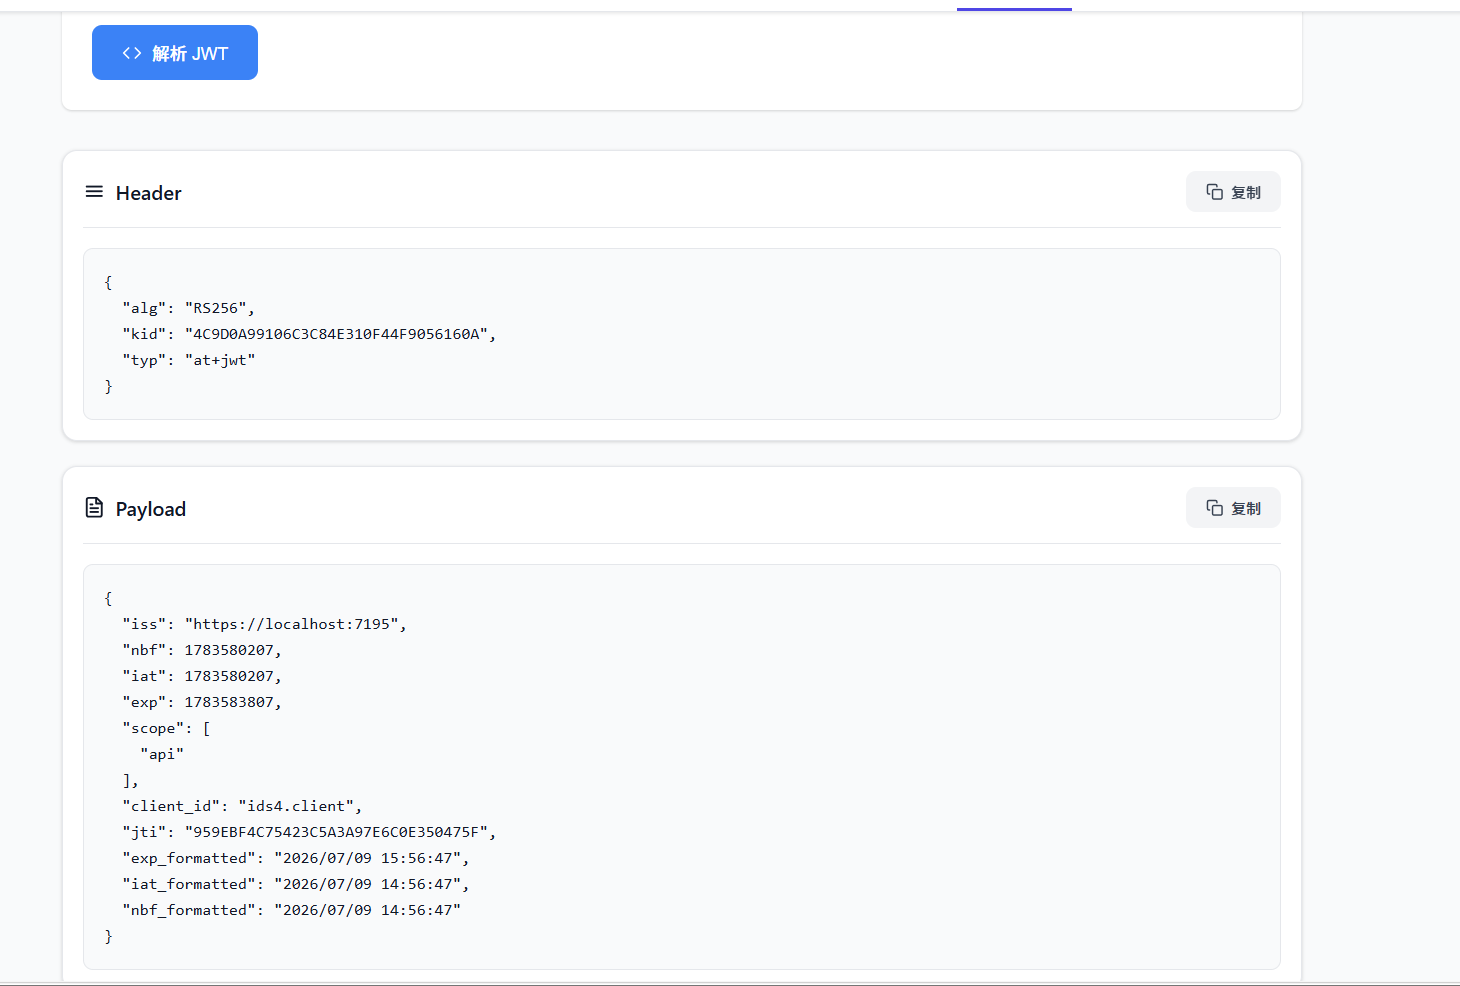
token解析之后:
JWT
JWT(JSON Web Token)
一种基于 JSON 的开放标准(RFC 7519),用于在各方之间安全地传递信息。
特点紧凑(Compact):可通过 URL、POST 参数或 HTTP 头传输
- 自包含(Self-contained):携带了用户的基本身份信息和声明(Claims)
- 可验证(Verifiable):签名保证数据未被篡改
典型场景:用户登录后,服务器颁发一个 JWT,客户端每次请求都携带它,无需再查数据库做 Session 验证。
JWT的结构
| 部分 | 用途 | 示例内容 |
|---|---|---|
| Header(头部) | 指定算法和类型 | {"alg":"HS256","typ":"JWT"} |
| Payload(负载) | 存放声明(Claims),如用户 ID、过期时间等 | {"sub":"1234567890","name":"Alice","exp":1600000000} |
| Signature(签名) | 保证前两部分不被篡改 | HMACSHA256(Base64Url(Header) + "." + Base64Url(Payload), Secret) |
Header 和 Payload 都要做 Base64Url 编码
JWT = Base64Url(Header) + "." + Base64Url(Payload) + "." + Base64Url(Signature)JWT Secret(密钥)介绍
作用
对称签名(HS256/HS384/HS512)中,Secret 用来签发和验证 Token。
形式 & 长度
高强度随机字节,建议 ≥256 bits(32 bytes)
常见编码:
- URL-Safe Base64
9d6bXFMmZ3RV8Ytp9rz8QpKBuGV9zZ4T5vHSuJEjw8M - Hex
e75ab5c53266774557c62da7dacfc429281b8695f736784f9bc74ae24923c3c30
签名算法(alg)
| 算法名称 | 描述 |
|---|---|
| HS256 | HMAC + SHA-256,对称加密(Shared Secret) |
| HS384 | HMAC + SHA-384 |
| HS512 | HMAC + SHA-512 |
| RS256 | RSA + SHA-256,非对称加密(公钥/私钥对) |
| ES256 | ECDSA + SHA-256,椭圆曲线数字签名算法 |
小项目常用 HS256;高安全需求可选 RS256(私钥签发、公钥验签)。
JWT 的工作流程
- 用户登录(提供用户名/密码)
- 服务器验证成功后,签发 JWT
- 客户端保存(LocalStorage / Cookie)
- 后续请求携带 JWT
- 推荐:请求头
Authorization: Bearer <token> - 服务器 验证签名 & 检查声明(如是否过期、是否有权限)
- 验证通过,返回数据;否则
401 Unauthorized
sequenceDiagram
    User->>Client: 输入用户名 & 密码
    Client->>Server: POST /login
    Server-->>Client: 返回 JWT(Header.Payload.Signature)
    Client->>Server: GET /profile + Authorization: Bearer <JWT>
    Server-->>Client: 返回 200 OK + 用户信息
签名 & 验证(HS256 示例)
1. 签名生成
令
H = Base64Url(Header)
P = Base64Url(Payload)
Secret = 服务器持有的密钥
LaTeX 公式版:
2. 验证流程
1. 拆分 Header.Payload.Signature
2. 重新计算 HMACSHA256(H+"."+P, Secret)
3. 对比结果:
- 相同:✅ 数据未被篡改
- 不同:❌ 拒绝访问
优缺点一览
| 优点 | 缺点 |
|---|---|
| 1. 无状态(Stateless),可水平扩展 | 1. 无法即时「撤销」已签发的 Token |
| 2. 携带信息自包含,无需多次查询数据库 | 2. Token 泄露风险大,需妥善存储 |
| 3. 支持跨域认证(适合微服务、移动端) | 3. Payload 明文可读,敏感信息请勿存放 |
客户端api和exe进行身份认证测试(客户端许可模式)
1、api
新建一个net core web api项目,然后引入JWT的依赖(根据自己的net 版本):microsoft.aspnetcore.authentication.jwtbearer
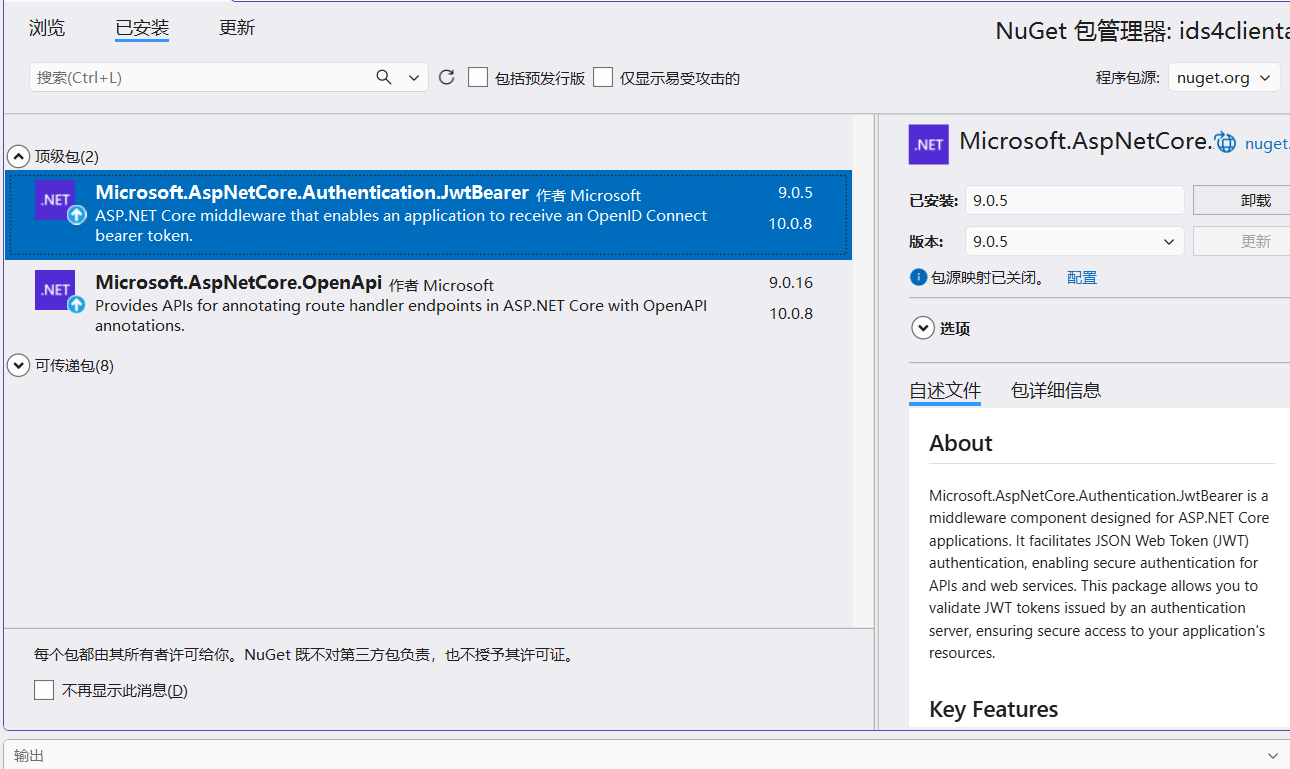
然后在Progam.cs中注册JWT
 builder.Services.AddAuthentication("Bearer")
     .AddJwtBearer("Bearer", option =>
     {
         option.Authority = "https://localhost:7195";
         option.RequireHttpsMetadata = false;
         option.TokenValidationParameters = new Microsoft.IdentityModel.Tokens.TokenValidationParameters
         {
             ValidateAudience = false  // ids4Demo 未配置 Audience,关闭验证
         };

     });//添加认证
app.UseAuthentication();//添加认证
app.UseAuthorization();//添加授权完整代码:
using Microsoft.Extensions.Options;
namespace ids4clientapi
{
public class Program
{
public static void Main(string[] args)
{
var builder = WebApplication.CreateBuilder(args);
// Add services to the container.
builder.Services.AddControllers();
// Learn more about configuring OpenAPI at https://aka.ms/aspnet/openapi
builder.Services.AddOpenApi();
builder.Services.AddAuthentication("Bearer")
.AddJwtBearer("Bearer", option =>
{
option.Authority = "https://localhost:7195";
option.RequireHttpsMetadata = false;
option.TokenValidationParameters = new Microsoft.IdentityModel.Tokens.TokenValidationParameters
{
ValidateAudience = false // ids4Demo 未配置 Audience,关闭验证
};
});//添加认证
var app = builder.Build();
// Configure the HTTP request pipeline.
if (app.Environment.IsDevelopment())
{
app.MapOpenApi();
}
app.UseHttpsRedirection();
          app.UseAuthentication();//添加认证
          app.UseAuthorization();//添加授权
app.MapControllers();
app.Run();
}
}
}
地址记得改为你实际的认证服务器的地址
添加一个测试用的控制器
using Microsoft.AspNetCore.Authorization;
using Microsoft.AspNetCore.Http;
using Microsoft.AspNetCore.Mvc;

namespace ids4clientapi.Controllers
{
    [Route("api/[controller]/[action]")]
    [ApiController]
    [Authorize]
    public class TestController : ControllerBase
    {
        [HttpGet]
        public  IActionResult Test()
        {
            return new JsonResult(from claim in User.Claims select new {claim.Type,claim.Value});
        }
    }
}
这样就能实现最简单的认证了,需要保证服务端在线,不然可能会401或者500
2、客户端
对于客户端,一般来说,都是去调用api接口,所以需要的是拿Token,然后去调用api
先新建一个控制台项目
选择是否导入Duende.IdentityModel,或者已弃用的IdentityModel,导入对应的版本
编写program.cs获取token,两种方法,一种使用HttpClint,另一种使用上面导入的Duende.IdentityModel
使用token的话,就把token传入就可以调用api的接口的
#region 获取token方法1:使用HttpClient
/*var client = new HttpClient();
var request = new HttpRequestMessage(HttpMethod.Post, "https://localhost:7195/connect/token");
var collection = new List<KeyValuePair<string, string>>();
collection.Add(new("grant_type", "client_credentials"));
collection.Add(new("client_id", "ids4.client"));
collection.Add(new("client_secret", "mysecret"));
collection.Add(new("scope", "api1"));
var content = new FormUrlEncodedContent(collection);
request.Content = content;
var response = await client.SendAsync(request);
response.EnsureSuccessStatusCode();
Console.WriteLine(await response.Content.ReadAsStringAsync());
Console.ReadLine();*/
#endregion


#region 获取token方法2: 通过IdentityModel
using Duende.IdentityModel.Client;

var client = new HttpClient();

DiscoveryDocumentResponse respose = await client.GetDiscoveryDocumentAsync("https://localhost:7195");
if (respose.IsError)
{
    Console.WriteLine(respose.Error);
    return;
}

TokenResponse tokenResponse = await client.RequestClientCredentialsTokenAsync(new ClientCredentialsTokenRequest
{
    Address = respose.TokenEndpoint,
    ClientId = "ids4.client",
    ClientSecret = "mysecret",
    Scope = "api1"
} );
if (tokenResponse.IsError)
{
    Console.WriteLine(tokenResponse.Error);
    return;
}

Console.WriteLine(tokenResponse);
Console.WriteLine();
Console.WriteLine(tokenResponse.Json);
Console.WriteLine();
Console.WriteLine(tokenResponse.AccessToken);
//Console.ReadLine();
#endregion

#region 消费Token


client.SetBearerToken(tokenResponse.AccessToken);
//别用http,会直接401,改成https
var response = await client.GetAsync("https://localhost:7040/api/test/test");
Console.WriteLine(await response.Content.ReadAsStringAsync());
Console.ReadLine();

#endregion
结果如下:
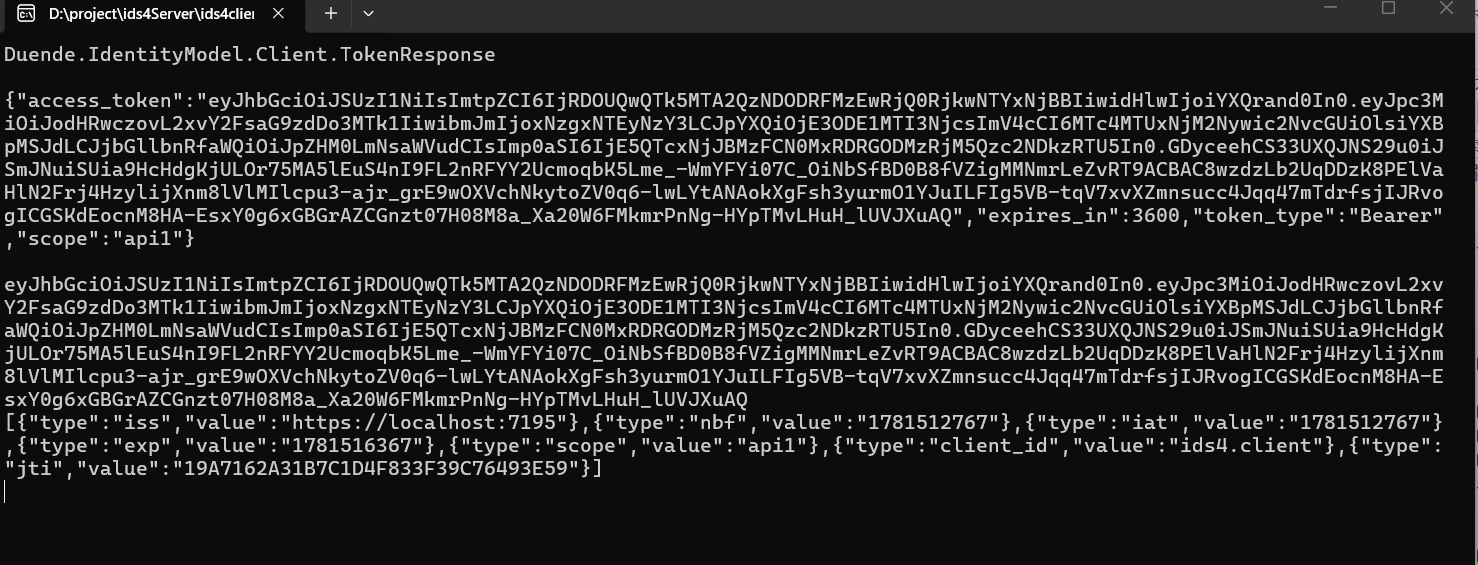
3、添加ApiScope
对于上面的实现来说,不能很好的保护到想要保护的资源,因为只要通过了认证,就能访问所有的资源,对此我们可以添加Scope来进行限制
因为我们的认证服务端已经添加了一个Scope api1,所以我们现在需要再客户端注册一下授权服务,在Program.cs中添加
//添加授权
builder.Services.AddAuthorization(options =>
{
    options.AddPolicy("api1", policy =>
    {
        policy.RequireAuthenticatedUser();//必须是认证用户
        policy.RequireClaim("scope", "api1");//必须有api1的scope
    });
});
然后在需要限制的控制器中添加限制
[Authorize(Policy = "api1")]
namespace ids4clientapi.Controllers
{
    [Route("api/[controller]/[action]")]
    [ApiController]
    [Authorize(Policy = "api1")]
    public class TestController : ControllerBase
    {
        [HttpGet]
        public  IActionResult Test()
        {
            return new JsonResult(from claim in User.Claims select new {claim.Type,claim.Value});
        }
    }
}
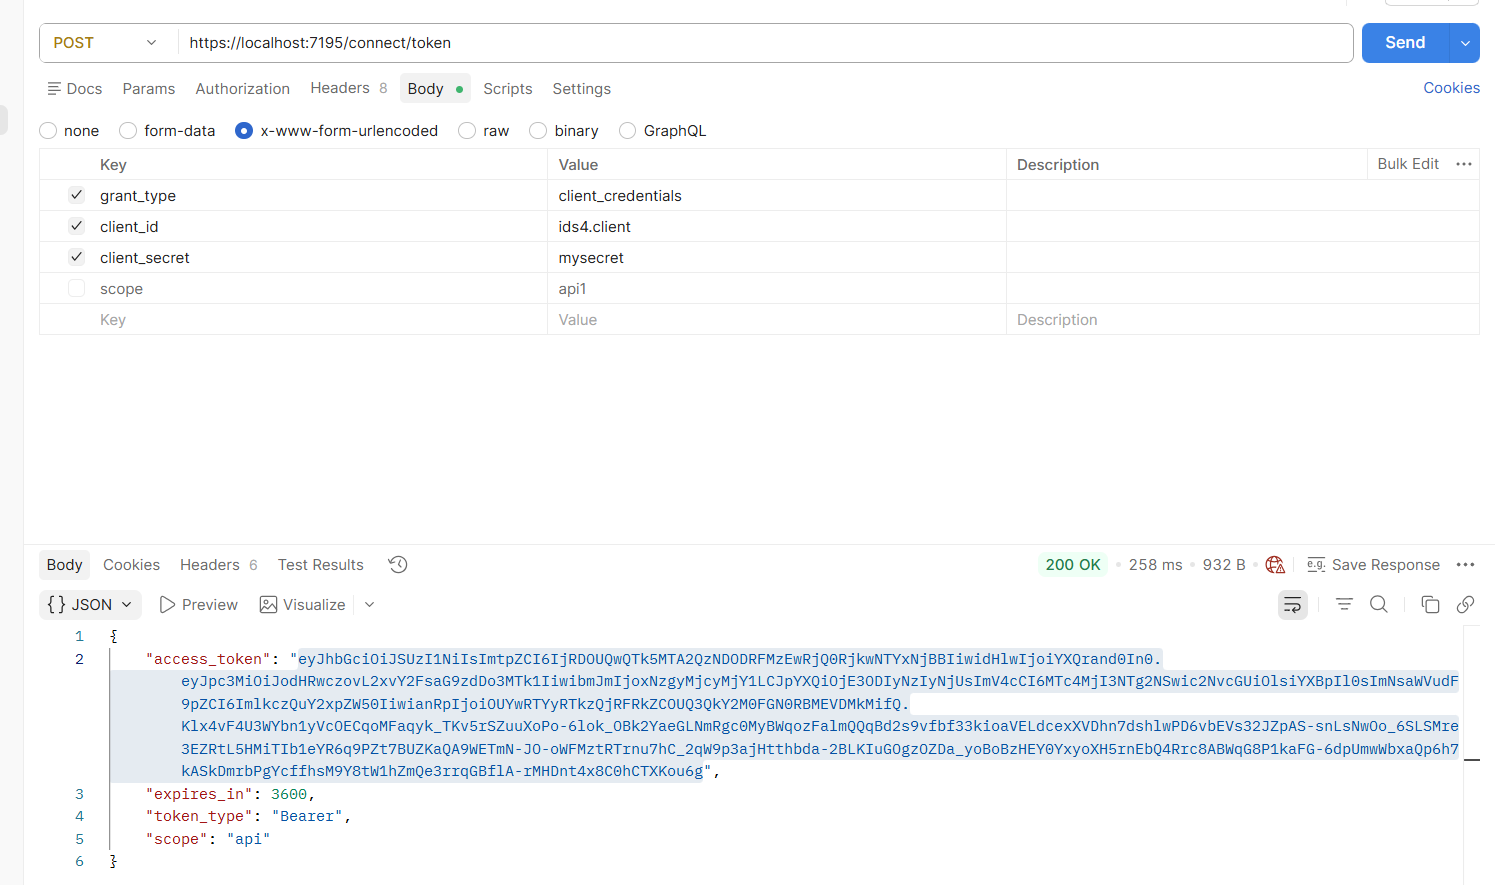
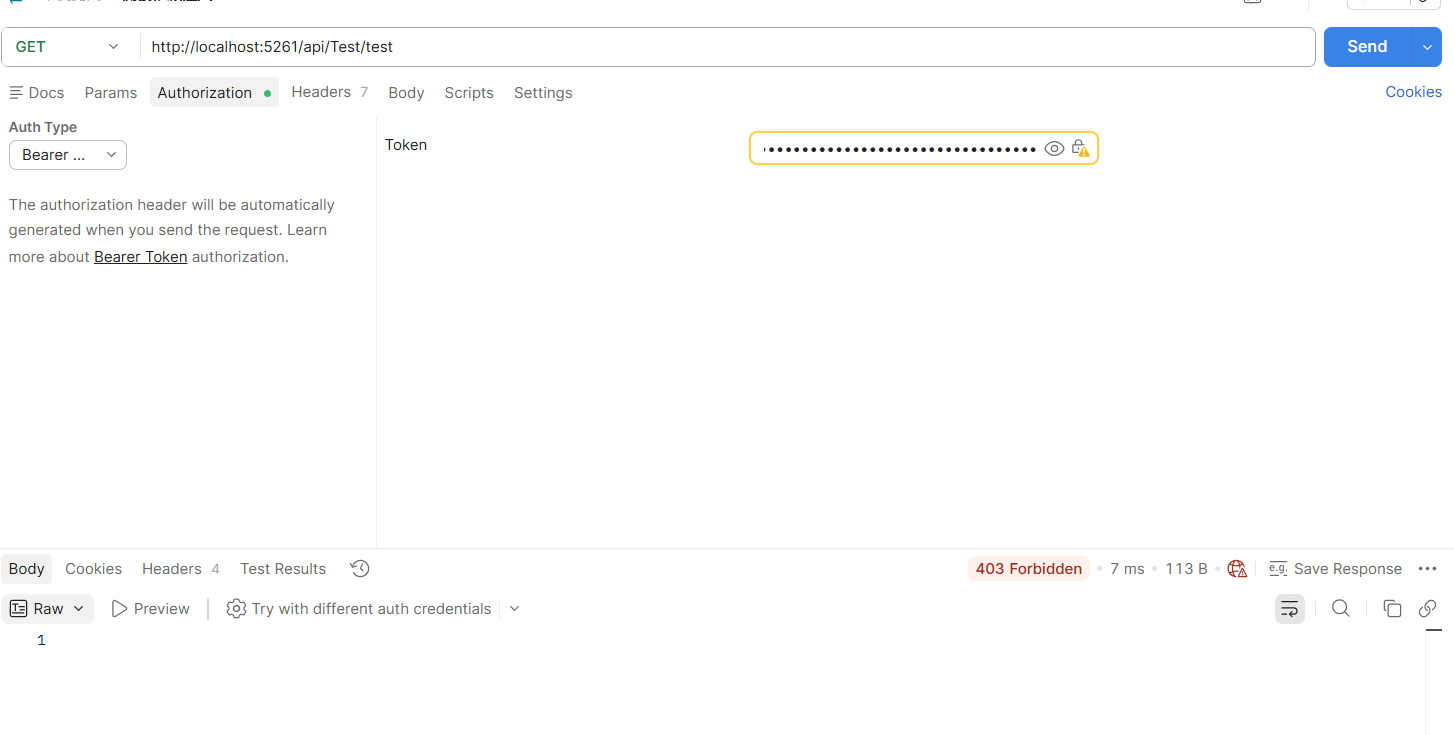
这样启动之后就能够限制,只有拥有api1的权限才能够访问这个控制器,否则就返回403,要测试的话,可以把客户端或者服务端其中一个的api1改为其他的,如api,这样的话再去访问的话,就会是403了,我这里是把服务端改成了api,可以看到,请求到的token的Scope是api,那么去访问api1的资源就会被限制了
资源拥有者凭据许可模式(密码模式)
针对密码许可模式,一般比较适合用于内部系统,通过用户名和密码来获取token
目前先使用测试用户来进行实现:
对config文件进行更新,添加新的作用域和客户端,也可以不添加,直接在原来的配置中修改
using Duende.IdentityServer.Models;
using Duende.IdentityServer.Test;

namespace ids4Server.config
{
    public static class Config
    {
        // 1. 定义受保护的API资源
        public static IEnumerable<ApiScope> ApiScopes =>
           new List<ApiScope>
           {
                new ApiScope{
                    Name = "api",
                    DisplayName = "My API"
                },
                new ApiScope{
                    Name = "api2",
                    DisplayName = "My API2"
                }
           };

        // 2. 定义客户端(允许谁来请求Token)
        public static IEnumerable<Client> Clients =>
            new List<Client>
            {
                new Client
                {
                    // 客户端唯一标识
                    ClientId = "ids4.client",
                    // 客户端密钥(加密 )
                    ClientSecrets = { new Secret("mysecret".Sha256()) },
                    // 授权模式:ClientCredentials(客户端凭证模式,适用于服务间调用)
                    AllowedGrantTypes = GrantTypes.ClientCredentials,
                    // 允许访问的作用域
                    AllowedScopes = { "api" },
                     // Duende 需要显式允许明文密码传输
                    RequireClientSecret = true
                },
                new Client
                {
                    // 客户端唯一标识
                    ClientId = "ids4.client2",
                    // 客户端密钥(加密 )
                    ClientSecrets = { new Secret("mysecret".Sha256()) },
                    // 授权模式:ResourceOwnerPassword(密码凭证模式)
                    AllowedGrantTypes = GrantTypes.ResourceOwnerPassword,
                    // 允许访问的作用域
                    AllowedScopes = { "api2" },
                     // Duende 需要显式允许明文密码传输
                    RequireClientSecret = true
                }
            };

        public static List<TestUser> Users() => new() {
            new TestUser
            {
                SubjectId="12",
                Username="admin",
                Password="admin"
            }
        };
    }
}
Program.cs文件中将用户信息添加进去
   builder.Services.AddIdentityServer(options =>
   {
       // 关闭自动密钥管理(免费开发模式必需)
       options.KeyManagement.Enabled = false;
   }) //添加IdentityServer
       .AddInMemoryApiScopes(Config.ApiScopes) //添加ApiScope
       .AddInMemoryClients(Config.Clients) //添加客户端
       .AddDeveloperSigningCredential()//自动生成密钥
       .AddTestUsers(Config.Users());//添加测试用户
然后我们重启应用,添加一个新的登录方式,参考之前的客户端凭据许可模式,只不过方式使用password,如:
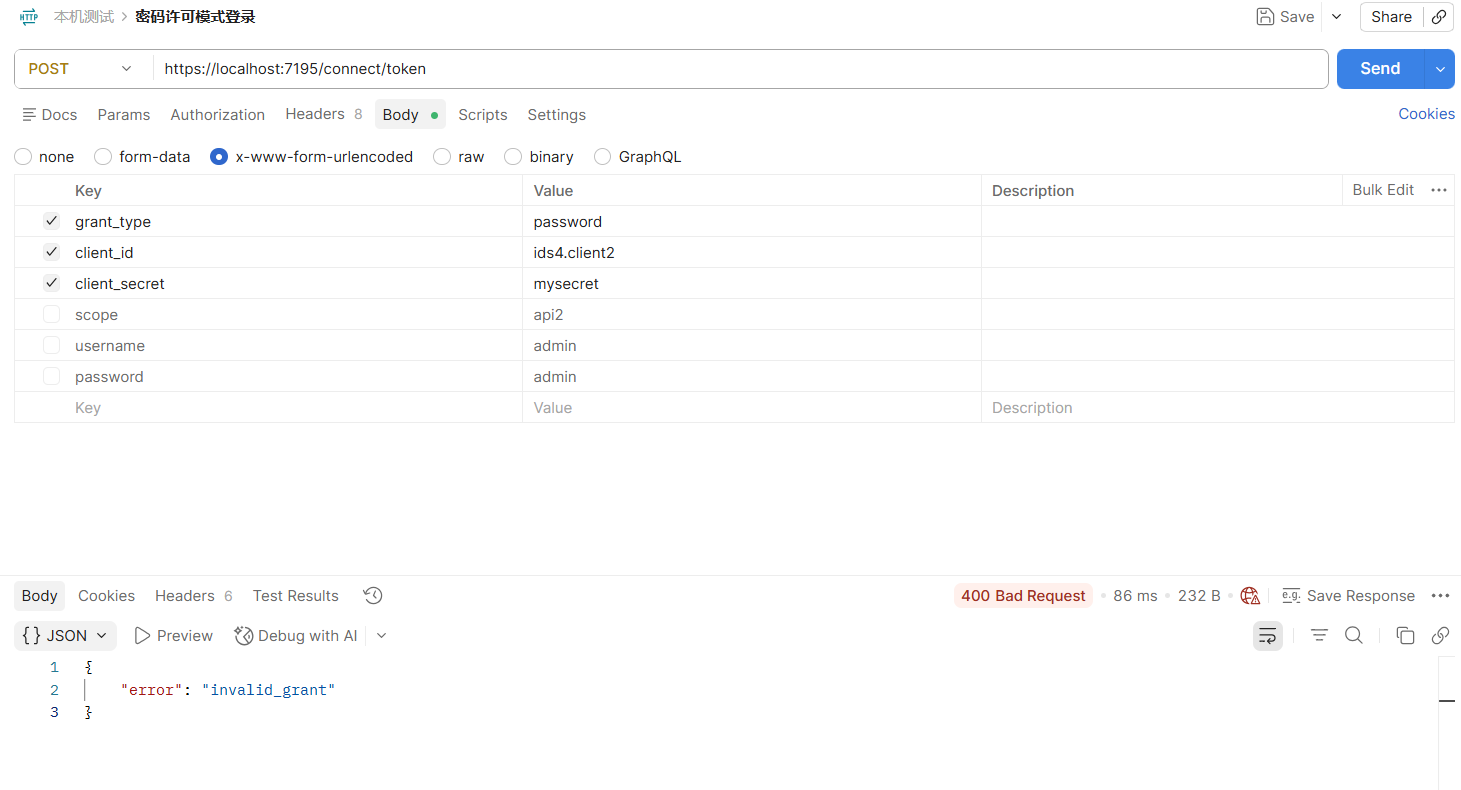
可以看到,我们切换了模式之后,就不能够只通过客户端id和密钥获取token了
我们加上用户名密码之后就可以获取token了
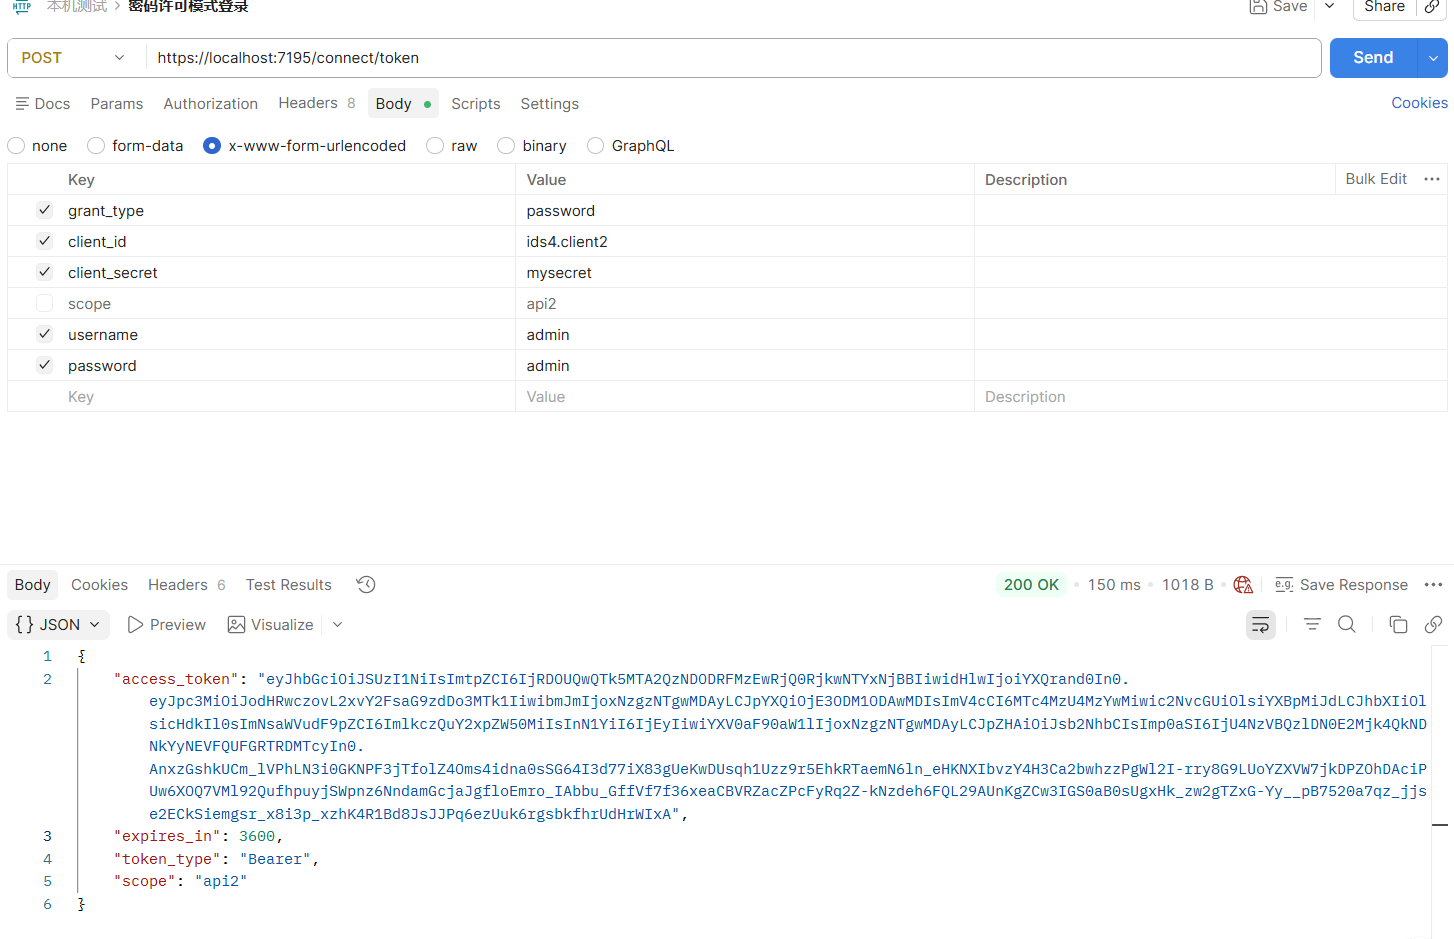
我们把token拿出去进行解析,可以看到
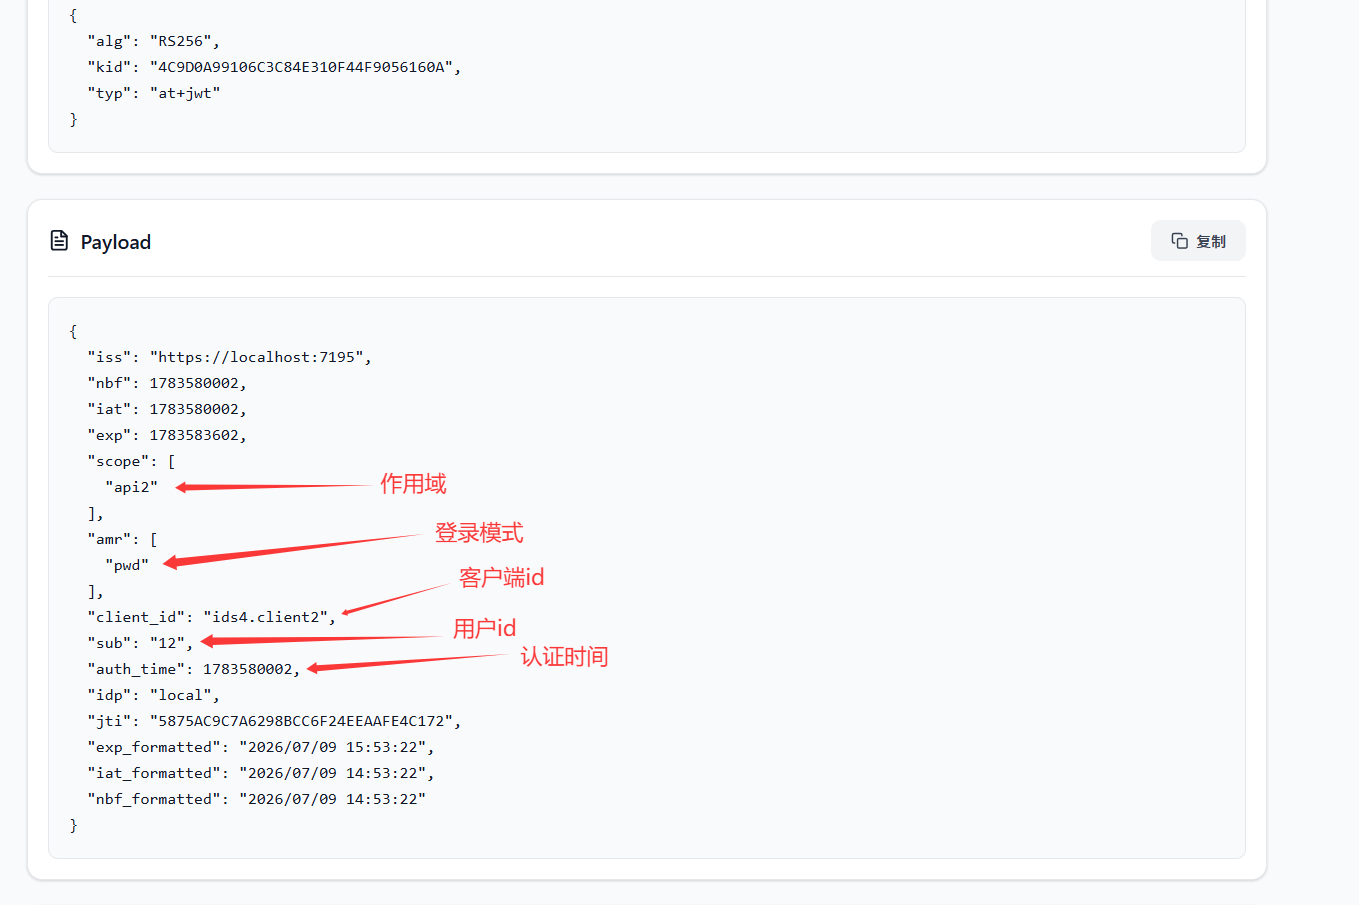 可以看到相较于客户端许可模式,多了部分信息
OIDC混合模式使用
1、对server新增客户端,启动文件修改
public static IEnumerable<Client> Clients =>
    new List<Client>
    {
        new Client
        {
            // 客户端唯一标识
            ClientId = "ids4.client",
            // 客户端密钥(加密 )
            ClientSecrets = { new Secret("mysecret".Sha256()) },
            // 授权模式:ClientCredentials(客户端凭证模式,适用于服务间调用)
            AllowedGrantTypes = GrantTypes.ClientCredentials,
            // 允许访问的作用域
            AllowedScopes = { "api" },
             // Duende 需要显式允许明文密码传输
            RequireClientSecret = true
        },
        new Client
        {
            // 客户端唯一标识
            ClientId = "ids4.client2",
            // 客户端密钥(加密 )
            ClientSecrets = { new Secret("mysecret".Sha256()) },
            // 授权模式:ResourceOwnerPassword(密码凭证模式)
            AllowedGrantTypes = GrantTypes.ResourceOwnerPassword,
            // 允许访问的作用域
            AllowedScopes = { "api2" },
             // Duende 需要显式允许明文密码传输
            RequireClientSecret = true
        },
        new Client
        {
            ProtocolType="oidc",
            ClientId="mvc_client",
            ClientName="MVC客户端",
            ClientSecrets={ new Secret ("mysercet".Sha256())},
            AllowedGrantTypes= GrantTypes.Hybrid,//使用hybrid模式
            RedirectUris={ "https://localhost:7174/signin-oidc" },
            PostLogoutRedirectUris={ "https://localhost:7174/signout-callback-oidc" },
            AllowedCorsOrigins={ "https://localhost:7174" },//允许跨域访问
            //AllowedScopes={ "openid", "profile", "api" },
            AllowedScopes=new List<String>()
            {
                IdentityServerConstants.StandardScopes.OpenId,
                IdentityServerConstants.StandardScopes.Profile,
                "api"
            },
            RequireConsent=true,//是否需要用户同意
            AlwaysIncludeUserClaimsInIdToken=true,//是否始终包含用户声明
            RequirePkce=false,//是否需要PKCE加密
            AccessTokenLifetime=31536000,
            IdentityTokenLifetime=360
        }
    };
修改启动文件
添加 .AddInMemoryIdentityResources(Config.IdentityResources)//添加身份资源
  // 添加 IdentityServer
  builder.Services.AddIdentityServer(options =>
  {
      // 关闭自动密钥管理(免费开发模式必需)
      options.KeyManagement.Enabled = false;
  })
      .AddInMemoryApiScopes(Config.ApiScopes)//添加API作用域
      .AddInMemoryClients(Config.Clients)//添加客户端
      .AddDeveloperSigningCredential()//添加开发者签名凭据
      .AddInMemoryIdentityResources(Config.IdentityResources)//添加身份资源
      .AddTestUsers(Config.Users());//添加测试用户
2、添加一个mvc项目用来测试
新建一个空白mvc项目,然后nuget导入
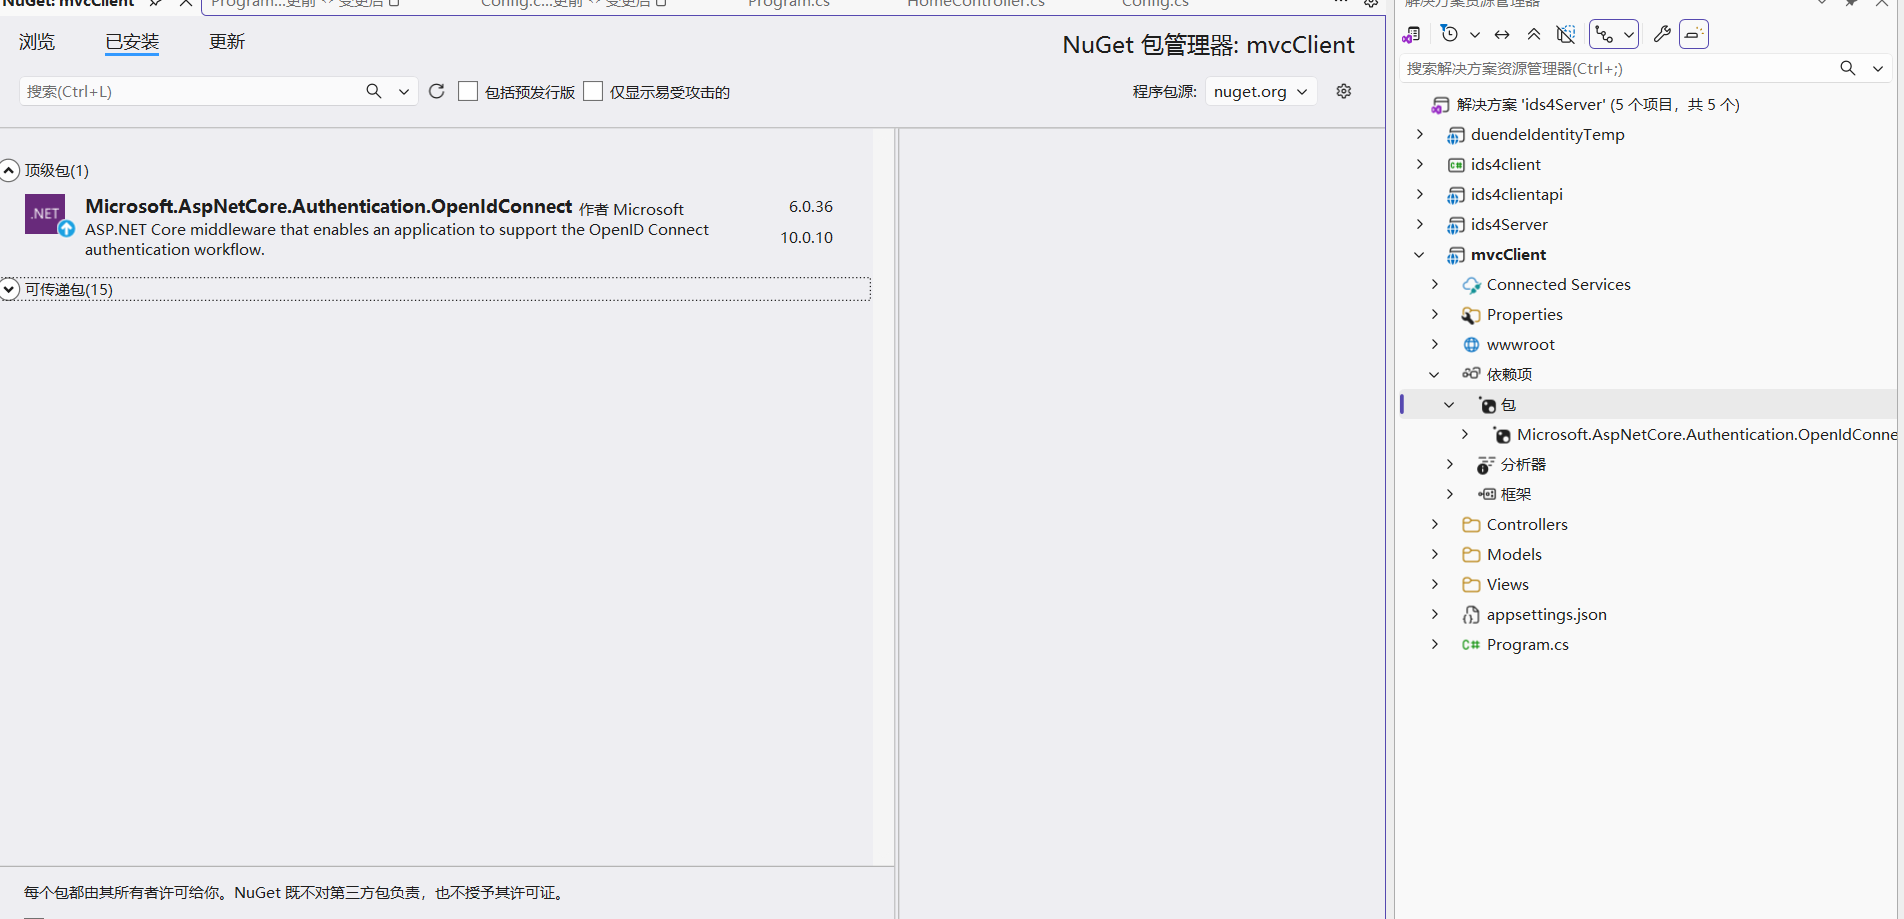
修改启动文件
using Microsoft.IdentityModel.Protocols.OpenIdConnect;

namespace mvcClient
{
    public class Program
    {
        public static void Main(string[] args)
        {
            var builder = WebApplication.CreateBuilder(args);

            // Add services to the container.
            builder.Services.AddControllersWithViews();

            builder.Services.AddAuthentication(option =>
            {
                option.DefaultScheme = "Cookies";
                option.DefaultChallengeScheme = "oidc";
            }).AddCookie("Cookies")
            .AddOpenIdConnect("oidc", option =>
            {
                option.Authority = "https://localhost:7195";
                option.ClientId = "mvc_client";
                option.ClientSecret = "mysercet";
                option.ResponseType = OpenIdConnectResponseType.CodeIdToken;
                option.GetClaimsFromUserInfoEndpoint = true;//是否从用户信息端点获取声明
                option.Scope.Add("api");
                option.UsePkce = false;
                option.SaveTokens = true;

            });

            var app = builder.Build();

            // Configure the HTTP request pipeline.
            if (!app.Environment.IsDevelopment())
            {
                app.UseExceptionHandler("/Home/Error");
                // The default HSTS value is 30 days. You may want to change this for production scenarios, see https://aka.ms/aspnetcore-hsts.
                app.UseHsts();
            }

            app.UseHttpsRedirection();
            app.UseStaticFiles();

            app.UseRouting();
            app.UseAuthentication();
            app.UseAuthorization();
            app.MapControllerRoute(
                name: "default",
                pattern: "{controller=Home}/{action=Index}/{id?}");

            app.Run();
        }
    }
}
对homecontroller修改
using Microsoft.AspNetCore.Authentication;
using Microsoft.AspNetCore.Authorization;
using Microsoft.AspNetCore.Mvc;
using mvcClient.Models;
using System.Diagnostics;

namespace mvcClient.Controllers
{
    public class HomeController : Controller
    {
        private readonly ILogger<HomeController> _logger;

        public HomeController(ILogger<HomeController> logger)
        {
            _logger = logger;
        }

        public IActionResult Index()
        {
            return View();
        }
        [Authorize]
        public IActionResult Privacy()
        {
            return View();
        }
        [Authorize]
        public IActionResult Logout()
        {
            return SignOut("Cookies","oidc");
        }

        [ResponseCache(Duration = 0, Location = ResponseCacheLocation.None, NoStore = true)]
        public IActionResult Error()
        {
            return View(new ErrorViewModel { RequestId = Activity.Current?.Id ?? HttpContext.TraceIdentifier });
        }
        [Authorize]
        public async Task<IActionResult> CallApi()
        {
            string? accessToken = await HttpContext.GetTokenAsync("access_token");
            var client =new HttpClient();
            client.DefaultRequestHeaders.Authorization = new System.Net.Http.Headers.AuthenticationHeaderValue("Bearer", accessToken);

            var response = await client.GetAsync("https://localhost:7040/api/Test/Test");
            ViewBag.Json = await response.Content.ReadAsStringAsync();

            return View();
        }
    }
}
修改Privacy对应视图 Privacy.cshtml
@using Microsoft.AspNetCore.Authentication
@{
    ViewData["Title"] = "Privacy Policy";
}
<h1>@ViewData["Title"]</h1>

<h2>Claims</h2>

<dl>
    @foreach(var calim in User.Claims)
    {
                <dt>@calim.Type</dt>
        <dd>@calim.Value</dd>
    }
</dl>

<h2>Properties</h2>

<dl>
    @foreach(var property in (await Context.AuthenticateAsync()).Properties.Items)

    {

        <dt>@property.Key</dt>

        <dd>@property.Value</dd>

    }

</dl>

<a asp-controller="Home" asp-action="Logout">Logout</a>
新增视图CallApi.cshtml
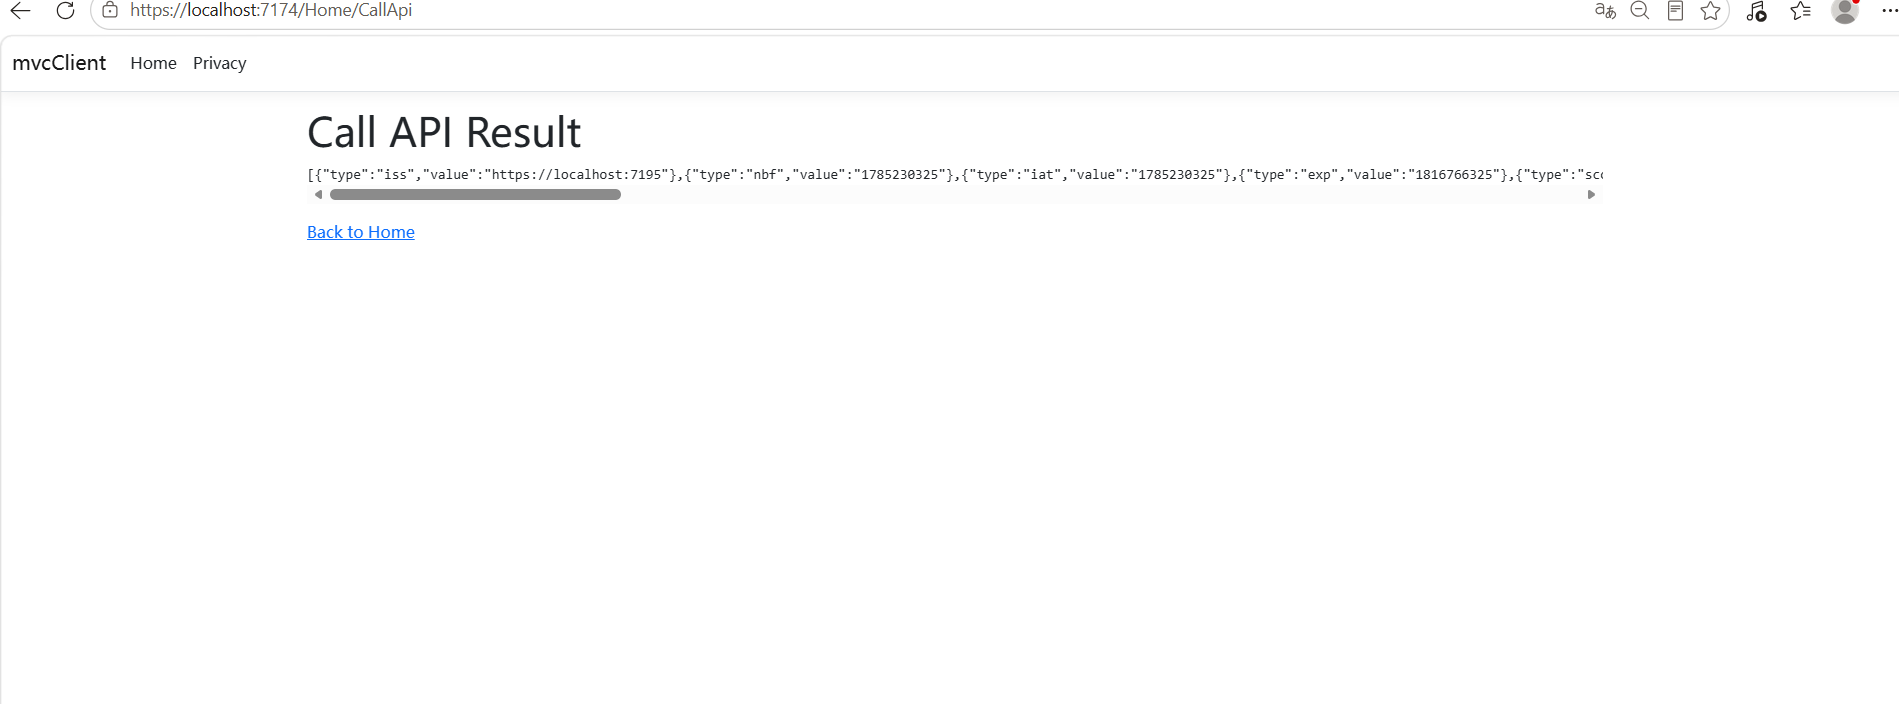
<h1>Call API Result</h1>

<pre>@ViewBag.Json</pre>

<a asp-controller="Home" asp-action="Index">Back to Home</a>
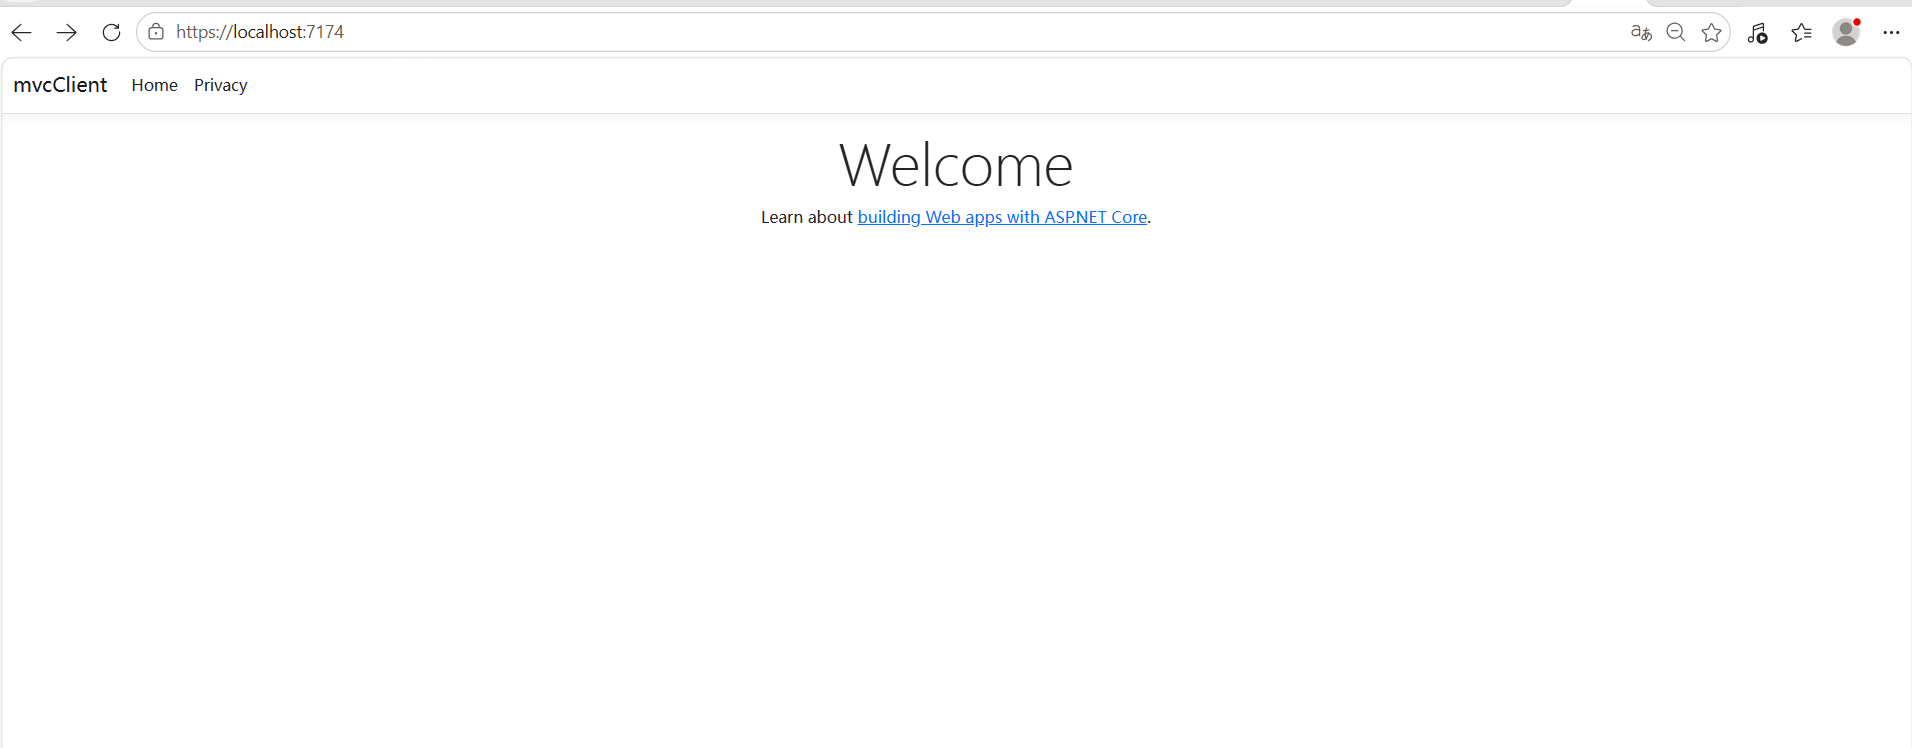
然后把两个项目都运行,点击Home是不需要认证直接能访问的,但是点击Privacy就需要认证,会自动跳转到指定的url
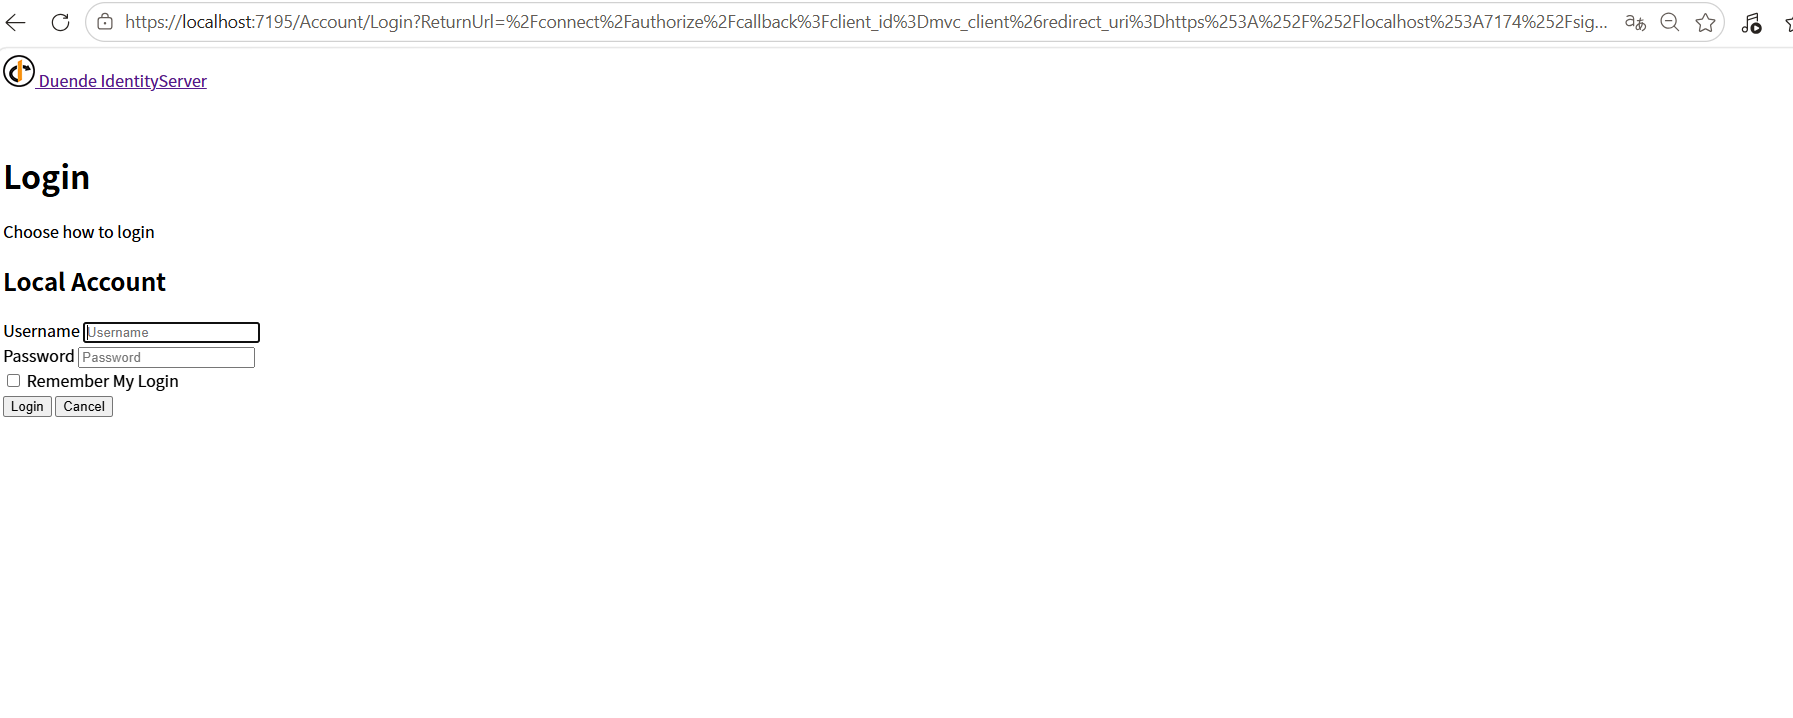
填写账户密码之后,会跳转到授权页面
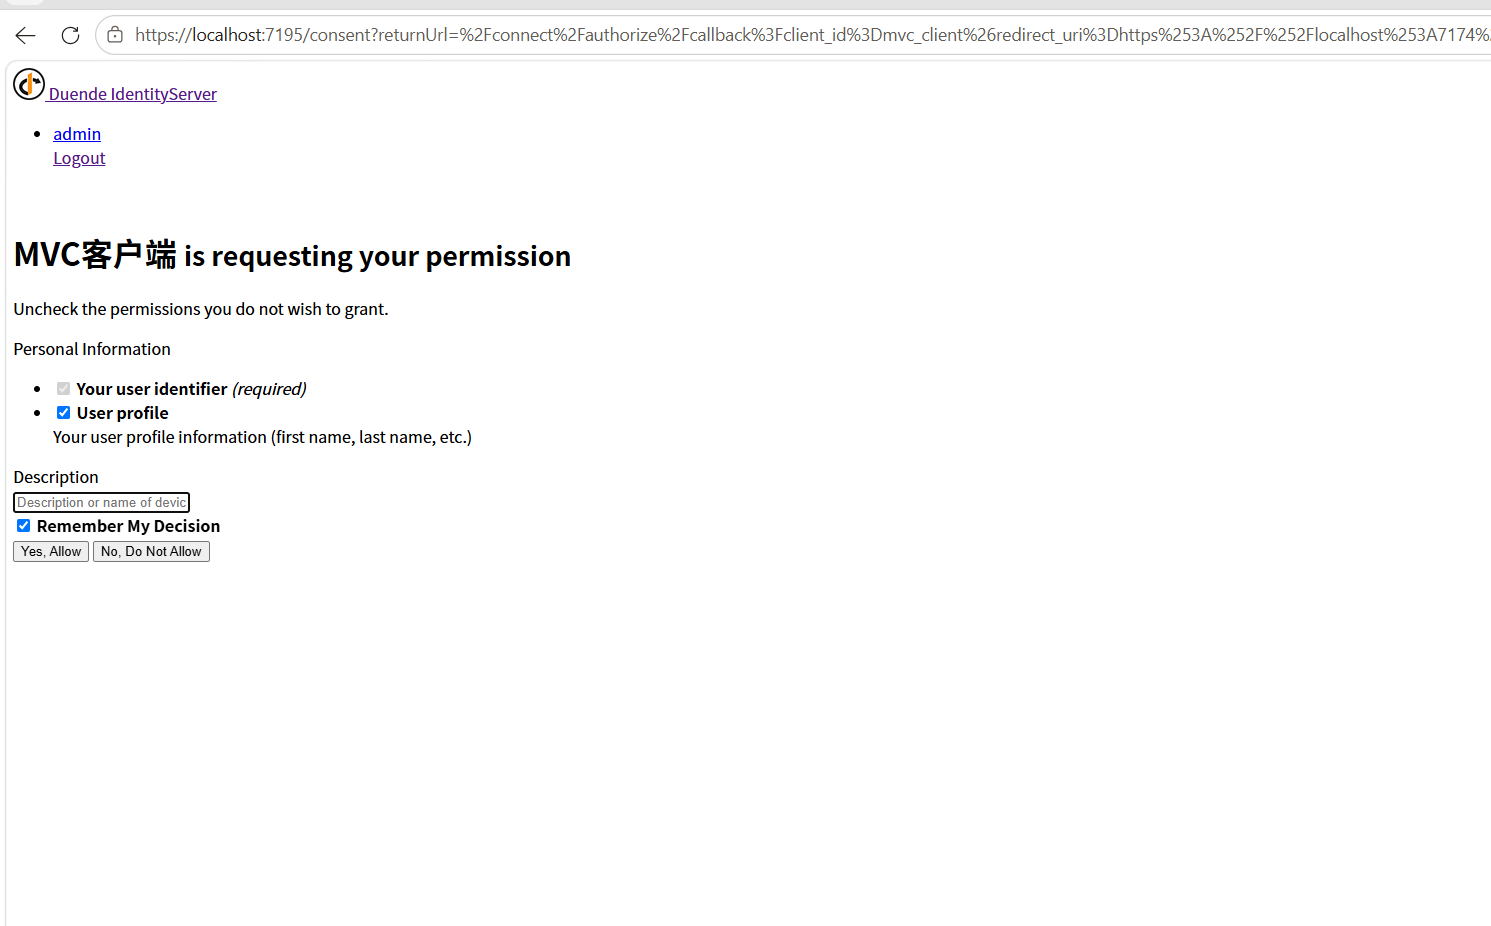
授权之后就跳转到我们自己的页面了
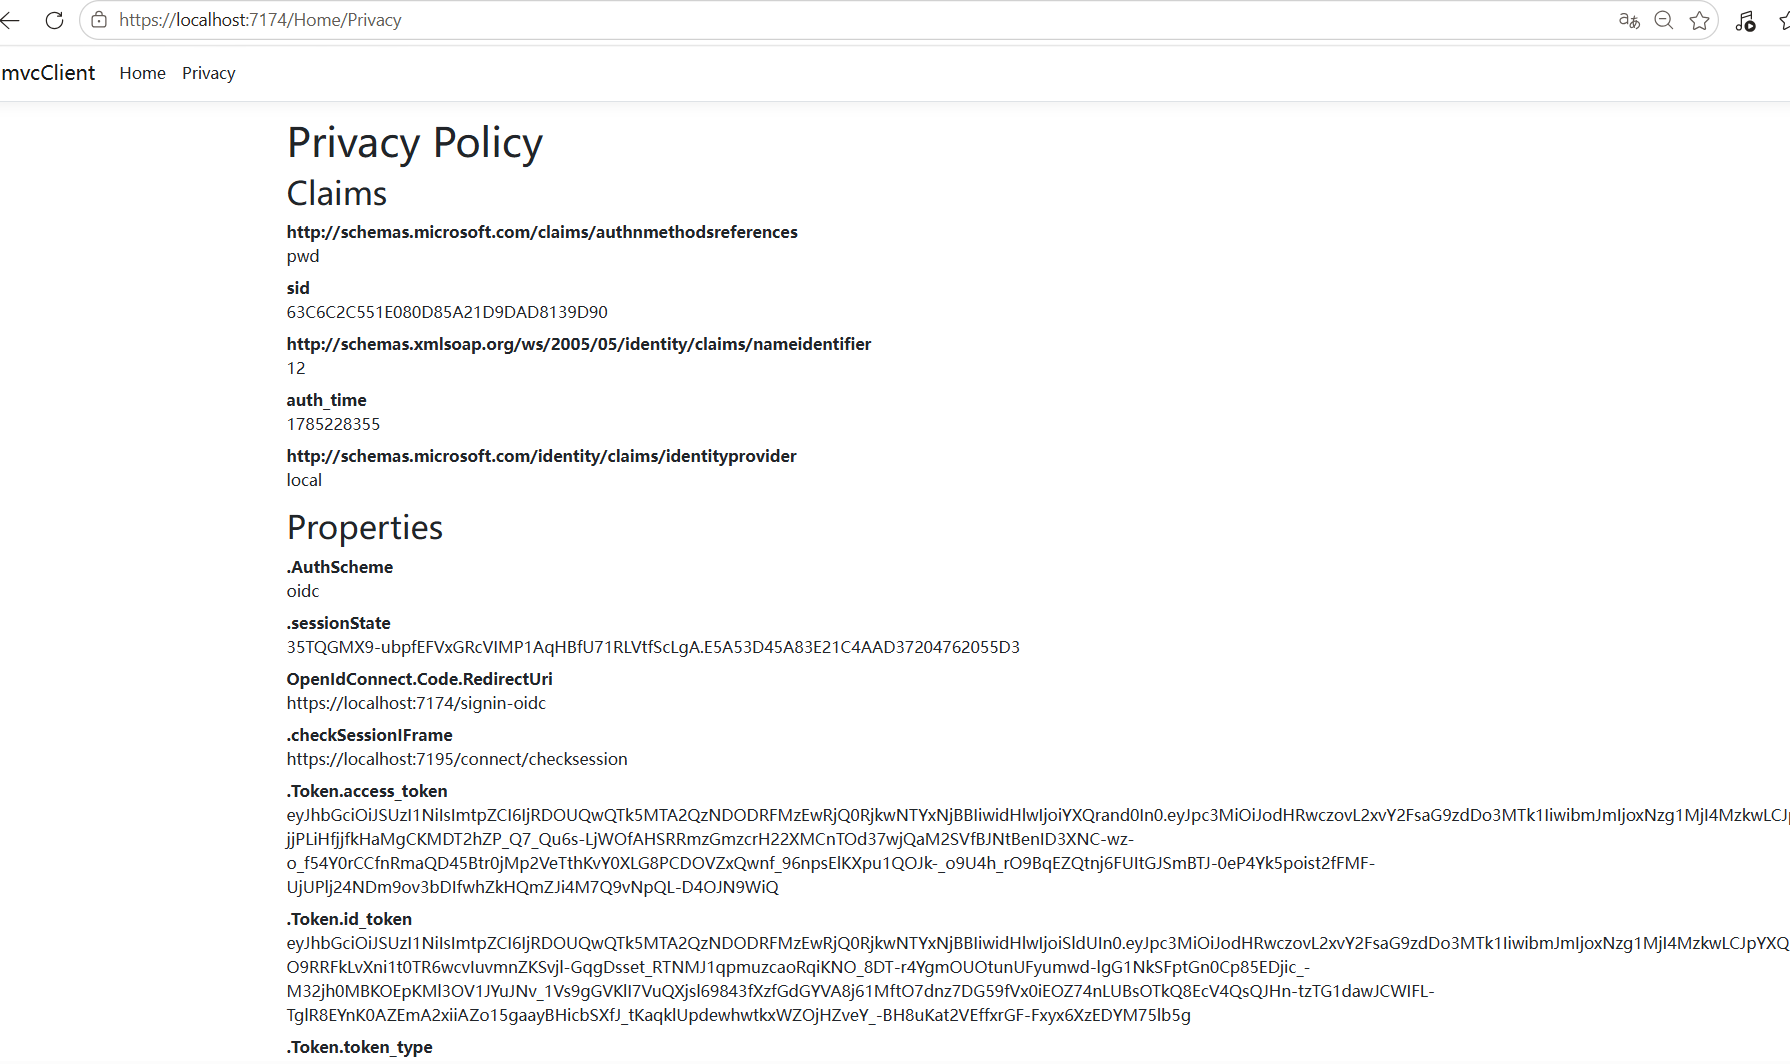
点击注销之后就会退出登录,再次点击就需要重新登录
再多运行一个作用域是api的项目,调用里面的测试接口,就能够使用token访问其他的api了

AtomGit 是由开放原子开源基金会联合 CSDN 等生态伙伴共同推出的新一代开源与人工智能协作平台。平台坚持“开放、中立、公益”的理念,把代码托管、模型共享、数据集托管、智能体开发体验和算力服务整合在一起,为开发者提供从开发、训练到部署的一站式体验。
更多推荐


 10
10 0
0- 0


 已为社区贡献1条内容

所有评论(0)