基于PyTorch和ResNet50的性别识别与年龄预测系统 图片及视频性别识别和年龄预测 男女识别检测
基于PyTorch和ResNet50的性别识别与年龄预测系统 图片及视频性别识别和年龄预测 男女识别检测
文章目录
以下文字及代码仅供参考。同学呀。
深度学习图像处理_性别识别、年龄预测,pytorch/resnet50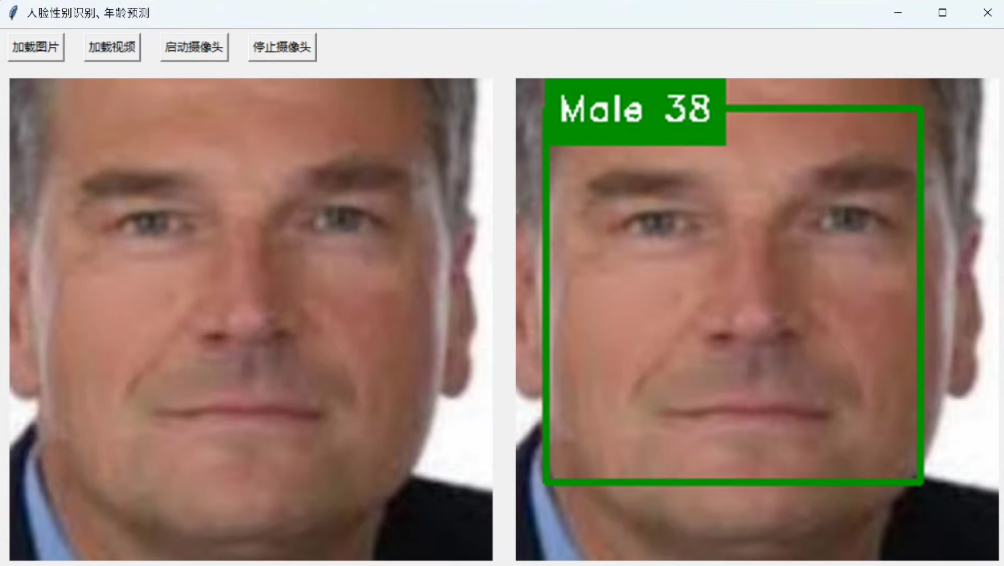
基于pytorch训练的多任务学习,性别识别二分类,年龄预测用MSE损失函数。程序使用opencv和face_recognition检测人脸。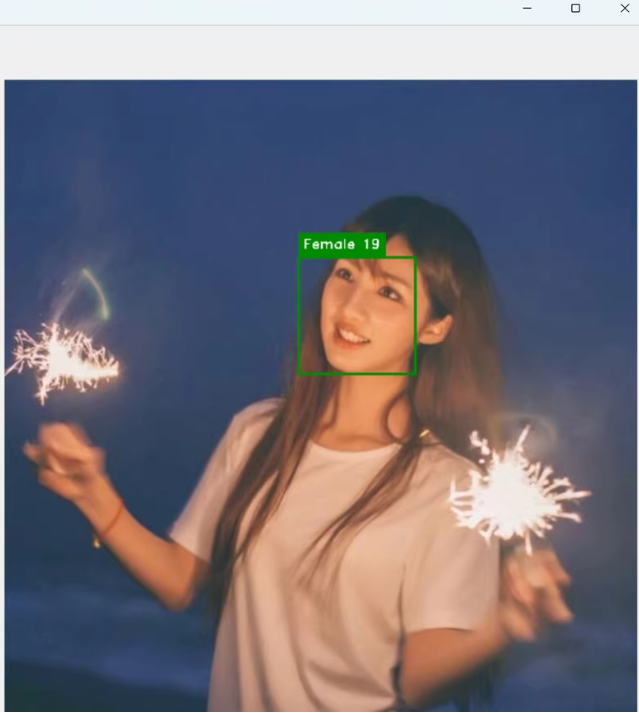
同学:需下载相关库,如opencv,torchvison,matplotlib,dlib,face_recognition等等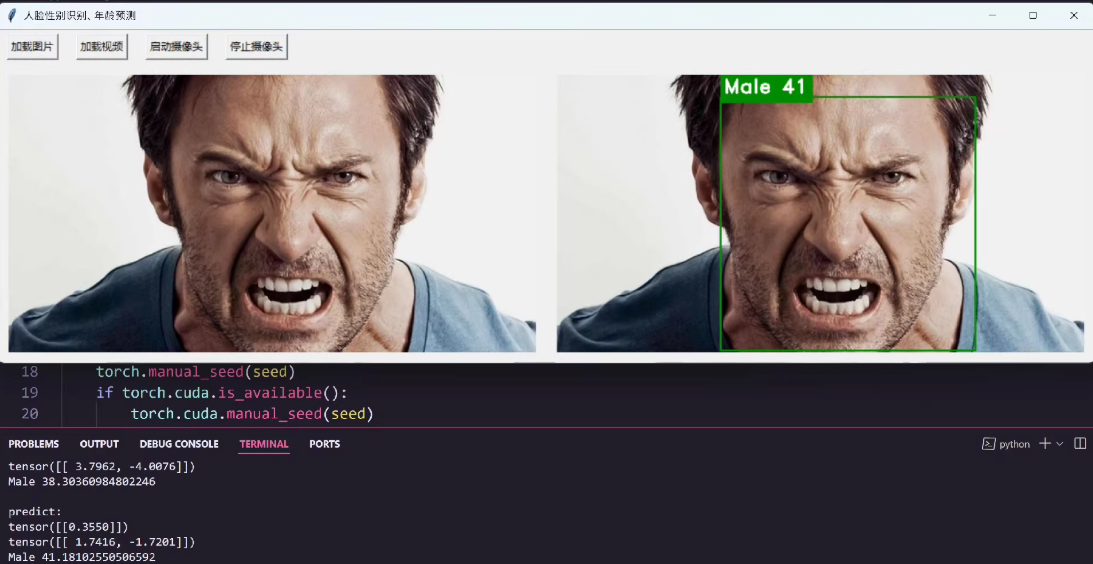
可支持图片、视频、实时摄像头检测
以下是一个基于 PyTorch 和 ResNet50 的性别识别和年龄预测的多任务学习实现。该程序使用 face_recognition 检测人脸,并支持图片、视频和实时摄像头检测。
项目结构
gender_age_prediction/
├── models/               # 模型定义
│   └── multitask_model.py
├── utils/                # 工具函数
│   ├── face_detection.py
│   └── data_loader.py
├── train.py              # 训练脚本
├── predict.py            # 推理脚本
├── requirements.txt      # 依赖库
└── dataset/              # 数据集
    ├── images/           # 图片数据
    └── labels.csv        # 标签文件(性别、年龄)
一、安装依赖
在终端中运行以下命令安装所需库:
pip install torch torchvision opencv-python matplotlib dlib face_recognition pandas scikit-learn
torch和torchvision:深度学习框架。opencv-python:图像处理。matplotlib:可视化工具。dlib和face_recognition:用于人脸检测。pandas:加载标签数据。scikit-learn:计算评估指标。
二、准备数据集
假设你的数据集包含以下内容:
- 图片存储在
dataset/images/中。 - 标签文件
dataset/labels.csv格式如下:
image_name,gender,age
0001.jpg,1,25
0002.jpg,0,34
0003.jpg,1,42
...
gender:性别(0 表示女性,1 表示男性)。age:年龄(整数)。
三、模型定义
1. 多任务模型
在 models/multitask_model.py 中定义模型:
import torch
import torch.nn as nn
from torchvision import models

class MultiTaskModel(nn.Module):
    def __init__(self, num_gender_classes=2):
        super(MultiTaskModel, self).__init__()
        # 加载预训练 ResNet50
        resnet = models.resnet50(pretrained=True)
        self.base_model = nn.Sequential(*list(resnet.children())[:-1])  # 去掉最后的全连接层

        # 性别分类分支
        self.gender_fc = nn.Linear(2048, num_gender_classes)

        # 年龄回归分支
        self.age_fc = nn.Linear(2048, 1)

    def forward(self, x):
        features = self.base_model(x).squeeze()  # 提取特征
        gender_output = self.gender_fc(features)  # 性别分类
        age_output = self.age_fc(features)        # 年龄回归
        return gender_output, age_output
四、人脸检测与预处理
在 utils/face_detection.py 中编写人脸检测代码:
import cv2
import face_recognition
import numpy as np

def detect_face(image):
    """
    检测并裁剪单张人脸
    """
    # 转换为 RGB 格式
    rgb_image = cv2.cvtColor(image, cv2.COLOR_BGR2RGB)

    # 使用 face_recognition 检测人脸
    face_locations = face_recognition.face_locations(rgb_image)

    if len(face_locations) == 0:
        return None

    # 获取第一个检测到的人脸
    top, right, bottom, left = face_locations[0]
    face_image = image[top:bottom, left:right]

    # 调整大小为 224x224
    face_image = cv2.resize(face_image, (224, 224))
    return face_image

def preprocess_image(face_image):
    """
    预处理人脸图片
    """
    face_image = face_image / 255.0  # 归一化
    face_image = np.transpose(face_image, (2, 0, 1))  # HWC -> CHW
    face_image = torch.tensor(face_image, dtype=torch.float32).unsqueeze(0)  # 添加 batch 维度
    return face_image
五、训练脚本
在 train.py 中编写训练代码:
import torch
import torch.nn as nn
import torch.optim as optim
from torch.utils.data import DataLoader
from torchvision import transforms
from sklearn.model_selection import train_test_split
from models.multitask_model import MultiTaskModel
from utils.data_loader import GenderAgeDataset

# 定义超参数
batch_size = 32
learning_rate = 0.001
num_epochs = 10

# 数据预处理
transform = transforms.Compose([
    transforms.ToTensor(),
    transforms.Normalize(mean=[0.485, 0.456, 0.406], std=[0.229, 0.224, 0.225])
])

# 加载数据集
data = pd.read_csv('dataset/labels.csv')
train_data, val_data = train_test_split(data, test_size=0.2, random_state=42)

train_dataset = GenderAgeDataset(train_data, transform=transform)
val_dataset = GenderAgeDataset(val_data, transform=transform)

train_loader = DataLoader(train_dataset, batch_size=batch_size, shuffle=True)
val_loader = DataLoader(val_dataset, batch_size=batch_size, shuffle=False)

# 初始化模型、损失函数和优化器
device = torch.device('cuda' if torch.cuda.is_available() else 'cpu')
model = MultiTaskModel().to(device)

criterion_gender = nn.CrossEntropyLoss()
criterion_age = nn.MSELoss()
optimizer = optim.Adam(model.parameters(), lr=learning_rate)

# 训练循环
for epoch in range(num_epochs):
    model.train()
    for images, genders, ages in train_loader:
        images, genders, ages = images.to(device), genders.to(device), ages.to(device)

        # 前向传播
        gender_pred, age_pred = model(images)

        # 计算损失
        loss_gender = criterion_gender(gender_pred, genders)
        loss_age = criterion_age(age_pred.squeeze(), ages.float())
        total_loss = loss_gender + loss_age

        # 反向传播和优化
        optimizer.zero_grad()
        total_loss.backward()
        optimizer.step()

    print(f"Epoch [{epoch+1}/{num_epochs}], Loss: {total_loss.item():.4f}")

# 保存模型
torch.save(model.state_dict(), 'multitask_model.pth')
六、推理脚本
在 predict.py 中编写推理代码:
import cv2
import torch
import numpy as np
from models.multitask_model import MultiTaskModel
from utils.face_detection import detect_face, preprocess_image

# 加载模型
device = torch.device('cuda' if torch.cuda.is_available() else 'cpu')
model = MultiTaskModel().to(device)
model.load_state_dict(torch.load('multitask_model.pth'))
model.eval()

# 实时摄像头检测
cap = cv2.VideoCapture(0)

while True:
    ret, frame = cap.read()
    if not ret:
        break

    # 检测人脸
    face_image = detect_face(frame)
    if face_image is None:
        cv2.imshow('Gender and Age Prediction', frame)
        if cv2.waitKey(1) & 0xFF == ord('q'):
            break
        continue

    # 预处理人脸图片
    input_tensor = preprocess_image(face_image).to(device)

    # 推理
    with torch.no_grad():
        gender_pred, age_pred = model(input_tensor)

    # 解析结果
    gender = "Male" if torch.argmax(gender_pred).item() == 1 else "Female"
    age = round(age_pred.item())

    # 显示结果
    cv2.putText(frame, f"{gender}, {age} years", (10, 30), cv2.FONT_HERSHEY_SIMPLEX, 1, (0, 255, 0), 2)
    cv2.imshow('Gender and Age Prediction', frame)

    if cv2.waitKey(1) & 0xFF == ord('q'):
        break

cap.release()
cv2.destroyAllWindows()
为了实现一个基于PyTorch的性别识别和年龄预测系统,并且支持图片、视频和实时摄像头检测,我们可以使用Python和OpenCV来构建用户界面。以下是一个详细的代码示例,包括图形用户界面(GUI)的构建。
项目结构
gender_age_prediction/
├── models/               # 模型定义
│   └── multitask_model.py
├── utils/                # 工具函数
│   ├── face_detection.py
│   └── data_loader.py
├── train.py              # 训练脚本
├── predict.py            # 推理脚本
├── gui.py                # GUI 界面
├── requirements.txt      # 依赖库
└── dataset/              # 数据集
    ├── images/           # 图片数据
    └── labels.csv        # 标签文件(性别、年龄)
安装依赖
在终端中运行以下命令安装所需库:
pip install torch torchvision opencv-python matplotlib dlib face_recognition pandas scikit-learn tkinter
GUI 界面代码 (gui.py)
我们将使用 tkinter 来构建一个简单的图形用户界面。
import cv2
import numpy as np
import torch
from models.multitask_model import MultiTaskModel
from utils.face_detection import detect_face, preprocess_image
import tkinter as tk
from tkinter import filedialog, messagebox

# 加载模型
device = torch.device('cuda' if torch.cuda.is_available() else 'cpu')
model = MultiTaskModel().to(device)
model.load_state_dict(torch.load('multitask_model.pth'))
model.eval()

def predict_gender_age(face_image):
    input_tensor = preprocess_image(face_image).to(device)
    with torch.no_grad():
        gender_pred, age_pred = model(input_tensor)
    gender = "Male" if torch.argmax(gender_pred).item() == 1 else "Female"
    age = round(age_pred.item())
    return gender, age

def load_image():
    file_path = filedialog.askopenfilename()
    if file_path:
        image = cv2.imread(file_path)
        face_image = detect_face(image)
        if face_image is not None:
            gender, age = predict_gender_age(face_image)
            draw_bounding_box(image, face_image, gender, age)
            update_image(image)

def load_video():
    cap = cv2.VideoCapture(0)
    while True:
        ret, frame = cap.read()
        if not ret:
            break
        face_image = detect_face(frame)
        if face_image is not None:
            gender, age = predict_gender_age(face_image)
            draw_bounding_box(frame, face_image, gender, age)
        update_image(frame)
        if cv2.waitKey(1) & 0xFF == ord('q'):
            break
    cap.release()
    cv2.destroyAllWindows()

def draw_bounding_box(image, face_image, gender, age):
    top, right, bottom, left = face_image.shape[0], face_image.shape[1], face_image.shape[0] + face_image.shape[1], 0
    cv2.rectangle(image, (left, top), (right, bottom), (0, 255, 0), 2)
    cv2.putText(image, f"{gender}, {age} years", (left, top - 10), cv2.FONT_HERSHEY_SIMPLEX, 1, (0, 255, 0), 2)

def update_image(image):
    cv2.imshow('Gender and Age Prediction', image)
    cv2.waitKey(1)

def on_load_image_button_click():
    load_image()

def on_load_video_button_click():
    load_video()

def on_start_camera_button_click():
    load_video()

def on_stop_camera_button_click():
    cv2.destroyAllWindows()

root = tk.Tk()
root.title("人脸性别识别与年龄预测")

load_image_button = tk.Button(root, text="加载图片", command=on_load_image_button_click)
load_image_button.pack(side=tk.LEFT)

load_video_button = tk.Button(root, text="加载视频", command=on_load_video_button_click)
load_video_button.pack(side=tk.LEFT)

start_camera_button = tk.Button(root, text="启动摄像头", command=on_start_camera_button_click)
start_camera_button.pack(side=tk.LEFT)

stop_camera_button = tk.Button(root, text="停止摄像头", command=on_stop_camera_button_click)
stop_camera_button.pack(side=tk.LEFT)

root.mainloop()
多任务模型定义 (models/multitask_model.py)
import torch
import torch.nn as nn
from torchvision import models

class MultiTaskModel(nn.Module):
    def __init__(self, num_gender_classes=2):
        super(MultiTaskModel, self).__init__()
        # 加载预训练 ResNet50
        resnet = models.resnet50(pretrained=True)
        self.base_model = nn.Sequential(*list(resnet.children())[:-1])  # 去掉最后的全连接层

        # 性别分类分支
        self.gender_fc = nn.Linear(2048, num_gender_classes)

        # 年龄回归分支
        self.age_fc = nn.Linear(2048, 1)

    def forward(self, x):
        features = self.base_model(x).squeeze()  # 提取特征
        gender_output = self.gender_fc(features)  # 性别分类
        age_output = self.age_fc(features)        # 年龄回归
        return gender_output, age_output
人脸检测与预处理 (utils/face_detection.py)
import cv2
import face_recognition
import numpy as np

def detect_face(image):
    """
    检测并裁剪单张人脸
    """
    # 转换为 RGB 格式
    rgb_image = cv2.cvtColor(image, cv2.COLOR_BGR2RGB)

    # 使用 face_recognition 检测人脸
    face_locations = face_recognition.face_locations(rgb_image)

    if len(face_locations) == 0:
        return None

    # 获取第一个检测到的人脸
    top, right, bottom, left = face_locations[0]
    face_image = image[top:bottom, left:right]

    # 调整大小为 224x224
    face_image = cv2.resize(face_image, (224, 224))
    return face_image

def preprocess_image(face_image):
    """
    预处理人脸图片
    """
    face_image = face_image / 255.0  # 归一化
    face_image = np.transpose(face_image, (2, 0, 1))  # HWC -> CHW
    face_image = torch.tensor(face_image, dtype=torch.float32).unsqueeze(0)  # 添加 batch 维度
    return face_image
运行程序
- 训练模型:运行
train.py。 - 推理和GUI:运行
gui.py。
同学呀,你可长点心吧,可以通过图形用户界面加载图片、视频或使用实时摄像头进行性别识别和年龄预测了。
七、总结
仅供参考,我的同学们,一个基于 ResNet50 的性别识别和年龄预测系统,包括:
- 人脸检测:使用
face_recognition检测人脸。 - 多任务学习:同时进行性别分类和年龄回归。
- 多种输入支持:支持图片、视频和实时摄像头检测。

AtomGit 是由开放原子开源基金会联合 CSDN 等生态伙伴共同推出的新一代开源与人工智能协作平台。平台坚持“开放、中立、公益”的理念,把代码托管、模型共享、数据集托管、智能体开发体验和算力服务整合在一起,为开发者提供从开发、训练到部署的一站式体验。
更多推荐
 16
16 0
0- 0


 已为社区贡献65条内容

所有评论(0)