Java 程序员第 30 阶段:Docker容器化部署大模型:标准化环境一键上线
作者:洛水石 | 适用:Java大模型面试
在人工智能飞速发展的今天,大语言模型(Large Language Model,LLM)已经成为企业智能化转型的核心基础设施。然而,大模型的部署却面临诸多挑战:复杂的依赖环境、CUDA版本兼容性、GPU资源调度、多模型协作等,每一个环节都可能成为生产落地的拦路虎。Docker容器化技术的出现,为这些问题提供了优雅的解决方案。
本文将深入探讨如何使用Docker容器化技术实现大模型的标准化部署,从环境配置、镜像制作、服务编排到生产级优化,形成一套完整的大模型容器化部署实践指南。
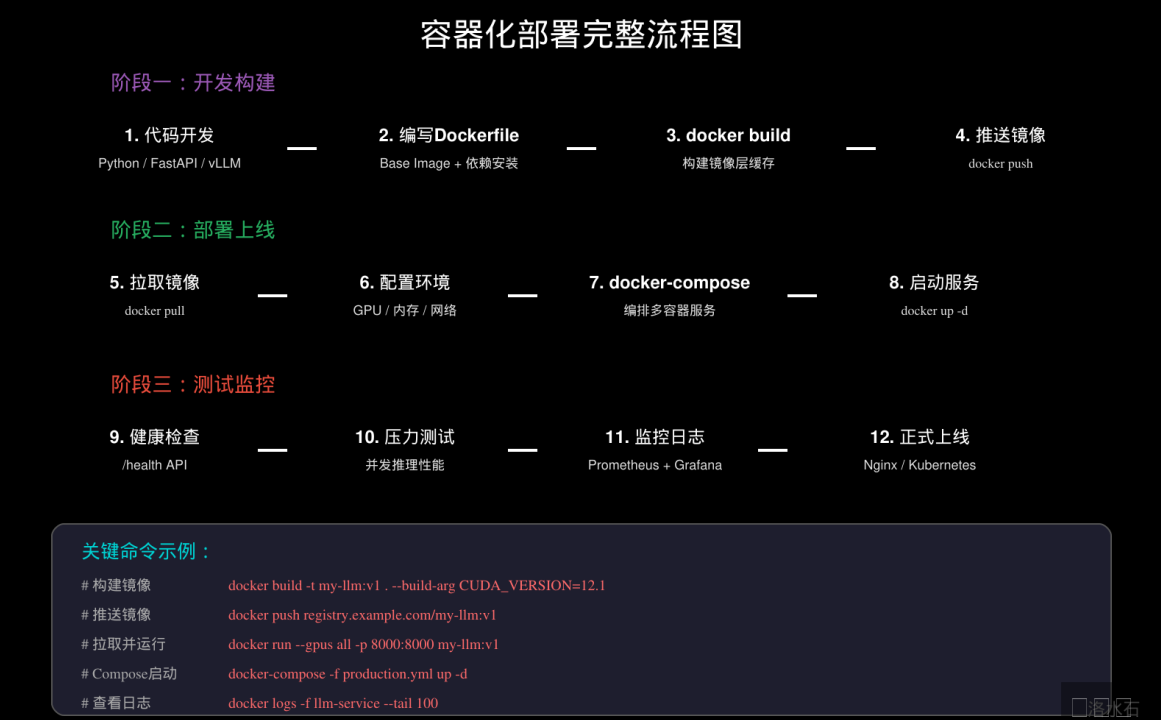
Docker容器化大模型的优势
环境标准化与一致性
传统的机器学习部署往往面临"在我机器上能跑"(It Works on My Machine)的困境。不同服务器的操作系统版本、CUDA驱动、Python库版本等细微差异,都可能导致模型推理行为不一致。Docker容器通过将应用及其所有依赖打包成镜像,确保了从开发到生产的完整环境一致性。
当企业需要部署多个大模型服务时,容器化优势更加明显。每个模型服务可以运行在独立的容器中,拥有自己的CUDA版本和依赖环境,彻底消除模型之间的依赖冲突。例如,可以使用一个容器运行基于CUDA 11.8的LLaMA-2-13B,另一个容器运行基于CUDA 12.1的Qwen-7B,它们之间完全隔离,互不影响。
资源隔离与高效利用
大模型推理是资源密集型任务,对GPU显存、内存、CPU都有较高要求。Docker容器提供了精细的资源隔离机制,可以为每个容器设置GPU数量、内存上限、CPU配额等参数。这种隔离不仅保证了服务质量,还提高了集群资源的整体利用率。
在共享GPU集群场景下,容器化允许将一张GPU卡分配给多个容器使用,每个容器只占用其中一部分显存。通过`nvidia-container-toolkit`提供的GPU虚拟化能力,可以实现GPU时间的时分复用,让小模型推理任务也能高效利用昂贵的GPU资源。
快速部署与弹性伸缩
Docker镜像是自包含的部署单元,只需一次构建,即可在任何支持Docker的环境中运行。这大大简化了大模型的分发和部署流程。对于需要频繁更新模型版本的场景,容器化可以实现蓝绿部署或金丝雀发布,将版本切换的停机时间压缩到秒级。
结合Kubernetes等容器编排平台,大模型服务可以根据负载情况自动伸缩。当请求量增加时,自动启动更多推理实例;当负载降低时,回收多余实例。这种弹性伸缩能力对于处理突发流量尤为重要,比如电商大促或热点事件引发的推理请求峰值。
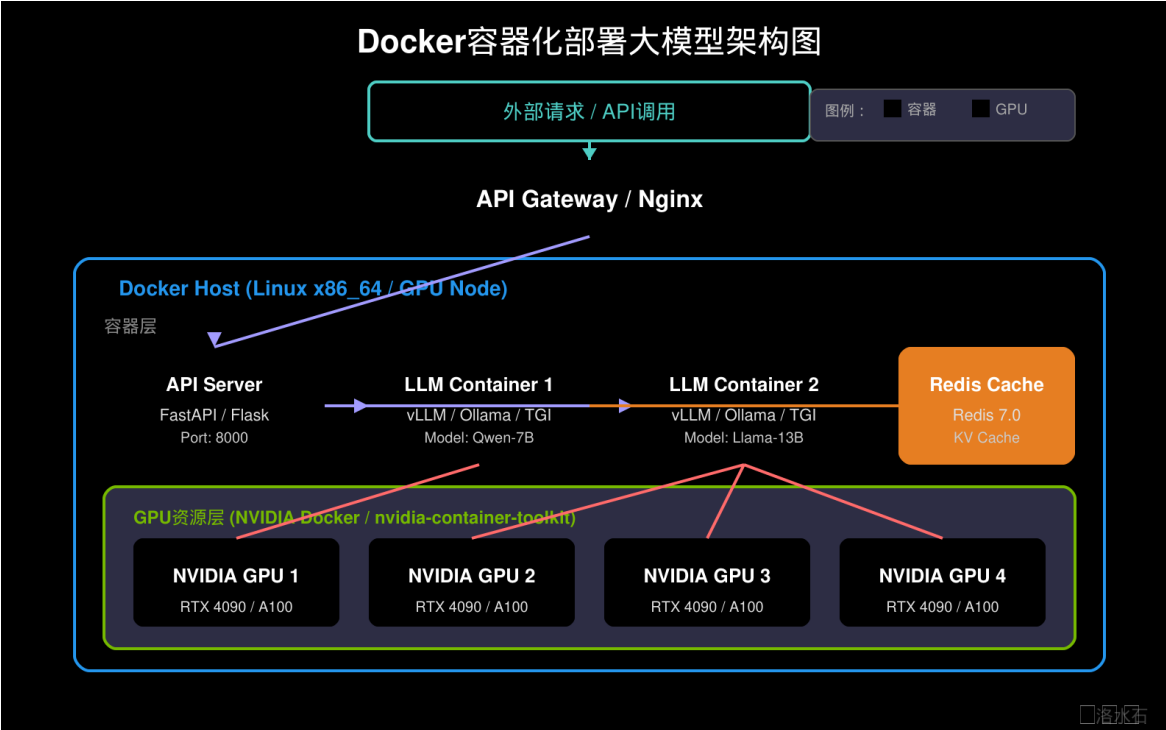
简化运维与故障恢复
容器化架构使得大模型服务的运维工作变得简单可控。每个容器的文件系统、进程空间、网络栈都是独立的,容器内的故障不会影响宿主机和其他容器。当服务出现问题时,可以快速定位到具体容器,并利用容器快照进行故障恢复或问题复现。
Docker的日志驱动机制将容器日志统一收集到标准输出,配合ELK(Elasticsearch、Logstash、Kibana)或Loki等日志系统,可以实现全量日志的聚合查询和实时分析。这种集中化的日志管理对于排查生产环境问题至关重要。
▲ 图1
NVIDIA Docker配置与GPU支持
nvidia-container-toolkit工作原理
在Docker容器中使用GPU,需要依赖nvidia-container-toolkit(原nvidia-docker2)提供的容器运行时支持。其核心原理是在容器启动时,将宿主机的NVIDIA驱动和GPU设备映射到容器内部,使容器内的CUDA程序能够直接访问物理GPU。
nvidia-container-toolkit通过Linux的设备映射(device mapper)和挂载命名空间(mount namespace)机制实现GPU穿透。当容器启动时,nvidia-container-runtime会拦截容器创建请求,将`/dev/nvidia*`设备节点和NVIDIA驱动库挂载到容器内部。这个过程对用户透明,开发者只需在`docker run`命令中指定`--gpus`参数即可。
技术实现上,nvidia-container-toolkit包含三个核心组件:`nvidia-container-runtime`负责与Docker通信,执行GPU挂载操作;`libnvidia-container`提供了GPU挂载的具体实现逻辑;`nvidia-container-toolkit`是命令行工具,用于配置容器运行时行为。这三者的协作使得GPU容器化成为可能。
CUDA版本兼容性矩阵
选择正确的CUDA版本是构建大模型Docker镜像的关键决策。CUDA版本的选择需要考虑多个因素:GPU驱动版本、深度学习框架兼容性、模型运行时要求等。以下是选择CUDA版本时需要遵循的核心原则:
**第一,容器内CUDA版本必须小于或等于主机驱动支持的最高CUDA版本。** 可以通过`nvidia-smi`命令查看主机驱动的CUDA支持版本。如果主机驱动为NVIDIA 535版本,那么容器内最高只能使用CUDA 12.1(12.x系列的最新稳定版)。强行使用更高版本的CUDA将导致运行时错误。
**第二,深度学习框架对CUDA版本有明确要求。** 以PyTorch为例,PyTorch 2.0+推荐使用CUDA 11.8或CUDA 12.1;TensorFlow 2.13+则推荐CUDA 12.1。使用不兼容的版本组合可能导致模型加载失败或推理结果异常。
**第三,cuDNN版本需要与CUDA版本匹配。** cuDNN(CUDA Deep Neural Network Library)是CUDA的深度学习加速库,其版本号遵循`major.minor.patch`格式。安装cuDNN时需要确认其与CUDA版本的兼容性,可以通过NVIDIA官方文档查询版本对应关系。
在实际项目中,推荐使用NVIDIA官方提供的CUDA基础镜像,如`nvidia/cuda:12.1.1-cudnn8-devel-ubuntu22.04`,这类镜像已经过严格测试,包含了经过验证的CUDA和cuDNN版本组合。
GPU资源配额配置
在生产环境中,通常需要在单个GPU上运行多个容器,或者限制单个容器可以使用的GPU资源。Docker提供了多种GPU资源配额配置方式。
**GPU数量限制**通过`--gpus`参数实现,可以指定容器可以使用的GPU数量。例如,`--gpus '"device=0"'`限制容器只能使用GPU 0,`--gpus '"device=0,1"'`则允许容器使用GPU 0和1。对于需要GPU数量感知的模型推理,可以使用`--gpus all`授予容器使用所有可用GPU。
**显存限制**需要通过环境变量配置,不同的推理引擎有不同的显存配置方式。vLLM使用`NVIDIA_VISIBLE_DEVICES`环境变量配合`gpu_memory_utilization`参数;TensorRT则使用`TF_FORCE_GPU_ALLOW_GROWTH=true`允许显存动态增长。显尔的显存预留可以通过`NVIDIA_DRIVER_CAPABILITIES`设置容器的GPU功能集。
**GPU算力限制**在某些场景下可能需要限制容器使用GPU的算力比例。这可以通过NVIDIA的GPU分区工具(mig-manager)实现,将GPU划分为多个GPU实例(GPI),每个实例拥有独立的算力和显存资源。不过,GPU分区会引入额外的开销,对于延迟敏感的推理任务通常不推荐使用。
验证GPU容器配置
配置完成后,需要验证GPU是否可以正常访问。可以通过以下命令检查容器内的GPU环境:
## 大模型Docker镜像制作
### Base Image选择策略
选择合适的基础镜像是构建大模型Docker镜像的第一步。NVIDIA官方维护的CUDA基础镜像是最佳选择,它们经过严格测试,包含了经过验证的驱动和库组合。
**Ubuntu基础镜像 vs CentOS基础镜像:** Ubuntu是目前主流的Docker镜像操作系统,拥有更广泛的软件包支持和更快的安全更新。对于需要频繁更新安全补丁的生产环境,Ubuntu是更好的选择。CentOS则以其稳定性著称,适合对系统一致性要求极高的企业级场景。
**-devel镜像 vs runtime镜像:** NVIDIA CUDA镜像分为`devel`和`runtime`两个版本。`devel`镜像包含完整的编译工具链(gcc、nvcc等),体积较大(约十几GB),适合需要编译CUDA程序或构建依赖CUDA的程序场景。`runtime`镜像只包含运行时库,体积较小(约5GB),适合直接运行已编译好的CUDA程序。对于大模型推理服务,推荐使用`runtime`镜像以减小镜像体积和攻击面。
** alpine基础镜像的局限性:** 部分大模型官方镜像使用alpine作为基础系统以减小体积。但alpine的libc为musl而非glibc,可能导致某些Python扩展(如numpy、scipy的底层C库)编译或运行问题。如果遇到奇怪的动态链接错误,可能需要切换到Ubuntu或CentOS基础镜像。
### CUDA版本与依赖环境配置
构建大模型Docker镜像时,需要在Dockerfile中显式指定CUDA版本和必要的依赖环境。以下是一个典型的Dockerfile结构:
```dockerfile
# 阶段一:构建阶段
FROM nvidia/cuda:12.1.1-cudnn8-devel-ubuntu22.04 AS builder
# 设置环境变量
ENV DEBIAN_FRONTEND=noninteractive
ENV CUDA_VERSION=12.1.1
ENV PYTHON_VERSION=3.10
# 安装构建工具和Python
RUN apt-get update && apt-get install -y \
python3.10 \
python3-pip \
git \
wget \
&& rm -rf /var/lib/apt/lists/*
# 设置Python符号链接
RUN ln -sf /usr/bin/python3.10 /usr/bin/python && \
ln -sf /usr/bin/pip3 /usr/bin/pip
# 安装PyTorch(支持CUDA 12.1)
RUN pip install --no-cache-dir \
torch==2.1.0 \
torchvision==0.16.0 \
torchaudio==2.1.0 \
--index-url https://download.pytorch.org/whl/cu121
# 安装推理框架
RUN pip install --no-cache-dir \
vllm==0.2.0 \
transformers==4.35.0 \
accelerate==0.25.0
# 阶段二:运行时阶段
FROM nvidia/cuda:12.1.1-cudnn8-runtime-ubuntu22.04
# 复制Python环境
COPY --from=builder /usr/bin/python /usr/bin/python
COPY --from=builder /usr/bin/pip /usr/bin/pip
COPY --from=builder /usr/lib/python3.10 /usr/lib/python3.10
# 复制已安装的Python包
COPY --from=builder /usr/local/lib/python3.10/dist-packages /usr/local/lib/python3.10/dist-packages
# 安装运行时依赖
RUN apt-get update && apt-get install -y \
libgomp1 \
libgl1-mesa-glx \
libglib2.0-0 \
&& rm -rf /var/lib/apt/lists/*
# 设置工作目录
WORKDIR /app
# 复制应用代码
COPY app.py /app/
COPY requirements.txt /app/
# 暴露端口
EXPOSE 8000
# 启动命令
CMD ["python", "app.py"]
```
### 镜像构建优化技巧
大模型Docker镜像通常体积较大(动辄十几GB),优化构建过程可以显著缩短构建时间和减少镜像体积。
**多阶段构建**是减小镜像体积的有效方法。如上例所示,第一阶段使用`devel`镜像安装编译工具和依赖,生成最终的可执行文件;第二阶段使用`runtime`镜像,只复制运行所需的文件。Python的`pip wheel`安装方式可以将已编译的包缓存起来,避免在运行时重新编译。
**层缓存优化**利用Docker的层缓存机制加速构建。将不经常变化的指令(如系统包安装、Python环境配置)放在Dockerfile前面,将频繁变化的指令(如应用代码复制)放在后面。这样,当应用代码变化时,可以复用前面不变的层,只重新构建后面的层。
**合并RUN指令**可以减少Docker镜像的层数。将多个`RUN`指令合并为一个,可以减小镜像体积并加快容器启动速度。但需要注意,合并后的RUN指令不宜过长,否则会降低Dockerfile的可读性和可维护性。
**使用.dockerignore文件**排除不需要的文件进入构建上下文,避免将大文件(如训练数据、缓存的模型权重)复制到镜像中,导致镜像体积膨胀。
### 构建参数与环境变量
为了提高Dockerfile的灵活性,可以使用`ARG`和`ENV`指令定义构建参数和环境变量:
```dockerfile
# 构建参数(可以在docker build时传入)
ARG CUDA_VERSION=12.1.1
ARG PYTHON_VERSION=3.10
ARG MODEL_NAME=Qwen-7B-Chat
# 环境变量(容器运行时可见)
ENV MODEL_NAME=${MODEL_NAME}
ENV CUDA_VISIBLE_DEVICES=0
ENV TRANSFORMERS_CACHE=/models/.cache
ENV HF_HOME=/models/.cache
# 使用构建参数动态选择基础镜像
FROM nvidia/cuda:${CUDA_VERSION}-cudnn8-runtime-ubuntu22.04
```
构建命令示例:
```bash
docker build \
--build-arg CUDA_VERSION=12.1.1 \
--build-arg MODEL_NAME=Qwen-7B-Chat \
-t my-llm-service:latest \
-f Dockerfile .
```
## 主流大模型Docker镜像
### Ollama官方镜像
Ollama是近年来备受关注的大模型推理框架,以其极简的使用方式和出色的本地部署体验著称。Ollama官方提供了预构建的Docker镜像,极大地简化了本地部署流程。
**ollama/ollama**镜像是Ollama的核心运行时,包含了Ollama服务程序和完整的模型推理能力。使用该镜像启动服务非常简单:
```bash
docker run -d \
--name ollama \
-p 11434:11434 \
--gpus all \
ollama/ollama:latest
```
服务启动后,可以通过REST API访问Ollama的各种功能。Ollama支持的模型数量众多,包括LLaMA-2、Mistral、Qwen、Yi等主流开源大模型。模型管理通过Ollama命令行工具完成:
```bash
# 进入容器
docker exec -it ollama ollama
# 拉取模型
pull qwen:7b
pull llama2:13b
pull mistral:7b
# 运行推理
run qwen:7b "请介绍一下Docker容器化技术"
```
**Ollama的优势**在于其模型管理的便捷性。Ollama会自动处理模型的下载、缓存和版本管理,避免了手动下载模型权重和配置文件的繁琐。Ollama还支持Modelfile,允许用户自定义模型的行为参数,如系统提示、温度系数、上下文窗口大小等。
**Ollama的局限**也很明显:Ollama主要面向个人用户和本地部署场景,其生产级特性(如高可用、水平扩展、详细的监控指标)相对较弱。对于需要构建高可用推理服务的企业用户,可能需要结合其他方案使用Ollama。
### HuggingFace TGI镜像
HuggingFace Text Generation Inference(TGI)是HuggingFace官方推出的推理服务框架,专为生产级大模型部署设计。TGI镜像提供了完整的推理服务能力,包括批量推理、流式输出、张量并行等高级特性。
**ghcr.io/huggingface/text-generation-inference**是TGI的官方镜像仓库。使用TGI部署Qwen-7B模型的示例:
```bash
docker run -d \
--name tgi \
--gpus all \
-p 8080:80 \
-e MODEL_ID=Qwen/Qwen-7B-Chat \
-e QUANTIZE=bitsandbytes \
-e MAX_INPUT_LENGTH=2048 \
-e MAX_TOTAL_TOKENS=4096 \
ghcr.io/huggingface/text-generation-inference:latest
```
**TGI的核心特性**包括:
**批量推理优化**允许同时处理多个推理请求,通过动态批处理(Dynamic Batching)提高GPU利用率。TGI会根据请求情况自动将多个小批量合并成大批量处理,减少GPU空闲时间。
**张量并行**支持将大模型分布到多个GPU上运行。对于单卡无法容纳的大模型(如70B参数规模),张量并行可以将模型切分到多张GPU,突破单卡显存限制。配置非常简单,只需设置`--num_shard`参数即可。
**流式输出**通过Server-Sent Events(SSE)协议实现 token by token的流式返回,显著降低首token延迟,提升用户体验。TGI的流式输出实现经过优化,能够在高并发场景下保持稳定。
**Flash Attention**是TGI默认启用的注意力机制优化。Flash Attention通过IO感知的注意力计算,显著降低显存占用同时提升计算效率,对于长上下文推理尤为重要。
### vLLM官方镜像
vLLM是UC Berkeley开发的PagedAttention推理引擎,以其高吞吐量和低延迟著称。vLLM采用分页注意力机制管理KV缓存,相同硬件条件下,吞吐量可达HuggingFace实现的好几倍。
**vllm/vllm-openai**镜像是vLLM官方提供的兼容OpenAI API的推理服务镜像。使用该镜像启动vLLM服务:
```bash
docker run -d \
--name vllm \
--gpus all \
-p 8000:8000 \
-v ~/.cache/huggingface:/root/.cache/huggingface \
-e MODEL_NAME=Qwen/Qwen-7B-Chat \
-e TOKENIZER=Qwen/Qwen-7B-Chat \
vllm/vllm-openai:latest
```
**vLLM的性能优势**来源于其创新的PagedAttention技术。传统推理过程中,KV缓存需要连续分配显存,但生成的token数量在请求处理完成前是未知的,导致显存碎片化严重。vLLM将KV缓存组织成固定大小的"页",像操作虚拟内存一样管理注意力缓存,显著提高显存利用率。
**Continuous Batching**是vLLM的另一项关键技术。传统批处理需要等待一个批次中所有请求完成才能开始下一个批次,造成GPU空闲。Continuous Batching允许完成的请求立即退出,新请求即时加入,实现更高的GPU利用率。
**vLLM的适用场景**包括:对延迟敏感的在线推理服务、需要处理大量并发请求的场景、显存受限但需要运行更大模型的场景。vLLM目前主要支持NVIDIA GPU,对于AMD GPU或CPU推理的支持仍在积极开发中。
### 其他值得关注的镜像
**lmz/cuda-lm-headers**镜像是国内开发者维护的轻量级CUDA开发环境,包含常用的深度学习开发工具和头文件,适合需要自定义CUDA kernel的场景。
**databricks/dolly**镜像是Databricks提供的Dolly大模型推理镜像,包含了优化过的推理服务和模型管理能力,适合企业级部署。
**deepinfra/deepstack**镜像是另一个值得关注的推理服务镜像,支持多种开源大模型,并提供了完善的OpenAI兼容API。
## Docker Compose编排多服务
### 模型服务与API网关编排
在大模型生产环境中,通常需要将推理服务封装成RESTful API对外提供服务。结合API网关可以实现负载均衡、流量控制、安全认证等功能。以下是一个完整的模型服务与API网关编排示例:
```yaml
# docker-compose.yml
version: '3.8'
services:
# vLLM推理服务
vllm-backend:
image: vllm/vllm-openai:latest
container_name: vllm-backend
ports:
- "8000:8000"
environment:
- MODEL_NAME=Qwen/Qwen-7B-Chat
- TOKENIZER=Qwen/Qwen-7B-Chat
- GPU_MEMORY_UTILIZATION=0.9
- MAX_MODEL_LEN=8192
- TENSOR_PARALLEL_SIZE=1
volumes:
- model_cache:/root/.cache/huggingface
deploy:
resources:
reservations:
devices:
- driver: nvidia
count: 1
capabilities: [gpu]
networks:
- llm-net
healthcheck:
test: ["CMD", "curl", "-f", "http://localhost:8000/health"]
interval: 30s
timeout: 10s
retries: 3
start_period: 120s
# Nginx反向代理
api-gateway:
image: nginx:alpine
container_name: api-gateway
ports:
- "80:80"
- "443:443"
volumes:
- ./nginx.conf:/etc/nginx/nginx.conf:ro
- ./ssl:/etc/nginx/ssl:ro
depends_on:
vllm-backend:
condition: service_healthy
networks:
- llm-net
healthcheck:
test: ["CMD", "wget", "-q", "--spider", "http://localhost:80/health"]
interval: 30s
timeout: 10s
retries: 3
# Prometheus监控
prometheus:
image: prom/prometheus:latest
container_name: prometheus
ports:
- "9090:9090"
volumes:
- ./prometheus.yml:/etc/prometheus/prometheus.yml:ro
- prometheus_data:/prometheus
command:
- '--config.file=/etc/prometheus/prometheus.yml'
- '--storage.tsdb.path=/prometheus'
networks:
- llm-net
networks:
llm-net:
driver: bridge
volumes:
model_cache:
prometheus_data:
```
对应的Nginx配置(nginx.conf):
```nginx
events {
worker_connections 1024;
}
http {
upstream vllm_backend {
server vllm-backend:8000;
keepalive 64;
}
# 限流配置
limit_req_zone $binary_remote_addr zone=api_limit:10m rate=10r/s;
server {
listen 80;
server_name _;
location /health {
return 200 'OK';
add_header Content-Type text/plain;
}
location /v1/chat/completions {
limit_req zone=api_limit burst=20 nodelay;
proxy_pass http://vllm_backend;
proxy_http_version 1.1;
proxy_set_header Host $host;
proxy_set_header X-Real-IP $remote_addr;
proxy_set_header X-Forwarded-For $proxy_add_x_forwarded_for;
proxy_set_header X-Forwarded-Proto $scheme;
# 流式响应配置
proxy_buffering off;
proxy_cache off;
proxy_read_timeout 300s;
proxy_connect_timeout 75s;
# 处理Server-Sent Events
proxy_set_header Connection '';
chunked_transfer_encoding on;
}
location /v1/completions {
limit_req zone=api_limit burst=20 nodelay;
proxy_pass http://vllm_backend;
proxy_http_version 1.1;
proxy_set_header Host $host;
proxy_set_header X-Real-IP $remote_addr;
proxy_set_header X-Forwarded-For $proxy_add_x_forwarded_for;
proxy_set_header X-Forwarded-Proto $scheme;
proxy_buffering off;
proxy_cache off;
proxy_read_timeout 300s;
}
# 模型列表接口
location /v1/models {
proxy_pass http://vllm_backend;
proxy_http_version 1.1;
proxy_set_header Host $host;
}
# 静态资源(前端监控面板)
location /dashboard {
alias /usr/share/nginx/html;
index index.html;
}
}
}
```
### 模型服务与Redis缓存编排
在大模型推理场景中,合理使用缓存可以显著降低响应延迟和减少GPU计算压力。Redis缓存主要用于存储对话历史、推理结果、模型元数据等信息。
```yaml
# docker-compose-with-cache.yml
version: '3.8'
services:
vllm-backend:
image: vllm/vllm-openai:latest
container_name: vllm-backend
ports:
- "8000:8000"
environment:
- MODEL_NAME=Qwen/Qwen-7B-Chat
- GPU_MEMORY_UTILIZATION=0.85
- MAX_MODEL_LEN=8192
- KV_CACHE_FP8_QUANTIZED=true
volumes:
- model_cache:/root/.cache/huggingface
deploy:
resources:
reservations:
devices:
- driver: nvidia
count: 1
capabilities: [gpu]
networks:
- llm-net
depends_on:
redis-cache:
condition: service_healthy
# Redis缓存服务
redis-cache:
image: redis:7-alpine
container_name: redis-cache
ports:
- "6379:6379"
command: redis-server --appendonly yes --maxmemory 2gb --maxmemory-policy allkeys-lru
volumes:
- redis_data:/data
networks:
- llm-net
healthcheck:
test: ["CMD", "redis-cli", "ping"]
interval: 10s
timeout: 5s
retries: 3
# 应用服务(处理缓存逻辑)
app-service:
image: python:3.10-slim
container_name: app-service
ports:
- "8080:8080"
environment:
- REDIS_HOST=redis-cache
- REDIS_PORT=6379
- VLLM_HOST=vllm-backend
- VLLM_PORT=8000
volumes:
- ./app:/app
working_dir: /app
command: python app.py
networks:
- llm-net
depends_on:
redis-cache:
condition: service_healthy
networks:
llm-net:
driver: bridge
volumes:
model_cache:
redis_data:
```
应用服务的缓存逻辑示例(app.py):
```python
import os
import redis
import hashlib
import json
from flask import Flask, request, jsonify
import requests
app = Flask(__name__)
redis_client = redis.Redis(
host=os.getenv('REDIS_HOST', 'localhost'),
port=int(os.getenv('REDIS_PORT', 6379)),
decode_responses=True
)
VLLM_URL = f"http://{os.getenv('VLLM_HOST', 'localhost')}:{os.getenv('VLLM_PORT', 8000)}/v1/chat/completions"
def generate_cache_key(messages, temperature, max_tokens):
"""生成缓存键"""
cache_data = json.dumps({
'messages': messages,
'temperature': temperature,
'max_tokens': max_tokens
}, sort_keys=True)
return f"llm:response:{hashlib.sha256(cache_data.encode()).hexdigest()}"
def check_cache(cache_key):
"""检查缓存"""
cached = redis_client.get(cache_key)
if cached:
return json.loads(cached)
return None
def save_to_cache(cache_key, response_data, ttl=3600):
"""保存到缓存"""
redis_client.setex(cache_key, ttl, json.dumps(response_data))
@app.route('/chat', methods=['POST'])
def chat():
data = request.json
messages = data.get('messages', [])
temperature = data.get('temperature', 0.7)
max_tokens = data.get('max_tokens', 2048)
use_cache = data.get('use_cache', True)
# 生成缓存键
cache_key = generate_cache_key(messages, temperature, max_tokens)
# 尝试从缓存获取
if use_cache:
cached_response = check_cache(cache_key)
if cached_response:
cached_response['cached'] = True
return jsonify(cached_response)
# 调用vLLM服务
payload = {
'model': 'Qwen/Qwen-7B-Chat',
'messages': messages,
'temperature': temperature,
'max_tokens': max_tokens,
'stream': False
}
try:
response = requests.post(VLLM_URL, json=payload, timeout=120)
response.raise_for_status()
result = response.json()
# 保存到缓存
if use_cache:
save_to_cache(cache_key, result)
result['cached'] = False
return jsonify(result)
except requests.exceptions.RequestException as e:
return jsonify({'error': str(e)}), 500
if __name__ == '__main__':
app.run(host='0.0.0.0', port=8080)
```
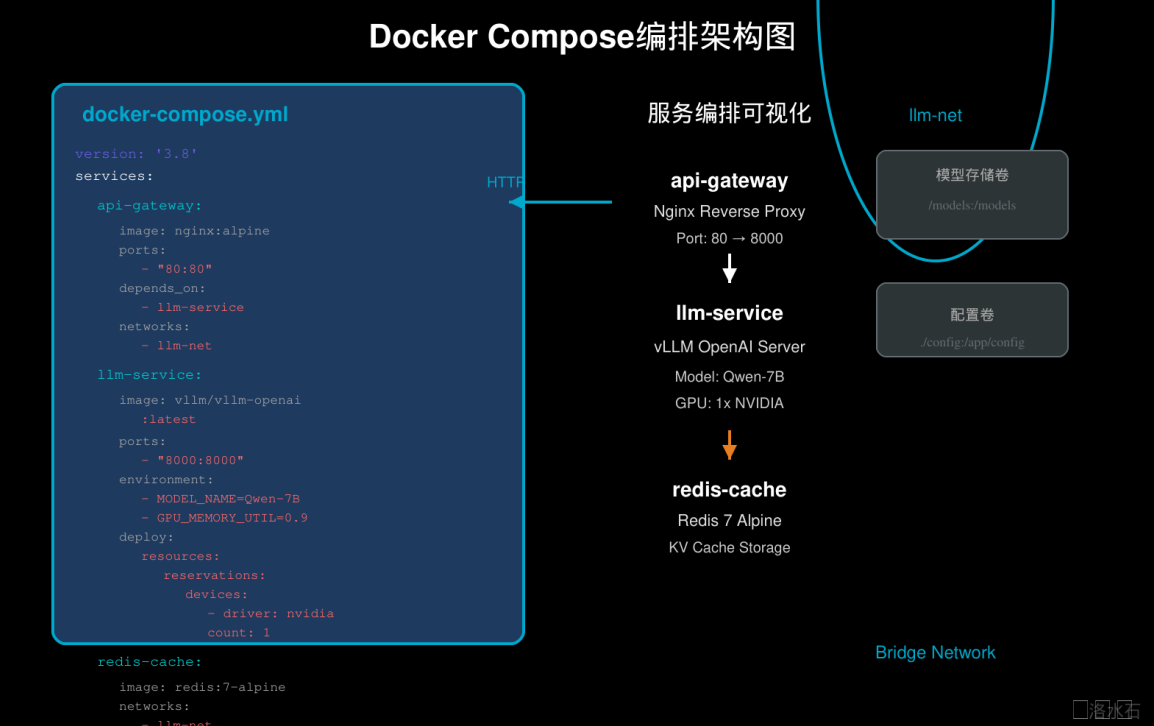
图2
docker_compose.png
### 集群模式部署配置
对于大规模推理服务,需要支持多实例部署和负载均衡。以下是一个支持水平扩展的集群部署配置:
```yaml
# docker-compose-cluster.yml
version: '3.8'
services:
# vLLM推理实例1
vllm-1:
image: vllm/vllm-openai:latest
container_name: vllm-1
environment:
- MODEL_NAME=Qwen/Qwen-7B-Chat
- GPU_MEMORY_UTILIZATION=0.85
- MAX_MODEL_LEN=8192
volumes:
- model_cache:/root/.cache/huggingface
deploy:
resources:
reservations:
devices:
- driver: nvidia
count: 1
capabilities: [gpu]
networks:
- llm-net
ports:
- "8001:8000"
healthcheck:
test: ["CMD", "curl", "-f", "http://localhost:8000/health"]
interval: 30s
timeout: 10s
retries: 3
start_period: 180s
# vLLM推理实例2
vllm-2:
image: vllm/vllm-openai:latest
container_name: vllm-2
environment:
- MODEL_NAME=Qwen/Qwen-7B-Chat
- GPU_MEMORY_UTILIZATION=0.85
- MAX_MODEL_LEN=8192
volumes:
- model_cache:/root/.cache/huggingface
deploy:
resources:
reservations:
devices:
- driver: nvidia
count: 1
capabilities: [gpu]
networks:
- llm-net
ports:
- "8002:8000"
healthcheck:
test: ["CMD", "curl", "-f", "http://localhost:8000/health"]
interval: 30s
timeout: 10s
retries: 3
start_period: 180s
# HAProxy负载均衡
haproxy:
image: haproxy:alpine
container_name: haproxy
ports:
- "80:8080"
- "8404:8404" # HAProxy stats page
volumes:
- ./haproxy.cfg:/usr/local/etc/haproxy/haproxy.cfg:ro
depends_on:
- vllm-1
- vllm-2
networks:
- llm-net
healthcheck:
test: ["CMD", "haproxy", "-c", "-f", "/usr/local/etc/haproxy/haproxy.cfg"]
interval: 30s
timeout: 10s
retries: 3
# Redis Session存储
redis:
image: redis:7-alpine
container_name: redis-session
command: redis-server --appendonly yes --maxmemory 4gb --maxmemory-policy allkeys-lru
volumes:
- redis_data:/data
networks:
- llm-net
ports:
- "6379:6379"
healthcheck:
test: ["CMD", "redis-cli", "ping"]
interval: 10s
timeout: 5s
retries: 3
networks:
llm-net:
driver: bridge
volumes:
model_cache:
redis_data:
```
HAProxy配置(haproxy.cfg):
```cfg
global
log stdout format raw local0
maxconn 4096
stats socket /var/run/hapee-listen.sock mode 600 level admin
stats timeout 2m
defaults
log global
mode http
option httplog
option dontlognull
option http-server-close
option forwardfor except 127.0.0.0/8
timeout connect 30s
timeout client 180s
timeout server 300s
timeout tunnel 600s
timeout check 5s
# 统计页面
listen stats
bind *:8404
mode http
stats enable
stats uri /
stats refresh 30s
# 推理服务负载均衡
frontend llm_frontend
bind *:8080
default_backend llm_backend
backend llm_backend
mode http
balance roundrobin
option tcp-check
tcp-check connect
tcp-check expect string X-Request-Id
# vLLM实例
server vllm1 vllm-1:8000 check inter 30s rise 2 fall 3 weight 100
server vllm2 vllm-2:8000 check inter 30s rise 2 fall 3 weight 100
# 健康检查
http-check expect status 200
option httpchk GET /health
http-check expect string OK
# 响应超时
timeout server 300s
# 会话保持
stick-table type string len 32 size 100k expire 30m
stick on req.cookie(X-Session-Id)
# 监控端点
frontend monitoring
bind *:8081
mode http
default_backend metrics_backend
backend metrics_backend
mode http
stats enable
stats uri /stats
stats realm Haproxy\ Statistics
stats auth admin:admin
```
## 容器化性能优化
### 内存与显存配置优化
大模型推理是内存密集型任务,合理配置内存和显存参数对性能影响显著。以下是各主要推理框架的内存优化配置:
**vLLM内存配置:**
```yaml
environment:
- GPU_MEMORY_UTILIZATION=0.9 # GPU显存使用率(默认0.9)
- MAX_MODEL_LEN=8192 # 最大模型长度
- KV_CACHE_FP8_QUANTIZED=true # KV缓存量化(需要GPU支持)
- BLOCK_SIZE=16 # KV缓存块大小
- NUM_PREEMPTIVE_SAMPLES=4 # 抢占式采样数
```
`GPU_MEMORY_UTILIZATION`控制vLLM可以使用的GPU显存比例。默认值0.9预留10%显存用于KV缓存和其他开销。如果遇到OOM错误,可以适当降低到0.8或0.7。
**PyTorch内存配置:**
```python
import torch
# 开启梯度检查点以节省显存
model.gradient_checkpointing_enable()
# 设置PyTorch内存分配器策略
torch.cuda.set_per_process_memory_fraction(0.9)
# 启用TF32计算(Ampere架构GPU)
torch.backends.cuda.matmul.allow_tf32 = True
torch.backends.cudnn.allow_tf32 = True
```
**Transformer模型内存优化:**
```python
from transformers import AutoModelForCausalLM
# 启用Flash Attention(需要安装flash-attn)
model = AutoModelForCausalLM.from_pretrained(
"Qwen/Qwen-7B-Chat",
device_map="auto",
torch_dtype=torch.float16,
use_flash_attention_2=True # 需要flash-attn包
)
# 4-bit量化加载
from transformers import BitsAndBytesConfig
quantization_config = BitsAndBytesConfig(
load_in_4bit=True,
bnb_4bit_compute_dtype=torch.float16,
bnb_4bit_use_double_quant=True,
bnb_4bit_quant_type="nf4"
)
model = AutoModelForCausalLM.from_pretrained(
"Qwen/Qwen-7B-Chat",
quantization_config=quantization_config,
device_map="auto"
)
```
### GPU分配策略
在多GPU环境下,选择合适的GPU分配策略对整体吞吐量至关重要。
**单GPU单容器**是最简单的部署模式,适合模型可以完整加载到单张GPU的场景。配置简单,但GPU利用率可能不够高:
```yaml
deploy:
resources:
reservations:
devices:
- driver: nvidia
count: 1
capabilities: [gpu]
```
**多GPU张量并行**将单个模型的权重分布到多张GPU上,适合超大模型或需要极致吞吐量的场景:
```bash
# 使用vLLM的张量并行
docker run --gpus '"device=0,1,2,3"' \
-e TENSOR_PARALLEL_SIZE=4 \
vllm/vllm-openai:latest
```
**多实例负载均衡**在每张GPU上运行独立的模型实例,通过负载均衡器分发请求。这种方式的吞吐量通常高于张量并行,因为每个实例可以独立进行批量处理:
```yaml
services:
vllm-gpu0:
# ...配置...
deploy:
resources:
reservations:
devices:
- driver: nvidia
count: 1
capabilities: [gpu]
environment:
- CUDA_VISIBLE_DEVICES=0
vllm-gpu1:
# ...配置...
deploy:
resources:
reservations:
devices:
- driver: nvidia
count: 1
capabilities: [gpu]
environment:
- CUDA_VISIBLE_DEVICES=1
```
### 批量推理优化
批量推理是提高GPU利用率的有效手段。合理的批处理配置可以将吞吐量提升数倍。
**动态批处理(Dynamic Batching)**由推理服务框架自动管理,自动将多个请求合并成批次处理:
```yaml
environment:
# vLLM动态批处理配置
- MAX_NUM_BATCHED_TOKENS=8192 # 单批次最大token数
- MAX_NUM_SEQUENCES=256 # 单批次最大序列数
- SERVING_NAME=Qwen-7B # 模型名称
```
**连续批处理(Continuous Batching)**是vLLM的默认批处理策略,允许在生成过程中动态添加新请求,无需等待整个批次完成:
```python
# vLLM连续批处理示例
from vllm import LLM, SamplingParams
llm = LLM(model="Qwen/Qwen-7B-Chat")
# 批量推理请求
prompts = [
"请介绍一下Docker: ",
"什么是Kubernetes: ",
"解释一下微服务架构: "
]
sampling_params = SamplingParams(
temperature=0.7,
top_p=0.95,
max_tokens=512,
stop=["\n", "用户:", "assistant:"]
)
# 批量生成
outputs = llm.generate(prompts, sampling_params)
for output in outputs:
prompt = output.prompt
generated_text = output.outputs[0].text
print(f"Prompt: {prompt!r}, Generated text: {generated_text!r}")
```
**预批处理(Prefix Caching)**对于具有相同系统提示的对话场景,可以复用已计算的KV缓存,显著降低首token延迟:
```yaml
environment:
- ENABLE_PREFIX_CACHING=true # 启用前缀缓存
- NUM_SCHEDULER_STEPS=8 # 调度步数
```
### 推理延迟优化
在线推理场景对延迟敏感,需要综合优化以降低响应时间。
**流式输出**允许在生成过程中就开始返回token,显著降低用户的感知延迟:
```python
# 使用流式输出
from vllm import LLM, SamplingParams
llm = LLM(model="Qwen/Qwen-7B-Chat")
sampling_params = SamplingParams(
temperature=0.7,
max_tokens=1024,
stream=True # 启用流式输出
)
# 流式生成
for output in llm.generate(["请介绍一下人工智能的发展历史"], sampling_params):
# output包含已生成的token
print(output.outputs[0].text, end="", flush=True)
```
**KV缓存量化**可以显著减少显存占用,允许更大的批量或更长的上下文:
```yaml
environment:
- KV_CACHE_DTYPE=fp8 # KV缓存数据类型
```
**CUDA Graph**通过捕获和重放GPU操作来减少内核启动开销:
```yaml
environment:
- ENABLE_CHUNKED_PREFILL=false # 禁用分块预填充以降低延迟
```
## Docker安全加固
### 容器安全基础配置
大模型推理服务通常处理敏感数据,容器安全加固至关重要。
**以非root用户运行容器**是基本的安全最佳实践:
```dockerfile
# Dockerfile中添加
RUN groupadd -r llmuser && useradd -r -g llmuser llmuser
# ... 安装依赖 ...
USER llmuser
WORKDIR /home/llmuser
CMD ["python", "app.py"]
```
docker-compose.yml中也可以指定运行用户:
```yaml
services:
vllm-backend:
image: vllm/vllm-openai:latest
user: "1000:1000" # 指定UID:GID
security_opt:
- no-new-privileges:true
cap_drop:
- ALL
```
**限制容器能力**通过`cap_drop`移除不必要的Linux能力:
```yaml
services:
vllm-backend:
image: vllm/vllm-openai:latest
cap_drop:
- ALL
cap_add:
- NET_BIND_SERVICE # 仅添加需要的capability
```
**启用SELinux/AppArmor**为容器提供额外的访问控制:
```bash
# Docker运行时的AppArmor配置
docker run --security-opt "apparmor=docker-default" \
--gpus all \
vllm/vllm-openai:latest
```
### 网络安全配置
限制容器的网络访问可以减少攻击面。
**使用自定义网络**隔离容器通信:
```yaml
networks:
llm-internal:
driver: bridge
internal: true # 禁止容器访问外部网络
llm-public:
driver: bridge
```
不同服务分配到不同网络层:
```yaml
services:
# 仅内部网络访问的推理服务
vllm-backend:
networks:
- llm-internal
# 不暴露任何端口
# 可访问公网的API网关
api-gateway:
networks:
- llm-public
- llm-internal
ports:
- "80:80"
```
**TLS/SSL加密**保护传输中的数据:
```yaml
services:
api-gateway:
image: nginx:alpine
volumes:
- ./ssl/cert.pem:/etc/nginx/ssl/cert.pem:ro
- ./ssl/key.pem:/etc/nginx/ssl/key.pem:ro
command: |
nginx -c /etc/nginx/nginx.conf -g 'daemon off;'
```
### 镜像安全扫描
构建和部署前扫描镜像漏洞是安全流程的重要环节。
**使用Trivy扫描镜像:**
```bash
# 安装Trivy
docker run --rm -v /var/run/docker.sock:/var/run/docker.sock \
aquasec/trivy image vllm/vllm-openai:latest
# 扫描已知漏洞
docker run --rm -v /var/run/docker.sock:/var/run/docker.sock \
aquasec/trivy image --severity HIGH,CRITICAL \
vllm/vllm-openai:latest
# 输出漏洞报告
docker run --rm -v /var/run/docker.sock:/var/run/docker.sock \
-v ./reports:/reports \
aquasec/trivy image \
--format json --output /reports/vuln-report.json \
vllm/vllm-openai:latest
```
**Docker Scout**是Docker官方提供的镜像安全分析工具:
```bash
# 登录Docker Hub
docker scout login
# 分析镜像
docker scout cves vllm/vllm-openai:latest
# 比较两个镜像版本
docker scout compare \
--from vllm/vllm-openai:0.1 \
--to vllm/vllm-openai:0.2
```
**CI/CD集成安全扫描:**
```yaml
# .github/workflows/security-scan.yml
name: Security Scan
on: [push, pull_request]
jobs:
trivy-scan:
runs-on: ubuntu-latest
steps:
- name: Checkout code
uses: actions/checkout@v4
- name: Run Trivy vulnerability scanner
uses: aquasecurity/trivy-action@master
with:
image-ref: 'vllm/vllm-openai:latest'
format: 'sarif'
output: 'trivy-results.sarif'
severity: 'CRITICAL,HIGH'
- name: Upload Trivy results to GitHub Security tab
uses: github/codeql-action/upload-sarif@v2
with:
sarif_file: 'trivy-results.sarif'
```
### 运行时安全监控
部署后的容器安全监控同样重要。
**Docker内置安全审计:**
```bash
# 查看容器运行状态
docker stats
# 检查容器权限
docker inspect --format '{{.HostConfig.Privileged}}' <container>
# 查看容器的Linux capabilities
docker inspect --format '{{.HostConfig.CapAdd}}' <container>
```
**Falco**是CNCF旗下的容器运行时安全监控工具:
```yaml
# docker-compose-falco.yml
version: '3.8'
services:
falco:
image: falcosecurity/falco:latest
container_name: falco
privileged: true
volumes:
- /var/run/docker.sock:/var/run/docker.sock
- /host:/host:ro
- ./falco-rules.yaml:/etc/falco/falco_rules.yaml:ro
environment:
- FALCO菲尔斯_ENABLED=true
network_mode: host
```
Falco规则示例(falco-rules.yaml):
```yaml
# 检测容器内运行shell
- rule: Shell spawned in container
desc: A shell was spawned by a non-shell program in a container
condition: >
spawned_process and
container and
proc.name = bash
output: >
Shell spawn detected (user=%user.name container_id=%container.id
container_name=%container.name shell=%proc.name parent=%proc.pname
cmdline=%proc.cmdline)
priority: NOTICE
# 检测特权容器
- rule: Privileged container started
desc: Privileged container started
condition: >
container and
container.privileged = true
output: >
Privileged container started (id=%container.id
image=%container.image.repository
user=%user.name)
priority: CRITICAL
```
## Kubernetes部署大模型
### kubectl基础配置
Kubernetes(K8s)是生产级容器编排的事实标准,掌握kubectl基础操作是部署大模型的必备技能。
**集群上下文配置:**
```bash
# 查看当前集群上下文
kubectl config current-context
# 列出所有上下文
kubectl config get-contexts
# 切换上下文
kubectl config use-context production-cluster
# 查看集群信息
kubectl cluster-info
```
**Namespace管理:**
```bash
# 创建命名空间
kubectl create namespace llm-production
# 切换默认命名空间
kubectl config set-context --current --namespace=llm-production
# 在指定命名空间操作
kubectl get pods -n llm-production
```
**Deployment创建:**
```yaml
# llm-deployment.yaml
apiVersion: apps/v1
kind: Deployment
metadata:
name: qwen-7b-deployment
namespace: llm-production
labels:
app: qwen-7b
version: v1
spec:
replicas: 2
selector:
matchLabels:
app: qwen-7b
template:
metadata:
labels:
app: qwen-7b
version: v1
spec:
containers:
- name: vllm
image: vllm/vllm-openai:latest
ports:
- containerPort: 8000
name: http
env:
- name: MODEL_NAME
value: "Qwen/Qwen-7B-Chat"
- name: GPU_MEMORY_UTILIZATION
value: "0.85"
resources:
limits:
nvidia.com/gpu: 1
memory: "32Gi"
cpu: "8"
requests:
nvidia.com/gpu: 1
memory: "16Gi"
cpu: "4"
env:
- name: NVIDIA_VISIBLE_DEVICES
value: "all"
- name: CUDA_VISIBLE_DEVICES
value: "all"
livenessProbe:
httpGet:
path: /health
port: 8000
initialDelaySeconds: 60
periodSeconds: 30
readinessProbe:
httpGet:
path: /health
port: 8000
initialDelaySeconds: 30
periodSeconds: 10
nodeSelector:
gpu-type: nvidia-rtx4090
tolerations:
- key: "nvidia.com/gpu"
operator: "Exists"
effect: "NoSchedule"
```
**Service创建:**
```yaml
# llm-service.yaml
apiVersion: v1
kind: Service
metadata:
name: qwen-7b-service
namespace: llm-production
spec:
type: ClusterIP
selector:
app: qwen-7b
ports:
- name: http
port: 8000
targetPort: 8000
protocol: TCP
```
**应用配置:**
```bash
kubectl apply -f llm-deployment.yaml
kubectl apply -f llm-service.yaml
# 查看部署状态
kubectl get deployments -n llm-production
kubectl get pods -n llm-production
# 查看日志
kubectl logs -n llm-production -l app=qwen-7b --tail=100
# 扩缩容
kubectl scale deployment qwen-7b-deployment --replicas=4 -n llm-production
# 更新镜像版本
kubectl set image deployment/qwen-7b-deployment \
vllm=vllm/vllm-openai:v0.2.0 -n llm-production
# 回滚
kubectl rollout undo deployment/qwen-7b-deployment -n llm-production
```
### Helm Chart部署
Helm是Kubernetes的包管理工具,使用Helm Chart可以简化大模型服务的部署和配置管理。
**安装Helm:**
```bash
# Linux/macOS
curl -fsSL https://get.helm.sh/helm-v3.14.0-linux-amd64.tar.gz | tar -xz
sudo mv linux-amd64/helm /usr/local/bin/helm
# Windows (使用Chocolatey)
choco install kubernetes-helm
```
**创建Helm Chart:**
```bash
helm create llm-service
cd llm-service
```
**Chart目录结构:**
```
llm-service/
├── Chart.yaml
├── values.yaml
├── templates/
│ ├── deployment.yaml
│ ├── service.yaml
│ ├── ingress.yaml
│ └── _helpers.tpl
└── .helmignore
```
**Chart.yaml:**
```yaml
apiVersion: v2
name: llm-service
description: A Helm chart for LLM inference service
type: application
version: 1.0.0
appVersion: "latest"
keywords:
- llm
- vllm
- inference
maintainers:
- name: LLM Team
email: llm-team@example.com
dependencies:
- name: common
version: "1.x.x"
repository: "https://charts.bitnami.com/bitnami"
```
**values.yaml:**
```yaml
replicaCount: 2
image:
repository: vllm/vllm-openai
tag: latest
pullPolicy: IfNotPresent
service:
type: ClusterIP
port: 8000
resources:
limits:
nvidia.com/gpu: 1
memory: 32Gi
cpu: 8
requests:
nvidia.com/gpu: 1
memory: 16Gi
cpu: 4
env:
MODEL_NAME: "Qwen/Qwen-7B-Chat"
GPU_MEMORY_UTILIZATION: "0.85"
MAX_MODEL_LEN: "8192"
autoscaling:
enabled: true
minReplicas: 1
maxReplicas: 10
targetCPUUtilizationPercentage: 70
targetMemoryUtilizationPercentage: 80
ingress:
enabled: true
className: nginx
annotations:
cert-manager.io/cluster-issuer: letsencrypt-prod
hosts:
- host: llm.example.com
paths:
- path: /
pathType: Prefix
tls:
- secretName: llm-tls
hosts:
- llm.example.com
persistence:
enabled: true
storageClass: nfs-client
size: 100Gi
nodeSelector:
gpu-type: nvidia-rtx4090
tolerations:
- key: "nvidia.com/gpu"
operator: "Exists"
effect: "NoSchedule"
affinity:
podAntiAffinity:
preferredDuringSchedulingIgnoredDuringExecution:
- weight: 100
podAffinityTerm:
labelSelector:
matchExpressions:
- key: app
operator: In
values:
- llm-service
topologyKey: kubernetes.io/hostname
```
**部署Helm Chart:**
```bash
# 添加依赖
helm dependency build llm-service
# 部署
helm install qwen-7b llm-service \
--namespace llm-production \
--create-namespace \
--values llm-service/values.yaml
# 升级
helm upgrade qwen-7b llm-service \
--namespace llm-production \
--values llm-service/values-prod.yaml
# 查看部署状态
helm status qwen-7b -n llm-production
# 列出部署
helm list -n llm-production
# 删除部署
helm uninstall qwen-7b -n llm-production
```
### GPU调度与资源管理
Kubernetes原生支持GPU调度,但需要正确配置才能生效。
**检查GPU资源:**
```bash
# 查看节点GPU信息
kubectl describe nodes | grep -A 10 "nvidia.com/gpu"
# 查看GPU可用数量
kubectl get nodes -o jsonpath='{range .items[*]}{.metadata.name}{"\t"}{.status.allocatable.nvidia\.com/gpu}{"\n"}{end}'
```
**GPU配额管理:**
```yaml
# ResourceQuota限制命名空间GPU使用
apiVersion: v1
kind: ResourceQuota
metadata:
name: llm-gpu-quota
namespace: llm-production
spec:
hard:
requests.nvidia.com/gpu: "4"
limits.nvidia.com/gpu: "4"
---
# LimitRange设置默认值
apiVersion: v1
kind: LimitRange
metadata:
name: llm-limits
namespace: llm-production
spec:
limits:
- max:
nvidia.com/gpu: 2
default:
nvidia.com/gpu: 1
defaultRequest:
nvidia.com/gpu: 1
type: Container
```
**时间片调度(Time Slicing):** 在共享GPU集群中,可以让多个容器分时使用同一张GPU:
```yaml
# device-plugin配置
apiVersion: apps/v1
kind: ConfigMap
metadata:
name: nvidia-device-plugin-config
namespace: gpu-operator
data:
config.yaml: |
version: v1
sharing:
timeSlicing:
resources:
- name: nvidia.com/gpu
replicas: 4 # 将1张GPU划分为4个时间片
```
### 监控与日志集成
生产环境需要完善的监控和日志系统。
**Prometheus监控:**
```yaml
# prometheus-config.yaml
apiVersion: v1
kind: ConfigMap
metadata:
name: prometheus-config
namespace: monitoring
data:
prometheus.yml: |
global:
scrape_interval: 15s
scrape_configs:
- job_name: 'vllm'
static_configs:
- targets: ['vllm-service.llm-production:8000']
metrics_path: /metrics
```
**Grafana仪表板:**
```yaml
# grafana-dashboard.yaml
apiVersion: v1
kind: ConfigMap
metadata:
name: vllm-grafana-dashboard
namespace: monitoring
labels:
grafana_dashboard: "1"
data:
vllm-dashboard.json: |
{
"dashboard": {
"title": "vLLM Inference Dashboard",
"panels": [
{
"title": "Requests per Second",
"type": "graph",
"targets": [
{
"expr": "rate(vllm_requests_total[5m])",
"legendFormat": "{{model}}"
}
]
},
{
"title": "Average Latency",
"type": "graph",
"targets": [
{
"expr": "histogram_quantile(0.95, rate(vllm_request_duration_seconds_bucket[5m]))",
"legendFormat": "p95"
}
]
},
{
"title": "GPU Memory Usage",
"type": "graph",
"targets": [
{
"expr": "vllm_gpu_memory_usage_bytes / vllm_gpu_memory_total_bytes",
"legendFormat": "Used {{gpu}}"
}
]
}
]
}
}
```
## 实战案例:docker-compose一键部署Qwen-7B推理服务
图4
deployment_flow.png
### 环境准备
在开始部署前,需要确保环境满足以下要求:
**硬件要求:** NVIDIA GPU(至少16GB显存,推荐RTX 4080或更高),8核以上CPU,32GB系统内存,100GB可用磁盘空间。
**软件要求:** Ubuntu 20.04+或CentOS 8+,NVIDIA Driver 535+,Docker 24+,NVIDIA Container Toolkit。
**环境验证:**
```bash
# 检查NVIDIA驱动
nvidia-smi
# 预期输出应显示GPU型号和驱动版本
# 检查Docker
docker --version
# 预期输出:Docker version 24.x.x
# 检查nvidia-container-toolkit
docker run --rm --gpus all nvidia/cuda:12.1.1-base-ubuntu22.04 nvidia-smi
# 预期输出应显示GPU信息
```
### 编写docker-compose配置
创建项目目录并编写docker-compose.yml:
```bash
mkdir -p ~/llm-deploy/qwen-7b
cd ~/llm-deploy/qwen-7b
```
```yaml
# docker-compose.yml
version: '3.8'
services:
# Qwen-7B推理服务
qwen7b-inference:
image: vllm/vllm-openai:latest
container_name: qwen7b-inference
hostname: qwen7b-inference
ports:
- "8000:8000"
environment:
# 模型配置
- MODEL_NAME=Qwen/Qwen-7B-Chat
- TOKENIZER=Qwen/Qwen-7B-Chat
# 性能优化
- GPU_MEMORY_UTILIZATION=0.9
- MAX_MODEL_LEN=8192
- MAX_NUM_BATCHED_TOKENS=8192
- MAX_NUM_SEQUENCES=256
# 推理优化
- ENABLE_CHUNKED_PREFILL=true
- ENABLE_PREFIX_CACHING=true
# GPU配置
- NVIDIA_VISIBLE_DEVICES=all
- CUDA_VISIBLE_DEVICES=all
# 日志配置
- LOG_LEVEL=INFO
volumes:
# HuggingFace模型缓存(避免重复下载)
- model_cache:/root/.cache/huggingface
# vLLM服务日志
- ./logs:/var/log/vllm
deploy:
resources:
reservations:
devices:
- driver: nvidia
count: 1
capabilities: [gpu]
shm_size: '16gb' # 共享内存(对vLLM重要)
restart: unless-stopped
healthcheck:
test: ["CMD", "curl", "-f", "http://localhost:8000/health"]
interval: 30s
timeout: 10s
retries: 3
start_period: 300s
networks:
- qwen-net
# API网关(Nginx)
api-gateway:
image: nginx:alpine
container_name: qwen7b-gateway
ports:
- "80:80"
- "443:443"
volumes:
- ./nginx/nginx.conf:/etc/nginx/nginx.conf:ro
- ./nginx/ssl:/etc/nginx/ssl:ro
depends_on:
qwen7b-inference:
condition: service_healthy
restart: unless-stopped
networks:
- qwen-net
# Prometheus监控
prometheus:
image: prom/prometheus:latest
container_name: qwen7b-prometheus
ports:
- "9090:9090"
volumes:
- ./prometheus/prometheus.yml:/etc/prometheus/prometheus.yml:ro
- ./prometheus/prometheus_data:/prometheus
command:
- '--config.file=/etc/prometheus/prometheus.yml'
- '--storage.tsdb.path=/prometheus'
- '--web.console.libraries=/etc/prometheus/console_libraries'
- '--web.console.templates=/etc/prometheus/consoles'
restart: unless-stopped
networks:
- qwen-net
# Grafana可视化
grafana:
image: grafana/grafana:latest
container_name: qwen7b-grafana
ports:
- "3000:3000"
environment:
- GF_SECURITY_ADMIN_USER=admin
- GF_SECURITY_ADMIN_PASSWORD=admin123
- GF_USERS_ALLOW_SIGN_UP=false
volumes:
- ./grafana/provisioning:/etc/grafana/provisioning:ro
- ./grafana/dashboards:/var/lib/grafana/dashboards
- ./grafana/data:/var/lib/grafana
depends_on:
- prometheus
restart: unless-stopped
networks:
- qwen-net
networks:
qwen-net:
driver: bridge
volumes:
model_cache:
```
### Nginx配置
```bash
mkdir -p nginx ssl prometheus grafana/provisioning/datasources grafana/provisioning/dashboards grafana/dashboards logs
```
```nginx
# nginx/nginx.conf
events {
worker_connections 1024;
}
http {
include /etc/nginx/mime.types;
default_type application/octet-stream;
# 日志格式
log_format main '$remote_addr - $remote_user [$time_local] "$request" '
'$status $body_bytes_sent "$http_referer" '
'"$http_user_agent" "$http_x_forwarded_for" '
'rt=$request_time uct="$upstream_connect_time" '
'uht="$upstream_header_time" urt="$upstream_response_time"';
access_log /var/log/nginx/access.log main;
error_log /var/log/nginx/error.log warn;
# 性能优化
sendfile on;
tcp_nopush on;
tcp_nodelay on;
keepalive_timeout 65;
types_hash_max_size 2048;
# Gzip压缩
gzip on;
gzip_vary on;
gzip_proxied any;
gzip_comp_level 6;
gzip_types text/plain text/css text/xml application/json application/javascript application/rss+xml application/atom+xml image/svg+xml;
# 限流配置
limit_req_zone $binary_remote_addr zone=api_limit:10m rate=30r/s;
limit_conn_zone $binary_remote_addr zone=conn_limit:10m;
upstream vllm_backend {
server qwen7b-inference:8000;
keepalive 64;
}
server {
listen 80;
server_name _;
# 健康检查
location /health {
access_log off;
return 200 "OK";
add_header Content-Type text/plain;
}
# OpenAI兼容API - Chat Completions
location /v1/chat/completions {
limit_req zone=api_limit burst=50 nodelay;
limit_conn conn_limit 10;
proxy_pass http://vllm_backend;
proxy_http_version 1.1;
# 代理头设置
proxy_set_header Host $host;
proxy_set_header X-Real-IP $remote_addr;
proxy_set_header X-Forwarded-For $proxy_add_x_forwarded_for;
proxy_set_header X-Forwarded-Proto $scheme;
# 流式响应(关键配置)
proxy_buffering off;
proxy_cache off;
proxy_read_timeout 300s;
proxy_connect_timeout 60s;
proxy_send_timeout 300s;
# SSE必需配置
proxy_set_header Connection '';
chunked_transfer_encoding on;
# 记录响应时间
add_header X-Response-Time $upstream_response_time;
}
# OpenAI兼容API - Completions
location /v1/completions {
limit_req zone=api_limit burst=50 nodelay;
limit_conn conn_limit 10;
proxy_pass http://vllm_backend;
proxy_http_version 1.1;
proxy_set_header Host $host;
proxy_set_header X-Real-IP $remote_addr;
proxy_set_header X-Forwarded-For $proxy_add_x_forwarded_for;
proxy_set_header X-Forwarded-Proto $scheme;
proxy_buffering off;
proxy_cache off;
proxy_read_timeout 300s;
proxy_set_header Connection '';
chunked_transfer_encoding on;
}
# 模型列表
location /v1/models {
proxy_pass http://vllm_backend;
proxy_http_version 1.1;
proxy_set_header Host $host;
proxy_set_header X-Real-IP $remote_addr;
}
# vLLM直接接口
location /v1 {
proxy_pass http://vllm_backend;
proxy_http_version 1.1;
proxy_set_header Host $host;
proxy_set_header X-Real-IP $remote_addr;
proxy_set_header X-Forwarded-For $proxy_add_x_forwarded_for;
proxy_set_header X-Forwarded-Proto $scheme;
}
# Prometheus指标(仅内网访问)
location /metrics {
proxy_pass http://prometheus:9090;
proxy_set_header Host $host;
allow 127.0.0.1;
allow 10.0.0.0/8;
allow 172.16.0.0/12;
deny all;
}
}
}
```
### Prometheus配置
```yaml
# prometheus/prometheus.yml
global:
scrape_interval: 15s
evaluation_interval: 15s
scrape_configs:
- job_name: 'vllm'
static_configs:
- targets: ['qwen7b-inference:8000']
metrics_path: '/metrics'
scrape_interval: 10s
```
### 启动服务
```bash
# 进入项目目录
cd ~/llm-deploy/qwen-7b
# 拉取镜像(提前完成,节省首次启动时间)
docker-compose pull
# 启动服务(后台运行)
docker-compose up -d
# 查看服务状态
docker-compose ps
# 查看日志
docker-compose logs -f qwen7b-inference
# 等待服务就绪后测试
# 首次启动需要下载模型,可能需要几分钟
sleep 120
# 健康检查
curl http://localhost:8000/health
# 模型列表
curl http://localhost:8000/v1/models
# 测试推理
curl -X POST http://localhost:8000/v1/chat/completions \
-H "Content-Type: application/json" \
-d '{
"model": "Qwen/Qwen-7B-Chat",
"messages": [
{"role": "system", "content": "你是一个有帮助的AI助手。"},
{"role": "user", "content": "请介绍一下Docker容器化技术的优势。"}
],
"max_tokens": 512,
"temperature": 0.7
}'
```
### 性能测试
```bash
# 安装测试工具
pip install locust
# 创建负载测试脚本 locustfile.py
cat > locustfile.py << 'EOF'
from locust import HttpUser, task, between
import json
class LLMUser(HttpUser):
wait_time = between(1, 3)
host = "http://localhost"
@task(3)
def chat_completion(self):
payload = {
"model": "Qwen/Qwen-7B-Chat",
"messages": [
{"role": "system", "content": "你是一个有帮助的AI助手。"},
{"role": "user", "content": "请用100字介绍一下人工智能。"}
],
"max_tokens": 200,
"temperature": 0.7,
"stream": False
}
with self.client.post(
"/v1/chat/completions",
json=payload,
catch_response=True
) as response:
if response.status_code == 200:
response.success()
else:
response.failure(f"Failed with status {response.status_code}")
@task(1)
def chat_completion_stream(self):
payload = {
"model": "Qwen/Qwen-7B-Chat",
"messages": [
{"role": "user", "content": "解释一下什么是机器学习。"}
],
"max_tokens": 256,
"temperature": 0.7,
"stream": True
}
with self.client.post(
"/v1/chat/completions",
json=payload,
catch_response=True
) as response:
if response.status_code == 200:
response.success()
else:
response.failure(f"Failed with status {response.status_code}")
EOF
# 运行负载测试(10个并发用户,持续60秒)
locust -f locustfile.py --headless -u 10 -r 2 -t 60s --csv results
# Web界面测试(可选)
locust -f locustfile.py --web-port 8089
```
## 容器化后的Spring Boot对接方案
### 概述
在企业级应用中,Java/Spring Boot仍然是主流的后端开发框架。将大模型推理服务容器化部署后,如何在Spring Boot应用中对接使用是开发者普遍关心的问题。
### RestTemplate对接方案
最直接的对接方式是使用Spring的RestTemplate或WebClient调用大模型API:
```java
package com.example.llm.config;
import org.springframework.context.annotation.Bean;
import org.springframework.context.annotation.Configuration;
import org.springframework.http.client.SimpleClientHttpRequestFactory;
import org.springframework.web.client.RestTemplate;
@Configuration
public class RestTemplateConfig {
@Bean
public RestTemplate restTemplate() {
SimpleClientHttpRequestFactory factory = new SimpleClientHttpRequestFactory();
factory.setConnectTimeout(10000); // 连接超时10秒
factory.setReadTimeout(120000); // 读取超时120秒(大模型推理可能较长)
factory.setBufferRequestBody(true);
return new RestTemplate(factory);
}
}
```
### OpenAI兼容客户端封装
为了方便对接支持OpenAI协议的大模型服务,封装一个统一的客户端:
```java
package com.example.llm.client;
import com.fasterxml.jackson.annotation.JsonProperty;
import lombok.Data;
import lombok.Builder;
import lombok.AllArgsConstructor;
import lombok.NoArgsConstructor;
import java.util.List;
import java.util.Map;
public class LLMClient {
private final RestTemplate restTemplate;
private final String baseUrl;
public LLMClient(RestTemplate restTemplate, String baseUrl) {
this.restTemplate = restTemplate;
this.baseUrl = baseUrl;
}
/**
* 聊天补全
*/
public ChatCompletionResponse chatCompletion(ChatCompletionRequest request) {
String url = baseUrl + "/v1/chat/completions";
HttpHeaders headers = new HttpHeaders();
headers.setContentType(MediaType.APPLICATION_JSON);
HttpEntity<ChatCompletionRequest> entity = new HttpEntity<>(request, headers);
ResponseEntity<ChatCompletionResponse> response = restTemplate.exchange(
url,
HttpMethod.POST,
entity,
ChatCompletionResponse.class
);
return response.getBody();
}
/**
* 流式聊天补全
*/
public Flux<String> chatCompletionStream(ChatCompletionRequest request) {
String url = baseUrl + "/v1/chat/completions";
HttpHeaders headers = new HttpHeaders();
headers.setContentType(MediaType.APPLICATION_JSON);
headers.setAccept(MediaType.TEXT_EVENT_STREAM);
HttpEntity<ChatCompletionRequest> entity = new HttpEntity<>(request, headers);
ParameterizedTypeReference<ServerSentEvent<String>> type = new ParameterizedTypeReference<>() {};
return restTemplate.exchange(
url,
HttpMethod.POST,
entity,
new ParameterizedTypeReference<ServerSentEvent<String>>() {}
)
.getBody()
.stream()
.map(ServerSentEvent::data);
}
@Data
@Builder
@NoArgsConstructor
@AllArgsConstructor
public static class ChatCompletionRequest {
private String model;
private List<Message> messages;
private Double temperature;
@JsonProperty("max_tokens")
private Integer maxTokens;
@JsonProperty("top_p")
private Double topP;
private Boolean stream;
private List<String> stop;
}
@Data
@Builder
@NoArgsConstructor
@AllArgsConstructor
public static class Message {
private String role;
private String content;
}
@Data
@Builder
@NoArgsConstructor
@AllArgsConstructor
public static class ChatCompletionResponse {
private String id;
private String object;
private Long created;
private String model;
private List<Choice> choices;
private Usage usage;
}
@Data
@Builder
@NoArgsConstructor
@AllArgsConstructor
public static class Choice {
private Integer index;
private Message message;
@JsonProperty("finish_reason")
private String finishReason;
}
@Data
@Builder
@NoArgsConstructor
@AllArgsConstructor
public static class Usage {
@JsonProperty("prompt_tokens")
private Integer promptTokens;
@JsonProperty("completion_tokens")
private Integer completionTokens;
@JsonProperty("total_tokens")
private Integer totalTokens;
}
}
```
### Spring Boot服务实现
```java
package com.example.llm.service;
import com.example.llm.client.LLMClient.ChatCompletionRequest;
import com.example.llm.client.LLMClient.ChatCompletionResponse;
import com.example.llm.client.LLMClient.LLMClient;
import com.example.llm.client.LLMClient.Message;
import lombok.RequiredArgsConstructor;
import lombok.extern.slf4j.Slf4j;
import org.springframework.stereotype.Service;
import java.util.Arrays;
import java.util.List;
import java.util.concurrent.CompletableFuture;
import java.util.concurrent.TimeUnit;
@Service
@RequiredArgsConstructor
@Slf4j
public class LLMService {
private final LLMClient llmClient;
/**
* 同步对话
*/
public String chat(String userMessage) {
return chat(userMessage, null);
}
/**
* 同步对话(带系统提示)
*/
public String chat(String userMessage, String systemPrompt) {
ChatCompletionRequest request = buildRequest(userMessage, systemPrompt, false);
try {
ChatCompletionResponse response = llmClient.chatCompletion(request);
if (response != null && response.getChoices() != null && !response.getChoices().isEmpty()) {
return response.getChoices().get(0).getMessage().getContent();
}
} catch (Exception e) {
log.error("LLM调用失败", e);
throw new RuntimeException("LLM服务调用失败: " + e.getMessage(), e);
}
return null;
}
/**
* 流式对话
*/
public Flux<String> chatStream(String userMessage) {
return chatStream(userMessage, null);
}
/**
* 流式对话(带系统提示)
*/
public Flux<String> chatStream(String userMessage, String systemPrompt) {
ChatCompletionRequest request = buildRequest(userMessage, systemPrompt, true);
return llmClient.chatCompletionStream(request)
.filter(data -> !data.startsWith("[DONE]"))
.map(data -> {
// 解析SSE数据
if (data.startsWith("data:")) {
data = data.substring(5).trim();
}
return data;
});
}
private ChatCompletionRequest buildRequest(String userMessage, String systemPrompt, boolean stream) {
List<Message> messages = Arrays.asList(
Message.builder()
.role("system")
.content(systemPrompt != null ? systemPrompt : "你是一个有帮助的AI助手。")
.build(),
Message.builder()
.role("user")
.content(userMessage)
.build()
);
return ChatCompletionRequest.builder()
.model("Qwen/Qwen-7B-Chat")
.messages(messages)
.temperature(0.7)
.maxTokens(2048)
.stream(stream)
.build();
}
/**
* 异步对话
*/
public CompletableFuture<String> chatAsync(String userMessage) {
return CompletableFuture.supplyAsync(() -> chat(userMessage))
.orTimeout(120, TimeUnit.SECONDS);
}
/**
* 批量对话
*/
public List<String> batchChat(List<String> messages) {
return messages.parallelStream()
.map(this::chat)
.toList();
}
}
```
### 控制器实现
```java
package com.example.llm.controller;
import com.example.llm.service.LLMService;
import lombok.RequiredArgsConstructor;
import lombok.extern.slf4j.Slf4j;
import org.springframework.http.MediaType;
import org.springframework.http.codec.ServerSentEvent;
import org.springframework.web.bind.annotation.*;
import reactor.core.publisher.Flux;
import reactor.core.publisher.Mono;
import java.util.HashMap;
import java.util.Map;
@RestController
@RequestMapping("/api/llm")
@RequiredArgsConstructor
@Slf4j
public class LLMController {
private final LLMService llmService;
/**
* 同步对话接口
*/
@PostMapping("/chat")
public Map<String, Object> chat(@RequestBody Map<String, String> request) {
String userMessage = request.get("message");
String systemPrompt = request.get("systemPrompt");
log.info("收到聊天请求: {}", userMessage);
String response = llmService.chat(userMessage, systemPrompt);
Map<String, Object> result = new HashMap<>();
result.put("code", 200);
result.put("message", "success");
result.put("data", response);
return result;
}
/**
* 流式对话接口
*/
@PostMapping(value = "/chat/stream", produces = MediaType.TEXT_EVENT_STREAM_VALUE)
public Flux<ServerSentEvent<String>> chatStream(@RequestBody Map<String, String> request) {
String userMessage = request.get("message");
String systemPrompt = request.get("systemPrompt");
log.info("收到流式聊天请求: {}", userMessage);
return llmService.chatStream(userMessage, systemPrompt)
.map(data -> ServerSentEvent.<String>builder()
.data(data)
.build()
)
.onErrorResume(e -> {
log.error("流式对话异常", e);
return Mono.just(ServerSentEvent.<String>builder()
.data("[ERROR]" + e.getMessage())
.build());
})
.concatWith(Mono.just(ServerSentEvent.<String>builder()
.data("[DONE]")
.build()));
}
/**
* 异步对话接口
*/
@PostMapping("/chat/async")
public Map<String, Object> chatAsync(@RequestBody Map<String, String> request) {
String userMessage = request.get("message");
log.info("收到异步聊天请求: {}", userMessage);
// 立即返回,后续异步处理
llmService.chatAsync(userMessage)
.thenAccept(response -> {
log.info("异步任务完成: {}", response);
// 这里可以添加回调逻辑,如发送WebSocket消息
})
.exceptionally(e -> {
log.error("异步任务失败", e);
return null;
});
Map<String, Object> result = new HashMap<>();
result.put("code", 202);
result.put("message", "请求已接受,正在异步处理");
return result;
}
}
```
### 熔断与重试配置
```java
package com.example.llm.config;
import io.github.resilience4j.circuitbreaker.CircuitBreaker;
import io.github.resilience4j.circuitbreaker.CircuitBreakerConfig;
import io.github.resilience4j.retry.Retry;
import io.github.resilience4j.retry.RetryConfig;
import lombok.extern.slf4j.Slf4j;
import org.springframework.context.annotation.Bean;
import org.springframework.context.annotation.Configuration;
import org.springframework.web.client.RestTemplate;
import java.time.Duration;
@Configuration
@Slf4j
public class ResilienceConfig {
@Bean
public CircuitBreaker llmCircuitBreaker() {
CircuitBreakerConfig config = CircuitBreakerConfig.custom()
.failureRateThreshold(50) // 失败率阈值50%
.slowCallRateThreshold(80) // 慢调用率阈值80%
.slowCallDurationThreshold(Duration.ofSeconds(30)) // 慢调用阈值30秒
.waitDurationInOpenState(Duration.ofMinutes(1)) // 熔断器开放时间1分钟
.permittedNumberOfCallsInHalfOpenState(3) // 半开状态允许调用次数
.slidingWindowType(CircuitBreakerConfig.SlidingWindowType.COUNT_BASED)
.slidingWindowSize(10) // 滑动窗口大小
.minimumNumberOfCalls(5) // 最小调用次数
.build();
return CircuitBreaker.of("llmService", config);
}
@Bean
public Retry llmRetry() {
RetryConfig config = RetryConfig.custom()
.maxAttempts(3) // 最大重试次数
.waitDuration(Duration.ofSeconds(2)) // 重试间隔
.retryExceptions(Exception.class) // 重试的异常类型
.ignoreExceptions(IllegalArgumentException.class) // 忽略的异常
.build();
return Retry.of("llmService", config);
}
}
```
### 应用配置
```yaml
# application.yml
spring:
application:
name: llm-spring-boot-client
server:
port: 8080
llm:
# 大模型服务地址
base-url: http://localhost:80
# 连接超时(毫秒)
connect-timeout: 10000
# 读取超时(毫秒)
read-timeout: 120000
# 熔断器配置
resilience4j:
circuitbreaker:
configs:
default:
failureRateThreshold: 50
waitDurationInOpenState: 60s
instances:
llmService:
registerHealthIndicator: true
slidingWindowSize: 10
# 日志配置
logging:
level:
com.example.llm: DEBUG
org.springframework.web.client: DEBUG
```
### Docker化Spring Boot应用
如果需要将Spring Boot应用也容器化部署,可以编写Dockerfile:
```dockerfile
# Multi-stage build
FROM eclipse-temurin:17-jdk-alpine AS builder
WORKDIR /app
# 复制Maven配置
COPY pom.xml .
COPY src ./src
# 下载依赖(利用缓存)
RUN ./mvnw dependency:go-offline -B
# 构建
RUN ./mvnw package -DskipTests -B
# 运行阶段
FROM eclipse-temurin:17-jre-alpine
WORKDIR /app
# 安全配置
RUN addgroup -S appgroup && adduser -S appuser -G appgroup
RUN chown -R appuser:appgroup /app
# 复制jar包
COPY --from=builder /app/target/*.jar app.jar
# 复制模型缓存(可选,共享HuggingFace缓存)
VOLUME ["/root/.cache/huggingface"]
USER appuser
EXPOSE 8080
ENTRYPOINT ["java", "-jar", "-Xms2g", "-Xmx4g", "-XX:+UseG1GC", "app.jar"]
```
相应的docker-compose配置:
```yaml
version: '3.8'
services:
spring-boot-app:
build: ./spring-boot-app
container_name: spring-boot-llm-client
ports:
- "8080:8080"
environment:
- LLM_BASE_URL=http://qwen7b-gateway:80
- SPRING_PROFILES_ACTIVE=production
depends_on:
- api-gateway
networks:
- qwen-net
api-gateway:
image: nginx:alpine
container_name: qwen7b-gateway
ports:
- "80:80"
volumes:
- ./nginx/nginx.conf:/etc/nginx/nginx.conf:ro
depends_on:
- qwen7b-inference
networks:
- qwen-net
qwen7b-inference:
image: vllm/vllm-openai:latest
container_name: qwen7b-inference
environment:
- MODEL_NAME=Qwen/Qwen-7B-Chat
- GPU_MEMORY_UTILIZATION=0.9
volumes:
- model_cache:/root/.cache/huggingface
deploy:
resources:
reservations:
devices:
- driver: nvidia
count: 1
capabilities: [gpu]
shm_size: '16gb'
networks:
- qwen-net
networks:
qwen-net:
driver: bridge
volumes:
model_cache:
```
## 总结
Docker容器化技术为大模型的部署提供了标准化、可复制、易扩展的解决方案。通过本文的详细介绍,我们已经覆盖了从环境配置、镜像制作、服务编排到生产部署的完整流程。
**核心要点回顾:**
1. **环境配置**:正确安装nvidia-container-toolkit是GPU容器化的前提,CUDA版本兼容性需要仔细规划。
2. **镜像制作**:选择合适的Base Image,合理利用多阶段构建减小镜像体积,通过层缓存优化构建速度。
3. **服务编排**:Docker Compose适合单主机多容器编排,Kubernetes适合大规模生产部署。
4. **性能优化**:合理的内存配置、批量推理、流式输出等优化手段可显著提升推理吞吐量。
5. **安全加固**:以非root用户运行、限制容器能力、启用TLS加密、进行安全扫描是基本的安全实践。
6. **Spring Boot对接**:通过封装统一的API客户端,Spring Boot应用可以方便地调用容器化部署的大模型服务。
随着容器化和云原生技术的持续发展,大模型的部署将变得更加简单高效。希望本文能够为你的大模型生产部署提供有价值的参考。
▲ 图3
大模型Docker镜像制作
Base Image选择策略
选择合适的基础镜像是构建大模型Docker镜像的第一步。NVIDIA官方维护的CUDA基础镜像是最佳选择,它们经过严格测试,包含了经过验证的驱动和库组合。
**Ubuntu基础镜像 vs CentOS基础镜像:** Ubuntu是目前主流的Docker镜像操作系统,拥有更广泛的软件包支持和更快的安全更新。对于需要频繁更新安全补丁的生产环境,Ubuntu是更好的选择。CentOS则以其稳定性著称,适合对系统一致性要求极高的企业级场景。
**-devel镜像 vs runtime镜像:** NVIDIA CUDA镜像分为`devel`和`runtime`两个版本。`devel`镜像包含完整的编译工具链(gcc、nvcc等),体积较大(约十几GB),适合需要编译CUDA程序或构建依赖CUDA的程序场景。`runtime`镜像只包含运行时库,体积较小(约5GB),适合直接运行已编译好的CUDA程序。对于大模型推理服务,推荐使用`runtime`镜像以减小镜像体积和攻击面。
** alpine基础镜像的局限性:** 部分大模型官方镜像使用alpine作为基础系统以减小体积。但alpine的libc为musl而非glibc,可能导致某些Python扩展(如numpy、scipy的底层C库)编译或运行问题。如果遇到奇怪的动态链接错误,可能需要切换到Ubuntu或CentOS基础镜像。
CUDA版本与依赖环境配置
构建大模型Docker镜像时,需要在Dockerfile中显式指定CUDA版本和必要的依赖环境。以下是一个典型的Dockerfile结构:
### 集群模式部署配置
对于大规模推理服务,需要支持多实例部署和负载均衡。以下是一个支持水平扩展的集群部署配置:
```yaml
# docker-compose-cluster.yml
version: '3.8'
services:
# vLLM推理实例1
vllm-1:
image: vllm/vllm-openai:latest
container_name: vllm-1
environment:
- MODEL_NAME=Qwen/Qwen-7B-Chat
- GPU_MEMORY_UTILIZATION=0.85
- MAX_MODEL_LEN=8192
volumes:
- model_cache:/root/.cache/huggingface
deploy:
resources:
reservations:
devices:
- driver: nvidia
count: 1
capabilities: [gpu]
networks:
- llm-net
ports:
- "8001:8000"
healthcheck:
test: ["CMD", "curl", "-f", "http://localhost:8000/health"]
interval: 30s
timeout: 10s
retries: 3
start_period: 180s
# vLLM推理实例2
vllm-2:
image: vllm/vllm-openai:latest
container_name: vllm-2
environment:
- MODEL_NAME=Qwen/Qwen-7B-Chat
- GPU_MEMORY_UTILIZATION=0.85
- MAX_MODEL_LEN=8192
volumes:
- model_cache:/root/.cache/huggingface
deploy:
resources:
reservations:
devices:
- driver: nvidia
count: 1
capabilities: [gpu]
networks:
- llm-net
ports:
- "8002:8000"
healthcheck:
test: ["CMD", "curl", "-f", "http://localhost:8000/health"]
interval: 30s
timeout: 10s
retries: 3
start_period: 180s
# HAProxy负载均衡
haproxy:
image: haproxy:alpine
container_name: haproxy
ports:
- "80:8080"
- "8404:8404" # HAProxy stats page
volumes:
- ./haproxy.cfg:/usr/local/etc/haproxy/haproxy.cfg:ro
depends_on:
- vllm-1
- vllm-2
networks:
- llm-net
healthcheck:
test: ["CMD", "haproxy", "-c", "-f", "/usr/local/etc/haproxy/haproxy.cfg"]
interval: 30s
timeout: 10s
retries: 3
# Redis Session存储
redis:
image: redis:7-alpine
container_name: redis-session
command: redis-server --appendonly yes --maxmemory 4gb --maxmemory-policy allkeys-lru
volumes:
- redis_data:/data
networks:
- llm-net
ports:
- "6379:6379"
healthcheck:
test: ["CMD", "redis-cli", "ping"]
interval: 10s
timeout: 5s
retries: 3
networks:
llm-net:
driver: bridge
volumes:
model_cache:
redis_data:
```
HAProxy配置(haproxy.cfg):
```cfg
global
log stdout format raw local0
maxconn 4096
stats socket /var/run/hapee-listen.sock mode 600 level admin
stats timeout 2m
defaults
log global
mode http
option httplog
option dontlognull
option http-server-close
option forwardfor except 127.0.0.0/8
timeout connect 30s
timeout client 180s
timeout server 300s
timeout tunnel 600s
timeout check 5s
# 统计页面
listen stats
bind *:8404
mode http
stats enable
stats uri /
stats refresh 30s
# 推理服务负载均衡
frontend llm_frontend
bind *:8080
default_backend llm_backend
backend llm_backend
mode http
balance roundrobin
option tcp-check
tcp-check connect
tcp-check expect string X-Request-Id
# vLLM实例
server vllm1 vllm-1:8000 check inter 30s rise 2 fall 3 weight 100
server vllm2 vllm-2:8000 check inter 30s rise 2 fall 3 weight 100
# 健康检查
http-check expect status 200
option httpchk GET /health
http-check expect string OK
# 响应超时
timeout server 300s
# 会话保持
stick-table type string len 32 size 100k expire 30m
stick on req.cookie(X-Session-Id)
# 监控端点
frontend monitoring
bind *:8081
mode http
default_backend metrics_backend
backend metrics_backend
mode http
stats enable
stats uri /stats
stats realm Haproxy\ Statistics
stats auth admin:admin
```
## 容器化性能优化
### 内存与显存配置优化
大模型推理是内存密集型任务,合理配置内存和显存参数对性能影响显著。以下是各主要推理框架的内存优化配置:
**vLLM内存配置:**
```yaml
environment:
- GPU_MEMORY_UTILIZATION=0.9 # GPU显存使用率(默认0.9)
- MAX_MODEL_LEN=8192 # 最大模型长度
- KV_CACHE_FP8_QUANTIZED=true # KV缓存量化(需要GPU支持)
- BLOCK_SIZE=16 # KV缓存块大小
- NUM_PREEMPTIVE_SAMPLES=4 # 抢占式采样数
```
`GPU_MEMORY_UTILIZATION`控制vLLM可以使用的GPU显存比例。默认值0.9预留10%显存用于KV缓存和其他开销。如果遇到OOM错误,可以适当降低到0.8或0.7。
**PyTorch内存配置:**
```python
import torch
# 开启梯度检查点以节省显存
model.gradient_checkpointing_enable()
# 设置PyTorch内存分配器策略
torch.cuda.set_per_process_memory_fraction(0.9)
# 启用TF32计算(Ampere架构GPU)
torch.backends.cuda.matmul.allow_tf32 = True
torch.backends.cudnn.allow_tf32 = True
```
**Transformer模型内存优化:**
```python
from transformers import AutoModelForCausalLM
# 启用Flash Attention(需要安装flash-attn)
model = AutoModelForCausalLM.from_pretrained(
"Qwen/Qwen-7B-Chat",
device_map="auto",
torch_dtype=torch.float16,
use_flash_attention_2=True # 需要flash-attn包
)
# 4-bit量化加载
from transformers import BitsAndBytesConfig
quantization_config = BitsAndBytesConfig(
load_in_4bit=True,
bnb_4bit_compute_dtype=torch.float16,
bnb_4bit_use_double_quant=True,
bnb_4bit_quant_type="nf4"
)
model = AutoModelForCausalLM.from_pretrained(
"Qwen/Qwen-7B-Chat",
quantization_config=quantization_config,
device_map="auto"
)
```
### GPU分配策略
在多GPU环境下,选择合适的GPU分配策略对整体吞吐量至关重要。
**单GPU单容器**是最简单的部署模式,适合模型可以完整加载到单张GPU的场景。配置简单,但GPU利用率可能不够高:
```yaml
deploy:
resources:
reservations:
devices:
- driver: nvidia
count: 1
capabilities: [gpu]
```
**多GPU张量并行**将单个模型的权重分布到多张GPU上,适合超大模型或需要极致吞吐量的场景:
```bash
# 使用vLLM的张量并行
docker run --gpus '"device=0,1,2,3"' \
-e TENSOR_PARALLEL_SIZE=4 \
vllm/vllm-openai:latest
```
**多实例负载均衡**在每张GPU上运行独立的模型实例,通过负载均衡器分发请求。这种方式的吞吐量通常高于张量并行,因为每个实例可以独立进行批量处理:
```yaml
services:
vllm-gpu0:
# ...配置...
deploy:
resources:
reservations:
devices:
- driver: nvidia
count: 1
capabilities: [gpu]
environment:
- CUDA_VISIBLE_DEVICES=0
vllm-gpu1:
# ...配置...
deploy:
resources:
reservations:
devices:
- driver: nvidia
count: 1
capabilities: [gpu]
environment:
- CUDA_VISIBLE_DEVICES=1
```
### 批量推理优化
批量推理是提高GPU利用率的有效手段。合理的批处理配置可以将吞吐量提升数倍。
**动态批处理(Dynamic Batching)**由推理服务框架自动管理,自动将多个请求合并成批次处理:
```yaml
environment:
# vLLM动态批处理配置
- MAX_NUM_BATCHED_TOKENS=8192 # 单批次最大token数
- MAX_NUM_SEQUENCES=256 # 单批次最大序列数
- SERVING_NAME=Qwen-7B # 模型名称
```
**连续批处理(Continuous Batching)**是vLLM的默认批处理策略,允许在生成过程中动态添加新请求,无需等待整个批次完成:
```python
# vLLM连续批处理示例
from vllm import LLM, SamplingParams
llm = LLM(model="Qwen/Qwen-7B-Chat")
# 批量推理请求
prompts = [
"请介绍一下Docker: ",
"什么是Kubernetes: ",
"解释一下微服务架构: "
]
sampling_params = SamplingParams(
temperature=0.7,
top_p=0.95,
max_tokens=512,
stop=["\n", "用户:", "assistant:"]
)
# 批量生成
outputs = llm.generate(prompts, sampling_params)
for output in outputs:
prompt = output.prompt
generated_text = output.outputs[0].text
print(f"Prompt: {prompt!r}, Generated text: {generated_text!r}")
```
**预批处理(Prefix Caching)**对于具有相同系统提示的对话场景,可以复用已计算的KV缓存,显著降低首token延迟:
```yaml
environment:
- ENABLE_PREFIX_CACHING=true # 启用前缀缓存
- NUM_SCHEDULER_STEPS=8 # 调度步数
```
### 推理延迟优化
在线推理场景对延迟敏感,需要综合优化以降低响应时间。
**流式输出**允许在生成过程中就开始返回token,显著降低用户的感知延迟:
```python
# 使用流式输出
from vllm import LLM, SamplingParams
llm = LLM(model="Qwen/Qwen-7B-Chat")
sampling_params = SamplingParams(
temperature=0.7,
max_tokens=1024,
stream=True # 启用流式输出
)
# 流式生成
for output in llm.generate(["请介绍一下人工智能的发展历史"], sampling_params):
# output包含已生成的token
print(output.outputs[0].text, end="", flush=True)
```
**KV缓存量化**可以显著减少显存占用,允许更大的批量或更长的上下文:
```yaml
environment:
- KV_CACHE_DTYPE=fp8 # KV缓存数据类型
```
**CUDA Graph**通过捕获和重放GPU操作来减少内核启动开销:
```yaml
environment:
- ENABLE_CHUNKED_PREFILL=false # 禁用分块预填充以降低延迟
```
## Docker安全加固
### 容器安全基础配置
大模型推理服务通常处理敏感数据,容器安全加固至关重要。
**以非root用户运行容器**是基本的安全最佳实践:
```dockerfile
# Dockerfile中添加
RUN groupadd -r llmuser && useradd -r -g llmuser llmuser
# ... 安装依赖 ...
USER llmuser
WORKDIR /home/llmuser
CMD ["python", "app.py"]
```
docker-compose.yml中也可以指定运行用户:
```yaml
services:
vllm-backend:
image: vllm/vllm-openai:latest
user: "1000:1000" # 指定UID:GID
security_opt:
- no-new-privileges:true
cap_drop:
- ALL
```
**限制容器能力**通过`cap_drop`移除不必要的Linux能力:
```yaml
services:
vllm-backend:
image: vllm/vllm-openai:latest
cap_drop:
- ALL
cap_add:
- NET_BIND_SERVICE # 仅添加需要的capability
```
**启用SELinux/AppArmor**为容器提供额外的访问控制:
```bash
# Docker运行时的AppArmor配置
docker run --security-opt "apparmor=docker-default" \
--gpus all \
vllm/vllm-openai:latest
```
### 网络安全配置
限制容器的网络访问可以减少攻击面。
**使用自定义网络**隔离容器通信:
```yaml
networks:
llm-internal:
driver: bridge
internal: true # 禁止容器访问外部网络
llm-public:
driver: bridge
```
不同服务分配到不同网络层:
```yaml
services:
# 仅内部网络访问的推理服务
vllm-backend:
networks:
- llm-internal
# 不暴露任何端口
# 可访问公网的API网关
api-gateway:
networks:
- llm-public
- llm-internal
ports:
- "80:80"
```
**TLS/SSL加密**保护传输中的数据:
```yaml
services:
api-gateway:
image: nginx:alpine
volumes:
- ./ssl/cert.pem:/etc/nginx/ssl/cert.pem:ro
- ./ssl/key.pem:/etc/nginx/ssl/key.pem:ro
command: |
nginx -c /etc/nginx/nginx.conf -g 'daemon off;'
```
### 镜像安全扫描
构建和部署前扫描镜像漏洞是安全流程的重要环节。
**使用Trivy扫描镜像:**
```bash
# 安装Trivy
docker run --rm -v /var/run/docker.sock:/var/run/docker.sock \
aquasec/trivy image vllm/vllm-openai:latest
# 扫描已知漏洞
docker run --rm -v /var/run/docker.sock:/var/run/docker.sock \
aquasec/trivy image --severity HIGH,CRITICAL \
vllm/vllm-openai:latest
# 输出漏洞报告
docker run --rm -v /var/run/docker.sock:/var/run/docker.sock \
-v ./reports:/reports \
aquasec/trivy image \
--format json --output /reports/vuln-report.json \
vllm/vllm-openai:latest
```
**Docker Scout**是Docker官方提供的镜像安全分析工具:
```bash
# 登录Docker Hub
docker scout login
# 分析镜像
docker scout cves vllm/vllm-openai:latest
# 比较两个镜像版本
docker scout compare \
--from vllm/vllm-openai:0.1 \
--to vllm/vllm-openai:0.2
```
**CI/CD集成安全扫描:**
```yaml
# .github/workflows/security-scan.yml
name: Security Scan
on: [push, pull_request]
jobs:
trivy-scan:
runs-on: ubuntu-latest
steps:
- name: Checkout code
uses: actions/checkout@v4
- name: Run Trivy vulnerability scanner
uses: aquasecurity/trivy-action@master
with:
image-ref: 'vllm/vllm-openai:latest'
format: 'sarif'
output: 'trivy-results.sarif'
severity: 'CRITICAL,HIGH'
- name: Upload Trivy results to GitHub Security tab
uses: github/codeql-action/upload-sarif@v2
with:
sarif_file: 'trivy-results.sarif'
```
### 运行时安全监控
部署后的容器安全监控同样重要。
**Docker内置安全审计:**
```bash
# 查看容器运行状态
docker stats
# 检查容器权限
docker inspect --format '{{.HostConfig.Privileged}}' <container>
# 查看容器的Linux capabilities
docker inspect --format '{{.HostConfig.CapAdd}}' <container>
```
**Falco**是CNCF旗下的容器运行时安全监控工具:
```yaml
# docker-compose-falco.yml
version: '3.8'
services:
falco:
image: falcosecurity/falco:latest
container_name: falco
privileged: true
volumes:
- /var/run/docker.sock:/var/run/docker.sock
- /host:/host:ro
- ./falco-rules.yaml:/etc/falco/falco_rules.yaml:ro
environment:
- FALCO菲尔斯_ENABLED=true
network_mode: host
```
Falco规则示例(falco-rules.yaml):
```yaml
# 检测容器内运行shell
- rule: Shell spawned in container
desc: A shell was spawned by a non-shell program in a container
condition: >
spawned_process and
container and
proc.name = bash
output: >
Shell spawn detected (user=%user.name container_id=%container.id
container_name=%container.name shell=%proc.name parent=%proc.pname
cmdline=%proc.cmdline)
priority: NOTICE
# 检测特权容器
- rule: Privileged container started
desc: Privileged container started
condition: >
container and
container.privileged = true
output: >
Privileged container started (id=%container.id
image=%container.image.repository
user=%user.name)
priority: CRITICAL
```
## Kubernetes部署大模型
### kubectl基础配置
Kubernetes(K8s)是生产级容器编排的事实标准,掌握kubectl基础操作是部署大模型的必备技能。
**集群上下文配置:**
```bash
# 查看当前集群上下文
kubectl config current-context
# 列出所有上下文
kubectl config get-contexts
# 切换上下文
kubectl config use-context production-cluster
# 查看集群信息
kubectl cluster-info
```
**Namespace管理:**
```bash
# 创建命名空间
kubectl create namespace llm-production
# 切换默认命名空间
kubectl config set-context --current --namespace=llm-production
# 在指定命名空间操作
kubectl get pods -n llm-production
```
**Deployment创建:**
```yaml
# llm-deployment.yaml
apiVersion: apps/v1
kind: Deployment
metadata:
name: qwen-7b-deployment
namespace: llm-production
labels:
app: qwen-7b
version: v1
spec:
replicas: 2
selector:
matchLabels:
app: qwen-7b
template:
metadata:
labels:
app: qwen-7b
version: v1
spec:
containers:
- name: vllm
image: vllm/vllm-openai:latest
ports:
- containerPort: 8000
name: http
env:
- name: MODEL_NAME
value: "Qwen/Qwen-7B-Chat"
- name: GPU_MEMORY_UTILIZATION
value: "0.85"
resources:
limits:
nvidia.com/gpu: 1
memory: "32Gi"
cpu: "8"
requests:
nvidia.com/gpu: 1
memory: "16Gi"
cpu: "4"
env:
- name: NVIDIA_VISIBLE_DEVICES
value: "all"
- name: CUDA_VISIBLE_DEVICES
value: "all"
livenessProbe:
httpGet:
path: /health
port: 8000
initialDelaySeconds: 60
periodSeconds: 30
readinessProbe:
httpGet:
path: /health
port: 8000
initialDelaySeconds: 30
periodSeconds: 10
nodeSelector:
gpu-type: nvidia-rtx4090
tolerations:
- key: "nvidia.com/gpu"
operator: "Exists"
effect: "NoSchedule"
```
**Service创建:**
```yaml
# llm-service.yaml
apiVersion: v1
kind: Service
metadata:
name: qwen-7b-service
namespace: llm-production
spec:
type: ClusterIP
selector:
app: qwen-7b
ports:
- name: http
port: 8000
targetPort: 8000
protocol: TCP
```
**应用配置:**
```bash
kubectl apply -f llm-deployment.yaml
kubectl apply -f llm-service.yaml
# 查看部署状态
kubectl get deployments -n llm-production
kubectl get pods -n llm-production
# 查看日志
kubectl logs -n llm-production -l app=qwen-7b --tail=100
# 扩缩容
kubectl scale deployment qwen-7b-deployment --replicas=4 -n llm-production
# 更新镜像版本
kubectl set image deployment/qwen-7b-deployment \
vllm=vllm/vllm-openai:v0.2.0 -n llm-production
# 回滚
kubectl rollout undo deployment/qwen-7b-deployment -n llm-production
```
### Helm Chart部署
Helm是Kubernetes的包管理工具,使用Helm Chart可以简化大模型服务的部署和配置管理。
**安装Helm:**
```bash
# Linux/macOS
curl -fsSL https://get.helm.sh/helm-v3.14.0-linux-amd64.tar.gz | tar -xz
sudo mv linux-amd64/helm /usr/local/bin/helm
# Windows (使用Chocolatey)
choco install kubernetes-helm
```
**创建Helm Chart:**
```bash
helm create llm-service
cd llm-service
```
**Chart目录结构:**
```
llm-service/
├── Chart.yaml
├── values.yaml
├── templates/
│ ├── deployment.yaml
│ ├── service.yaml
│ ├── ingress.yaml
│ └── _helpers.tpl
└── .helmignore
```
**Chart.yaml:**
```yaml
apiVersion: v2
name: llm-service
description: A Helm chart for LLM inference service
type: application
version: 1.0.0
appVersion: "latest"
keywords:
- llm
- vllm
- inference
maintainers:
- name: LLM Team
email: llm-team@example.com
dependencies:
- name: common
version: "1.x.x"
repository: "https://charts.bitnami.com/bitnami"
```
**values.yaml:**
```yaml
replicaCount: 2
image:
repository: vllm/vllm-openai
tag: latest
pullPolicy: IfNotPresent
service:
type: ClusterIP
port: 8000
resources:
limits:
nvidia.com/gpu: 1
memory: 32Gi
cpu: 8
requests:
nvidia.com/gpu: 1
memory: 16Gi
cpu: 4
env:
MODEL_NAME: "Qwen/Qwen-7B-Chat"
GPU_MEMORY_UTILIZATION: "0.85"
MAX_MODEL_LEN: "8192"
autoscaling:
enabled: true
minReplicas: 1
maxReplicas: 10
targetCPUUtilizationPercentage: 70
targetMemoryUtilizationPercentage: 80
ingress:
enabled: true
className: nginx
annotations:
cert-manager.io/cluster-issuer: letsencrypt-prod
hosts:
- host: llm.example.com
paths:
- path: /
pathType: Prefix
tls:
- secretName: llm-tls
hosts:
- llm.example.com
persistence:
enabled: true
storageClass: nfs-client
size: 100Gi
nodeSelector:
gpu-type: nvidia-rtx4090
tolerations:
- key: "nvidia.com/gpu"
operator: "Exists"
effect: "NoSchedule"
affinity:
podAntiAffinity:
preferredDuringSchedulingIgnoredDuringExecution:
- weight: 100
podAffinityTerm:
labelSelector:
matchExpressions:
- key: app
operator: In
values:
- llm-service
topologyKey: kubernetes.io/hostname
```
**部署Helm Chart:**
```bash
# 添加依赖
helm dependency build llm-service
# 部署
helm install qwen-7b llm-service \
--namespace llm-production \
--create-namespace \
--values llm-service/values.yaml
# 升级
helm upgrade qwen-7b llm-service \
--namespace llm-production \
--values llm-service/values-prod.yaml
# 查看部署状态
helm status qwen-7b -n llm-production
# 列出部署
helm list -n llm-production
# 删除部署
helm uninstall qwen-7b -n llm-production
```
### GPU调度与资源管理
Kubernetes原生支持GPU调度,但需要正确配置才能生效。
**检查GPU资源:**
```bash
# 查看节点GPU信息
kubectl describe nodes | grep -A 10 "nvidia.com/gpu"
# 查看GPU可用数量
kubectl get nodes -o jsonpath='{range .items[*]}{.metadata.name}{"\t"}{.status.allocatable.nvidia\.com/gpu}{"\n"}{end}'
```
**GPU配额管理:**
```yaml
# ResourceQuota限制命名空间GPU使用
apiVersion: v1
kind: ResourceQuota
metadata:
name: llm-gpu-quota
namespace: llm-production
spec:
hard:
requests.nvidia.com/gpu: "4"
limits.nvidia.com/gpu: "4"
---
# LimitRange设置默认值
apiVersion: v1
kind: LimitRange
metadata:
name: llm-limits
namespace: llm-production
spec:
limits:
- max:
nvidia.com/gpu: 2
default:
nvidia.com/gpu: 1
defaultRequest:
nvidia.com/gpu: 1
type: Container
```
**时间片调度(Time Slicing):** 在共享GPU集群中,可以让多个容器分时使用同一张GPU:
```yaml
# device-plugin配置
apiVersion: apps/v1
kind: ConfigMap
metadata:
name: nvidia-device-plugin-config
namespace: gpu-operator
data:
config.yaml: |
version: v1
sharing:
timeSlicing:
resources:
- name: nvidia.com/gpu
replicas: 4 # 将1张GPU划分为4个时间片
```
### 监控与日志集成
生产环境需要完善的监控和日志系统。
**Prometheus监控:**
```yaml
# prometheus-config.yaml
apiVersion: v1
kind: ConfigMap
metadata:
name: prometheus-config
namespace: monitoring
data:
prometheus.yml: |
global:
scrape_interval: 15s
scrape_configs:
- job_name: 'vllm'
static_configs:
- targets: ['vllm-service.llm-production:8000']
metrics_path: /metrics
```
**Grafana仪表板:**
```yaml
# grafana-dashboard.yaml
apiVersion: v1
kind: ConfigMap
metadata:
name: vllm-grafana-dashboard
namespace: monitoring
labels:
grafana_dashboard: "1"
data:
vllm-dashboard.json: |
{
"dashboard": {
"title": "vLLM Inference Dashboard",
"panels": [
{
"title": "Requests per Second",
"type": "graph",
"targets": [
{
"expr": "rate(vllm_requests_total[5m])",
"legendFormat": "{{model}}"
}
]
},
{
"title": "Average Latency",
"type": "graph",
"targets": [
{
"expr": "histogram_quantile(0.95, rate(vllm_request_duration_seconds_bucket[5m]))",
"legendFormat": "p95"
}
]
},
{
"title": "GPU Memory Usage",
"type": "graph",
"targets": [
{
"expr": "vllm_gpu_memory_usage_bytes / vllm_gpu_memory_total_bytes",
"legendFormat": "Used {{gpu}}"
}
]
}
]
}
}
```
## 实战案例:docker-compose一键部署Qwen-7B推理服务
图4
deployment_flow.png
### 环境准备
在开始部署前,需要确保环境满足以下要求:
**硬件要求:** NVIDIA GPU(至少16GB显存,推荐RTX 4080或更高),8核以上CPU,32GB系统内存,100GB可用磁盘空间。
**软件要求:** Ubuntu 20.04+或CentOS 8+,NVIDIA Driver 535+,Docker 24+,NVIDIA Container Toolkit。
**环境验证:**
```bash
# 检查NVIDIA驱动
nvidia-smi
# 预期输出应显示GPU型号和驱动版本
# 检查Docker
docker --version
# 预期输出:Docker version 24.x.x
# 检查nvidia-container-toolkit
docker run --rm --gpus all nvidia/cuda:12.1.1-base-ubuntu22.04 nvidia-smi
# 预期输出应显示GPU信息
```
### 编写docker-compose配置
创建项目目录并编写docker-compose.yml:
```bash
mkdir -p ~/llm-deploy/qwen-7b
cd ~/llm-deploy/qwen-7b
```
```yaml
# docker-compose.yml
version: '3.8'
services:
# Qwen-7B推理服务
qwen7b-inference:
image: vllm/vllm-openai:latest
container_name: qwen7b-inference
hostname: qwen7b-inference
ports:
- "8000:8000"
environment:
# 模型配置
- MODEL_NAME=Qwen/Qwen-7B-Chat
- TOKENIZER=Qwen/Qwen-7B-Chat
# 性能优化
- GPU_MEMORY_UTILIZATION=0.9
- MAX_MODEL_LEN=8192
- MAX_NUM_BATCHED_TOKENS=8192
- MAX_NUM_SEQUENCES=256
# 推理优化
- ENABLE_CHUNKED_PREFILL=true
- ENABLE_PREFIX_CACHING=true
# GPU配置
- NVIDIA_VISIBLE_DEVICES=all
- CUDA_VISIBLE_DEVICES=all
# 日志配置
- LOG_LEVEL=INFO
volumes:
# HuggingFace模型缓存(避免重复下载)
- model_cache:/root/.cache/huggingface
# vLLM服务日志
- ./logs:/var/log/vllm
deploy:
resources:
reservations:
devices:
- driver: nvidia
count: 1
capabilities: [gpu]
shm_size: '16gb' # 共享内存(对vLLM重要)
restart: unless-stopped
healthcheck:
test: ["CMD", "curl", "-f", "http://localhost:8000/health"]
interval: 30s
timeout: 10s
retries: 3
start_period: 300s
networks:
- qwen-net
# API网关(Nginx)
api-gateway:
image: nginx:alpine
container_name: qwen7b-gateway
ports:
- "80:80"
- "443:443"
volumes:
- ./nginx/nginx.conf:/etc/nginx/nginx.conf:ro
- ./nginx/ssl:/etc/nginx/ssl:ro
depends_on:
qwen7b-inference:
condition: service_healthy
restart: unless-stopped
networks:
- qwen-net
# Prometheus监控
prometheus:
image: prom/prometheus:latest
container_name: qwen7b-prometheus
ports:
- "9090:9090"
volumes:
- ./prometheus/prometheus.yml:/etc/prometheus/prometheus.yml:ro
- ./prometheus/prometheus_data:/prometheus
command:
- '--config.file=/etc/prometheus/prometheus.yml'
- '--storage.tsdb.path=/prometheus'
- '--web.console.libraries=/etc/prometheus/console_libraries'
- '--web.console.templates=/etc/prometheus/consoles'
restart: unless-stopped
networks:
- qwen-net
# Grafana可视化
grafana:
image: grafana/grafana:latest
container_name: qwen7b-grafana
ports:
- "3000:3000"
environment:
- GF_SECURITY_ADMIN_USER=admin
- GF_SECURITY_ADMIN_PASSWORD=admin123
- GF_USERS_ALLOW_SIGN_UP=false
volumes:
- ./grafana/provisioning:/etc/grafana/provisioning:ro
- ./grafana/dashboards:/var/lib/grafana/dashboards
- ./grafana/data:/var/lib/grafana
depends_on:
- prometheus
restart: unless-stopped
networks:
- qwen-net
networks:
qwen-net:
driver: bridge
volumes:
model_cache:
```
### Nginx配置
```bash
mkdir -p nginx ssl prometheus grafana/provisioning/datasources grafana/provisioning/dashboards grafana/dashboards logs
```
```nginx
# nginx/nginx.conf
events {
worker_connections 1024;
}
http {
include /etc/nginx/mime.types;
default_type application/octet-stream;
# 日志格式
log_format main '$remote_addr - $remote_user [$time_local] "$request" '
'$status $body_bytes_sent "$http_referer" '
'"$http_user_agent" "$http_x_forwarded_for" '
'rt=$request_time uct="$upstream_connect_time" '
'uht="$upstream_header_time" urt="$upstream_response_time"';
access_log /var/log/nginx/access.log main;
error_log /var/log/nginx/error.log warn;
# 性能优化
sendfile on;
tcp_nopush on;
tcp_nodelay on;
keepalive_timeout 65;
types_hash_max_size 2048;
# Gzip压缩
gzip on;
gzip_vary on;
gzip_proxied any;
gzip_comp_level 6;
gzip_types text/plain text/css text/xml application/json application/javascript application/rss+xml application/atom+xml image/svg+xml;
# 限流配置
limit_req_zone $binary_remote_addr zone=api_limit:10m rate=30r/s;
limit_conn_zone $binary_remote_addr zone=conn_limit:10m;
upstream vllm_backend {
server qwen7b-inference:8000;
keepalive 64;
}
server {
listen 80;
server_name _;
# 健康检查
location /health {
access_log off;
return 200 "OK";
add_header Content-Type text/plain;
}
# OpenAI兼容API - Chat Completions
location /v1/chat/completions {
limit_req zone=api_limit burst=50 nodelay;
limit_conn conn_limit 10;
proxy_pass http://vllm_backend;
proxy_http_version 1.1;
# 代理头设置
proxy_set_header Host $host;
proxy_set_header X-Real-IP $remote_addr;
proxy_set_header X-Forwarded-For $proxy_add_x_forwarded_for;
proxy_set_header X-Forwarded-Proto $scheme;
# 流式响应(关键配置)
proxy_buffering off;
proxy_cache off;
proxy_read_timeout 300s;
proxy_connect_timeout 60s;
proxy_send_timeout 300s;
# SSE必需配置
proxy_set_header Connection '';
chunked_transfer_encoding on;
# 记录响应时间
add_header X-Response-Time $upstream_response_time;
}
# OpenAI兼容API - Completions
location /v1/completions {
limit_req zone=api_limit burst=50 nodelay;
limit_conn conn_limit 10;
proxy_pass http://vllm_backend;
proxy_http_version 1.1;
proxy_set_header Host $host;
proxy_set_header X-Real-IP $remote_addr;
proxy_set_header X-Forwarded-For $proxy_add_x_forwarded_for;
proxy_set_header X-Forwarded-Proto $scheme;
proxy_buffering off;
proxy_cache off;
proxy_read_timeout 300s;
proxy_set_header Connection '';
chunked_transfer_encoding on;
}
# 模型列表
location /v1/models {
proxy_pass http://vllm_backend;
proxy_http_version 1.1;
proxy_set_header Host $host;
proxy_set_header X-Real-IP $remote_addr;
}
# vLLM直接接口
location /v1 {
proxy_pass http://vllm_backend;
proxy_http_version 1.1;
proxy_set_header Host $host;
proxy_set_header X-Real-IP $remote_addr;
proxy_set_header X-Forwarded-For $proxy_add_x_forwarded_for;
proxy_set_header X-Forwarded-Proto $scheme;
}
# Prometheus指标(仅内网访问)
location /metrics {
proxy_pass http://prometheus:9090;
proxy_set_header Host $host;
allow 127.0.0.1;
allow 10.0.0.0/8;
allow 172.16.0.0/12;
deny all;
}
}
}
```
### Prometheus配置
```yaml
# prometheus/prometheus.yml
global:
scrape_interval: 15s
evaluation_interval: 15s
scrape_configs:
- job_name: 'vllm'
static_configs:
- targets: ['qwen7b-inference:8000']
metrics_path: '/metrics'
scrape_interval: 10s
```
### 启动服务
```bash
# 进入项目目录
cd ~/llm-deploy/qwen-7b
# 拉取镜像(提前完成,节省首次启动时间)
docker-compose pull
# 启动服务(后台运行)
docker-compose up -d
# 查看服务状态
docker-compose ps
# 查看日志
docker-compose logs -f qwen7b-inference
# 等待服务就绪后测试
# 首次启动需要下载模型,可能需要几分钟
sleep 120
# 健康检查
curl http://localhost:8000/health
# 模型列表
curl http://localhost:8000/v1/models
# 测试推理
curl -X POST http://localhost:8000/v1/chat/completions \
-H "Content-Type: application/json" \
-d '{
"model": "Qwen/Qwen-7B-Chat",
"messages": [
{"role": "system", "content": "你是一个有帮助的AI助手。"},
{"role": "user", "content": "请介绍一下Docker容器化技术的优势。"}
],
"max_tokens": 512,
"temperature": 0.7
}'
```
### 性能测试
```bash
# 安装测试工具
pip install locust
# 创建负载测试脚本 locustfile.py
cat > locustfile.py << 'EOF'
from locust import HttpUser, task, between
import json
class LLMUser(HttpUser):
wait_time = between(1, 3)
host = "http://localhost"
@task(3)
def chat_completion(self):
payload = {
"model": "Qwen/Qwen-7B-Chat",
"messages": [
{"role": "system", "content": "你是一个有帮助的AI助手。"},
{"role": "user", "content": "请用100字介绍一下人工智能。"}
],
"max_tokens": 200,
"temperature": 0.7,
"stream": False
}
with self.client.post(
"/v1/chat/completions",
json=payload,
catch_response=True
) as response:
if response.status_code == 200:
response.success()
else:
response.failure(f"Failed with status {response.status_code}")
@task(1)
def chat_completion_stream(self):
payload = {
"model": "Qwen/Qwen-7B-Chat",
"messages": [
{"role": "user", "content": "解释一下什么是机器学习。"}
],
"max_tokens": 256,
"temperature": 0.7,
"stream": True
}
with self.client.post(
"/v1/chat/completions",
json=payload,
catch_response=True
) as response:
if response.status_code == 200:
response.success()
else:
response.failure(f"Failed with status {response.status_code}")
EOF
# 运行负载测试(10个并发用户,持续60秒)
locust -f locustfile.py --headless -u 10 -r 2 -t 60s --csv results
# Web界面测试(可选)
locust -f locustfile.py --web-port 8089
```
## 容器化后的Spring Boot对接方案
### 概述
在企业级应用中,Java/Spring Boot仍然是主流的后端开发框架。将大模型推理服务容器化部署后,如何在Spring Boot应用中对接使用是开发者普遍关心的问题。
### RestTemplate对接方案
最直接的对接方式是使用Spring的RestTemplate或WebClient调用大模型API:
```java
package com.example.llm.config;
import org.springframework.context.annotation.Bean;
import org.springframework.context.annotation.Configuration;
import org.springframework.http.client.SimpleClientHttpRequestFactory;
import org.springframework.web.client.RestTemplate;
@Configuration
public class RestTemplateConfig {
@Bean
public RestTemplate restTemplate() {
SimpleClientHttpRequestFactory factory = new SimpleClientHttpRequestFactory();
factory.setConnectTimeout(10000); // 连接超时10秒
factory.setReadTimeout(120000); // 读取超时120秒(大模型推理可能较长)
factory.setBufferRequestBody(true);
return new RestTemplate(factory);
}
}
```
### OpenAI兼容客户端封装
为了方便对接支持OpenAI协议的大模型服务,封装一个统一的客户端:
```java
package com.example.llm.client;
import com.fasterxml.jackson.annotation.JsonProperty;
import lombok.Data;
import lombok.Builder;
import lombok.AllArgsConstructor;
import lombok.NoArgsConstructor;
import java.util.List;
import java.util.Map;
public class LLMClient {
private final RestTemplate restTemplate;
private final String baseUrl;
public LLMClient(RestTemplate restTemplate, String baseUrl) {
this.restTemplate = restTemplate;
this.baseUrl = baseUrl;
}
/**
* 聊天补全
*/
public ChatCompletionResponse chatCompletion(ChatCompletionRequest request) {
String url = baseUrl + "/v1/chat/completions";
HttpHeaders headers = new HttpHeaders();
headers.setContentType(MediaType.APPLICATION_JSON);
HttpEntity<ChatCompletionRequest> entity = new HttpEntity<>(request, headers);
ResponseEntity<ChatCompletionResponse> response = restTemplate.exchange(
url,
HttpMethod.POST,
entity,
ChatCompletionResponse.class
);
return response.getBody();
}
/**
* 流式聊天补全
*/
public Flux<String> chatCompletionStream(ChatCompletionRequest request) {
String url = baseUrl + "/v1/chat/completions";
HttpHeaders headers = new HttpHeaders();
headers.setContentType(MediaType.APPLICATION_JSON);
headers.setAccept(MediaType.TEXT_EVENT_STREAM);
HttpEntity<ChatCompletionRequest> entity = new HttpEntity<>(request, headers);
ParameterizedTypeReference<ServerSentEvent<String>> type = new ParameterizedTypeReference<>() {};
return restTemplate.exchange(
url,
HttpMethod.POST,
entity,
new ParameterizedTypeReference<ServerSentEvent<String>>() {}
)
.getBody()
.stream()
.map(ServerSentEvent::data);
}
@Data
@Builder
@NoArgsConstructor
@AllArgsConstructor
public static class ChatCompletionRequest {
private String model;
private List<Message> messages;
private Double temperature;
@JsonProperty("max_tokens")
private Integer maxTokens;
@JsonProperty("top_p")
private Double topP;
private Boolean stream;
private List<String> stop;
}
@Data
@Builder
@NoArgsConstructor
@AllArgsConstructor
public static class Message {
private String role;
private String content;
}
@Data
@Builder
@NoArgsConstructor
@AllArgsConstructor
public static class ChatCompletionResponse {
private String id;
private String object;
private Long created;
private String model;
private List<Choice> choices;
private Usage usage;
}
@Data
@Builder
@NoArgsConstructor
@AllArgsConstructor
public static class Choice {
private Integer index;
private Message message;
@JsonProperty("finish_reason")
private String finishReason;
}
@Data
@Builder
@NoArgsConstructor
@AllArgsConstructor
public static class Usage {
@JsonProperty("prompt_tokens")
private Integer promptTokens;
@JsonProperty("completion_tokens")
private Integer completionTokens;
@JsonProperty("total_tokens")
private Integer totalTokens;
}
}
```
### Spring Boot服务实现
```java
package com.example.llm.service;
import com.example.llm.client.LLMClient.ChatCompletionRequest;
import com.example.llm.client.LLMClient.ChatCompletionResponse;
import com.example.llm.client.LLMClient.LLMClient;
import com.example.llm.client.LLMClient.Message;
import lombok.RequiredArgsConstructor;
import lombok.extern.slf4j.Slf4j;
import org.springframework.stereotype.Service;
import java.util.Arrays;
import java.util.List;
import java.util.concurrent.CompletableFuture;
import java.util.concurrent.TimeUnit;
@Service
@RequiredArgsConstructor
@Slf4j
public class LLMService {
private final LLMClient llmClient;
/**
* 同步对话
*/
public String chat(String userMessage) {
return chat(userMessage, null);
}
/**
* 同步对话(带系统提示)
*/
public String chat(String userMessage, String systemPrompt) {
ChatCompletionRequest request = buildRequest(userMessage, systemPrompt, false);
try {
ChatCompletionResponse response = llmClient.chatCompletion(request);
if (response != null && response.getChoices() != null && !response.getChoices().isEmpty()) {
return response.getChoices().get(0).getMessage().getContent();
}
} catch (Exception e) {
log.error("LLM调用失败", e);
throw new RuntimeException("LLM服务调用失败: " + e.getMessage(), e);
}
return null;
}
/**
* 流式对话
*/
public Flux<String> chatStream(String userMessage) {
return chatStream(userMessage, null);
}
/**
* 流式对话(带系统提示)
*/
public Flux<String> chatStream(String userMessage, String systemPrompt) {
ChatCompletionRequest request = buildRequest(userMessage, systemPrompt, true);
return llmClient.chatCompletionStream(request)
.filter(data -> !data.startsWith("[DONE]"))
.map(data -> {
// 解析SSE数据
if (data.startsWith("data:")) {
data = data.substring(5).trim();
}
return data;
});
}
private ChatCompletionRequest buildRequest(String userMessage, String systemPrompt, boolean stream) {
List<Message> messages = Arrays.asList(
Message.builder()
.role("system")
.content(systemPrompt != null ? systemPrompt : "你是一个有帮助的AI助手。")
.build(),
Message.builder()
.role("user")
.content(userMessage)
.build()
);
return ChatCompletionRequest.builder()
.model("Qwen/Qwen-7B-Chat")
.messages(messages)
.temperature(0.7)
.maxTokens(2048)
.stream(stream)
.build();
}
/**
* 异步对话
*/
public CompletableFuture<String> chatAsync(String userMessage) {
return CompletableFuture.supplyAsync(() -> chat(userMessage))
.orTimeout(120, TimeUnit.SECONDS);
}
/**
* 批量对话
*/
public List<String> batchChat(List<String> messages) {
return messages.parallelStream()
.map(this::chat)
.toList();
}
}
```
### 控制器实现
```java
package com.example.llm.controller;
import com.example.llm.service.LLMService;
import lombok.RequiredArgsConstructor;
import lombok.extern.slf4j.Slf4j;
import org.springframework.http.MediaType;
import org.springframework.http.codec.ServerSentEvent;
import org.springframework.web.bind.annotation.*;
import reactor.core.publisher.Flux;
import reactor.core.publisher.Mono;
import java.util.HashMap;
import java.util.Map;
@RestController
@RequestMapping("/api/llm")
@RequiredArgsConstructor
@Slf4j
public class LLMController {
private final LLMService llmService;
/**
* 同步对话接口
*/
@PostMapping("/chat")
public Map<String, Object> chat(@RequestBody Map<String, String> request) {
String userMessage = request.get("message");
String systemPrompt = request.get("systemPrompt");
log.info("收到聊天请求: {}", userMessage);
String response = llmService.chat(userMessage, systemPrompt);
Map<String, Object> result = new HashMap<>();
result.put("code", 200);
result.put("message", "success");
result.put("data", response);
return result;
}
/**
* 流式对话接口
*/
@PostMapping(value = "/chat/stream", produces = MediaType.TEXT_EVENT_STREAM_VALUE)
public Flux<ServerSentEvent<String>> chatStream(@RequestBody Map<String, String> request) {
String userMessage = request.get("message");
String systemPrompt = request.get("systemPrompt");
log.info("收到流式聊天请求: {}", userMessage);
return llmService.chatStream(userMessage, systemPrompt)
.map(data -> ServerSentEvent.<String>builder()
.data(data)
.build()
)
.onErrorResume(e -> {
log.error("流式对话异常", e);
return Mono.just(ServerSentEvent.<String>builder()
.data("[ERROR]" + e.getMessage())
.build());
})
.concatWith(Mono.just(ServerSentEvent.<String>builder()
.data("[DONE]")
.build()));
}
/**
* 异步对话接口
*/
@PostMapping("/chat/async")
public Map<String, Object> chatAsync(@RequestBody Map<String, String> request) {
String userMessage = request.get("message");
log.info("收到异步聊天请求: {}", userMessage);
// 立即返回,后续异步处理
llmService.chatAsync(userMessage)
.thenAccept(response -> {
log.info("异步任务完成: {}", response);
// 这里可以添加回调逻辑,如发送WebSocket消息
})
.exceptionally(e -> {
log.error("异步任务失败", e);
return null;
});
Map<String, Object> result = new HashMap<>();
result.put("code", 202);
result.put("message", "请求已接受,正在异步处理");
return result;
}
}
```
### 熔断与重试配置
```java
package com.example.llm.config;
import io.github.resilience4j.circuitbreaker.CircuitBreaker;
import io.github.resilience4j.circuitbreaker.CircuitBreakerConfig;
import io.github.resilience4j.retry.Retry;
import io.github.resilience4j.retry.RetryConfig;
import lombok.extern.slf4j.Slf4j;
import org.springframework.context.annotation.Bean;
import org.springframework.context.annotation.Configuration;
import org.springframework.web.client.RestTemplate;
import java.time.Duration;
@Configuration
@Slf4j
public class ResilienceConfig {
@Bean
public CircuitBreaker llmCircuitBreaker() {
CircuitBreakerConfig config = CircuitBreakerConfig.custom()
.failureRateThreshold(50) // 失败率阈值50%
.slowCallRateThreshold(80) // 慢调用率阈值80%
.slowCallDurationThreshold(Duration.ofSeconds(30)) // 慢调用阈值30秒
.waitDurationInOpenState(Duration.ofMinutes(1)) // 熔断器开放时间1分钟
.permittedNumberOfCallsInHalfOpenState(3) // 半开状态允许调用次数
.slidingWindowType(CircuitBreakerConfig.SlidingWindowType.COUNT_BASED)
.slidingWindowSize(10) // 滑动窗口大小
.minimumNumberOfCalls(5) // 最小调用次数
.build();
return CircuitBreaker.of("llmService", config);
}
@Bean
public Retry llmRetry() {
RetryConfig config = RetryConfig.custom()
.maxAttempts(3) // 最大重试次数
.waitDuration(Duration.ofSeconds(2)) // 重试间隔
.retryExceptions(Exception.class) // 重试的异常类型
.ignoreExceptions(IllegalArgumentException.class) // 忽略的异常
.build();
return Retry.of("llmService", config);
}
}
```
### 应用配置
```yaml
# application.yml
spring:
application:
name: llm-spring-boot-client
server:
port: 8080
llm:
# 大模型服务地址
base-url: http://localhost:80
# 连接超时(毫秒)
connect-timeout: 10000
# 读取超时(毫秒)
read-timeout: 120000
# 熔断器配置
resilience4j:
circuitbreaker:
configs:
default:
failureRateThreshold: 50
waitDurationInOpenState: 60s
instances:
llmService:
registerHealthIndicator: true
slidingWindowSize: 10
# 日志配置
logging:
level:
com.example.llm: DEBUG
org.springframework.web.client: DEBUG
```
### Docker化Spring Boot应用
如果需要将Spring Boot应用也容器化部署,可以编写Dockerfile:
```dockerfile
# Multi-stage build
FROM eclipse-temurin:17-jdk-alpine AS builder
WORKDIR /app
# 复制Maven配置
COPY pom.xml .
COPY src ./src
# 下载依赖(利用缓存)
RUN ./mvnw dependency:go-offline -B
# 构建
RUN ./mvnw package -DskipTests -B
# 运行阶段
FROM eclipse-temurin:17-jre-alpine
WORKDIR /app
# 安全配置
RUN addgroup -S appgroup && adduser -S appuser -G appgroup
RUN chown -R appuser:appgroup /app
# 复制jar包
COPY --from=builder /app/target/*.jar app.jar
# 复制模型缓存(可选,共享HuggingFace缓存)
VOLUME ["/root/.cache/huggingface"]
USER appuser
EXPOSE 8080
ENTRYPOINT ["java", "-jar", "-Xms2g", "-Xmx4g", "-XX:+UseG1GC", "app.jar"]
```
相应的docker-compose配置:
```yaml
version: '3.8'
services:
spring-boot-app:
build: ./spring-boot-app
container_name: spring-boot-llm-client
ports:
- "8080:8080"
environment:
- LLM_BASE_URL=http://qwen7b-gateway:80
- SPRING_PROFILES_ACTIVE=production
depends_on:
- api-gateway
networks:
- qwen-net
api-gateway:
image: nginx:alpine
container_name: qwen7b-gateway
ports:
- "80:80"
volumes:
- ./nginx/nginx.conf:/etc/nginx/nginx.conf:ro
depends_on:
- qwen7b-inference
networks:
- qwen-net
qwen7b-inference:
image: vllm/vllm-openai:latest
container_name: qwen7b-inference
environment:
- MODEL_NAME=Qwen/Qwen-7B-Chat
- GPU_MEMORY_UTILIZATION=0.9
volumes:
- model_cache:/root/.cache/huggingface
deploy:
resources:
reservations:
devices:
- driver: nvidia
count: 1
capabilities: [gpu]
shm_size: '16gb'
networks:
- qwen-net
networks:
qwen-net:
driver: bridge
volumes:
model_cache:
```
## 总结
Docker容器化技术为大模型的部署提供了标准化、可复制、易扩展的解决方案。通过本文的详细介绍,我们已经覆盖了从环境配置、镜像制作、服务编排到生产部署的完整流程。
**核心要点回顾:**
1. **环境配置**:正确安装nvidia-container-toolkit是GPU容器化的前提,CUDA版本兼容性需要仔细规划。
2. **镜像制作**:选择合适的Base Image,合理利用多阶段构建减小镜像体积,通过层缓存优化构建速度。
3. **服务编排**:Docker Compose适合单主机多容器编排,Kubernetes适合大规模生产部署。
4. **性能优化**:合理的内存配置、批量推理、流式输出等优化手段可显著提升推理吞吐量。
5. **安全加固**:以非root用户运行、限制容器能力、启用TLS加密、进行安全扫描是基本的安全实践。
6. **Spring Boot对接**:通过封装统一的API客户端,Spring Boot应用可以方便地调用容器化部署的大模型服务。
随着容器化和云原生技术的持续发展,大模型的部署将变得更加简单高效。希望本文能够为你的大模型生产部署提供有价值的参考。
▲ 图2
集群模式部署配置
对于大规模推理服务,需要支持多实例部署和负载均衡。以下是一个支持水平扩展的集群部署配置:
### 环境准备
在开始部署前,需要确保环境满足以下要求:
**硬件要求:** NVIDIA GPU(至少16GB显存,推荐RTX 4080或更高),8核以上CPU,32GB系统内存,100GB可用磁盘空间。
**软件要求:** Ubuntu 20.04+或CentOS 8+,NVIDIA Driver 535+,Docker 24+,NVIDIA Container Toolkit。
**环境验证:**
```bash
# 检查NVIDIA驱动
nvidia-smi
# 预期输出应显示GPU型号和驱动版本
# 检查Docker
docker --version
# 预期输出:Docker version 24.x.x
# 检查nvidia-container-toolkit
docker run --rm --gpus all nvidia/cuda:12.1.1-base-ubuntu22.04 nvidia-smi
# 预期输出应显示GPU信息
```
### 编写docker-compose配置
创建项目目录并编写docker-compose.yml:
```bash
mkdir -p ~/llm-deploy/qwen-7b
cd ~/llm-deploy/qwen-7b
```
```yaml
# docker-compose.yml
version: '3.8'
services:
# Qwen-7B推理服务
qwen7b-inference:
image: vllm/vllm-openai:latest
container_name: qwen7b-inference
hostname: qwen7b-inference
ports:
- "8000:8000"
environment:
# 模型配置
- MODEL_NAME=Qwen/Qwen-7B-Chat
- TOKENIZER=Qwen/Qwen-7B-Chat
# 性能优化
- GPU_MEMORY_UTILIZATION=0.9
- MAX_MODEL_LEN=8192
- MAX_NUM_BATCHED_TOKENS=8192
- MAX_NUM_SEQUENCES=256
# 推理优化
- ENABLE_CHUNKED_PREFILL=true
- ENABLE_PREFIX_CACHING=true
# GPU配置
- NVIDIA_VISIBLE_DEVICES=all
- CUDA_VISIBLE_DEVICES=all
# 日志配置
- LOG_LEVEL=INFO
volumes:
# HuggingFace模型缓存(避免重复下载)
- model_cache:/root/.cache/huggingface
# vLLM服务日志
- ./logs:/var/log/vllm
deploy:
resources:
reservations:
devices:
- driver: nvidia
count: 1
capabilities: [gpu]
shm_size: '16gb' # 共享内存(对vLLM重要)
restart: unless-stopped
healthcheck:
test: ["CMD", "curl", "-f", "http://localhost:8000/health"]
interval: 30s
timeout: 10s
retries: 3
start_period: 300s
networks:
- qwen-net
# API网关(Nginx)
api-gateway:
image: nginx:alpine
container_name: qwen7b-gateway
ports:
- "80:80"
- "443:443"
volumes:
- ./nginx/nginx.conf:/etc/nginx/nginx.conf:ro
- ./nginx/ssl:/etc/nginx/ssl:ro
depends_on:
qwen7b-inference:
condition: service_healthy
restart: unless-stopped
networks:
- qwen-net
# Prometheus监控
prometheus:
image: prom/prometheus:latest
container_name: qwen7b-prometheus
ports:
- "9090:9090"
volumes:
- ./prometheus/prometheus.yml:/etc/prometheus/prometheus.yml:ro
- ./prometheus/prometheus_data:/prometheus
command:
- '--config.file=/etc/prometheus/prometheus.yml'
- '--storage.tsdb.path=/prometheus'
- '--web.console.libraries=/etc/prometheus/console_libraries'
- '--web.console.templates=/etc/prometheus/consoles'
restart: unless-stopped
networks:
- qwen-net
# Grafana可视化
grafana:
image: grafana/grafana:latest
container_name: qwen7b-grafana
ports:
- "3000:3000"
environment:
- GF_SECURITY_ADMIN_USER=admin
- GF_SECURITY_ADMIN_PASSWORD=admin123
- GF_USERS_ALLOW_SIGN_UP=false
volumes:
- ./grafana/provisioning:/etc/grafana/provisioning:ro
- ./grafana/dashboards:/var/lib/grafana/dashboards
- ./grafana/data:/var/lib/grafana
depends_on:
- prometheus
restart: unless-stopped
networks:
- qwen-net
networks:
qwen-net:
driver: bridge
volumes:
model_cache:
```
### Nginx配置
```bash
mkdir -p nginx ssl prometheus grafana/provisioning/datasources grafana/provisioning/dashboards grafana/dashboards logs
```
```nginx
# nginx/nginx.conf
events {
worker_connections 1024;
}
http {
include /etc/nginx/mime.types;
default_type application/octet-stream;
# 日志格式
log_format main '$remote_addr - $remote_user [$time_local] "$request" '
'$status $body_bytes_sent "$http_referer" '
'"$http_user_agent" "$http_x_forwarded_for" '
'rt=$request_time uct="$upstream_connect_time" '
'uht="$upstream_header_time" urt="$upstream_response_time"';
access_log /var/log/nginx/access.log main;
error_log /var/log/nginx/error.log warn;
# 性能优化
sendfile on;
tcp_nopush on;
tcp_nodelay on;
keepalive_timeout 65;
types_hash_max_size 2048;
# Gzip压缩
gzip on;
gzip_vary on;
gzip_proxied any;
gzip_comp_level 6;
gzip_types text/plain text/css text/xml application/json application/javascript application/rss+xml application/atom+xml image/svg+xml;
# 限流配置
limit_req_zone $binary_remote_addr zone=api_limit:10m rate=30r/s;
limit_conn_zone $binary_remote_addr zone=conn_limit:10m;
upstream vllm_backend {
server qwen7b-inference:8000;
keepalive 64;
}
server {
listen 80;
server_name _;
# 健康检查
location /health {
access_log off;
return 200 "OK";
add_header Content-Type text/plain;
}
# OpenAI兼容API - Chat Completions
location /v1/chat/completions {
limit_req zone=api_limit burst=50 nodelay;
limit_conn conn_limit 10;
proxy_pass http://vllm_backend;
proxy_http_version 1.1;
# 代理头设置
proxy_set_header Host $host;
proxy_set_header X-Real-IP $remote_addr;
proxy_set_header X-Forwarded-For $proxy_add_x_forwarded_for;
proxy_set_header X-Forwarded-Proto $scheme;
# 流式响应(关键配置)
proxy_buffering off;
proxy_cache off;
proxy_read_timeout 300s;
proxy_connect_timeout 60s;
proxy_send_timeout 300s;
# SSE必需配置
proxy_set_header Connection '';
chunked_transfer_encoding on;
# 记录响应时间
add_header X-Response-Time $upstream_response_time;
}
# OpenAI兼容API - Completions
location /v1/completions {
limit_req zone=api_limit burst=50 nodelay;
limit_conn conn_limit 10;
proxy_pass http://vllm_backend;
proxy_http_version 1.1;
proxy_set_header Host $host;
proxy_set_header X-Real-IP $remote_addr;
proxy_set_header X-Forwarded-For $proxy_add_x_forwarded_for;
proxy_set_header X-Forwarded-Proto $scheme;
proxy_buffering off;
proxy_cache off;
proxy_read_timeout 300s;
proxy_set_header Connection '';
chunked_transfer_encoding on;
}
# 模型列表
location /v1/models {
proxy_pass http://vllm_backend;
proxy_http_version 1.1;
proxy_set_header Host $host;
proxy_set_header X-Real-IP $remote_addr;
}
# vLLM直接接口
location /v1 {
proxy_pass http://vllm_backend;
proxy_http_version 1.1;
proxy_set_header Host $host;
proxy_set_header X-Real-IP $remote_addr;
proxy_set_header X-Forwarded-For $proxy_add_x_forwarded_for;
proxy_set_header X-Forwarded-Proto $scheme;
}
# Prometheus指标(仅内网访问)
location /metrics {
proxy_pass http://prometheus:9090;
proxy_set_header Host $host;
allow 127.0.0.1;
allow 10.0.0.0/8;
allow 172.16.0.0/12;
deny all;
}
}
}
```
### Prometheus配置
```yaml
# prometheus/prometheus.yml
global:
scrape_interval: 15s
evaluation_interval: 15s
scrape_configs:
- job_name: 'vllm'
static_configs:
- targets: ['qwen7b-inference:8000']
metrics_path: '/metrics'
scrape_interval: 10s
```
### 启动服务
```bash
# 进入项目目录
cd ~/llm-deploy/qwen-7b
# 拉取镜像(提前完成,节省首次启动时间)
docker-compose pull
# 启动服务(后台运行)
docker-compose up -d
# 查看服务状态
docker-compose ps
# 查看日志
docker-compose logs -f qwen7b-inference
# 等待服务就绪后测试
# 首次启动需要下载模型,可能需要几分钟
sleep 120
# 健康检查
curl http://localhost:8000/health
# 模型列表
curl http://localhost:8000/v1/models
# 测试推理
curl -X POST http://localhost:8000/v1/chat/completions \
-H "Content-Type: application/json" \
-d '{
"model": "Qwen/Qwen-7B-Chat",
"messages": [
{"role": "system", "content": "你是一个有帮助的AI助手。"},
{"role": "user", "content": "请介绍一下Docker容器化技术的优势。"}
],
"max_tokens": 512,
"temperature": 0.7
}'
```
### 性能测试
```bash
# 安装测试工具
pip install locust
# 创建负载测试脚本 locustfile.py
cat > locustfile.py << 'EOF'
from locust import HttpUser, task, between
import json
class LLMUser(HttpUser):
wait_time = between(1, 3)
host = "http://localhost"
@task(3)
def chat_completion(self):
payload = {
"model": "Qwen/Qwen-7B-Chat",
"messages": [
{"role": "system", "content": "你是一个有帮助的AI助手。"},
{"role": "user", "content": "请用100字介绍一下人工智能。"}
],
"max_tokens": 200,
"temperature": 0.7,
"stream": False
}
with self.client.post(
"/v1/chat/completions",
json=payload,
catch_response=True
) as response:
if response.status_code == 200:
response.success()
else:
response.failure(f"Failed with status {response.status_code}")
@task(1)
def chat_completion_stream(self):
payload = {
"model": "Qwen/Qwen-7B-Chat",
"messages": [
{"role": "user", "content": "解释一下什么是机器学习。"}
],
"max_tokens": 256,
"temperature": 0.7,
"stream": True
}
with self.client.post(
"/v1/chat/completions",
json=payload,
catch_response=True
) as response:
if response.status_code == 200:
response.success()
else:
response.failure(f"Failed with status {response.status_code}")
EOF
# 运行负载测试(10个并发用户,持续60秒)
locust -f locustfile.py --headless -u 10 -r 2 -t 60s --csv results
# Web界面测试(可选)
locust -f locustfile.py --web-port 8089
```
## 容器化后的Spring Boot对接方案
### 概述
在企业级应用中,Java/Spring Boot仍然是主流的后端开发框架。将大模型推理服务容器化部署后,如何在Spring Boot应用中对接使用是开发者普遍关心的问题。
### RestTemplate对接方案
最直接的对接方式是使用Spring的RestTemplate或WebClient调用大模型API:
```java
package com.example.llm.config;
import org.springframework.context.annotation.Bean;
import org.springframework.context.annotation.Configuration;
import org.springframework.http.client.SimpleClientHttpRequestFactory;
import org.springframework.web.client.RestTemplate;
@Configuration
public class RestTemplateConfig {
@Bean
public RestTemplate restTemplate() {
SimpleClientHttpRequestFactory factory = new SimpleClientHttpRequestFactory();
factory.setConnectTimeout(10000); // 连接超时10秒
factory.setReadTimeout(120000); // 读取超时120秒(大模型推理可能较长)
factory.setBufferRequestBody(true);
return new RestTemplate(factory);
}
}
```
### OpenAI兼容客户端封装
为了方便对接支持OpenAI协议的大模型服务,封装一个统一的客户端:
```java
package com.example.llm.client;
import com.fasterxml.jackson.annotation.JsonProperty;
import lombok.Data;
import lombok.Builder;
import lombok.AllArgsConstructor;
import lombok.NoArgsConstructor;
import java.util.List;
import java.util.Map;
public class LLMClient {
private final RestTemplate restTemplate;
private final String baseUrl;
public LLMClient(RestTemplate restTemplate, String baseUrl) {
this.restTemplate = restTemplate;
this.baseUrl = baseUrl;
}
/**
* 聊天补全
*/
public ChatCompletionResponse chatCompletion(ChatCompletionRequest request) {
String url = baseUrl + "/v1/chat/completions";
HttpHeaders headers = new HttpHeaders();
headers.setContentType(MediaType.APPLICATION_JSON);
HttpEntity<ChatCompletionRequest> entity = new HttpEntity<>(request, headers);
ResponseEntity<ChatCompletionResponse> response = restTemplate.exchange(
url,
HttpMethod.POST,
entity,
ChatCompletionResponse.class
);
return response.getBody();
}
/**
* 流式聊天补全
*/
public Flux<String> chatCompletionStream(ChatCompletionRequest request) {
String url = baseUrl + "/v1/chat/completions";
HttpHeaders headers = new HttpHeaders();
headers.setContentType(MediaType.APPLICATION_JSON);
headers.setAccept(MediaType.TEXT_EVENT_STREAM);
HttpEntity<ChatCompletionRequest> entity = new HttpEntity<>(request, headers);
ParameterizedTypeReference<ServerSentEvent<String>> type = new ParameterizedTypeReference<>() {};
return restTemplate.exchange(
url,
HttpMethod.POST,
entity,
new ParameterizedTypeReference<ServerSentEvent<String>>() {}
)
.getBody()
.stream()
.map(ServerSentEvent::data);
}
@Data
@Builder
@NoArgsConstructor
@AllArgsConstructor
public static class ChatCompletionRequest {
private String model;
private List<Message> messages;
private Double temperature;
@JsonProperty("max_tokens")
private Integer maxTokens;
@JsonProperty("top_p")
private Double topP;
private Boolean stream;
private List<String> stop;
}
@Data
@Builder
@NoArgsConstructor
@AllArgsConstructor
public static class Message {
private String role;
private String content;
}
@Data
@Builder
@NoArgsConstructor
@AllArgsConstructor
public static class ChatCompletionResponse {
private String id;
private String object;
private Long created;
private String model;
private List<Choice> choices;
private Usage usage;
}
@Data
@Builder
@NoArgsConstructor
@AllArgsConstructor
public static class Choice {
private Integer index;
private Message message;
@JsonProperty("finish_reason")
private String finishReason;
}
@Data
@Builder
@NoArgsConstructor
@AllArgsConstructor
public static class Usage {
@JsonProperty("prompt_tokens")
private Integer promptTokens;
@JsonProperty("completion_tokens")
private Integer completionTokens;
@JsonProperty("total_tokens")
private Integer totalTokens;
}
}
```
### Spring Boot服务实现
```java
package com.example.llm.service;
import com.example.llm.client.LLMClient.ChatCompletionRequest;
import com.example.llm.client.LLMClient.ChatCompletionResponse;
import com.example.llm.client.LLMClient.LLMClient;
import com.example.llm.client.LLMClient.Message;
import lombok.RequiredArgsConstructor;
import lombok.extern.slf4j.Slf4j;
import org.springframework.stereotype.Service;
import java.util.Arrays;
import java.util.List;
import java.util.concurrent.CompletableFuture;
import java.util.concurrent.TimeUnit;
@Service
@RequiredArgsConstructor
@Slf4j
public class LLMService {
private final LLMClient llmClient;
/**
* 同步对话
*/
public String chat(String userMessage) {
return chat(userMessage, null);
}
/**
* 同步对话(带系统提示)
*/
public String chat(String userMessage, String systemPrompt) {
ChatCompletionRequest request = buildRequest(userMessage, systemPrompt, false);
try {
ChatCompletionResponse response = llmClient.chatCompletion(request);
if (response != null && response.getChoices() != null && !response.getChoices().isEmpty()) {
return response.getChoices().get(0).getMessage().getContent();
}
} catch (Exception e) {
log.error("LLM调用失败", e);
throw new RuntimeException("LLM服务调用失败: " + e.getMessage(), e);
}
return null;
}
/**
* 流式对话
*/
public Flux<String> chatStream(String userMessage) {
return chatStream(userMessage, null);
}
/**
* 流式对话(带系统提示)
*/
public Flux<String> chatStream(String userMessage, String systemPrompt) {
ChatCompletionRequest request = buildRequest(userMessage, systemPrompt, true);
return llmClient.chatCompletionStream(request)
.filter(data -> !data.startsWith("[DONE]"))
.map(data -> {
// 解析SSE数据
if (data.startsWith("data:")) {
data = data.substring(5).trim();
}
return data;
});
}
private ChatCompletionRequest buildRequest(String userMessage, String systemPrompt, boolean stream) {
List<Message> messages = Arrays.asList(
Message.builder()
.role("system")
.content(systemPrompt != null ? systemPrompt : "你是一个有帮助的AI助手。")
.build(),
Message.builder()
.role("user")
.content(userMessage)
.build()
);
return ChatCompletionRequest.builder()
.model("Qwen/Qwen-7B-Chat")
.messages(messages)
.temperature(0.7)
.maxTokens(2048)
.stream(stream)
.build();
}
/**
* 异步对话
*/
public CompletableFuture<String> chatAsync(String userMessage) {
return CompletableFuture.supplyAsync(() -> chat(userMessage))
.orTimeout(120, TimeUnit.SECONDS);
}
/**
* 批量对话
*/
public List<String> batchChat(List<String> messages) {
return messages.parallelStream()
.map(this::chat)
.toList();
}
}
```
### 控制器实现
```java
package com.example.llm.controller;
import com.example.llm.service.LLMService;
import lombok.RequiredArgsConstructor;
import lombok.extern.slf4j.Slf4j;
import org.springframework.http.MediaType;
import org.springframework.http.codec.ServerSentEvent;
import org.springframework.web.bind.annotation.*;
import reactor.core.publisher.Flux;
import reactor.core.publisher.Mono;
import java.util.HashMap;
import java.util.Map;
@RestController
@RequestMapping("/api/llm")
@RequiredArgsConstructor
@Slf4j
public class LLMController {
private final LLMService llmService;
/**
* 同步对话接口
*/
@PostMapping("/chat")
public Map<String, Object> chat(@RequestBody Map<String, String> request) {
String userMessage = request.get("message");
String systemPrompt = request.get("systemPrompt");
log.info("收到聊天请求: {}", userMessage);
String response = llmService.chat(userMessage, systemPrompt);
Map<String, Object> result = new HashMap<>();
result.put("code", 200);
result.put("message", "success");
result.put("data", response);
return result;
}
/**
* 流式对话接口
*/
@PostMapping(value = "/chat/stream", produces = MediaType.TEXT_EVENT_STREAM_VALUE)
public Flux<ServerSentEvent<String>> chatStream(@RequestBody Map<String, String> request) {
String userMessage = request.get("message");
String systemPrompt = request.get("systemPrompt");
log.info("收到流式聊天请求: {}", userMessage);
return llmService.chatStream(userMessage, systemPrompt)
.map(data -> ServerSentEvent.<String>builder()
.data(data)
.build()
)
.onErrorResume(e -> {
log.error("流式对话异常", e);
return Mono.just(ServerSentEvent.<String>builder()
.data("[ERROR]" + e.getMessage())
.build());
})
.concatWith(Mono.just(ServerSentEvent.<String>builder()
.data("[DONE]")
.build()));
}
/**
* 异步对话接口
*/
@PostMapping("/chat/async")
public Map<String, Object> chatAsync(@RequestBody Map<String, String> request) {
String userMessage = request.get("message");
log.info("收到异步聊天请求: {}", userMessage);
// 立即返回,后续异步处理
llmService.chatAsync(userMessage)
.thenAccept(response -> {
log.info("异步任务完成: {}", response);
// 这里可以添加回调逻辑,如发送WebSocket消息
})
.exceptionally(e -> {
log.error("异步任务失败", e);
return null;
});
Map<String, Object> result = new HashMap<>();
result.put("code", 202);
result.put("message", "请求已接受,正在异步处理");
return result;
}
}
```
### 熔断与重试配置
```java
package com.example.llm.config;
import io.github.resilience4j.circuitbreaker.CircuitBreaker;
import io.github.resilience4j.circuitbreaker.CircuitBreakerConfig;
import io.github.resilience4j.retry.Retry;
import io.github.resilience4j.retry.RetryConfig;
import lombok.extern.slf4j.Slf4j;
import org.springframework.context.annotation.Bean;
import org.springframework.context.annotation.Configuration;
import org.springframework.web.client.RestTemplate;
import java.time.Duration;
@Configuration
@Slf4j
public class ResilienceConfig {
@Bean
public CircuitBreaker llmCircuitBreaker() {
CircuitBreakerConfig config = CircuitBreakerConfig.custom()
.failureRateThreshold(50) // 失败率阈值50%
.slowCallRateThreshold(80) // 慢调用率阈值80%
.slowCallDurationThreshold(Duration.ofSeconds(30)) // 慢调用阈值30秒
.waitDurationInOpenState(Duration.ofMinutes(1)) // 熔断器开放时间1分钟
.permittedNumberOfCallsInHalfOpenState(3) // 半开状态允许调用次数
.slidingWindowType(CircuitBreakerConfig.SlidingWindowType.COUNT_BASED)
.slidingWindowSize(10) // 滑动窗口大小
.minimumNumberOfCalls(5) // 最小调用次数
.build();
return CircuitBreaker.of("llmService", config);
}
@Bean
public Retry llmRetry() {
RetryConfig config = RetryConfig.custom()
.maxAttempts(3) // 最大重试次数
.waitDuration(Duration.ofSeconds(2)) // 重试间隔
.retryExceptions(Exception.class) // 重试的异常类型
.ignoreExceptions(IllegalArgumentException.class) // 忽略的异常
.build();
return Retry.of("llmService", config);
}
}
```
### 应用配置
```yaml
# application.yml
spring:
application:
name: llm-spring-boot-client
server:
port: 8080
llm:
# 大模型服务地址
base-url: http://localhost:80
# 连接超时(毫秒)
connect-timeout: 10000
# 读取超时(毫秒)
read-timeout: 120000
# 熔断器配置
resilience4j:
circuitbreaker:
configs:
default:
failureRateThreshold: 50
waitDurationInOpenState: 60s
instances:
llmService:
registerHealthIndicator: true
slidingWindowSize: 10
# 日志配置
logging:
level:
com.example.llm: DEBUG
org.springframework.web.client: DEBUG
```
### Docker化Spring Boot应用
如果需要将Spring Boot应用也容器化部署,可以编写Dockerfile:
```dockerfile
# Multi-stage build
FROM eclipse-temurin:17-jdk-alpine AS builder
WORKDIR /app
# 复制Maven配置
COPY pom.xml .
COPY src ./src
# 下载依赖(利用缓存)
RUN ./mvnw dependency:go-offline -B
# 构建
RUN ./mvnw package -DskipTests -B
# 运行阶段
FROM eclipse-temurin:17-jre-alpine
WORKDIR /app
# 安全配置
RUN addgroup -S appgroup && adduser -S appuser -G appgroup
RUN chown -R appuser:appgroup /app
# 复制jar包
COPY --from=builder /app/target/*.jar app.jar
# 复制模型缓存(可选,共享HuggingFace缓存)
VOLUME ["/root/.cache/huggingface"]
USER appuser
EXPOSE 8080
ENTRYPOINT ["java", "-jar", "-Xms2g", "-Xmx4g", "-XX:+UseG1GC", "app.jar"]
```
相应的docker-compose配置:
```yaml
version: '3.8'
services:
spring-boot-app:
build: ./spring-boot-app
container_name: spring-boot-llm-client
ports:
- "8080:8080"
environment:
- LLM_BASE_URL=http://qwen7b-gateway:80
- SPRING_PROFILES_ACTIVE=production
depends_on:
- api-gateway
networks:
- qwen-net
api-gateway:
image: nginx:alpine
container_name: qwen7b-gateway
ports:
- "80:80"
volumes:
- ./nginx/nginx.conf:/etc/nginx/nginx.conf:ro
depends_on:
- qwen7b-inference
networks:
- qwen-net
qwen7b-inference:
image: vllm/vllm-openai:latest
container_name: qwen7b-inference
environment:
- MODEL_NAME=Qwen/Qwen-7B-Chat
- GPU_MEMORY_UTILIZATION=0.9
volumes:
- model_cache:/root/.cache/huggingface
deploy:
resources:
reservations:
devices:
- driver: nvidia
count: 1
capabilities: [gpu]
shm_size: '16gb'
networks:
- qwen-net
networks:
qwen-net:
driver: bridge
volumes:
model_cache:
```
## 总结
Docker容器化技术为大模型的部署提供了标准化、可复制、易扩展的解决方案。通过本文的详细介绍,我们已经覆盖了从环境配置、镜像制作、服务编排到生产部署的完整流程。
**核心要点回顾:**
1. **环境配置**:正确安装nvidia-container-toolkit是GPU容器化的前提,CUDA版本兼容性需要仔细规划。
2. **镜像制作**:选择合适的Base Image,合理利用多阶段构建减小镜像体积,通过层缓存优化构建速度。
3. **服务编排**:Docker Compose适合单主机多容器编排,Kubernetes适合大规模生产部署。
4. **性能优化**:合理的内存配置、批量推理、流式输出等优化手段可显著提升推理吞吐量。
5. **安全加固**:以非root用户运行、限制容器能力、启用TLS加密、进行安全扫描是基本的安全实践。
6. **Spring Boot对接**:通过封装统一的API客户端,Spring Boot应用可以方便地调用容器化部署的大模型服务。
随着容器化和云原生技术的持续发展,大模型的部署将变得更加简单高效。希望本文能够为你的大模型生产部署提供有价值的参考。
▲ 图4
环境准备
在开始部署前,需要确保环境满足以下要求:
**硬件要求:** NVIDIA GPU(至少16GB显存,推荐RTX 4080或更高),8核以上CPU,32GB系统内存,100GB可用磁盘空间。
**软件要求:** Ubuntu 20.04+或CentOS 8+,NVIDIA Driver 535+,Docker 24+,NVIDIA Container Toolkit。
**环境验证:**
```bash
检查NVIDIA驱动
nvidia-smi
预期输出应显示GPU型号和驱动版本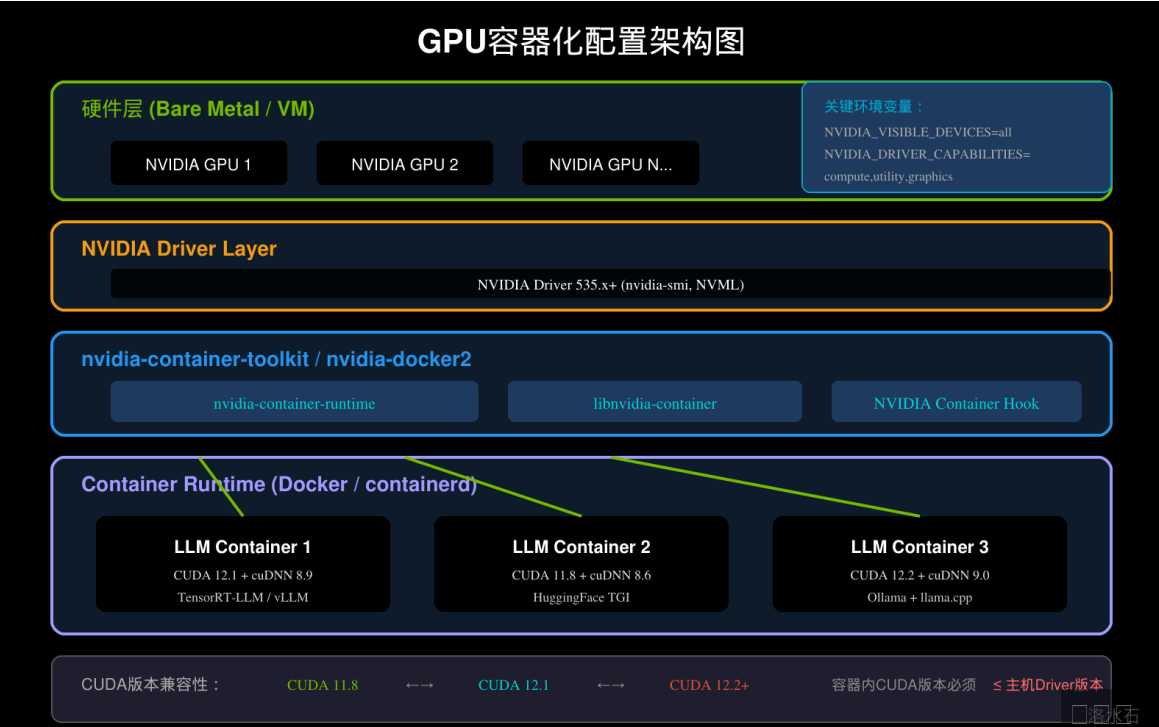
检查Docker
docker --version
预期输出:Docker version 24.x.x
检查nvidia-container-toolkit
docker run --rm --gpus all nvidia/cuda:12.1.1-base-ubuntu22.04 nvidia-smi
预期输出应显示GPU信息
```
编写docker-compose配置
创建项目目录并编写docker-compose.yml:
```bash
mkdir -p ~/llm-deploy/qwen-7b
cd ~/llm-deploy/qwen-7b
```
```yaml
docker-compose.yml
version: '3.8'
services:
# Qwen-7B推理服务
qwen7b-inference:
image: vllm/vllm-openai:latest
container_name: qwen7b-inference
hostname: qwen7b-inference
ports:
- "8000:8000"
environment:
# 模型配置
- MODEL_NAME=Qwen/Qwen-7B-Chat
- TOKENIZER=Qwen/Qwen-7B-Chat
# 性能优化
- GPU_MEMORY_UTILIZATION=0.9
- MAX_MODEL_LEN=8192
- MAX_NUM_BATCHED_TOKENS=8192
- MAX_NUM_SEQUENCES=256
# 推理优化
- ENABLE_CHUNKED_PREFILL=true
- ENABLE_PREFIX_CACHING=true
# GPU配置
- NVIDIA_VISIBLE_DEVICES=all
- CUDA_VISIBLE_DEVICES=all
# 日志配置
- LOG_LEVEL=INFO
volumes:
# HuggingFace模型缓存(避免重复下载)
- model_cache:/root/.cache/huggingface
# vLLM服务日志
- ./logs:/var/log/vllm
deploy:
resources:
reservations:
devices:
- driver: nvidia
count: 1
capabilities: [gpu]
shm_size: '16gb' # 共享内存(对vLLM重要)
restart: unless-stopped
healthcheck:
test: ["CMD", "curl", "-f", "http://localhost:8000/health"]
interval: 30s
timeout: 10s
retries: 3
start_period: 300s
networks:
- qwen-net
# API网关(Nginx)
api-gateway:
image: nginx:alpine
container_name: qwen7b-gateway
ports:
- "80:80"
- "443:443"
volumes:
- ./nginx/nginx.conf:/etc/nginx/nginx.conf:ro
- ./nginx/ssl:/etc/nginx/ssl:ro
depends_on:
qwen7b-inference:
condition: service_healthy
restart: unless-stopped
networks:
- qwen-net
# Prometheus监控
prometheus:
image: prom/prometheus:latest
container_name: qwen7b-prometheus
ports:
- "9090:9090"
volumes:
- ./prometheus/prometheus.yml:/etc/prometheus/prometheus.yml:ro
- ./prometheus/prometheus_data:/prometheus
command:
- '--config.file=/etc/prometheus/prometheus.yml'
- '--storage.tsdb.path=/prometheus'
- '--web.console.libraries=/etc/prometheus/console_libraries'
- '--web.console.templates=/etc/prometheus/consoles'
restart: unless-stopped
networks:
- qwen-net
# Grafana可视化
grafana:
image: grafana/grafana:latest
container_name: qwen7b-grafana
ports:
- "3000:3000"
environment:
- GF_SECURITY_ADMIN_USER=admin
- GF_SECURITY_ADMIN_PASSWORD=admin123
- GF_USERS_ALLOW_SIGN_UP=false
volumes:
- ./grafana/provisioning:/etc/grafana/provisioning:ro
- ./grafana/dashboards:/var/lib/grafana/dashboards
- ./grafana/data:/var/lib/grafana
depends_on:
- prometheus
restart: unless-stopped
networks:
- qwen-net
networks:
qwen-net:
driver: bridge
volumes:
model_cache:
```
Nginx配置
```bash
mkdir -p nginx ssl prometheus grafana/provisioning/datasources grafana/provisioning/dashboards grafana/dashboards logs
```
```nginx
nginx/nginx.conf
events {
worker_connections 1024;
}
http {
include /etc/nginx/mime.types;
default_type application/octet-stream;
# 日志格式
log_format main '$remote_addr - $remote_user [$time_local] "$request" '
'$status $body_bytes_sent "$http_referer" '
'"$http_user_agent" "$http_x_forwarded_for" '
'rt=$request_time uct="$upstream_connect_time" '
'uht="$upstream_header_time" urt="$upstream_response_time"';
access_log /var/log/nginx/access.log main;
error_log /var/log/nginx/error.log warn;
# 性能优化
sendfile on;
tcp_nopush on;
tcp_nodelay on;
keepalive_timeout 65;
types_hash_max_size 2048;
# Gzip压缩
gzip on;
gzip_vary on;
gzip_proxied any;
gzip_comp_level 6;
gzip_types text/plain text/css text/xml application/json application/javascript application/rss+xml application/atom+xml image/svg+xml;
# 限流配置
limit_req_zone $binary_remote_addr zone=api_limit:10m rate=30r/s;
limit_conn_zone $binary_remote_addr zone=conn_limit:10m;
upstream vllm_backend {
server qwen7b-inference:8000;
keepalive 64;
}
server {
listen 80;
server_name _;
# 健康检查
location /health {
access_log off;
return 200 "OK";
add_header Content-Type text/plain;
}
# OpenAI兼容API - Chat Completions
location /v1/chat/completions {
limit_req zone=api_limit burst=50 nodelay;
limit_conn conn_limit 10;
proxy_pass http://vllm_backend;
proxy_http_version 1.1;
# 代理头设置
proxy_set_header Host $host;
proxy_set_header X-Real-IP $remote_addr;
proxy_set_header X-Forwarded-For $proxy_add_x_forwarded_for;
proxy_set_header X-Forwarded-Proto $scheme;
# 流式响应(关键配置)
proxy_buffering off;
proxy_cache off;
proxy_read_timeout 300s;
proxy_connect_timeout 60s;
proxy_send_timeout 300s;
# SSE必需配置
proxy_set_header Connection '';
chunked_transfer_encoding on;
# 记录响应时间
add_header X-Response-Time $upstream_response_time;
}
# OpenAI兼容API - Completions
location /v1/completions {
limit_req zone=api_limit burst=50 nodelay;
limit_conn conn_limit 10;
proxy_pass http://vllm_backend;
proxy_http_version 1.1;
proxy_set_header Host $host;
proxy_set_header X-Real-IP $remote_addr;
proxy_set_header X-Forwarded-For $proxy_add_x_forwarded_for;
proxy_set_header X-Forwarded-Proto $scheme;
proxy_buffering off;
proxy_cache off;
proxy_read_timeout 300s;
proxy_set_header Connection '';
chunked_transfer_encoding on;
}
# 模型列表
location /v1/models {
proxy_pass http://vllm_backend;
proxy_http_version 1.1;
proxy_set_header Host $host;
proxy_set_header X-Real-IP $remote_addr;
}
# vLLM直接接口
location /v1 {
proxy_pass http://vllm_backend;
proxy_http_version 1.1;
proxy_set_header Host $host;
proxy_set_header X-Real-IP $remote_addr;
proxy_set_header X-Forwarded-For $proxy_add_x_forwarded_for;
proxy_set_header X-Forwarded-Proto $scheme;
}
# Prometheus指标(仅内网访问)
location /metrics {
proxy_pass http://prometheus:9090;
proxy_set_header Host $host;
allow 127.0.0.1;
allow 10.0.0.0/8;
allow 172.16.0.0/12;
deny all;
}
}
}
```
Prometheus配置
```yaml
prometheus/prometheus.yml
global:
scrape_interval: 15s
evaluation_interval: 15s
scrape_configs:
- job_name: 'vllm'
static_configs:
- targets: ['qwen7b-inference:8000']
metrics_path: '/metrics'
scrape_interval: 10s
```
启动服务
```bash
进入项目目录
cd ~/llm-deploy/qwen-7b
拉取镜像(提前完成,节省首次启动时间)
docker-compose pull
启动服务(后台运行)
docker-compose up -d
查看服务状态
docker-compose ps
查看日志
docker-compose logs -f qwen7b-inference
等待服务就绪后测试
首次启动需要下载模型,可能需要几分钟
sleep 120
健康检查
curl http://localhost:8000/health
模型列表
curl http://localhost:8000/v1/models
测试推理
curl -X POST http://localhost:8000/v1/chat/completions \
-H "Content-Type: application/json" \
-d '{
"model": "Qwen/Qwen-7B-Chat",
"messages": [
{"role": "system", "content": "你是一个有帮助的AI助手。"},
{"role": "user", "content": "请介绍一下Docker容器化技术的优势。"}
],
"max_tokens": 512,
"temperature": 0.7
}'
```
性能测试
```bash
安装测试工具
pip install locust
创建负载测试脚本 locustfile.py
cat > locustfile.py << 'EOF'
from locust import HttpUser, task, between
import json
class LLMUser(HttpUser):
wait_time = between(1, 3)
host = "http://localhost"
@task(3)
def chat_completion(self):
payload = {
"model": "Qwen/Qwen-7B-Chat",
"messages": [
{"role": "system", "content": "你是一个有帮助的AI助手。"},
{"role": "user", "content": "请用100字介绍一下人工智能。"}
],
"max_tokens": 200,
"temperature": 0.7,
"stream": False
}
with self.client.post(
"/v1/chat/completions",
json=payload,
catch_response=True
) as response:
if response.status_code == 200:
response.success()
else:
response.failure(f"Failed with status {response.status_code}")
@task(1)
def chat_completion_stream(self):
payload = {
"model": "Qwen/Qwen-7B-Chat",
"messages": [
{"role": "user", "content": "解释一下什么是机器学习。"}
],
"max_tokens": 256,
"temperature": 0.7,
"stream": True
}
with self.client.post(
"/v1/chat/completions",
json=payload,
catch_response=True
) as response:
if response.status_code == 200:
response.success()
else:
response.failure(f"Failed with status {response.status_code}")
EOF
运行负载测试(10个并发用户,持续60秒)
locust -f locustfile.py --headless -u 10 -r 2 -t 60s --csv results
Web界面测试(可选)
locust -f locustfile.py --web-port 8089
```
容器化后的Spring Boot对接方案
概述
在企业级应用中,Java/Spring Boot仍然是主流的后端开发框架。将大模型推理服务容器化部署后,如何在Spring Boot应用中对接使用是开发者普遍关心的问题。
RestTemplate对接方案
最直接的对接方式是使用Spring的RestTemplate或WebClient调用大模型API:
```java
package com.example.llm.config;
import org.springframework.context.annotation.Bean;
import org.springframework.context.annotation.Configuration;
import org.springframework.http.client.SimpleClientHttpRequestFactory;
import org.springframework.web.client.RestTemplate;
@Configuration
public class RestTemplateConfig {
@Bean
public RestTemplate restTemplate() {
SimpleClientHttpRequestFactory factory = new SimpleClientHttpRequestFactory();
factory.setConnectTimeout(10000); // 连接超时10秒
factory.setReadTimeout(120000); // 读取超时120秒(大模型推理可能较长)
factory.setBufferRequestBody(true);
return new RestTemplate(factory);
}
}
```
OpenAI兼容客户端封装
为了方便对接支持OpenAI协议的大模型服务,封装一个统一的客户端:
```java
package com.example.llm.client;
import com.fasterxml.jackson.annotation.JsonProperty;
import lombok.Data;
import lombok.Builder;
import lombok.AllArgsConstructor;
import lombok.NoArgsConstructor;
import java.util.List;
import java.util.Map;
public class LLMClient {
private final RestTemplate restTemplate;
private final String baseUrl;
public LLMClient(RestTemplate restTemplate, String baseUrl) {
this.restTemplate = restTemplate;
this.baseUrl = baseUrl;
}
/**
* 聊天补全
*/
public ChatCompletionResponse chatCompletion(ChatCompletionRequest request) {
String url = baseUrl + "/v1/chat/completions";
HttpHeaders headers = new HttpHeaders();
headers.setContentType(MediaType.APPLICATION_JSON);
HttpEntity<ChatCompletionRequest> entity = new HttpEntity<>(request, headers);
ResponseEntity<ChatCompletionResponse> response = restTemplate.exchange(
url,
HttpMethod.POST,
entity,
ChatCompletionResponse.class
);
return response.getBody();
}
/**
* 流式聊天补全
*/
public Flux<String> chatCompletionStream(ChatCompletionRequest request) {
String url = baseUrl + "/v1/chat/completions";
HttpHeaders headers = new HttpHeaders();
headers.setContentType(MediaType.APPLICATION_JSON);
headers.setAccept(MediaType.TEXT_EVENT_STREAM);
HttpEntity<ChatCompletionRequest> entity = new HttpEntity<>(request, headers);
ParameterizedTypeReference<ServerSentEvent<String>> type = new ParameterizedTypeReference<>() {};
return restTemplate.exchange(
url,
HttpMethod.POST,
entity,
new ParameterizedTypeReference<ServerSentEvent<String>>() {}
)
.getBody()
.stream()
.map(ServerSentEvent::data);
}
@Data
@Builder
@NoArgsConstructor
@AllArgsConstructor
public static class ChatCompletionRequest {
private String model;
private List<Message> messages;
private Double temperature;
@JsonProperty("max_tokens")
private Integer maxTokens;
@JsonProperty("top_p")
private Double topP;
private Boolean stream;
private List<String> stop;
}
@Data
@Builder
@NoArgsConstructor
@AllArgsConstructor
public static class Message {
private String role;
private String content;
}
@Data
@Builder
@NoArgsConstructor
@AllArgsConstructor
public static class ChatCompletionResponse {
private String id;
private String object;
private Long created;
private String model;
private List<Choice> choices;
private Usage usage;
}
@Data
@Builder
@NoArgsConstructor
@AllArgsConstructor
public static class Choice {
private Integer index;
private Message message;
@JsonProperty("finish_reason")
private String finishReason;
}
@Data
@Builder
@NoArgsConstructor
@AllArgsConstructor
public static class Usage {
@JsonProperty("prompt_tokens")
private Integer promptTokens;
@JsonProperty("completion_tokens")
private Integer completionTokens;
@JsonProperty("total_tokens")
private Integer totalTokens;
}
}
```
Spring Boot服务实现
```java
package com.example.llm.service;
import com.example.llm.client.LLMClient.ChatCompletionRequest;
import com.example.llm.client.LLMClient.ChatCompletionResponse;
import com.example.llm.client.LLMClient.LLMClient;
import com.example.llm.client.LLMClient.Message;
import lombok.RequiredArgsConstructor;
import lombok.extern.slf4j.Slf4j;
import org.springframework.stereotype.Service;
import java.util.Arrays;
import java.util.List;
import java.util.concurrent.CompletableFuture;
import java.util.concurrent.TimeUnit;
@Service
@RequiredArgsConstructor
@Slf4j
public class LLMService {
private final LLMClient llmClient;
/**
* 同步对话
*/
public String chat(String userMessage) {
return chat(userMessage, null);
}
/**
* 同步对话(带系统提示)
*/
public String chat(String userMessage, String systemPrompt) {
ChatCompletionRequest request = buildRequest(userMessage, systemPrompt, false);
try {
ChatCompletionResponse response = llmClient.chatCompletion(request);
if (response != null && response.getChoices() != null && !response.getChoices().isEmpty()) {
return response.getChoices().get(0).getMessage().getContent();
}
} catch (Exception e) {
log.error("LLM调用失败", e);
throw new RuntimeException("LLM服务调用失败: " + e.getMessage(), e);
}
return null;
}
/**
* 流式对话
*/
public Flux<String> chatStream(String userMessage) {
return chatStream(userMessage, null);
}
/**
* 流式对话(带系统提示)
*/
public Flux<String> chatStream(String userMessage, String systemPrompt) {
ChatCompletionRequest request = buildRequest(userMessage, systemPrompt, true);
return llmClient.chatCompletionStream(request)
.filter(data -> !data.startsWith("[DONE]"))
.map(data -> {
// 解析SSE数据
if (data.startsWith("data:")) {
data = data.substring(5).trim();
}
return data;
});
}
private ChatCompletionRequest buildRequest(String userMessage, String systemPrompt, boolean stream) {
List<Message> messages = Arrays.asList(
Message.builder()
.role("system")
.content(systemPrompt != null ? systemPrompt : "你是一个有帮助的AI助手。")
.build(),
Message.builder()
.role("user")
.content(userMessage)
.build()
);
return ChatCompletionRequest.builder()
.model("Qwen/Qwen-7B-Chat")
.messages(messages)
.temperature(0.7)
.maxTokens(2048)
.stream(stream)
.build();
}
/**
* 异步对话
*/
public CompletableFuture<String> chatAsync(String userMessage) {
return CompletableFuture.supplyAsync(() -> chat(userMessage))
.orTimeout(120, TimeUnit.SECONDS);
}
/**
* 批量对话
*/
public List<String> batchChat(List<String> messages) {
return messages.parallelStream()
.map(this::chat)
.toList();
}
}
```
控制器实现
```java
package com.example.llm.controller;
import com.example.llm.service.LLMService;
import lombok.RequiredArgsConstructor;
import lombok.extern.slf4j.Slf4j;
import org.springframework.http.MediaType;
import org.springframework.http.codec.ServerSentEvent;
import org.springframework.web.bind.annotation.*;
import reactor.core.publisher.Flux;
import reactor.core.publisher.Mono;
import java.util.HashMap;
import java.util.Map;
@RestController
@RequestMapping("/api/llm")
@RequiredArgsConstructor
@Slf4j
public class LLMController {
private final LLMService llmService;
/**
* 同步对话接口
*/
@PostMapping("/chat")
public Map<String, Object> chat(@RequestBody Map<String, String> request) {
String userMessage = request.get("message");
String systemPrompt = request.get("systemPrompt");
log.info("收到聊天请求: {}", userMessage);
String response = llmService.chat(userMessage, systemPrompt);
Map<String, Object> result = new HashMap<>();
result.put("code", 200);
result.put("message", "success");
result.put("data", response);
return result;
}
/**
* 流式对话接口
*/
@PostMapping(value = "/chat/stream", produces = MediaType.TEXT_EVENT_STREAM_VALUE)
public Flux<ServerSentEvent<String>> chatStream(@RequestBody Map<String, String> request) {
String userMessage = request.get("message");
String systemPrompt = request.get("systemPrompt");
log.info("收到流式聊天请求: {}", userMessage);
return llmService.chatStream(userMessage, systemPrompt)
.map(data -> ServerSentEvent.<String>builder()
.data(data)
.build()
)
.onErrorResume(e -> {
log.error("流式对话异常", e);
return Mono.just(ServerSentEvent.<String>builder()
.data("[ERROR]" + e.getMessage())
.build());
})
.concatWith(Mono.just(ServerSentEvent.<String>builder()
.data("[DONE]")
.build()));
}
/**
* 异步对话接口
*/
@PostMapping("/chat/async")
public Map<String, Object> chatAsync(@RequestBody Map<String, String> request) {
String userMessage = request.get("message");
log.info("收到异步聊天请求: {}", userMessage);
// 立即返回,后续异步处理
llmService.chatAsync(userMessage)
.thenAccept(response -> {
log.info("异步任务完成: {}", response);
// 这里可以添加回调逻辑,如发送WebSocket消息
})
.exceptionally(e -> {
log.error("异步任务失败", e);
return null;
});
Map<String, Object> result = new HashMap<>();
result.put("code", 202);
result.put("message", "请求已接受,正在异步处理");
return result;
}
}
```
熔断与重试配置
```java
package com.example.llm.config;
import io.github.resilience4j.circuitbreaker.CircuitBreaker;
import io.github.resilience4j.circuitbreaker.CircuitBreakerConfig;
import io.github.resilience4j.retry.Retry;
import io.github.resilience4j.retry.RetryConfig;
import lombok.extern.slf4j.Slf4j;
import org.springframework.context.annotation.Bean;
import org.springframework.context.annotation.Configuration;
import org.springframework.web.client.RestTemplate;
import java.time.Duration;
@Configuration
@Slf4j
public class ResilienceConfig {
@Bean
public CircuitBreaker llmCircuitBreaker() {
CircuitBreakerConfig config = CircuitBreakerConfig.custom()
.failureRateThreshold(50) // 失败率阈值50%
.slowCallRateThreshold(80) // 慢调用率阈值80%
.slowCallDurationThreshold(Duration.ofSeconds(30)) // 慢调用阈值30秒
.waitDurationInOpenState(Duration.ofMinutes(1)) // 熔断器开放时间1分钟
.permittedNumberOfCallsInHalfOpenState(3) // 半开状态允许调用次数
.slidingWindowType(CircuitBreakerConfig.SlidingWindowType.COUNT_BASED)
.slidingWindowSize(10) // 滑动窗口大小
.minimumNumberOfCalls(5) // 最小调用次数
.build();
return CircuitBreaker.of("llmService", config);
}
@Bean
public Retry llmRetry() {
RetryConfig config = RetryConfig.custom()
.maxAttempts(3) // 最大重试次数
.waitDuration(Duration.ofSeconds(2)) // 重试间隔
.retryExceptions(Exception.class) // 重试的异常类型
.ignoreExceptions(IllegalArgumentException.class) // 忽略的异常
.build();
return Retry.of("llmService", config);
}
}
```
应用配置
```yaml
application.yml
spring:
application:
name: llm-spring-boot-client
server:
port: 8080
llm:
# 大模型服务地址
base-url: http://localhost:80
# 连接超时(毫秒)
connect-timeout: 10000
# 读取超时(毫秒)
read-timeout: 120000
熔断器配置
resilience4j:
circuitbreaker:
configs:
default:
failureRateThreshold: 50
waitDurationInOpenState: 60s
instances:
llmService:
registerHealthIndicator: true
slidingWindowSize: 10
日志配置
logging:
level:
com.example.llm: DEBUG
org.springframework.web.client: DEBUG
```
Docker化Spring Boot应用
如果需要将Spring Boot应用也容器化部署,可以编写Dockerfile:
```dockerfile
Multi-stage build
FROM eclipse-temurin:17-jdk-alpine AS builder
WORKDIR /app
复制Maven配置
COPY pom.xml .
COPY src ./src
下载依赖(利用缓存)
RUN ./mvnw dependency:go-offline -B
构建
RUN ./mvnw package -DskipTests -B
运行阶段
FROM eclipse-temurin:17-jre-alpine
WORKDIR /app
安全配置
RUN addgroup -S appgroup && adduser -S appuser -G appgroup
RUN chown -R appuser:appgroup /app
复制jar包
COPY --from=builder /app/target/*.jar app.jar
复制模型缓存(可选,共享HuggingFace缓存)
VOLUME ["/root/.cache/huggingface"]
USER appuser
EXPOSE 8080
ENTRYPOINT ["java", "-jar", "-Xms2g", "-Xmx4g", "-XX:+UseG1GC", "app.jar"]
```
相应的docker-compose配置:
```yaml
version: '3.8'
services:
spring-boot-app:
build: ./spring-boot-app
container_name: spring-boot-llm-client
ports:
- "8080:8080"
environment:
- LLM_BASE_URL=http://qwen7b-gateway:80
- SPRING_PROFILES_ACTIVE=production
depends_on:
- api-gateway
networks:
- qwen-net
api-gateway:
image: nginx:alpine
container_name: qwen7b-gateway
ports:
- "80:80"
volumes:
- ./nginx/nginx.conf:/etc/nginx/nginx.conf:ro
depends_on:
- qwen7b-inference
networks:
- qwen-net
qwen7b-inference:
image: vllm/vllm-openai:latest
container_name: qwen7b-inference
environment:
- MODEL_NAME=Qwen/Qwen-7B-Chat
- GPU_MEMORY_UTILIZATION=0.9
volumes:
- model_cache:/root/.cache/huggingface
deploy:
resources:
reservations:
devices:
- driver: nvidia
count: 1
capabilities: [gpu]
shm_size: '16gb'
networks:
- qwen-net
networks:
qwen-net:
driver: bridge
volumes:
model_cache:
```
总结
Docker容器化技术为大模型的部署提供了标准化、可复制、易扩展的解决方案。通过本文的详细介绍,我们已经覆盖了从环境配置、镜像制作、服务编排到生产部署的完整流程。
**核心要点回顾:**
1. **环境配置**:正确安装nvidia-container-toolkit是GPU容器化的前提,CUDA版本兼容性需要仔细规划。
2. **镜像制作**:选择合适的Base Image,合理利用多阶段构建减小镜像体积,通过层缓存优化构建速度。
3. **服务编排**:Docker Compose适合单主机多容器编排,Kubernetes适合大规模生产部署。
4. **性能优化**:合理的内存配置、批量推理、流式输出等优化手段可显著提升推理吞吐量。
5. **安全加固**:以非root用户运行、限制容器能力、启用TLS加密、进行安全扫描是基本的安全实践。
6. **Spring Boot对接**:通过封装统一的API客户端,Spring Boot应用可以方便地调用容器化部署的大模型服务。
随着容器化和云原生技术的持续发展,大模型的部署将变得更加简单高效。希望本文能够为你的大模型生产部署提供有价值的参考。

AtomGit 是由开放原子开源基金会联合 CSDN 等生态伙伴共同推出的新一代开源与人工智能协作平台。平台坚持“开放、中立、公益”的理念,把代码托管、模型共享、数据集托管、智能体开发体验和算力服务整合在一起,为开发者提供从开发、训练到部署的一站式体验。
更多推荐
 17
17 0
0- 0


 已为社区贡献47条内容

所有评论(0)