Zabbix 7.0 LTS 企业级生产部署实战与千万级并发架构优化指南
目录
一.Zabbix简介

Zabbix 是一款开源的企业级监控解决方案,主要用于实时监控网络、服务器、应用程序等 IT 基础设施的状态和性能,帮助管理员及时发现并解决问题,保障系统的稳定运行
-
开发与发布:由拉脱维亚公司 Zabbix SIA 开发,首个版本于 2001 年发布,目前已更新至多个版本(截至 2026 年 5 月,最新稳定版为 Zabbix 7.0 lts)
-
开源性质:基于 GPL v2 许可证开源,用户可免费使用、修改源代码,适合企业根据自身需求定制监控方案。
-
跨平台支持:可运行在 Linux、Windows、Solaris 等主流操作系统上,能监控各类设备(服务器、路由器、交换机等)和应用(数据库、Web 服务、容器等)。
二.核心功能

-
全面监控能力
-
硬件监控:CPU、内存、磁盘、网络接口等服务器 / 设备硬件指标。
-
软件与应用监控:操作系统进程、服务状态(如 Apache、Nginx)、数据库性能(MySQL、PostgreSQL 等)、中间件(如 Tomcat)等。
-
网络监控:网络带宽、延迟、丢包率,以及交换机、路由器等网络设备的端口状态。
-
自定义监控:支持通过脚本、API 等方式监控特定业务指标(如订单量、用户在线数)。
-
-
告警机制
-
当监控指标超过预设阈值(如 CPU 使用率过高、服务宕机)时,可通过邮件、短信、微信、Slack 等多种渠道发送告警。
-
支持告警分级(严重、警告等)和升级策略(如多次告警未处理时通知上级)。
-
-
数据可视化与分析
-
提供丰富的图表(折线图、柱状图、饼图等),实时展示监控数据趋势。
-
支持自定义仪表盘,集中展示关键指标,方便管理员快速掌握系统状态。
-
历史数据存储在数据库(如 MySQL、PostgreSQL)中,可用于趋势分析和容量规划。
-
-
自动发现
-
能自动扫描网络中的设备和服务(如新增服务器、数据库实例),并自动添加监控项,减少手动配置工作量。
-
-
分布式监控
-
支持通过 Proxy 节点实现分布式监控,适合跨机房、大规模部署的场景,减轻中心服务器压力,提高监控效率。
-
三. 架构组成
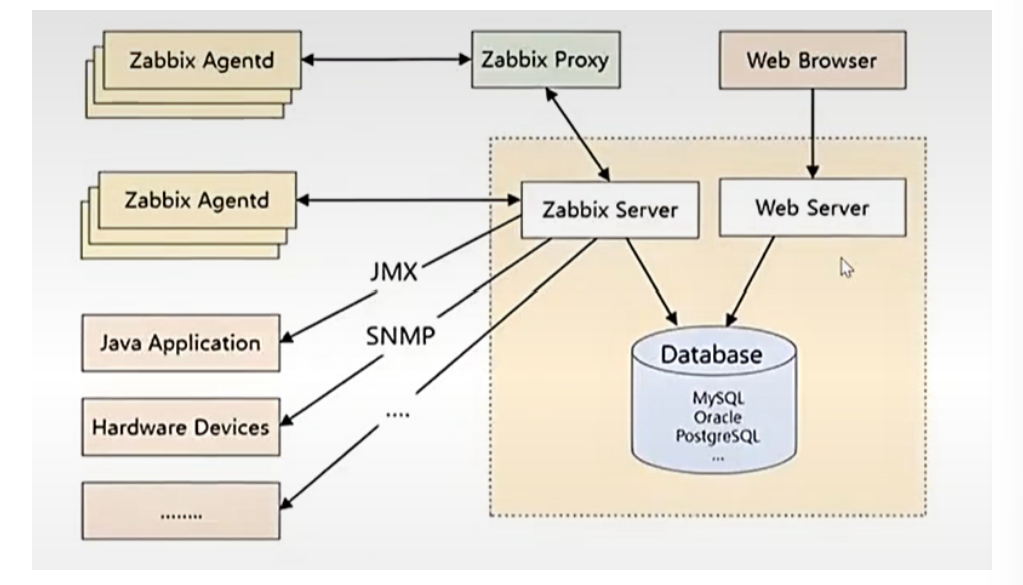
Zabbix 架构主要包含以下组件:
-
Zabbix Server:核心组件,负责接收 Agent 发送的监控数据、处理告警、存储数据、管理配置等。
-
Zabbix Agent:(采集数据)安装在被监控设备上,采集本地硬件和软件指标,发送给 Server 或 Proxy。
-
Zabbix Proxy:可选组件,用于分布式监控,代理 Server 收集数据并转发,减轻 Server 负载。
-
Database:存储监控配置、历史数据、告警信息等(支持 MySQL、PostgreSQL、Oracle 等)。
-
Web 界面:基于 PHP 开发,提供图形化操作界面,用于配置监控、查看数据和管理系统。
-
Java Gateway:用于监控 Java 应用程序(如 JVM 性能),通过 JMX 协议与 Java 进程通信。
-
SNMP:网络数据传输协议;简单网络邮件
功能与普罗米修斯大体相似
四.部署zabbix
1.通过官方网站下载zabbix资源

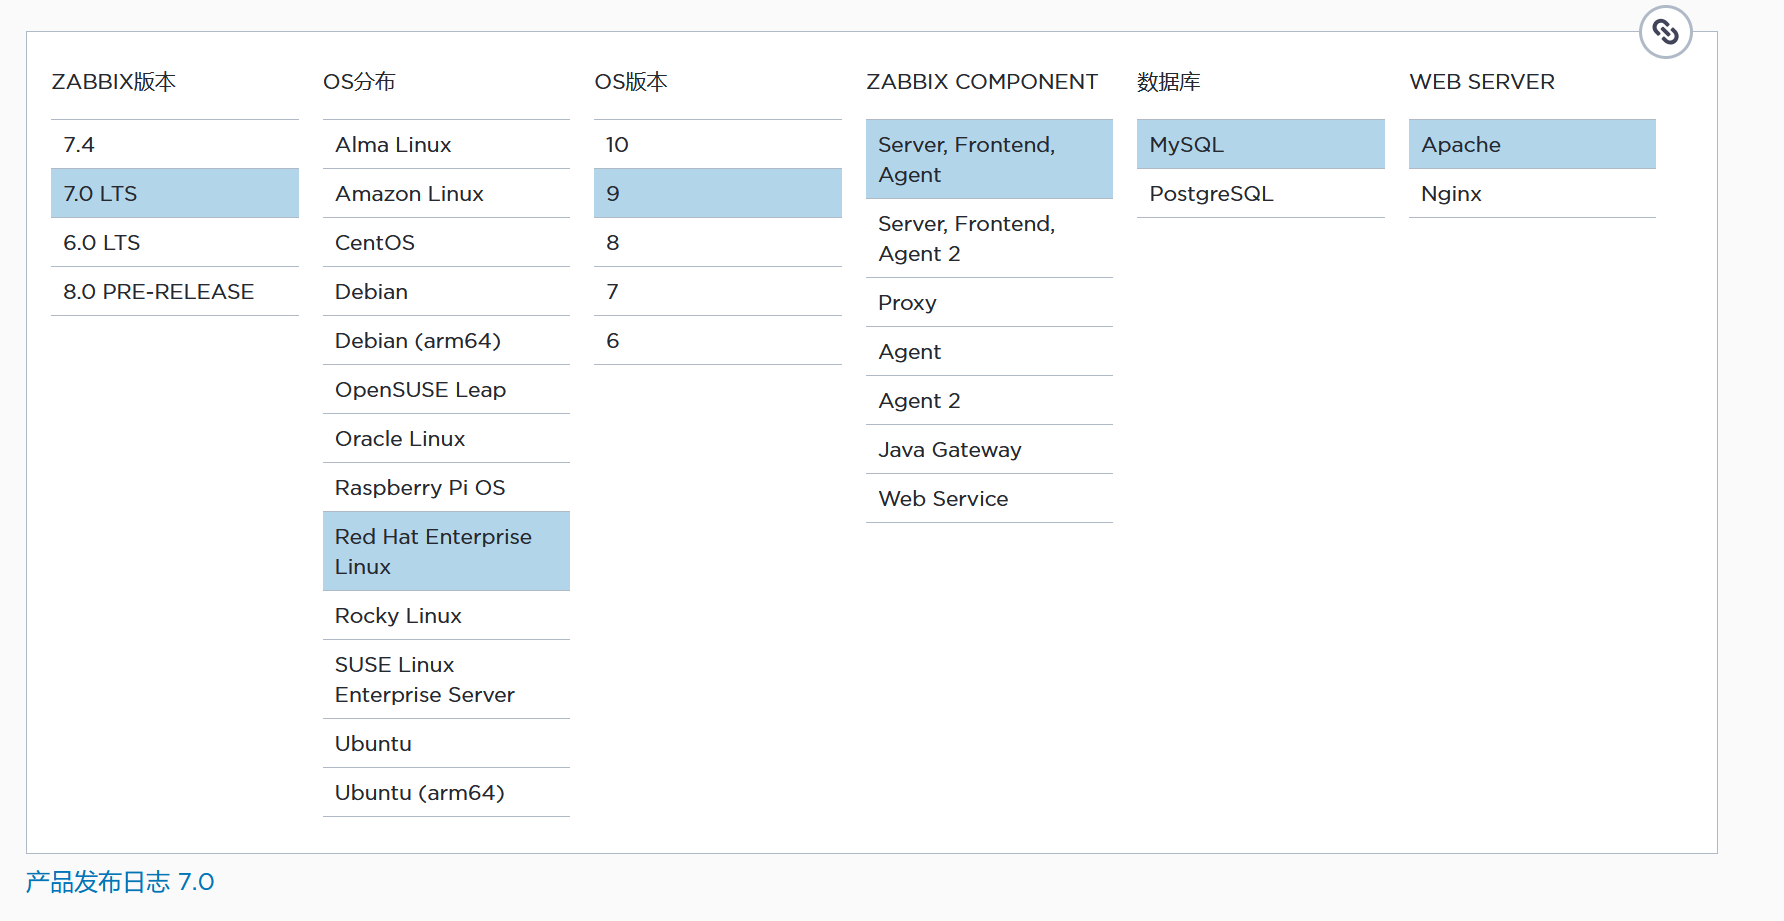
2.部署zabbix安装源
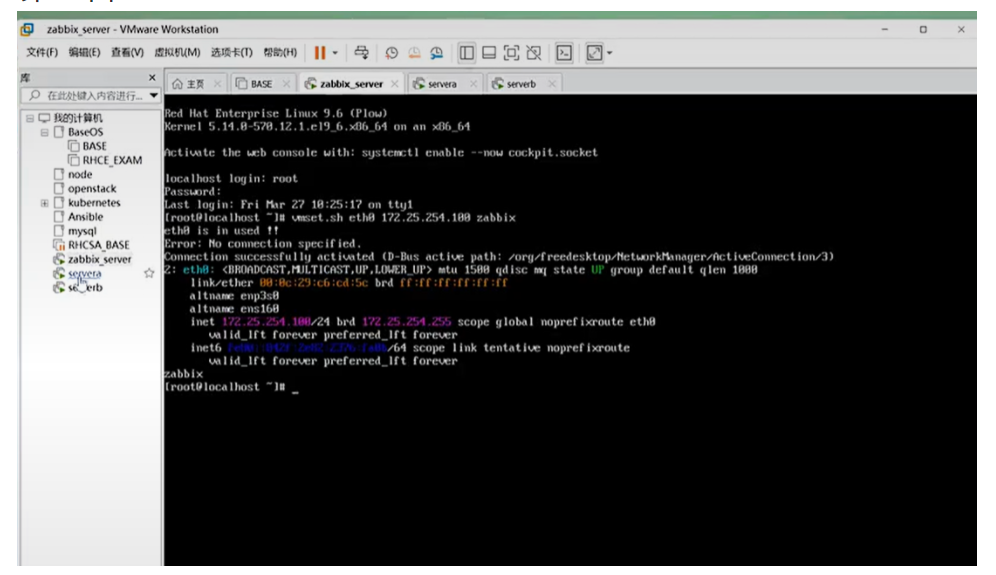
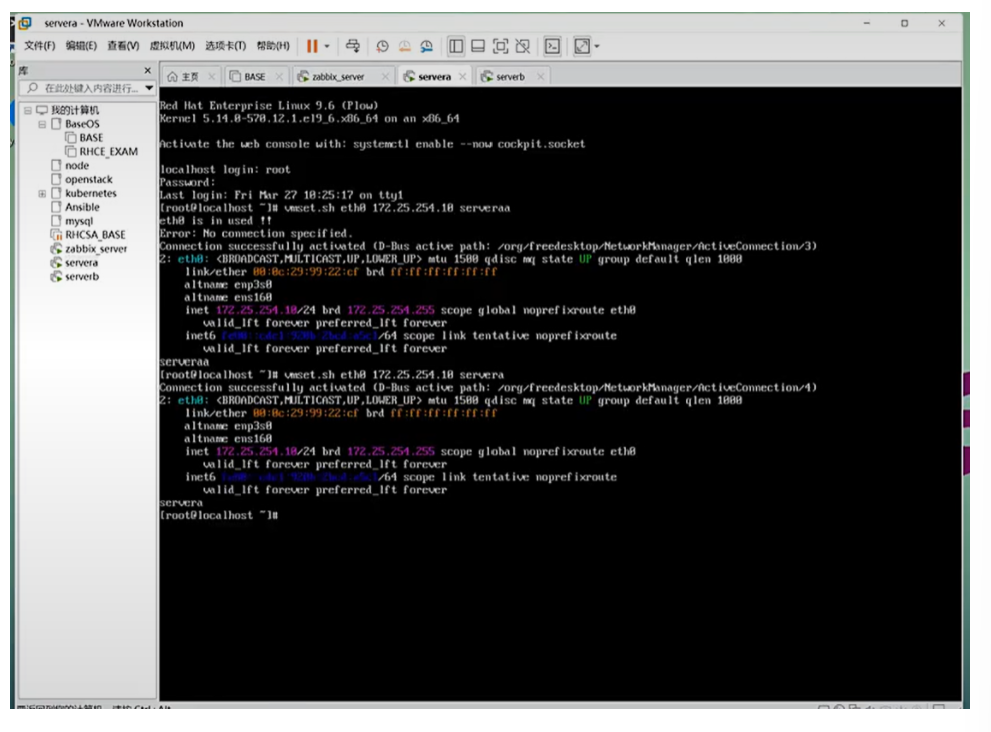
整三个虚拟机:

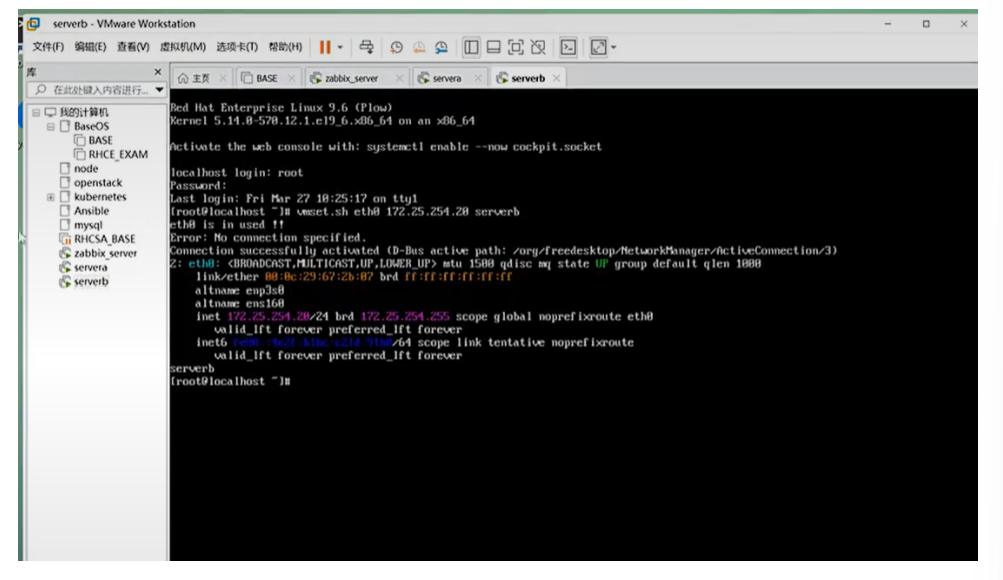
然后设置IP:
第一台:

第二台:

第三台:
云方向比较好部署,有镜像直接跑就可以了
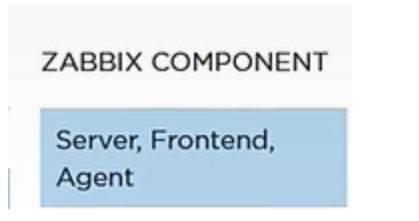
Frontend:前端; Agent:采集器,后端;
然后鼠标下滑:
然后开始复制粘贴:
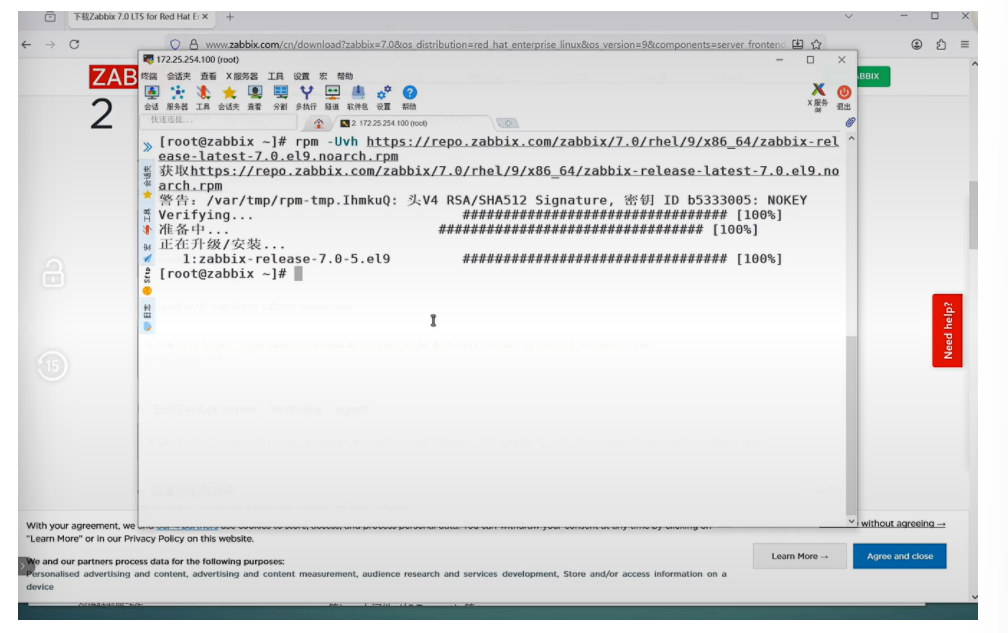

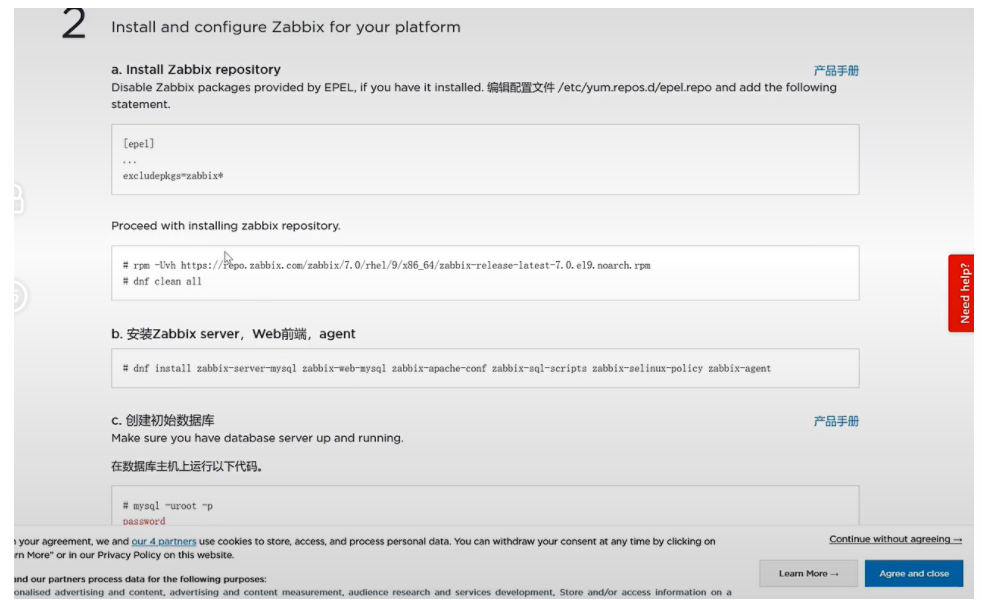
#安装官方源到系统中 [root@zabbix ~]# dnf install zabbix-server-mysql zabbix-web-mysql zabbix-apache-conf zabbix-sql-scripts zabbix-selinux-policy zabbix-agent #查看信息 [root@zabbix ~]# cd /etc/yum.repos.d/ [root@zabbix yum.repos.d]# ls redhat.repo rhel9.repo zabbix.repo zabbix-tools.repo
3.安装zabbix服务端
[root@zabbix ~]# dnf install zabbix-agent.x86_64 zabbix-server-mysql.x86_64 -y4.安装zabbix前端及客户端
[root@zabbix ~]# dnf install zabbix-web-mysql zabbix-nginx-conf zabbix-sql-scripts zabbix-agent -y
5.安装数据库
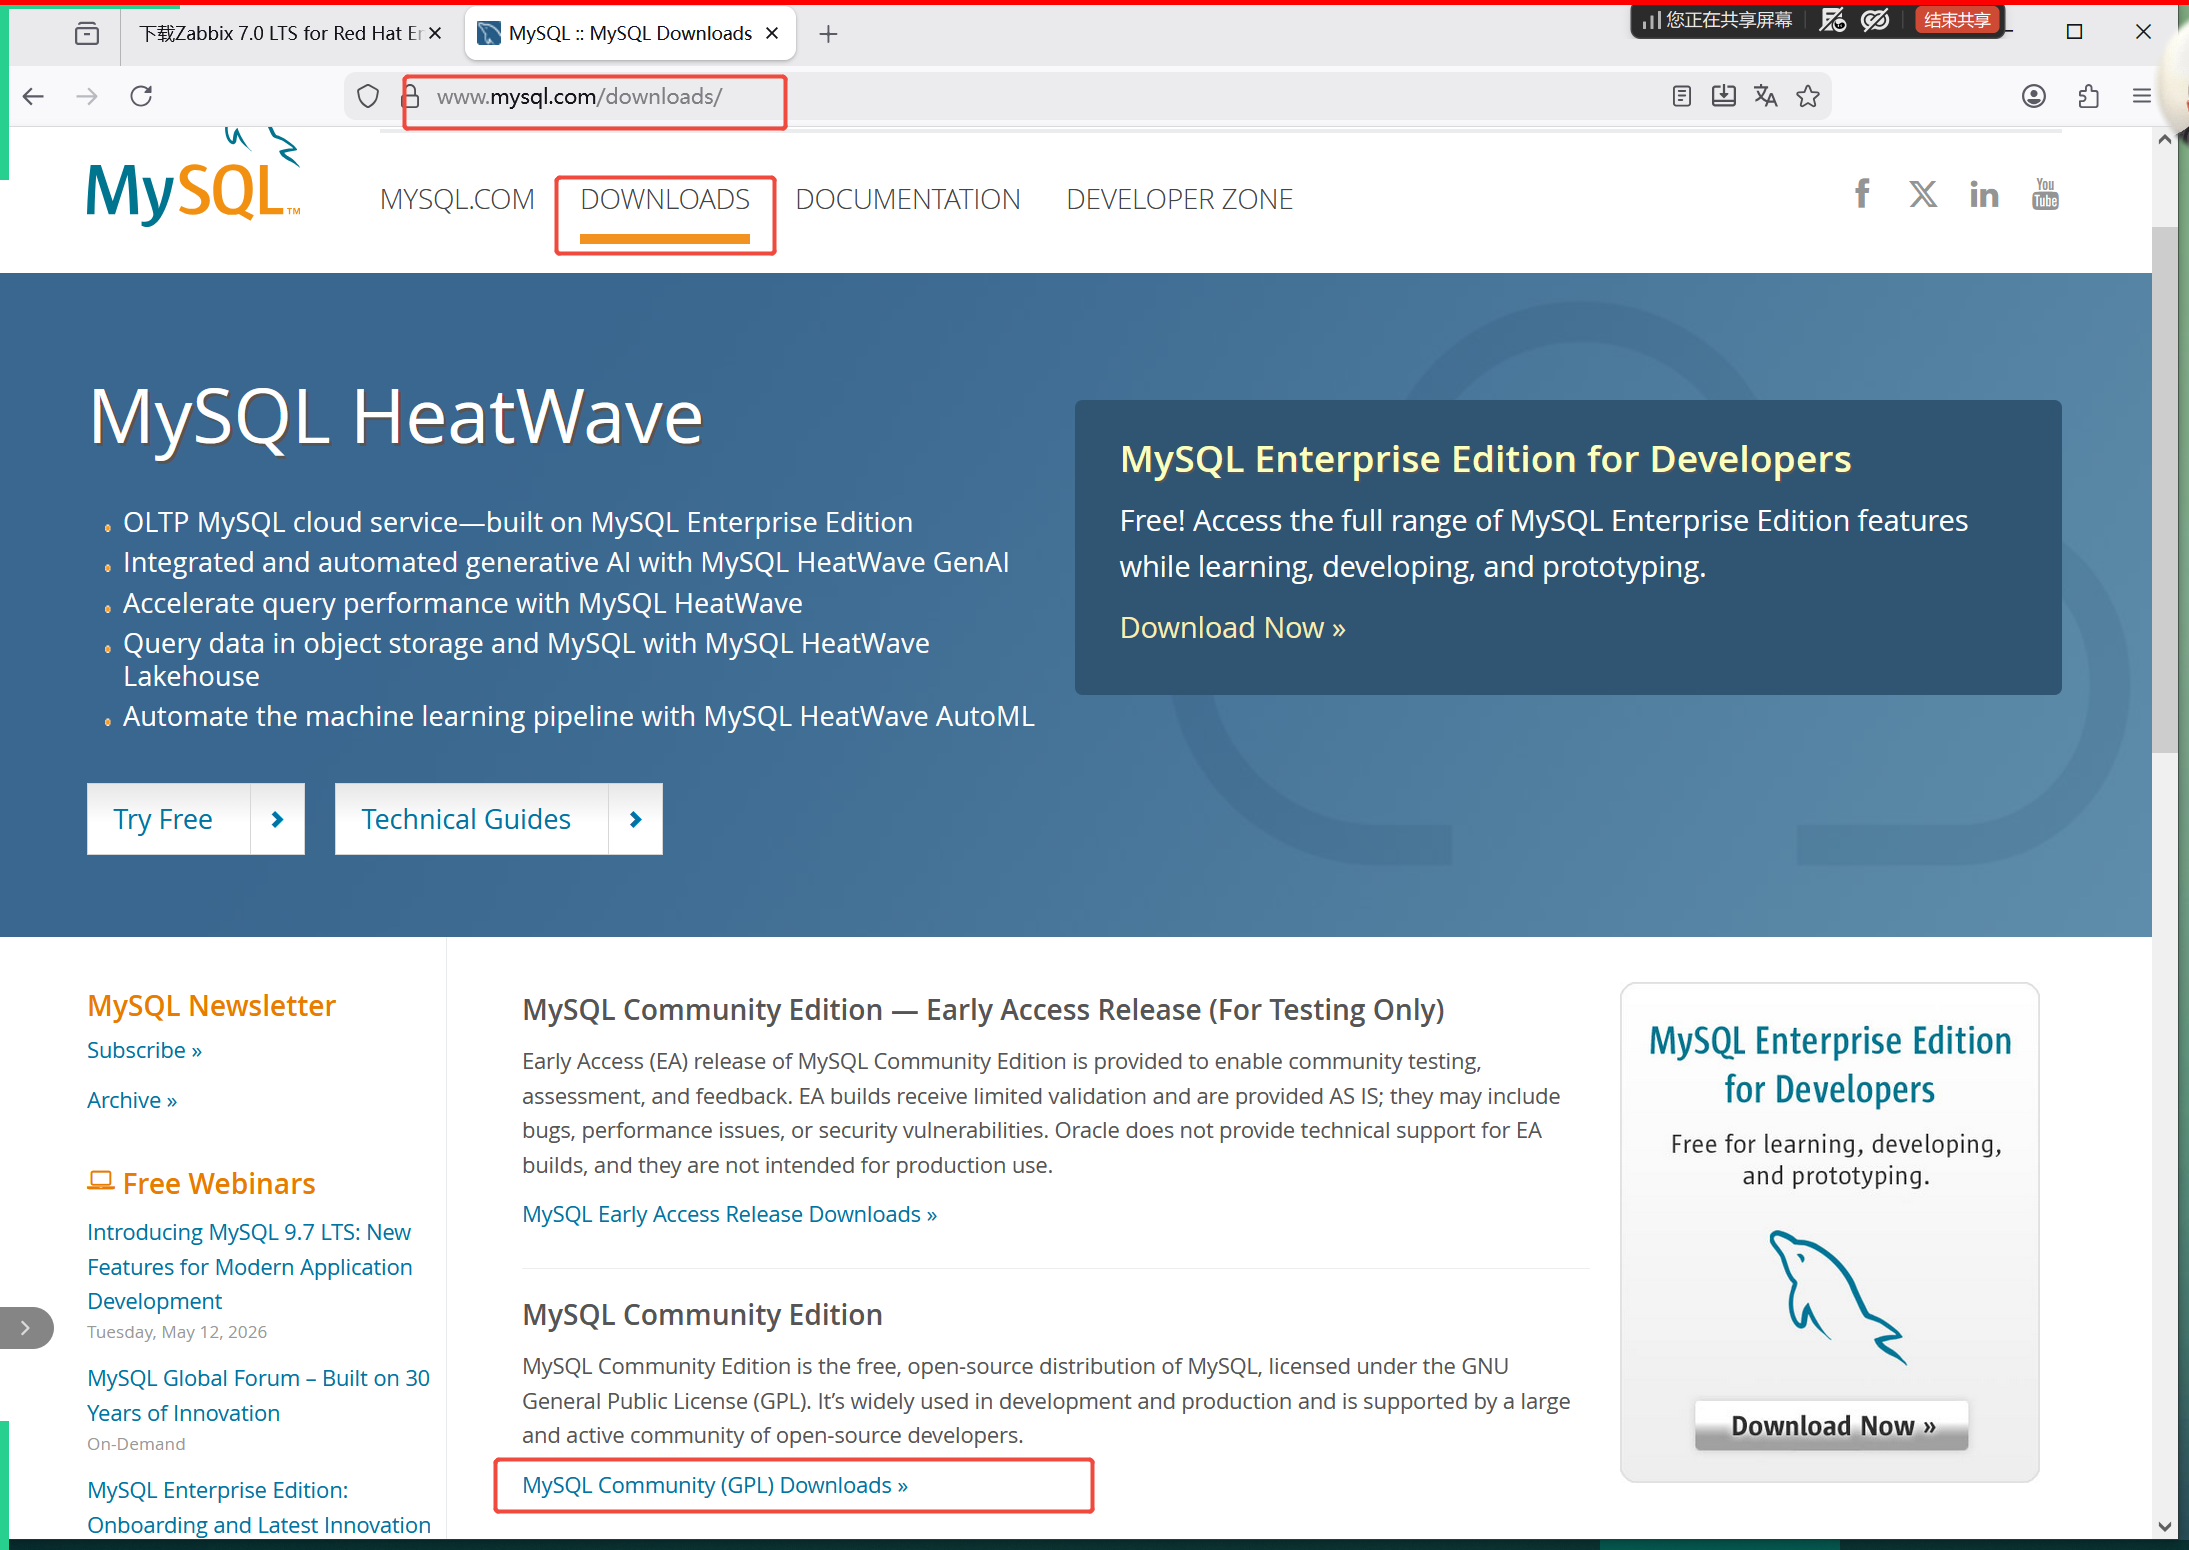
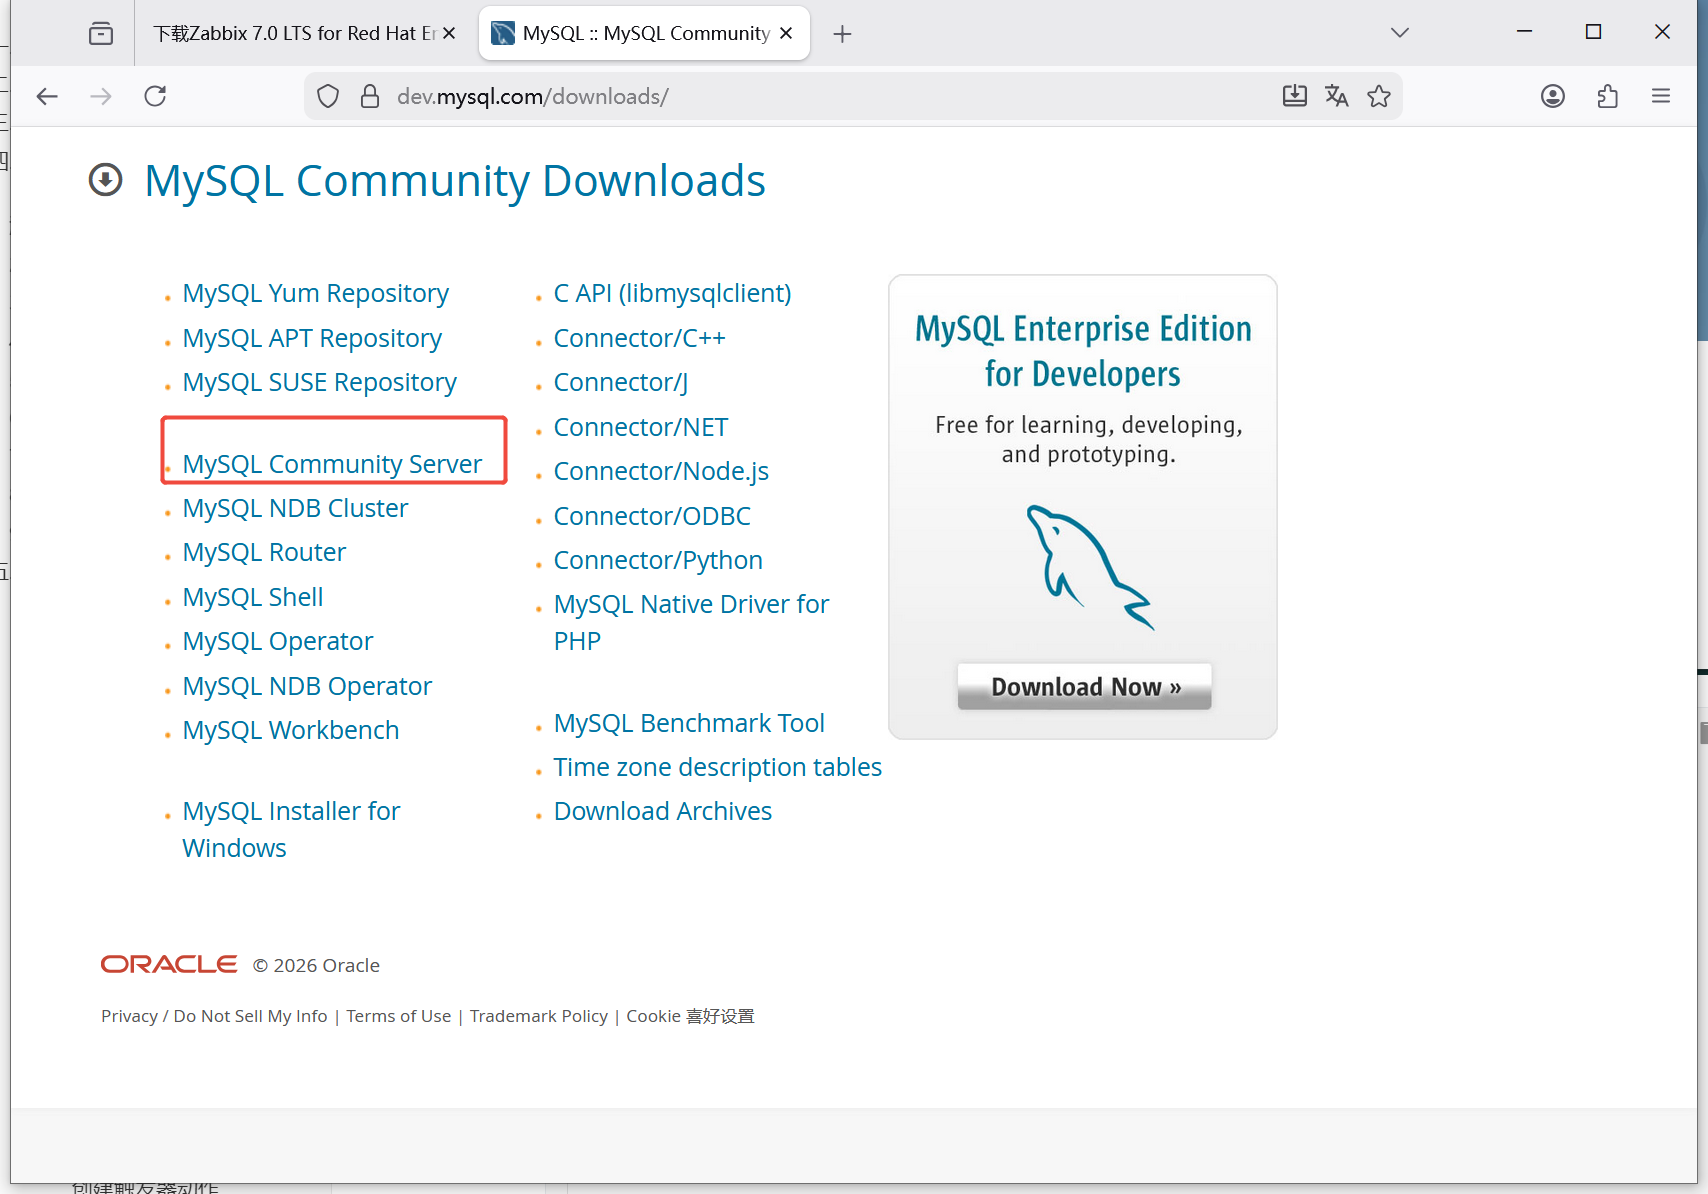
mysql数据库官网:www.mysql.com
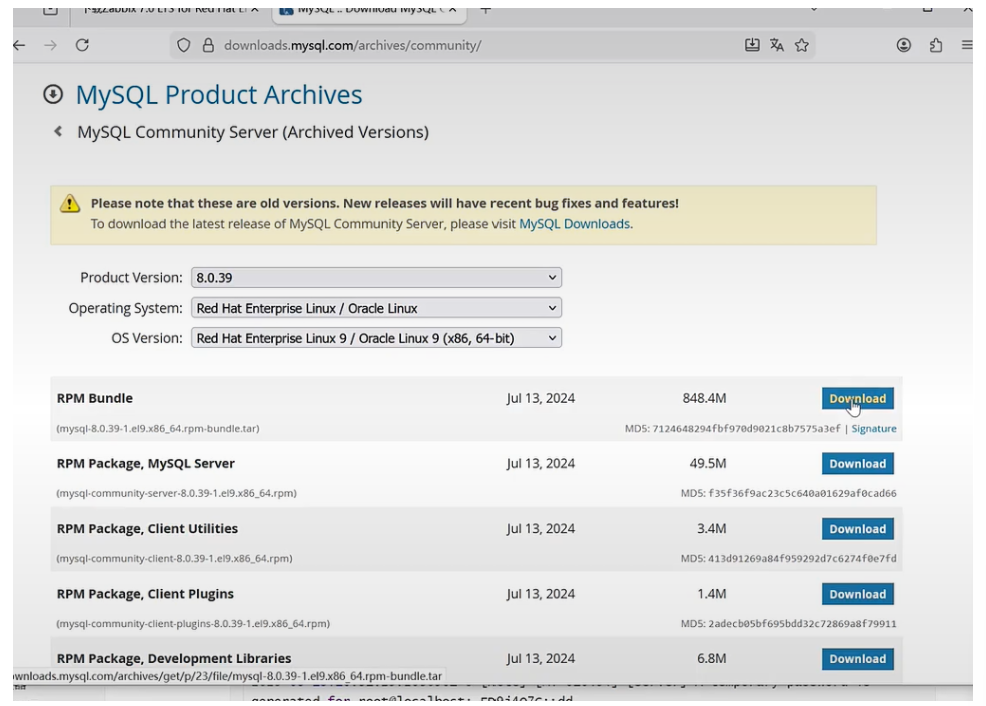
#下载mysql8的rpm包 [root@zabbix ~]# wget https://downloads.mysql.com/archives/get/p/23/file/mysql-8.0.39-1.el9.x86_64.rpm-bundle.tar #解压mysql8软件包归档文件 [root@zabbix ~]# tar xf mysql-8.0.45-1.el9.x86_64.rpm-bundle.tar #安装mysql8 [root@zabbix ~]# dnf install mysql-community-client-8.0.39-1.el9.x86_64.rpm \ mysql-community-client-plugins-8.0.39-1.el9.x86_64.rpm \ mysql-community-common-8.0.39-1.el9.x86_64.rpm \ mysql-community-icu-data-files-8.0.39-1.el9.x86_64.rpm \ mysql-community-server-8.0.39-1.el9.x86_64.rpm \ mysql-community-libs-8.0.39-1.el9.x86_64.rpm -y #启动数据库 [root@zabbix ~]# systemctl enable --now mysqld #查看数据库密码 [[root@zabbix ~]# grep password /var/log/mysqld.log 2026-05-10T06:26:37.360106Z 6 [Note] [MY-010454] [Server] A temporary password is generated for root@localhost: JMFd.amNY9Qm #数据库安全初始化 [root@zabbix ~]# mysql_secure_installation Securing the MySQL server deployment. Enter password for user root: The 'validate_password' component is installed on the server. The subsequent steps will run with the existing configuration of the component. Using existing password for root. Estimated strength of the password: 100 Change the password for root ? ((Press y|Y for Yes, any other key for No) : no ... skipping. By default, a MySQL installation has an anonymous user, allowing anyone to log into MySQL without having to have a user account created for them. This is intended only for testing, and to make the installation go a bit smoother. You should remove them before moving into a production environment. Remove anonymous users? (Press y|Y for Yes, any other key for No) : ... skipping. Normally, root should only be allowed to connect from 'localhost'. This ensures that someone cannot guess at the root password from the network. Disallow root login remotely? (Press y|Y for Yes, any other key for No) : ... skipping. By default, MySQL comes with a database named 'test' that anyone can access. This is also intended only for testing, and should be removed before moving into a production environment. Remove test database and access to it? (Press y|Y for Yes, any other key for No) : ... skipping. Reloading the privilege tables will ensure that all changes made so far will take effect immediately. Reload privilege tables now? (Press y|Y for Yes, any other key for No) : ... skipping. All done!
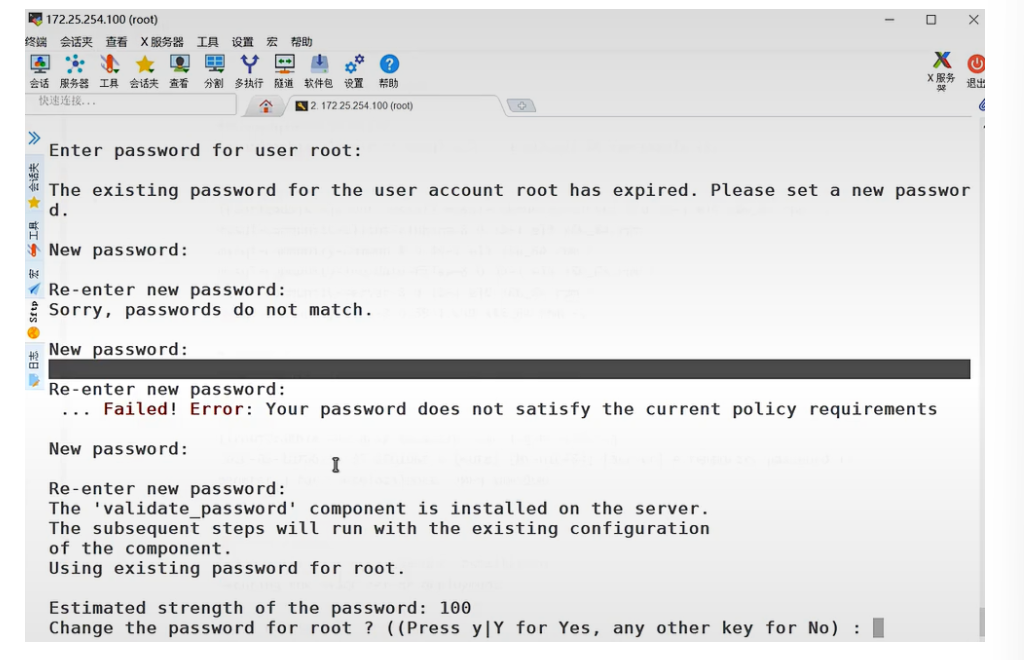
设置最高级别密码
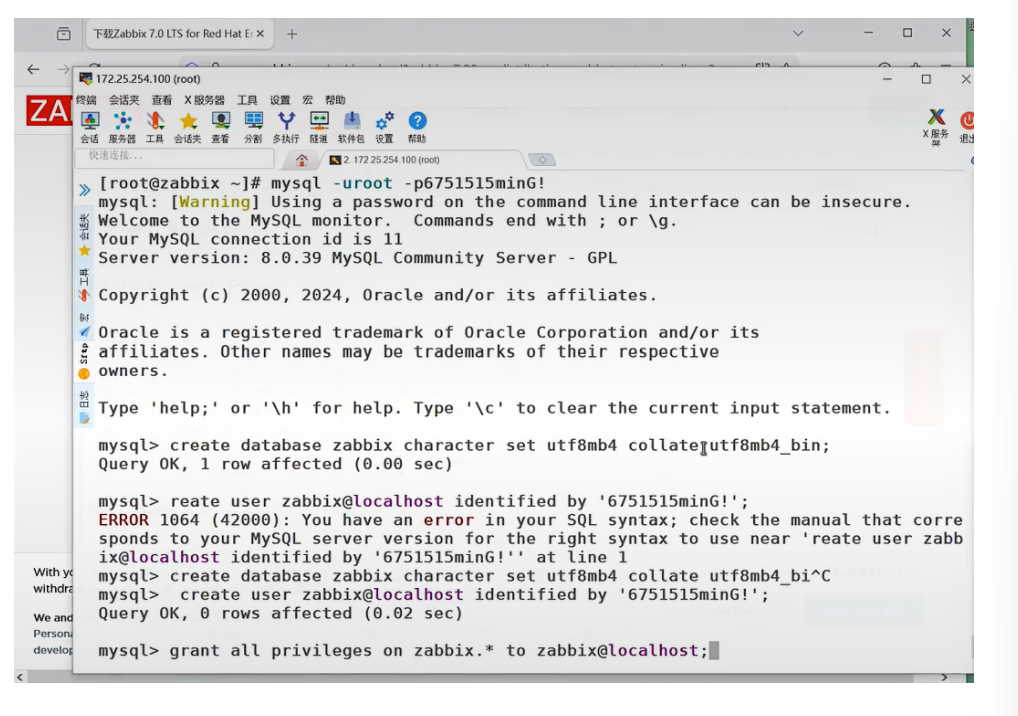
6.为zabbix建立数据库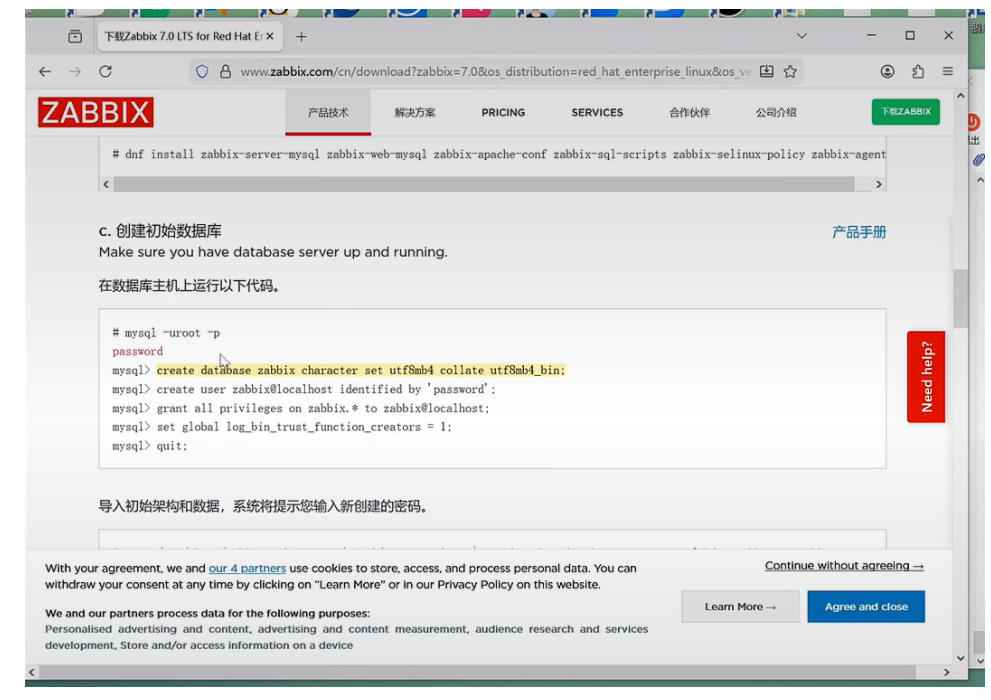
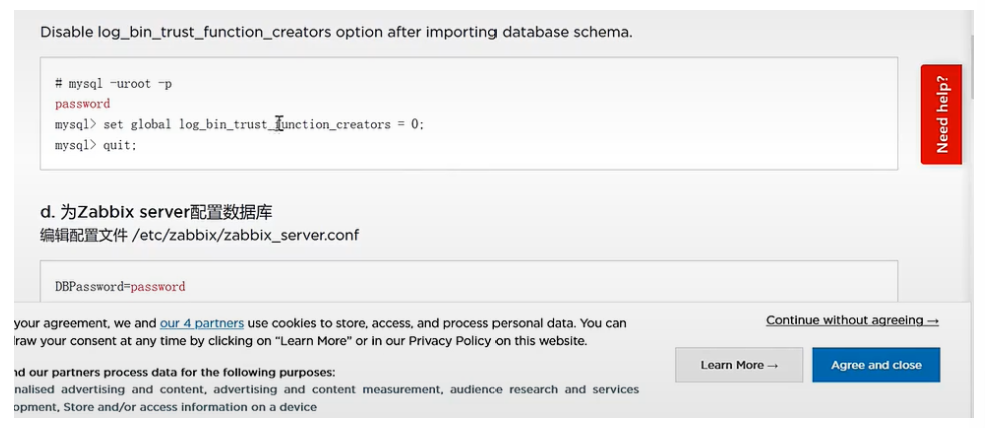
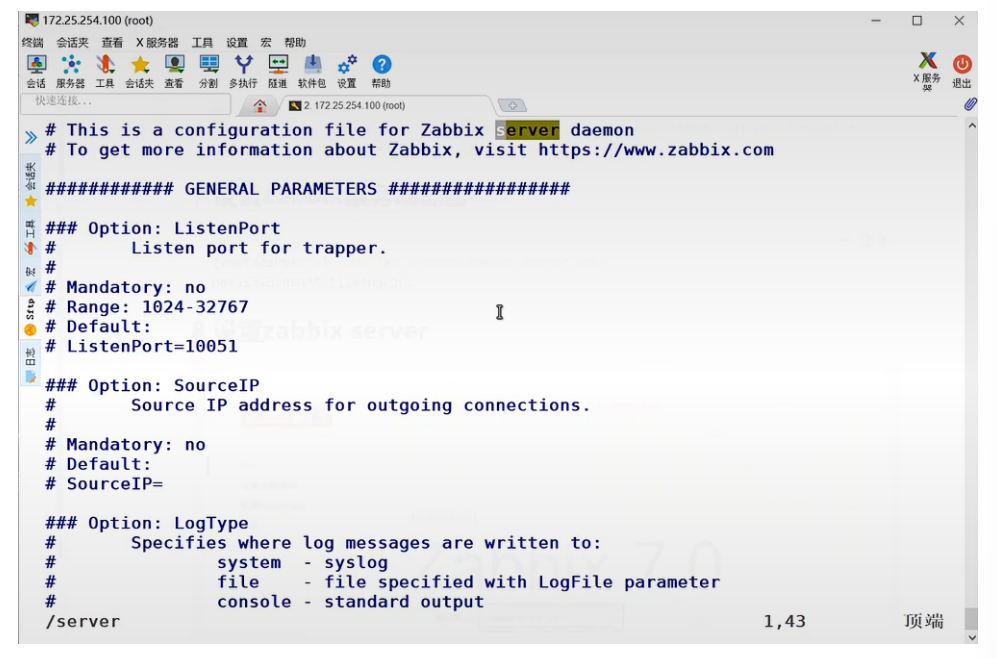
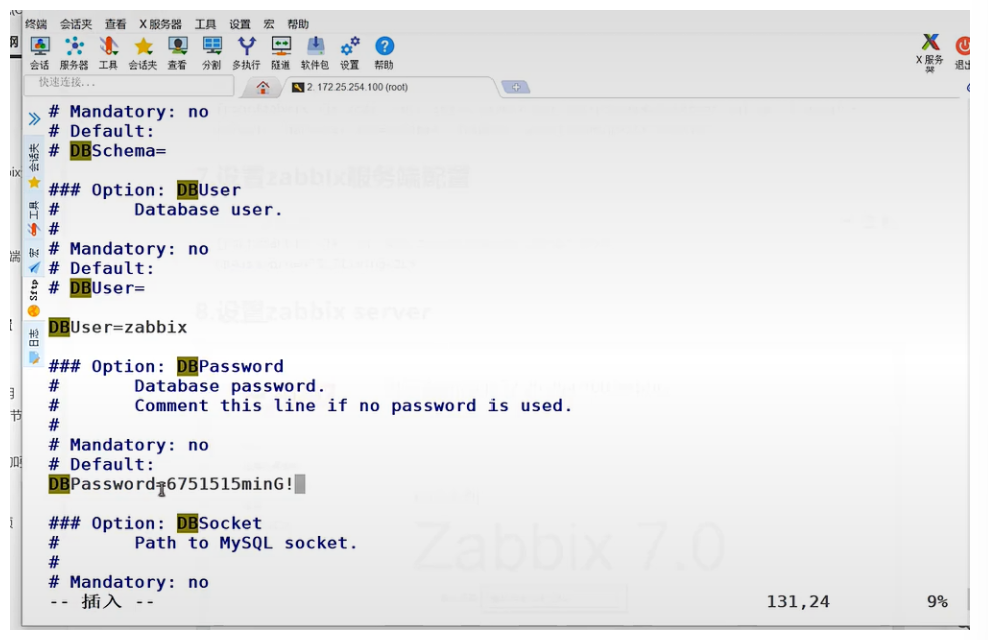
7.设置zabbix服务端配置
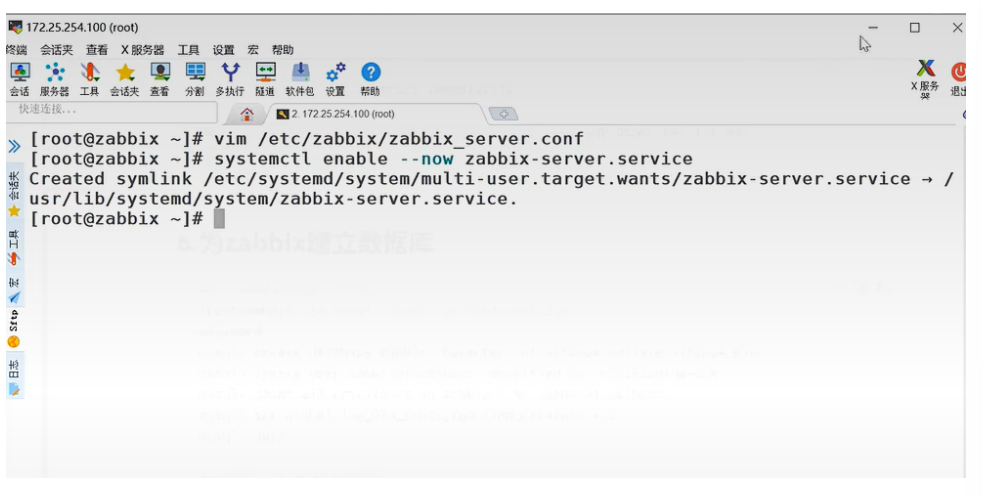
#编辑主配置文件
[root@zabbix ~]# vim /etc/zabbix/zabbix_server.conf
DBPassword=6751515ming+ZLN
#启动zabbix
[root@zabbix ~]# systemctl enable --now zabbix-server zabbix-agent httpd php-fpm续上步骤:
vim查找技巧:/ + 查找
修改密码:
开始运行了
所有服务都要启动:

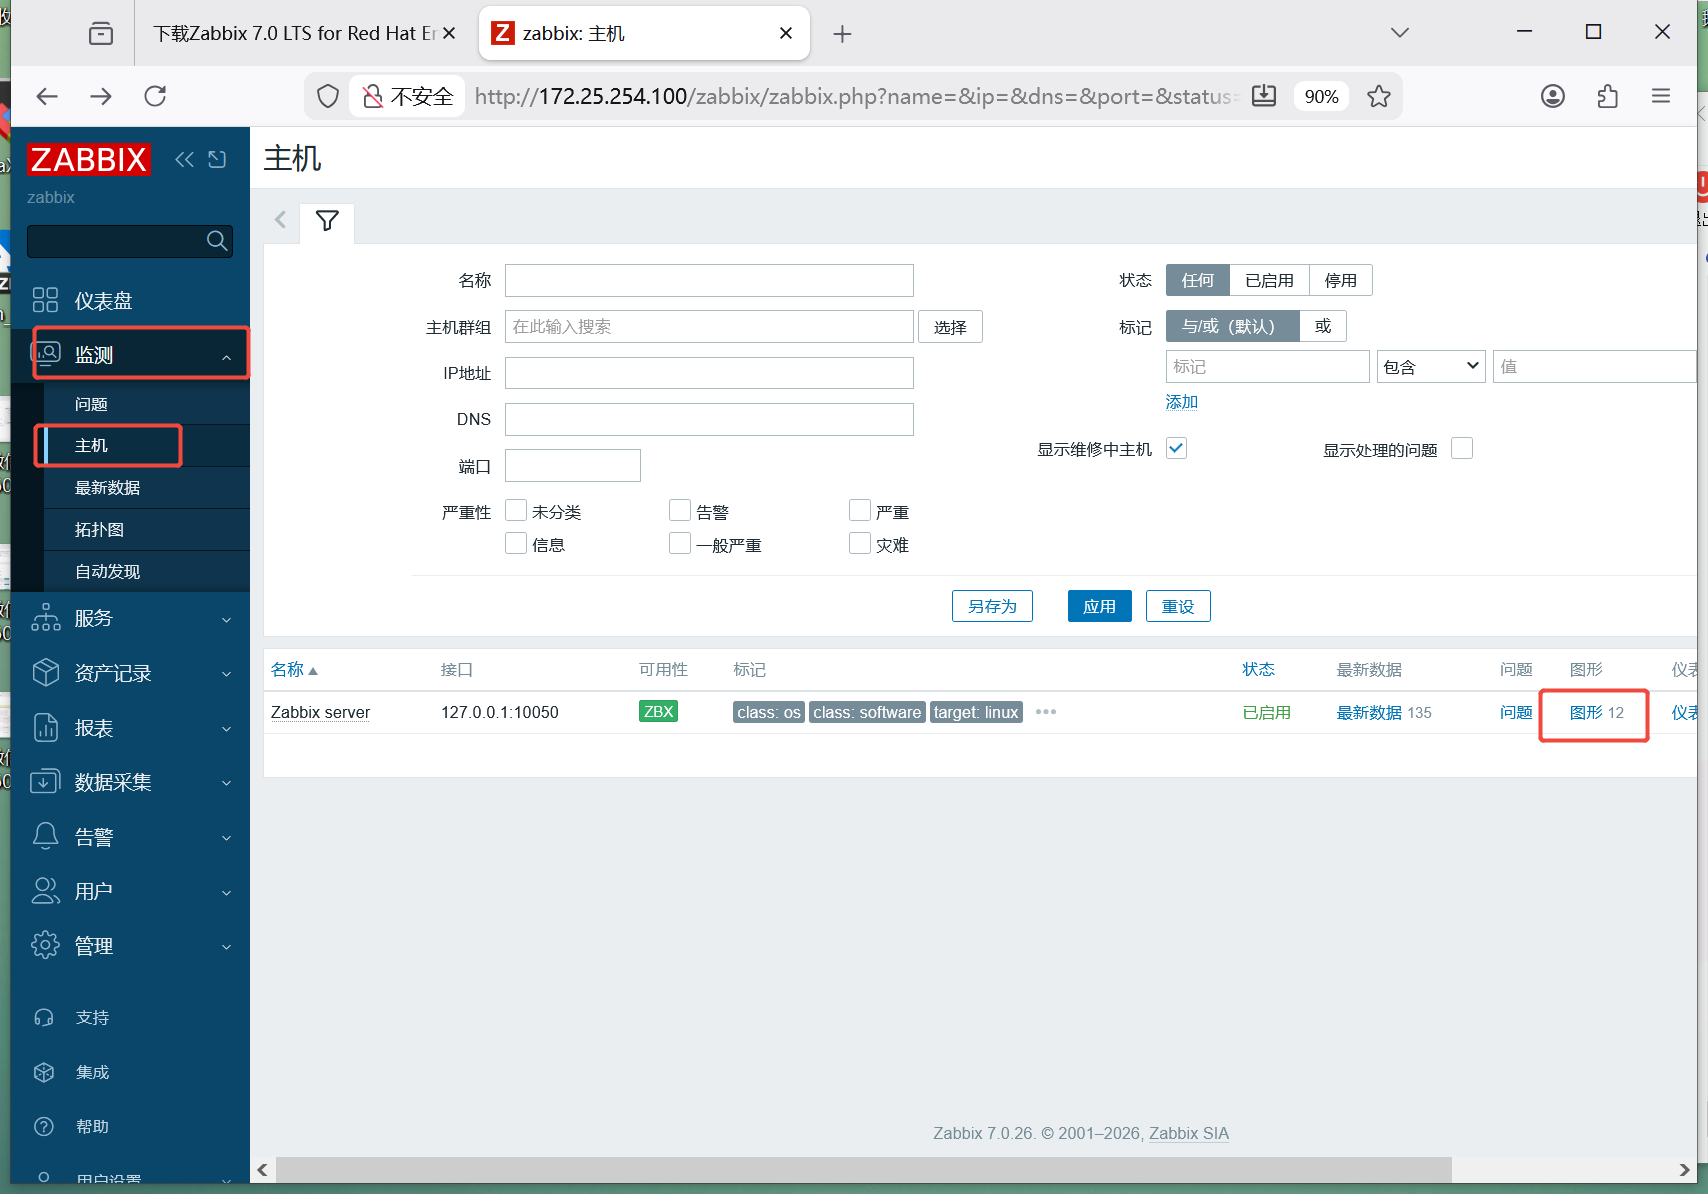
8.设置zabbix server
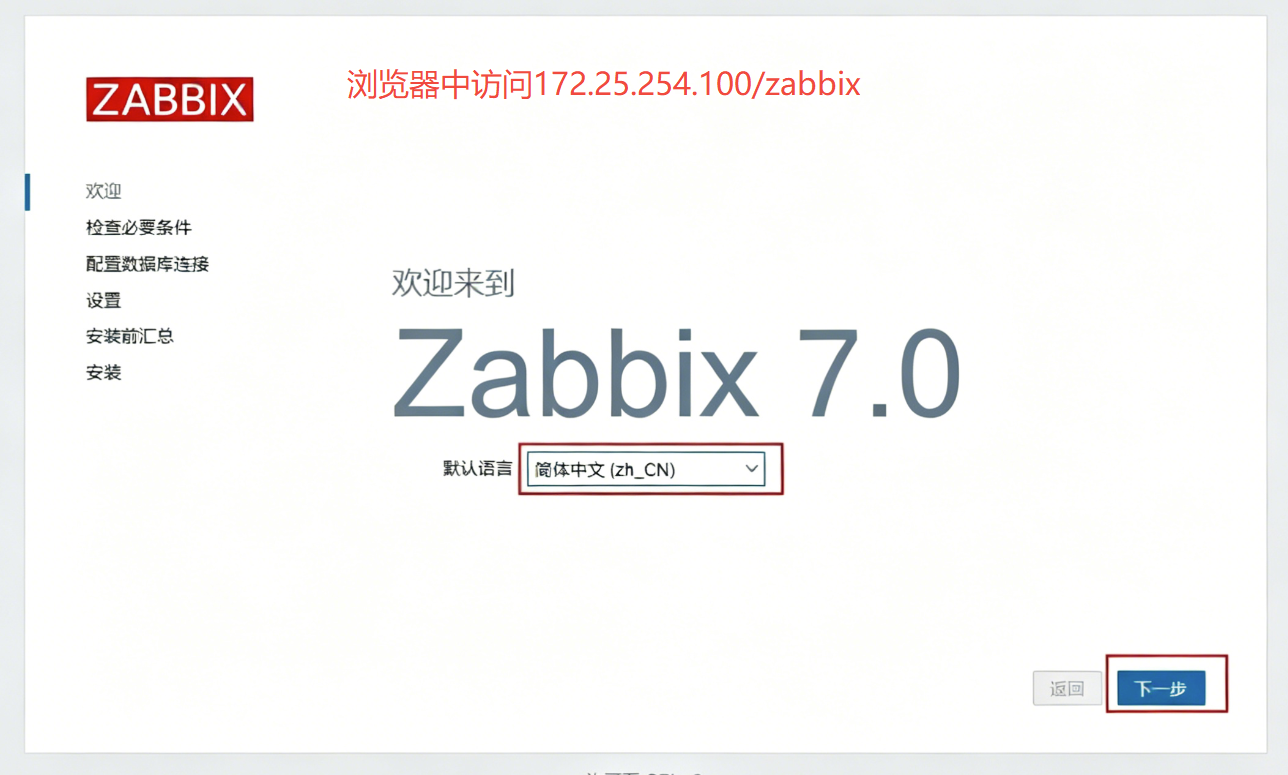
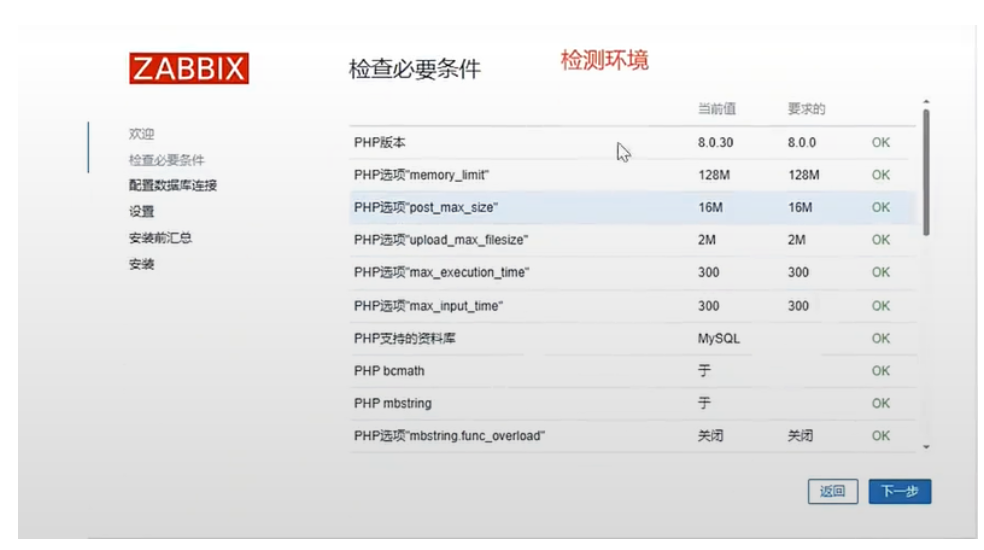
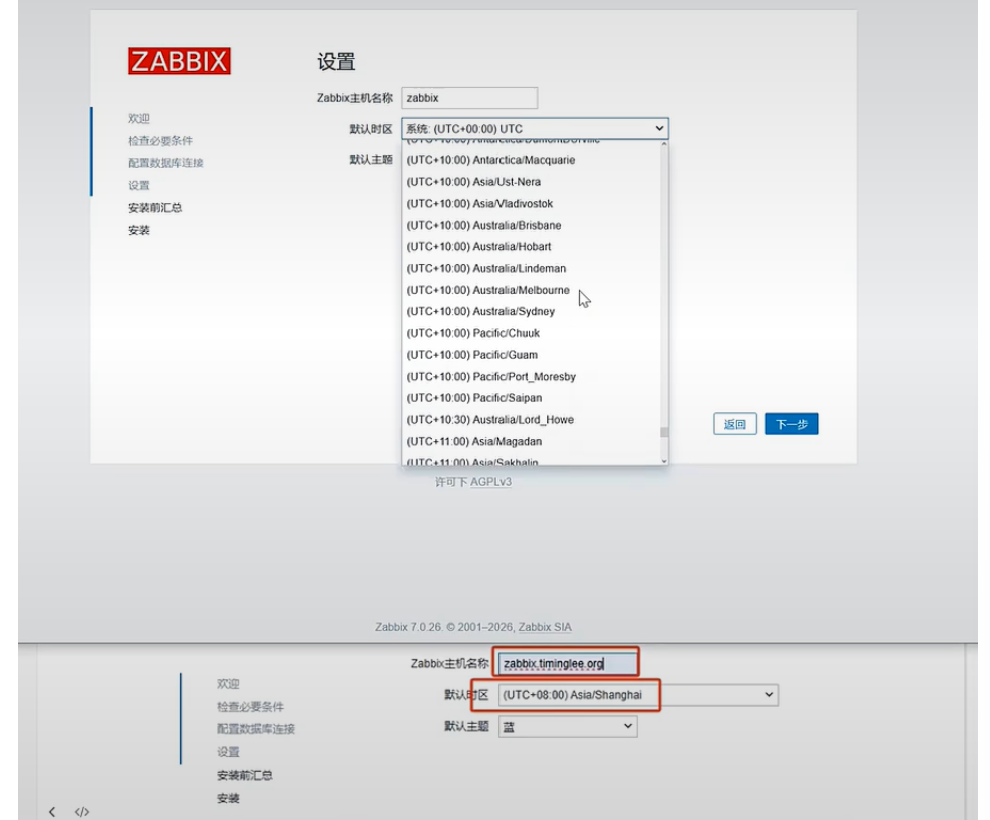


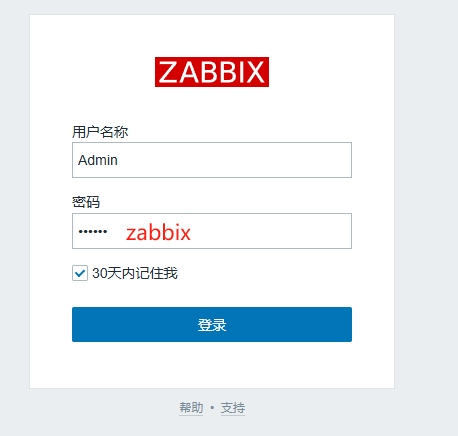
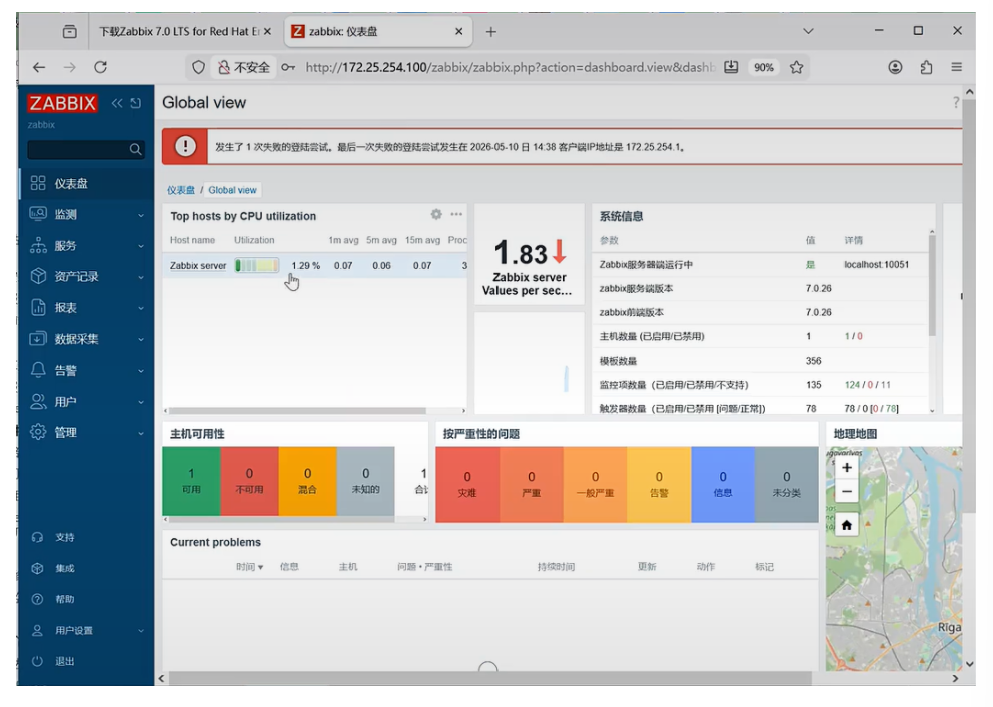
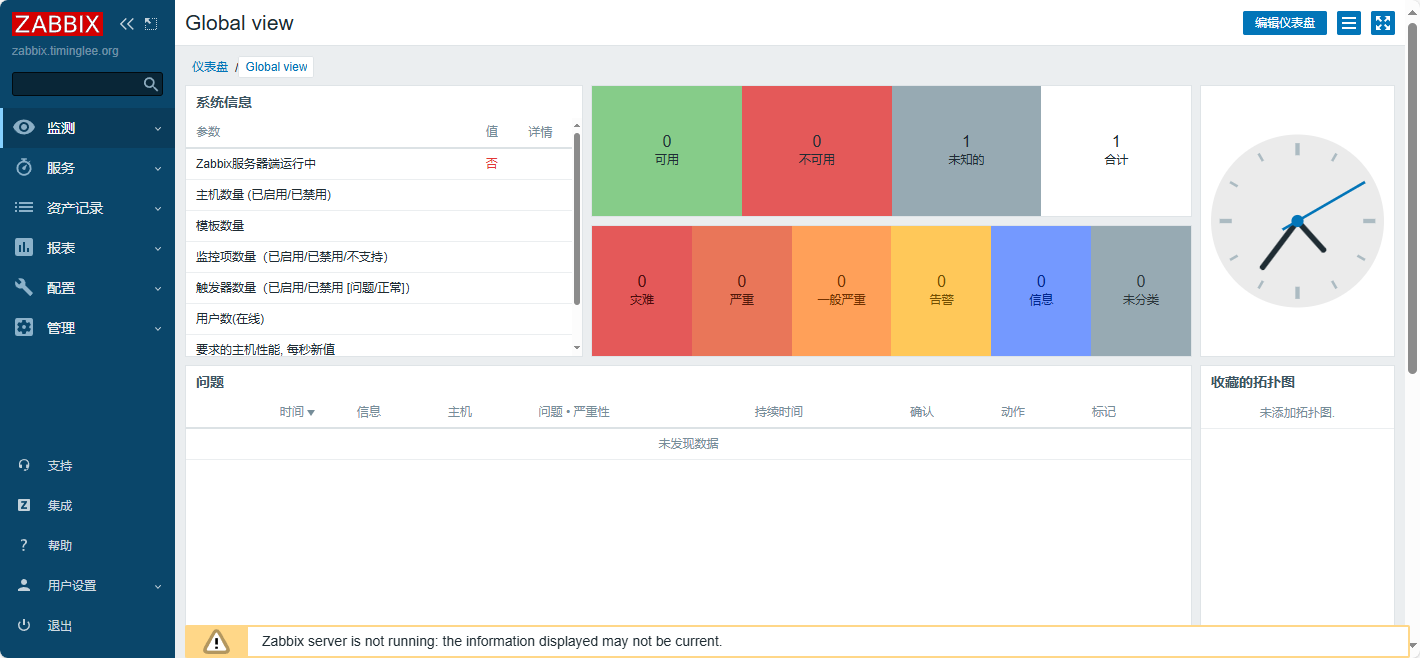
至此我们的zabbix server 就安装好了
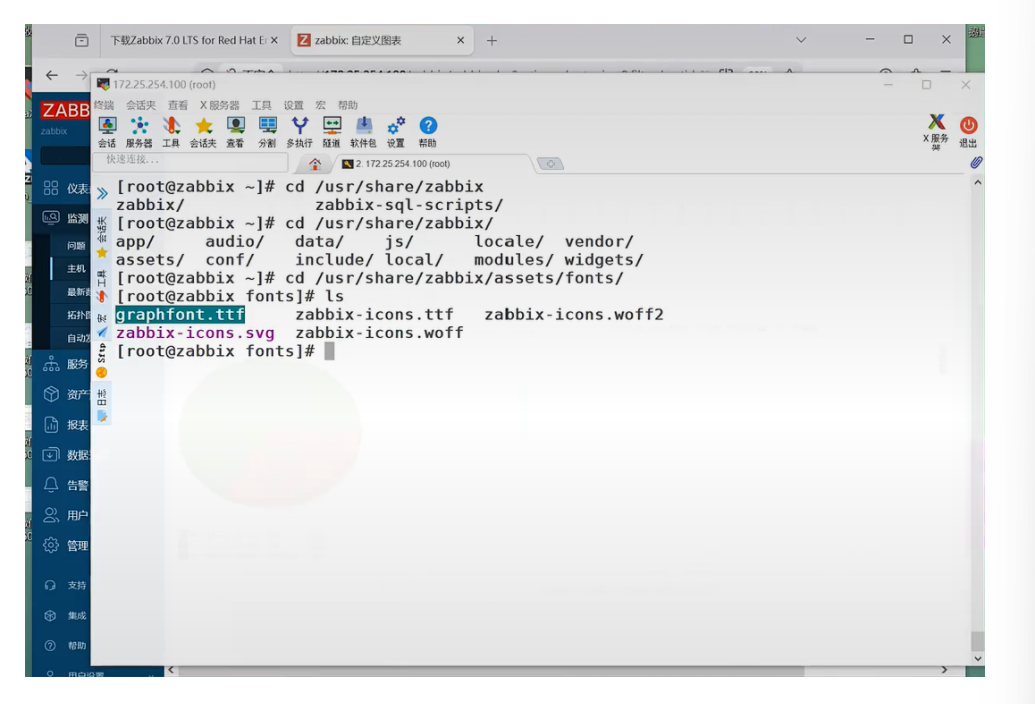
9.修改字体文件
在zabbix中如果使用中文字体图形显示会有错误,需要手动调整字体来解决问题
解决字体问题方法:
嘻嘻:
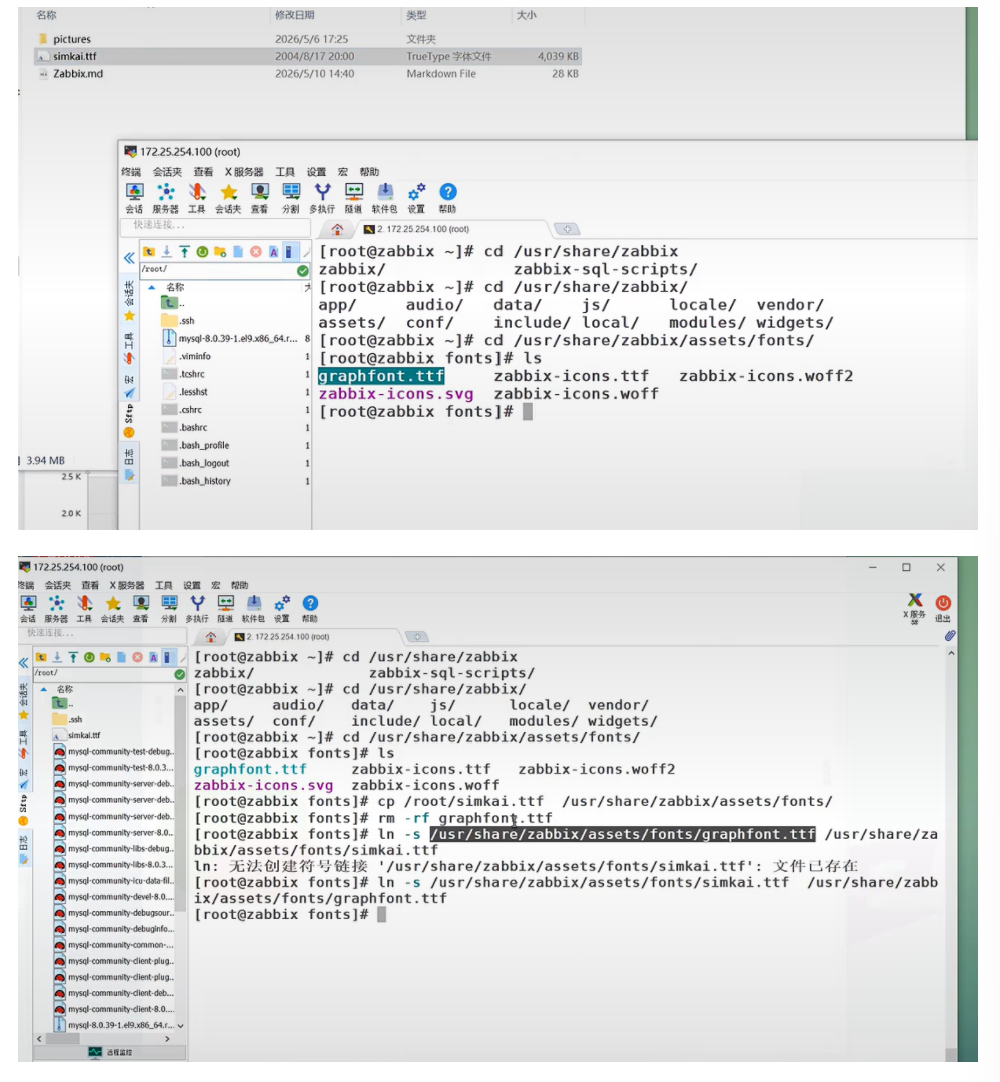
然后字体就好了:

打版结束

AtomGit 是由开放原子开源基金会联合 CSDN 等生态伙伴共同推出的新一代开源与人工智能协作平台。平台坚持“开放、中立、公益”的理念,把代码托管、模型共享、数据集托管、智能体开发体验和算力服务整合在一起,为开发者提供从开发、训练到部署的一站式体验。
更多推荐


 26
26 0
0- 0


 已为社区贡献2条内容

所有评论(0)