Python 网络请求与爬虫实战:Requests + BeautifulSoup + Scrapy + Selenium
Python 网络请求与爬虫实战:Requests + BeautifulSoup + Scrapy + Selenium
专栏:Python 常用工具库实战教程 | 第四篇
适合人群:全栈开发者、数据采集工程师、自动化测试工程师
目录
- 前言:网络请求与爬虫的关系
- 第一章:Requests —— 最优雅的 HTTP 库
- 第二章:aiohttp —— 异步高并发请求
- 第三章:BeautifulSoup —— HTML 解析神器
- 第四章:Selenium —— 浏览器自动化
- 第五章:Scrapy 简介
- 爬虫伦理与法律
前言
在互联网时代,数据就是力量。无论是做数据分析、竞品调研,还是构建自己的数据集,都离不开从网络获取数据。Python 提供了一套完整的工具链来应对各种场景:
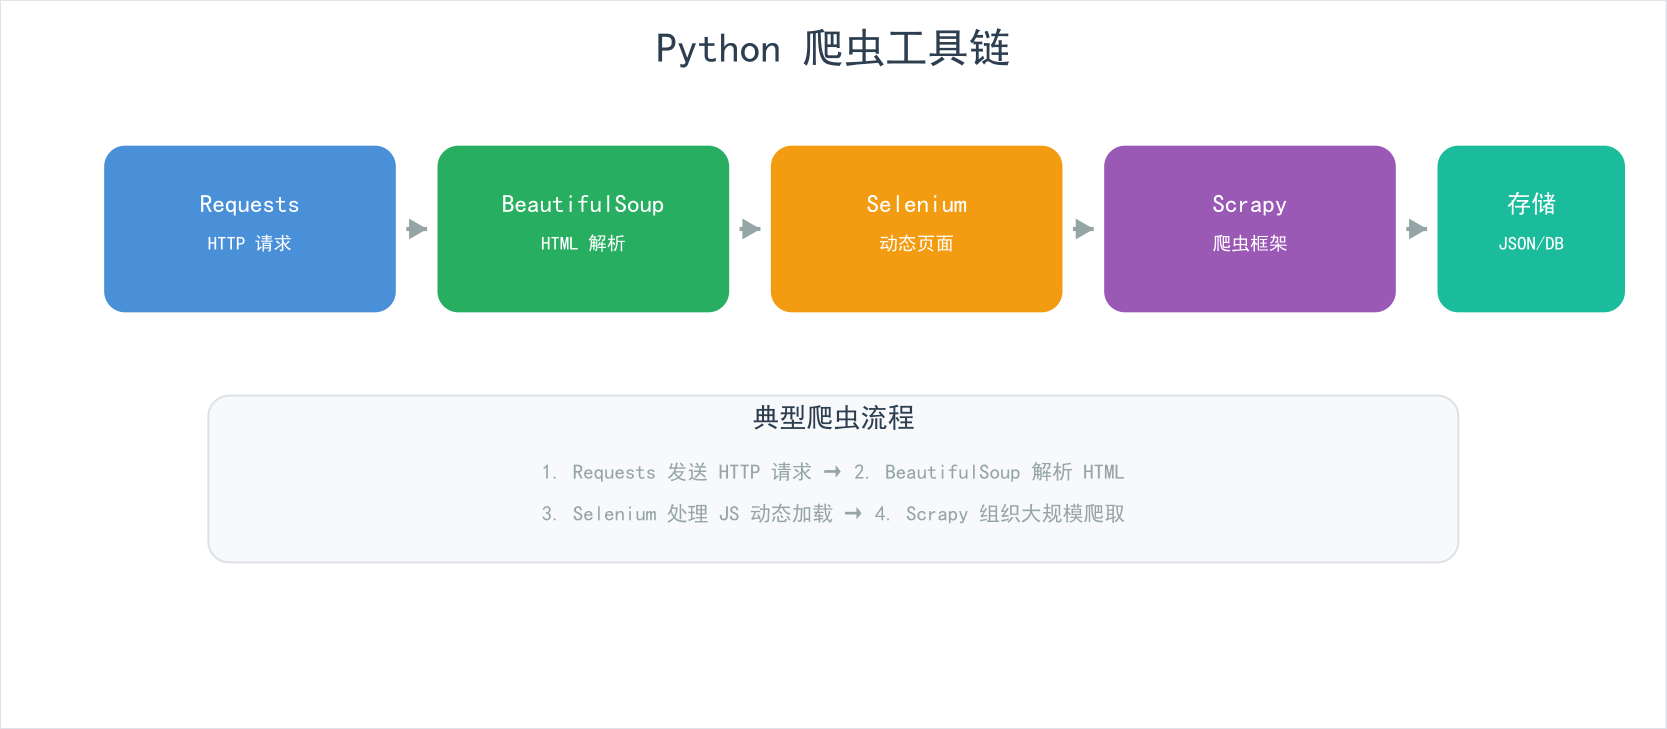
| 工具 | 定位 | 学习难度 | 适用场景 |
|---|---|---|---|
| requests | HTTP 客户端 | ⭐ | API 调用、简单抓取 |
| aiohttp | 异步 HTTP | ⭐⭐ | 大量并发请求 |
| BeautifulSoup | HTML 解析 | ⭐ | 从 HTML 提取数据 |
| Selenium | 浏览器自动化 | ⭐⭐⭐ | JS 渲染页面、表单交互 |
| Scrapy | 爬虫框架 | ⭐⭐⭐⭐ | 大规模爬取 |
第一章:Requests —— 最优雅的 HTTP 库
1.1 一行代码发起请求
Requests 被称为"HTTP for Humans",它的 API 设计极其优雅,让你忘记 HTTP 协议的复杂性。
pip install requests
import requests

# 一行代码获取网页
resp = requests.get('https://httpbin.org/get')
print(resp.json())
输出结果:
{
  "args": {},
  "headers": {
    "Accept": "*/*",
    "Host": "httpbin.org",
    "User-Agent": "python-requests/2.31.0"
  },
  "origin": "123.45.67.89",
  "url": "https://httpbin.org/get"
}
1.2 GET 请求详解
基本 GET 请求
import requests

resp = requests.get('https://httpbin.org/get', timeout=10)
print(f"状态码: {resp.status_code}")           # 200
print(f"响应时间: {resp.elapsed.total_seconds():.3f}s")  # ~7.6s
print(f"Content-Type: {resp.headers.get('Content-Type')}")  # application/json
实际运行结果:
状态码: 200
响应时间: 7.593s
Content-Type: application/json
URL: https://httpbin.org/get
Origin: 117.21.10.122
带参数的 GET 请求
params = {
    'page': 1,
    'per_page': 5,
    'search': 'python教程'
}
resp = requests.get('https://httpbin.org/get', params=params, timeout=10)

# 最终URL会自动拼接参数
# https://httpbin.org/get?page=1&per_page=5&search=python%E6%95%99%E7%A8%8B

print(f"Args: {resp.json().get('args')}")
# {'page': '1', 'per_page': '5', 'search': 'python教程'}
1.3 POST 请求与数据提交
# JSON 数据
resp = requests.post('https://httpbin.org/post', json={
    'username': 'testuser',
    'action': 'login'
})
print(resp.json().get('json'))
# {'username': 'testuser', 'action': 'login'}

# 表单数据
resp = requests.post('https://httpbin.org/post', data={
    'username': 'testuser',
    'password': 'secret'
})

# 文件上传
files = {'file': open('document.pdf', 'rb')}
resp = requests.post('https://httpbin.org/post', files=files)
1.4 自定义请求头与 Cookie
headers = {
    'User-Agent': 'Mozilla/5.0 (Windows NT 10.0; Win64; x64)',
    'Accept': 'application/json',
    'Accept-Language': 'zh-CN,zh;q=0.9',
    'Referer': 'https://example.com',
    'X-Custom-Header': 'PythonTutorial'
}

resp = requests.get('https://httpbin.org/headers', headers=headers)
for k, v in resp.json().get('headers', {}).items():
    print(f"  {k}: {v}")

# 带Cookie请求
cookies = {'session_id': 'abc123', 'user_pref': 'dark_mode'}
resp = requests.get('https://httpbin.org/cookies', cookies=cookies)
实际运行输出:
  Accept: application/json
  Accept-Language: zh-CN,zh;q=0.9
  Host: httpbin.org
  User-Agent: Mozilla/5.0 (Windows NT 10.0; Win64; x64)
  X-Custom-Header: PythonTutorial
1.5 响应处理与状态码
resp = requests.get('https://httpbin.org/status/200')

# 响应内容
resp.text          # 文本内容 (str)
resp.content       # 二进制内容 (bytes)
resp.json()        # JSON 解析 (dict/list)
resp.status_code   # 状态码 (int)
resp.headers       # 响应头 (dict)
resp.url           # 最终 URL
resp.encoding      # 编码
resp.cookies       # Cookie
resp.elapsed       # 响应时间 (timedelta)

# 常见状态码
STATUS_CODES = {
    200: 'OK - 请求成功',
    201: 'Created - 资源创建成功',
    301: 'Moved Permanently - 永久重定向',
    302: 'Found - 临时重定向',
    304: 'Not Modified - 缓存有效',
    400: 'Bad Request - 请求参数错误',
    401: 'Unauthorized - 未认证',
    403: 'Forbidden - 无权限',
    404: 'Not Found - 资源不存在',
    429: 'Too Many Requests - 请求过多',
    500: 'Internal Server Error - 服务器错误',
    502: 'Bad Gateway - 网关错误',
    503: 'Service Unavailable - 服务不可用',
}
1.6 Session 会话管理
Session 可以在多次请求之间保持 Cookie,类似浏览器的会话:
session = requests.Session()

# 设置公共请求头
session.headers.update({
    'User-Agent': 'PythonTutorial/1.0',
    'Accept': 'application/json'
})

# 第一次请求(服务端设置Cookie)
session.get('https://httpbin.org/cookies/set/session_id/abc123')

# 第二次请求(自动携带Cookie)
resp = session.get('https://httpbin.org/cookies')
print(resp.json().get('cookies'))
# {'session_id': 'abc123'}

session.close()
Session vs 普通请求对比:
| 特性 | 普通请求 | Session |
|---|---|---|
| Cookie 保持 | 否 | 是 |
| 公共 Headers | 每次手动设置 | 一次设置即可 |
| TCP 连接复用 | 否 | 是(更快) |
| 适用场景 | 一次性请求 | 多次关联请求 |
1.7 文件上传与下载
# ─── 文件上传 ───
files = {
    'file': ('report.pdf', open('report.pdf', 'rb'), 'application/pdf')
}
resp = requests.post('https://httpbin.org/post', files=files)

# ─── 小文件下载 ───
resp = requests.get('https://example.com/image.jpg')
with open('downloaded.jpg', 'wb') as f:
    f.write(resp.content)

# ─── 大文件流式下载 ───
resp = requests.get('https://example.com/large.zip', stream=True)
total = int(resp.headers.get('content-length', 0))
downloaded = 0

with open('large.zip', 'wb') as f:
    for chunk in resp.iter_content(chunk_size=8192):
        f.write(chunk)
        downloaded += len(chunk)
        percent = downloaded / total * 100
        print(f"\r下载进度: {percent:.1f}%", end='')
1.8 超时与重试机制
from requests.adapters import HTTPAdapter
from urllib3.util.retry import Retry

# 设置超时
resp = requests.get('https://httpbin.org/delay/5', timeout=(3, 10))
#                      timeout=(连接超时, 读取超时)

# 自动重试
session = requests.Session()
retry = Retry(
    total=3,                    # 总重试次数
    backoff_factor=1,           # 重试间隔: 1, 2, 4 秒
    status_forcelist=[500, 502, 503, 504],  # 重试的状态码
    allowed_methods=['GET']     # 只对GET重试
)
adapter = HTTPAdapter(max_retries=retry)
session.mount('http://', adapter)
session.mount('https://', adapter)

resp = session.get('https://httpbin.org/get')
1.9 异常处理最佳实践
import requests
from requests.exceptions import (
    ConnectionError, Timeout, HTTPError,
    RequestException, TooManyRedirects
)

def safe_request(url, method='GET', **kwargs):
    """安全的请求函数,统一异常处理"""
    try:
        resp = requests.request(method, url, timeout=10, **kwargs)
        resp.raise_for_status()  # 非200抛出HTTPError
        return resp

    except ConnectionError:
        print(f"❌ 连接失败: 检查网络或URL是否正确")
    except Timeout:
        print(f"⏱️ 请求超时: {url}")
    except HTTPError as e:
        code = e.response.status_code
        if code == 429:
            print(f"🚦 请求过频: 请降低请求频率")
        elif code >= 500:
            print(f"🔧 服务器错误: {code} 请稍后重试")
        else:
            print(f"🚫 HTTP错误: {code}")
    except TooManyRedirects:
        print(f"🔄 重定向过多: {url}")
    except RequestException as e:
        print(f"⚠️ 请求异常: {e}")

    return None

# 使用
resp = safe_request('https://api.example.com/data')
if resp:
    data = resp.json()
第二章:aiohttp —— 异步高并发请求
2.1 为什么需要异步
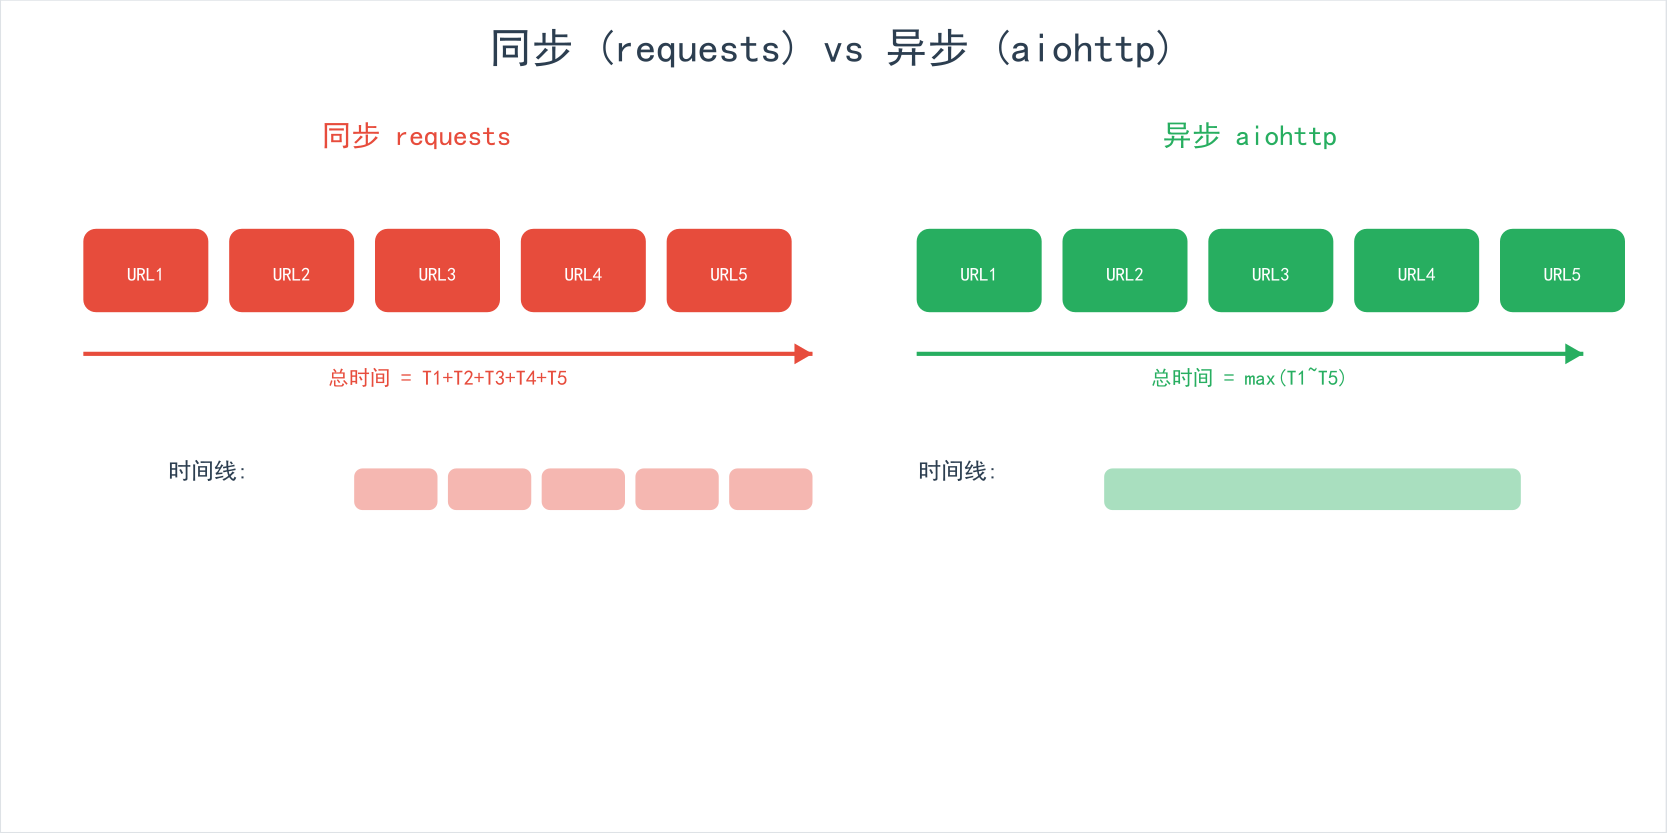
当我们需要同时请求大量 URL 时,同步的 requests 效率很低:
pip install aiohttp
2.2 aiohttp 基本用法
import aiohttp
import asyncio

async def fetch(url):
    async with aiohttp.ClientSession() as session:
        async with session.get(url) as resp:
            print(f"状态码: {resp.status}")
            return await resp.text()

# 运行异步函数
html = asyncio.run(fetch('https://httpbin.org/get'))
2.3 并发请求实战
import aiohttp
import asyncio
import time

async def fetch(session, url):
    try:
        async with session.get(url, timeout=aiohttp.ClientTimeout(total=10)) as resp:
            data = await resp.json()
            return {'url': url, 'status': resp.status, 'data': data}
    except Exception as e:
        return {'url': url, 'status': 0, 'error': str(e)}

async def fetch_all(urls):
    async with aiohttp.ClientSession() as session:
        tasks = [fetch(session, url) for url in urls]
        results = await asyncio.gather(*tasks)
        return results

# 对比同步 vs 异步
urls = [f'https://httpbin.org/delay/{i % 3 + 1}' for i in range(10)]

# 异步
start = time.time()
results = asyncio.run(fetch_all(urls))
async_time = time.time() - start
print(f"异步: {len(urls)} 个请求, 耗时 {async_time:.2f}s")

# 同步对比
import requests
start = time.time()
for url in urls:
    requests.get(url)
sync_time = time.time() - start
print(f"同步: {len(urls)} 个请求, 耗时 {sync_time:.2f}s")
print(f"加速比: {sync_time / async_time:.1f}x")
第三章:BeautifulSoup —— HTML 解析神器
3.1 解析器选择
pip install beautifulsoup4
| 解析器 | 速度 | 容错性 | 安装 |
|---|---|---|---|
html.parser |
中等 | 好 | 内置 |
lxml |
最快 | 最好 | pip install lxml |
html5lib |
最慢 | 最好 | pip install html5lib |
xml |
快 | - | pip install lxml |
推荐:HTML 用 lxml,XML 用 xml 解析器。
from bs4 import BeautifulSoup

html = '<html><body><h1>标题</h1></body></html>'
soup = BeautifulSoup(html, 'lxml')
3.2 查找元素的方法
BeautifulSoup 提供了多种查找元素的方式:
find / find_all
html = '''
<html>
<head><title>Python教程网站</title></head>
<body>
    <h1 id="main-title">Python 常用工具库</h1>
    <nav>
        <a href="/numpy" class="nav-link">NumPy</a>
        <a href="/pandas" class="nav-link">Pandas</a>
        <a href="/matplotlib" class="nav-link">Matplotlib</a>
    </nav>
    <div class="articles">
        <article class="post" data-id="1">
            <h2><a href="/post/1">NumPy 入门教程</a></h2>
            <p class="summary">学习 NumPy 数组操作和矩阵运算...</p>
            <span class="author">作者: 张三</span>
            <span class="date">2025-01-15</span>
        </article>
        <article class="post" data-id="2">
            <h2><a href="/post/2">Pandas 数据分析实战</a></h2>
            <p class="summary">使用 Pandas 处理 CSV 和 Excel 文件...</p>
            <span class="author">作者: 李四</span>
            <span class="date">2025-02-20</span>
        </article>
        <article class="post" data-id="3">
            <h2><a href="/post/3">Matplotlib 可视化指南</a></h2>
            <p class="summary">从折线图到3D图的完整教程...</p>
            <span class="author">作者: 王五</span>
            <span class="date">2025-03-10</span>
        </article>
    </div>
</body>
</html>
'''

soup = BeautifulSoup(html, 'html.parser')

# find: 找第一个匹配的元素
title = soup.find('h1', id='main-title')
print(title.text)    # Python 常用工具库

# find_all: 找所有匹配的元素
links = soup.find_all('a', class_='nav-link')
for link in links:
    print(f"{link.text} → {link['href']}")

# 实际输出:
# NumPy → /numpy
# Pandas → /pandas
# Matplotlib → /matplotlib
实际运行的完整解析结果:
页面标题: Python教程网站
主标题: Python 常用工具库

导航链接:
  NumPy → /numpy
  Pandas → /pandas
  Matplotlib → /matplotlib

文章列表:
  [1] NumPy 入门教程
      摘要: 学习 NumPy 数组操作和矩阵运算...
      作者: 张三 | 2025-01-15
  [2] Pandas 数据分析实战
      摘要: 使用 Pandas 处理 CSV 和 Excel 文件...
      作者: 李四 | 2025-02-20
  [3] Matplotlib 可视化指南
      摘要: 从折线图到3D图的完整教程...
      作者: 王五 | 2025-03-10
find_all 的参数详解
# 按标签名
soup.find_all('a')

# 按 id
soup.find_all(id='main-title')

# 按 class
soup.find_all(class_='post')

# 按属性
soup.find_all(attrs={'data-id': True})

# 按文本内容
soup.find_all(string='NumPy')

# 限制数量
soup.find_all('a', limit=2)

# 正则表达式
import re
soup.find_all('a', href=re.compile(r'^/post'))

# 多条件组合
soup.find_all('article', class_='post', attrs={'data-id': True})
其他查找方法
# find_parent / find_parents —— 向上查找
article = soup.find('article')
parent = article.find_parent('div')

# find_next_sibling / find_previous_sibling —— 兄弟元素
h2 = soup.find('h2')
next_span = h2.find_next_sibling('span')

# find_next / find_previous —— 向后/前查找
first_article = soup.find('article')
next_article = first_article.find_next('article')
3.3 CSS 选择器
# CSS 选择器 (需要 lxml 或 html5lib)
soup = BeautifulSoup(html, 'lxml')

# 标签选择
soup.select('h1')
soup.select('article.post')

# id 选择
soup.select('#main-title')

# class 选择
soup.select('.nav-link')
soup.select('.post h2')

# 后代选择 (空格)
soup.select('.articles .summary')

# 子代选择 (>)
soup.select('article > h2')

# 属性选择
soup.select('a[href^="/post"]')   # href 以 /post 开头
soup.select('article[data-id]')   # 有 data-id 属性
soup.select('a[href$=".html"]')   # href 以 .html 结尾

# 伪类选择
soup.select('article:first-child')
soup.select('article:nth-child(2)')

# 组合
soup.select('article.post h2 a')
CSS 选择器 vs find/find_all 对比:
| 场景 | find 写法 | CSS 选择器 |
|---|---|---|
| 按 id | find(id='x') |
select('#x') |
| 按 class | find(class_='x') |
select('.x') |
| 多条件 | find('div', class_='x', id='y') |
select('div.x#y') |
| 子元素 | find('div').find_all('p') |
select('div > p') |
| 后代 | find('div').find_all('p') |
select('div p') |
| 属性 | find('a', attrs={'href': True}) |
select('a[href]') |
| 多个选择 | 用循环或列表 | select('h1, h2, h3') |
3.4 数据提取实战
from bs4 import BeautifulSoup
import requests

# 完整的网页抓取流程
def scrape_articles(url):
    """从博客页面抓取文章列表"""
    resp = requests.get(url, headers={
        'User-Agent': 'Mozilla/5.0 (Windows NT 10.0; Win64; x64)'
    })
    resp.encoding = 'utf-8'
    soup = BeautifulSoup(resp.text, 'lxml')

    articles = []
    for article in soup.select('article.post'):
        title = article.select_one('h2').text.strip()
        summary = article.select_one('.summary').text
        author = article.select_one('.author').text.replace('作者: ', '')
        date = article.select_one('.date').text
        link = article.select_one('h2 a')['href']

        articles.append({
            'title': title,
            'summary': summary,
            'author': author,
            'date': date,
            'link': link
        })

    return articles

# 数据清洗
def clean_text(text):
    """清理提取的文本"""
    return ' '.join(text.strip().split())

# 解析表格数据
def parse_table(html):
    """从HTML表格提取数据"""
    soup = BeautifulSoup(html, 'lxml')
    table = soup.find('table')
    headers = [th.text.strip() for th in table.find_all('th')]
    rows = []
    for tr in table.find_all('tr')[1:]:
        cells = [td.text.strip() for td in tr.find_all('td')]
        rows.append(dict(zip(headers, cells)))
    return rows
第四章:Selenium —— 浏览器自动化
4.1 为什么需要浏览器自动化
很多现代网站使用 JavaScript 动态渲染内容。普通的 HTTP 请求只能获取到 HTML 骨架,实际内容由 JS 填充。这时就需要浏览器自动化:
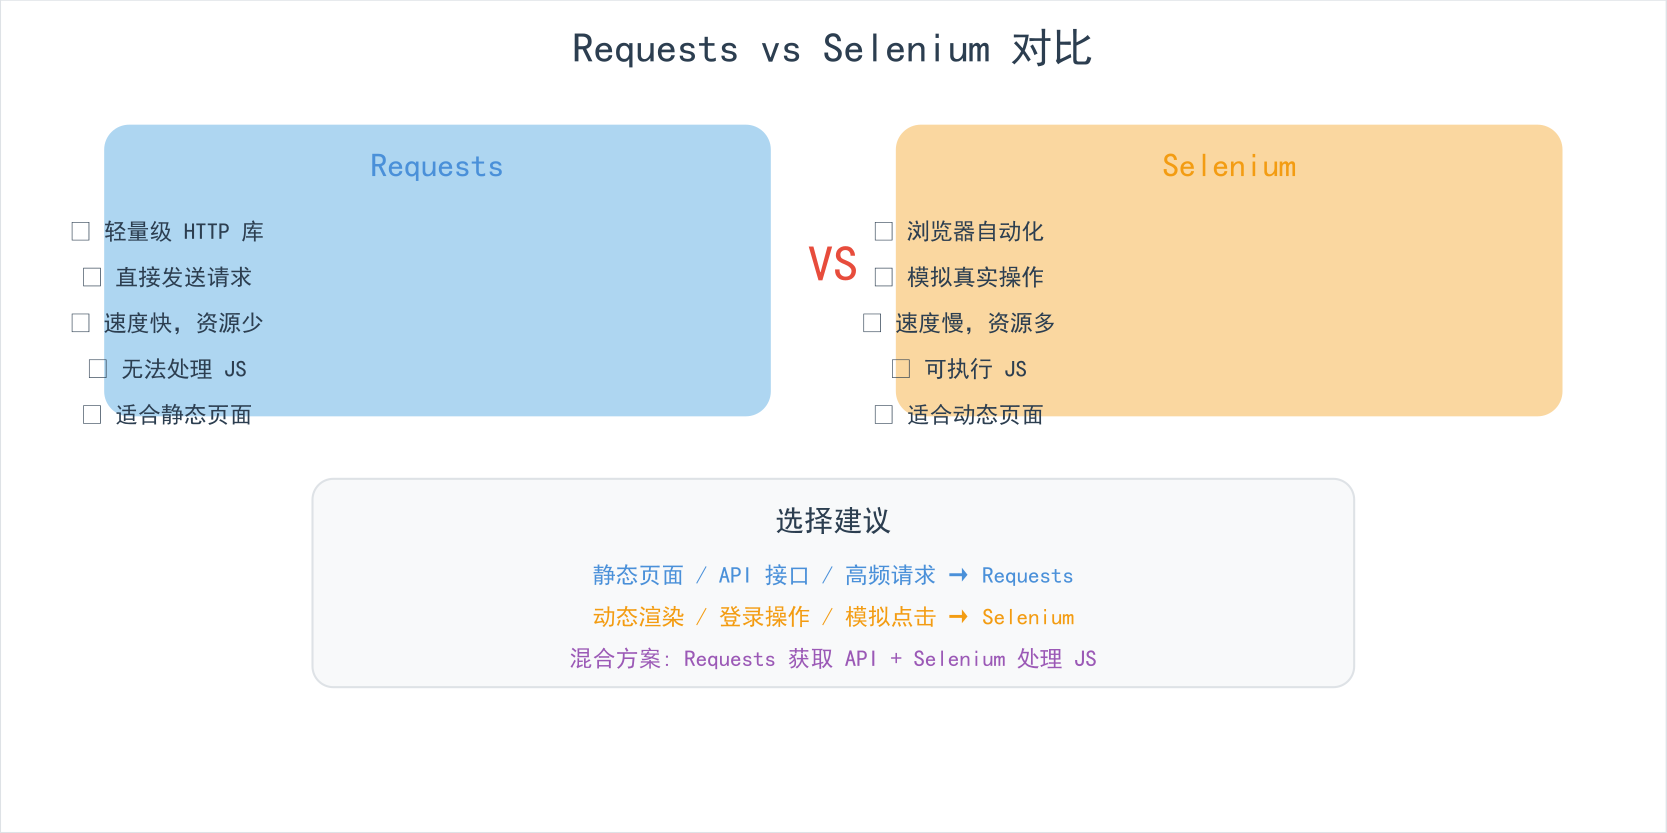
适用场景:
- SPA 单页应用(Vue/React 项目)
- 需要登录的网站
- 无限滚动页面
- 需要点击/输入的交互
- 反爬机制严格的网站
pip install selenium
4.2 Selenium 基本操作
from selenium import webdriver
from selenium.webdriver.common.by import By
from selenium.webdriver.chrome.options import Options

# 配置
options = Options()
options.add_argument('--headless')      # 无头模式(不弹窗)
options.add_argument('--disable-gpu')
options.add_argument('--no-sandbox')

# 启动浏览器
driver = webdriver.Chrome(options=options)

# 打开网页
driver.get('https://www.example.com')

# 获取标题
print(driver.title)

# 获取页面源码
html = driver.page_source

# 截图
driver.save_screenshot('screenshot.png')

# 关闭
driver.quit()
4.3 元素定位策略
from selenium.webdriver.common.by import By

# 8种定位方式
driver.find_element(By.ID, 'username')                          # ID
driver.find_element(By.NAME, 'password')                        # name属性
driver.find_element(By.CLASS_NAME, 'login-form')               # class
driver.find_element(By.TAG_NAME, 'input')                       # 标签名
driver.find_element(By.LINK_TEXT, '注册')                        # 链接文本
driver.find_element(By.PARTIAL_LINK_TEXT, '注')                 # 部分链接文本
driver.find_element(By.CSS_SELECTOR, 'div.login > input[type="text"]')  # CSS
driver.find_element(By.XPATH, '//div[@class="login"]/input[1]')         # XPath
定位优先级建议:ID > Name > CSS Selector > XPath
4.4 表单交互
from selenium import webdriver
from selenium.webdriver.common.by import By
from selenium.webdriver.common.keys import Keys

driver = webdriver.Chrome()
driver.get('https://example.com/login')

# 输入文字
username = driver.find_element(By.ID, 'username')
username.clear()
username.send_keys('my_username')

# 密码输入
password = driver.find_element(By.ID, 'password')
password.send_keys('my_password')

# 点击按钮
login_btn = driver.find_element(By.CSS_SELECTOR, 'button[type="submit"]')
login_btn.click()

# 下拉选择
from selenium.webdriver.support.ui import Select
select = Select(driver.find_element(By.ID, 'country'))
select.select_by_visible_text('中国')
select.select_by_value('cn')
select.select_by_index(0)

# 勾选复选框
checkbox = driver.find_element(By.ID, 'agree')
if not checkbox.is_selected():
    checkbox.click()

# 滚动页面
driver.execute_script("window.scrollTo(0, document.body.scrollHeight);")

# 切换窗口/iframe
driver.switch_to.window(driver.window_handles[1])  # 切换到新窗口
driver.switch_to.frame('iframe_name')               # 切换到iframe
driver.switch_to.default_content()                   # 返回主页面
4.5 等待机制
Selenium 需要等待页面加载完成后再操作,否则会找不到元素:
from selenium.webdriver.support.ui import WebDriverWait
from selenium.webdriver.support import expected_conditions as EC

# 隐式等待(全局生效,设置一次即可)
driver.implicitly_wait(10)  # 最多等10秒

# 显式等待(推荐,精确控制)
wait = WebDriverWait(driver, 10)

# 等待元素出现
element = wait.until(
    EC.presence_of_element_located((By.ID, 'result'))
)

# 等待元素可点击
button = wait.until(
    EC.element_to_be_clickable((By.CSS_SELECTOR, 'button.submit'))
)
button.click()

# 等待元素消失
wait.until(
    EC.invisibility_of_element_located((By.CLASS_NAME, 'loading'))
)

# 等待文本出现
wait.until(
    EC.text_to_be_present_in_element((By.ID, 'status'), '完成')
)
等待条件速查:
| 条件 | 说明 |
|---|---|
presence_of_element_located |
元素存在于 DOM |
visibility_of_element_located |
元素可见 |
element_to_be_clickable |
元素可见且可点击 |
invisibility_of_element_located |
元素消失 |
text_to_be_present_in_element |
元素包含指定文本 |
alert_is_present |
alert 弹窗出现 |
title_contains |
页面标题包含指定文本 |
url_contains |
URL 包含指定文本 |
第五章:Scrapy 简介
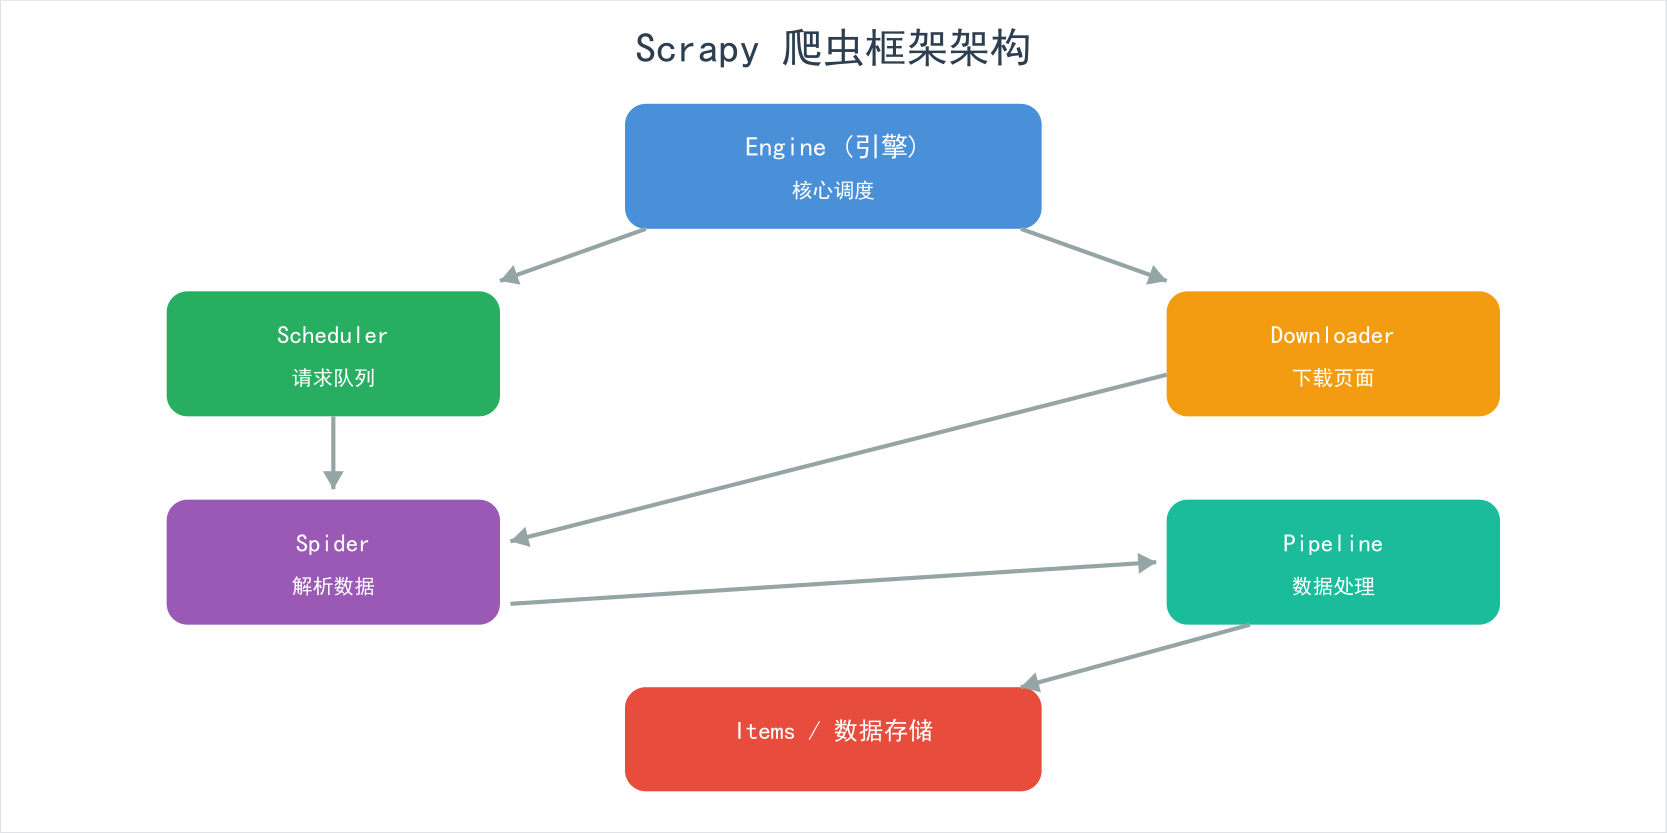
Scrapy 是一个功能完整的爬虫框架,适合大规模数据采集。
pip install scrapy
创建项目:
scrapy startproject myspider
cd myspider
scrapy genspider example example.com
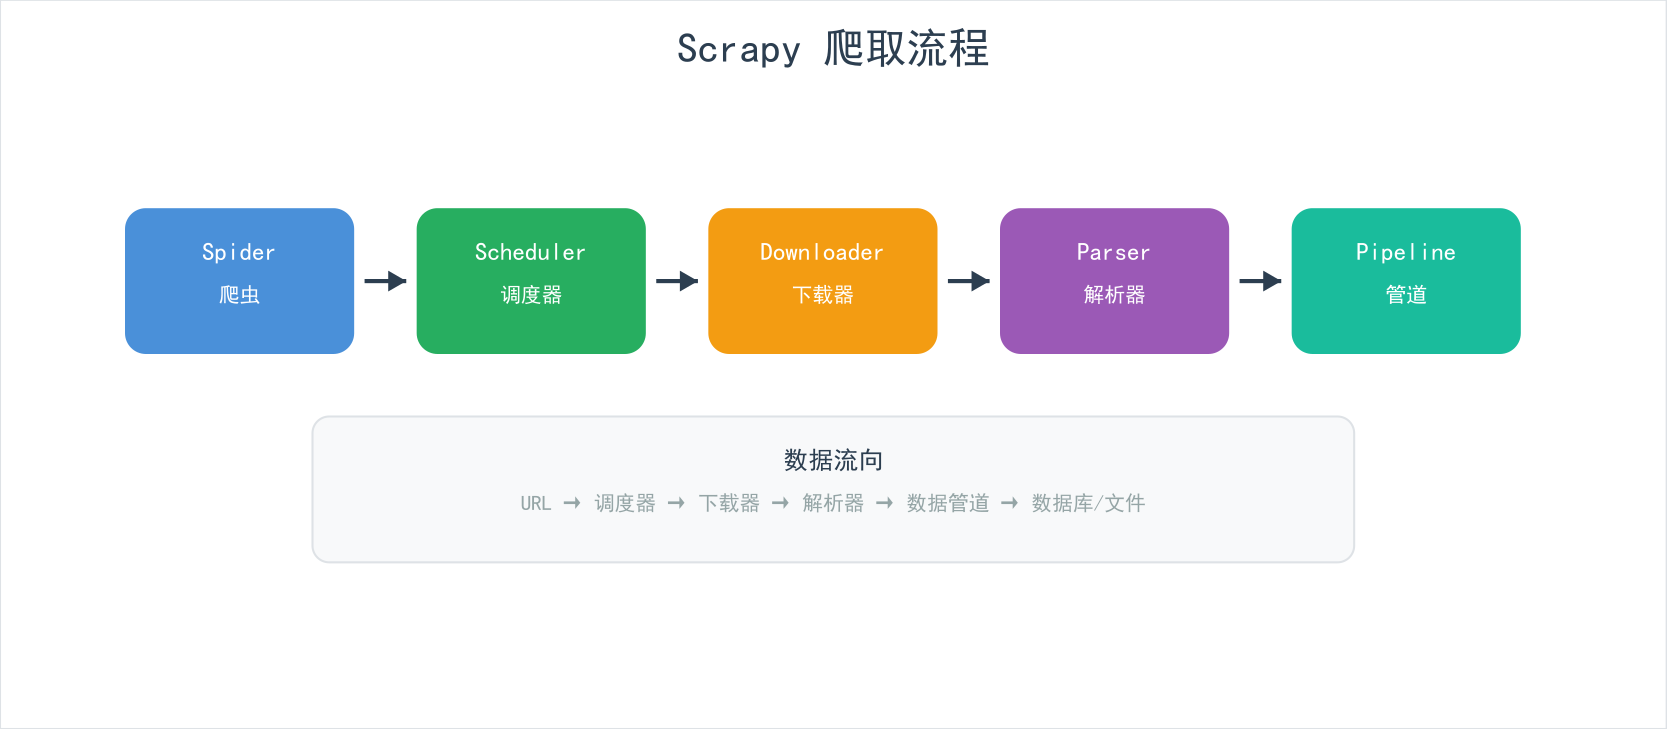
基本结构:
简单示例:
import scrapy

class ExampleSpider(scrapy.Spider):
    name = 'example'
    allowed_domains = ['example.com']
    start_urls = ['https://example.com/quotes']

    def parse(self, response):
        for quote in response.css('div.quote'):
            yield {
                'text': quote.css('span.text::text').get(),
                'author': quote.css('small.author::text').get(),
                'tags': quote.css('div.tags a.tag::text').getall(),
            }

        # 跟进下一页
        next_page = response.css('li.next a::attr(href)').get()
        if next_page:
            yield response.follow(next_page, self.parse)
Scrapy 特性一览:
| 特性 | 说明 |
|---|---|
| 异步引擎 | 基于 Twisted,高并发 |
| 选择器 | CSS + XPath |
| Item Pipeline | 数据清洗、验证、存储 |
| 中间件 | 请求/响应处理、代理、UA轮换 |
| 限速控制 | 自动控制请求频率 |
| 去重 | 自动 URL 去重 |
| 反爬处理 | User-Agent 旋转、代理池 |
| 输出格式 | JSON、CSV、XML、数据库 |
爬虫伦理与法律
在进行网络爬取时,请务必遵守以下原则:
| 原则 | 说明 |
|---|---|
| 检查 robots.txt | https://example.com/robots.txt —— 尊重网站的爬取规则 |
| 控制请求频率 | 不要高频请求,避免给服务器造成压力 |
| 不要爬取私有数据 | 个人隐私、付费内容、非公开信息 |
| 遵守服务条款 | 阅读网站的 Terms of Service |
| 注明来源 | 使用数据时标明来源 |
| 遵守法律 | 《网络安全法》、《数据安全法》等 |
# 好的爬虫习惯
import time
import random

# 1. 设置延迟
time.sleep(random.uniform(1, 3))  # 随机延迟1-3秒

# 2. 设置请求头
headers = {
    'User-Agent': 'MyBot/1.0 (contact: admin@example.com)',
}

# 3. 检查 robots.txt
from urllib.robotparser import RobotFileParser
rp = RobotFileParser()
rp.set_url('https://example.com/robots.txt')
rp.read()
can_crawl = rp.can_fetch('*', 'https://example.com/page')
总结与选择指南
| 你的需求 | 推荐工具 | 示例 |
|---|---|---|
| 调用 REST API | requests | requests.get(url, params=...) |
| 抓取静态 HTML 页面 | requests + BeautifulSoup | 获取 + 解析 |
| 大量并发请求 | aiohttp | 异步并发抓取 |
| 需要登录/验证码 | Selenium | 模拟浏览器操作 |
| JS 渲染的页面 | Selenium 或 Playwright | 动态内容 |
| 大规模爬虫项目 | Scrapy | 结构化爬取 |
| 文件下载 | requests(流式) | stream=True |
完整爬取流程
下一篇预告:《Python 实用工具与机器学习入门:Rich、Tqdm、Faker、Schedule + Scikit-learn 实战》—— 让你的 Python 项目更专业!

AtomGit 是由开放原子开源基金会联合 CSDN 等生态伙伴共同推出的新一代开源与人工智能协作平台。平台坚持“开放、中立、公益”的理念,把代码托管、模型共享、数据集托管、智能体开发体验和算力服务整合在一起,为开发者提供从开发、训练到部署的一站式体验。
更多推荐



 11
11 0
0- 0


 已为社区贡献2条内容

所有评论(0)