【c++】string类
c语言中的字符串
C语言中,字符串是以'\0'结尾的一些字符的集合,为了操作方便,C标准库中提供了一些str系列
的库函数,但是这些库函数与字符串是分离开的,不太符合OOP的思想,而且底层空间需要用户
自己管理,稍不留神可能还会越界访问。
标准库中的string类
string类的简单理解
字符串是表示字符序列的对象。
标准字符串类为此类对象提供了类似标准字节容器接口的支持,但增加了专门设计用于处理单字节字符串的功能。
字符串类是basic_string类模板的实例化,使用char(即字节)作为字符类型,默认的char_traits和配置类型(详见basic_string模板)。
简单来说就是串。在使用时必须包含#include头文件以及using namespace std;
auto和范围for
auto关键字
// 不能做参数
void func2(auto a)
{
}
// 可以做返回值,但是建议谨慎使用
auto func3()
{
	return 3;
}
5、auto不能直接用来声明数组
下面来对上面进行一个总的演示
int main()
{
	int a = 10;
	auto b = a;
	auto c = 'a';
	auto d = func1();
	// 编译报错:rror C3531: “e”: 类型包含“auto”的符号必须具有初始值设定项
	//auto e;
	cout << typeid(b).name() << endl;
	cout << typeid(c).name() << endl;
	cout << typeid(d).name() << endl;
	int x = 10;
	auto y = &x;
	auto* z = &x;
	auto& m = x;
	cout << typeid(x).name() << endl;
	cout << typeid(y).name() << endl;
	cout << typeid(z).name() << endl;
	auto aa = 1, bb = 2;
	// 编译报错:error C3538: 在声明符列表中,“auto”必须始终推导为同一类型
	//auto cc = 3, dd = 4.0;
	//// 编译报错:error C3318: “auto []”: 数组不能具有其中包含“auto”的元素类型
	//auto array[] = { 4, 5, 6 };
	return 0;
}
这里并不能显示出auto的用武之处,真正用得到的地方在于迭代器与map当中如下
#include<iostream>
#include <string>
#include <map>
using namespace std;
int main()
{
	std::map<std::string, std::string> dict = { { "apple", "苹果" },{ "orange",
	"橙子" }, {"pear","梨"} };
	// auto的用武之地
	//std::map<std::string, std::string>::iterator it = dict.begin();
	auto it = dict.begin();
	while (it != dict.end())
	{
		cout << it->first << ":" << it->second << endl;
		++it;
	}
	return 0;
}
范围for
#include<iostream>
#include <string>
#include <map>
using namespace std;
int main()
{
int array[] = { 1, 2, 3, 4, 5 };
// C++98的遍历
for (int i = 0; i < sizeof(array) / sizeof(array[0]); ++i)
{
array[i] *= 2;
}
for (int i = 0; i < sizeof(array) / sizeof(array[0]); ++i)
{
cout << array[i] << endl;
}
// C++11的遍历
for (auto& e : array)
e *= 2;
for (auto e : array)
cout << e << " " << endl;
string str("hello world");
for (auto ch : str)
{
cout << ch << " ";
}
cout << endl;
return 0;
}上述代码展示的是两种数组遍历的方式。第一种是下标+[ ]的方式,这种方式是之前常用的。下面的就是使用范围for的方式来对数组进行遍历。在auto后面加引用是的对e修改可以改变原数组数据。
string类的常用接口说明
在这里只讲解最常见的接口,并会一步步带你去认识以及如何使用一个你未曾学习或使用过的一个模块或函数。
首先先来到这个关于c++的网址,虽然不是官网但是这个网站很好使用,然后在上面的search栏输入你要了解的函数等。
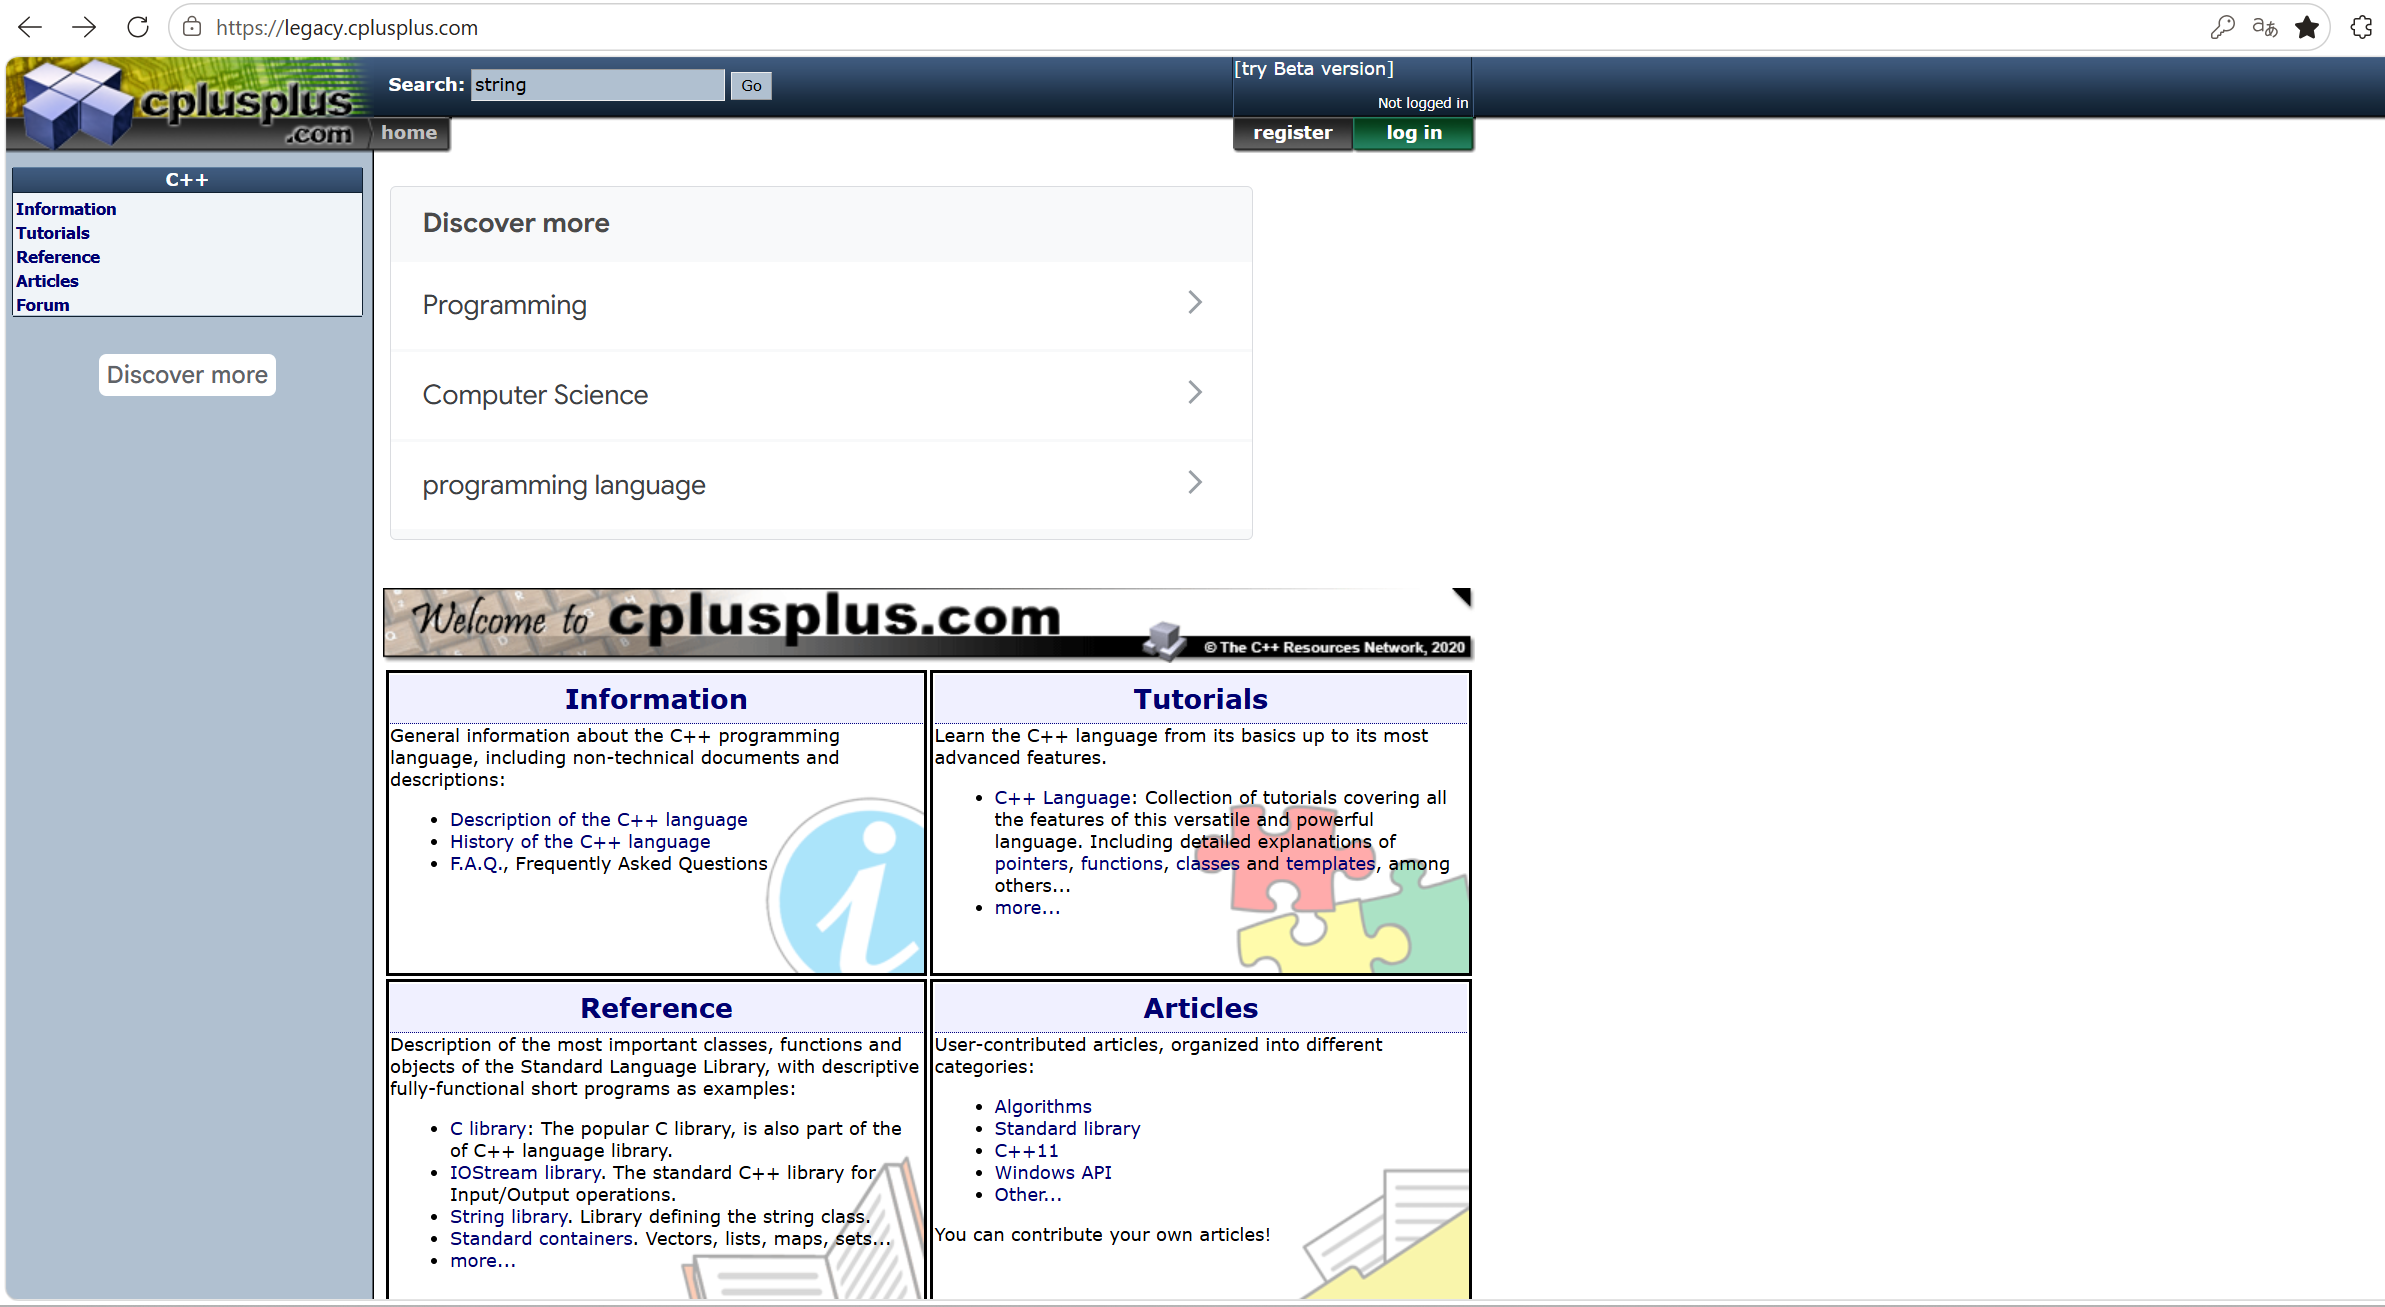
点击go之后会进入下面的页面
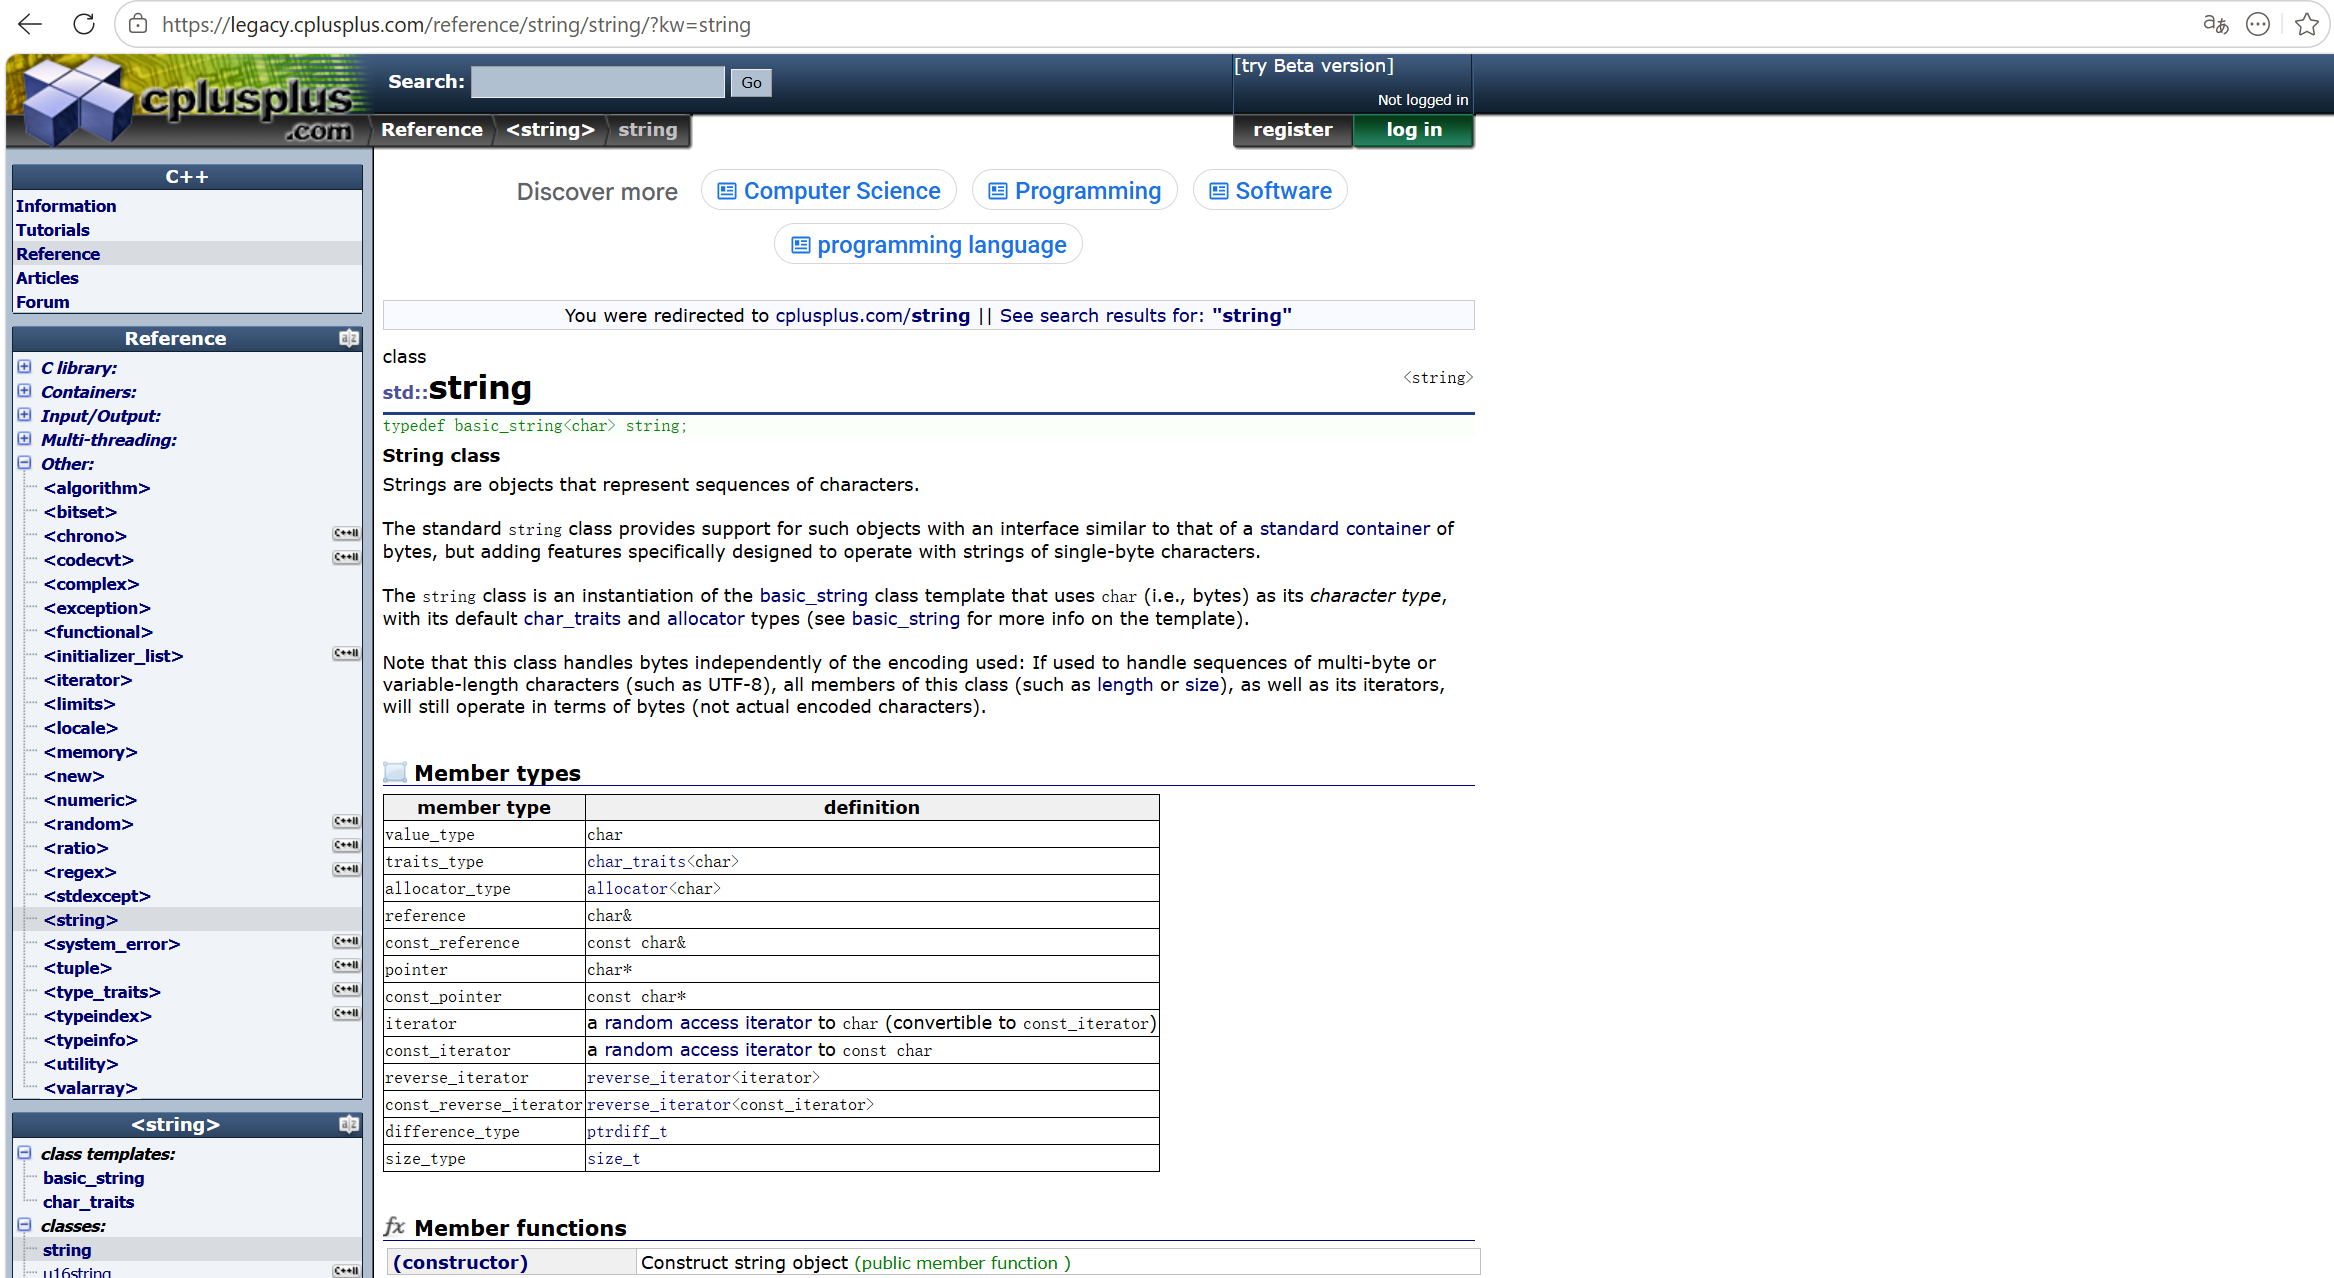
其中在这里是对string类的解释
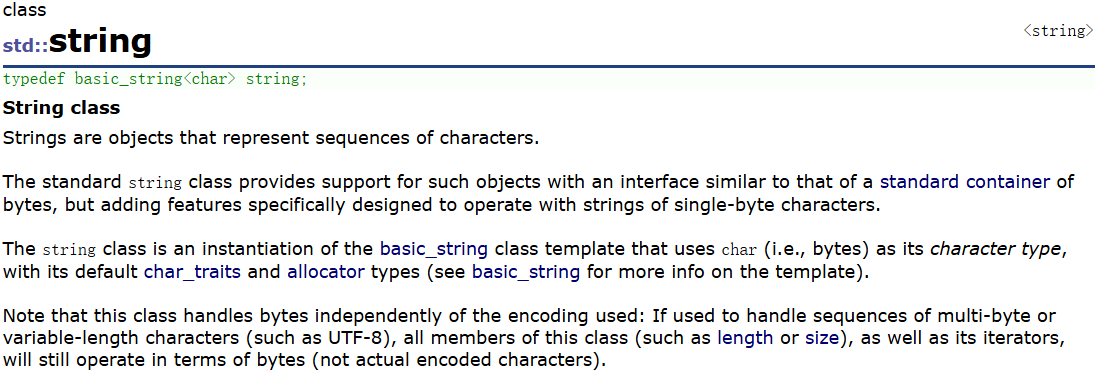 下面的那个类型简单看看就可以了。
然后来看下面的
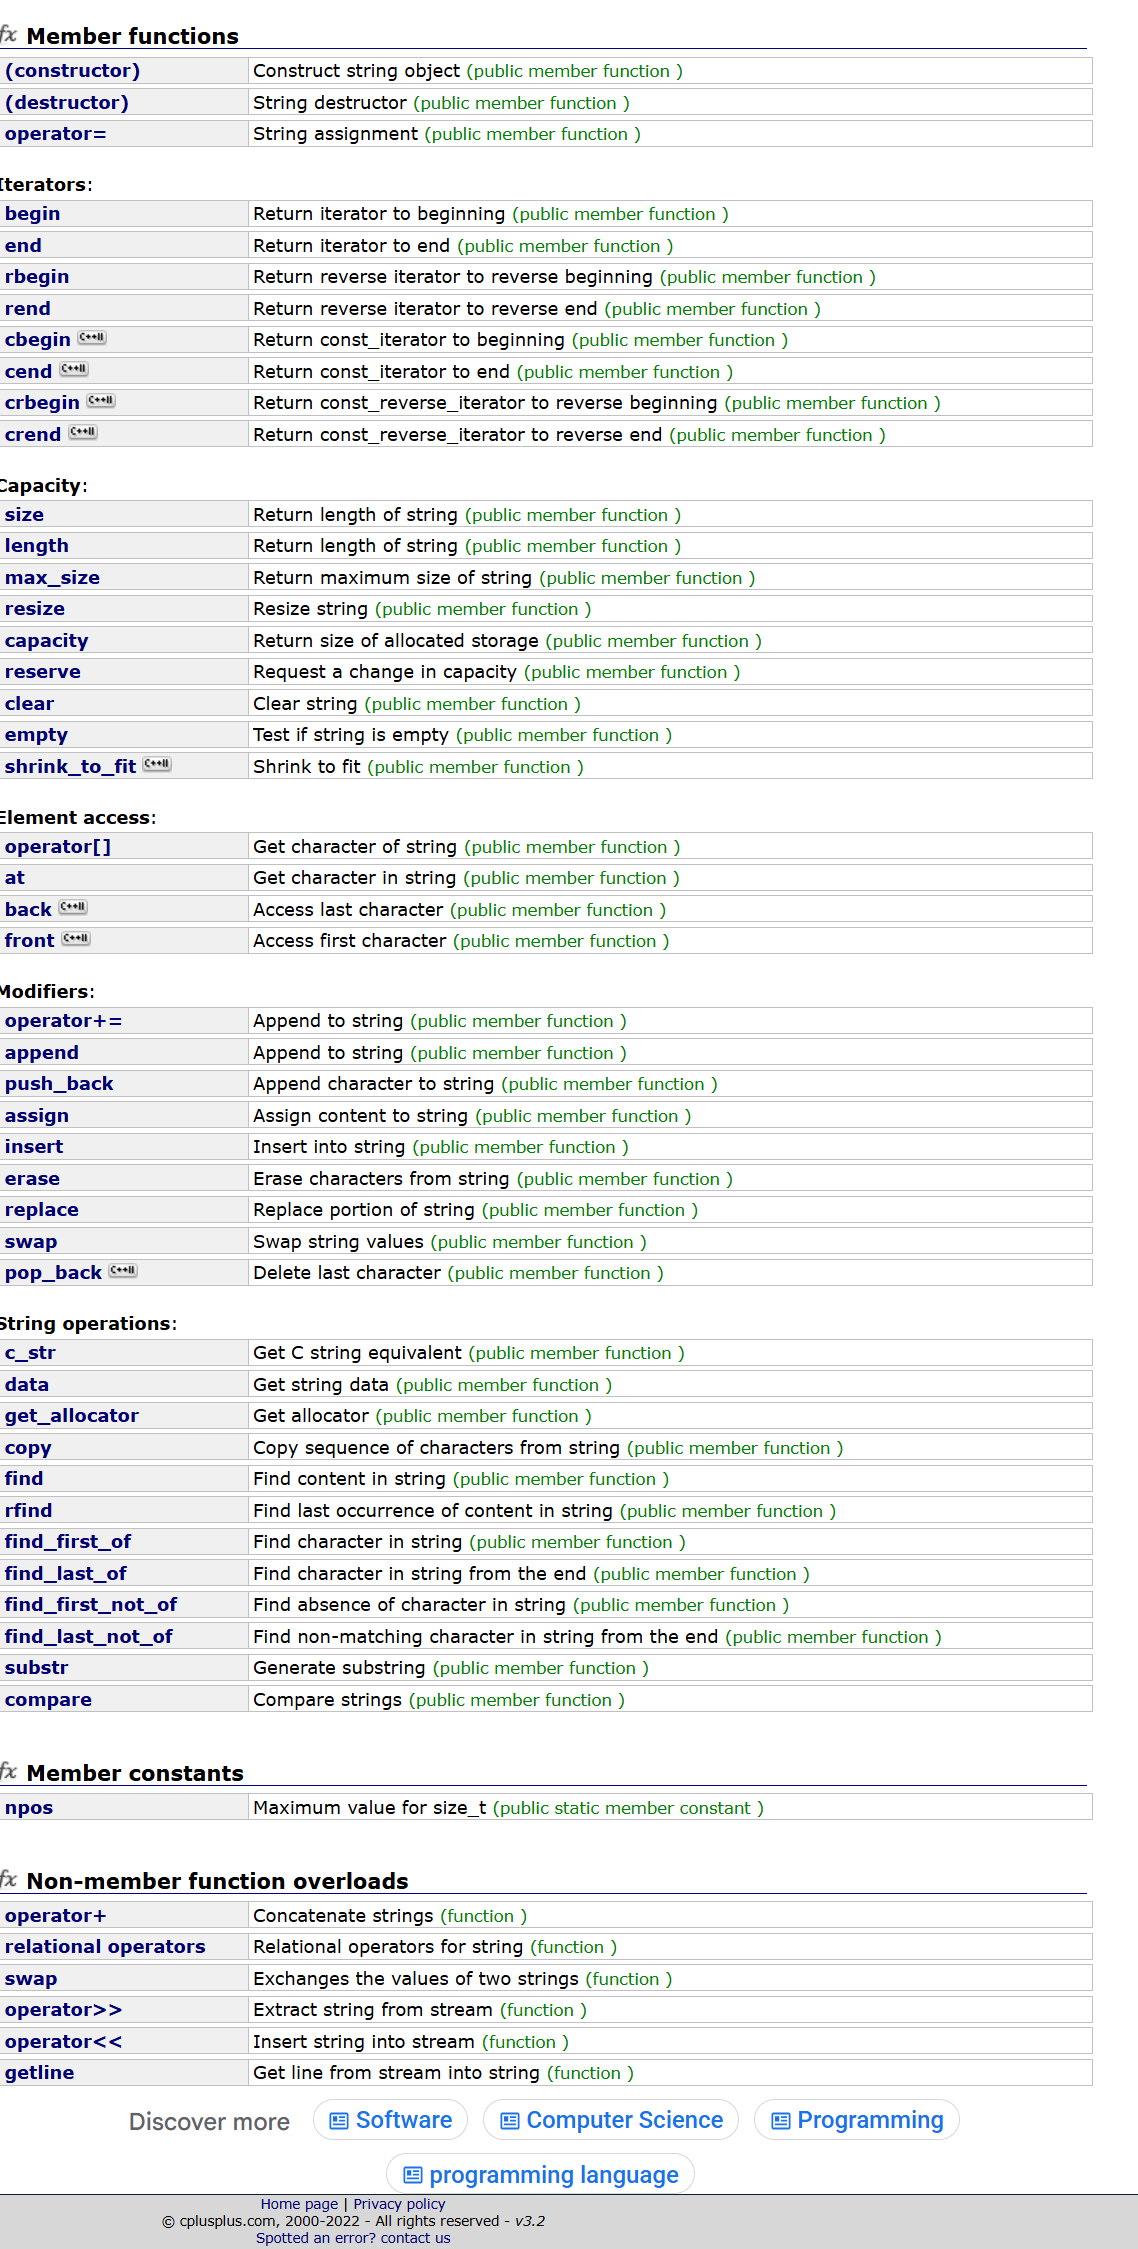
这些是这里对string具体如何使用,如果你想要详细的了解一个点击他的名称
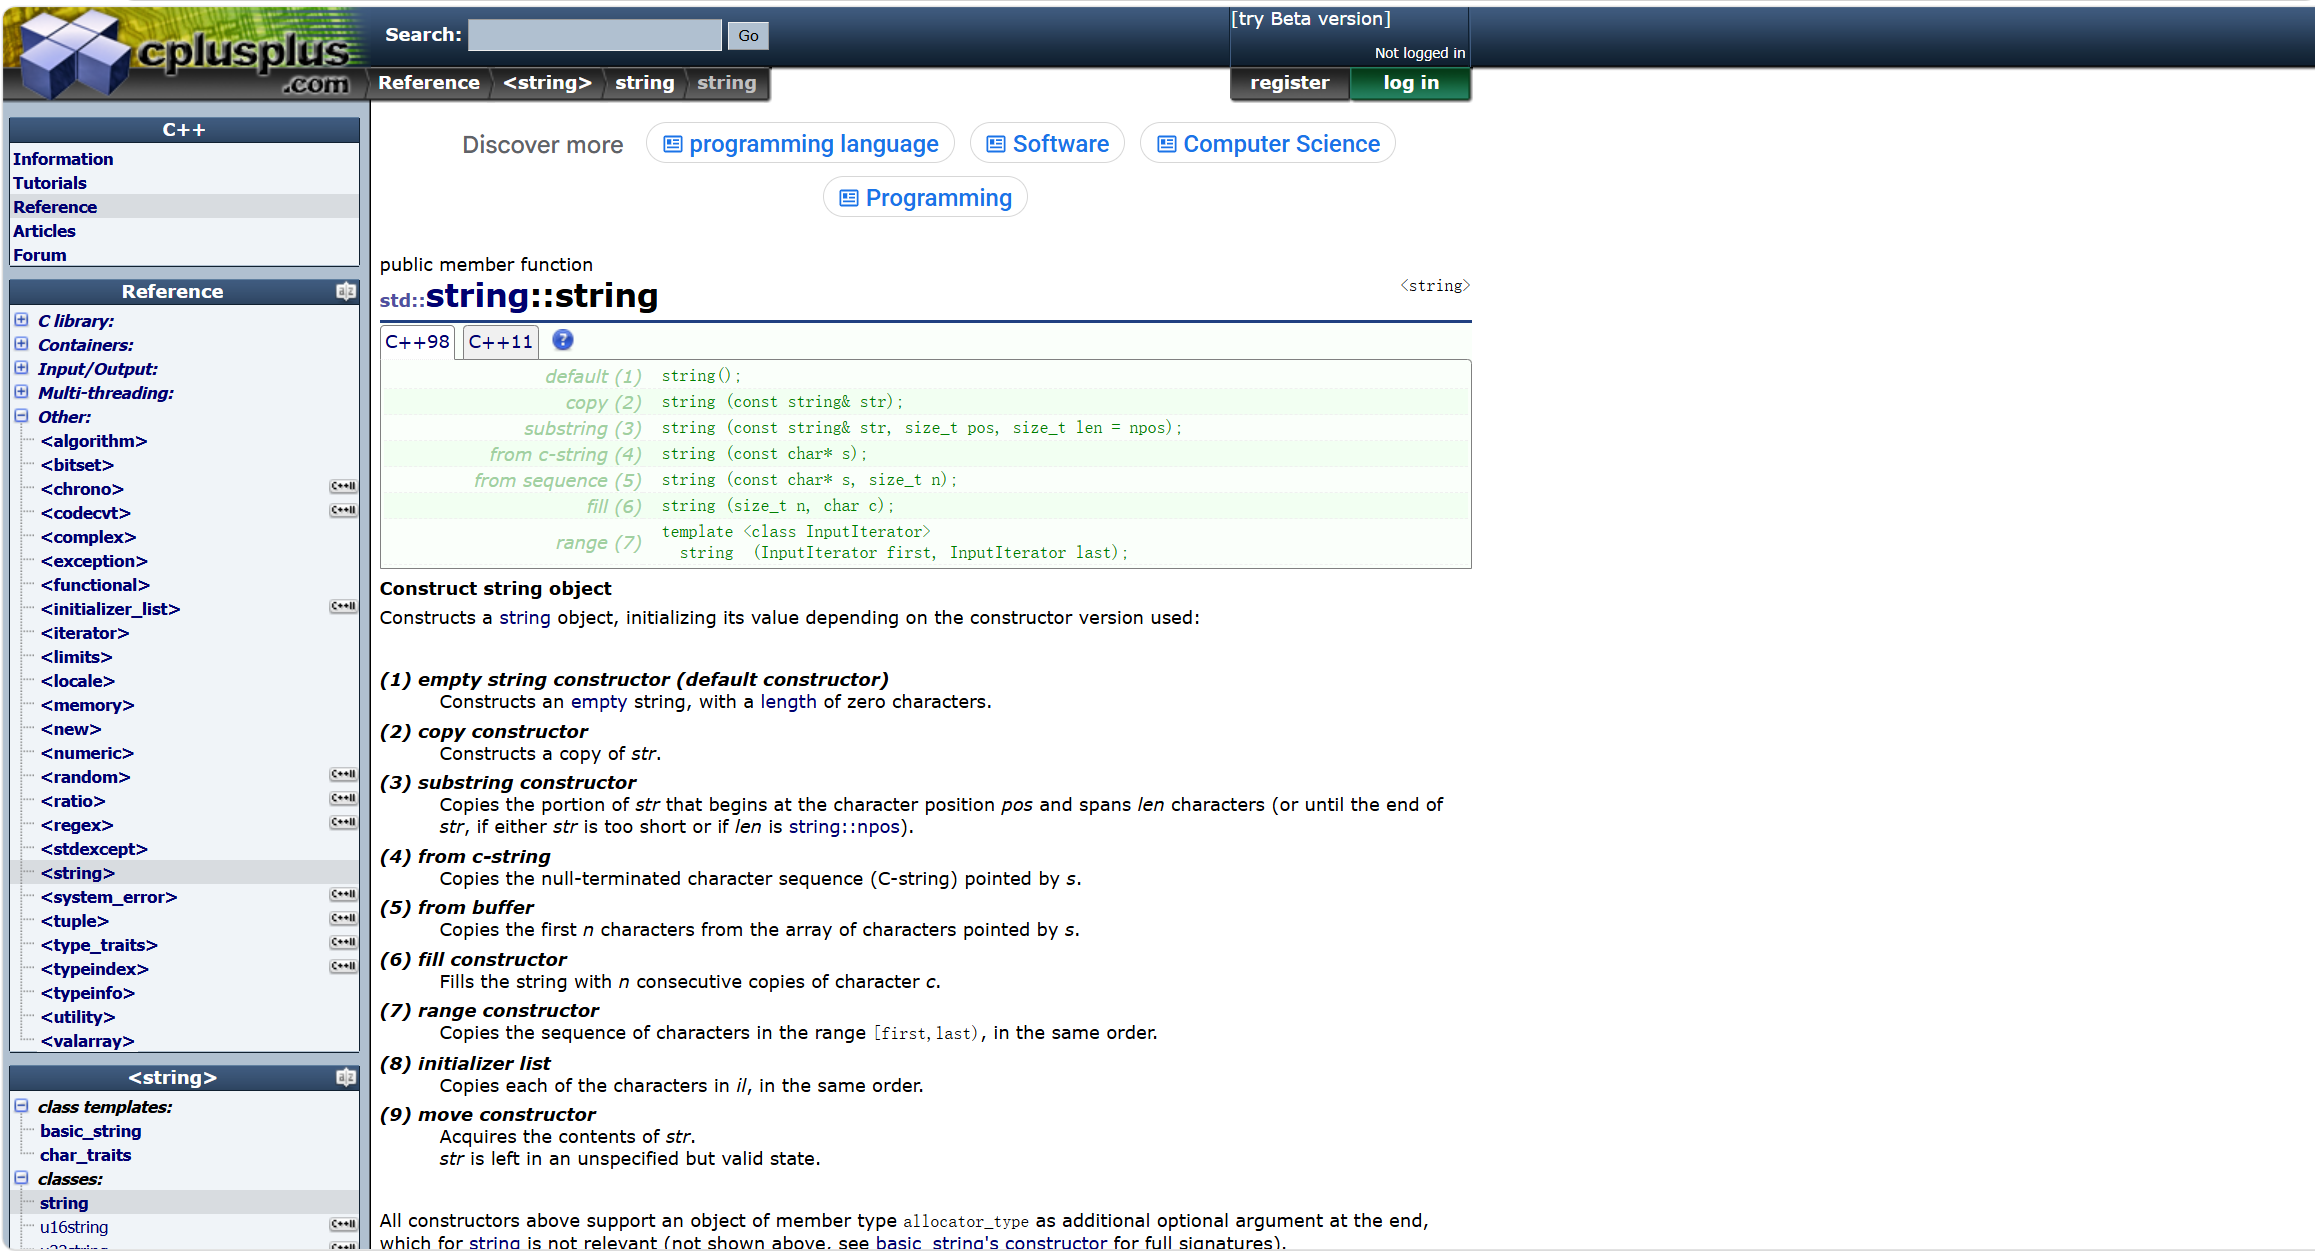
就会到达这个界面,其中绿色区域是该对construct中的使用方式下面的黑色字体是对上面的使用方式的具体解释。
如果还是没有彻底了解往下滑将会看到用一块紫色区域,该区域是对上方式的示例
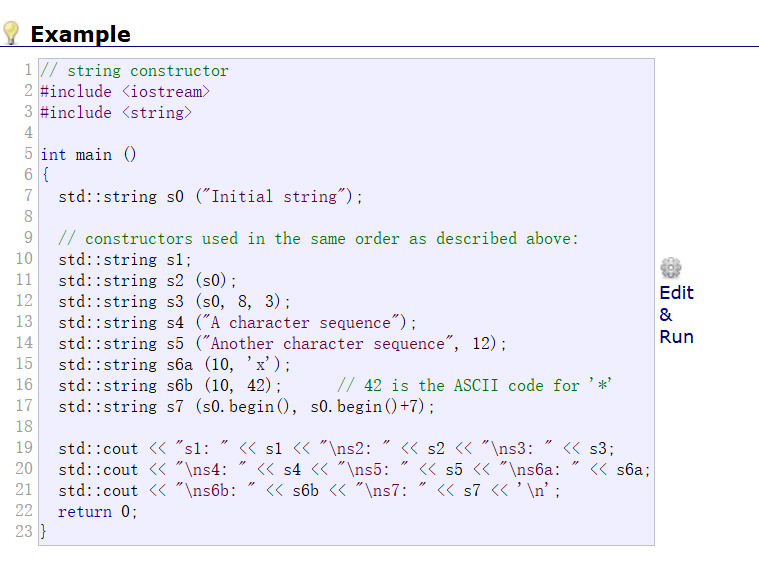
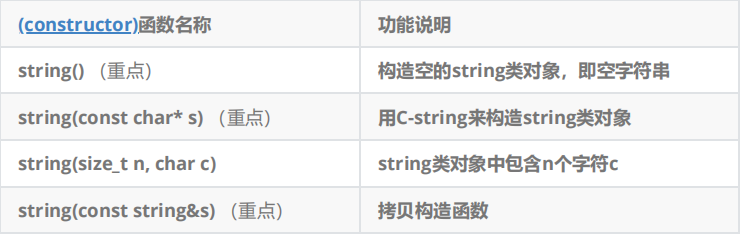
在这里我来讲解一些常用的
1、string类对象的常见构造
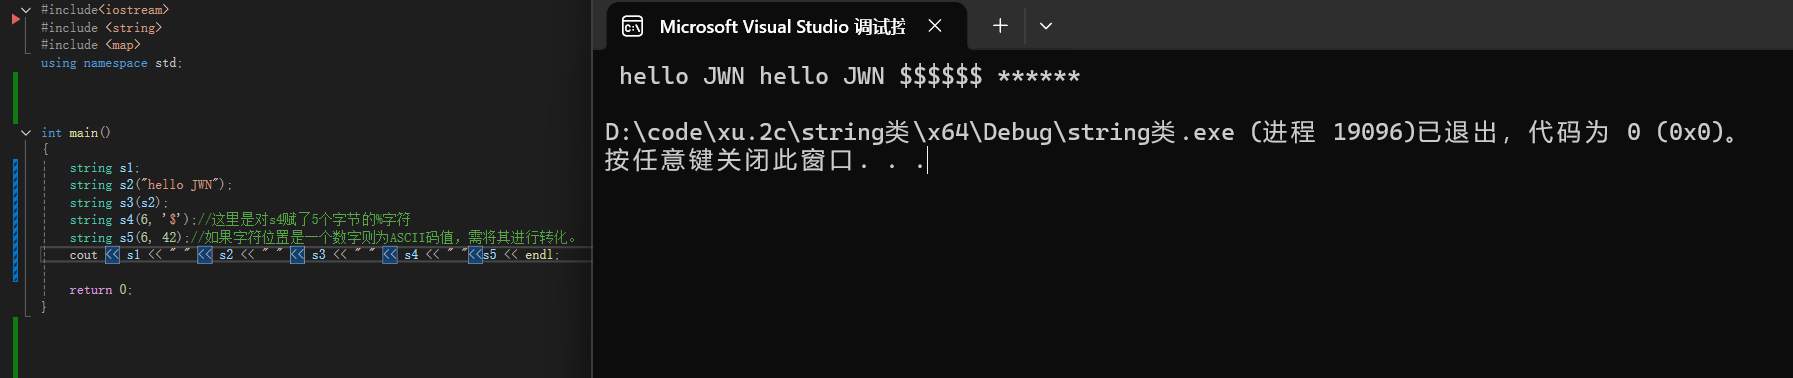
下面我来对这些方式进行简单的实操一下
int main()
{
	string s1;
	string s2("hello JWN");
	string s3(s2);
	string s4(6, '$');//这里是对s4赋了5个字节的%字符
	string s5(6, 42);//如果字符位置是一个数字则为ASCII码值,需将其进行转化。
	cout << s1 << " " << s2 << " " << s3 << " " << s4 << endl;

	return 0;
}
2、string类对象的容量操作(capacity)
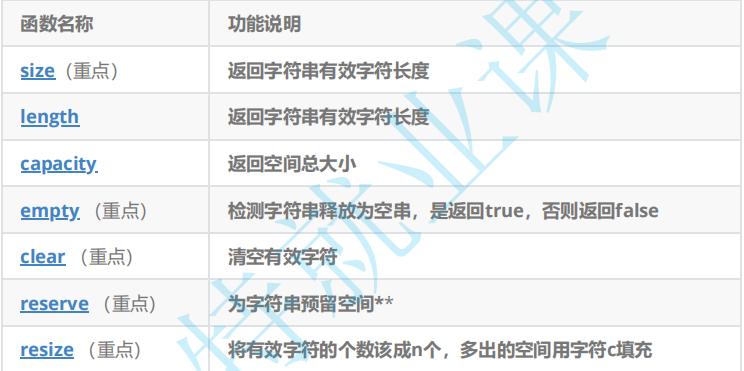
string s("hello world");
cout << s.size() << endl;
cout << s.length() << endl;
cout << s.capacity() << endl;
cout << s.length() << endl;
char c;
string str;
cout << "Please type some lines of text. Enter a dot (.) to finish:\n";
do {
c = cin.get();
str += c;
if (c == '\n')
{
cout << str;
str.clear();
}
} while (c != '.');这里仅仅是对一些简单的举例
3、string类对象的访问及遍历操作
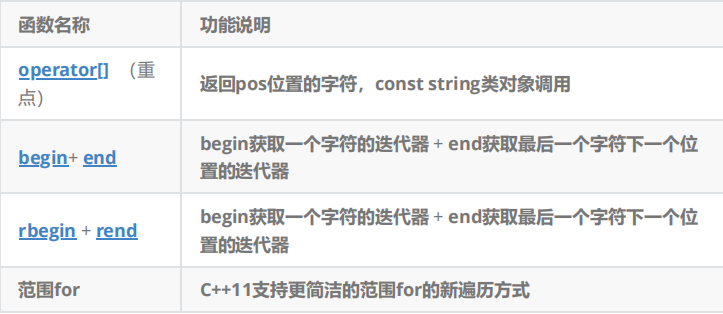
string s("hello world");
s[0] = 'm';//[]的重载就是为了让string类可以像数组一样同过下标对数组中的内容进行修改

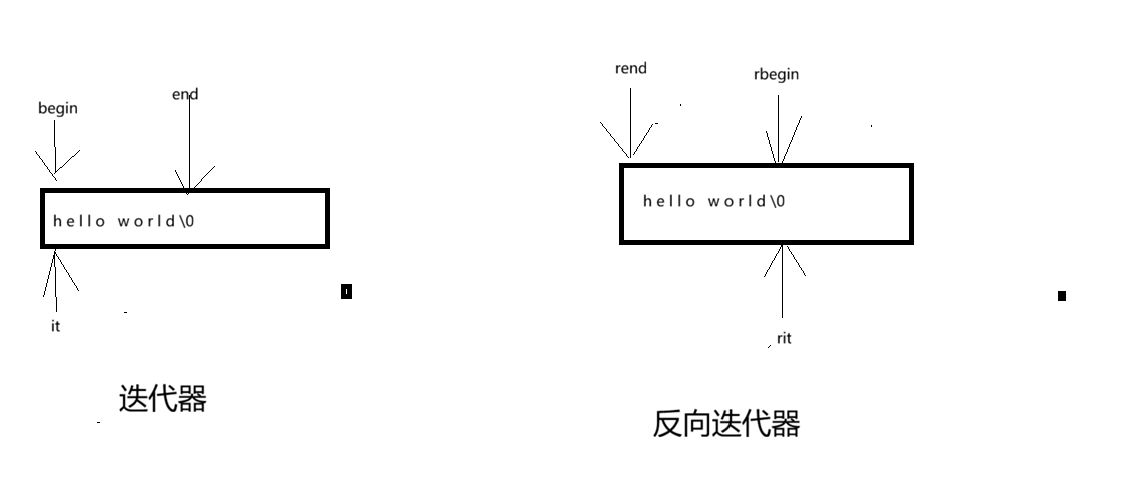
string::iterator it = s.begin();//这里使用了迭代器
while (it != s.end())
{
	cout << *it <<" ";
	it++;
}
cout << endl;

string::reverse_iterator rit = s.rbegin();//这里是反向迭代器
while (rit != s.rend())
{
	cout << *rit << " ";
	rit++;
}
cout << endl;
上面的使用迭代器就是对数组便利的第三种方式。
下面这张图片是对上面迭代器遍历数组的图像解释
4、string类对象的修改操作
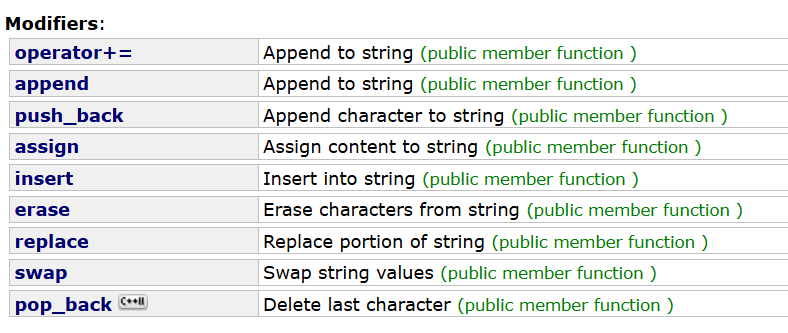
在这里主要讲解append、push_back、insert、erase、replace
这里我们依旧先点击我们要查找的操作名称,然后看绿色区域的方式,以及示例等,然后自己进行模拟。
append
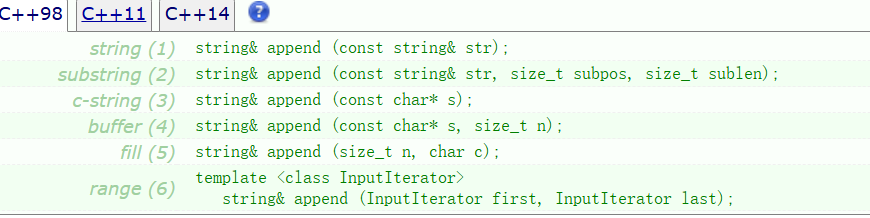
int main()
{
	string str;
	string str2 = "Writing ";
	string str3 = "print 10 and then 5 more";

	// used in the same order as described above:
	str.append(str2);                       // "Writing "
	str.append(str3, 6, 3);                   // "10 "
	str.append("dots are cool", 5);          // "dots "
	str.append("here: ");                   // "here: "
	str.append(10u, '.');                    // ".........."
	str.append(str3.begin() + 8, str3.end());  // " and then 5 more"
	str.append<int>(5, 0x2E);                // "....."

	cout << str << '\n';
	return 0;
}
push_back

int main()
{
	string str;
	ifstream file("test.txt", std::ios::in);
	if (file) {
		while (!file.eof()) str.push_back(file.get());
	}
	cout << str << '\n';
	return 0;
}
insert
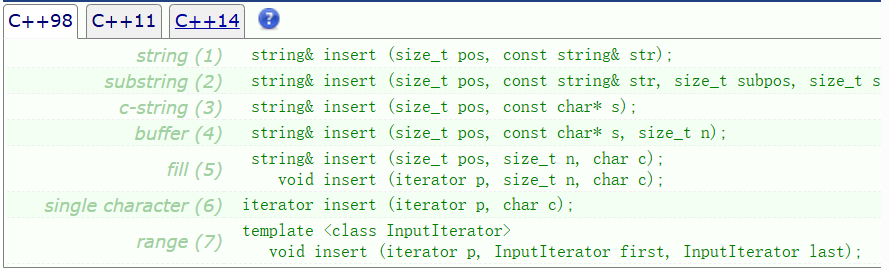
int main()
{
	string str = "to be question";
	string str2 = "the ";
	string str3 = "or not to be";
	string::iterator it;

	// used in the same order as described above:
	str.insert(6, str2);                 // to be (the )question
	str.insert(6, str3, 3, 4);             // to be (not )the question
	str.insert(10, "that is cool", 8);    // to be not (that is )the question
	str.insert(10, "to be ");            // to be not (to be )that is the question
	str.insert(15, 1, ':');               // to be not to be(:) that is the question
	it = str.insert(str.begin() + 5, ','); // to be(,) not to be: that is the question
	str.insert(str.end(), 3, '.');       // to be, not to be: that is the question(...)
	str.insert(it + 2, str3.begin(), str3.begin() + 3); // (or )

	cout << str << '\n';
	return 0;
}
erase

int main()
{
	string str("This is an example sentence.");
	cout << str << '\n';
	// "This is an example sentence."
	str.erase(10, 8);                        //            ^^^^^^^^
	std::cout << str << '\n';
	// "This is an sentence."
	str.erase(str.begin() + 9);               //           ^
	cout << str << '\n';
	// "This is a sentence."
	str.erase(str.begin() + 5, str.end() - 9);  //       ^^^^^
	cout << str << '\n';
	// "This sentence."
	return 0;
}
replace
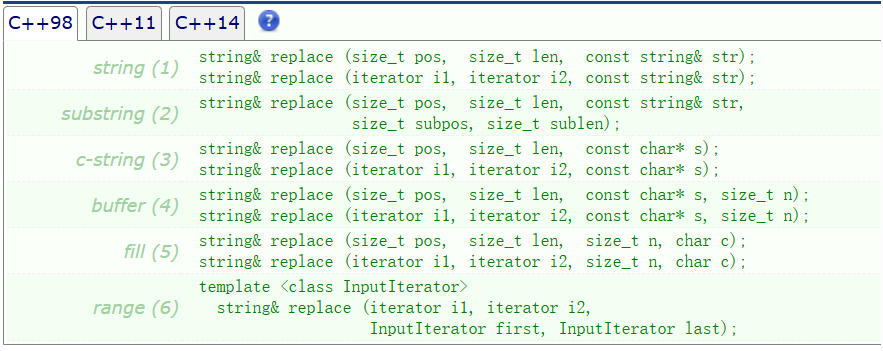
int main()
{
	string base = "this is a test string.";
	string str2 = "n example";
	string str3 = "sample phrase";
	string str4 = "useful.";

	// replace signatures used in the same order as described above:

	// Using positions:                 0123456789*123456789*12345
	string str = base;           // "this is a test string."
	str.replace(9, 5, str2);          // "this is an example string." (1)
	str.replace(19, 6, str3, 7, 6);     // "this is an example phrase." (2)
	str.replace(8, 10, "just a");     // "this is just a phrase."     (3)
	str.replace(8, 6, "a shorty", 7);  // "this is a short phrase."    (4)
	str.replace(22, 1, 3, '!');        // "this is a short phrase!!!"  (5)

	// Using iterators:                                               0123456789*123456789*
	str.replace(str.begin(), str.end() - 3, str3);                    // "sample phrase!!!"      (1)
	str.replace(str.begin(), str.begin() + 6, "replace");             // "replace phrase!!!"     (3)
	str.replace(str.begin() + 8, str.begin() + 14, "is coolness", 7);    // "replace is cool!!!"    (4)
	str.replace(str.begin() + 12, str.end() - 4, 4, 'o');                // "replace is cooool!!!"  (5)
	str.replace(str.begin() + 11, str.end(), str4.begin(), str4.end());// "replace is useful."    (6)
	cout << str << '\n';
	return 0;
}
5、string类的操作
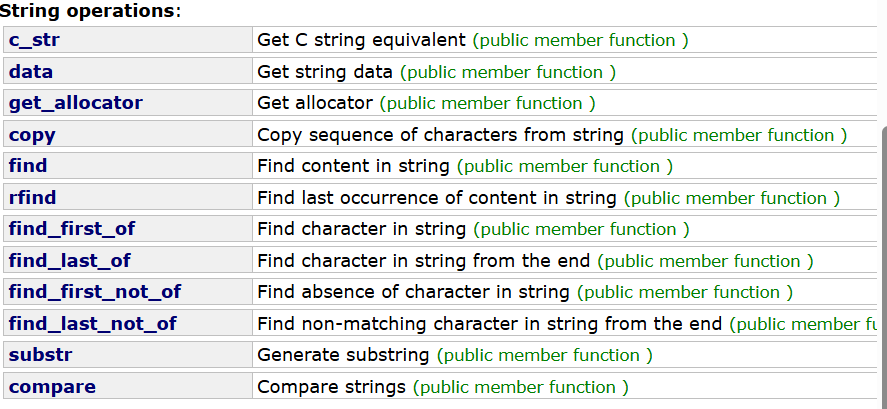
在这里主要来看c_str、find、rfind
c_str(返回c格式字符串)
int main()
{
	string file;
	cin >> file;
	FILE* fout = fopen(file.c_str(), "r");
	char ch = fgetc(fout);
	while (ch != EOF)
	{
		cout << ch;
		ch = fgetc(fout);
	}
	fclose(fout);
	return 0;
}
find(正着找字符串c,并返回位置)
int main()
{
	string s("hello world");
	size_t pos = s.find('w');
	//string suffix = s.substr(pos, s.npos);
	string suffix = s.substr(pos);
	cout << suffix << endl;

	return 0;
}
在这串代码中也顺便使用了substr和npos,这里也来简单的介绍一下substr是返回子串,从pos位置开始,到npos结束,npos指到字符串最后一个字符。如果那个位置啥也不写,也是从pos到结束。
rfind
其与find相反倒着寻找,并返回位置。依次类推下面的关于find的类型
6、string类的非成员函数
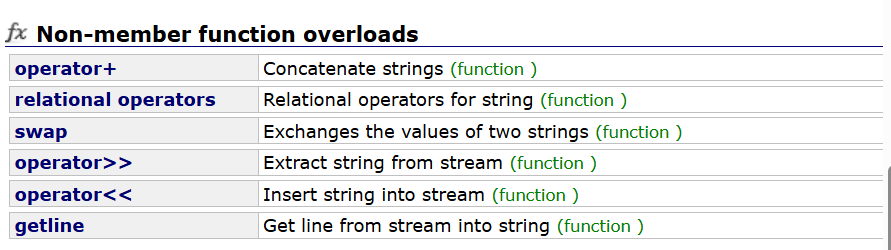
这里主要看operate+、getline
string s1("hello");
string s2 = s1 + "world";
string s3 = "world" + s1;

getline(cin, s1, '*');//后面*号位置若没有则默认换行结束vs和g++下string结构的说明(了解)
vs下string的结构
union _Bxty
{ // storage for small buffer or pointer to larger one
	value_type _Buf[_BUF_SIZE];
	pointer _Ptr;
	char _Alias[_BUF_SIZE]; // to permit aliasing
} _Bx;
g++下string的结构
struct _Rep_base
{
	size_type _M_length;
	size_type _M_capacity;
	_Atomic_word _M_refcount;
};
这次的介绍就结束了,下面一篇会讲到string类的底层实现。
感谢支持!!!

AtomGit 是由开放原子开源基金会联合 CSDN 等生态伙伴共同推出的新一代开源与人工智能协作平台。平台坚持“开放、中立、公益”的理念,把代码托管、模型共享、数据集托管、智能体开发体验和算力服务整合在一起,为开发者提供从开发、训练到部署的一站式体验。
更多推荐



 7
7 0
0- 0


 已为社区贡献2条内容

所有评论(0)