【Python × 深度学习 × Agent 系列·第一篇】Python 基础精要:你以为你懂,但这些才是写出好代码的关键
【Python × 深度学习 × Agent 系列·第一篇】Python 基础精要:你以为你懂,但这些才是写出好代码的关键
作者:技术博主 | 更新时间:2026-05-14 | 阅读时长:约 22 分钟
系列:Python × 深度学习 × Agent 系列(共 6 篇)
标签:Python深度学习Agent生成器装饰器上下文管理器类型注解PyTorch
🔥 写给谁看:你写过 Python,能调 PyTorch 训练模型,能用 LangChain 跑 Agent。但你不确定自己对 Python 的理解是否足够扎实——为什么
w2 = weights之后修改w2会影响weights?生成器为什么能省内存?装饰器的本质是什么、为什么 Agent 工具调用离不开它?本篇用深度学习和 Agent 的真实场景把这些基础知识串起来,看完你会发现原来 Python 这些"底层"的东西每天都在用。

系列规划
| 篇次 | 主题 | 状态 |
|---|---|---|
| 第一篇(本篇) | Python 基础精要:对象模型、生成器、装饰器、上下文管理器 | — |
| 第二篇 | NumPy 矩阵运算:广播、向量化、einsum,手推前向传播 | 即将发布 |
| 第三篇 | PyTorch 核心:Tensor、autograd、DataLoader、训练循环 | 即将发布 |
| 第四篇 | Agent 工具调用与异步:async/await、并发 LLM 调用 | 即将发布 |
| 第五篇 | 类型系统与工程化:Pydantic、dataclass、LLM 结构化输出 | 即将发布 |
| 第六篇 | 性能与部署:cProfile、推理优化、并发模型服务 | 即将发布 |
目录
- 一、Python 对象模型:变量是引用,这个细节影响每一行 DL 代码
- 二、可变与不可变:为什么 in-place 操作是 autograd 的定时炸弹
- 三、列表推导与生成器:DataLoader 底层为什么这样设计
- 四、装饰器:Agent 工具调用、重试、限流的核心实现机制
- 五、上下文管理器:
with torch.no_grad()到底做了什么 - 六、
*args和**kwargs:模型forward()的灵活接口设计 - 七、闭包与作用域:学习率调度器为什么要用闭包
- 八、Python 的 GIL:为什么 CPU 密集型用多进程而不是多线程
- 九、综合练习:用本篇知识实现一个 Agent 工具注册系统
一、Python 对象模型:变量是引用,这个细节影响每一行 DL 代码
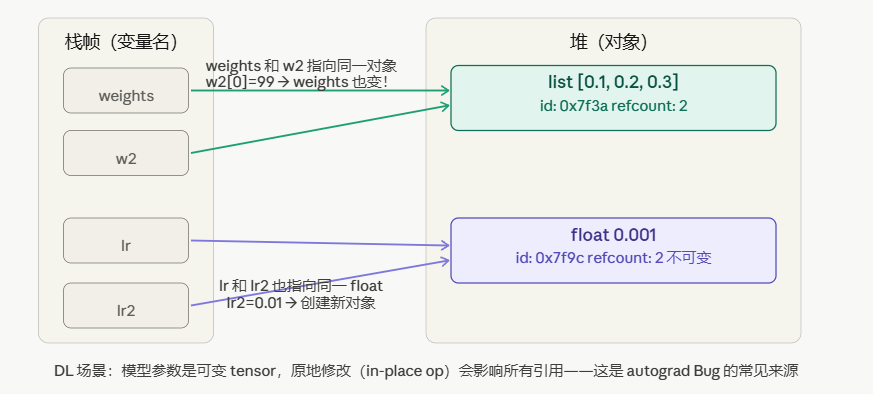
如上图一所示。
这是 Python 里最容易产生误解的地方,也是深度学习代码里 Bug 的高发地带。
1.1 变量名只是标签
Python 的变量不像 C/C++ 那样直接存储值,变量名是对象的引用(指针)。
# 这段代码做了什么?
weights = [0.1, 0.2, 0.3]   # 创建 list 对象,weights 指向它
w2 = weights                  # w2 也指向同一个 list 对象

w2[0] = 999                   # 修改 list 对象本身
print(weights)                # [999, 0.2, 0.3]  ← weights 也变了!
print(w2 is weights)          # True ← 是同一个对象
w2 = weights 不是复制,是让 w2 这个标签也贴到同一个对象上。这个列表有两个名字,但只有一个实体。
1.2 深度学习场景:参数共享的陷阱
import torch

# 场景:多头注意力机制共享 QKV 投影矩阵(某些简化实现)
class SharedAttention(torch.nn.Module):
    def __init__(self):
        super().__init__()
        self.qkv = torch.nn.Linear(64, 192)
        # 错误做法:直接赋值
        self.q_proj = self.qkv    # 这两个是同一个 Linear!
        self.k_proj = self.qkv

    def wrong_usage(self):
        # 以为在修改 q_proj 的权重,实际上 qkv、k_proj 全被改了
        self.q_proj.weight.data.fill_(0)
        print(self.k_proj.weight.data)   # 全 0!
正确做法——需要独立对象时,显式复制:
import copy

original_layer = torch.nn.Linear(64, 64)
copied_layer   = copy.deepcopy(original_layer)  # 深拷贝:完全独立的对象

# 验证独立性
with torch.no_grad():
    original_layer.weight.data.fill_(1.0)
    copied_layer.weight.data.fill_(0.0)

print(original_layer.weight.data[0, 0])  # 1.0
print(copied_layer.weight.data[0, 0])    # 0.0  ← 相互独立
1.3 id() 和 is vs ==
a = [1, 2, 3]
b = a          # 同一对象
c = [1, 2, 3]  # 内容相同,但不同对象

print(a == c)  # True(值相等)
print(a is c)  # False(不是同一对象)
print(a is b)  # True(是同一对象)
print(id(a), id(b), id(c))  # a 和 b 的 id 相同,c 不同
在 PyTorch 中的应用:
# 判断是否是同一个 tensor(不只是值相等)
tensor_a = torch.tensor([1.0, 2.0])
tensor_b = tensor_a          # 同一个对象,共享存储
tensor_c = tensor_a.clone()  # 新对象,独立存储

print(tensor_a.data_ptr() == tensor_b.data_ptr())  # True(同一块内存)
print(tensor_a.data_ptr() == tensor_c.data_ptr())  # False(不同内存)
二、可变与不可变:为什么 in-place 操作是 autograd 的定时炸弹
2.1 可变 vs 不可变类型
不可变(Immutable):int, float, str, tuple, frozenset
  "修改"实际上是创建新对象,原对象不变

可变(Mutable):list, dict, set, 自定义对象, torch.Tensor
  原地修改(in-place)会改变对象本身,所有引用都看到变化
# 不可变:重新赋值 = 新对象
lr = 0.001
lr2 = lr
lr2 = 0.01          # 创建新的 float 对象,lr 不受影响
print(lr)           # 0.001

# 可变:原地修改 = 影响所有引用
params = [0.1, 0.2]
params2 = params
params2.append(0.3)  # 原地修改
print(params)        # [0.1, 0.2, 0.3]  ← 被影响了
2.2 PyTorch in-place 操作为什么危险
import torch

x = torch.tensor([1.0, 2.0, 3.0], requires_grad=True)
y = x * 2
z = y.sum()

# ❌ 危险:在反向传播前对 x 做原地操作
x.add_(1.0)  # add_ 是 in-place 操作(带下划线后缀)
# RuntimeError: one of the variables needed for gradient computation
# has been modified by an inplace operation

# ✅ 安全:用非原地操作
x2 = torch.tensor([1.0, 2.0, 3.0], requires_grad=True)
y2 = x2 * 2
z2 = y2.sum()
x3 = x2 + 1.0       # 创建新 tensor,x2 不变
z2.backward()        # 正常
原因:autograd 记录了计算图,当它需要反向传播时,会去读之前存储的中间值。in-place 操作修改了这些中间值,导致梯度计算错误或报错。
三、列表推导与生成器:DataLoader 底层为什么这样设计
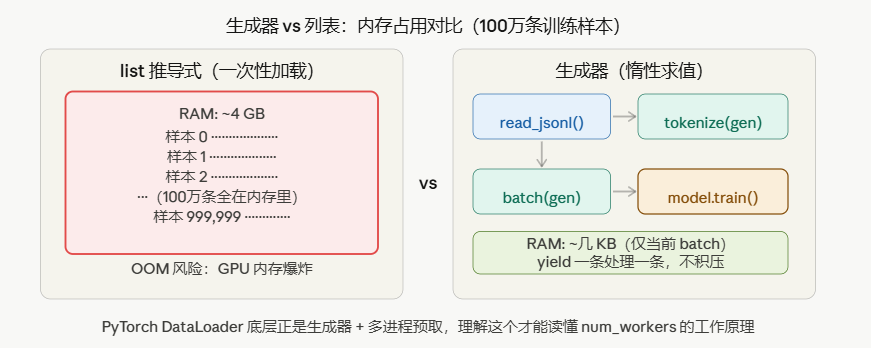
如上图三所示。
3.1 列表推导:简洁但全量加载
# 普通循环
squares = []
for i in range(10):
    squares.append(i ** 2)

# 等价的列表推导(更 Pythonic)
squares = [i ** 2 for i in range(10)]

# 带条件的列表推导
even_squares = [i ** 2 for i in range(10) if i % 2 == 0]

# 嵌套(二维矩阵展平)
matrix = [[1, 2, 3], [4, 5, 6], [7, 8, 9]]
flat   = [x for row in matrix for x in row]  # [1, 2, 3, 4, 5, 6, 7, 8, 9]
DL 场景:
# 批量构建 embedding 查询
vocab = {"apple": 0, "banana": 1, "cherry": 2}
sentences = ["apple banana", "cherry apple"]

# 将每个单词转换为 id 序列
token_ids = [[vocab[w] for w in s.split()] for s in sentences]
# [[0, 1], [2, 0]]
问题:如果数据集有 100 万条,列表推导会把所有数据一次性装进内存,可能触发 OOM。
3.2 生成器:惰性求值,按需产出
# 列表推导:立即计算,全部存入内存
all_data = [load_sample(i) for i in range(1_000_000)]   # 危险!

# 生成器表达式:只定义"怎么算",不立即计算
data_gen = (load_sample(i) for i in range(1_000_000))   # 安全!内存极小

# 生成器函数(yield)
def data_pipeline(file_path: str, batch_size: int = 32):
    """流式读取大型 JSONL 文件并分批"""
    batch = []
    with open(file_path) as f:
        for line in f:
            sample = json.loads(line)
            batch.append(preprocess(sample))
            if len(batch) == batch_size:
                yield batch        # 产出一个 batch,暂停,等待下次 next()
                batch = []
    if batch:
        yield batch                # 最后一个不完整的 batch

# 使用:每次只有一个 batch 在内存里
for batch in data_pipeline("train.jsonl", batch_size=32):
    loss = model(batch)
    loss.backward()
3.3 yield 的执行机制
def counter():
    print("开始")
    yield 1          # 暂停点1:返回 1,保存状态
    print("继续")
    yield 2          # 暂停点2:返回 2,保存状态
    print("结束")

gen = counter()      # 创建生成器对象,不执行任何代码
x = next(gen)        # 执行到第一个 yield:打印"开始",返回 1
y = next(gen)        # 从上次暂停点继续:打印"继续",返回 2
# next(gen)          # 执行到"结束",然后 StopIteration
与 PyTorch DataLoader 的联系:
# DataLoader 的简化实现(伪代码)
class DataLoader:
    def __init__(self, dataset, batch_size, shuffle):
        self.dataset    = dataset
        self.batch_size = batch_size
        self.shuffle    = shuffle

    def __iter__(self):
        indices = list(range(len(self.dataset)))
        if self.shuffle:
            random.shuffle(indices)

        batch = []
        for idx in indices:
            batch.append(self.dataset[idx])     # 触发 __getitem__
            if len(batch) == self.batch_size:
                yield collate_fn(batch)          # ← 生成器!按需产出
                batch = []
        if batch:
            yield collate_fn(batch)
DataLoader 是一个迭代器,底层正是生成器机制——每次 for batch in loader 的循环,只取出一个 batch,不预先加载全部数据。num_workers 参数开启多进程预取,本质是在生成器的基础上加了并行流水线。
四、装饰器:Agent 工具调用、重试、限流的核心实现机制
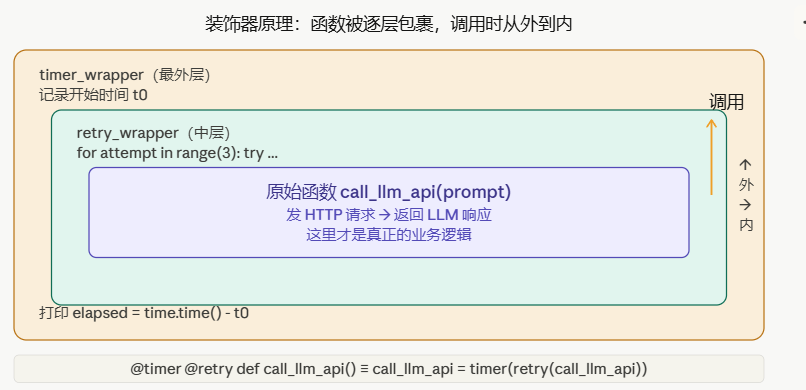
如上图二所示。
4.1 装饰器的本质
装饰器的本质是高阶函数:接受一个函数作为输入,返回一个新函数。
# 最简单的装饰器
def my_decorator(func):
    def wrapper(*args, **kwargs):
        print(f"调用 {func.__name__} 之前")
        result = func(*args, **kwargs)
        print(f"调用 {func.__name__} 之后")
        return result
    return wrapper

# 用法1:语法糖 @
@my_decorator
def say_hello(name):
    return f"Hello, {name}"

# 用法2:等价的手动写法
def say_hello(name):
    return f"Hello, {name}"
say_hello = my_decorator(say_hello)   # 完全一样
4.2 实用装饰器:Agent 工具调用的重试与超时
import time
import functools
from typing import Callable, TypeVar

T = TypeVar("T")

def retry(max_attempts: int = 3, delay: float = 1.0, backoff: float = 2.0):
    """
    指数退避重试装饰器
    Agent 调用 LLM API 时必备——网络错误、速率限制都需要重试
    """
    def decorator(func: Callable) -> Callable:
        @functools.wraps(func)   # 保留原函数的 __name__, __doc__ 等元信息
        def wrapper(*args, **kwargs):
            last_exception = None
            current_delay  = delay

            for attempt in range(max_attempts):
                try:
                    return func(*args, **kwargs)
                except (ConnectionError, TimeoutError) as e:
                    last_exception = e
                    if attempt < max_attempts - 1:
                        print(f"第 {attempt+1} 次调用失败:{e},{current_delay:.1f}s 后重试")
                        time.sleep(current_delay)
                        current_delay *= backoff    # 指数退避

            raise last_exception

        return wrapper
    return decorator


def timer(func: Callable) -> Callable:
    """记录函数执行时间"""
    @functools.wraps(func)
    def wrapper(*args, **kwargs):
        t0     = time.perf_counter()
        result = func(*args, **kwargs)
        elapsed = time.perf_counter() - t0
        print(f"{func.__name__} 耗时 {elapsed:.3f}s")
        return result
    return wrapper


# 叠加多个装饰器(从下到上包裹,从上到下执行)
@timer
@retry(max_attempts=3, delay=1.0)
def call_llm_api(prompt: str) -> str:
    """调用 LLM API,可能失败,需要重试"""
    import anthropic
    client = anthropic.Anthropic()
    response = client.messages.create(
        model="claude-sonnet-4-20250514",
        max_tokens=1024,
        messages=[{"role": "user", "content": prompt}],
    )
    return response.content[0].text

# call_llm_api = timer(retry(max_attempts=3, delay=1.0)(call_llm_api))
4.3 Agent 工具注册装饰器
这是 Agent 框架(LangChain、CrewAI 等)大量使用的模式:
from typing import Callable, Dict, Any
import inspect

# 工具注册表
_TOOL_REGISTRY: Dict[str, Dict[str, Any]] = {}

def tool(name: str = None, description: str = ""):
    """
    把普通函数注册为 Agent 工具的装饰器
    类似 CrewAI 的 @tool 装饰器
    """
    def decorator(func: Callable) -> Callable:
        tool_name = name or func.__name__
        tool_desc = description or func.__doc__ or ""

        # 从函数签名自动提取参数信息
        sig    = inspect.signature(func)
        params = {
            k: str(v.annotation)
            for k, v in sig.parameters.items()
            if k != "self"
        }

        # 注册到全局工具表
        _TOOL_REGISTRY[tool_name] = {
            "func":        func,
            "description": tool_desc,
            "params":      params,
        }

        @functools.wraps(func)
        def wrapper(*args, **kwargs):
            return func(*args, **kwargs)

        wrapper._is_tool = True
        wrapper._tool_name = tool_name
        return wrapper

    # 支持 @tool 和 @tool("name") 两种写法
    if callable(name):
        # @tool(无括号,name 实际上是被装饰的函数)
        func, name = name, None
        return decorator(func)

    return decorator


# 使用
@tool("web_search", description="在网络上搜索给定关键词,返回前 5 条结果")
def web_search(query: str, num_results: int = 5) -> list[str]:
    """网络搜索工具"""
    # ... 实际搜索实现
    return [f"结果 {i}: {query}" for i in range(num_results)]

@tool
def get_current_time() -> str:
    """获取当前时间"""
    from datetime import datetime
    return datetime.now().isoformat()

print(_TOOL_REGISTRY.keys())
# dict_keys(['web_search', 'get_current_time'])
五、上下文管理器:with torch.no_grad() 到底做了什么
5.1 上下文管理器的接口
上下文管理器实现了两个方法:__enter__(进入 with 块时调用)和 __exit__(离开时调用,无论是否有异常)。
# 最典型的例子
with open("data.txt") as f:
    content = f.read()
# 等价于:
f = open("data.txt")
f.__enter__()
try:
    content = f.read()
finally:
    f.__exit__(None, None, None)   # 确保文件被关闭
5.2 torch.no_grad() 的实现原理
# 手动实现一个类似 torch.no_grad() 的上下文管理器
import torch

class NoGradContext:
    """禁用梯度计算的上下文管理器(简化版)"""

    def __enter__(self):
        self._prev = torch.is_grad_enabled()
        torch.set_grad_enabled(False)   # 进入:关闭梯度
        return self

    def __exit__(self, exc_type, exc_val, exc_tb):
        torch.set_grad_enabled(self._prev)  # 离开:恢复原状态
        return False  # 不抑制异常

# 使用:推理阶段必须用!
model.eval()
with NoGradContext():    # 等同于 torch.no_grad()
    predictions = model(test_batch)
    # 此处创建的 tensor 不会记录梯度
    # 内存占用约减少 50%(不存储前向过程中间值)
5.3 用 contextlib.contextmanager 写生成器风格的上下文管理器
from contextlib import contextmanager
import time

@contextmanager
def timer_ctx(label: str):
    """计时上下文管理器"""
    t0 = time.perf_counter()
    try:
        yield    # 执行 with 块中的代码
    finally:
        elapsed = time.perf_counter() - t0
        print(f"[{label}] 耗时 {elapsed:.3f}s")


@contextmanager
def temporary_seed(seed: int):
    """临时设置随机种子,退出后恢复"""
    import numpy as np
    old_state = np.random.get_state()
    np.random.seed(seed)
    torch.manual_seed(seed)
    try:
        yield
    finally:
        np.random.set_state(old_state)    # 恢复原随机状态


# 使用
with timer_ctx("模型推理"):
    with torch.no_grad():
        output = model(input_batch)

with temporary_seed(42):
    dropout_output = model(x)    # 使用固定随机种子,结果可复现
六、*args 和 **kwargs:模型 forward() 的灵活接口设计
6.1 基础用法
def demo(*args, **kwargs):
    print(f"位置参数:{args}")    # tuple
    print(f"关键字参数:{kwargs}")  # dict

demo(1, 2, 3, name="Alice", lr=0.001)
# 位置参数:(1, 2, 3)
# 关键字参数:{'name': 'Alice', 'lr': 0.001}
6.2 PyTorch forward() 的灵活设计
import torch
import torch.nn as nn
from typing import Optional

class TransformerBlock(nn.Module):
    """Transformer 编码器块(简化)"""

    def __init__(self, d_model: int, nhead: int):
        super().__init__()
        self.attn = nn.MultiheadAttention(d_model, nhead, batch_first=True)
        self.ffn  = nn.Sequential(
            nn.Linear(d_model, d_model * 4),
            nn.GELU(),
            nn.Linear(d_model * 4, d_model),
        )
        self.norm1 = nn.LayerNorm(d_model)
        self.norm2 = nn.LayerNorm(d_model)

    def forward(
        self,
        x: torch.Tensor,                              # 必须参数
        attention_mask: Optional[torch.Tensor] = None,  # 可选参数
        **kwargs                                      # 吸收额外参数,不报错
    ) -> torch.Tensor:
        # 自注意力(带残差连接)
        attn_out, _ = self.attn(x, x, x, key_padding_mask=attention_mask)
        x = self.norm1(x + attn_out)

        # FFN(带残差连接)
        x = self.norm2(x + self.ffn(x))
        return x

# **kwargs 的好处:上层代码可以传入额外参数,不会报 TypeError
block = TransformerBlock(d_model=512, nhead=8)
x = torch.randn(2, 10, 512)   # batch=2, seq_len=10, d_model=512
out = block(x, return_attention=True)   # return_attention 被 **kwargs 吸收,不报错
6.3 解包操作:*list 和 **dict
# 场景:动态构建模型层
layer_configs = [
    {"in_features": 512, "out_features": 256},
    {"in_features": 256, "out_features": 128},
    {"in_features": 128, "out_features": 10},
]

# 用 * 解包列表作为位置参数,用 ** 解包字典作为关键字参数
layers = [nn.Linear(**config) for config in layer_configs]

# 用 * 把列表解包给 nn.Sequential
model = nn.Sequential(*layers)   # 等同于 nn.Sequential(layers[0], layers[1], layers[2])
print(model)
七、闭包与作用域:学习率调度器为什么要用闭包
7.1 什么是闭包
def make_lr_scheduler(initial_lr: float, decay: float):
    """
    工厂函数:返回一个学习率计算函数
    返回的函数"记住"了 initial_lr 和 decay——这就是闭包
    """
    step = 0   # 这个变量被内层函数"捕获"

    def get_lr() -> float:
        nonlocal step    # 声明要修改外层变量
        lr = initial_lr * (decay ** step)
        step += 1
        return lr

    return get_lr


# 每个调度器实例都有自己独立的 step 计数器
scheduler1 = make_lr_scheduler(0.001, 0.9)
scheduler2 = make_lr_scheduler(0.01,  0.95)

print(scheduler1())   # 0.001   step=0
print(scheduler1())   # 0.0009  step=1
print(scheduler2())   # 0.01    step=0(独立的!)
7.2 为什么 PyTorch 的学习率调度器也是这个思路
# PyTorch LambdaLR 的简化实现
optimizer = torch.optim.Adam(model.parameters(), lr=0.001)

# lr_lambda 是一个闭包:捕获了 warmup_steps
warmup_steps = 4000

def get_lr_lambda(step: int) -> float:
    """Transformer 原论文的 warmup + 衰减调度"""
    d_model = 512
    if step == 0:
        step = 1
    return (d_model ** -0.5) * min(step ** -0.5, step * warmup_steps ** -1.5)

scheduler = torch.optim.lr_scheduler.LambdaLR(optimizer, lr_lambda=get_lr_lambda)
八、Python 的 GIL:为什么 CPU 密集型用多进程而不是多线程
这是做深度学习工程经常遇到的问题:DataLoader 为什么用 num_workers 而不是线程?
8.1 GIL 是什么
GIL(Global Interpreter Lock,全局解释器锁)是 CPython 实现的一把互斥锁,同一时刻只有一个线程在执行 Python 字节码。
线程A: 请求 GIL ──→ 获得 ──→ 执行 ──→ 释放 ─────────────→ ...
线程B: 请求 GIL ──────────────────→ 等待 ──→ 获得 ──→ 执行

多线程的 Python 代码实际上不并行!(CPU 密集型任务)
8.2 什么时候线程有效?
import threading
import time
import requests

def fetch_url(url):
    """I/O 操作:等待网络响应时,GIL 自动释放"""
    response = requests.get(url)
    return len(response.content)

urls = ["https://example.com"] * 10

# 多线程对 I/O 密集型有效(等待 I/O 时 GIL 释放)
start = time.time()
threads = [threading.Thread(target=fetch_url, args=(url,)) for url in urls]
for t in threads:
    t.start()
for t in threads:
    t.join()
print(f"多线程 I/O: {time.time()-start:.2f}s")   # 快!并发等待网络

# PyTorch 的 CUDA 操作也会释放 GIL(C++/CUDA 扩展不受 GIL 限制)
# 这就是为什么 GPU 训练没有受 GIL 影响
8.3 DataLoader 为什么用多进程
# num_workers=0:主进程顺序加载(慢,但调试方便)
# num_workers=4:4个独立子进程并行加载,不受 GIL 限制

loader = DataLoader(
    dataset,
    batch_size=32,
    num_workers=4,      # 4 个子进程并行预处理
    pin_memory=True,    # 预分配固定内存,加速 CPU→GPU 传输
    prefetch_factor=2,  # 每个 worker 预取 2 个 batch
)
子进程不共享 GIL,所以可以真正并行执行 Python 数据预处理代码(图像解码、数据增强等 CPU 密集型操作)。
九、综合练习:用本篇知识实现一个 Agent 工具注册系统
把本篇所有知识点综合起来,实现一个完整的 Agent 工具系统:
"""
agent_tools.py
用本篇的知识点实现:
  装饰器 → 工具注册与元信息提取
  上下文管理器 → 工具执行的超时控制
  生成器 → 流式工具结果
  *args/**kwargs → 灵活的工具调用接口
  闭包 → 有状态的工具(如计数器)
"""
import inspect
import functools
import signal
import time
from typing import Callable, Dict, Any, Optional, Generator
from dataclasses import dataclass, field


@dataclass
class ToolResult:
    success: bool
    output: Any
    error: Optional[str] = None
    elapsed: float = 0.0


# ── 全局工具注册表 ──────────────────────────────────────────────
_TOOLS: Dict[str, Dict[str, Any]] = {}


def register_tool(name: str = None, description: str = "", timeout: int = 30):
    """
    工具注册装饰器(综合:装饰器 + 闭包 + 上下文管理器)
    """
    def decorator(func: Callable) -> Callable:
        tool_name = name or func.__name__
        tool_desc = description or (func.__doc__ or "").strip()

        # 提取参数信息(用于 LLM 工具调用的 JSON Schema)
        sig = inspect.signature(func)
        parameters = {}
        for param_name, param in sig.parameters.items():
            ann = param.annotation
            parameters[param_name] = {
                "type": ann.__name__ if hasattr(ann, "__name__") else str(ann),
                "required": param.default is inspect.Parameter.empty,
            }

        _TOOLS[tool_name] = {
            "func": func,
            "description": tool_desc,
            "parameters": parameters,
            "timeout": timeout,
        }

        @functools.wraps(func)
        def wrapper(*args, **kwargs) -> ToolResult:
            t0 = time.perf_counter()
            try:
                result = func(*args, **kwargs)
                return ToolResult(
                    success=True,
                    output=result,
                    elapsed=time.perf_counter() - t0,
                )
            except Exception as e:
                return ToolResult(
                    success=False,
                    output=None,
                    error=str(e),
                    elapsed=time.perf_counter() - t0,
                )

        wrapper._tool_name = tool_name
        wrapper._is_tool   = True
        return wrapper

    if callable(name):
        func, name = name, None
        return decorator(func)

    return decorator


def make_search_tool(max_results: int = 5) -> Callable:
    """
    工厂函数(闭包):生成有状态的搜索工具
    max_results 被捕获,每次搜索调用共享同一配置
    """
    call_count = 0   # 闭包变量:记录调用次数

    @register_tool("web_search", "网络搜索,返回相关结果列表")
    def web_search(query: str) -> list:
        nonlocal call_count
        call_count += 1
        print(f"搜索第 {call_count} 次:{query}(最多 {max_results} 条)")
        # ... 实际搜索实现
        return [f"结果 {i}: 关于 {query} 的内容" for i in range(max_results)]

    return web_search


def stream_tool_results(
    tool_name: str, **kwargs
) -> Generator[str, None, ToolResult]:
    """
    生成器:流式产出工具执行日志
    用于实时展示 Agent 执行过程
    """
    if tool_name not in _TOOLS:
        yield f"[错误] 未知工具:{tool_name}"
        return

    tool_info = _TOOLS[tool_name]
    yield f"[开始] 调用工具:{tool_name}"
    yield f"[参数] {kwargs}"

    func   = tool_info["func"]
    result = func(**kwargs)

    if result.success:
        yield f"[成功] 耗时 {result.elapsed:.3f}s"
        yield f"[输出] {result.output}"
    else:
        yield f"[失败] {result.error}"

    return result


# ── 使用示例 ────────────────────────────────────────────────────
if __name__ == "__main__":
    # 创建工具(闭包捕获 max_results=3)
    search = make_search_tool(max_results=3)

    # 流式执行
    for log_line in stream_tool_results("web_search", query="Python 生成器原理"):
        print(log_line)

    # 查看所有注册的工具(用于生成 LLM 工具调用的 JSON Schema)
    for name, info in _TOOLS.items():
        print(f"\n工具:{name}")
        print(f"描述:{info['description']}")
        print(f"参数:{info['parameters']}")
运行输出:
[开始] 调用工具:web_search
[参数] {'query': 'Python 生成器原理'}
搜索第 1 次:Python 生成器原理(最多 3 条)
[成功] 耗时 0.001s
[输出] ['结果 0: 关于 Python 生成器原理的内容', ...]

工具:web_search
描述:网络搜索,返回相关结果列表
参数:{'query': {'type': 'str', 'required': True}}
本篇知识点速查
| 知识点 | DL/Agent 应用场景 | 关键代码 |
|---|---|---|
| 对象引用 | 参数共享、避免意外修改 | copy.deepcopy() |
| 不可变类型 | 超参数安全传递 | lr = 0.001(float 不可变) |
| in-place 操作 | autograd 安全 | 避免 tensor.add_() |
| 生成器 | DataLoader、流式推理 | yield |
| 装饰器 | 工具注册、重试、计时 | @functools.wraps |
| 上下文管理器 | no_grad、资源管理 |
__enter__/__exit__ |
**kwargs |
灵活的 forward() 接口 |
def forward(self, x, **kwargs) |
| 闭包 | 有状态的调度器/工具 | nonlocal |
| 多进程 vs 多线程 | DataLoader num_workers |
num_workers > 0 |
预告:第二篇
《Python × 深度学习 × Agent 系列·第二篇:NumPy 矩阵运算——广播、einsum、向量化,手推 Transformer 的前向传播》
将要覆盖:
ndarray内存布局:C-contiguousvsF-contiguous为什么影响速度- 广播规则:
(batch, seq, d_model) + (d_model,)是怎么算的 np.einsum:用一行代码表达注意力矩阵乘法- 手推 Self-Attention 的 NumPy 实现
- 从 NumPy 到 PyTorch 的无缝切换
💬 你遇到过 Python 引用问题导致的 DL Bug 吗? 欢迎评论区分享!
🙏 如果这篇帮到你,一键三连(点赞👍 + 收藏⭐ + 关注)!第二篇即将发布!
本文为原创技术分享。转载请注明出处。最后更新:2026-05-14

AtomGit 是由开放原子开源基金会联合 CSDN 等生态伙伴共同推出的新一代开源与人工智能协作平台。平台坚持“开放、中立、公益”的理念,把代码托管、模型共享、数据集托管、智能体开发体验和算力服务整合在一起,为开发者提供从开发、训练到部署的一站式体验。
更多推荐


 15
15 0
0- 0


 已为社区贡献202条内容

所有评论(0)