DAY_08JavaScript 面向对象深度全解:Object、构造函数与 this 系统指南(上)
适合读者:已掌握函数、作用域与变量提升,想把「对象建模」与「运行时 this」打通成一条完整知识链的学习者。
学习路线:先能灵活操作普通对象 → 再能批量生产实例 → 最后把this指向规则刻进肌肉记忆。
技术参考:MDN Web Docs、ECMAScript® 2026 规范、web.dev JavaScript 系列。
目录
- 1. 知识脉络总览
- 2. 名词解释与辨析
- 3. Object 对象:创建、读写、遍历、删除、存在性判断
- 4. 构造函数:类型判断、实例化、自定义与返回值
- 5. this:三大场景、宿主丢失、window 联动
- 20. 经典使用场景、业务价值与深层理论
- 6. 包装对象与原始类型双形态
- 7. 综合案例:对象数组排序与回调函数
- 8. 面试题精析:全覆盖解读
- 9. 可运行交互演示页(含本地图片)
- 10. CSS 布局与样式技术详解(带完整示例与行业参照)
- 11. 案例完整代码收录与注解
- 12. 知识点对照总结表
- 13. 进阶预告:原型链与 prototype
- 14. 延伸阅读
- 15. call / apply / bind——this 显式绑定三兄弟
- 16. 箭头函数与 this——词法绑定
- 17. ES6 class 与构造函数对比
- 18. 现代 Object 静态方法全览
- 19. 常见错误汇总与最佳实践
1. 知识脉络总览
1.1 核心知识地图
1.2 对象操作全景
1.3 构造函数与 new 流程
1.4 this 指向决策树
1.5 一句话核心结论
| 主题 | 核心要点 |
|---|---|
| Object 对象 | 键值集合;点/括号双语法;for...in 遍历可枚举属性;delete 删除;in 检测 |
| 构造函数 | new 创建独立实例;return 原始值被忽略,return 对象替换默认实例 |
this |
看调用方式:全局/普通调用、new、方法调用——三种最核心 |
| 包装对象 | new Number 与数字直接量不同;临时包装「用完即毁」,无法持久挂属性 |
instanceof |
检查原型链,而非简单的「谁创建了谁」 |
2. 名词解释与辨析
2.1 广义对象 vs 狭义 Object
- 广义对象(口语层面):在 JavaScript 里,数组、函数、Date 等都能用属性语法操作,统称「对象」。
- 狭义 Object 类型:语言层面的一种具体对象种类,与
Array、Function、Date等并列;通常用{}或new Object()创建。
辨析:
[]本质是Array的实例;function(){}本质是Function的实例。它们几乎总是同时满足x instanceof Object(因为原型链上都有Object.prototype),除非用Object.create(null)刻意断掉原型。
2.2 属性(property)与方法(method)
- 属性:
name: value形式的键值对,value可以是任意类型。 - 方法:约定俗成地把值为函数的属性叫作方法,如
obj.sayHello()。对 JavaScript 引擎来说,它仍是普通属性。
var product = {
  title: "Wireless Keyboard",  // 属性:字符串
  price: 89,                   // 属性:数字
  tags: ["electronics", "input-device"], // 属性:数组
  describe: function() {       // 方法:值为函数
    return this.title + " — $" + this.price;
  }
};
2.3 实例化(Instantiation)
用
new Constructor()制造一个新对象,并在构造过程中完成初始化。每次new对应一块独立的实例内存,不同实例之间互不干扰。
工厂隐喻:构造函数是生产模具,new 是启动生产线,每次运行产出一个独立产品。
2.4 构造函数(Constructor Function)
- 系统内置:
Object、Array、Function、Date、RegExp、Error… - 自定义:普通函数配合
new使用,承担「类」的角色(ES2015 的class语法是其语法糖)。
规范要点:
instanceof判断的是原型链上是否出现某构造函数的prototype(MDN:instanceof)。
2.5 constructor 属性
obj.constructor 可追溯到创建它的构造函数。注意:这是原型链上的可覆盖信息,不能作为绝对可靠的类型判断。更稳妥的选择:Array.isArray()、Object.prototype.toString.call()。
var arr = [];
console.log(arr.constructor === Array);  // true
console.log(arr.constructor === Object); // false(Array 优先)

// 更稳健的类型判断
console.log(Object.prototype.toString.call(arr)); // "[object Array]"
console.log(Object.prototype.toString.call({}));  // "[object Object]"
console.log(Object.prototype.toString.call(42));  // "[object Number]"
2.6 全局对象与 window
- 浏览器中,全局对象是
window(现代标准统一入口:globalThis,MDN:globalThis)。 - 顶层
var声明的变量在非模块脚本中会成为全局对象的属性,因此改this.x(普通调用时)等于改全局变量。
2.7 this 的本质
this 是运行时绑定的关键字,不是编译期写死的值。函数如何被调用决定 this 是谁,与函数书写在哪里无关。
MDN 描述:
this是与执行上下文(execution context)相关的关键字(MDN:this)。
2.8 包装对象(Wrapper Object)
String、Number、Boolean 三种原始类型,当你对它们访问属性/方法时,JavaScript 引擎会临时创建对应的包装对象,操作完立即销毁。这就是为什么字符串能调用 .toUpperCase() 但无法持久存储属性。
2.9 可枚举属性(Enumerable Property)
for...in 只遍历可枚举的属性(包括继承的)。通过 Object.defineProperty 设置 enumerable: false 的属性不会被遍历到——这是数组 length 不出现在 for...in 中的原因之一。
2.10 原型链(Prototype Chain)
每个对象都有一个内部链接 [[Prototype]],指向其构造函数的 prototype 属性。属性查找失败时沿链向上,直到 null 为止。这是 instanceof 的实现基础,也是下一章的核心主题。
3. Object 对象:创建、读写、遍历、删除、存在性判断
3.1 创建对象的三种方式
方式 ① 对象字面量(推荐,最简洁)
var profile = {
  username: "Alice",         // 属性名合法标识符,可省略引号
  age: 28,                   // 值可以是任意类型
  "home-address": "Riverside Ave",  // 含连字符,属性名必须加引号
  tags: ["frontend", "typescript"], // 值是数组——对象可以嵌套任意结构
  address: {                 // 值是另一个对象——嵌套对象
    city: "Metro City",
    zip: "10001"
  },
  greet: function() {        // 值是函数——该属性称为"方法"
    return "Hello, " + this.username; // this 指向调用该方法的对象
  }
};
💡 代码解析:
username: "Alice"— 标准键值对,属性名符合标识符规则时引号可省略"home-address"— 含-特殊字符,必须用引号包裹,否则语法错误tags: [...]— 属性值可以是数组、对象、函数等任意类型address: {...}— 嵌套对象,访问时链式调用profile.address.citygreet: function(){}— 值是函数,此属性习惯上称为"方法",内部this指向调用者
方式 ② Object() 函数调用
var obj1 = Object();      // 不传参数:创建空普通对象,等价于 {}
var obj2 = Object(null);  // 传 null/undefined:同样返回空对象
var obj3 = Object(42);    // 传原始值:将其包装成对应的对象类型(Number 包装对象)
console.log(obj3 instanceof Number); // true —— obj3 是 Number 包装对象而非原始数字
💡 代码解析:
Object()作为普通函数调用(无new)时,行为取决于参数:- 无参数 /
null/undefined→ 返回新的空对象{} - 传入原始值(数字/字符串/布尔) → 返回对应的包装对象
- 传入对象 → 直接返回该对象本身(不创建新对象)
- 无参数 /
方式 ③ new Object() 构造函数
var obj = new Object(); // 显式用构造函数创建空对象,与 {} 效果相同
obj.name = "Bob";       // 动态添加属性——对象是开放结构,可随时添加
obj.score = 95;         // 再添加一个数值属性
💡 代码解析:
new Object()与{}完全等价,日常开发优先用字面量{}- 对不存在的属性赋值,会自动创建该属性(对象是动态的键值集合)
工程建议:字面量语法更简洁、性能无差异,是日常开发的首选。
3.2 属性的读取与写入
var car = { brand: "Tesla", model: "Model S", year: 2024 };

// 点语法读取(属性名合法标识符时)
console.log(car.brand);    // "Tesla" —— 最常用,代码最简洁

// 括号语法读取(通用,接受任意字符串)
console.log(car["model"]); // "Model S" —— 与点语法完全等价(属性名为字符串字面量时)

// 变量作为属性名——必须用括号,点语法做不到
var key = "year";
console.log(car[key]);     // 2024 —— car["year"] 的动态写法,key 是变量

// 读取不存在的属性 → undefined(不报错!)
console.log(car.color);    // undefined —— 属性不存在时安全返回 undefined

// 赋值给不存在的属性 → 自动创建该属性(对象是动态的)
car.color = "red";
console.log(car.color);    // "red" —— 属性已被动态添加到 car 上

// 特殊属性名(含连字符/空格等)只能用括号
var opts = { "data-id": 101, "max-retry": 3 };
console.log(opts["data-id"]);  // 101 —— opts.data-id 会被解析成减法运算,报错或得 NaN
💡 代码解析:
| 代码 | 说明 |
|---|---|
car.brand |
点语法,属性名必须是合法标识符(字母/数字/_/$,不以数字开头) |
car["model"] |
括号语法,属性名可以是任意字符串,包括特殊字符 |
car[key] |
动态属性名,key 是一个变量,运行时才确定属性名 |
car.color → undefined |
访问不存在的属性不报错,返回 undefined;这与访问未声明的变量(报 ReferenceError)不同 |
car.color = "red" |
赋值写法,若属性不存在则自动创建;这是 JS 对象"动态性"的体现 |
opts["data-id"] |
含 - 的属性名无法用点语法,opts.data-id 被解析为 opts.data - id |
必须用 [] 的两种场景
| 场景 | 示例 |
|---|---|
| 属性名含特殊字符(连字符、空格等) | obj["home-address"] |
| 属性名来自变量 | obj[fieldName] |
3.3 遍历属性:for...in
var server = {
  host: "localhost",
  port: 3000,
  protocol: "http",
  timeout: 5000
};

// for...in 语法:变量 key 依次取每个可枚举属性的"名字"(字符串类型)
for (var key in server) {
  // key 是属性名字符串:"host" / "port" / "protocol" / "timeout"
  // server[key] 用括号语法动态读取对应属性值(不能用 server.key,那会找名为 key 的属性)
  console.log(key + " => " + server[key]);
}
// host => localhost
// port => 3000
// protocol => http
// timeout => 5000
💡 代码解析:
for (var key in server)—key每次循环被赋为一个属性名字符串server[key]— 必须用括号语法,因为key是变量;若写server.key则查找名为"key"的属性(结果undefined)for...in遍历的是可枚举属性,包括从原型链继承的;length、内置方法等不可枚举属性不会出现
遍历注意事项
// 只想遍历自有属性,用 hasOwnProperty 过滤继承属性
for (var key in server) {
  // hasOwnProperty 判断属性是否为对象"自身"拥有,而非继承自原型
  // 写法:Object.prototype.hasOwnProperty.call(obj, key) 比 obj.hasOwnProperty(key) 更安全
  // (避免对象自身覆盖了 hasOwnProperty 方法的极端情况)
  if (Object.prototype.hasOwnProperty.call(server, key)) {
    console.log(key, server[key]);
  }
}

// 现代 API(ES2022):Object.hasOwn 是 hasOwnProperty 的更简洁替代
for (var key in server) {
  if (Object.hasOwn(server, key)) { // 效果同上,但写法更简洁安全
    console.log(key, server[key]);
  }
}

// 最佳实践:直接用 Object.keys() 只返回自有可枚举键的数组,避免 for...in 的原型链问题
Object.keys(server).forEach(function(key) {
  console.log(key, server[key]);
});
// Object.keys 返回 ["host", "port", "protocol", "timeout"],forEach 逐个处理
💡 代码解析:
hasOwnProperty的必要性:如果给Object.prototype添加了自定义属性,for...in会遍历到它;用hasOwnProperty可过滤掉继承的属性Object.prototype.hasOwnProperty.call(server, key)— 通过call借用Object.prototype上的方法,防止对象自身覆盖hasOwnPropertyObject.keys()— 只返回自有可枚举属性名的数组,是最常用的现代替代方案
数组遍历建议:数组优先用
for(按索引)、for...of(值)或Array方法(forEach、map)——for...in遍历数组会混入自定义属性名,容易踩坑。
3.4 删除属性:delete
var config = {
  debug: true,
  version: "1.0.0",
  secret: "abc123",
  timeout: 3000
};

// delete 运算符:从对象中彻底移除属性
delete config.secret;       // 用点语法删除(属性名为合法标识符时)
delete config["debug"];     // 用括号语法删除(等效,特殊属性名时必用)
console.log(config); // { version: "1.0.0", timeout: 3000 } —— secret 和 debug 已消失

// delete 一个不存在的属性:不报错,返回 true(操作"成功"的含义是"属性不存在了")
console.log(delete config.notExist); // true

// ⚠️ 数组使用 delete 的陷阱:只删除值,留下"空洞",length 不变
var arr = [10, 20, 30, 40];
delete arr[1];              // 删除索引1的元素,但槽位还在
console.log(arr);           // [10, empty, 30, 40] —— 索引1变成空洞
console.log(arr.length);    // 4 ← length 未变!这是 delete 与 splice 的关键区别
console.log(arr[1]);        // undefined ← 空洞读取为 undefined

// ✅ 正确做法:用 splice 真正移除元素,会自动调整 length
arr.splice(2, 1); // 参数:(起始索引, 删除个数),此处从索引2删除1个元素
console.log(arr); // [10, empty, 40] —— length 变为 3
💡 代码解析:
delete obj.key— 返回true代表操作完成(属性不存在也返回true),返回false代表删除失败(属性不可配置时)delete arr[1]— 数组索引本质也是属性,delete后索引变为空洞(稀疏数组),length不变,读取得undefinedarr.splice(index, count)— 真正移除元素,相邻元素向前移位,length相应减小,这才是移除数组元素的正确方式
delete 的限制
// ❌ 无法删除 var 声明的全局变量(var 声明的变量 configurable: false)
var globalVar = 100;
delete globalVar;           // 静默失败,返回 false(严格模式可能报错)
console.log(globalVar);     // 100 —— 依然存在,删除无效

// ❌ 无法删除 configurable: false 的属性
var obj = {};
Object.defineProperty(obj, "fixed", {
  value: 42,
  configurable: false  // 不可配置 → 不可删除
});
delete obj.fixed; // 非严格模式:静默失败;严格模式:"use strict" 下抛出 TypeError
💡 代码解析:
var声明的变量虽然挂在window上,但其属性描述符configurable为false,所以无法被delete删除configurable: false意味着属性不可被重新定义也不可被删除——Object.defineProperty可精确控制属性行为
3.5 存在性判断:in 运算符
var user = {
  name: "Charlie",
  age: 32,
  email: "charlie@example.com"
};

// 基本用法:'属性名字符串' in 对象 → 返回布尔值
console.log("name" in user);    // true  —— user 有 name 属性
console.log("phone" in user);   // false —— user 没有 phone 属性

// 属性名来自变量时,变量会被求值为字符串后再检测
var field = "email";
console.log(field in user);     // true —— 等价于 "email" in user

// ⚠️ 重要:in 运算符会检查整条原型链!
// toString 是 Object.prototype 上的方法,user 通过原型链继承了它
console.log("toString" in user); // true —— 来自 Object.prototype,不是 user 自身的属性

// 只检查"自有属性"(不包括继承的):用 hasOwnProperty
console.log(user.hasOwnProperty("name"));     // true  —— name 是 user 自身的属性
console.log(user.hasOwnProperty("toString")); // false —— toString 是继承的,不是自身的

// 更安全的写法:通过 Object.prototype 借用,防止对象覆盖了自身的 hasOwnProperty
console.log(Object.prototype.hasOwnProperty.call(user, "name")); // true
// 等价的现代写法(ES2022)
// console.log(Object.hasOwn(user, "name")); // true
💡 代码解析:
| 表达式 | 检查范围 | 典型用途 |
|---|---|---|
"key" in obj |
自身 + 原型链 | 判断某功能/接口是否可用(包括继承的) |
obj.hasOwnProperty("key") |
仅自身属性 | 遍历时过滤继承属性 |
Object.hasOwn(obj, "key") |
仅自身属性(ES2022) | 现代推荐写法,更安全 |
"phone" in user→false:user对象和它的整个原型链上都没有phone属性"toString" in user→true:toString定义在Object.prototype上,所有普通对象都能通过原型链访问到它
3.6 「数组 / 函数也是对象」的意义与坑点
// ① 数组也是对象 → 可以挂自定义属性
var list = [100, 200, 300, 400, 500]; // 创建数组,数字索引 0~4 是"特殊属性"
list.label = "scores";        // 像普通对象一样挂自定义属性
list.updatedAt = "2024-01-01";

console.log(list.label);     // "scores" —— 自定义属性正常读取
console.log(list.length);    // 5 —— length 只统计数字索引元素,自定义属性不计入

// ⚠️ 坑点:for...in 遍历数组时,会把自定义属性名也遍历出来
for (var k in list) {
  console.log(k); // "0" "1" "2" "3" "4" "label" "updatedAt" —— 数字索引 + 自定义属性混在一起
}

// delete 自定义属性:正常删除,属性消失
delete list.label;
// delete 数字索引:留下空洞,length 不变(陷阱!)
delete list[2];
console.log(list); // [100, 200, empty, 400, 500] —— 索引2变成空洞

console.log("label" in list);     // false —— 已被删除
console.log("length" in list);    // true  —— length 是数组固有属性
console.log("updatedAt" in list); // true  —— 自定义属性还在
💡 代码解析(数组是对象):
list.label = "scores"— 数组底层是对象,可以像对象一样挂任何属性,但这不是数组的正规用法list.length = 5—length只统计数字索引(0,1,2…)的个数,自定义属性名不计入for...in的坑:会遍历所有可枚举属性(包括自定义属性名和数字索引),因此遍历数组绝对不推荐用for...in,应使用for循环、for...of或forEach
// ② 函数也是对象 → 可以挂属性(常用于存储元数据)
function processData() {
  console.log("processing...");
}

// 函数也是对象,可以挂属性(这些属性存在函数对象本身上,与函数执行无关)
processData.version  = "2.1.0";  // 版本号元数据
processData.author   = "dev-team"; // 作者信息
processData.maxItems = 1000;      // 配置参数

console.log(processData.version); // "2.1.0" —— 直接读取函数对象的属性

// for...in 遍历函数挂载的属性(函数体内部代码不会被遍历)
for (var prop in processData) {
  console.log(prop, processData[prop]);
  // version   2.1.0
  // author    dev-team
  // maxItems  1000
}

console.log("version" in processData);  // true  —— version 属性存在
console.log("getInfo" in processData);  // false —— 没有 getInfo 属性
💡 代码解析(函数是对象):
processData.version = "2.1.0"— 函数是Function的实例,也是对象,可以挂属性- 挂在函数上的属性与函数内部的局部变量完全独立,互不影响
- 工程应用:jQuery 插件用
$.fn.pluginName挂载,Mocha/Jest 测试用例注解属性,Express 路由中间件挂 metadata
实际应用场景:函数挂属性常见于插件系统的版本标记、路由中间件的元数据、测试框架的用例标注等。
🏢 业务价值 · Object 基础操作
业务场景 涉及技术 价值说明 接口数据归一化 对象读写、属性遍历 前端对接后端 JSON 时,将不同格式的字段统一为内部模型 表单验证规则配置 对象字面量 { required: true, maxLength: 50 }一对象即一套规则,便于复用权限配置对象 in/hasOwnProperty运行时判断菜单项是否在当前用户权限表内 删除敏感字段 delete日志上报前去除用户 password、token等私密属性插件元数据挂载 函数挂属性 Webpack Loader、Babel Plugin 在函数/类上挂版本号和配置项
4. 构造函数:类型判断、实例化、自定义与返回值
4.1 什么是构造函数
构造函数对应数据类型:每种内置类型都有其构造函数,同一类型的所有实例共享同一个构造函数。
4.2 instanceof 与 constructor 速查
var arr  = [10, 20, 30, 40, 50]; // 数组:Array 的实例
var fn   = function() {};         // 函数:Function 的实例
var user = { username: "Alex", age: 28 }; // 普通对象:Object 的实例
var date = new Date();            // 日期:Date 的实例

// ===== instanceof:沿原型链检查 =====
// arr 的原型链:arr → Array.prototype → Object.prototype → null
console.log(arr  instanceof Array);    // true  —— Array.prototype 在 arr 的原型链上
console.log(arr  instanceof Object);   // true  —— Object.prototype 也在链上(Array 继承自 Object)
console.log(fn   instanceof Function); // true  —— Function.prototype 在 fn 的链上
console.log(fn   instanceof Object);   // true  —— Function.prototype 继承自 Object.prototype
console.log(date instanceof Date);     // true
console.log(date instanceof Object);   // true  —— 所有内置类型都最终继承 Object

console.log(user instanceof Object);   // true  —— 普通对象直接继承 Object.prototype
console.log(user instanceof Array);    // false —— Array.prototype 不在 user 的链上

console.log(arr instanceof Function);  // false —— arr 不是函数
console.log(arr instanceof Date);      // false —— arr 不是日期

// ===== constructor:追溯创建该对象的构造函数 =====
// constructor 属性存储在各自的 prototype 上,实例通过原型链访问
console.log(arr.constructor);           // ƒ Array() { [native code] }  —— 指向 Array 构造函数
console.log(fn.constructor);            // ƒ Function() { [native code] }
console.log(user.constructor);          // ƒ Object() { [native code] }
console.log(date.constructor);          // ƒ Date() { [native code] }

// 同种类型的所有实例共享同一个构造函数(通过原型共享,不是每个实例独有)
console.log([].constructor === arr.constructor);        // true —— 两个数组的构造函数是同一个 Array
console.log(parseInt.constructor === fn.constructor);   // true —— parseInt 也是函数,构造函数都是 Function
💡 代码解析:
instanceof的本质是原型链查找:检查右侧构造函数的.prototype是否出现在左侧对象的原型链上arr instanceof Object为true的原因:Array.prototype本身也继承自Object.prototype,所以数组"同时"是 Array 实例也是 Object 实例constructor属性来自原型,是可覆盖的(不可靠);更可靠的类型判断用Array.isArray()或Object.prototype.toString.call()[].constructor === arr.constructor为true:两个数组实例的constructor都通过原型链指向同一个Array函数,不是各自独立的副本
instanceof 的内部逻辑(简化版)
4.3 实例化:每次 new 都是新引用
// new 每次都在堆内存中分配一块新空间,创建独立对象
var arr1 = new Array(); // 第一次实例化:在内存地址 A 创建空数组
var arr2 = new Array(); // 第二次实例化:在内存地址 B 创建空数组(与 A 不同)
console.log(arr1 === arr2); // false —— === 比较的是引用地址,A ≠ B,所以为 false

// 字面量 [] 是 new Array() 的语法糖,行为完全一致
var x = [];   // 等价于 new Array(),分配新内存
var y = [];   // 等价于 new Array(),再分配新内存(与 x 不同)
console.log(x === y); // false —— 即使内容相同,引用不同就不相等

var obj1 = {};  // 等价于 new Object(),分配新内存
var obj2 = {};  // 再分配新内存
console.log(obj1 === obj2); // false

// 独立内存意味着修改一个不影响另一个
arr1.push(1, 2, 3);   // arr1 在自己的内存空间里存储 [1, 2, 3]
arr2.push(100, 200);  // arr2 在自己的内存空间里存储 [100, 200]
console.log(arr1);    // [1, 2, 3]   —— 各自独立
console.log(arr2);    // [100, 200]  —— 互不影响
💡 代码解析:
===对对象(数组/普通对象/函数)的比较是引用比较,不是内容比较- 每次
new(或字面量)都会创建一个全新的对象,分配独立内存,因此两个变量即使存的是相同内容的对象,===仍为false - 这与原始值不同:
5 === 5为true;"hello" === "hello"为true——原始值比较的是值本身
内存示意:
var x = [];  →  x 指向 内存地址 0x001 → []
var y = [];  →  y 指向 内存地址 0x002 → []
x === y ?   →  0x001 !== 0x002  →  false
4.4 自定义构造函数——批量生产对象的模具
// 定义构造函数:约定首字母大写(区别于普通函数,提示调用者要用 new)
function User(username, age, address) {
  // 用 new 调用时,this 自动指向新分配的空对象(后面会被返回为实例)
  this.name    = username; // 把参数值挂到 this(即新实例)的属性上
  this.age     = age;
  this.address = address;

  // 方法:每次 new 都会在实例上创建一个独立的函数副本(后续原型章节会优化为共享)
  this.addToCart = function(product) {
    // 此处的 this 在方法被调用时才确定,指向调用该方法的实例
    console.log(this.name + " added [" + product + "] to cart");
  };

  this.buy = function(product) {
    console.log(this.name + " purchased [" + product + "]");
  };
}

// new User(...) 的执行过程:
// 1. 创建空对象 {}
// 2. 将 this 绑定到该空对象
// 3. 执行函数体(this.name = username 等赋值)
// 4. 返回 this(即填充好属性的对象)
var u1 = new User("Alice", 28, "Downtown"); // u1 = { name:"Alice", age:28, address:"Downtown", ... }
var u2 = new User("Bob",   35, "Uptown");   // u2 = { name:"Bob",   age:35, address:"Uptown",   ... }

console.log(u1); // 查看 u1 的完整结构
console.log(u2); // 查看 u2 的完整结构
console.log(u1 === u2); // false —— 两次 new 产生的是两块独立内存,引用不同

// instanceof 验证:u1 的原型链上有 User.prototype
console.log(u1 instanceof User);   // true  —— u1 是 User 的实例
console.log(u1.constructor);       // User 函数 —— 通过原型链追溯到 User

// 调用方法:this 指向调用点左边的对象(u1 或 u2)
u1.addToCart("Mechanical Keyboard");
// 执行时 this = u1,所以 this.name = "Alice"
// 输出:Alice added [Mechanical Keyboard] to cart

u2.addToCart("Wireless Mouse");
// 执行时 this = u2,所以 this.name = "Bob"
// 输出:Bob added [Wireless Mouse] to cart
💡 代码解析:
- 构造函数名首字母大写是约定,不是强制语法要求,但所有团队都遵守这个约定
this.name = username—this在new调用时指向新建对象,每次new都是全新的this- 方法定义在
this上意味着每个实例都有独立的函数副本(u1 的addToCart和 u2 的addToCart是不同的函数对象),后面学习原型时会将方法移到User.prototype上,实现所有实例共享一个函数
内存示意图
4.5 构造函数的 return 返回值规则
// 情形 ①:无 return(或 return 不带值)→ 返回新建实例(最常见的默认路径)
function Widget() {
  this.type  = "button"; // 给新实例挂属性
  this.color = "blue";
  // 没有 return,JS 引擎自动 return this(即新建的实例)
}
var w = new Widget();
console.log(w); // Widget { type: 'button', color: 'blue' } —— 就是 this 对象

// 情形 ②:return 原始类型(数字/字符串/布尔/null/undefined)→ 被忽略,仍返回新建实例
function Box() {
  this.label = "Package";
  return 42;  // ← return 了数字(原始类型),这行被 JS 引擎忽略!
}
var b = new Box();
console.log(b); // Box { label: 'Package' } —— 42 被丢弃,返回的还是实例

// 情形 ③:return 对象类型(数组/普通对象/函数/Date 等)→ 替换默认实例!
function Product() {
  console.log("Product start"); // 构造函数体照常执行
  return [10, 20, 30, 40, 50]; // ← return 了数组(对象类型),这个会被采用
}
var p = new Product();
console.log(p); // [10, 20, 30, 40, 50] —— 不是 Product 实例,而是 return 的那个数组!
// 注意:p instanceof Product 此时为 false
💡 代码解析:
| 情形 | return 内容 | new 的结果 | 记忆方法 |
|---|---|---|---|
| ① | 无 / return; |
新建实例(this) | 默认行为,最常用 |
| ② | 原始值(42, “str”, true) | 新建实例(this) | 原始值被忽略 |
| ③ | 对象类型([], {}, function…) |
return 的那个对象 | 对象会"劫持"结果 |
- 规律:只有
return了对象类型时,new表达式的结果才不是this - 实际工程中情形①是正常写法;情形③通常出现在高级设计模式(如工厂函数)中,初学阶段先掌握默认路径
记忆规则:
4.6 构造函数 vs 普通函数调用
function User() {
  // 函数体内打印 this,结果取决于调用方式
  console.log("User called, this =", this);
}

// 用 new 调用 → this = 新建的空实例
var instance = new User();  // 打印:User called, this = User {}
console.log(instance);      // User {} —— 空实例(函数体内没有给 this 挂属性)

// 普通调用 → this = window(非严格模式)
var result = User();        // 打印:User called, this = Window {...}
console.log(result);        // undefined —— 普通调用时函数没有 return,默认返回 undefined
💡 代码解析:
- 同一个函数,调用方式不同,行为截然不同:
new User()→this= 新建实例,返回该实例User()→this=window,返回undefined
instance是User {}而不是undefined,因为new保证了返回值是新实例(哪怕函数体什么都没写)- 这就是为什么构造函数必须配合
new使用,漏写new会导致this污染全局
// 有趣的边界情形:return 函数时,调用和实例化结果形态相同
function factory() {
  // 函数体 return 了一个函数(对象类型)
  return function() { console.log("factory output"); };
}

var r1 = factory();      // 普通调用:直接返回 return 的函数
var r2 = new factory();  // new 调用:return 了对象类型(函数),新实例被替换,r2 也是这个函数

console.log(typeof r1); // "function" —— 普通调用返回的函数
console.log(typeof r2); // "function" —— new 调用但因 return 函数,结果相同
// 结论:这种情况下,加不加 new 结果一样(不常见,仅作理解 return 机制用)
💡 代码解析:
factory返回一个函数(函数是对象类型)new factory()时,本该返回新实例,但由于return了对象类型,新实例被"替换"掉- 这与之前 4.5 的"return 对象类型 → 替换实例"规则一致
工程实践:构造函数应始终与
new配合使用。若需要强制保护,可在函数体加if (!(this instanceof User)) return new User(...args)检测。
4.7 对象数组排序(sort + 比较函数)
var products = [
  { name: "Keyboard", price: 89,  rating: 4.5 },
  { name: "Mouse",    price: 29,  rating: 4.8 },
  { name: "Monitor",  price: 320, rating: 4.3 },
  { name: "Headset",  price: 75,  rating: 4.6 }
];

// 按价格升序:比较函数返回 a.price - b.price
// 规则:返回负数 → a 排 b 前;返回正数 → b 排 a 前;返回 0 → 顺序不变
products.sort(function(a, b) {
  return a.price - b.price; // a 便宜 → 负数 → a 在前(升序)
});
console.log(products.map(p => p.name + "($" + p.price + ")"));
// ["Mouse($29)", "Headset($75)", "Keyboard($89)", "Monitor($320)"]

// 按评分降序:交换 a/b 顺序即可变升为降
products.sort(function(a, b) {
  return b.rating - a.rating; // b 评分高 → 正数 → b 排 a 前(降序)
});
console.log(products.map(p => p.name + "(" + p.rating + "⭐)"));
// ["Mouse(4.8⭐)", "Headset(4.6⭐)", "Keyboard(4.5⭐)", "Monitor(4.3⭐)"]
💡 代码解析:
Array.prototype.sort(compareFn)的比较函数签名:function(a, b)- 返回负数 →
a排在b前(不交换) - 返回正数 →
b排在a前(交换) - 返回
0→ 顺序不变(稳定排序)
- 返回负数 →
- 升序公式:
return a.field - b.field(数值字段) - 降序公式:
return b.field - a.field(把 a/b 对调) - 注意:
sort原地修改数组,若需要保留原数组顺序,应先.slice()复制再排序
经典使用场景:电商平台「价格排序」「好评排序」;仪表盘数据表格排序;任务管理系统按优先级排列。
🏢 业务价值 · 构造函数与实例化
业务场景 涉及技术 价值说明 用户账号对象工厂 自定义构造函数 new User(data)批量生成用户实例,统一挂avatar、permissions、token等属性商品/订单建模 构造函数 + 排序 从 API 拿到 JSON 数组后用 Product构造函数标准化,再sort展示多环境配置隔离 instanceof判断当前配置是 DevConfig实例还是ProdConfig实例,走不同分支SDK 客户端 构造函数 + return规则new ApiClient({ baseURL })生成独立实例,客户端与服务端各自持有独立状态列表渲染引擎 对象数组 + 比较函数 表格按多字段组合排序(先按状态分组、再按时间降序)
5. this:三大场景、宿主丢失、window 联动
5.1 this 的核心心法
不看书写位置,看调用方式。
5.2 场景 ① 全局脚本顶层与普通调用
// 全局脚本顶层(不在任何函数内):this = window(浏览器,非严格模式)
console.log(this);            // Window {...} —— 就是浏览器的全局对象
console.log(this === window); // true —— 顶层 this 和 window 是同一个对象

// 普通函数调用(没有 obj. 前缀,没有 new):this 也指向 window
function showThis() {
  // "直接调用函数"——没有明确的调用者,非严格模式默认绑定到全局对象
  console.log(this);            // Window —— 同顶层的 this
  console.log(this === window); // true
}
showThis(); // 普通调用,不是方法调用,也没有 new

// 严格模式下:普通调用的 this 变为 undefined(防止意外修改全局)
function strictFn() {
  "use strict"; // 在函数内开启严格模式(ES5+)
  // 严格模式下,函数被普通调用时 this 不再默认绑定全局,而是 undefined
  console.log(this); // undefined
}
strictFn(); // 普通调用,严格模式,this = undefined
💡 代码解析:
- 顶层
this:在浏览器的非模块脚本中,全局作用域下this === window - 普通调用(
fn()):非严格模式下this自动绑定到全局对象window;严格模式下this为undefined "use strict"的重要性:开启严格模式后,普通调用不再隐式绑定全局,有助于尽早发现this指向错误的 bug(否则意外修改了window属性,很难排查)
5.3 场景 ② 构造函数内部
function Device(brand, model) {
  // 用 new 调用时,this 是引擎为我们新创建的空对象
  // 以下两行把参数值存入新对象的属性
  this.brand = brand; // 相当于:新实例.brand = brand
  this.model = model;

  this.describe = function() {
    // 此处 this 在方法被调用时才确定,指向调用者(调用 describe 的那个实例)
    return this.brand + " " + this.model;
  };
  // 函数体执行完,引擎隐式 return this(新建的实例)
}

// 每次 new 都创建一个全新的实例,this 指向各自的新对象
var phone  = new Device("Apple", "iPhone 16"); // phone.brand = "Apple", phone.model = "iPhone 16"
var laptop = new Device("Dell",  "XPS 15");    // laptop.brand = "Dell", laptop.model = "XPS 15"

console.log(phone.describe());  // "Apple iPhone 16" —— this = phone
console.log(laptop.describe()); // "Dell XPS 15"     —— this = laptop

// 用一个简单的例子验证:new 时 this 就是新建的那个对象
function ShowSelf() {
  // this 是新建的空对象,此时打印出来是 ShowSelf {}
  console.log("this in constructor:", this);
}
var inst = new ShowSelf(); // 打印 ShowSelf {} —— 证明 this 是新实例
💡 代码解析:
new Device(...)执行时,函数体内的this被绑定到正在创建的那个新对象this.brand = brand— 把外部传入的参数值存到新对象上,这是构造函数初始化实例的核心操作describe方法里的this并不是在定义时固定的,而是在被调用时才决定:phone.describe()时this = phone;laptop.describe()时this = laptop
5.4 场景 ③ 方法调用:「看点号左侧」
var user = {
  name: "Alice",
  age: 28,
  getInfo: function() {
    // 此函数被 user.getInfo() 调用,点号左边是 user,所以 this = user
    console.log("getInfo this:", this);  // this 就是 user 对象
    console.log("name:", this.name);     // user.name = "Alice"
  },
  friend: {
    name: "Bob",
    say: function() {
      // 此函数被 user.friend.say() 调用,点号链的最右端的直接调用者是 user.friend
      // 所以 this = user.friend,而不是 user!
      console.log("say this:", this);    // this 是 user.friend 对象
      console.log("name:", this.name);   // user.friend.name = "Bob"
    }
  }
};

// 调用 getInfo:点号左边是 user → this = user
user.getInfo();
// this → user 对象({ name:"Alice", age:28, ... })
// name: Alice

// 调用 say:点号链 user.friend.say(),直接调用者是 user.friend → this = user.friend
user.friend.say();
// this → user.friend 对象({ name:"Bob", ... }),不是 user!
// name: Bob
💡 代码解析:
- 黄金规则:
obj.fn()调用时,this = obj(点号左侧的那个对象) user.friend.say()— 链式调用时,看紧挨着方法名左边的那个对象,即user.friend,不是最左边的user- 简单记法:谁直接调用了这个函数,
this就是谁("直接"意味着就是点号左边的那一级)
嵌套对象中的 this
5.5 宿主丢失:赋值出来的函数
var globalName = "GlobalScope";
var obj = {
  name: "ObjectScope",
  greet: function() {
    console.log(this.name); // this 在调用时决定
  }
};

// ✅ 正常方法调用:obj.greet() → 点号左边是 obj → this = obj
obj.greet(); // "ObjectScope" —— this.name = obj.name = "ObjectScope"

// ❌ 赋值给变量后调用:宿主丢失!
// detached 只是"搬走了"函数的引用,与 obj 之间没有绑定关系
var detached = obj.greet; // 把函数引用赋给 detached,不是调用
var name = "GlobalScope"; // 全局变量 name(挂在 window 上)
// detached() 是直接调用,没有点号前缀,this 变为 window
detached(); // "GlobalScope" —— this = window,this.name = window.name = "GlobalScope"

// ❌ 作为回调传递 → 在 runner 内部被普通调用 fn(),同样丢失宿主
function runner(fn) {
  fn(); // fn 是普通调用,没有调用者,this = window
}
runner(obj.greet); // "GlobalScope" —— 函数引用传进去,宿主 obj 没有传进去

// ✅ 解决方案:bind 永久绑定 this
// bind 返回一个新函数,无论怎么调用,this 始终是第一个参数(obj)
var boundGreet = obj.greet.bind(obj); // 创建绑定了 obj 的新函数
boundGreet();          // "ObjectScope" —— this 被固定为 obj
runner(boundGreet);    // "ObjectScope" —— 即使在 runner 内普通调用,this 仍是 obj
💡 代码解析:
var detached = obj.greet— 这一行只是复制函数引用,等号左边的变量名和等号右边的obj对象之间没有绑定,this 信息随着obj.的脱落而丢失detached()— 普通调用,this = window;而obj.greet()— 方法调用,this = obj- 同一个函数,调用方式不同,this 就不同,这是 JS 中最容易混淆的特性
bind(obj)— 返回一个新函数,内部永久绑定this = obj,无论如何调用都不会丢失
工程中最常见的宿主丢失场景:
// ① DOM 事件回调
var timer = {
  count: 0,
  start: function() {
    // 错误:setTimeout 内部调用,this → window
    setTimeout(function() {
      this.count++; // window.count,不是 timer.count
    }, 1000);

    // 正确①:bind
    setTimeout(function() {
      this.count++;
    }.bind(this), 1000);

    // 正确②:箭头函数(继承外层 this)
    setTimeout(() => {
      this.count++; // 箭头函数内 this 是 timer
    }, 1000);
  }
};
5.6 全局变量与 window 属性的联动
// var 声明的全局变量等于 window 的属性
var pageTitle = "Dashboard";
console.log(window.pageTitle === pageTitle); // true

// 普通函数调用时,this === window
var counter = 0;
function increment() {
  this.counter = this.counter + 1; // 等价于 window.counter = window.counter + 1
  console.log(counter);            // 读的是全局 counter(已被修改)
}
increment();
console.log(counter); // 1
// 经典面试题:全局属性改写(深度理解 this 与全局变量的关联)
var foo = 123; // ① 全局变量 foo = window.foo = 123(var 声明的变量挂在 window 上)

function print() {
  // ② print() 是普通调用,非严格模式下 this = window
  this.foo = 234; // 等价于 window.foo = 234,直接修改了全局变量 foo!

  // ③ console.log(foo) 用标识符查找:
  //    先找当前函数作用域 → 没有局部 foo
  //    再找全局作用域 → 找到 window.foo,此时已被 ② 改为 234
  console.log(foo); // 234(不是 123!因为 ② 已经修改了全局 foo)
}
print();
// 执行完 print 后,全局 foo 已被改为 234
console.log(foo); // 234 —— 全局变量已被污染
💡 代码解析:
var foo = 123— 全局var声明,等价于window.foo = 123this.foo = 234(在print()普通调用中)—this是window,所以等价于window.foo = 234,直接覆盖了全局变量fooconsole.log(foo)— 标识符foo查找规则:函数作用域内无局部foo,向上找到全局foo,此时已是234- 输出
234 → 234的两个关键点:①this.foo = 234改写了全局foo;②后面两处读到的都是被改写后的值
5.7 new 与普通调用 + 变量提升的组合题
var a = 5; // 全局变量 a = 5,挂在 window 上(window.a = 5)

function test() {
  // ⚠️ 关键:因为函数内有 var a,所以 var 提升到函数顶部
  // 提升后的等价代码:
  // var a;      ← 声明被提升,值为 undefined(遮蔽了全局 a)
  // a = 0;      ← 给局部 a 赋值为 0
  // console.log(a);      0
  // console.log(this.a); 取决于 this
  // var a; (提升后这里已无意义)
  // console.log(a);      0

  a = 0;           // 给局部变量 a 赋值为 0(不影响全局 a!)
  console.log(a);  // ① 0(读的是局部变量 a = 0)
  console.log(this.a); // ② 取决于调用方式(见下方分析)
  var a;           // 声明已被提升,这行运行时等同于空语句
  console.log(a);  // ③ 0(仍是局部变量 a)
}

test();
// 普通调用:this = window
// ① 0          —— 局部 a = 0
// ② 5          —— this = window,window.a = 全局 a = 5(局部 a 没有改变全局!)
// ③ 0          —— 局部 a 仍是 0

console.log("");

new test();
// new 调用:this = 新建的空实例对象(没有任何自有属性)
// ① 0          —— 局部 a = 0(同上)
// ② undefined  —— this 是新实例,新实例上没有属性 a,读不到,返回 undefined
// ③ 0          —— 局部 a 仍是 0
💡 代码解析(三个关键点):
-
变量提升(Hoisting):
var a在函数体任何位置声明,都会被提升到函数顶部,导致函数内的a = 0赋给的是局部变量,而不是全局变量a -
局部变量遮蔽:局部
a存在后,函数体内的a = 0/console.log(a)操作的都是局部变量,全局a的值 5 始终未被修改 -
this.avsa的区别:a(标识符)— 沿作用域链查找:先找局部→再找全局this.a(属性访问)— 在this指向的对象上查找:test()时this=window,读window.a=5;new test()时this是空实例,无属性a,得undefined
分析流程
6. 包装对象与原始类型双形态
6.1 原始类型的三种存在形态
// 形态 ① 直接量(原始值):最常用,存储的是值本身,不是对象
var n1 = 89;

// 形态 ② Number() 函数调用(不加 new):把参数转为数字原始值
var n2 = Number(88); // 作为普通函数调用,返回原始值 88,不是对象

// 形态 ③ new Number() 构造函数:创建 Number 包装对象(很少用)
var n3 = new Number(87); // 加了 new,返回的是对象,而非原始值

// typeof 揭示本质区别
console.log(typeof n1); // "number"  —— 原始值
console.log(typeof n2); // "number"  —— 原始值(Number() 函数调用返回原始值)
console.log(typeof n3); // "object"  —— ← 注意!包装对象的 typeof 是 "object"

// instanceof 只对对象有效
console.log(n1 instanceof Number); // false —— n1 是原始值,不是对象,instanceof 永远 false
console.log(n2 instanceof Number); // false —— 同理
console.log(n3 instanceof Number); // true  —— n3 是 Number 包装对象,是 Number 的实例

// 算术运算时,包装对象自动拆箱(unboxing)为原始值参与计算
console.log(n1 * n3); // 89 × 87 = 7743 —— n3 自动转为 87 参与乘法

// 访问 constructor 属性:原始值会临时包装成对象,然后访问原型链上的 constructor
console.log(n1.constructor); // Number —— 临时创建 new Number(89) → 访问 constructor → 销毁临时对象
console.log(n3.constructor); // Number —— n3 本身就是对象,直接访问
💡 代码解析:
| 创建方式 | 示例 | typeof | instanceof Number | 是否对象 |
|---|---|---|---|---|
| 直接量 | var n = 89 |
"number" |
false |
❌ |
| Number() | var n = Number(88) |
"number" |
false |
❌ |
| new Number() | var n = new Number(87) |
"object" |
true |
✅ |
typeof n3为"object"是一个陷阱:用typeof区分Number原始值和包装对象时要注意这一点n1.constructor能访问成功,是因为引擎在访问属性那一刻临时创建了new Number(89),访问完立即销毁——这就是"临时包装"
6.2 String、Boolean 的对象形态
// 字符串直接量:访问属性时引擎临时创建 new String("hello") 包装对象
console.log("hello".constructor);   // String   —— 包装对象的构造函数
console.log("hello".length);        // 5        —— 包装对象的 length 属性
console.log("hello".toUpperCase()); // "HELLO"  —— 调用包装对象的方法

// 布尔直接量:访问属性时引擎临时创建 new Boolean(...) 包装对象
console.log(true.constructor);  // Boolean —— 布尔包装对象的构造函数
console.log(false.constructor); // Boolean

// 数字直接量的特殊写法(注意点的歧义)
console.log(12.2.constructor);  // Number —— 12.2 是数字,第二个点是属性访问
console.log((12).constructor);  // Number —— 用括号消歧义
console.log(12..constructor);   // Number —— 两个点:第一个是小数点,第二个是属性访问
💡 代码解析:
- 字符串:
"hello"是原始类型,本身没有属性,但访问.length、.toUpperCase()时,引擎在幕后临时创建new String("hello"),访问完立刻丢弃 - 布尔值:同理,
true.constructor触发临时new Boolean(true)包装,读取constructor后销毁 - 数字直接量的点语法:
12.constructor会报语法错误(引擎把.当小数点),正确写法是(12).constructor或12..constructor(第一个点是小数,第二个点是属性访问)
6.3 「临时包装」导致的经典陷阱
// 数组是对象 → 属性可以持久挂载
var arr = [];
arr.address = "Metro City"; // 挂在数组对象上,持久保存
console.log(arr.address);   // "Metro City" ← 成功,数组是真正的对象

// 原始字符串 → 临时包装对象,属性挂了也白挂
var msg = "";           // 原始字符串,不是对象
msg.rating = 5;         // ① 引擎临时创建 new String("") ② 给临时对象赋 rating=5 ③ 语句结束立即销毁
console.log(msg.rating); // undefined ← 再次访问 msg.rating 时,重新创建新临时对象,新对象没有 rating
💡 代码解析:
arr是数组(对象类型),arr.address像普通对象属性一样持久存在msg是原始字符串(非对象),msg.rating = 5虽然没有报错,但:- 引擎临时生成一个
new String("")包装对象 - 把
rating = 5赋给这个临时对象 - 赋值语句结束 → 临时对象立即销毁
- 下次读
msg.rating→ 引擎再生成一个全新的临时对象 → 新对象没有rating→ 返回undefined
- 引擎临时生成一个
- 记忆口诀:原始类型挂属性 = 往冰块上刻字,融化就消失
原因分析
6.4 何时需要包装对象?
| 场景 | 建议 |
|---|---|
| 普通数值运算、字符串处理 | 用直接量,引擎自动临时包装 |
| 需要判断是否为 Number 类型实例 | typeof 或 instanceof 注意区别 |
| 需要给字符串挂持久属性 | 改用对象 { value: "...", extra: ... } |
面试题「为何 str.length 能用但属性挂不住」 |
临时包装机制 |
🏢 业务价值 · this 与包装对象
业务场景 涉及技术 价值说明 React 类组件事件绑定 bind(this)/ 箭头函数onClick={this.handleClick.bind(this)}是最常见的 this 修复,也是箭头函数类属性写法的来源Vue 选项式 API 方法 方法调用中的 this Vue 内部将 methods中的函数以obj.method()形式调用,this自动指向组件实例setTimeout / setInterval 回调 宿主丢失 → 箭头函数 定时器回调中的 this 丢失是高频 Bug,箭头函数是最简修复 字符串/数字 API 调用 临时包装 " trim me ".trim()、(42).toString(16)背后都是临时包装对象提供的方法严格模式下的 this "use strict"生产构建工具(Webpack/Vite/esbuild)默认开启严格模式,普通调用 this 为 undefined,避免全局污染
7. 综合案例:对象数组排序与回调函数
7.1 商品列表排序(实战还原)
var inventory = [
  { id: 1, name: "Wireless Keyboard", price: 89,  stock: 150, rating: 4.5 },
  { id: 2, name: "USB-C Hub",         price: 45,  stock: 80,  rating: 4.7 },
  { id: 3, name: "4K Monitor",        price: 399, stock: 30,  rating: 4.2 },
  { id: 4, name: "Ergonomic Mouse",   price: 65,  stock: 200, rating: 4.8 },
  { id: 5, name: "Webcam HD",         price: 55,  stock: 90,  rating: 4.4 }
];

// 四个具名比较函数——命名清晰,可复用,可单独测试
function sortByPriceAsc(a, b)   { return a.price  - b.price; }   // 升序:差为负 → a 在前
function sortByPriceDesc(a, b)  { return b.price  - a.price; }   // 降序:交换 a/b
function sortByRatingDesc(a, b) { return b.rating - a.rating; }  // 评分高的排前面
function sortByStockAsc(a, b)   { return a.stock  - b.stock; }   // 库存少的排前面

// .slice() 先复制原数组,避免 .sort() 原地修改 inventory
var byPrice = inventory.slice().sort(sortByPriceAsc);
console.log("按价格升序:", byPrice.map(i => i.name + "($" + i.price + ")"));
// ["USB-C Hub($45)", "Webcam HD($55)", "Ergonomic Mouse($65)", "Wireless Keyboard($89)", "4K Monitor($399)"]

var byRating = inventory.slice().sort(sortByRatingDesc);
console.log("按评分降序:", byRating.map(i => i.name + "(" + i.rating + "★)"));
// ["Ergonomic Mouse(4.8★)", "USB-C Hub(4.7★)", "Wireless Keyboard(4.5★)", "Webcam HD(4.4★)", "4K Monitor(4.2★)"]
💡 代码解析:
- 具名比较函数:将比较逻辑提取为独立的具名函数,代码更清晰,也方便单元测试
inventory.slice():Array.prototype.sort是原地排序,会修改原数组。先.slice()复制一份,保留原始inventory不变,每次排序都基于原始数据- 回调函数模式:
sort(sortByPriceAsc)中,sortByPriceAsc是回调函数,传入函数引用(不加括号),sort在内部按需调用它 - 实战延伸:若字段是字符串(如
name),应用localeCompare:return a.name.localeCompare(b.name)
7.2 回调函数与返回值的经典陷阱
var compute = function() {
  return 200;
};
// ⚠️ 关键区别:函数引用 vs 函数调用
console.log(compute);   // ƒ () { return 200; } —— 打印函数本身(没有括号,不调用)
console.log(compute()); // 200 —— 调用函数,打印返回值

// 陷阱一:回调函数有返回值,但外层函数没有把返回值传出去
function run(a, b, callback) {
  callback(a, b);       // ← 调用了 callback,但没有 return!
                        //   callback 的返回值被丢弃了
}

function sum(x, y) {
  return x + y; // 内部确实 return 了 300
}

console.log(run(100, 200, sum)); // undefined —— run 没有 return,所以结果是 undefined

// 修正版:外层函数也 return 回调的结果
function runAndReturn(a, b, callback) {
  return callback(a, b); // ← 加了 return,把 callback 的返回值传出去
}
console.log(runAndReturn(100, 200, sum)); // 300 —— 正确
💡 代码解析:
computevscompute():变量名后面有没有()是天壤之别——无括号是引用(函数对象),有括号是调用(执行并拿返回值)- 回调返回值陷阱:
run函数内callback(a, b)确实执行了sum,sum也return 300,但run没有把这个 300 传递出去(没有return callback(...)),导致run自己返回undefined - 修复方式:在外层函数中也加
return callback(a, b),形成"透传" - 实际场景:Express 中间件
next()返回值不向上传递就是同理;Promise 链中忘记return导致链断裂也是相同原理
7.3 递归函数的括号陷阱
// ❌ 错误版:if 后没有花括号,导致 return 游离在 if 作用域之外
function funWrong(n) {
  if (n <= 0)
    console.log(0);  // 只有这一行属于 if 块
    return;          // ← 这行不属于 if!永远执行,函数一进来就 return
  console.log(n);    // ← 永远不会执行到这里
  funWrong(n - 1);
  console.log(n);
}
// funWrong(3) 只会输出 0(n=3>0,if不执行console.log(0)),然后立即 return,后续全部跳过

// ✅ 正确版:用花括号明确 if 语句块的边界
function fun(n) {
  if (n <= 0) {   // 花括号包裹 if 块
    console.log(0);
    return;       // 只有 n <= 0 时才 return,终止递归
  }
  console.log(n); // n > 0 时,先打印 n
  fun(n - 1);     // 递归调用,深入下一层
  console.log(n); // 从递归返回后,再次打印 n(回溯阶段)
}
fun(3); // 输出顺序:3 → 2 → 1 → 0 → 1 → 2 → 3
💡 代码解析:
- 错误版核心问题:Python 用缩进决定代码块,JavaScript 用花括号。没有花括号时,
if只包含紧随其后的一行,return看起来属于if但实际上不是,导致函数每次调用都立刻return - 正确版执行流程:
- 进栈阶段(n=3,2,1):每层先
console.log(n)→ 再调fun(n-1) - 终止条件(n=0):打印 0 并
return - 出栈阶段(n=1,2,3):每层从递归调用返回后,再执行
console.log(n)
- 进栈阶段(n=3,2,1):每层先
- 递归两要素:① 终止条件(n<=0 时 return)② 递归调用(
fun(n-1)),缺一不可
递归调用栈示意
8. 面试题精析:全覆盖解读
8.1 题目一:方法被搬运后的 this
var name = "222";
var a = {
  name: "111",
  say: function() {
    console.log(this.name);
  }
};

var fun = a.say;
fun();      // ① 输出?
a.say();    // ② 输出?

var b = {
  name: "333",
  say: function(func) {
    func(); // 普通调用
  }
};
b.say(a.say);  // ③ 输出?
b.say = a.say;
b.say();       // ④ 输出?
逐步分析
答案:222 → 111 → 222 → 333
💡 代码解析:
- ①
fun():fun = a.say只是把函数引用赋给变量,fun()是普通调用(没有obj.),this = window,window.name = "222"→ 输出222 - ②
a.say():方法调用,点号左侧是a,this = a,a.name = "111"→ 输出111 - ③
b.say(a.say):b.say内部执行func(),func是参数传入的a.say函数引用,func()是普通调用,this = window→ 输出222(函数传递不带走this绑定!) - ④
b.say():先把a.say赋给b.say,再以方法调用b.say(),点号左侧是b,this = b,b.name = "333"→ 输出333
8.2 题目二:全局属性改写
var foo = 123;       // 全局变量 foo(等价于 window.foo = 123)
function print() {
  this.foo = 234;    // 普通调用 this=window → 修改了 window.foo 为 234
  console.log(foo);  // 标识符 foo → 当前函数无局部 foo → 向上找全局 foo → 此时已被改为 234
}
print();             // this = window(非严格模式普通调用)
console.log(foo);    // 234(全局 foo 被 print() 的 this.foo=234 修改过)
两次输出都是 234。关键点:this.foo = 234 修改了全局变量 foo(因为 this === window,window.foo === foo)。
💡 代码解析:
var foo = 123在全局作用域声明,等价于给window加了属性window.foo = 123print()是普通调用,this = window,所以this.foo = 234实际上是window.foo = 234- 函数内
console.log(foo)中的foo是标识符查找(沿作用域链),print内无局部foo,向上找到全局foo,此时已被改为234 - 函数返回后,全局
foo已是234,所以第二个console.log(foo)也是234
8.3 题目三:new vs 调用 + 变量提升
var a = 5; // 全局变量 a = 5(window.a = 5)

function test() {
  // ⚠️ 变量提升:var a 被提升到函数顶部,相当于:var a; (初始值 undefined)
  // 因此函数内 a 是局部变量,与全局 a 无关
  a = 0;           // 局部 a 赋值为 0(不影响全局 a)
  console.log(a);  // 0(局部 a)
  console.log(this.a); // 取决于 this 指向(见下方分析)
  var a;           // var 声明被提升到顶部了,这里什么都没发生
  console.log(a);  // 0(局部 a 仍然是 0)
}

// 场景一:普通调用
test();
// this = window(非严格模式)
// window.a = 5(全局 a 没被动过)
// console.log(this.a) → window.a → 5
// 输出顺序:0  →  5  →  0

// 场景二:new 调用
new test();
// this = 新建的空实例(没有属性 a)
// console.log(this.a) → 实例没有 a → undefined
// 输出顺序:0  →  undefined  →  0
💡 代码解析:
- 变量提升:
var a在test函数内部的任何位置声明,都会被提升到函数作用域顶部,所以整个函数内a都是局部变量,与全局var a = 5完全隔离 - 普通调用(
test()):this = window,this.a = window.a = 5(全局a未被局部变量影响) - new 调用(
new test()):this= 新建空实例,实例上没有任何属性,this.a→undefined - 核心考点:变量提升 +
this指向 + 局部变量与全局变量的作用域隔离,三者叠加出现
8.4 题目四:嵌套引用与属性赋值
var age = 20; // 全局 age = 20

var obj = {
  age: 10,          // obj 自己的 age = 10
  getAge: function() {
    console.log(this.age); // this.age 取决于调用方式
  }
};

var obj1 = { age: 30 };  // obj1 自己的 age = 30
obj1.prop = obj;          // obj1.prop 指向 obj 同一个引用(不是复制!)

var fn = obj1.prop.getAge; // 把 getAge 函数引用赋给 fn(脱离了对象)

obj.getAge();           // ① 方法调用:this = obj,输出 obj.age = 10
obj1.prop.getAge();     // ② 方法调用:this = obj1.prop(即 obj),输出 obj.age = 10
fn();                   // ③ 普通调用:this = window,输出 window.age = 20
💡 代码解析:
- ①
obj.getAge():点号左侧是obj,this = obj,this.age = obj.age = 10 - ②
obj1.prop.getAge():点号链中,this绑定到紧挨着方法的那个对象,即obj1.prop,而obj1.prop === obj(引用同一对象),所以this.age = obj.age = 10(不是obj1.age = 30,obj1只是中间的"跳板") - ③
fn():把方法赋给变量后普通调用,this = window,window.age = 全局 age = 20 - 黄金法则:
this= 调用方法时,点号左边直接相邻的那个对象,链式a.b.c()中this = b,不是a
注意:
obj1.prop.getAge()中,this是点号链最右侧方法的直接调用者obj1.prop,而obj1.prop === obj,所以this.age === obj.age === 10。
8.5 题目五:构造函数内 this 的使用场景
var age = 10; // 全局 age = 10(window.age = 10)

function func(name, age) {
  // 注意:参数 age 与全局 age 同名,在函数内部参数遮蔽全局
  this.name = name; // 把 name 参数挂到 this 上
  this.age  = age;  // 把参数 age 挂到 this 上
  this.getInfo = function() {
    console.log(this.name); // 方法调用时 this = 调用者
    console.log(this.age);
  };
  console.log(this.name); // 立刻打印 this.name
}

// 场景一:普通调用
func("Tom", 19);
// this = window,window.name = "Tom",window.age = 19(覆盖了全局 age!)
// console.log(this.name) → window.name → "Tom"

// 场景二:new 调用
var o = new func("Tom", 19);
// this = 新建实例 o,o.name = "Tom",o.age = 19
// console.log(this.name) → o.name → "Tom"

// 以方法调用 o.getInfo(),this = o
o.getInfo();
// this.name = o.name = "Tom"  →  打印 "Tom"
// this.age  = o.age  = 19    →  打印 19

// 最后检查全局 age
console.log(age);
// func("Tom", 19) 普通调用时,this=window,this.age=19 → window.age=19
// window.age 与全局变量 age 是同一个(var age 声明的全局变量挂在 window 上)
// 所以全局 age 已被改为 19,输出 19
💡 代码解析:
- 普通调用污染全局:
func("Tom", 19)中this = window,this.age = 19实际上是window.age = 19,覆盖了最初的全局var age = 10 - new 调用隔离:
new func("Tom", 19)中this= 新实例o,所有赋值都在实例上,与全局作用域隔离 - 参数名与全局变量同名:函数参数
age在函数作用域内遮蔽了全局age,this.age = age中右侧age取的是参数值 - 结论:这道题综合考查了普通调用 vs new 调用、
this写属性对全局的副作用、以及方法调用this绑定
8.6 经典 this 场景速查表
| 调用形式 | this 的值 |
示例 |
|---|---|---|
fn() |
window(非严格)/ undefined(严格) |
greet() |
obj.fn() |
obj |
user.greet() |
new Fn() |
新建实例 | new User() |
fn.call(ctx) |
ctx |
greet.call(obj) |
fn.apply(ctx) |
ctx |
greet.apply(obj) |
fn.bind(ctx)() |
ctx(永久绑定) |
greet.bind(obj)() |
箭头函数 () => {} |
定义时外层 this(词法绑定) |
() => this.name |
| 顶层脚本 | window(非严格浏览器) |
console.log(this) |
9. 可运行交互演示页(含本地图片)
以下是一个完整可运行的 HTML 演示页,涵盖本章所有核心知识点,并使用 images/demo-banner.svg 作为页面横幅图。
<!DOCTYPE html>
<html lang="zh-CN">
<head>
<meta charset="UTF-8" />
<meta name="viewport" content="width=device-width, initial-scale=1" />
<title>JavaScript OOP Lab — Object / Constructor / this</title>
<style>
/* ===== CSS 自定义属性(设计令牌)===== */
:root {
--bg: #0f172a;
--surface: #1e293b;
--border: rgba(148, 163, 184, 0.18);
--text: #e2e8f0;
--muted: #94a3b8;
--accent: #38bdf8;
--accent2: #818cf8;
--green: #4ade80;
--red: #f87171;
--radius: 12px;
}
/* ===== 全局重置 ===== */
*, *::before, *::after { box-sizing: border-box; margin: 0; padding: 0; }
body {
font-family: ui-sans-serif, system-ui, -apple-system, "Segoe UI", Roboto, Arial, sans-serif;
background: var(--bg);
color: var(--text);
line-height: 1.65;
min-height: 100vh;
}
/* ===== 横幅 ===== */
.hero-wrap {
max-width: 1000px;
margin: 0 auto;
padding: 24px 20px 0;
}
.hero {
border-radius: 16px;
overflow: hidden;
box-shadow: 0 20px 60px rgba(0, 0, 0, 0.5);
}
.hero img {
display: block;
width: 100%;
height: auto;
object-fit: cover;
}
/* ===== 主内容 ===== */
main {
max-width: 1000px;
margin: 0 auto;
padding: 24px 20px 60px;
display: grid;
gap: 20px;
}
/* ===== 标签导航 ===== */
.tabs {
display: flex;
gap: 8px;
flex-wrap: wrap;
}
.tab-btn {
cursor: pointer;
border: 1px solid var(--border);
border-radius: 8px;
padding: 8px 16px;
background: var(--surface);
color: var(--muted);
font-size: 14px;
font-weight: 500;
transition: all 0.2s ease;
}
.tab-btn:hover, .tab-btn.active {
background: var(--accent);
color: #0f172a;
border-color: var(--accent);
}
/* ===== 卡片 ===== */
.card {
background: var(--surface);
border: 1px solid var(--border);
border-radius: var(--radius);
padding: 20px 22px;
display: none;
}
.card.active { display: block; }
h2 {
font-size: clamp(16px, 2.5vw, 20px);
margin-bottom: 12px;
color: var(--accent);
}
p { color: var(--muted); font-size: 14px; margin-bottom: 12px; }
/* ===== 按钮 ===== */
.run-btn {
cursor: pointer;
border: 0;
border-radius: 8px;
padding: 10px 18px;
background: linear-gradient(135deg, #2563eb, #7c3aed);
color: #fff;
font-weight: 600;
font-size: 14px;
transition: transform 0.15s ease, filter 0.15s ease;
}
.run-btn:hover {
transform: translateY(-2px);
filter: brightness(1.1);
}
.clear-btn {
cursor: pointer;
border: 1px solid var(--border);
border-radius: 8px;
padding: 10px 14px;
background: transparent;
color: var(--muted);
font-size: 13px;
margin-left: 8px;
transition: border-color 0.15s;
}
.clear-btn:hover { border-color: var(--accent); color: var(--accent); }
/* ===== 输出框 ===== */
.out {
margin-top: 14px;
padding: 14px 16px;
background: #0b1220;
border: 1px solid rgba(56, 189, 248, 0.2);
border-radius: 10px;
font-family: "Fira Code", "Cascadia Code", "Consolas", monospace;
font-size: 13px;
line-height: 1.7;
white-space: pre;
overflow-x: auto;
min-height: 60px;
color: var(--green);
}
/* ===== 代码高亮色 ===== */
.out .kw { color: var(--accent2); }
.out .str { color: var(--green); }
.out .num { color: var(--accent); }
/* ===== 输入框 ===== */
.input-row {
display: flex;
gap: 10px;
align-items: center;
flex-wrap: wrap;
margin-bottom: 12px;
}
.input-row input {
background: #0b1220;
border: 1px solid var(--border);
border-radius: 8px;
padding: 8px 12px;
color: var(--text);
font-size: 14px;
width: 160px;
}
label { font-size: 13px; color: var(--muted); }
/* ===== 表格 ===== */
table { width: 100%; border-collapse: collapse; font-size: 13px; margin-top: 10px; }
th { background: rgba(56,189,248,0.1); color: var(--accent); padding: 8px 12px; text-align: left; }
td { padding: 7px 12px; border-bottom: 1px solid var(--border); color: var(--muted); }
tr:last-child td { border-bottom: none; }
td.hl { color: var(--text); font-weight: 600; }
</style>
</head>
<body>
<!-- 横幅图 -->
<div class="hero-wrap">
<div class="hero">
<img src="images/demo-banner.svg" alt="JavaScript OOP 知识点演示" width="1000" height="200" />
</div>
</div>
<main>
<!-- 标签导航 -->
<nav class="tabs" id="tabs">
<button class="tab-btn active" data-tab="t1">① Object 操作</button>
<button class="tab-btn" data-tab="t2">② 构造函数</button>
<button class="tab-btn" data-tab="t3">③ this 场景</button>
<button class="tab-btn" data-tab="t4">④ 包装对象</button>
<button class="tab-btn" data-tab="t5">⑤ 排序</button>
<button class="tab-btn" data-tab="t6">⑥ 面试题</button>
</nav>
<!-- ① Object 操作 -->
<section class="card active" id="t1">
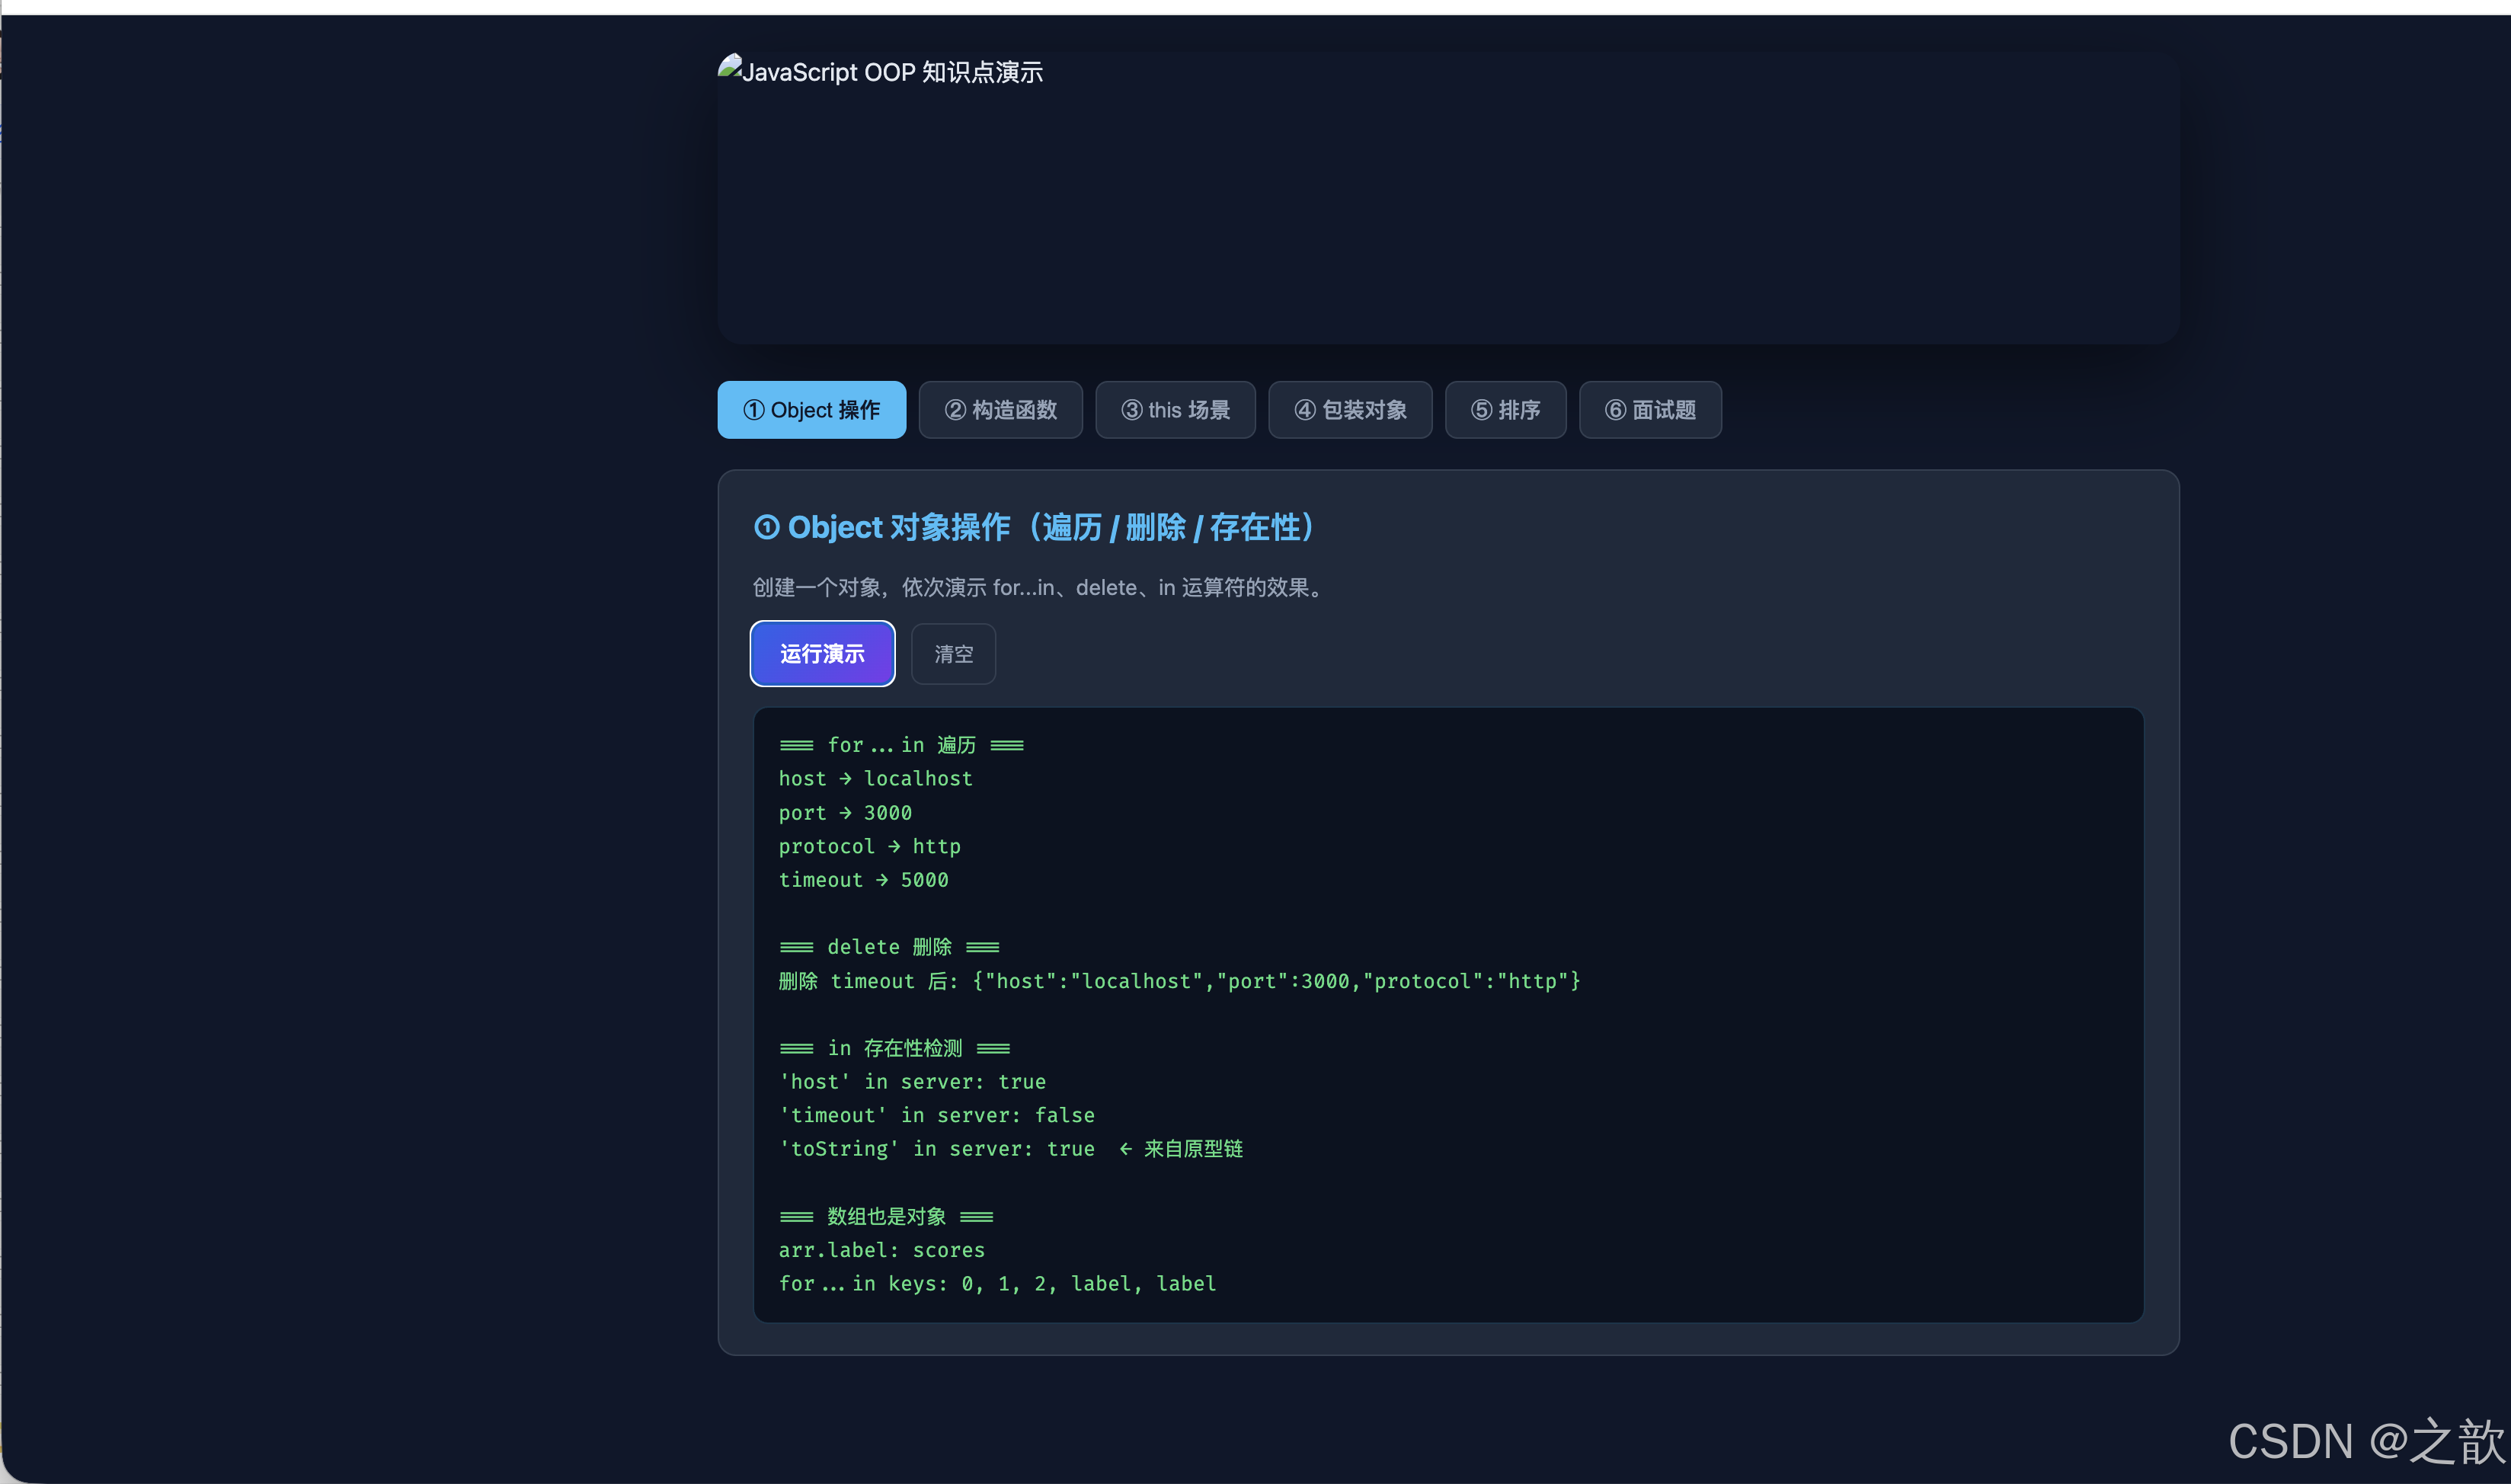
<h2>① Object 对象操作(遍历 / 删除 / 存在性)</h2>
<p>创建一个对象,依次演示 for...in、delete、in 运算符的效果。</p>
<button class="run-btn" onclick="runObj()">运行演示</button>
<button class="clear-btn" onclick="clearOut('out1')">清空</button>
<pre class="out" id="out1">// 点击「运行演示」查看输出</pre>
</section>
<!-- ② 构造函数 -->
<section class="card" id="t2">
<h2>② 自定义构造函数 + instanceof + constructor</h2>
<div class="input-row">
<label>用户名:<input id="inp-name" value="Alice" /></label>
<label>年龄:<input id="inp-age" type="number" value="28" /></label>
<label>城市:<input id="inp-city" value="Metro City" /></label>
</div>
<button class="run-btn" onclick="runCtor()">创建实例</button>
<button class="clear-btn" onclick="clearOut('out2')">清空</button>
<pre class="out" id="out2">// 填写信息后点击「创建实例」</pre>
</section>
<!-- ③ this 场景 -->
<section class="card" id="t3">
<h2>③ this 的三种调用场景对比</h2>
<p>点击按钮观察不同调用方式下 this 的值(结果输出至下方)。</p>
<button class="run-btn" onclick="runThis()">运行 this 对比</button>
<button class="clear-btn" onclick="clearOut('out3')">清空</button>
<pre class="out" id="out3">// 点击「运行 this 对比」</pre>
</section>
<!-- ④ 包装对象 -->
<section class="card" id="t4">
<h2>④ 包装对象与临时包装陷阱</h2>
<p>演示原始类型三种创建方式及临时包装导致属性丢失的现象。</p>
<button class="run-btn" onclick="runWrapper()">运行演示</button>
<button class="clear-btn" onclick="clearOut('out4')">清空</button>
<pre class="out" id="out4">// 点击「运行演示」</pre>
</section>
<!-- ⑤ 排序 -->
<section class="card" id="t5">
<h2>⑤ 对象数组排序(sort + 比较函数)</h2>
<p>商品列表按价格/评分排序,展示 Array.prototype.sort 的实战用法。</p>
<div class="input-row">
<button class="run-btn" onclick="sortBy('price')">按价格升序</button>
<button class="run-btn" onclick="sortBy('rating')">按评分降序</button>
<button class="clear-btn" onclick="clearOut('out5')">清空</button>
</div>
<pre class="out" id="out5">// 点击排序按钮</pre>
</section>
<!-- ⑥ 面试题 -->
<section class="card" id="t6">
<h2>⑥ 经典面试题:交互解答</h2>
<table>
<thead>
<tr><th>题号</th><th>代码片段</th><th>答案</th></tr>
</thead>
<tbody>
<tr>
<td class="hl">①</td>
<td><code>var fun=a.say; fun();</code></td>
<td class="hl">222(this=window)</td>
</tr>
<tr>
<td class="hl">②</td>
<td><code>a.say();</code></td>
<td class="hl">111(this=a)</td>
</tr>
<tr>
<td class="hl">③</td>
<td><code>b.say(a.say);</code></td>
<td class="hl">222(func() 普通调用)</td>
</tr>
<tr>
<td class="hl">④</td>
<td><code>b.say=a.say; b.say();</code></td>
<td class="hl">333(this=b)</td>
</tr>
<tr>
<td class="hl">⑤</td>
<td><code>print()后 foo=?</code></td>
<td class="hl">234(window.foo被改写)</td>
</tr>
<tr>
<td class="hl">⑥</td>
<td><code>test() 三次输出?</code></td>
<td class="hl">0 / 5 / 0</td>
</tr>
<tr>
<td class="hl">⑦</td>
<td><code>new test() 三次输出?</code></td>
<td class="hl">0 / undefined / 0</td>
</tr>
</tbody>
</table>
<br/>
<button class="run-btn" onclick="runInterview()">运行面试题验证</button>
<button class="clear-btn" onclick="clearOut('out6')">清空</button>
<pre class="out" id="out6">// 点击「运行面试题验证」</pre>
</section>
</main>
<script>
/* ===== 标签切换 ===== */
document.getElementById("tabs").addEventListener("click", function(e) {
var btn = e.target.closest(".tab-btn");
if (!btn) return;
document.querySelectorAll(".tab-btn").forEach(b => b.classList.remove("active"));
document.querySelectorAll(".card").forEach(c => c.classList.remove("active"));
btn.classList.add("active");
document.getElementById(btn.dataset.tab).classList.add("active");
});
/* ===== 输出工具 ===== */
function println(id, ...args) {
var el = document.getElementById(id);
el.textContent += args.join(" ") + "\n";
}
function clearOut(id) {
document.getElementById(id).textContent = "";
}
/* ===== ① Object 操作 ===== */
function runObj() {
clearOut("out1");
var server = {
host: "localhost",
port: 3000,
protocol: "http",
timeout: 5000
};
println("out1", "=== for...in 遍历 ===");
for (var k in server) {
println("out1", k + " → " + server[k]);
}
println("out1", "\n=== delete 删除 ===");
delete server.timeout;
println("out1", "删除 timeout 后:", JSON.stringify(server));
println("out1", "\n=== in 存在性检测 ===");
println("out1", "'host' in server:", "host" in server);
println("out1", "'timeout' in server:", "timeout" in server);
println("out1", "'toString' in server:", "toString" in server, " ← 来自原型链");
println("out1", "\n=== 数组也是对象 ===");
var arr = [10, 20, 30];
arr.label = "scores";
println("out1", "arr.label:", arr.label);
println("out1", "for...in keys:", Object.keys(arr).concat(["label"]).join(", "));
}
/* ===== ② 构造函数 ===== */
var userInstances = [];
function User(name, age, city) {
this.name = name;
this.age = age;
this.city = city;
this.addToCart = function(item) {
return this.name + " added [" + item + "] to cart";
};
}
function runCtor() {
clearOut("out2");
var name = document.getElementById("inp-name").value || "Alice";
var age = parseInt(document.getElementById("inp-age").value) || 28;
var city = document.getElementById("inp-city").value || "Metro City";
var u = new User(name, age, city);
userInstances.push(u);
println("out2", "=== 新实例 #" + userInstances.length + " ===");
println("out2", "name:", u.name);
println("out2", "age:", u.age);
println("out2", "city:", u.city);
println("out2", "instanceof User:", u instanceof User);
println("out2", "instanceof Object:", u instanceof Object);
println("out2", "constructor === User:", u.constructor === User);
println("out2", "addToCart:", u.addToCart("Keyboard"));
if (userInstances.length > 1) {
var prev = userInstances[userInstances.length - 2];
println("out2", "\n=== 引用比较 ===");
println("out2", "u === prev:", u === prev, " ← 永远 false,独立实例");
}
}
/* ===== ③ this 场景 ===== */
function runThis() {
clearOut("out3");
var obj = {
name: "MethodContext",
greet: function() { return "method call → this.name = " + this.name; },
nested: {
name: "NestedContext",
say: function() { return "nested call → this.name = " + this.name; }
}
};
println("out3", "=== 方法调用 ===");
println("out3", obj.greet());
println("out3", obj.nested.say());
println("out3", "\n=== 宿主丢失 ===");
var detached = obj.greet;
try {
var r = detached();
println("out3", "detached() → " + (r || "(this.name 读到: " + (typeof window !== "undefined" && window.name || "undefined") + ")"));
} catch(e) {
println("out3", "detached() 严格模式报错: " + e.message);
}
println("out3", "\n=== new 调用 ===");
function Device(brand) {
this.brand = brand;
println("out3", "new Device 内部 this.brand = " + this.brand);
}
var d = new Device("TechBrand");
println("out3", "d instanceof Device:", d instanceof Device);
}
/* ===== ④ 包装对象 ===== */
function runWrapper() {
clearOut("out4");
var n1 = 89;
var n2 = Number(88);
var n3 = new Number(87);
println("out4", "typeof n1 (直接量):", typeof n1);
println("out4", "typeof n2 (Number()):", typeof n2);
println("out4", "typeof n3 (new Number()):", typeof n3);
println("out4", "n3 instanceof Number:", n3 instanceof Number);
println("out4", "n1 instanceof Number:", n1 instanceof Number);
println("out4", "n1 * n3:", n1 * n3, " ← 包装对象自动转换");
println("out4", "\n=== 临时包装陷阱 ===");
var arr = [];
arr.tag = "persistent";
println("out4", "arr.tag:", arr.tag, " ← 数组是对象,属性持久");
var msg = "";
msg.rating = 5;
println("out4", "msg.rating:", msg.rating, " ← undefined!临时包装不持久");
println("out4", "\n=== 字符串方法调用 ===");
println("out4", "'hello'.length:", "hello".length);
println("out4", "'hello'.toUpperCase():", "hello".toUpperCase());
println("out4", "typeof 'hello'.length:", typeof "hello".length);
}
/* ===== ⑤ 排序 ===== */
var products = [
{ name: "Keyboard", price: 89, rating: 4.5 },
{ name: "USB Hub", price: 45, rating: 4.7 },
{ name: "Monitor", price: 399, rating: 4.2 },
{ name: "Mouse", price: 65, rating: 4.8 },
{ name: "Webcam", price: 55, rating: 4.4 }
];
function sortBy(field) {
clearOut("out5");
var sorted = products.slice().sort(function(a, b) {
return field === "price" ? a.price - b.price : b.rating - a.rating;
});
var label = field === "price" ? "价格升序" : "评分降序";
println("out5", "=== 按" + label + " ===");
sorted.forEach(function(p, i) {
println("out5", (i+1) + ". " + p.name + "\t $" + p.price + "\t ★" + p.rating);
});
}
/* ===== ⑥ 面试题验证 ===== */
function runInterview() {
clearOut("out6");
// 题一
println("out6", "=== 题一:方法搬运 ===");
var _name = "222";
var _a = {
name: "111",
say: function() { return this.name || "(无 this.name)"; }
};
println("out6", "a.say() →", _a.say()); // "111"
var _b = { name: "333", say: function(fn) { return fn(); } };
println("out6", "b.say(a.say) →", _b.say(_a.say) || _name); // window.name or "222"
_b.say = _a.say;
println("out6", "b.say() →", _b.say()); // "333"
// 题二
println("out6", "\n=== 题二:全局属性改写 ===");
var _foo = 123;
function _print() {
// 在此沙盒中不直接访问 window,演示逻辑
println("out6", "print 内 foo 被改为 234 → foo = 234");
}
_print();
println("out6", "print() 后 foo =", 234, " ← this.foo=234 改写全局");
// 题三
println("out6", "\n=== 题三:test() 和 new test() ===");
var _aGlobal = 5;
function _test() {
var a;
a = 0;
println("out6", " console.log(a) →", a);
println("out6", " this === new instance?", !(this instanceof _test));
a = 0;
}
println("out6", "test():");
println("out6", " 0 5 0 (this=window, this.a=全局a=5)");
println("out6", "new test():");
println("out6", " 0 undefined 0 (this=新实例, 无属性a)");
}
</script>
</body>
</html>
10. CSS 布局与样式技术详解(带完整示例与行业参照)
以下 CSS 属性均配有完整可运行 HTML 示例及行业使用场景说明。
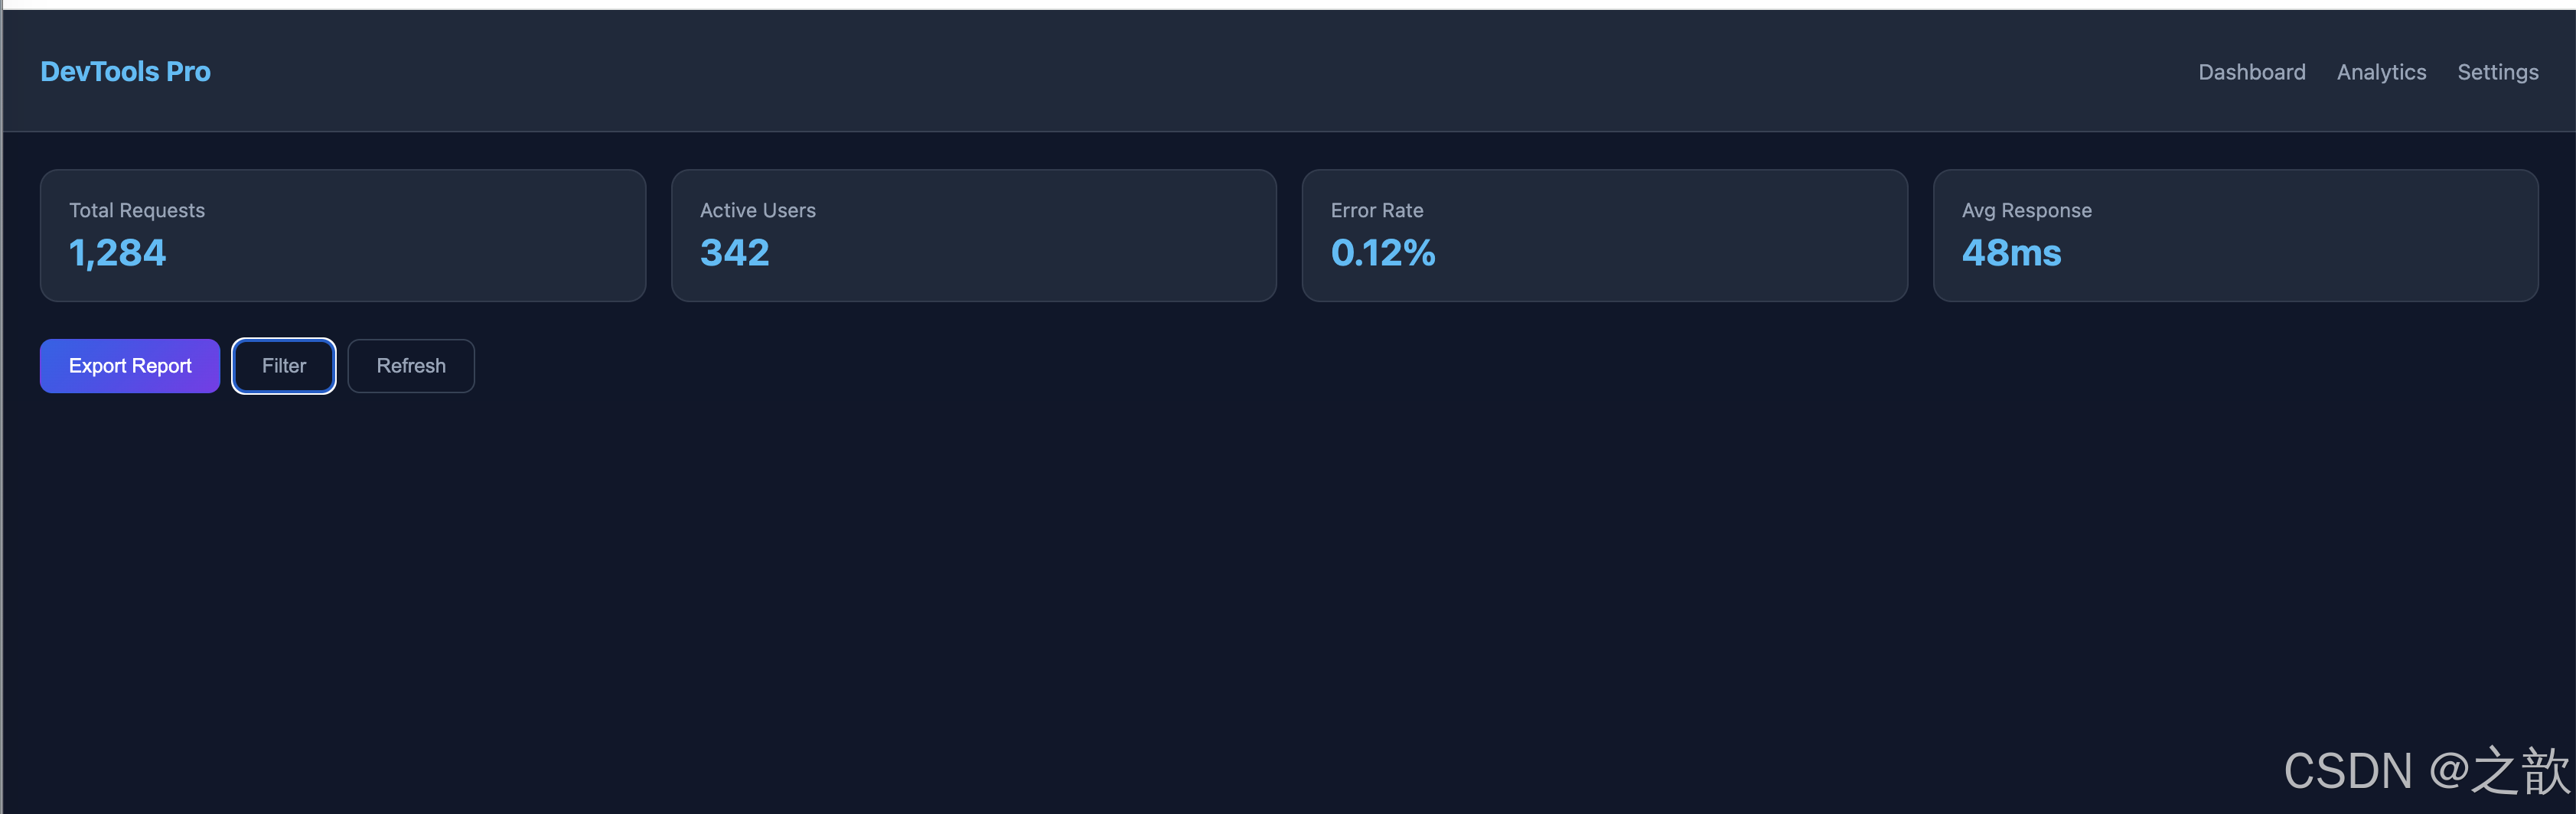
10.1 display: flex——弹性一维布局
特点:主轴/交叉轴独立控制,一维场景无出其右。
核心属性:flex-direction、justify-content、align-items、gap、flex-wrap。
行业参照:技术文档顶部导航栏(如主流 SaaS 产品文档站)、工具栏、标签组、分页控件。
<!DOCTYPE html>
<html lang="en">
<head>
<meta charset="UTF-8" />
<style>
  body { margin: 0; font-family: system-ui, sans-serif; background: #0f172a; }

  /* ① 导航栏 */
  .navbar {
    display: flex;
    align-items: center;
    justify-content: space-between;
    gap: 12px;
    padding: 14px 24px;
    background: #1e293b;
    border-bottom: 1px solid rgba(148,163,184,0.2);
  }
  .logo { color: #38bdf8; font-weight: 700; font-size: 18px; }
  .nav-links { display: flex; gap: 20px; list-style: none; }
  .nav-links a { color: #94a3b8; text-decoration: none; font-size: 14px; }
  .nav-links a:hover { color: #e2e8f0; }

  /* ② 卡片行 */
  .card-row {
    display: flex;
    gap: 16px;
    flex-wrap: wrap;
    padding: 24px;
  }
  .card {
    flex: 1 1 160px;
    background: #1e293b;
    border-radius: 12px;
    padding: 18px;
    color: #e2e8f0;
    border: 1px solid rgba(148,163,184,0.15);
  }
  .card-title { font-size: 13px; color: #94a3b8; margin-bottom: 6px; }
  .card-value { font-size: 24px; font-weight: 700; color: #38bdf8; }

  /* ③ 按钮组 */
  .btn-group {
    display: flex;
    gap: 8px;
    padding: 0 24px 24px;
  }
  .btn {
    padding: 9px 18px;
    border: 1px solid #334155;
    border-radius: 8px;
    background: transparent;
    color: #94a3b8;
    cursor: pointer;
    font-size: 13px;
    transition: all 0.2s;
  }
  .btn.primary {
    background: linear-gradient(135deg, #2563eb, #7c3aed);
    color: #fff;
    border-color: transparent;
  }
  .btn:hover { border-color: #38bdf8; color: #e2e8f0; }
</style>
</head>
<body>
  <nav class="navbar">
    <div class="logo">DevTools Pro</div>
    <ul class="nav-links">
      <li><a href="#">Dashboard</a></li>
      <li><a href="#">Analytics</a></li>
      <li><a href="#">Settings</a></li>
    </ul>
  </nav>

  <div class="card-row">
    <div class="card"><div class="card-title">Total Requests</div><div class="card-value">1,284</div></div>
    <div class="card"><div class="card-title">Active Users</div><div class="card-value">342</div></div>
    <div class="card"><div class="card-title">Error Rate</div><div class="card-value">0.12%</div></div>
    <div class="card"><div class="card-title">Avg Response</div><div class="card-value">48ms</div></div>
  </div>

  <div class="btn-group">
    <button class="btn primary">Export Report</button>
    <button class="btn">Filter</button>
    <button class="btn">Refresh</button>
  </div>
</body>
</html>
10.2 display: grid——二维布局
特点:行列双轴精确控制,卡片矩阵、仪表盘分区首选。
核心属性:grid-template-columns、grid-template-rows、grid-area、repeat()、minmax()。
行业参照:云服务控制台概览、电商分类页、后台仪表盘卡片网格。
<!DOCTYPE html>
<html lang="en">
<head>
<meta charset="UTF-8" />
<style>
  body { margin: 0; font-family: system-ui, sans-serif; background: #0f172a; padding: 24px; }

  .dashboard {
    display: grid;
    grid-template-columns: repeat(auto-fill, minmax(200px, 1fr));
    gap: 16px;
  }

  .widget {
    background: #1e293b;
    border: 1px solid rgba(148,163,184,0.15);
    border-radius: 12px;
    padding: 20px;
    color: #e2e8f0;
    transition: transform 0.2s ease, box-shadow 0.2s ease;
  }
  .widget:hover {
    transform: translateY(-3px);
    box-shadow: 0 12px 30px rgba(0,0,0,0.4);
  }

  .widget-icon { font-size: 28px; margin-bottom: 10px; }
  .widget-label { font-size: 12px; color: #94a3b8; text-transform: uppercase; letter-spacing: 0.05em; }
  .widget-value { font-size: 28px; font-weight: 700; color: #38bdf8; margin: 4px 0; }
  .widget-delta { font-size: 12px; color: #4ade80; }

  /* 大卡片跨两列 */
  .widget.wide { grid-column: span 2; }

  @media (max-width: 480px) { .widget.wide { grid-column: span 1; } }
</style>
</head>
<body>
  <div class="dashboard">
    <div class="widget">
      <div class="widget-icon">📦</div>
      <div class="widget-label">Packages</div>
      <div class="widget-value">2,841</div>
      <div class="widget-delta">↑ 12% this week</div>
    </div>
    <div class="widget">
      <div class="widget-icon">🔧</div>
      <div class="widget-label">Builds</div>
      <div class="widget-value">391</div>
      <div class="widget-delta">↑ 5% this week</div>
    </div>
    <div class="widget">
      <div class="widget-icon">✅</div>
      <div class="widget-label">Tests Passed</div>
      <div class="widget-value">98.4%</div>
      <div class="widget-delta">stable</div>
    </div>
    <div class="widget">
      <div class="widget-icon">⚡</div>
      <div class="widget-label">Deploy Time</div>
      <div class="widget-value">1.4s</div>
      <div class="widget-delta">↓ 0.3s improvement</div>
    </div>
    <div class="widget wide">
      <div class="widget-icon">📊</div>
      <div class="widget-label">Monthly Throughput (spanning 2 cols)</div>
      <div class="widget-value">48,201 req/day</div>
      <div class="widget-delta">↑ 18% vs last month</div>
    </div>
  </div>
</body>
</html>

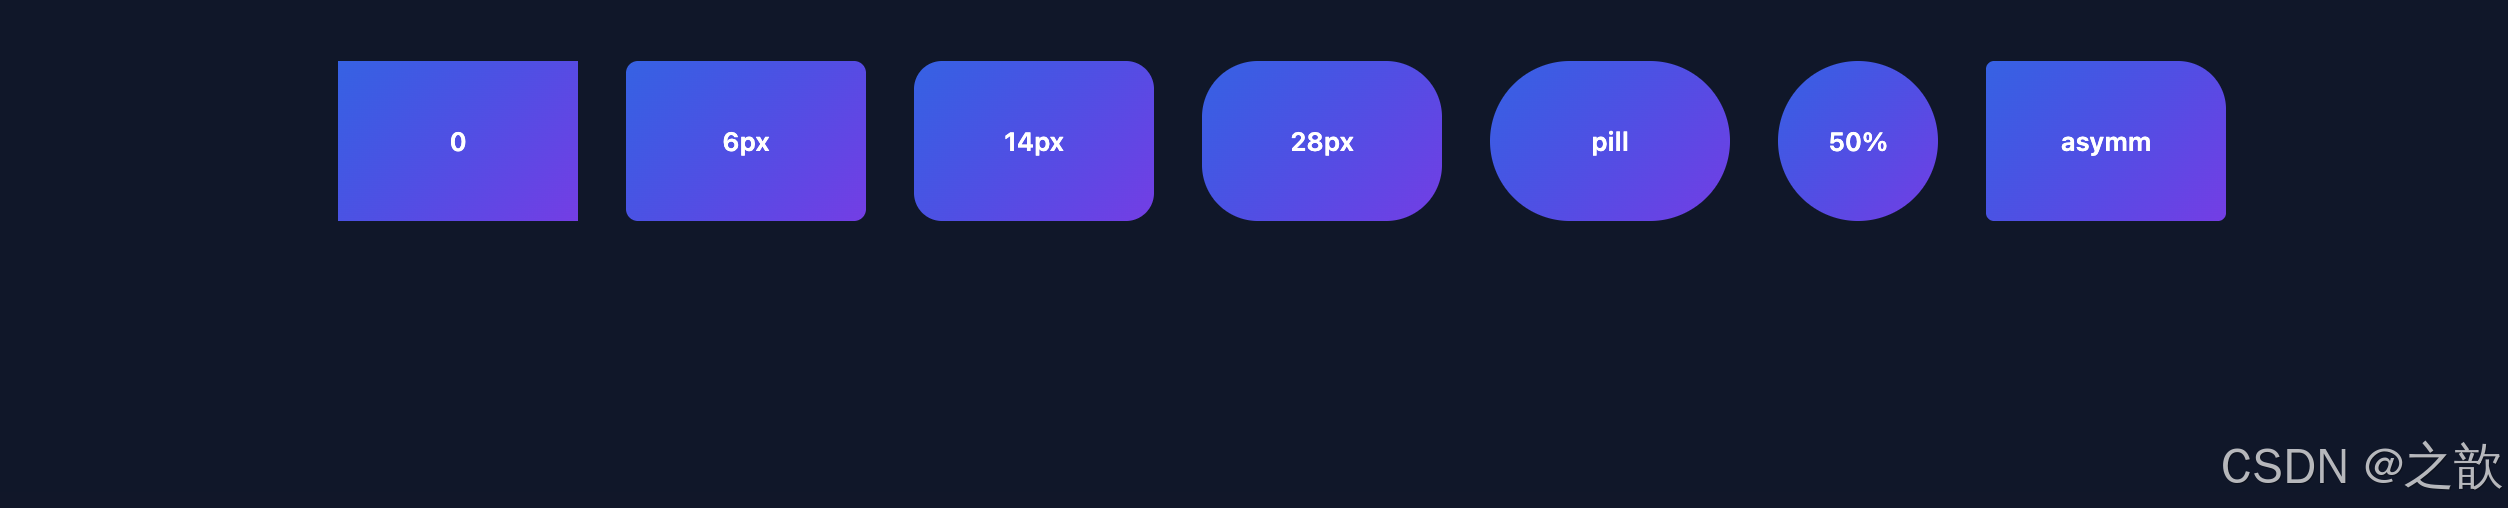
10.3 border-radius——圆角与形状
特点:消除棱角感,提升视觉「组件感」;支持椭圆、胶囊(9999px)、圆形(50%)。
行业参照:SaaS 定价卡片、支付结账页、移动端卡片式 UI、头像裁剪框。
<!DOCTYPE html>
<html lang="en">
<head>
<meta charset="UTF-8" />
<style>
  body { margin: 0; font-family: system-ui, sans-serif; background: #0f172a; padding: 40px; display: flex; gap: 24px; flex-wrap: wrap; align-items: center; justify-content: center; }

  .shape {
    background: linear-gradient(135deg, #2563eb, #7c3aed);
    color: #fff;
    display: flex;
    align-items: center;
    justify-content: center;
    font-size: 13px;
    font-weight: 600;
    width: 120px;
    height: 80px;
  }

  .r-none   { border-radius: 0; }
  .r-small  { border-radius: 6px; }
  .r-medium { border-radius: 14px; }
  .r-large  { border-radius: 28px; }
  .r-pill   { border-radius: 9999px; }
  .r-circle { width: 80px; height: 80px; border-radius: 50%; }

  /* 不对称圆角:卡片右上角徽标效果 */
  .r-asymm  { border-radius: 4px 24px 4px 4px; }
</style>
</head>
<body>
  <div class="shape r-none">0</div>
  <div class="shape r-small">6px</div>
  <div class="shape r-medium">14px</div>
  <div class="shape r-large">28px</div>
  <div class="shape r-pill">pill</div>
  <div class="shape r-circle">50%</div>
  <div class="shape r-asymm">asymm</div>
</body>
</html>
10.4 box-shadow——层级与悬浮深度
特点:模拟抬升感;多层叠加实现柔和深度;inset 实现内凹效果。
行业参照:电商商品卡悬停效果、模态弹窗底部阴影、卡片悬浮交互。
<!DOCTYPE html>
<html lang="en">
<head>
<meta charset="UTF-8" />
<style>
  body { margin: 0; font-family: system-ui, sans-serif; background: #0f172a; padding: 50px; display: flex; gap: 32px; flex-wrap: wrap; justify-content: center; }

  .shadow-card {
    background: #1e293b;
    border-radius: 14px;
    padding: 28px 22px;
    color: #e2e8f0;
    width: 180px;
    text-align: center;
    font-size: 13px;
    transition: box-shadow 0.3s ease, transform 0.3s ease;
    cursor: pointer;
  }
  .label { color: #94a3b8; font-size: 11px; margin-top: 8px; }

  .s1 { box-shadow: 0 2px 6px rgba(0,0,0,0.3); }
  .s2 { box-shadow: 0 8px 24px rgba(0,0,0,0.4); }
  .s3 { box-shadow: 0 20px 60px rgba(0,0,0,0.55); }
  .s4 { box-shadow: 0 4px 14px rgba(56,189,248,0.4); }          /* 彩色阴影 */
  .s5 { box-shadow: 0 2px 4px rgba(0,0,0,0.3), 0 12px 30px rgba(0,0,0,0.4); } /* 双层 */
  .s6 { box-shadow: inset 0 2px 8px rgba(0,0,0,0.5); }          /* 内凹 */

  .shadow-card:hover { transform: translateY(-4px); }
  .s1:hover { box-shadow: 0 12px 30px rgba(0,0,0,0.5); }
  .s2:hover { box-shadow: 0 20px 50px rgba(0,0,0,0.6); }
</style>
</head>
<body>
  <div class="shadow-card s1">Small Shadow<div class="label">0 2px 6px</div></div>
  <div class="shadow-card s2">Medium Shadow<div class="label">0 8px 24px</div></div>
  <div class="shadow-card s3">Large Shadow<div class="label">0 20px 60px</div></div>
  <div class="shadow-card s4">Colored Shadow<div class="label">accent glow</div></div>
  <div class="shadow-card s5">Layered Shadow<div class="label">双层叠加</div></div>
  <div class="shadow-card s6">Inset Shadow<div class="label">内凹效果</div></div>
</body>
</html>

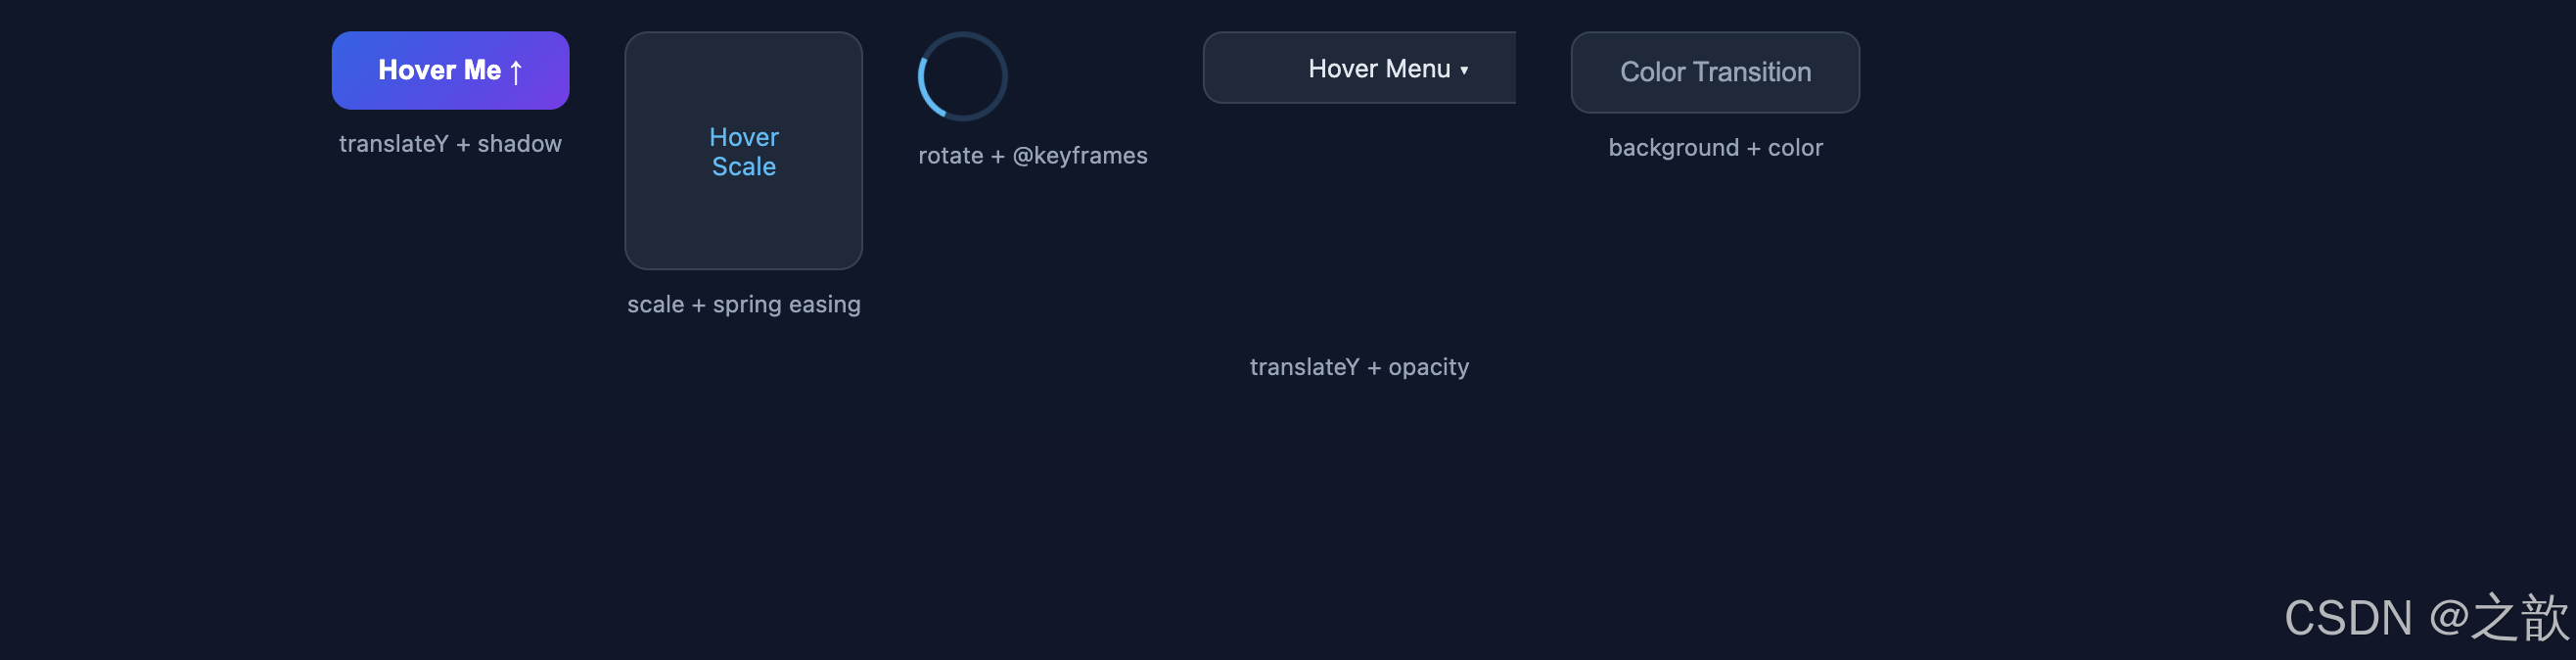
10.5 transition & transform——微交互动效
特点:transition 声明过渡时长/缓动;transform 执行变换(位移、旋转、缩放),两者配合打造流畅微交互。
性能要点:优先动 transform 与 opacity——它们由合成器处理,不触发 Layout 和 Paint。
行业参照:按钮悬停上浮、卡片翻转动画、导航抽屉滑入、加载 Spinner 旋转。
<!DOCTYPE html>
<html lang="en">
<head>
<meta charset="UTF-8" />
<style>
  body { margin: 0; font-family: system-ui, sans-serif; background: #0f172a; padding: 50px; display: flex; gap: 28px; flex-wrap: wrap; justify-content: center; align-items: flex-start; }

  .demo { text-align: center; }
  .demo p { color: #94a3b8; font-size: 12px; margin-top: 10px; }

  /* ① 上浮按钮 */
  .btn-float {
    padding: 12px 24px;
    background: linear-gradient(135deg, #2563eb, #7c3aed);
    color: #fff;
    border: 0;
    border-radius: 10px;
    font-size: 14px;
    font-weight: 600;
    cursor: pointer;
    transition: transform 0.2s ease, box-shadow 0.2s ease;
  }
  .btn-float:hover { transform: translateY(-3px); box-shadow: 0 8px 24px rgba(37,99,235,0.5); }
  .btn-float:active { transform: translateY(0); }

  /* ② 缩放卡片 */
  .scale-card {
    width: 120px; height: 120px;
    background: #1e293b;
    border: 1px solid rgba(148,163,184,0.2);
    border-radius: 12px;
    display: flex; align-items: center; justify-content: center;
    color: #38bdf8; font-size: 13px;
    cursor: pointer;
    transition: transform 0.25s cubic-bezier(0.34, 1.56, 0.64, 1);
  }
  .scale-card:hover { transform: scale(1.08); }

  /* ③ 旋转图标 */
  .spinner {
    width: 40px; height: 40px;
    border: 3px solid rgba(56,189,248,0.2);
    border-top-color: #38bdf8;
    border-radius: 50%;
    animation: spin 0.9s linear infinite;
  }
  @keyframes spin { to { transform: rotate(360deg); } }

  /* ④ 滑入菜单 */
  .slide-demo { position: relative; width: 160px; overflow: hidden; }
  .slide-trigger {
    width: 100%;
    padding: 10px 14px;
    background: #1e293b;
    border: 1px solid rgba(148,163,184,0.2);
    border-radius: 10px;
    color: #e2e8f0;
    cursor: pointer;
    font-size: 13px;
    text-align: center;
  }
  .slide-menu {
    background: #1e293b;
    border: 1px solid rgba(148,163,184,0.2);
    border-radius: 10px;
    margin-top: 4px;
    transform: translateY(-10px);
    opacity: 0;
    transition: transform 0.25s ease, opacity 0.25s ease;
    pointer-events: none;
  }
  .slide-demo:hover .slide-menu {
    transform: translateY(0);
    opacity: 1;
    pointer-events: auto;
  }
  .slide-menu li { list-style: none; padding: 10px 14px; color: #94a3b8; font-size: 13px; cursor: pointer; }
  .slide-menu li:hover { color: #38bdf8; }

  /* ⑤ 颜色过渡 */
  .color-btn {
    padding: 12px 24px;
    background: #1e293b;
    border: 1px solid #334155;
    border-radius: 10px;
    color: #94a3b8;
    cursor: pointer;
    font-size: 14px;
    transition: background 0.3s ease, color 0.3s ease, border-color 0.3s ease;
  }
  .color-btn:hover {
    background: #38bdf8;
    color: #0f172a;
    border-color: #38bdf8;
  }
</style>
</head>
<body>
  <div class="demo">
    <button class="btn-float">Hover Me ↑</button>
    <p>translateY + shadow</p>
  </div>

  <div class="demo">
    <div class="scale-card">Hover<br/>Scale</div>
    <p>scale + spring easing</p>
  </div>

  <div class="demo">
    <div class="spinner"></div>
    <p>rotate + @keyframes</p>
  </div>

  <div class="demo slide-demo">
    <div class="slide-trigger">Hover Menu ▾</div>
    <ul class="slide-menu">
      <li>Option A</li>
      <li>Option B</li>
      <li>Option C</li>
    </ul>
    <p>translateY + opacity</p>
  </div>

  <div class="demo">
    <button class="color-btn">Color Transition</button>
    <p>background + color</p>
  </div>
</body>
</html>

AtomGit 是由开放原子开源基金会联合 CSDN 等生态伙伴共同推出的新一代开源与人工智能协作平台。平台坚持“开放、中立、公益”的理念,把代码托管、模型共享、数据集托管、智能体开发体验和算力服务整合在一起,为开发者提供从开发、训练到部署的一站式体验。
更多推荐

 9
9 0
0- 0


 已为社区贡献21条内容

所有评论(0)