Jetbrains使用codex之通过三方中转站
1. 介绍
本文主要记录如何在 JetBrains 系列 IDE 中,例如 GoLand、IntelliJ IDEA、WebStorm、PyCharm,通过 ACP 接入 Codex,并使用第三方 OpenAI 兼容中转站作为模型服务。
适合场景:
- 你想在 JetBrains IDE 里使用 Codex
- 你使用的是 Windows
- 你有第三方中转站 API Key
- 你的中转站支持 /v1/responses 接口
- 你不想直接使用 OpenAI 官方 API Key
2. 准备条件
2.1. 安装 Node.js
先确认本机已经安装 Node.js 和 npm。 在终端执行:
node -v
npm -v
能正常输出版本号即可。
2.2. 安装 JetBrains IDE
本文以 GoLand 为例,其他 JetBrains IDE 配置方式类似。 支持范围通常包括:
- GoLand
- IntelliJ IDEA
- WebStorm
- PyCharm
- PhpStorm
- CLion
- Rider
前提是你的 JetBrains IDE 版本已经支持 ACP Agent。 版本最好2025.3 或以上, 本示例使用的2026.1
3. 安装 Codex ACP
3.1. 全局安装 ACP 适配器
Windows 下建议安装 win32-x64 版本:
npm install -g @zed-industries/codex-acp-win32-x64 --registry=https://registry.npmmirror.com --force
如果你能正常访问 npm 官方源,也可以使用:
npm install -g @zed-industries/codex-acp-win32-x64 --force
3.2. 查看是否安装成功
执行:
npm list -g
如果能看到类似内容,说明安装成功:
@zed-industries/codex-acp-win32-x64@0.12.0
也可以查看全局 npm 安装目录:
npm root -g
4. JetBrains 中配置 ACP
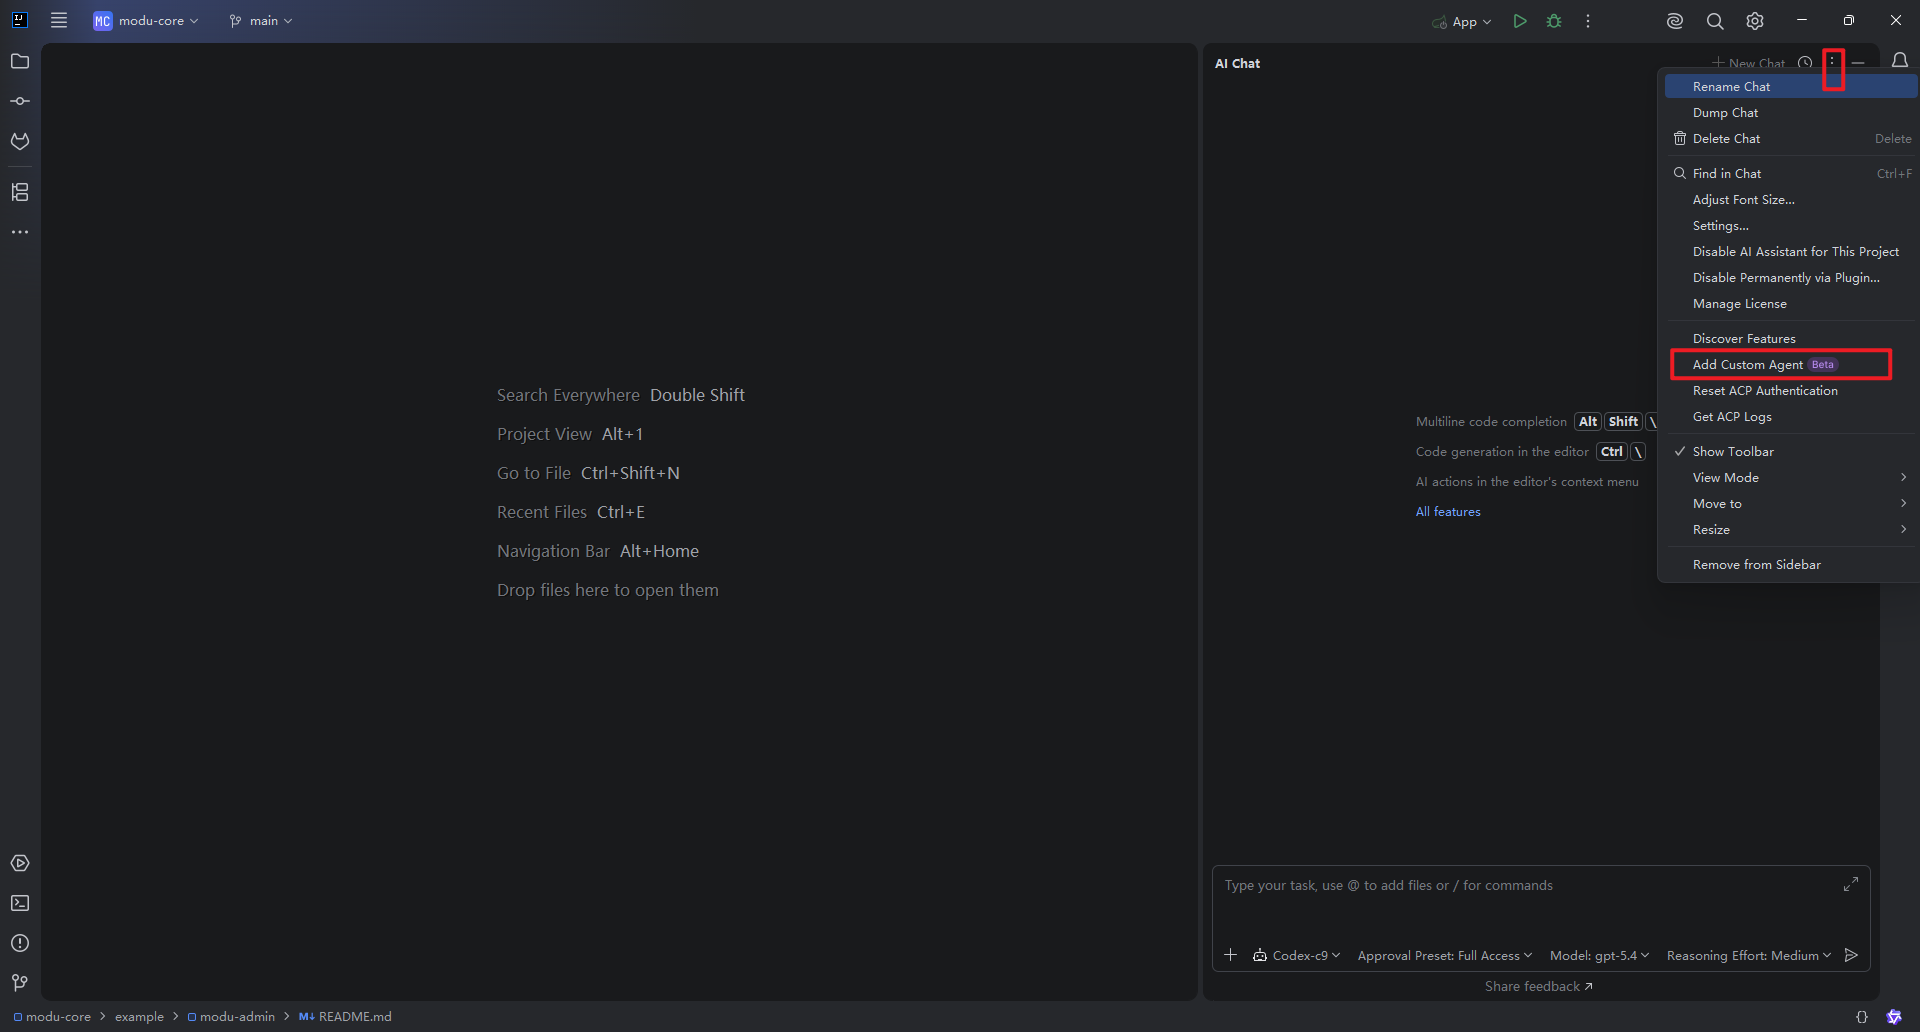
在 JetBrains IDE 中找到 ACP / Agent 配置位置,然后新增一个 Agent。
然后添加如下配置。
5. 完整配置示例
可以增加多个智能体, 协同工作
{
  "default_mcp_settings":{
    "use_idea_mcp": true,
    "use_custom_mcp": true
  },
  "agent_servers": {
    "codex-1": {
      "command": "npx.cmd",
      "args": [
        "@zed-industries/codex-acp-win32-x64",
        "-c", "model_provider=提供商名称",
        "-c", "model=gpt-5.4",
        "-c", "model_providers.提供商名称.name=提供商名称",
        "-c", "model_providers.提供商名称.base_url=https://提供商地址/v1",
        "-c", "model_providers.提供商名称.env_key=提供商名称_API_KEY",
        "-c", "model_providers.提供商名称.wire_api=responses",
        "-c", "sandbox_mode=danger-full-access",
        "-c", "sandbox_workspace_write.network_access=true",
        "-c", "approval_policy=never"
      ],
      "env": {
        "提供商名称_API_KEY": "提供商的KEY"
      },
      "use_idea_mcp": true,
      "use_custom_mcp": true,
      "always_allow_all_mcp_tools": true
    },
    "codex-2": {
      "command": "npx.cmd",
      "args": [
        "@zed-industries/codex-acp-win32-x64",
        "-c", "model_provider=c9token",
        "-c", "model=gpt-5.4",
        "-c", "model_providers.c9token.name=c9token",
        "-c", "model_providers.c9token.base_url=https://c9token.com/v1",
        "-c", "model_providers.c9token.env_key=c9token_API_KEY",
        "-c", "model_providers.c9token.wire_api=responses",
        "-c", "sandbox_mode=danger-full-access",
        "-c", "sandbox_workspace_write.network_access=true",
        "-c", "approval_policy=never"
      ],
      "env": {
        "c9token_API_KEY": "提供商的KEY"
      },
      "use_idea_mcp": true,
      "use_custom_mcp": true,
      "always_allow_all_mcp_tools": true
    },
  }
}
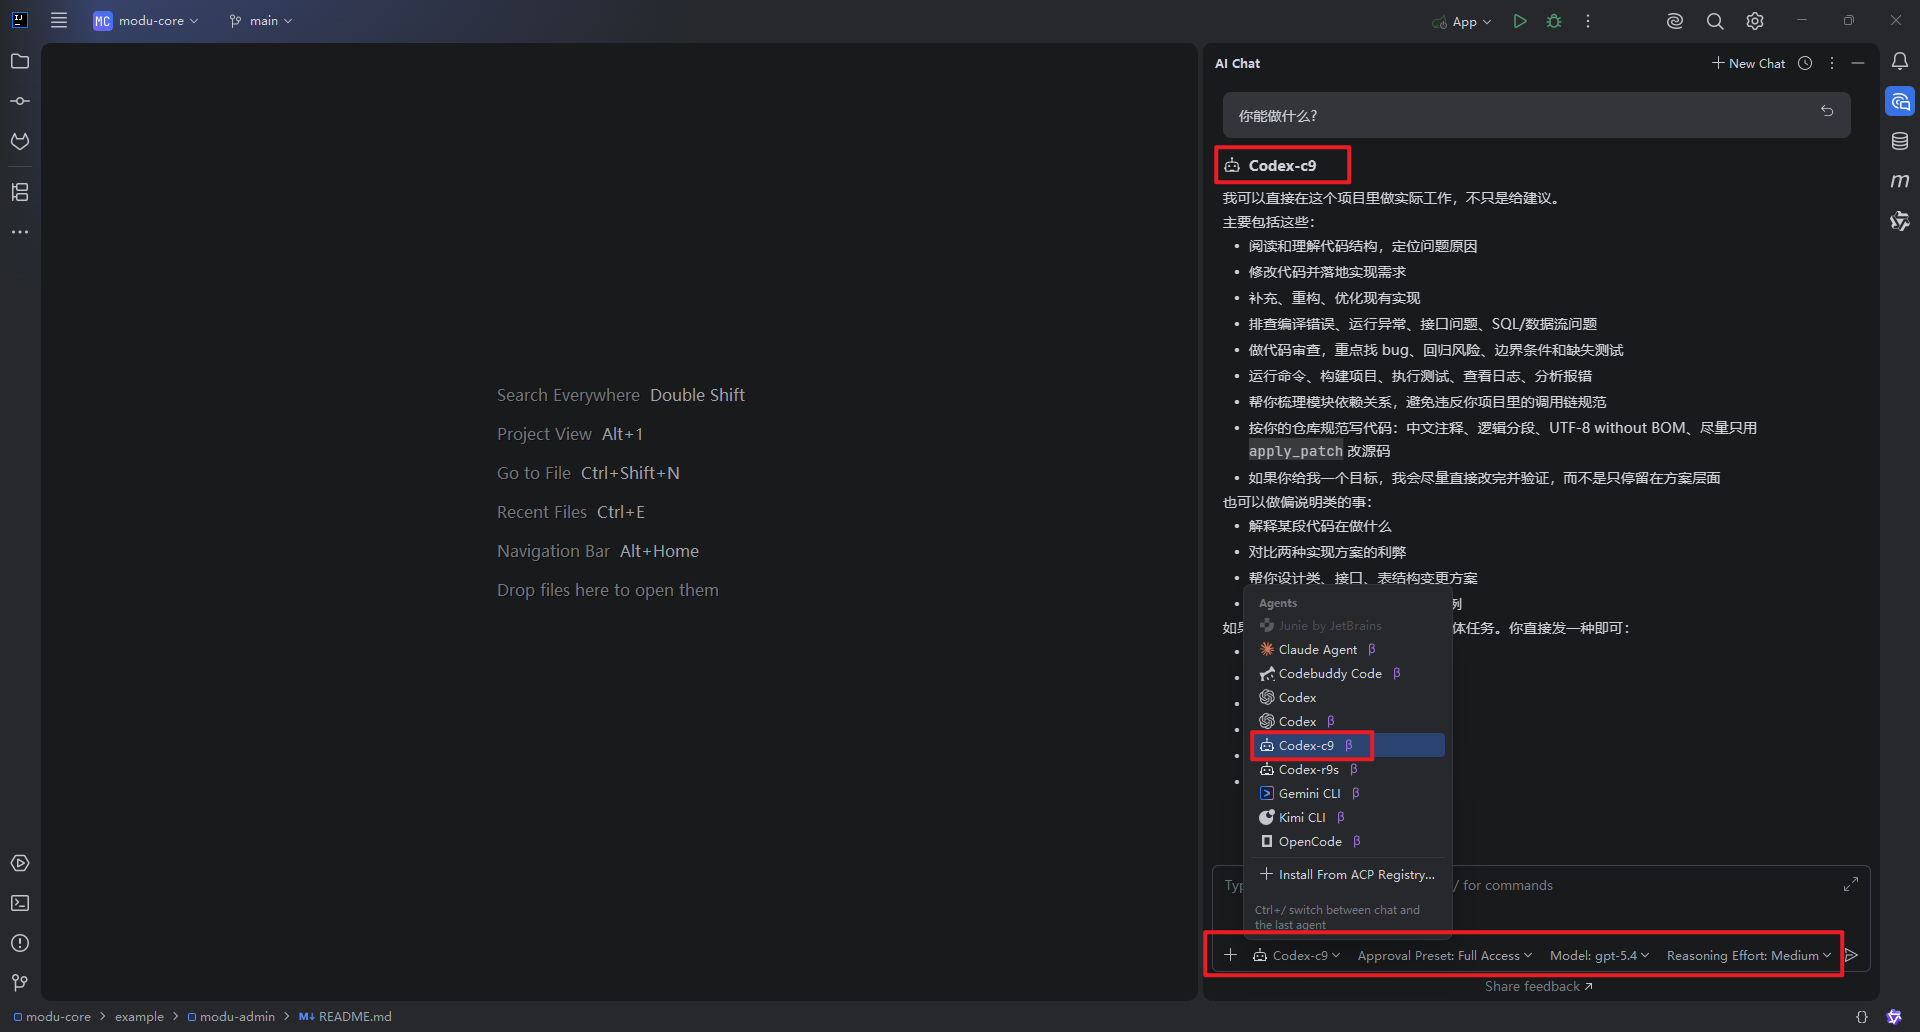
6. 使用
现在就可以快乐的使用了, 使用方法和原生的codex没有区别
7. 配置说明
7.1. command
"command": "npx.cmd"
Windows 下使用:
npx.cmd
如果是 macOS 或 Linux,通常使用:
npx
7.2. args
"args": [
  "@zed-industries/codex-acp-win32-x64@0.12.0"
]
表示通过 npx 启动 Codex ACP 适配器。 如果你已经全局安装,也可以直接使用对应命令,但使用 npx.cmd 更方便统一配置。
7.3. model_provider
"-c", "model_provider=proxy"
表示当前 Codex 使用名为 proxy 的模型提供商。 这个名字可以自定义,但必须和下面配置保持一致:
"-c", "model_providers.proxy.name=proxy",
"-c", "model_providers.proxy.base_url=https://xxx.com/v1",
"-c", "model_providers.proxy.env_key=PROXY_API_KEY"
如果你把 provider 改成 c9token,则相关配置也要同步改成:
"-c", "model_provider=c9token",
"-c", "model_providers.c9token.name=c9token",
"-c", "model_providers.c9token.base_url=https://c9token.com/v1",
"-c", "model_providers.c9token.env_key=c9token_API_KEY"
7.4. model
"-c", "model=gpt-5.4"
这里填写三方中转站支持的模型名称。 例如:
gpt-5.5
gpt-5.4
gpt-5.1
gpt-4.1
gpt-4o
claude-sonnet-4-5
deepseek-chat
具体能填什么,要以你的中转站模型列表为准。 如果模型名不正确,通常会报:
model not found
或者:
invalid model
7.5. base_url
"-c", "model_providers.proxy.base_url=https://xxx.com/v1"
这里填写三方中转站的 OpenAI 兼容接口地址。 注意要包含:
/v1
不要写成:
https://xxx.com
建议写成:
https://xxx.com/v1
Codex 会在此基础上请求:
/v1/responses
7.6. env_key
"-c", "model_providers.proxy.env_key=PROXY_API_KEY"
这里非常重要。 env_key 不是 API Key 本身,而是环境变量名称。 正确写法:
"-c", "model_providers.proxy.env_key=PROXY_API_KEY"
然后在 env 中填写真实 key:
"env": {
  "PROXY_API_KEY": "sk-xxxx"
}
错误写法:
"-c", "model_providers.proxy.env_key=sk-xxxx"
7.7. wire_api
"-c", "model_providers.proxy.wire_api=responses"
新版 Codex 必须使用:
responses
不要再写:
chat
否则可能出现:
wire_api = "chat" is no longer supported
7.8. use_idea_mcp
"use_idea_mcp": false
这里建议三方中转站先设置为:
false
原因是:开启后,JetBrains 会把 IDE 能力暴露给 Codex,例如读取项目、搜索文件、编辑代码等。Codex 可能会把这些工具以 namespace 类型发送到 /v1/responses。 部分三方中转站的 Responses 接口不支持 namespace 工具类型,会报错:
Unsupported tool types for /v1/responses: namespace
allowed: custom, function, image_generation, web_search
所以使用三方中转站时,建议先关闭:
"use_idea_mcp": false
如果你的中转站明确支持 Codex 的完整 Responses 工具协议,再改成:
"use_idea_mcp": true
7.9. use_custom_mcp
"use_custom_mcp": true
表示是否启用你自己配置的 MCP 工具。 如果你只是先测试模型能否跑通,可以先改成:
"use_custom_mcp": false
最稳的测试配置是:
"use_idea_mcp": false,
"use_custom_mcp": false
跑通后再逐步开启。
8. 常见错误处理
8.1. 401 Unauthorized
错误示例:
Incorrect API key provided
401 Unauthorized
url: https://api.openai.com/v1/responses
重点看 URL。如果 URL 是:
https://api.openai.com/v1/responses
说明没有走三方中转站,而是走了 OpenAI 官方接口。 常见原因:
model_provider 没配置成功
provider 名称不一致
env_key 没配置
读取到了系统里的 OPENAI_API_KEY
检查:
"-c", "model_provider=proxy",
"-c", "model_providers.proxy.base_url=https://xxx.com/v1",
"-c", "model_providers.proxy.env_key=PROXY_API_KEY"
8.2. wire_api = "chat" is no longer supported
错误示例:
wire_api = "chat" is no longer supported
How to fix: set wire_api = "responses"
解决方法:
"-c", "model_providers.proxy.wire_api=responses"
不要使用:
"-c", "model_providers.proxy.wire_api=chat"
8.3. Unsupported tool types: namespace
错误示例:
Unsupported tool types for /v1/responses: namespace
allowed: custom, function, image_generation, web_search
原因:
三方中转站的 /v1/responses 接口不支持 Codex 发送的 namespace 工具类型
优先解决:
"use_idea_mcp": false,
"use_custom_mcp": false
如果需要自定义 MCP:
"use_idea_mcp": false,
"use_custom_mcp": true
不建议三方中转站一开始就开启:
"use_idea_mcp": true
因为它可能会触发 IDE 工具注入,导致三方接口不兼容。
8.4. model not found
错误示例:
model not found
invalid model
原因:
填写的模型名不是中转站支持的模型名
解决:
"-c", "model=gpt-5.4"
改成你的中转站实际支持的模型名称。
8.5. npx.cmd 找不到
错误示例:
npx.cmd is not recognized
解决:
确认 Node.js 已安装
确认 npm 已加入 PATH
重启 JetBrains IDE
重启电脑
检查:
node -v
npm -v
npx -v

AtomGit 是由开放原子开源基金会联合 CSDN 等生态伙伴共同推出的新一代开源与人工智能协作平台。平台坚持“开放、中立、公益”的理念,把代码托管、模型共享、数据集托管、智能体开发体验和算力服务整合在一起,为开发者提供从开发、训练到部署的一站式体验。
更多推荐



 8
8 0
0- 0


 已为社区贡献1条内容

所有评论(0)