git 使用相关笔记
git基础
设置用户信息
$ git config --global user.name "John Doe"
$ git config --global user.email johndoe@example.com
设置文本编辑器
# 将Emacs作为git的文本编辑器。
$ git config --global core.editor emacs
查看帮助文档
# 查看config指令的帮助文档(可离线)
$ git help config
$ git config --help

# 查看简易帮助文档
$ git config -h
仓库初始化
$ cd 仓库目录
$ git init
克隆仓库
# 只克隆
$ git clone 仓库url

# 克隆并更名仓库
$ git clone 仓库url 别名
为下次提交增添内容
# 添加单个文件
$ git add 文件路径

# 添加所有后缀为xx的文件
$ git add *.xx

# 添加所有文件
$ git add .
查看状态
$ git status
忽略文件选项
在 .gitignore 中声明不会自动添加的文件
# 忽略所有.a 后缀文件
*.a

# 在忽略所有.a 时依旧跟踪 lib.a
!lib.a

# 只忽略当前目录的TODO文件,而不是其他目录的TODO
/TODO

# 忽略所有名为build的目录下的所有文件
build/

# 只忽略 doc/note.txt ,不忽略 doc/server/arch.txt
doc/*.txt

# 忽略所有在目录doc下的pdf文件,包括doc的子目录
doc/**/*.pdf
查看具体的更改
$ git diff
$ git diff --staged
提交内容并添加描述信息
# 添加了内容后提交
$ git commit -m "Story 182: Fix benchmarks for speed"

# 不添加内容直接提交(自动添加)
$ git commit -a -m 'added new benchmarks'
从下次提交中移除文件
# 移除单个文件
$ git rm 文件名

# 移除目录
$ git rm log/\*.log

# 移除以~结尾的文件
$ git rm \*~

# 移除文件并确保不再会被添加(与忽略文件类似),也可以移除目录
$ git rm --cached README
修改文件名
本质是移动文件
$ git mv README.md README
查看日志
# 简单查看
git log

# 查看具体修改
git log -p

# 查看简易修改
git log --stat

# 用一行显示主要信息
git log --pretty=oneline

# 以图表形式显示
$ git log --oneline --decorate --graph --all

# 格式化日志
$ git log --pretty=format:"%h - %an, %ar : %s"
ca82a6d - Scott Chacon, 6 years ago : changed the version number
085bb3b - Scott Chacon, 6 years ago : removed unnecessary test
a11bef0 - Scott Chacon, 6 years ago : first commit

# 查看在origin/master中的提交,忽略issue54中的提交日志
# git log --no-merges issue54..origin/master
格式化日志参数:
| Option | Description of Output |
|---|---|
%H | Commit hash |
%h | Abbreviated commit hash |
%T | Tree hash |
%t | Abbreviated tree hash |
%P | Parent hashes |
%p | Abbreviated parent hashes |
%an | Author name |
%ae | Author email |
%ad | Author date (format respects the --date=option) |
%ar | Author date, relative |
%cn | Committer name |
%ce | Committer email |
%cd | Committer date |
%cr | Committer date, relative |
%s | Subject |
git log 部分命令行选项:
| Option | Description of Output |
|---|---|
-p | Show the patch introduced with each commit. |
--stat | Show statistics for files modified in each commit. |
--shortstat | Display only the changed/insertions/deletions line from the --stat command. |
--name-only | Show the list of files modified after the commit information. |
--name-status | Show the list of files affected with added/modified/deleted information as well. |
--abbrev-commit | Show only the first few characters of the SHA-1 checksum instead of all 40. |
--relative-date | Display the date in a relative format (for example, “2 weeks ago”) instead of using the full date format. |
--graph | Display an ASCII graph of the branch and merge history beside the log output. |
--pretty | Show commits in an alternate format. Options include oneline, short, full, fuller, and format (where you specify your own format). |
--oneline | Shorthand for --pretty=oneline --abbrev-commit used together. |
--<n> | Show only the last n commits. |
--since,--after | Limit the commits to those made after the specified date. |
--until,--before | Limit the commits to those made before the specified date. |
--author | Only show commits in which the author entry matches the specified string. |
--committer | Only show commits in which the committer entry matches the specified string. |
--grep | Only show commits with a commit message containing the string. |
-S | Only show commits adding or removing code matching the string. |
撤销操作
# 还没添加完就提交了,想修改提交
$ git commit --amend

# 把已添加的文件变回修改状态(危险指令)
$ git reset HEAD 文件名

# 舍弃某个文件的所有改动,相当于回到最后一次提交的状态(危险指令)
$ git checkout -- 文件名
远程操作
# 查看所有远程仓库
$ git remote

# 查看所有远程仓库及其url
$ git remote -v

# 添加远程仓库
$ git remote add 仓库别名 <url>

# 获取远程仓库内容,不自动合并
$ git fetch 仓库别名

# 拉取远程仓库内容,自动合并
$ git pull 仓库别名

# 推送本地分支到远程仓库
$ git push 仓库别名 本地分支

# 审视远程仓库信息
$ git remote show 仓库别名

# 更改现有别名
$ git remote rename 现有别名 新别名

# 删除别名
$ git remote remove 仓库别名
$ git remote rm 仓库别名
标签操作
在一次commit后,可以添加一个标签来标识本次commit,每个标签默认标识最后一次commit
# 显示所有标签
$ git tag
$ git tag -l
$ git tag --list

# 添加详细信息标签
$ git tag -a 标签名 -m 描述信息

# 添加简略信息标签
$ git tag 标签名

# 显示标签信息
$ git show 标签名

# 标识某次提交
$ git tag -a 标签名 该提交的校验和或前几位

# 推送一个标签到远程仓库
$ git push 仓库别名 标签名

# 推送全部标签到远程仓库
$ git push 仓库别名 --tags

# 删除标签
$ git tag -d 标签名

# 删除远程仓库的标签
$ git push origin :refs/tags/标签名
$ git push origin --delete 标签名
指令别名
# 给指令'reset HEAD --'设置别名'unstage'
$ git config --global alias.unstage 'reset HEAD --'

# 设置别名后,以下两条指令等价
$ git unstage fileA
$ git reset HEAD -- fileA
git分支
新建分支
# 新建一个testing分支
$ git branch testing

# 新建一个testing分支同时转换过去
$ git checkout -b testing

# 新建serverfix分支,定位于origin/serverfix所在的地方,两个分支也将具有跟踪关系
$ git checkout -b serverfix origin/serverfix
转换分支
# 从当前分支转换到testing(移动HEAD指针)
$ git checkout testing
删除分支
# 删除hotfix分支
$ git branch -d hotfix

# 强制删除hotfix分支,丢弃未合并的工作
$ git branch -D hotfix
合并分支
# 将master分支合并到当前分支
$ git merge master
显示分支列表
$ git branch
显示每个分支中的最后一次提交
$ git branch -v
查看分支合并情况
# 显示已经合并到当前分支的分支
$ git branch --merged

# 显示未进行合并的分支
$ git branch --no-merged

# 单独查看master分支的合并情况
$ git branch --merged master
$ git branch --no-merged master
推送分支
# 推送本地分支serverfix到远程仓库上的testing分支
$ git push origin serverfix:testing
跟踪分支
# 将当前分支跟踪到一个远程分支origin/serverfix
$ git branch -u origin/serverfix
$ git branch --set-upstream-to origin/serverfix
查看分支跟踪列表
$ git branch -vv
删除远程分支
# 删除远程仓库上的serverfix分支
$ git push origin --delete serverfix
分支变基
# 将当前分支 基于 master分支进行变基
$ git rebase master

# 仅把分支client转移到master分支的顶部,绕开server分支
$ git rebase --onto master server client

$ git rebase master server
# 把分支server转移到master分支的顶部
在拉取时加入变基判断
$ git pull --rebase
分布式git
检测是否有空格错误
$ git diff --check
应用补丁
# 将/tmp/patch-ruby-client.patch应用到项目上
$ git apply /tmp/patch-ruby-client.patch

# 应用补丁并提交
$ git am 0001-limit-log-function.patch
检测补丁
# 检测补丁是否应用了
$ git apply --check 0001-seeing-if-this-helps-the-gem.patch
查看新增的工作
# 查看以master为公共祖先节点,查看后面contrib新增的内容
$ git diff master...contrib
使用场景学习
对一个派生仓库提交了一系列工作到 featureB 后,源项目作者打算合并自己的工作,但是要做一些修改。
# 基于主跟踪分支重新创建主题分支
$ git checkout -b featureBv2 origin/master

# --squash 将一个分支的所有提交压缩成一个变更集,但是不生成合并提交
$ git merge --squash featureB
... 修改实现 ...

# 提交工作
$ git commit

# 推送新分支到派生仓库
$ git push myfork featureBv2
squash 进阶场景一
现在有一个项目先在本地开发了一段时间,上面有很多个人风格的 commit, 可能不符合团队风格,就是写给自己看的。然后团队创建了一个仓库要求你推送代码上。
- 先添加团队 git 作为一个 remote
git remote add origin xxx
然后 fetch 这个仓库,加入这个仓库默认分支是 main, 你就会得到两个分离的分支,类似下面这个图
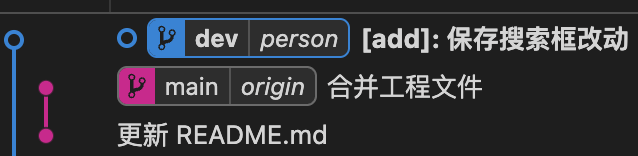
2. 这时就要使用命令行才好处理一点,各种 git 可视化工具往往不允许合并分离的分支
建议不要直接 merge 分离的分支, 用 squash 来将自己分离的分支代码压缩成一个提交再合并会好很多,这也是等下要讲的另一个进阶场景的用法。
指令流程
# 切到团队分支
git checkout main

# 允许合并分离分支,并将整个 dev 分支压缩成一个提交
# 因为 dev 上是个人风格的 commit, 可能不符合团队规范
git merge --squash --allow-unrelated-histories dev

# 这时大概率会提示 README.md 冲突,
# 直接打开 README.md 文件,里面有 git 标记
# 的冲突提示,修改文件内容完毕后直接
# git add README.md 就行
git add README.md

# 如果 IDE 装了工具可能可以直接在界面上写 commit message 然后点击提交就行
# 不然就手动写
git commit -m "合并工程文件"
处理完冲突就会看的 main 分支上多了新的提交,就像上图那样,包含了我们本地开发的所有代码
- 正常提交到团队 git 即可
git push origin main
squash 进阶场景二
利用 squash + cherrypick 打造自由的分支工作流程
想象这么一个场景,首先在一个团队项目中,团队对 git 提交可能有严格要求也可能没有要求,无论是严格要求或者没有要求,都可能和你个人的提交风格不符。那么这时既想要在本地用个人风格进行 commit, 又希望能够方便的合并代码到团队项目中,这时就建议使用 squash + cherrypick 了。
首先必须要在本地中新建一个分支来进行新功能的开发,假设这个分支是 feature, 派生于 dev, 在这个 feature 上你可以尽可能的按自己的风格来提交代码。现在 feature 开发完了。准备合并到团队分支。切换到本地 dev 分支,也就是 feature 的根结点,然后执行
git merge --squash feature
这里会将 feature 的所有改动压缩成一个提交,然后你可以按团队要求修改这个提交的信息或者代码。修改完后,dev 上就有了一个包含新版代码和符合团队要求的 commit 了,
切换到团队的 main 分支,对这个 commit 进行 cherrypick 就行。
我发现 cherrypick 在这里没有介绍过好像,其实很简单就一条指令
git cherry-pick e43a6
执行后 e43a6 的所有改动就会被应用于当前分支并且生成新的提交了。

AtomGit 是由开放原子开源基金会联合 CSDN 等生态伙伴共同推出的新一代开源与人工智能协作平台。平台坚持“开放、中立、公益”的理念,把代码托管、模型共享、数据集托管、智能体开发体验和算力服务整合在一起,为开发者提供从开发、训练到部署的一站式体验。
更多推荐
 0
0 0
0- 0


 已为社区贡献1条内容

所有评论(0)