GridMask--随机用“网格状”的遮挡去盖住图片的一部分,迫使模型学习更鲁棒的特征。
import cv2
import numpy as np
import torch
from PIL import Image
class GridMask(object):
def __init__(
self,
use_h=True,
use_w=True,
rotate=1,
offset=False,
ratio=0.5,
mode=0,
prob=1.0,
):
self.use_h = use_h
self.use_w = use_w
self.rotate = rotate
self.offset = offset
self.ratio = ratio
self.mode = mode
self.prob = prob
def __call__(self, img):
"""
img:
torch.Tensor [C,H,W]
"""
if np.random.rand() > self.prob:
return img
c, h, w = img.shape
hh = int(1.5 * h)
ww = int(1.5 * w)
#d = np.random.randint(2, h)
d = np.random.randint(50,80)
l = min(max(int(d * self.ratio + 0.5), 1), d - 1)
mask = np.ones((hh, ww), np.float32)
st_h = np.random.randint(d)
st_w = np.random.randint(d)
# 横向mask
if self.use_h:
for i in range(hh // d):
s = d * i + st_h
t = min(s + l, hh)
mask[s:t, :] *= 0
# 纵向mask
if self.use_w:
for i in range(ww // d):
s = d * i + st_w
t = min(s + l, ww)
mask[:, s:t] *= 0
# rotate
r = np.random.randint(self.rotate)
mask = Image.fromarray(np.uint8(mask))
mask = mask.rotate(r)
mask = np.asarray(mask)
# crop回原图大小
mask = mask[
(hh - h) // 2 : (hh - h) // 2 + h,
(ww - w) // 2 : (ww - w) // 2 + w,
]
mask = torch.from_numpy(mask).float().to(img.device)
if self.mode == 1:
mask = 1 - mask
# [H,W] -> [C,H,W]
mask = mask.unsqueeze(0).expand_as(img)
if self.offset:
offset = (
torch.from_numpy(
2 * (np.random.rand(h, w) - 0.5)
)
.float()
.to(img.device)
)
offset = offset.unsqueeze(0).expand_as(img)
img = img * mask + offset * (1 - mask)
else:
img = img * mask
return img
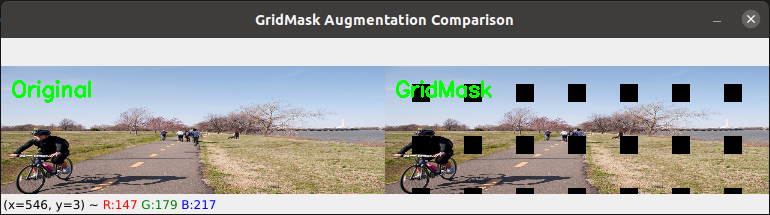
def visualize_gridmask_opencv_only(image_path, gridmask, save_augmented_path=None):
# 使用 OpenCV 读取图片
img_bgr = cv2.imread(image_path)
if img_bgr is None:
print(f"Error: Cannot read image from {image_path}")
return None
img_bgr = cv2.resize(img_bgr, (384,128))
# 归一化到 [0, 1]
img_normalized = img_bgr.astype(np.float32) / 255.0
# OpenCV 是 HWC BGR 格式,需要转换为 CHW RGB 格式
img_rgb = cv2.cvtColor(img_bgr, cv2.COLOR_BGR2RGB)
img_normalized_rgb = img_rgb.astype(np.float32) / 255.0
# 转换为 tensor [C, H, W]
img_tensor = torch.from_numpy(img_normalized_rgb).permute(2, 0, 1)
# 应用 GridMask
augmented_tensor = gridmask(img_tensor)
# 转换回 numpy [H, W, C]
augmented_rgb = augmented_tensor.permute(1, 2, 0).cpu().numpy()
augmented_rgb = np.clip(augmented_rgb, 0, 1)
# 转回 0-255 范围并转为 BGR 格式用于 OpenCV 显示
augmented_uint8_rgb = (augmented_rgb * 255).astype(np.uint8)
augmented_bgr = cv2.cvtColor(augmented_uint8_rgb, cv2.COLOR_RGB2BGR)
# 水平拼接原图和增强图(宽度相同,高度相同)
# 如果图片太大,可以调整大小
h, w = img_bgr.shape[:2]
if max(h, w) > 800:
scale = 800 / max(h, w)
new_w = int(w * scale)
new_h = int(h * scale)
img_resized = cv2.resize(img_bgr, (new_w, new_h))
aug_resized = cv2.resize(augmented_bgr, (new_w, new_h))
else:
img_resized = img_bgr
aug_resized = augmented_bgr
# 水平拼接
comparison = np.hstack((img_resized, aug_resized))
# 添加文字标注
font = cv2.FONT_HERSHEY_SIMPLEX
font_scale = 0.7
thickness = 2
text_color = (0, 255, 0) # 绿色
# 在左侧图片上方添加 "Original"
cv2.putText(comparison, "Original", (10, 30), font, font_scale, text_color, thickness)
# 在右侧图片上方添加 "GridMask"
cv2.putText(comparison, "GridMask", (comparison.shape[1]//2 + 10, 30), font, font_scale, text_color, thickness)
# 显示图像
cv2.imshow('GridMask Augmentation Comparison', comparison)
# 保存增强后的图片
if save_augmented_path:
cv2.imwrite(save_augmented_path, augmented_bgr)
print(f"Augmented image saved to {save_augmented_path}")
print("Press any key to close the window...")
cv2.waitKey(0)
cv2.destroyAllWindows()
return augmented_bgr
# 创建 GridMask 实例
gridmask = GridMask(
use_h=True,
use_w=True,
rotate=4,
offset=False,
ratio=0.65,
mode=1,
prob=1, # 70% 概率应用增强
)
# 调用可视化(替换为你的图片路径)
image_path = "test.jpg" # 修改为你的图片路径
augmented = visualize_gridmask_opencv_only(image_path, gridmask, save_augmented_path="augmented.jpg")
这是一个经典的数据增强模块 GridMask,常用于目标检测、BEV、分类等视觉任务。
它的核心思想:
随机用“网格状”的遮挡去盖住图片的一部分,迫使模型学习更鲁棒的特征。
类似:
Cutout(随机挖洞)
Random Erasing
DropBlock
但 GridMask 是:
“规则网格”遮挡,而不是随机矩形。
set_prob()作用:
训练前期弱增强,
后期逐渐增强。
epoch=0 -> prob=0
epoch=50 -> prob=0.5
epoch=100 -> prob=1
属于 curriculum augmentation。
import numpy as np
import torch
import torch.nn as nn
from PIL import Image
import matplotlib.pyplot as plt
import cv2
class GridMask(nn.Module):
def __init__(
self, use_h, use_w, rotate=1, offset=False, ratio=0.5, mode=0, prob=1.0
):
super(GridMask, self).__init__()
self.use_h = use_h
self.use_w = use_w
self.rotate = rotate
self.offset = offset
self.ratio = ratio
self.mode = mode
self.st_prob = prob
self.prob = prob
def set_prob(self, epoch, max_epoch):
self.prob = self.st_prob * epoch / max_epoch
def forward(self, x):
if np.random.rand() > self.prob or not self.training:
return x
n, c, h, w = x.size()
x = x.view(-1, h, w)
hh = int(1.5 * h)
ww = int(1.5 * w)
d = np.random.randint(2, h)
self.l = min(max(int(d * self.ratio + 0.5), 1), d - 1)
mask = np.ones((hh, ww), np.float32)
st_h = np.random.randint(d)
st_w = np.random.randint(d)
if self.use_h:
for i in range(hh // d):
s = d * i + st_h
t = min(s + self.l, hh)
mask[s:t, :] *= 0
if self.use_w:
for i in range(ww // d):
s = d * i + st_w
t = min(s + self.l, ww)
mask[:, s:t] *= 0
r = np.random.randint(self.rotate)
mask = Image.fromarray(np.uint8(mask))
mask = mask.rotate(r)
mask = np.asarray(mask)
mask = mask[
(hh - h) // 2 : (hh - h) // 2 + h,
(ww - w) // 2 : (ww - w) // 2 + w,
]
device = x.device
mask = torch.from_numpy(mask).float().to(device)
if self.mode == 1:
mask = 1 - mask
mask = mask.expand_as(x)
if self.offset:
offset = (
torch.from_numpy(2 * (np.random.rand(h, w) - 0.5))
.float()
.to(device)
)
x = x * mask + offset * (1 - mask)
else:
x = x * mask
return x.view(n, c, h, w)
# =========================
# 创建 GridMask
# =========================
grid_mask = GridMask(
True,
True,
rotate=10,
offset=False,
ratio=0.65,
mode=1,
prob=1.0, # 这里改成1,保证一定触发
)
# 一定要train模式
# eval模式不会增强
grid_mask.train()
# =========================
# 读取图片
# =========================
img_path = 'test.jpg'
img = cv2.imread(img_path)
img = cv2.cvtColor(img, cv2.COLOR_BGR2RGB)
# 保存原图
img_ori = img.copy()
# 转 tensor
img_tensor = torch.from_numpy(img).float() / 255.0
img_tensor = img_tensor.permute(2, 0, 1).unsqueeze(0)
# =========================
# GridMask增强
# =========================
with torch.no_grad():
out = grid_mask(img_tensor)
# 转回 numpy
out = out.squeeze(0).permute(1, 2, 0).numpy()
# clip
out = np.clip(out, 0, 1)
# =========================
# 可视化
# =========================
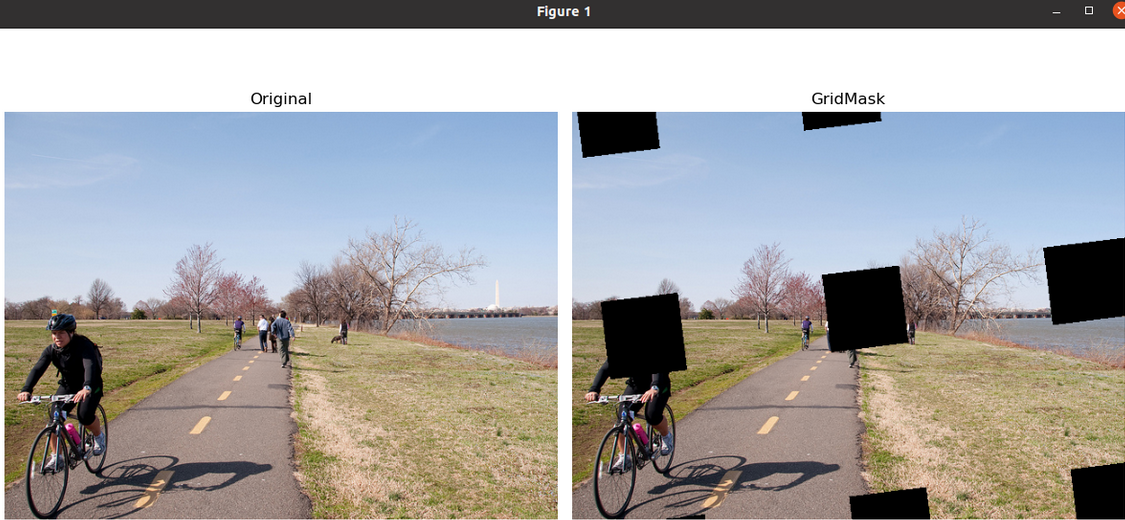
plt.figure(figsize=(12, 6))
plt.subplot(1, 2, 1)
plt.imshow(img_ori)
plt.title('Original')
plt.axis('off')
plt.subplot(1, 2, 2)
plt.imshow(out)
plt.title('GridMask')
plt.axis('off')
plt.tight_layout()
plt.show()这是一个经典的数据增强模块 GridMask,常用于目标检测、BEV、分类等视觉任务。
它的核心思想:
随机用“网格状”的遮挡去盖住图片的一部分,迫使模型学习更鲁棒的特征。
类似:
- Cutout(随机挖洞)
- Random Erasing
- DropBlock
但 GridMask 是:
“规则网格”遮挡,而不是随机矩形。
整体效果
例如原图:
################
################
################
################
GridMask 后:
##..##..##..####
##..##..##..####
################
################
##..##..##..####
形成周期性遮挡。
代码整体流程
forward 流程:
输入图像
  ↓
随机生成网格mask
  ↓
随机旋转
  ↓
裁剪回原图大小
  ↓
mask乘到图像
  ↓
输出增强图
1. 初始化
def __init__(
    self,
    use_h,
    use_w,
    rotate=1,
    offset=False,
    ratio=0.5,
    mode=0,
    prob=1.0
)
参数解释
use_h
是否沿高度方向遮挡
self.use_h = use_h例如:
True会生成横条遮挡。
use_w
是否沿宽度方向遮挡
self.use_w = use_w例如:
True会生成竖条遮挡。
如果:
use_h=True
use_w=True
就形成网格。
rotate
mask随机旋转角度范围
r = np.random.randint(self.rotate)例如:
rotate=10表示:
0~9°随机旋转。
offset
是否用随机值填充被遮挡区域
默认:
False即:
遮挡区域 = 0如果:
True则:
遮挡区域 = 随机噪声ratio
遮挡比例
self.l = d * ratio例如:
d = 100
ratio = 0.5
则:
遮挡宽度 = 50mode
mask翻转模式
mode=0正常:
0 -> 被遮挡
1 -> 保留
如果:
mode=1则反转。
prob
应用增强概率
if np.random.rand() > self.prob:
    return x
2. set_prob()
def set_prob(self, epoch, max_epoch):
    self.prob = self.st_prob * epoch / max_epoch
作用:
训练前期弱增强,
后期逐渐增强。
例如:
st_prob = 1.0训练:
epoch=0   -> prob=0
epoch=50  -> prob=0.5
epoch=100 -> prob=1
属于 curriculum augmentation。
3. forward()
Step1 判断是否增强
if np.random.rand() > self.prob or not self.training:
    return x
推理阶段不增强。
Step2 获取shape
n, c, h, w = x.size()例如:
[8, 3, 256, 256]Step3 reshape
x = x.view(-1, h, w)变成:
[8*3, 256, 256]方便mask broadcast。
Step4 扩大mask尺寸
hh = int(1.5 * h)
ww = int(1.5 * w)
为什么?
因为后面会旋转。
旋转后角落会缺失。
扩大后再中心裁剪。
这是经典 trick。
Step5 随机网格间距 d
d = np.random.randint(2, h)例如:
d = 80表示:
每80像素一个周期Step6 计算遮挡宽度
self.l = min(max(int(d * self.ratio + 0.5), 1), d - 1)即:
l = d * ratio并保证:
1 <= l < d例如:
d=80
ratio=0.5
得到:
l=40Step7 初始化mask
mask = np.ones((hh, ww), np.float32)开始全部为1:
111111111
111111111
Step8 横向遮挡
for i in range(hh // d):
    s = d * i + st_h
    t = min(s + self.l, hh)
    mask[s:t, :] *= 0
例如:
11111111
00000000
11111111
00000000
Step9 纵向遮挡
mask[:, s:t] *= 0形成网格:
11001100
11001100
00000000
00000000
11001100
Step10 随机旋转
mask = Image.fromarray(np.uint8(mask))
mask = mask.rotate(r)
避免:
总是水平垂直提升随机性。
Step11 中心裁剪
mask = mask[
    (hh - h) // 2 : (hh - h) // 2 + h,
    (ww - w) // 2 : (ww - w) // 2 + w,
]
恢复原图大小。
Step12 转tensor
mask = torch.from_numpy(mask).float().cuda()shape:
[h,w]Step13 mode翻转
if self.mode == 1:
    mask = 1 - mask
Step14 broadcast
mask = mask.expand_as(x)扩展成:
[n*c, h, w]Step15 应用mask
普通模式
x = x * mask遮挡部分变0。
offset模式
x = x * mask + offset * (1 - mask)被遮挡区域填随机噪声。
类似:
CutMix + NoiseStep16 reshape回去
return x.view(n, c, h, w)恢复:
[B,C,H,W]GridMask核心思想
本质:
强迫模型:
不能依赖局部纹理
必须学习全局特征
特别适合:
- 检测
- 分割
- BEV
- 自动驾驶
因为:
现实中:
- 遮挡
- 雨雾
- 行人遮挡
- 传感器缺失
都很多。
为什么 BEVDepth 里经常用?
BEV任务:
camera → depth → BEV非常容易:
过拟合局部纹理GridMask 能:
- 提升泛化
- 提升鲁棒性
- 防止依赖单摄像头区域
所以:
很多 BEV 系列:
- BEVDet
- BEVDepth
- PETR
- BEVFormer
都会默认带 GridMask。

AtomGit 是由开放原子开源基金会联合 CSDN 等生态伙伴共同推出的新一代开源与人工智能协作平台。平台坚持“开放、中立、公益”的理念,把代码托管、模型共享、数据集托管、智能体开发体验和算力服务整合在一起,为开发者提供从开发、训练到部署的一站式体验。
更多推荐


 9
9 0
0- 0


 已为社区贡献2条内容

所有评论(0)