yolov26改进 | Conv/卷积篇 | DWRSeg扩张式残差独家创新SPPF助力小目标检测(附创新后网络结构图)
开始讲解之前推荐一下我的专栏,本专栏的内容支持(分类、检测、分割、追踪、关键点检测),专栏目前为限时折扣,欢迎大家订阅本专栏,本专栏每周更新5-7篇最新机制,更有包含我所有改进的文件和交流群提供给大家,本人定期在群内分享发表论文方法和经验。
一、本文介绍
本文内容给大家带来的DWRSeg中的DWR模块来二次创新yolov26中的模块,主要针对的是小目标检测,主要创新点可以总结如下:多尺度特征提取机制的深入研究和创新的DWR模块和SIR模块的提出,这种方法使得网络能够更灵活地适应不同尺度的特征,从而更准确地识别和分割图像中的物体。 通过本文你能够了解到:DWRSeg的基本原理和框架,并且能够在你自己的网络结构中进行添加(同时本文有我独家创新的DWRSPPF模块可直接在论文中使用,并包含网络结构图)。


专栏链接:YOLOv26有效涨点专栏包含:Conv、注意力机制、主干/Backbone、损失函数、优化器、后处理等改进机制
目录
二、DWRSeg的原理介绍
论文地址:官方论文地址
代码地址:该代码目前还未开源,代码为论文内容复现结果。
2.1 DWRSeg的主要思想
DWRSeg的主要创新点可以总结如下:
-
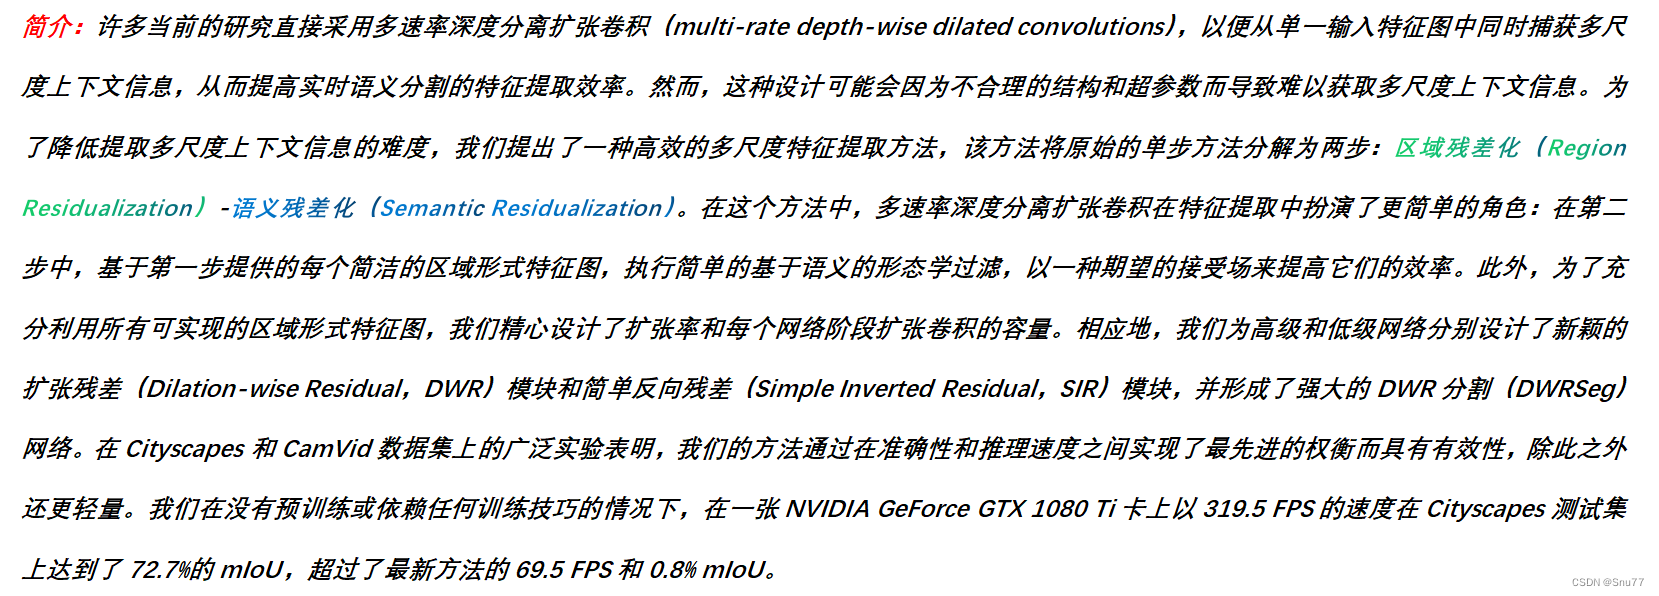
多尺度特征提取机制的深入研究:利用深度分离扩张卷积进行多尺度特征提取,并设计了一种高效的两步残差特征提取方法(区域残差化 – 语义残差化)。这种方法显著提高了实时语义分割中捕获多尺度信息的效率。
-
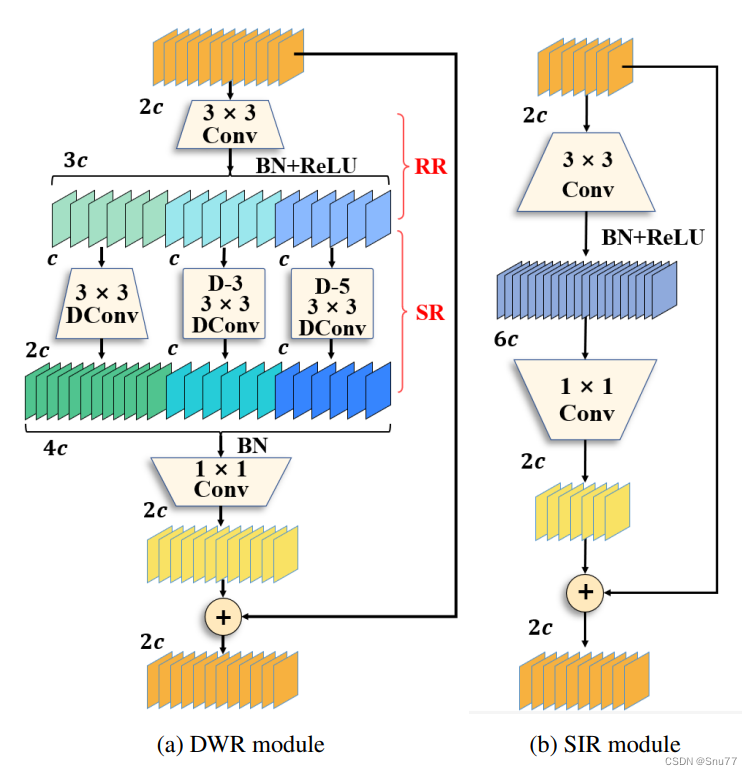
创新的DWR模块和SIR模块的提出:提出了一个新颖的DWR(扩张残差)模块和SIR(简单反向残差)模块。这些模块具有精心设计的接收场大小,分别用于网络的上层和下层。
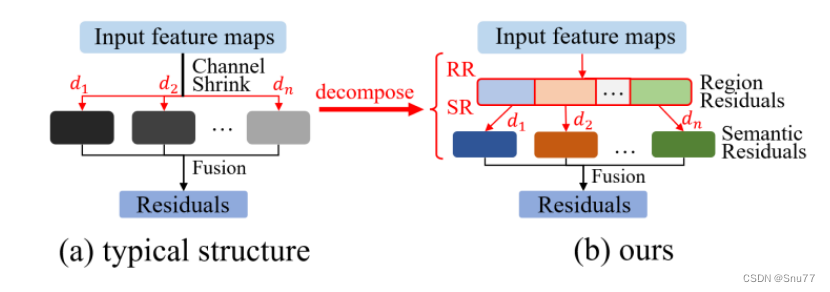
DWRSeg网络在实时语义分割领域取得了一定的效果(从论文的结果来看下图),特别是在提高处理速度和减轻模型负担的方面。
2.2 多尺度特征提取机制的深入研究
利用深度分离扩张卷积进行多尺度特征提取。主要内容可以总结如下:
-
两步残差特征提取方法:该方法包括区域残差化(Region Residualization)和语义残差化(Semantic Residualization),旨在提高实时语义分割中多尺度信息捕获的效率。
-
区域残差化:这一步骤中,首先将区域特征图分成几组,然后对这些组进行不同速率的深度分离扩张卷积。这样做可以智慧地根据第二步中的接收场大小来学习特征图,以反向匹配接收场。
-
语义残差化:在这一步中,仅使用一个具有期望接收场的深度分离扩张卷积对每个简洁的区域形式特征图进行基于语义的形态学过滤。这改变了多速率深度分离扩张卷积在特征提取中的角色,从尝试获取尽可能多的复杂语义信息转变为对每个简洁表达的特征图进行简单的形态学过滤。
-
精细化的扩张率和容量设计:为了充分利用每个网络阶段可以实现的不同区域大小的特征图,需要精心设计扩张率和深度分离卷积的容量,以匹配每个网络阶段的不同接收场要求。
通过这种多尺度特征提取机制的深入研究和创新设计,论文提高了实时语义分割任务中多尺度信息捕获的效率(第一小节的图片)。
2.3 创新的DWR模块和SIR模块的提出
提出的DWR模块和SIR模块的创新点如下:
DWR(Dilation-wise Residual)模块(本文复现的就是这个DWR模块)
- 应用场景:DWR模块主要应用于网络的高阶段,采用设计的两步特征提取方法。
- 特征提取:该模块利用两步残差特征提取方法(区域残差化 – 语义残差化),有效提高实时语义分割中多尺度信息捕获的效率。
- 接收场大小设计:DWR模块针对网络的上层设计了精细化的接收场大小。
SIR(Simple Inverted Residual)模块
- 应用场景:SIR模块专门为网络的低阶段设计,以满足小接收场的需求,保持高效的特征提取效率。
- 结构调整:
- 移除了多分支扩张卷积结构,仅保留第一分支,以压缩接收场。
- 移除了对提取效果贡献较小的3x3深度分离卷积(语义残差化),因为输入特征图的大尺寸和弱语义使得单通道卷积收集的信息太少。因此,在低阶段,单步特征提取比两步特征提取更高效。
总结:这两个模块的设计改进对于提高实时语义分割网络的性能至关重要,高效处理多尺度上下文信息的能力方面。
三、核心代码
使用方法请看章节四
import torch
import torch.nn as nn

__all__ = ['DWRSPPF', 'C3k2_DWRSeg']


def autopad(k, p=None, d=1):  # kernel, padding, dilation
    """Pad to 'same' shape outputs."""
    if d > 1:
        k = d * (k - 1) + 1 if isinstance(k, int) else [d * (x - 1) + 1 for x in k]  # actual kernel-size
    if p is None:
        p = k // 2 if isinstance(k, int) else [x // 2 for x in k]  # auto-pad
    return p


class Conv(nn.Module):
    """Standard convolution with args(ch_in, ch_out, kernel, stride, padding, groups, dilation, activation)."""
    default_act = nn.SiLU()  # default activation

    def __init__(self, c1, c2, k=1, s=1, p=None, g=1, d=1, act=True):
        """Initialize Conv layer with given arguments including activation."""
        super().__init__()
        self.conv = nn.Conv2d(c1, c2, k, s, autopad(k, p, d), groups=g, dilation=d, bias=False)
        self.bn = nn.BatchNorm2d(c2)
        self.act = self.default_act if act is True else act if isinstance(act, nn.Module) else nn.Identity()

    def forward(self, x):
        """Apply convolution, batch normalization and activation to input tensor."""
        return self.act(self.bn(self.conv(x)))

    def forward_fuse(self, x):
        """Perform transposed convolution of 2D data."""
        return self.act(self.conv(x))


class DWR(nn.Module):
    def __init__(self, dim) -> None:
        super().__init__()

        self.conv_3x3 = Conv(dim, dim // 2, 3)

        self.conv_3x3_d1 = Conv(dim // 2, dim, 3, d=1)
        self.conv_3x3_d3 = Conv(dim // 2, dim // 2, 3, d=3)
        self.conv_3x3_d5 = Conv(dim // 2, dim // 2, 3, d=5)

        self.conv_1x1 = Conv(dim * 2, dim, k=1)

    def forward(self, x):
        conv_3x3 = self.conv_3x3(x)
        x1, x2, x3 = self.conv_3x3_d1(conv_3x3), self.conv_3x3_d3(conv_3x3), self.conv_3x3_d5(conv_3x3)
        x_out = torch.cat([x1, x2, x3], dim=1)
        x_out = self.conv_1x1(x_out) + x
        return x_out


class DWRSeg_Conv(nn.Module):
    def __init__(self, in_channels, out_channels):
        super().__init__()
        self.conv = Conv(in_channels, out_channels, k=1)

        self.dcnv3 = DWR(out_channels)

        self.bn = nn.BatchNorm2d(out_channels)
        self.gelu = nn.GELU()

    def forward(self, x):
        x = self.conv(x)

        x = self.dcnv3(x)

        x = self.gelu(self.bn(x))
        return x

class Bottleneck_DWRSeg(nn.Module):
    """Standard bottleneck."""

    def __init__(self, c1, c2, shortcut=True, g=1, k=(3, 3), e=0.5):
        """Initializes a bottleneck module with given input/output channels, shortcut option, group, kernels, and
        expansion.
        """
        super().__init__()
        c_ = int(c2 * e)  # hidden channels
        self.cv1 = Conv(c1, c_, k[0], 1)
        self.cv2 = DWRSeg_Conv(c_, c2)
        self.add = shortcut and c1 == c2

    def forward(self, x):
        """'forward()' applies the YOLO FPN to input data."""
        return x + self.cv2(self.cv1(x)) if self.add else self.cv2(self.cv1(x))


class Bottleneck_DWRSeg(nn.Module):
    """Standard bottleneck."""

    def __init__(self, c1, c2, shortcut=True, g=1, k=(3, 3), e=0.5):
        """Initializes a bottleneck module with given input/output channels, shortcut option, group, kernels, and
        expansion.
        """
        super().__init__()
        c_ = c2 # hidden channels
        self.cv1 = Conv(c1, c_, k[0], 1)
        self.cv2 = DWRSeg_Conv(c_, c2)
        self.add = shortcut and c1 == c2

    def forward(self, x):
        """'forward()' applies the YOLO FPN to input data."""
        return x + self.cv2(self.cv1(x)) if self.add else self.cv2(self.cv1(x))


class Bottleneck(nn.Module):
    """Standard bottleneck."""

    def __init__(
        self, c1: int, c2: int, shortcut: bool = True, g: int = 1, k: tuple[int, int] = (3, 3), e: float = 0.5
    ):
        """Initialize a standard bottleneck module.

        Args:
            c1 (int): Input channels.
            c2 (int): Output channels.
            shortcut (bool): Whether to use shortcut connection.
            g (int): Groups for convolutions.
            k (tuple): Kernel sizes for convolutions.
            e (float): Expansion ratio.
        """
        super().__init__()
        c_ = int(c2 * e)  # hidden channels
        self.cv1 = Conv(c1, c_, k[0], 1)
        self.cv2 = Conv(c_, c2, k[1], 1, g=g)
        self.add = shortcut and c1 == c2

    def forward(self, x: torch.Tensor) -> torch.Tensor:
        """Apply bottleneck with optional shortcut connection."""
        return x + self.cv2(self.cv1(x)) if self.add else self.cv2(self.cv1(x))


class C2f(nn.Module):
    """Faster Implementation of CSP Bottleneck with 2 convolutions."""

    def __init__(self, c1, c2, n=1, shortcut=False, g=1, e=0.5):
        """Initializes a CSP bottleneck with 2 convolutions and n Bottleneck blocks for faster processing."""
        super().__init__()
        self.c = int(c2 * e)  # hidden channels
        self.cv1 = Conv(c1, 2 * self.c, 1, 1)
        self.cv2 = Conv((2 + n) * self.c, c2, 1)  # optional act=FReLU(c2)
        self.m = nn.ModuleList(Bottleneck(self.c, self.c, shortcut, g, k=((3, 3), (3, 3)), e=1.0) for _ in range(n))

    def forward(self, x):
        """Forward pass through C2f layer."""
        y = list(self.cv1(x).chunk(2, 1))
        y.extend(m(y[-1]) for m in self.m)
        return self.cv2(torch.cat(y, 1))

    def forward_split(self, x):
        """Forward pass using split() instead of chunk()."""
        y = list(self.cv1(x).split((self.c, self.c), 1))
        y.extend(m(y[-1]) for m in self.m)
        return self.cv2(torch.cat(y, 1))

class C3(nn.Module):
    """CSP Bottleneck with 3 convolutions."""

    def __init__(self, c1, c2, n=1, shortcut=True, g=1, e=0.5):
        """Initialize the CSP Bottleneck with given channels, number, shortcut, groups, and expansion values."""
        super().__init__()
        c_ = int(c2 * e)  # hidden channels
        self.cv1 = Conv(c1, c_, 1, 1)
        self.cv2 = Conv(c1, c_, 1, 1)
        self.cv3 = Conv(2 * c_, c2, 1)  # optional act=FReLU(c2)
        self.m = nn.Sequential(*(Bottleneck(c_, c_, shortcut, g, k=((1, 1), (3, 3)), e=1.0) for _ in range(n)))

    def forward(self, x):
        """Forward pass through the CSP bottleneck with 2 convolutions."""
        return self.cv3(torch.cat((self.m(self.cv1(x)), self.cv2(x)), 1))

class Attention_YOLOv26(nn.Module):
    """Attention module that performs self-attention on the input tensor.

    Args:
        dim (int): The input tensor dimension.
        num_heads (int): The number of attention heads.
        attn_ratio (float): The ratio of the attention key dimension to the head dimension.

    Attributes:
        num_heads (int): The number of attention heads.
        head_dim (int): The dimension of each attention head.
        key_dim (int): The dimension of the attention key.
        scale (float): The scaling factor for the attention scores.
        qkv (Conv): Convolutional layer for computing the query, key, and value.
        proj (Conv): Convolutional layer for projecting the attended values.
        pe (Conv): Convolutional layer for positional encoding.
    """

    def __init__(self, dim: int, num_heads: int = 8, attn_ratio: float = 0.5):
        """Initialize multi-head attention module.

        Args:
            dim (int): Input dimension.
            num_heads (int): Number of attention heads.
            attn_ratio (float): Attention ratio for key dimension.
        """
        super().__init__()
        self.num_heads = num_heads
        self.head_dim = dim // num_heads
        self.key_dim = int(self.head_dim * attn_ratio)
        self.scale = self.key_dim**-0.5
        nh_kd = self.key_dim * num_heads
        h = dim + nh_kd * 2
        self.qkv = Conv(dim, h, 1, act=False)
        self.proj = Conv(dim, dim, 1, act=False)
        self.pe = Conv(dim, dim, 3, 1, g=dim, act=False)

    def forward(self, x: torch.Tensor) -> torch.Tensor:
        """Forward pass of the Attention module.

        Args:
            x (torch.Tensor): The input tensor.

        Returns:
            (torch.Tensor): The output tensor after self-attention.
        """
        B, C, H, W = x.shape
        N = H * W
        qkv = self.qkv(x)
        q, k, v = qkv.view(B, self.num_heads, self.key_dim * 2 + self.head_dim, N).split(
            [self.key_dim, self.key_dim, self.head_dim], dim=2
        )

        attn = (q.transpose(-2, -1) @ k) * self.scale
        attn = attn.softmax(dim=-1)
        x = (v @ attn.transpose(-2, -1)).view(B, C, H, W) + self.pe(v.reshape(B, C, H, W))
        x = self.proj(x)
        return x


class PSABlock(nn.Module):
    """PSABlock class implementing a Position-Sensitive Attention block for neural networks.

    This class encapsulates the functionality for applying multi-head attention and feed-forward neural network layers
    with optional shortcut connections.

    Attributes:
        attn (Attention): Multi-head attention module.
        ffn (nn.Sequential): Feed-forward neural network module.
        add (bool): Flag indicating whether to add shortcut connections.

    Methods:
        forward: Performs a forward pass through the PSABlock, applying attention and feed-forward layers.

    """

    def __init__(self, c: int, attn_ratio: float = 0.5, num_heads: int = 4, shortcut: bool = True) -> None:
        """Initialize the PSABlock.

        Args:
            c (int): Input and output channels.
            attn_ratio (float): Attention ratio for key dimension.
            num_heads (int): Number of attention heads.
            shortcut (bool): Whether to use shortcut connections.
        """
        super().__init__()

        self.attn = Attention_YOLOv26(c, attn_ratio=attn_ratio, num_heads=num_heads)
        self.ffn = nn.Sequential(Conv(c, c * 2, 1), Conv(c * 2, c, 1, act=False))
        self.add = shortcut

    def forward(self, x: torch.Tensor) -> torch.Tensor:
        """Execute a forward pass through PSABlock.

        Args:
            x (torch.Tensor): Input tensor.

        Returns:
            (torch.Tensor): Output tensor after attention and feed-forward processing.
        """
        x = x + self.attn(x) if self.add else self.attn(x)
        x = x + self.ffn(x) if self.add else self.ffn(x)
        return x

class C3k_DWRSeg(C3):
    """C3k is a CSP bottleneck module with customizable kernel sizes for feature extraction in neural networks."""

    def __init__(self, c1, c2, n=1, shortcut=True, g=1, e=0.5, k=3):
        """Initializes the C3k module with specified channels, number of layers, and configurations."""
        super().__init__(c1, c2, n, shortcut, g, e)
        c_ = int(c2 * e)  # hidden channels
        # self.m = nn.Sequential(*(RepBottleneck(c_, c_, shortcut, g, k=(k, k), e=1.0) for _ in range(n)))
        self.m = nn.Sequential(*(Bottleneck_DWRSeg(c_, c_, shortcut, g, k=(k, k), e=1.0) for _ in range(n)))


class C3k2_DWRSeg(C2f):
    """Faster Implementation of CSP Bottleneck with 2 convolutions."""

    def __init__(
        self,
        c1: int,
        c2: int,
        n: int = 1,
        c3k: bool = False,
        e: float = 0.5,
        attn: bool = False,
        g: int = 1,
        shortcut: bool = True,
    ):
        """Initialize C3k2 modu
        Args:
            c1 (int): Input channels.
            c2 (int): Output channels.
            n (int): Number of blocks.
            c3k (bool): Whether to use C3k blocks.
            e (float): Expansion ratio.
            attn (bool): Whether to use attention blocks.
            g (int): Groups for convolutions.
            shortcut (bool): Whether to use shortcut connections.
        """
        super().__init__(c1, c2, n, shortcut, g, e)
        self.m = nn.ModuleList(
            nn.Sequential(
                Bottleneck_DWRSeg(self.c, self.c, shortcut, g),
                PSABlock(self.c, attn_ratio=0.5, num_heads=max(self.c // 64, 1)),
            )
            if attn
            else C3k_DWRSeg(self.c, self.c, 2, shortcut, g)
            if c3k
            else Bottleneck_DWRSeg(self.c, self.c, shortcut, g)
            for _ in range(n)
        )

class DWRSPPF(nn.Module):
    """
    DWR-SPPF:
    使用 DWR 替换 SPPF 中第一个堆叠 MaxPool 层。

    原始 SPPF:
        y0 = cv1(x)
        y1 = MaxPool(y0)
        y2 = MaxPool(y1)
        y3 = MaxPool(y2)

    改进后:
        y0 = cv1(x)
        y1 = DWR(y0)
        y2 = MaxPool(y1)
        y3 = MaxPool(y2)
    """

    def __init__(self, c1: int, c2: int, k: int = 5, n: int = 3, shortcut: bool = False):
        super().__init__()

        c_ = c1 // 2
        self.cv1 = Conv(c1, c_, 1, 1, act=False)
        self.dwr = DWR(c_)
        self.m = nn.MaxPool2d(kernel_size=k, stride=1, padding=k // 2)
        self.cv2 = Conv(c_ * (n + 1), c2, 1, 1)
        self.n = n
        self.add = shortcut and c1 == c2

    def forward(self, x: torch.Tensor) -> torch.Tensor:
        identity = x

        y = [self.cv1(x)]

        y.append(self.dwr(y[-1]))

        for _ in range(self.n - 1):
            y.append(self.m(y[-1]))

        y = self.cv2(torch.cat(y, dim=1))

        return y + identity if self.add else y


if __name__ == "__main__":
    # Generating Sample image
    image_size = (1, 64, 240, 240)
    image = torch.rand(*image_size)

    # Model
    mobilenet_v1 = C3k2_DWRSeg(64,64)

    out = mobilenet_v1(image)
    print(out.size())
四、手把手教你添加DWR和C2f_DWR模块
下面的步骤如果你不会或者不想麻烦操作,可以联系作者获得本专栏添加所有项目文件的源代码,可直接训练.
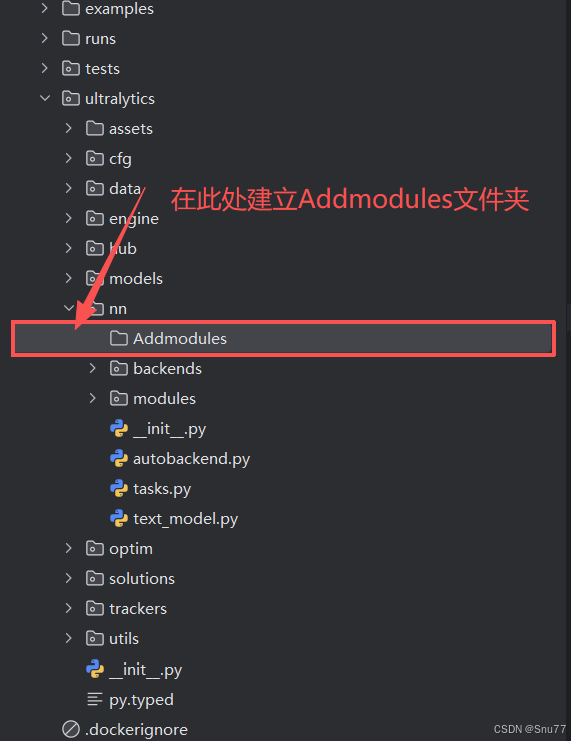
4.1 修改一
第一还是建立文件,我们找到如下ultralytics/nn文件夹下建立一个目录名字呢就是'Addmodules'文件夹!
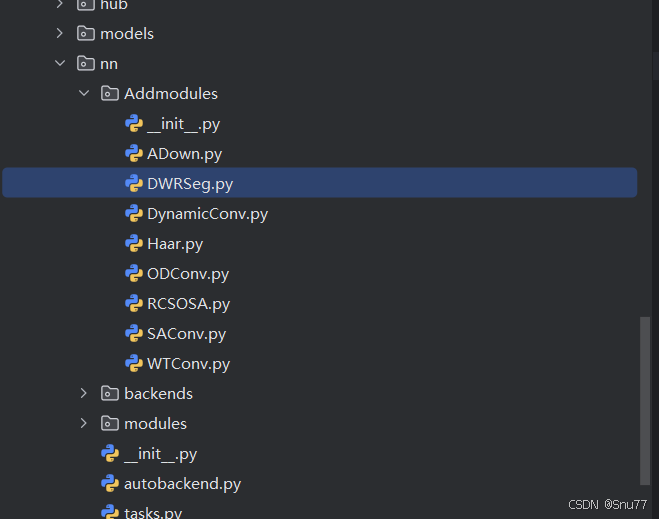
4.2 修改二
然后在Addmodules文件夹内建立一个新的py文件,将本文章节三中的“核心代码"复制粘贴进去。
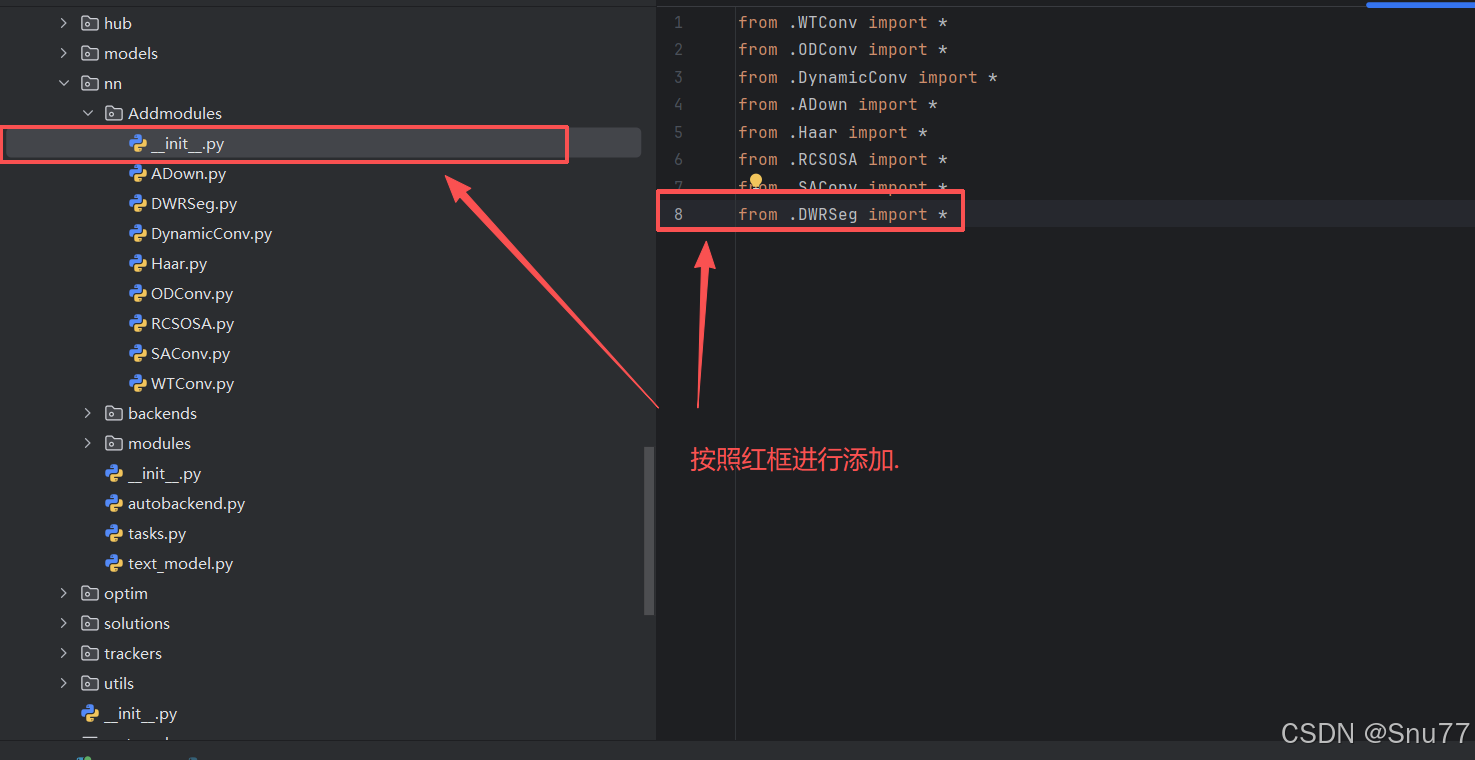
4.3 修改三
第二步我们在该目录下创建一个新的py文件名字为'__init__.py',然后在其内部导入我们的文件,如下图所示。
4.4 修改四
第三步我门中到如下文件'ultralytics/nn/tasks.py'进行导入和注册我们的模块(此处只需要添加一次即可,如果你用我其它的改进机制这里的步骤只需要添加一次)!

4.5 修改五
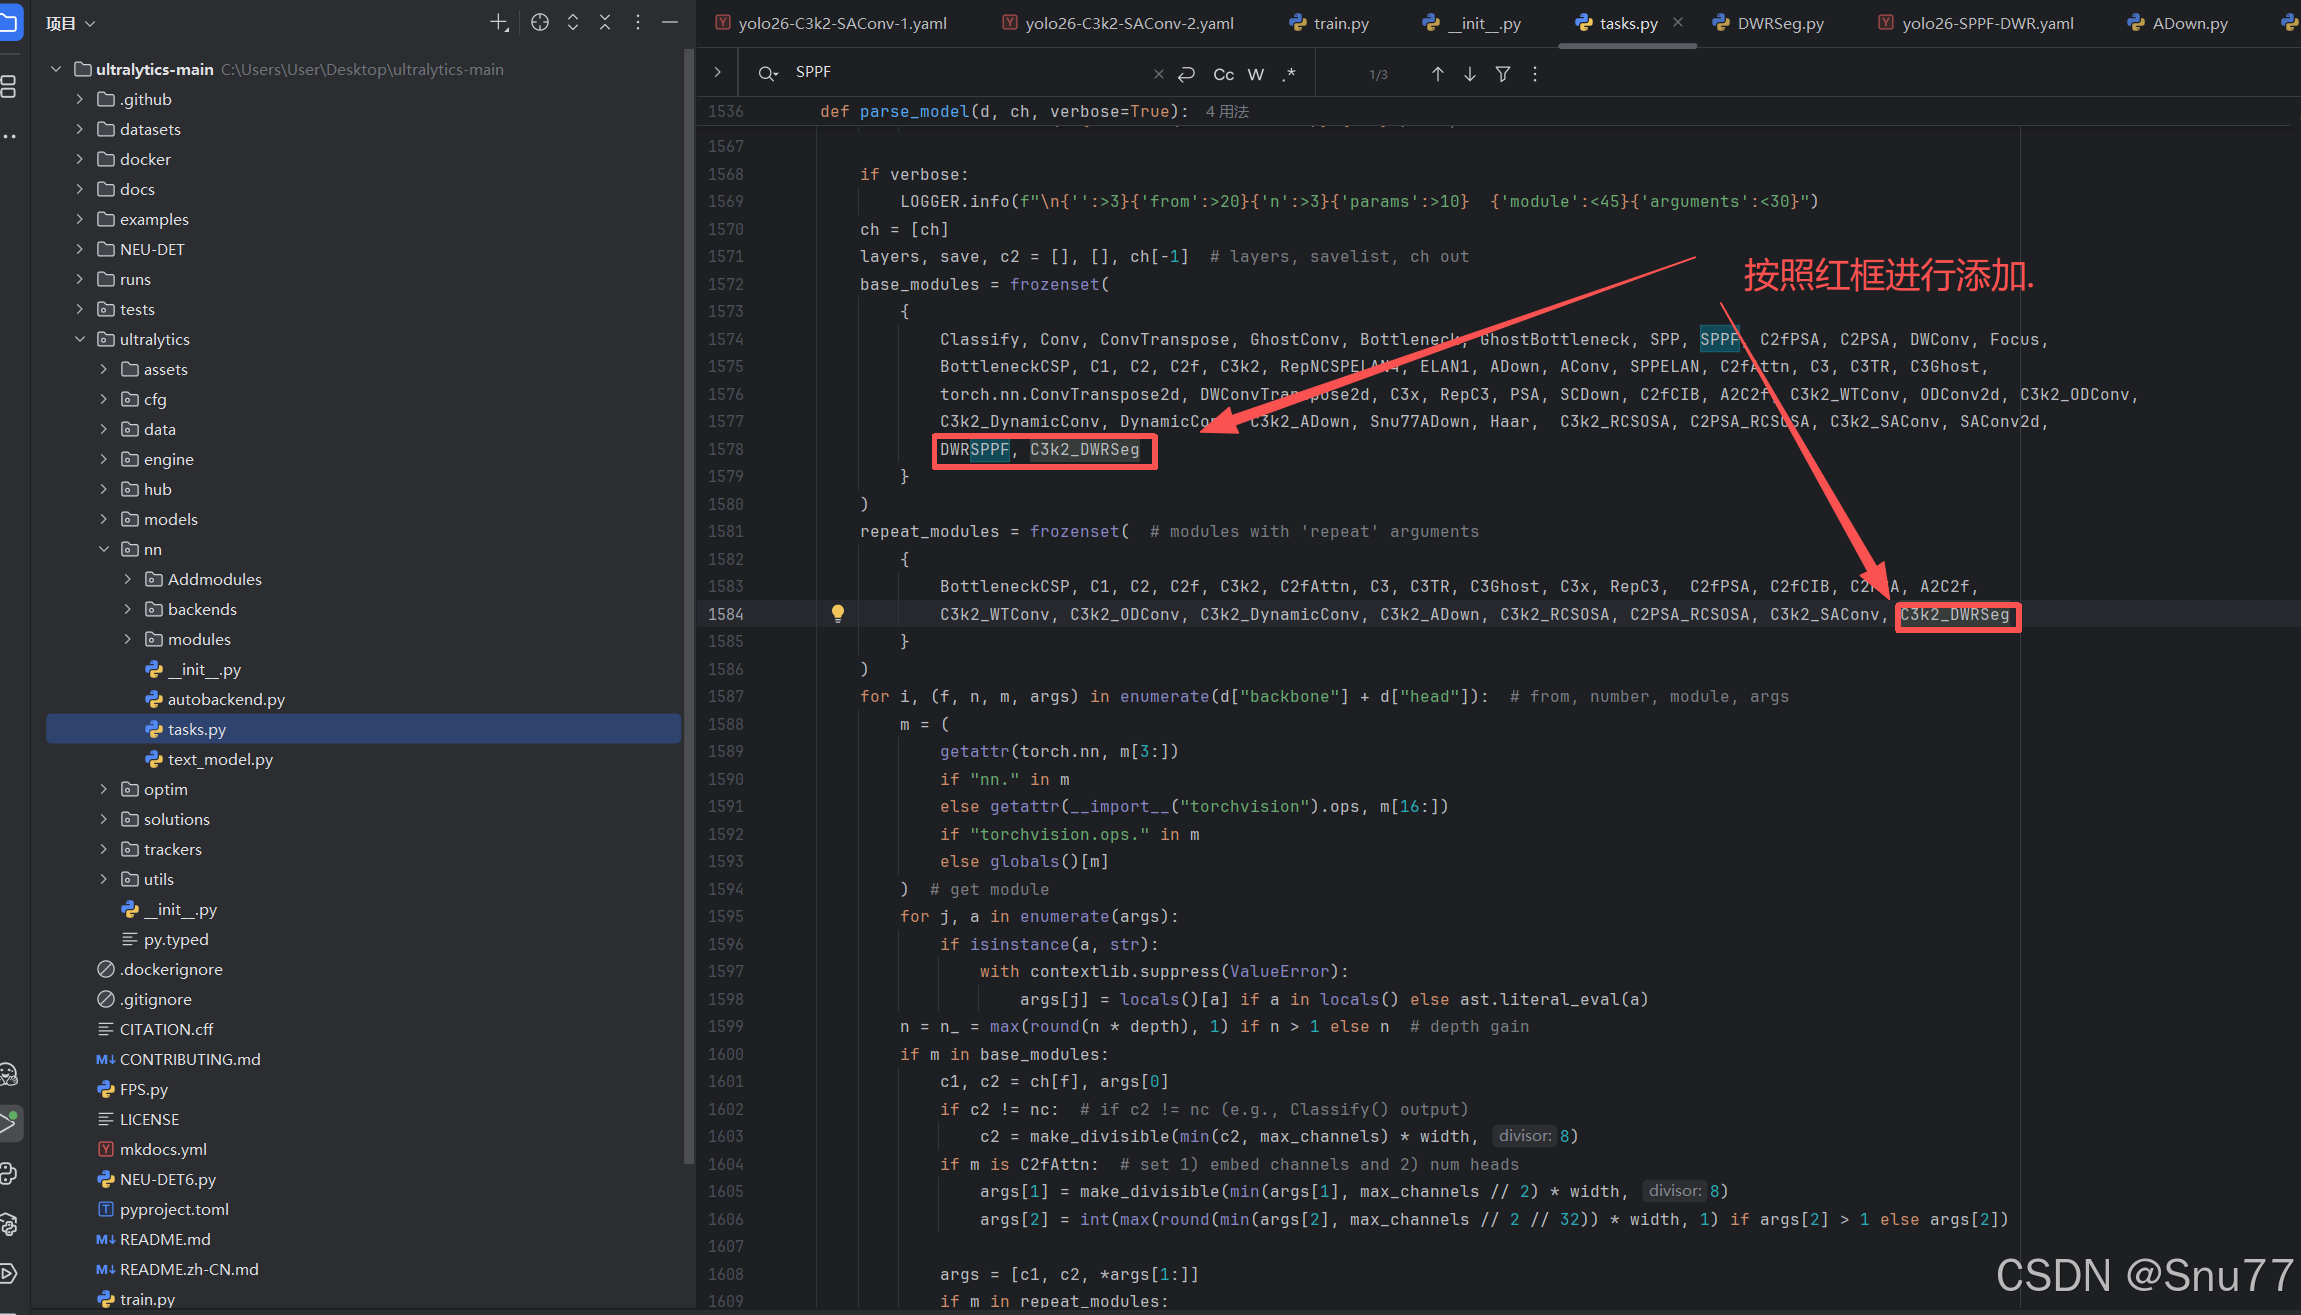
在'ultralytics/nn/tasks.py'文件内的parse_model方法函数内(位置大概在1500+行左右),按照图示位置添加即可(此处需要自己有一定的判别能力,如果不会可联系作者获得视频教程)。
4.6 修改六
在'ultralytics/nn/tasks.py'文件内的parse_model方法函数内(位置大概在1600+行左右),按照图示位置进行代码的替换即可(此处不改如果你yaml文件中的所有C3k2都被改名了,则检测头会使用老版本的v8检测头参数量会大幅度增加,但不影响运行很多人都忽略了这一步)。
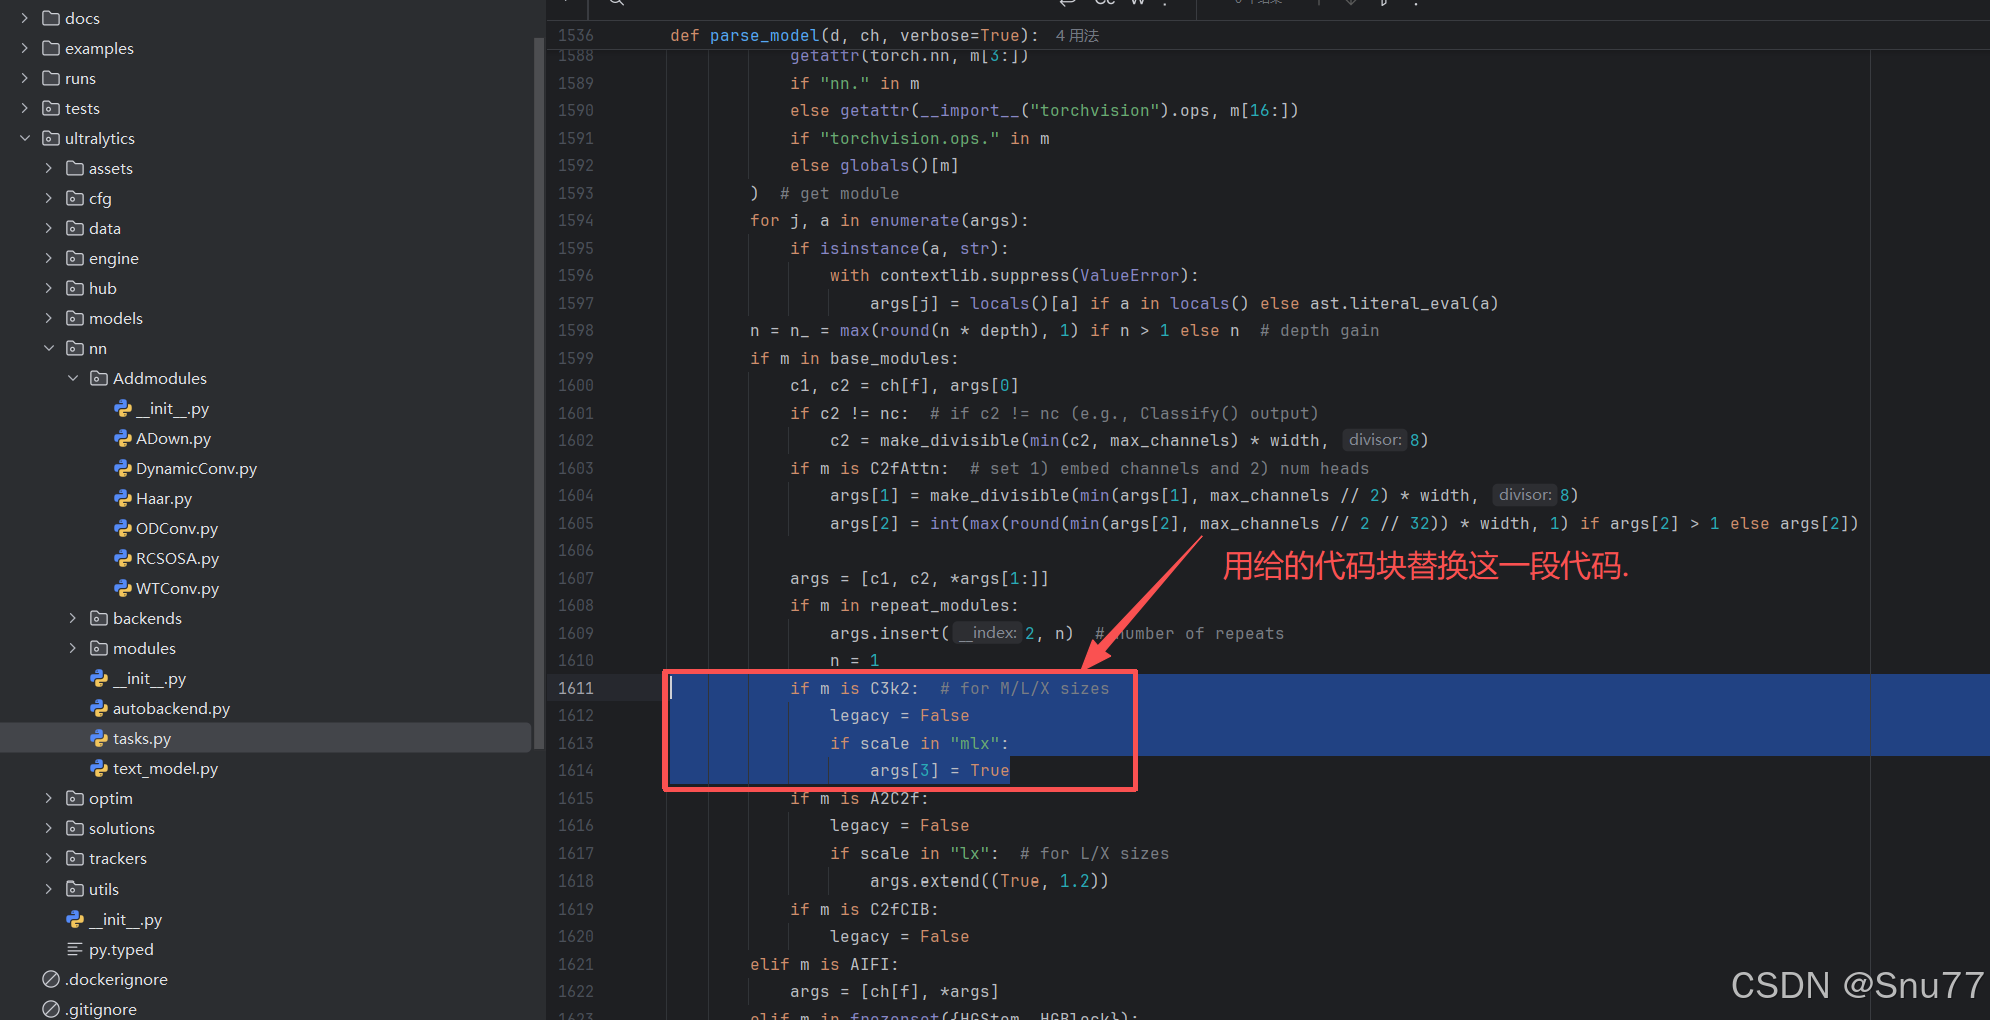
            if "C3k2" in getattr(m, "__name__", str(m)):
                legacy = False
                if scale in "mlx":
                    args[3] = True
到此就修改完成了,大家可以复制下面的yaml文件运行,更多使用方式可以联系作者获得使用视频,本文仅列出常见的使用方式。。
五、正式训练
5.1 yaml文件
5.1.1 yaml文件1
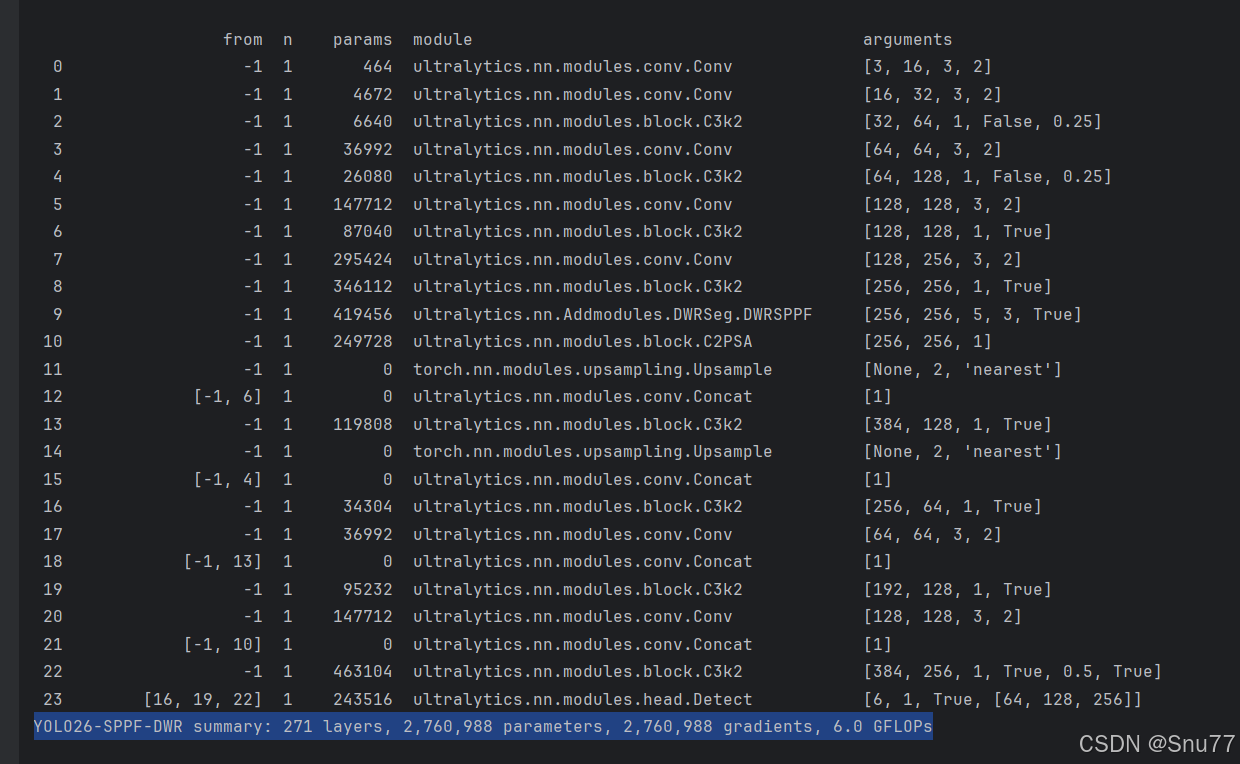
训练信息:YOLO26-SPPF-DWR summary: 271 layers, 2,760,988 parameters, 2,760,988 gradients, 6.0 GFLOPs
# Ultralytics 🚀 AGPL-3.0 License - https://ultralytics.com/license

# Ultralytics YOLO26 object detection model with P3/8 - P5/32 outputs
# Model docs: https://docs.ultralytics.com/models/yolo26
# Task docs: https://docs.ultralytics.com/tasks/detect

# Parameters
nc: 80 # number of classes
end2end: True # whether to use end-to-end mode
reg_max: 1 # DFL bins
scales: # model compound scaling constants, i.e. 'model=yolo26n.yaml' will call yolo26.yaml with scale 'n'
  # [depth, width, max_channels]
  n: [0.50, 0.25, 1024] # summary: 260 layers, 2,572,280 parameters, 2,572,280 gradients, 6.1 GFLOPs
  s: [0.50, 0.50, 1024] # summary: 260 layers, 10,009,784 parameters, 10,009,784 gradients, 22.8 GFLOPs
  m: [0.50, 1.00, 512] # summary: 280 layers, 21,896,248 parameters, 21,896,248 gradients, 75.4 GFLOPs
  l: [1.00, 1.00, 512] # summary: 392 layers, 26,299,704 parameters, 26,299,704 gradients, 93.8 GFLOPs
  x: [1.00, 1.50, 512] # summary: 392 layers, 58,993,368 parameters, 58,993,368 gradients, 209.5 GFLOPs

# YOLO26n backbone
backbone:
  # [from, repeats, module, args]
  - [-1, 1, Conv, [64, 3, 2]] # 0-P1/2
  - [-1, 1, Conv, [128, 3, 2]] # 1-P2/4
  - [-1, 2, C3k2, [256, False, 0.25]]
  - [-1, 1, Conv, [256, 3, 2]] # 3-P3/8
  - [-1, 2, C3k2, [512, False, 0.25]]
  - [-1, 1, Conv, [512, 3, 2]] # 5-P4/16
  - [-1, 2, C3k2, [512, True]]
  - [-1, 1, Conv, [1024, 3, 2]] # 7-P5/32
  - [-1, 2, C3k2, [1024, True]]
  - [-1, 1, DWRSPPF, [1024, 5, 3, True]] # 9
  - [-1, 2, C2PSA, [1024]] # 10

# YOLO26n head
head:
  - [-1, 1, nn.Upsample, [None, 2, "nearest"]]
  - [[-1, 6], 1, Concat, [1]] # cat backbone P4
  - [-1, 2, C3k2, [512, True]] # 13

  - [-1, 1, nn.Upsample, [None, 2, "nearest"]]
  - [[-1, 4], 1, Concat, [1]] # cat backbone P3
  - [-1, 2, C3k2, [256, True]] # 16 (P3/8-small)

  - [-1, 1, Conv, [256, 3, 2]]
  - [[-1, 13], 1, Concat, [1]] # cat head P4
  - [-1, 2, C3k2, [512, True]] # 19 (P4/16-medium)

  - [-1, 1, Conv, [512, 3, 2]]
  - [[-1, 10], 1, Concat, [1]] # cat head P5
  - [-1, 1, C3k2, [1024, True, 0.5, True]] # 22 (P5/32-large)

  - [[16, 19, 22], 1, Detect, [nc]] # Detect(P3, P4, P5)
5.1.2 yaml文件2
训练信息:YOLO26-C3K2-DWRSeg-1 summary: 333 layers, 2,606,268 parameters, 2,606,268 gradients, 6.3 GFLOPs
# Ultralytics 🚀 AGPL-3.0 License - https://ultralytics.com/license

# Ultralytics YOLO26 object detection model with P3/8 - P5/32 outputs
# Model docs: https://docs.ultralytics.com/models/yolo26
# Task docs: https://docs.ultralytics.com/tasks/detect

# Parameters
nc: 80 # number of classes
end2end: True # whether to use end-to-end mode
reg_max: 1 # DFL bins
scales: # model compound scaling constants, i.e. 'model=yolo26n.yaml' will call yolo26.yaml with scale 'n'
  # [depth, width, max_channels]
  n: [0.50, 0.25, 1024] # summary: 260 layers, 2,572,280 parameters, 2,572,280 gradients, 6.1 GFLOPs
  s: [0.50, 0.50, 1024] # summary: 260 layers, 10,009,784 parameters, 10,009,784 gradients, 22.8 GFLOPs
  m: [0.50, 1.00, 512] # summary: 280 layers, 21,896,248 parameters, 21,896,248 gradients, 75.4 GFLOPs
  l: [1.00, 1.00, 512] # summary: 392 layers, 26,299,704 parameters, 26,299,704 gradients, 93.8 GFLOPs
  x: [1.00, 1.50, 512] # summary: 392 layers, 58,993,368 parameters, 58,993,368 gradients, 209.5 GFLOPs

# YOLO26n backbone
backbone:
  # [from, repeats, module, args]
  - [-1, 1, Conv, [64, 3, 2]] # 0-P1/2
  - [-1, 1, Conv, [128, 3, 2]] # 1-P2/4
  - [-1, 2, C3k2_DWRSeg, [256, False, 0.25]]
  - [-1, 1, Conv, [256, 3, 2]] # 3-P3/8
  - [-1, 2, C3k2_DWRSeg, [512, False, 0.25]]
  - [-1, 1, Conv, [512, 3, 2]] # 5-P4/16
  - [-1, 2, C3k2_DWRSeg, [512, True]]
  - [-1, 1, Conv, [1024, 3, 2]] # 7-P5/32
  - [-1, 2, C3k2_DWRSeg, [1024, True]]
  - [-1, 1, SPPF, [1024, 5, 3, True]] # 9
  - [-1, 2, C2PSA, [1024]] # 10

# YOLO26n head
head:
  - [-1, 1, nn.Upsample, [None, 2, "nearest"]]
  - [[-1, 6], 1, Concat, [1]] # cat backbone P4
  - [-1, 2, C3k2, [512, True]] # 13

  - [-1, 1, nn.Upsample, [None, 2, "nearest"]]
  - [[-1, 4], 1, Concat, [1]] # cat backbone P3
  - [-1, 2, C3k2, [256, True]] # 16 (P3/8-small)

  - [-1, 1, Conv, [256, 3, 2]]
  - [[-1, 13], 1, Concat, [1]] # cat head P4
  - [-1, 2, C3k2, [512, True]] # 19 (P4/16-medium)

  - [-1, 1, Conv, [512, 3, 2]]
  - [[-1, 10], 1, Concat, [1]] # cat head P5
  - [-1, 1, C3k2, [1024, True, 0.5, True]] # 22 (P5/32-large)

  - [[16, 19, 22], 1, Detect, [nc]] # Detect(P3, P4, P5)
5.1.3 yaml文件3
训练信息:YOLO26-C3K2-DWRSeg-2 summary: 345 layers, 2,813,756 parameters, 2,813,756 gradients, 6.2 GFLOPs
# Ultralytics 🚀 AGPL-3.0 License - https://ultralytics.com/license

# Ultralytics YOLO26 object detection model with P3/8 - P5/32 outputs
# Model docs: https://docs.ultralytics.com/models/yolo26
# Task docs: https://docs.ultralytics.com/tasks/detect

# Parameters
nc: 80 # number of classes
end2end: True # whether to use end-to-end mode
reg_max: 1 # DFL bins
scales: # model compound scaling constants, i.e. 'model=yolo26n.yaml' will call yolo26.yaml with scale 'n'
  # [depth, width, max_channels]
  n: [0.50, 0.25, 1024] # summary: 260 layers, 2,572,280 parameters, 2,572,280 gradients, 6.1 GFLOPs
  s: [0.50, 0.50, 1024] # summary: 260 layers, 10,009,784 parameters, 10,009,784 gradients, 22.8 GFLOPs
  m: [0.50, 1.00, 512] # summary: 280 layers, 21,896,248 parameters, 21,896,248 gradients, 75.4 GFLOPs
  l: [1.00, 1.00, 512] # summary: 392 layers, 26,299,704 parameters, 26,299,704 gradients, 93.8 GFLOPs
  x: [1.00, 1.50, 512] # summary: 392 layers, 58,993,368 parameters, 58,993,368 gradients, 209.5 GFLOPs

# YOLO26n backbone
backbone:
  # [from, repeats, module, args]
  - [-1, 1, Conv, [64, 3, 2]] # 0-P1/2
  - [-1, 1, Conv, [128, 3, 2]] # 1-P2/4
  - [-1, 2, C3k2, [256, False, 0.25]]
  - [-1, 1, Conv, [256, 3, 2]] # 3-P3/8
  - [-1, 2, C3k2, [512, False, 0.25]]
  - [-1, 1, Conv, [512, 3, 2]] # 5-P4/16
  - [-1, 2, C3k2, [512, True]]
  - [-1, 1, Conv, [1024, 3, 2]] # 7-P5/32
  - [-1, 2, C3k2, [1024, True]]
  - [-1, 1, SPPF, [1024, 5, 3, True]] # 9
  - [-1, 2, C2PSA, [1024]] # 10

# YOLO26n head
head:
  - [-1, 1, nn.Upsample, [None, 2, "nearest"]]
  - [[-1, 6], 1, Concat, [1]] # cat backbone P4
  - [-1, 2, C3k2_DWRSeg, [512, True]] # 13

  - [-1, 1, nn.Upsample, [None, 2, "nearest"]]
  - [[-1, 4], 1, Concat, [1]] # cat backbone P3
  - [-1, 2, C3k2_DWRSeg, [256, True]] # 16 (P3/8-small)

  - [-1, 1, Conv, [256, 3, 2]]
  - [[-1, 13], 1, Concat, [1]] # cat head P4
  - [-1, 2, C3k2_DWRSeg, [512, True]] # 19 (P4/16-medium)

  - [-1, 1, Conv, [512, 3, 2]]
  - [[-1, 10], 1, Concat, [1]] # cat head P5
  - [-1, 1, C3k2_DWRSeg, [1024, True, 0.5, True]] # 22 (P5/32-large)

  - [[16, 19, 22], 1, Detect, [nc]] # Detect(P3, P4, P5)
5.1.4 yaml文件4
训练信息:YOLO26-C3K2-DWRSeg-3 summary: 417 layers, 2,913,884 parameters, 2,913,884 gradients, 6.7 GFLOPs
# Ultralytics 🚀 AGPL-3.0 License - https://ultralytics.com/license

# Ultralytics YOLO26 object detection model with P3/8 - P5/32 outputs
# Model docs: https://docs.ultralytics.com/models/yolo26
# Task docs: https://docs.ultralytics.com/tasks/detect

# Parameters
nc: 80 # number of classes
end2end: True # whether to use end-to-end mode
reg_max: 1 # DFL bins
scales: # model compound scaling constants, i.e. 'model=yolo26n.yaml' will call yolo26.yaml with scale 'n'
  # [depth, width, max_channels]
  n: [0.50, 0.25, 1024] # summary: 260 layers, 2,572,280 parameters, 2,572,280 gradients, 6.1 GFLOPs
  s: [0.50, 0.50, 1024] # summary: 260 layers, 10,009,784 parameters, 10,009,784 gradients, 22.8 GFLOPs
  m: [0.50, 1.00, 512] # summary: 280 layers, 21,896,248 parameters, 21,896,248 gradients, 75.4 GFLOPs
  l: [1.00, 1.00, 512] # summary: 392 layers, 26,299,704 parameters, 26,299,704 gradients, 93.8 GFLOPs
  x: [1.00, 1.50, 512] # summary: 392 layers, 58,993,368 parameters, 58,993,368 gradients, 209.5 GFLOPs

# YOLO26n backbone
backbone:
  # [from, repeats, module, args]
  - [-1, 1, Conv, [64, 3, 2]] # 0-P1/2
  - [-1, 1, Conv, [128, 3, 2]] # 1-P2/4
  - [-1, 2, C3k2_DWRSeg, [256, False, 0.25]]
  - [-1, 1, Conv, [256, 3, 2]] # 3-P3/8
  - [-1, 2, C3k2_DWRSeg, [512, False, 0.25]]
  - [-1, 1, Conv, [512, 3, 2]] # 5-P4/16
  - [-1, 2, C3k2_DWRSeg, [512, True]]
  - [-1, 1, Conv, [1024, 3, 2]] # 7-P5/32
  - [-1, 2, C3k2_DWRSeg, [1024, True]]
  - [-1, 1, SPPF, [1024, 5, 3, True]] # 9
  - [-1, 2, C2PSA, [1024]] # 10

# YOLO26n head
head:
  - [-1, 1, nn.Upsample, [None, 2, "nearest"]]
  - [[-1, 6], 1, Concat, [1]] # cat backbone P4
  - [-1, 2, C3k2_DWRSeg, [512, True]] # 13

  - [-1, 1, nn.Upsample, [None, 2, "nearest"]]
  - [[-1, 4], 1, Concat, [1]] # cat backbone P3
  - [-1, 2, C3k2_DWRSeg, [256, True]] # 16 (P3/8-small)

  - [-1, 1, Conv, [256, 3, 2]]
  - [[-1, 13], 1, Concat, [1]] # cat head P4
  - [-1, 2, C3k2_DWRSeg, [512, True]] # 19 (P4/16-medium)

  - [-1, 1, Conv, [512, 3, 2]]
  - [[-1, 10], 1, Concat, [1]] # cat head P5
  - [-1, 1, C3k2_DWRSeg, [1024, True, 0.5, True]] # 22 (P5/32-large)

  - [[16, 19, 22], 1, Detect, [nc]] # Detect(P3, P4, P5)
5.2 训练代码
大家可以创建一个py文件将我给的代码复制粘贴进去,配置好自己的文件路径即可运行。
import warnings
warnings.filterwarnings('ignore')
from ultralytics import YOLO

if __name__ == '__main__':
    model = YOLO('模型配置文件地址,也就是5.1你保存到本地文件的地址')
    # 如何切换模型版本, 上面的ymal文件可以改为 yolo26s.yaml就是使用的26s,
    # 类似某个改进的yaml文件名称为yolo26-XXX.yaml那么如果想使用其它版本就把上面的名称改为yolo26l-XXX.yaml即可(改的是上面YOLO中间的名字不是配置文件的)!
    # model.load('yolo26n.pt') # 是否加载预训练权重,科研不建议大家加载否则很难提升精度
    model.train(
        data=r"数据集文件地址",
                # 如果大家任务是其它的'ultralytics/cfg/default.yaml'找到这里修改task可以改成detect, segment, classify, pose
                cache=False,
                imgsz=640,
                epochs=20,
                single_cls=False,  # 是否是单类别检测
                batch=16,
                close_mosaic=0,
                workers=0,
                device='0',
                optimizer='MuSGD', # using SGD/MuSGD
                # resume=, # 这里是填写last.pt地址
                amp=True,  # 如果出现训练损失为Nan可以关闭amp
                project='runs/train',
                name='exp',
                )
5.3 训练过程截图
五、本文总结
到此本文的正式分享内容就结束了,在这里给大家推荐我的YOLOv26改进有效涨点专栏,本专栏目前为新开的平均质量分98分,后期我会根据各种最新的前沿顶会进行论文复现,也会对一些老的改进机制进行补充,如果大家觉得本文帮助到你了,订阅本专栏,关注后续更多的更新~
专栏链接:YOLOv26有效涨点专栏包含:Conv、注意力机制、主干/Backbone、损失函数、优化器、后处理等改进机制


AtomGit 是由开放原子开源基金会联合 CSDN 等生态伙伴共同推出的新一代开源与人工智能协作平台。平台坚持“开放、中立、公益”的理念,把代码托管、模型共享、数据集托管、智能体开发体验和算力服务整合在一起,为开发者提供从开发、训练到部署的一站式体验。
更多推荐
 9
9 0
0- 0


 已为社区贡献17条内容

所有评论(0)