python(pytorch模型)生成动态链接
本文是将pytorch模型(手部识别)生成动态链接,以便用C++语言调用
开发环境
电脑有NVIDIA GPU
Anaconda
pycharm专业版
python3.12
Visual Studio 2019
1. 环境配置
1.1 python环境搭建
pytorch环境搭建见博文安装Pytorch(GPU)
与此博文不同的是本文的PyCharm必须是专业版
原因如下(.pyx文件在用cython编译时需要):
*.pyx files are supported by PyCharm Professional
1.2 安装cython库
环境搭建好后,在新建的虚拟环境里安装cython库
pip install cython
或者
conda install cython
查看安装库
conda list
2. 方法一:通过VS编译得到动态链接库dll
此方法的局限性
1)此方法的动态库无法在没有安装python的机器上面运行
2)此方法相当于将原始python函数进行修改,再用cython编译成.c和.h文件,最后生成动态链接库dll,用于第三方调用。总体来说挺麻烦,不如用博文c++调用python里的方法,此方法是直接将原始python函数当作库进行调用,无需中间的编译过程。
2.1 使用Cython编译
2.1.1 run.pyx
新建一个python脚本,add.py
def str_add(str1, str2):
  return int(str1) + int(str2)
为了使该函数能够被Cython编译,需要新建一个run.pyx脚本
cdef public int str_add(const char* str1,const char* str2):
  return int(str1) + int(str2)
2.1.2 run.h和run.c
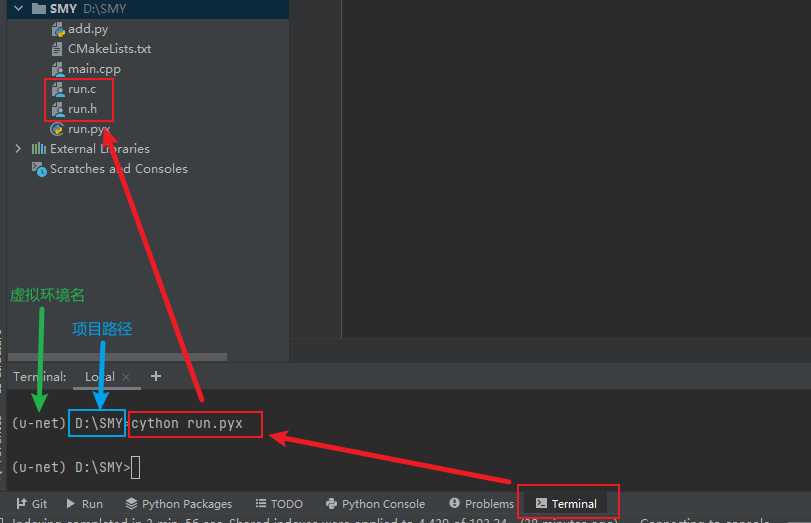
cdef和public等都是cython关键字,这些关键字可以帮助函数可以被外部调用。然后在PyCharm中使用下面的命令编译,生成run.h和run.c两个文件
激活虚拟环境
conda activate u-net
进入项目路径
cd D:\SMY
编译
cython run.pyx
2.2 VS编译得到动态链接库
2.2.1 动态库项目SMY_dll
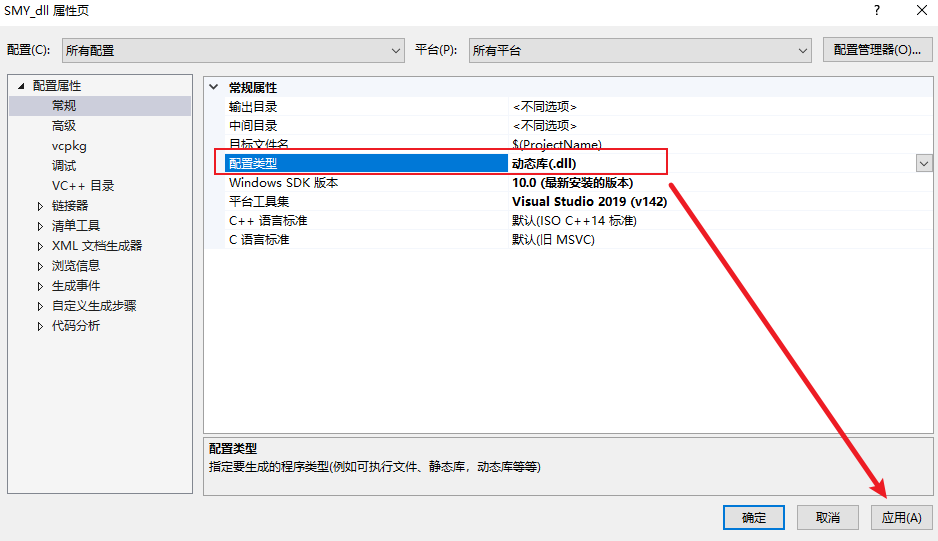
1)新建VS空项目,本文项目名为SMY_dll
项目 → SMY_dll属性
配置类型改为动态库,点击应用
2)将刚刚的.c和.h文件复制到项目存放代码的文件夹并添加到项目中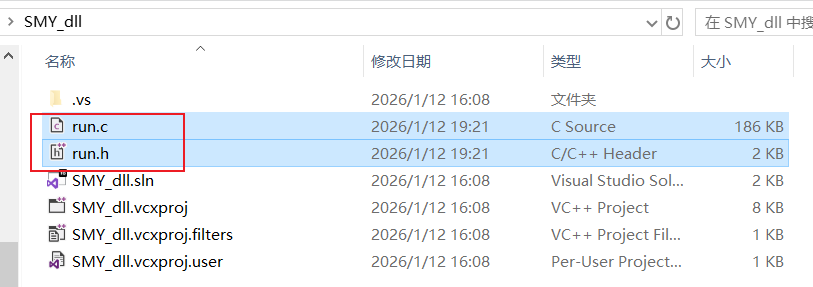
3)在项目上右键添加 → 现有项 ,然后选择编译后的.c和.h文件
或者直接用快捷键Shift+Alt+A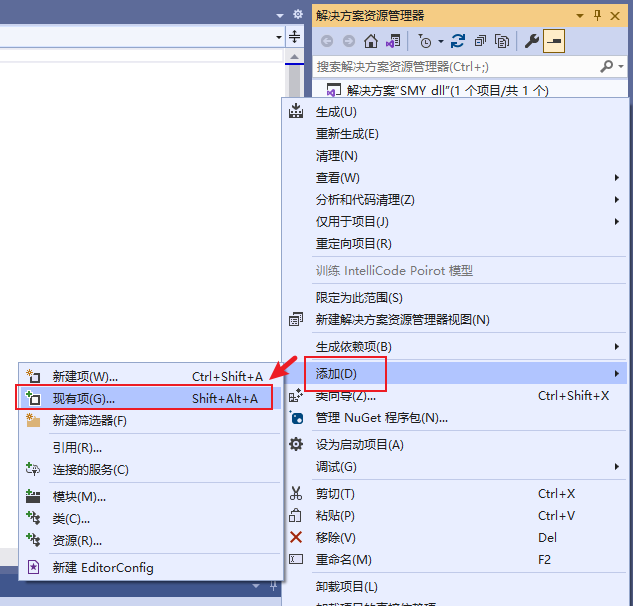
添加后如下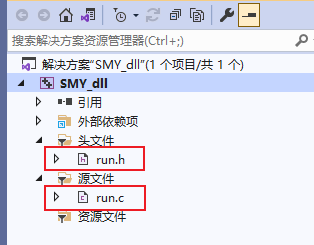
2.2.2 项目配置属性
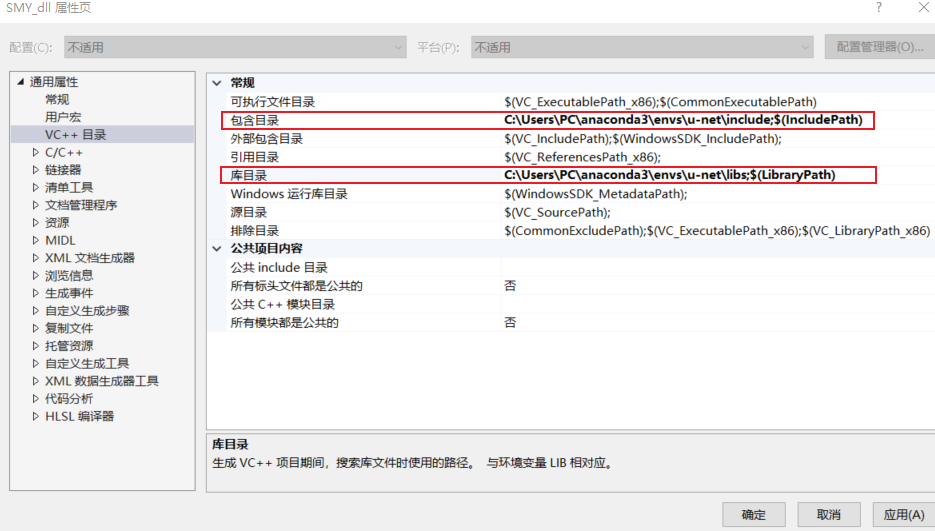
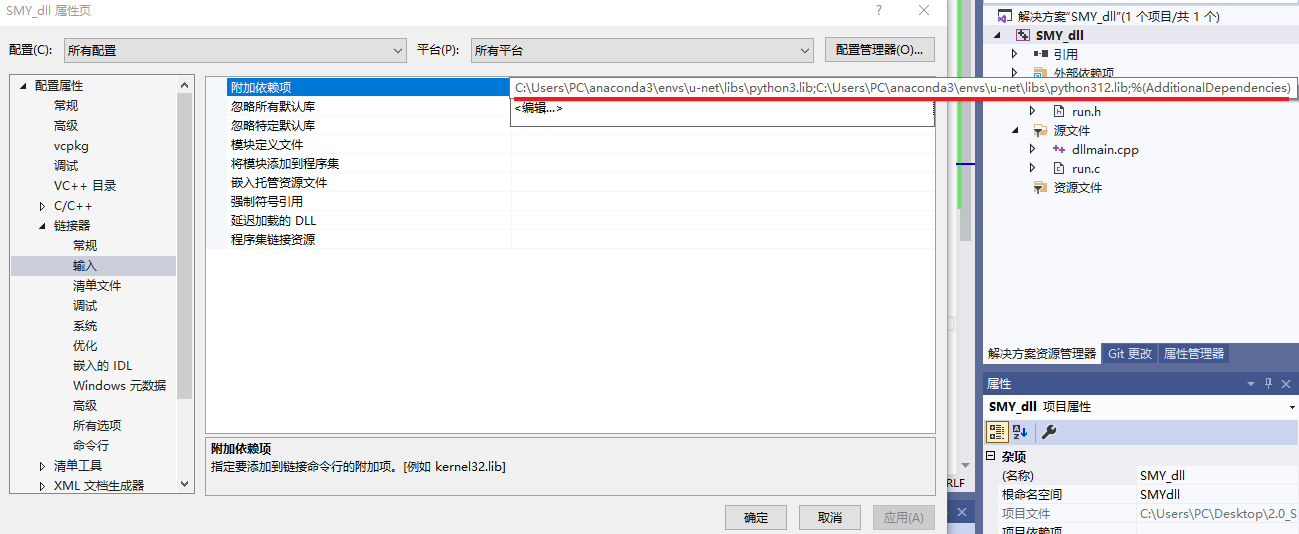
将python的include路径放在包含目录里,python库文件放在库目录里,将python3.lib和python312.lib添加到依赖项里,详细步骤可参考c++调用python里的1.环境配置
包含目录
C:\Users\PC\anaconda3\envs\u-net\include
库目录
C:\Users\PC\anaconda3\envs\u-net\libs
依赖项
C:\Users\PC\anaconda3\envs\u-net\libs\python3.lib
C:\Users\PC\anaconda3\envs\u-net\libs\python312.lib
2.2.3 dllmain.cpp
新建dllmain.cpp脚本
在项目上右键添加 → 新建项
#include <Python.h>
#include <Windows.h>
#include "run.h"

// 提前注册模块初始化函数
static struct _inittab run_inittab[] = {
    {"run", PyInit_run},
    {NULL, NULL}
};

extern "C"
{
    __declspec(dllexport) int __stdcall _str_add(const char* a, const char* b)
    {
        return str_add(a, b);
    }
}

BOOL WINAPI DllMain(HINSTANCE hinstDLL, DWORD fdwReason, LPVOID lpReserved)
{
    switch (fdwReason)
    {
    case DLL_PROCESS_ATTACH:
        // 在初始化Python之前注册模块
        PyImport_ExtendInittab(run_inittab);
        // 初始化Python解释器
        Py_Initialize();
        // 确保模块被正确导入
        PyImport_ImportModule("run");
        break;
    case DLL_PROCESS_DETACH:
        // 关闭Python解释器
        Py_Finalize();
        break;
    }
    return TRUE;
}
2.2.4 生成dll文件
1)编译的版本选择Release,架构选择x64
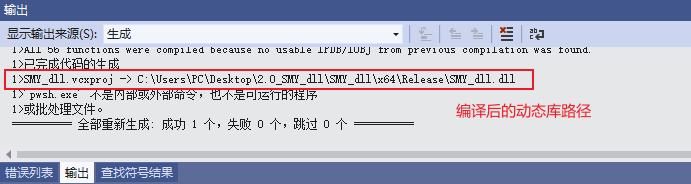
2)生成dll文件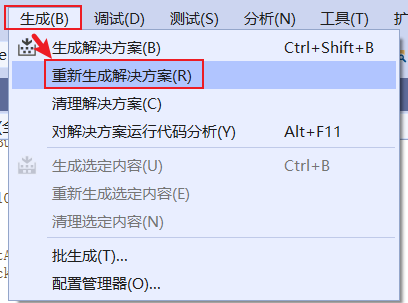
编译后可以得到dll文件
C:\Users\PC\Desktop\2.0_SMY_dll\SMY_dll\x64\Release\SMY_dll.dll
想要知道动态链接dll是否导出成功,可以参考博文CFF Explorer.exe验证 DLL 导出的函数名进行验证
2.3 dll的动态调用
建立另一个项目对刚生成的dll进行测试,本文此处的项目名依旧为SMY_dll
注意:
1)属性配置,与2.2.2一致
2)版本和架构配置,与2.2.3一致
3)将SMY_dll.dll文件复制在可执行文件(项目名.exe)所在的目录(项目名\x64\Release)
添加脚本main.cpp
#include <Windows.h>
#include <iostream>

int main()
{
    // 定义函数指针类型
    typedef int(__stdcall *pAdd)(const char* a, const char* b);

    // 调用dll测试
    // 使用 LoadLibraryA 并传递一个普通的 const char*
    HINSTANCE hDLL = LoadLibraryA("SMY_dll.dll");


    std::cout << "hDLL: " << hDLL << std::endl;

    if (hDLL != NULL)
    {
        // 获取DLL中需要调用的函数的地址
        // GetProcAddress 的第二个参数也应该是 const char*
        pAdd pFun = (pAdd)GetProcAddress(hDLL, "_str_add");
        std::cout << "pFun: " << pFun << std::endl;

        const char* stra = "12";
        const char* strb = "22";

        if (pFun != NULL)
        {
            int i = pFun(stra, strb);
            std::cout << "i = " << i << std::endl;
        }
        else
        {
            // 如果函数没找到,打印错误信息
            DWORD dwError = GetLastError();
            std::cerr << "Failed to get function address. Error code: " << dwError << std::endl;
        }

        // 释放DLL
        FreeLibrary(hDLL);
    }
    else
    {
        // 如果 DLL 加载失败,打印错误信息
        DWORD dwError = GetLastError();
        std::cerr << "Failed to load DLL. Error code: " << dwError << std::endl;
    }

    system("pause");
    return 0;
}
运行后得到结果“i = 34”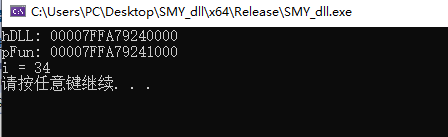
3. 方法二:python编译得到动态链接库(.pyd)
将训练好的模型best_model.pth 和预测脚本predict.py 打包成动态链接库的详细步骤
此方法的特性
1)此方法的动态库无法在没有安装python的机器上面运行
2)此方法无需改变原始python函数。总体来说与博文c++调用python差不多,但是博文的方法不需要pycharm是专业版。
3.1 组织python代码
3.1.1 项目结构
D:\09_Pytorch-UNet-master\01_SMY_4
|-- best_model.pth
|-- unet\model.py # 包含 UNet 类的定义
|-- hand_segmentation.py # 核心推理逻辑 (新建或重构)
|-- wrapper.pyx # Cython 包装器 (新建)
|-- setup.py # 编译脚本 (新建)
3.1.2 hand_segmentation.py
将模型加载和推理逻辑封装起来,这样可以避免全局变量污染,也更清晰
import logging
from pathlib import Path

import cv2
import numpy as np
import torch
import torch.nn.functional as F
from PIL import Image


class HandSegmentationModel:
    """手部分割模型封装"""

    def __init__(self, model_path, device, scale_factor=0.5, threshold=0.5,
                 classes=1, bilinear=False, use_ghost=True, dropout_p=0.3):
        self.device = device
        self.scale_factor = scale_factor
        self.threshold = threshold
        self.classes = classes

        from unet.model import UNet  # 确保该包在 PYTHONPATH 下可 import

        self.model = UNet(
            n_channels=3,
            n_classes=classes,
            bilinear=bilinear,
            use_ghost=use_ghost,
            dropout_p=dropout_p
        )

        self.model = self.model.to(memory_format=torch.channels_last)
        self.model.to(device=self.device)

        state_dict = torch.load(model_path, map_location=device)
        if isinstance(state_dict, dict) and 'model_state_dict' in state_dict:
            self.model.load_state_dict(state_dict['model_state_dict'])
            if 'best_dice' in state_dict:
                logging.info(f'best_dice={state_dict["best_dice"]:.4f}')
        else:
            if isinstance(state_dict, dict) and 'mask_values' in state_dict:
                del state_dict['mask_values']
            self.model.load_state_dict(state_dict)

        self.model.eval()
        logging.info(f"Model loaded: {model_path}")

    def predict(self, color_image_bgr: np.ndarray) -> np.ndarray:
        """输入 BGR uint8 [H,W,3],输出 mask uint8 [H,W] 0/255"""

        if color_image_bgr is None or color_image_bgr.ndim != 3 or color_image_bgr.shape[2] != 3:
            raise ValueError("Input must be BGR image with shape [H,W,3].")

        img_rgb = cv2.cvtColor(color_image_bgr, cv2.COLOR_BGR2RGB)
        img = img_rgb.transpose(2, 0, 1).astype(np.float32) / 255.0  # [C,H,W]

        img_tensor = torch.from_numpy(img).unsqueeze(0).to(
            device=self.device, dtype=torch.float32, memory_format=torch.channels_last
        )

        with torch.no_grad():
            img_tensor = F.interpolate(
                img_tensor, scale_factor=self.scale_factor,
                mode='bilinear', align_corners=False
            )

            output = self.model(img_tensor)
            if isinstance(output, tuple):
                output = output[0]

            if self.model.n_classes > 1:
                probs = F.softmax(output, dim=1)
                mask = torch.argmax(probs, dim=1).to(torch.float32)  # [N,H,W]
            else:
                probs = torch.sigmoid(output)
                mask = (probs > self.threshold).to(torch.float32)  # [N,1,H,W]

            H, W = color_image_bgr.shape[:2]
            if mask.dim() == 3:
                mask = mask.unsqueeze(1)  # [N,1,H,W]

            mask = F.interpolate(mask, size=(H, W), mode='nearest')
            mask = mask.squeeze().to('cpu').numpy().astype(np.uint8) * 255

        return mask


_model = None

def get_model(model_path: str = "best_model.pth"):
    global _model
    if _model is None:
        device = torch.device('cuda' if torch.cuda.is_available() else 'cpu')

        model_path = Path(model_path)
        if not model_path.is_absolute():
            model_path = Path(__file__).parent / model_path

        if not model_path.exists():
            raise FileNotFoundError(f"Model file not found: {model_path}")

        _model = HandSegmentationModel(model_path=str(model_path), device=device)
    return _model


if __name__ == '__main__':
    model_path = 'best_model.pth'
    device = torch.device('cuda' if torch.cuda.is_available() else 'cpu')
    model = HandSegmentationModel(
        model_path=model_path,
        device=device,
        scale_factor=0.5,
        threshold=0.5
    )

    image_path_str = r"D:\09_Pytorch-UNet-master\01_SMY_4\predict\20250610_123809_581.jpg"
    color_image = cv2.imread(image_path_str)        # 默认就是 BGR, uint8, [H, W, 3] 格式,这正是 model.predict 方法所期望的输入格式
    if color_image is None:
        raise FileNotFoundError(f"无法读取图片,请检查路径是否正确:{image_path_str}")

    pred_mask = model.predict(color_image)


    output_dir = Path(r"D:\09_Pytorch-UNet-master\01_SMY_4\predict")
    image_path = Path(image_path_str)  # 将路径字符串转换为Path对象以便使用 .stem
    mask_save_path = output_dir / f'{image_path.stem}_mask.png'

    # 确保输出目录存在
    output_dir.mkdir(parents=True, exist_ok=True)

    # 直接保存 pred_mask,它已经是 uint8 类型
    Image.fromarray(pred_mask).save(mask_save_path)

    print(f"掩码已保存至: {mask_save_path}")
3.2 Cython编译得到动态库(.pyd)
3.2.1 wrapper.pyx
定义将从 DLL 中导出的 C 语言函数
# wrapper.pyx
# cython: language_level=3
# distutils: language = c++

import numpy as np          # Python 层
cimport numpy as cnp        # Cython 层(用于类型)

cnp.import_array()          # 初始化 NumPy C-API

from hand_segmentation import get_model

def segment_image(cnp.ndarray[cnp.uint8_t, ndim=3] input_bgr not None,
                  model_path="best_model.pth"):
    """
    input_bgr: uint8 HxWx3 (BGR, contiguous)
    return: uint8 HxW mask (0/255)
    """
    if input_bgr.shape[2] != 3:
        raise ValueError("input_bgr must be HxWx3")

    # 若你担心不是连续内存,可强制:
    if not input_bgr.flags["C_CONTIGUOUS"]:
        input_bgr = np.ascontiguousarray(input_bgr)

    model = get_model(model_path)
    mask = model.predict(input_bgr)
    return mask
3.2.2 setup.py
from setuptools import setup, Extension
from Cython.Build import cythonize
import numpy
import sys

# 确定平台,因为链接器参数是平台相关的
# 这里我们只处理 Windows (msvc)
if sys.platform == 'win32':
    link_args = ['/DEF:hand_segmentation_dll.def']
else:
    # สำหรับ Linux/macOS,可能需要 -Wl,--version-script=...
    link_args = []


extensions = [
    Extension(
        "hand_segmentation_dll",
        ["wrapper.pyx"],
        include_dirs=[numpy.get_include()],
        extra_link_args=link_args  # <--- 添加这一行
    )
]

setup(
    ext_modules=cythonize(
        extensions,
        compiler_directives={'language_level': "3"}
    ),
)
3.2.3 编译生成pyd
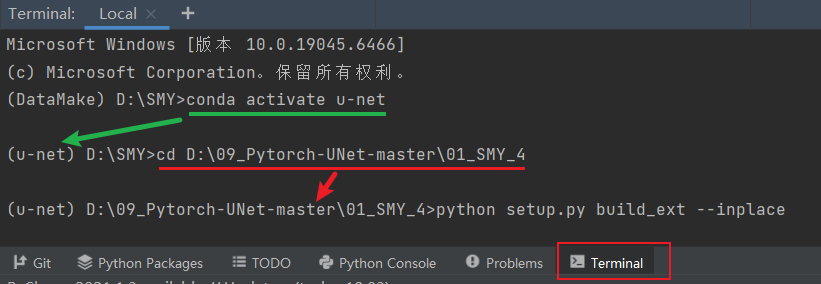
1)激活虚拟环境
conda activate u-net
2)先进入项目目录
cd D:\09_Pytorch-UNet-master\01_SMY_4
3)运行编译命令:
python setup.py build_ext --inplace
若是出错需要再次编译时,可以在编译前清理旧文件
python setup.py clean --all
4)编译完成,当前目录下可以看到** hand_segmentation_dll.cp312-win_amd64.pyd**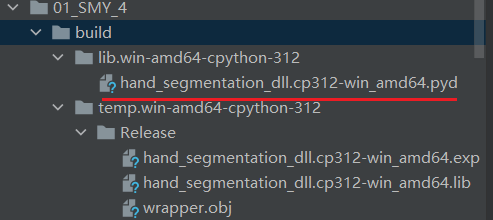
5)复制一份.pyd 文件,将其重命名为 hand_segmentation_dll.pyd
3.3 dll的动态调用
建立一个C++项目对刚生成的动态链接进行测试,本文此处的项目名依旧为SMY_dll
注意:
1)属性配置,与2.2.2一致
包含目录还需加上以下路径(C++代码需用到numpy)
C:\Users\PC\anaconda3\envs\u-net\Lib\site-packages\numpy_core\include2)版本和架构配置,与2.2.3一致
3)将hand_segmentation_dll.pyd文件复制在可执行文件(项目名.exe)所在的目录(项目名\x64\Release)
4)此项目脚本用到OpenCV 库,所以需要配置对应的属性,详细步骤可参考Windows10_visual studio 2019+opencv 4.5.2,此处配置的OpenCV 库链接不能有 Debug 库(*.lib 文件名以 ‘d’ 结尾),Python 和它的生态系统全部都是在 Release 模式下编译的
3.3.1 项目结构
将python项目的相关文件复制在VS项目里,项目结构如下
C:\Users\PC\Desktop\SMY_dll
|-- main.cpp
|-- x64\Release\best_model.pth
|-- x64\Release\hand_segmentation_dll.pyd
|-- x64\Release\hand_segmentation.py
|-- x64\Release\python312.dll
|-- x64\Release\python3.dll
|-- x64\Release\unet\model.py
3.3.2 main.cpp
因为后续运行总是出现找不到python的标准库的提示,因此这里直接将环境路径写在代码里了
添加脚本main.cpp
#define PY_SSIZE_T_CLEAN
#include <Python.h>

#define NPY_NO_DEPRECATED_API NPY_1_7_API_VERSION
#include <numpy/arrayobject.h>

#include <opencv2/opencv.hpp>

#ifdef _WIN32
#include <Windows.h>
#endif

#include <iostream>
#include <string>

// ===== 路径配置(按机器写死)=====
static const wchar_t* PY_HOME = L"C:\\Users\\PC\\anaconda3\\envs\\u-net";
static const wchar_t* PY_LIB = L"C:\\Users\\PC\\anaconda3\\envs\\u-net\\Lib";
static const wchar_t* PY_DLLS = L"C:\\Users\\PC\\anaconda3\\envs\\u-net\\DLLs";
static const wchar_t* PY_SITE = L"C:\\Users\\PC\\anaconda3\\envs\\u-net\\Lib\\site-packages";
static const wchar_t* APP_DIR = L"C:\\Users\\PC\\Desktop\\SMY_dll\\x64\\Release";
static const wchar_t* CONDA_BIN = L"C:\\Users\\PC\\anaconda3\\envs\\u-net\\Library\\bin";

static std::string narrow_from_wide_simple(const std::wstring& ws) {
    return std::string(ws.begin(), ws.end());
}

static void add_dll_dir_win(const wchar_t* dir) {
#ifdef _WIN32
    SetDllDirectoryW(dir);
#else
    (void)dir;
#endif
}

static void set_workdir_release() {
#ifdef _WIN32
    SetCurrentDirectoryW(APP_DIR);
#endif
}

static int init_python_embedded() {
    add_dll_dir_win(CONDA_BIN);
    set_workdir_release();

    PyStatus status;
    PyConfig config;
    PyConfig_InitPythonConfig(&config);

    config.use_environment = 0;
    config.site_import = 0;
    config.user_site_directory = 0;
    config.isolated = 1;

    status = PyConfig_SetString(&config, &config.home, PY_HOME);
    if (PyStatus_Exception(status)) { PyConfig_Clear(&config); return -1; }

    config.module_search_paths_set = 1;
    status = PyWideStringList_Append(&config.module_search_paths, PY_LIB);
    if (PyStatus_Exception(status)) { PyConfig_Clear(&config); return -2; }
    status = PyWideStringList_Append(&config.module_search_paths, PY_DLLS);
    if (PyStatus_Exception(status)) { PyConfig_Clear(&config); return -3; }
    status = PyWideStringList_Append(&config.module_search_paths, PY_SITE);
    if (PyStatus_Exception(status)) { PyConfig_Clear(&config); return -4; }
    status = PyWideStringList_Append(&config.module_search_paths, APP_DIR);
    if (PyStatus_Exception(status)) { PyConfig_Clear(&config); return -5; }

    status = Py_InitializeFromConfig(&config);
    PyConfig_Clear(&config);
    if (PyStatus_Exception(status)) {
        Py_ExitStatusException(status);
        return -6;
    }

    if (_import_array() < 0) {
        PyErr_Print();
        return -7;
    }
    return 0;
}

// capsule 析构:释放我们 new 出来的 cv::Mat*
static void capsule_cleanup(PyObject* capsule) {
    void* p = PyCapsule_GetPointer(capsule, "cv_mat_ptr");
    auto* m = reinterpret_cast<cv::Mat*>(p);
    delete m;
}

// cv::Mat(BGR, uint8, HxWx3, continuous) -> numpy ndarray (H,W,3) uint8
// numpy 持有 capsule,确保底层内存有效
static PyObject* mat_to_numpy_uint8_3c_owned(const cv::Mat& mat_bgr_u8) {
    if (mat_bgr_u8.empty()) return nullptr;
    if (mat_bgr_u8.type() != CV_8UC3) return nullptr;
    if (!mat_bgr_u8.isContinuous()) return nullptr;

    // 拷贝一个 header(共享同一块 data),并用 new 保存,交给 capsule 管
    auto* heapMat = new cv::Mat(mat_bgr_u8);

    npy_intp dims[3] = { heapMat->rows, heapMat->cols, 3 };
    npy_intp strides[3] = {
        (npy_intp)heapMat->step, // 每行字节数
        3,                       // 每列像素前进 3 字节
        1                        // 每通道前进 1 字节
    };

    PyArray_Descr* descr = PyArray_DescrFromType(NPY_UINT8);
    if (!descr) {
        delete heapMat;
        return nullptr;
    }

    PyObject* arr = PyArray_NewFromDescr(
        &PyArray_Type,
        descr,
        3,
        dims,
        strides,
        (void*)heapMat->data,
        0,
        nullptr
    );
    if (!arr) {
        delete heapMat;
        return nullptr;
    }

    PyObject* capsule = PyCapsule_New((void*)heapMat, "cv_mat_ptr", capsule_cleanup);
    if (!capsule) {
        Py_DECREF(arr);
        delete heapMat;
        return nullptr;
    }

    // 把 capsule 挂到 ndarray.base 上:ndarray 销毁时会触发 capsule_cleanup
    if (PyArray_SetBaseObject((PyArrayObject*)arr, capsule) < 0) {
        Py_DECREF(capsule);
        Py_DECREF(arr);
        return nullptr;
    }

    return arr; // new reference
}

// Python mask -> cv::Mat CV_8UC1(拷贝)
static bool py_mask_to_cv8uc1(PyObject* py_mask, cv::Mat& out_mask) {
    if (!py_mask) return false;

    PyObject* arr_obj = PyArray_FromAny(
        py_mask, nullptr,
        2, 2,
        NPY_ARRAY_CARRAY,
        nullptr
    );
    if (!arr_obj) { PyErr_Print(); return false; }

    PyArrayObject* arr = (PyArrayObject*)arr_obj;
    npy_intp h = PyArray_DIM(arr, 0);
    npy_intp w = PyArray_DIM(arr, 1);

    if (PyArray_TYPE(arr) != NPY_UINT8) {
        PyObject* u8 = PyArray_Cast(arr, NPY_UINT8);
        Py_DECREF(arr_obj);
        if (!u8) { PyErr_Print(); return false; }
        arr_obj = u8;
        arr = (PyArrayObject*)arr_obj;
        h = PyArray_DIM(arr, 0);
        w = PyArray_DIM(arr, 1);
    }

    unsigned char* data = (unsigned char*)PyArray_DATA(arr);

    out_mask = cv::Mat((int)h, (int)w, CV_8UC1);
    std::memcpy(out_mask.data, data, (size_t)h * (size_t)w);

    Py_DECREF(arr_obj);
    return true;
}

int wmain(int argc, wchar_t** argv) {
    std::wstring input_path =  L"D:\\09_Pytorch-UNet-master\\01_SMY_4\\predict\\20250610_123809_581.jpg";
    std::wstring output_path =  L"C:\\Users\\PC\\Desktop\\SMY_dll\\output\\mask.png";
    std::wstring model_path = L"best_model.pth";

    if (argc >= 2) input_path = argv[1];
    if (argc >= 3) output_path = argv[2];
    if (argc >= 4) model_path = argv[3];

    int rc = init_python_embedded();
    if (rc != 0) {
        std::cerr << "init_python_embedded failed, rc=" << rc << "\n";
        return 1;
    }

    cv::Mat img = cv::imread(narrow_from_wide_simple(input_path), cv::IMREAD_COLOR);
    if (img.empty()) {
        std::cerr << "Failed to read image: " << narrow_from_wide_simple(input_path) << "\n";
        Py_Finalize();
        return 2;
    }
    if (!img.isContinuous()) img = img.clone(); // 保证连续

    PyObject* mod = PyImport_ImportModule("hand_segmentation_dll");
    if (!mod) {
        std::cerr << "Import hand_segmentation_dll failed\n";
        PyErr_Print();
        Py_Finalize();
        return 3;
    }

    PyObject* func = PyObject_GetAttrString(mod, "segment_image");
    if (!func || !PyCallable_Check(func)) {
        std::cerr << "segment_image not found/callable\n";
        PyErr_Print();
        Py_XDECREF(func);
        Py_DECREF(mod);
        Py_Finalize();
        return 4;
    }

    PyObject* np_img = mat_to_numpy_uint8_3c_owned(img);
    if (!np_img) {
        std::cerr << "Mat->numpy failed\n";
        PyErr_Print();
        Py_DECREF(func);
        Py_DECREF(mod);
        Py_Finalize();
        return 5;
    }

    PyObject* args = PyTuple_Pack(1, np_img);
    Py_DECREF(np_img);

    PyObject* kwargs = PyDict_New();
    PyObject* py_model_path = PyUnicode_FromWideChar(model_path.c_str(), (Py_ssize_t)model_path.size());
    PyDict_SetItemString(kwargs, "model_path", py_model_path);
    Py_DECREF(py_model_path);

    PyObject* py_mask = PyObject_Call(func, args, kwargs);
    Py_DECREF(kwargs);
    Py_DECREF(args);
    Py_DECREF(func);
    Py_DECREF(mod);

    if (!py_mask) {
        std::cerr << "segment_image call failed\n";
        PyErr_Print();
        Py_Finalize();
        return 6;
    }

    cv::Mat mask;
    bool ok = py_mask_to_cv8uc1(py_mask, mask);
    Py_DECREF(py_mask);

    if (!ok || mask.empty()) {
        std::cerr << "mask convert failed\n";
        Py_Finalize();
        return 7;
    }

    if (!cv::imwrite(narrow_from_wide_simple(output_path), mask)) {
        std::cerr << "Failed to write: " << narrow_from_wide_simple(output_path) << "\n";
        Py_Finalize();
        return 8;
    }

    std::cout << "OK. mask saved to: " << narrow_from_wide_simple(output_path) << "\n";
    Py_Finalize();
    return 0;
}
调用成功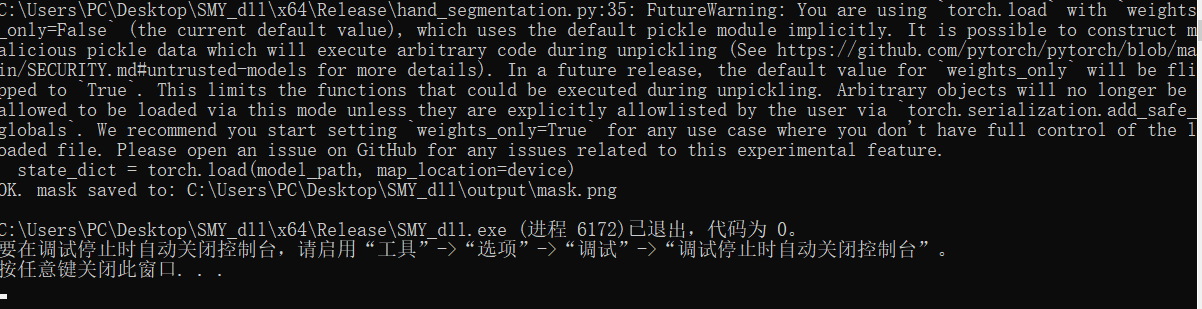
常见错误
2.3 调用出错 Could not find platform independent 1ibraries
Could not find platform independent 1ibraries
Python path configuration: PYTHONHOME = (not set) PYTHONPATH = (not set)
Fatal Python error: init-fs_encoding: failed to get the Python codec of the filesystem encoding ModuleNotFoundError: No module named ‘encodings’
sys.prefix = ‘C:\Users\PC\Desktop\SMY_dl1’
C++ 程序成功加载了 SMY_dll.dll,然后 SMY_dll.dll 尝试启动 Python,但 Python 像一个“失忆”的人,不知道自己的核心文件(标准库)放在哪里,导致启动失败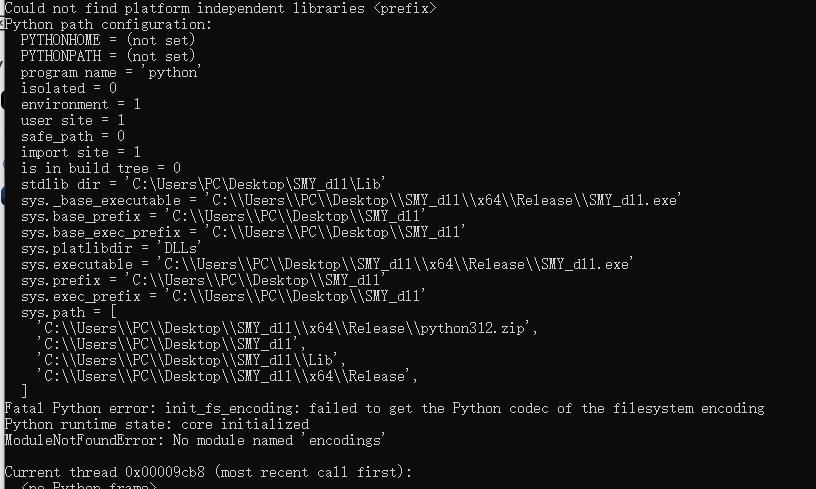
解决方法:
依次执行以下步骤
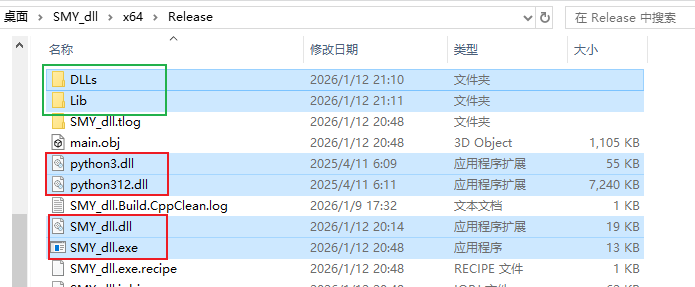
1)将虚拟环境目录里的Lib 文件夹和DLLs 文件夹复制在可执行文件所在的目录
可执行文件(项目名.exe)所在的目录
C:\Users\PC\Desktop\SMY_dll\x64\Release
虚拟环境目录
C:\Users\PC\anaconda3\envs\u-net
2)确保以下文件也在.exe文件所在的目录
python3.dll
python312.dll
SMY_dll.dll
SMY_dll.exe
3.3 调用出错 0xC0000005
0x00007FF9594D855B (ucrtbased.dll)处(位于 SMY_dll.exe 中)引发的异常: 0xC0000005: 读取位置 0x0000000000920090 时发生访问冲突。
这个错误信息里的 ucrtbased.dll 是铁证。那个尾缀的 d 代表 “Debug”。这明确地告诉我们,尽管 Visual Studio 项目配置设置为了 “Release”,但由于某种原因,进程在运行时仍然加载了 Debug 版本的 C 运行时库
只要 ucrtbased.dll 被加载进来了,与 Python 环境的 Release 库(ucrtbase.dll,没有’d’)冲突就不可避免,崩溃是必然的
解决方法:
依次执行以下步骤
1)打开VS项目里的属性页面
2)检查运行时库设置
确保顶部的 配置 (Configuration) 设置为 活动(Release),平台 (Platform) 设置为 活动(x64)
导航到 C/C++ -> 代码生成 (Code Generation)
检查 运行时库 (Runtime Library) ,必须 是 多线程 DLL (/MD)
3)清理链接器输入
导航到 链接器 (Linker) -> 输入 (Input)
查看 附加依赖项 (Additional Dependencies)
删除所有以 d.lib 结尾的库
4)重新生成解决方案
右键项目,选择重新生成解决方案
参考文章
参考视频
Unity常用API讲解
参考博文
python打包dll:https://blog.csdn.net/2301_79605567/article/details/141613618
手把手教你将Python程序打包为DLL:https://blog.csdn.net/zmr1994/article/details/90703017
用cython将python程序打包成C++动态库(windows+Vistual Studio2017平台):https://blog.csdn.net/weixin_45805339/article/details/147312793

AtomGit 是由开放原子开源基金会联合 CSDN 等生态伙伴共同推出的新一代开源与人工智能协作平台。平台坚持“开放、中立、公益”的理念,把代码托管、模型共享、数据集托管、智能体开发体验和算力服务整合在一起,为开发者提供从开发、训练到部署的一站式体验。
更多推荐


 16
16 0
0- 0


 已为社区贡献1条内容

所有评论(0)