【flutter for open harmony】第三方库Flutter 鸿蒙版 分贝计 实战指南(适配 1.0.0)✨
【flutter for open harmony】第三方库Flutter 鸿蒙版 分贝计 实战指南(适配 1.0.0)✨
Flutter 三方库 cached_network_image 的鸿蒙化适配与实战指南
欢迎加入开源鸿蒙跨平台社区: https://openharmonycrossplatform.csdn.net
本文详细介绍如何在Flutter鸿蒙应用中实现分贝计功能,包括声音强度显示、等级判断和可视化仪表盘。
一、前言
分贝计是测量声音强度的工具,广泛应用于噪音监测、环境评估等场景。本文将介绍如何在Flutter鸿蒙应用中实现模拟分贝计功能。
二、效果展示
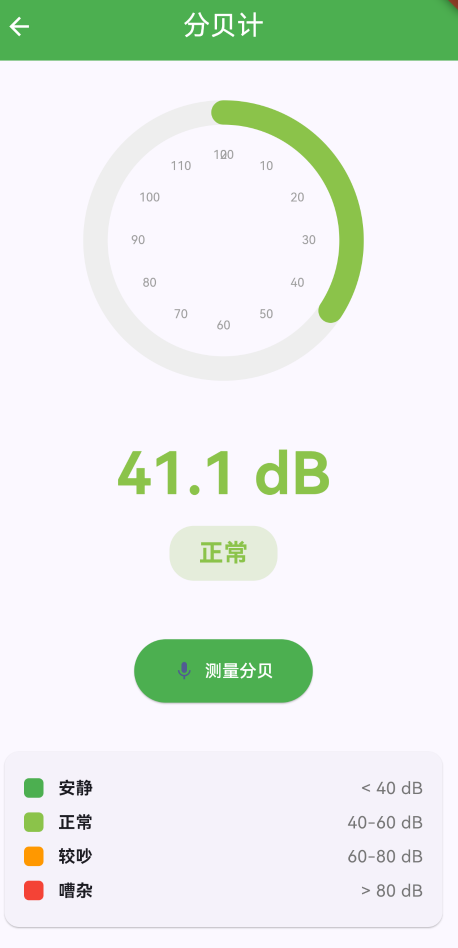
2.1 功能特性
| 功能 | 描述 |
|---|---|
| 分贝显示 | 显示当前分贝数值 |
| 等级判断 | 判断声音等级(安静/正常/较吵/嘈杂) |
| 可视化仪表 | 圆形仪表盘显示分贝 |
| 颜色指示 | 不同等级显示不同颜色 |
三、项目背景与目标
3.1 项目背景
噪音污染是现代城市面临的重要问题,分贝计可以帮助用户了解周围环境的噪音水平。
3.2 项目目标
- 实现分贝数值显示
- 实现声音等级判断
- 实现可视化仪表盘
- 实现颜色指示功能
四、技术架构设计
4.1 架构概述
分贝计使用Flutter的CustomPaint绘制仪表盘,通过随机数模拟分贝值(实际应用中需要使用麦克风权限获取真实数据)。
4.2 分贝等级划分
| 等级 | 分贝范围 | 颜色 |
|---|---|---|
| 安静 | < 40 dB | 绿色 |
| 正常 | 40-60 dB | 浅绿 |
| 较吵 | 60-80 dB | 橙色 |
| 嘈杂 | > 80 dB | 红色 |
五、详细实现
5.1 Flutter端实现
import 'dart:math';
import 'package:flutter/material.dart';
class DecibelMeterPage extends StatefulWidget {
const DecibelMeterPage({super.key});
State<DecibelMeterPage> createState() => _DecibelMeterPageState();
}
class _DecibelMeterPageState extends State<DecibelMeterPage> {
double _decibel = 0;
final Random _random = Random();
void _measureDecibel() {
setState(() {
_decibel = 30 + _random.nextDouble() * 70;
});
}
Color _getDecibelColor() {
if (_decibel < 40) return Colors.green;
if (_decibel < 60) return Colors.lightGreen;
if (_decibel < 80) return Colors.orange;
return Colors.red;
}
String _getDecibelLevel() {
if (_decibel < 40) return '安静';
if (_decibel < 60) return '正常';
if (_decibel < 80) return '较吵';
return '嘈杂';
}
Widget build(BuildContext context) {
return Scaffold(
appBar: AppBar(
title: const Text('分贝计'),
centerTitle: true,
backgroundColor: Colors.green,
foregroundColor: Colors.white,
),
body: Center(
child: Column(
mainAxisAlignment: MainAxisAlignment.center,
children: [
SizedBox(
width: 250,
height: 250,
child: CustomPaint(
painter: DecibelMeterPainter(_decibel),
),
),
const SizedBox(height: 32),
Text(
'${_decibel.toStringAsFixed(1)} dB',
style: TextStyle(
fontSize: 48,
fontWeight: FontWeight.bold,
color: _getDecibelColor(),
),
),
const SizedBox(height: 8),
Container(
padding: const EdgeInsets.symmetric(horizontal: 24, vertical: 8),
decoration: BoxDecoration(
color: _getDecibelColor().withOpacity(0.2),
borderRadius: BorderRadius.circular(20),
),
child: Text(
_getDecibelLevel(),
style: TextStyle(
fontSize: 20,
color: _getDecibelColor(),
fontWeight: FontWeight.bold,
),
),
),
const SizedBox(height: 48),
ElevatedButton.icon(
onPressed: _measureDecibel,
icon: const Icon(Icons.mic),
label: const Text('测量分贝'),
style: ElevatedButton.styleFrom(
backgroundColor: Colors.green,
foregroundColor: Colors.white,
padding: const EdgeInsets.symmetric(horizontal: 32, vertical: 16),
),
),
const SizedBox(height: 24),
Card(
margin: const EdgeInsets.all(16),
child: Padding(
padding: const EdgeInsets.all(16),
child: Column(
children: [
_buildLevel('安静', '< 40 dB', Colors.green),
_buildLevel('正常', '40-60 dB', Colors.lightGreen),
_buildLevel('较吵', '60-80 dB', Colors.orange),
_buildLevel('嘈杂', '> 80 dB', Colors.red),
],
),
),
),
],
),
),
);
}
Widget _buildLevel(String level, String range, Color color) {
return Padding(
padding: const EdgeInsets.symmetric(vertical: 4),
child: Row(
children: [
Container(width: 16, height: 16, decoration: BoxDecoration(color: color, borderRadius: BorderRadius.circular(4))),
const SizedBox(width: 12),
Text(level, style: const TextStyle(fontWeight: FontWeight.bold)),
const Spacer(),
Text(range, style: TextStyle(color: Colors.grey[600])),
],
),
);
}
}
class DecibelMeterPainter extends CustomPainter {
final double decibel;
DecibelMeterPainter(this.decibel);
void paint(Canvas canvas, Size size) {
final center = Offset(size.width / 2, size.height / 2);
final radius = size.width / 2 - 20;
final bgPaint = Paint()
..color = Colors.grey[200]!
..style = PaintingStyle.stroke
..strokeWidth = 20;
canvas.drawCircle(center, radius, bgPaint);
final progress = (decibel / 120).clamp(0.0, 1.0);
final progressPaint = Paint()
..color = _getColor()
..style = PaintingStyle.stroke
..strokeWidth = 20
..strokeCap = StrokeCap.round;
canvas.drawArc(
Rect.fromCircle(center: center, radius: radius),
-pi / 2,
progress * 2 * pi,
false,
progressPaint,
);
final textPainter = TextPainter(textDirection: TextDirection.ltr);
for (int i = 0; i <= 12; i++) {
final angle = -pi / 2 + (i / 12) * 2 * pi;
final x = center.dx + (radius - 35) * cos(angle);
final y = center.dy + (radius - 35) * sin(angle);
textPainter.text = TextSpan(
text: '${i * 10}',
style: const TextStyle(fontSize: 10, color: Colors.grey),
);
textPainter.layout();
textPainter.paint(canvas, Offset(x - textPainter.width / 2, y - textPainter.height / 2));
}
}
Color _getColor() {
if (decibel < 40) return Colors.green;
if (decibel < 60) return Colors.lightGreen;
if (decibel < 80) return Colors.orange;
return Colors.red;
}
bool shouldRepaint(covariant CustomPainter oldDelegate) => true;
}
5.2 核心功能解析
分贝等级判断
根据分贝值返回对应的颜色和等级文字描述。
仪表盘绘制
使用CustomPainter绘制圆形仪表盘,包括背景圆、进度弧和刻度数字。
颜色指示
根据分贝等级动态改变显示颜色,直观反映声音强度。
六、实际应用场景
6.1 环境监测
监测家庭、办公室等环境的噪音水平。
6.2 健康提醒
提醒用户注意噪音环境,保护听力健康。
6.3 工业安全
工业环境中监测噪音,确保工人安全。
七、优化建议
7.1 真实麦克风数据
集成permission_handler和flutter_sound获取真实麦克风数据。
7.2 实时监测
添加实时监测模式,持续显示分贝变化。
7.3 历史记录
保存测量历史,生成噪音报告。
八、常见问题与解决方案
8.1 权限问题
确保应用获取了麦克风权限。
8.2 数值波动
添加平滑处理算法,减少数值波动。
8.3 性能问题
优化绘制频率,避免过度重绘。
九、总结
本文详细介绍了Flutter鸿蒙分贝计功能的实现过程,包括分贝显示、等级判断和可视化仪表盘。通过本实例,开发者可以掌握Flutter自定义绘制、状态管理、颜色处理等关键技术点。
十、参考资料
- Flutter官方文档:https://flutter.dev
- HarmonyOS开发者文档:https://developer.harmonyos.com
- Flutter中国社区:https://flutter-io.cn

AtomGit 是由开放原子开源基金会联合 CSDN 等生态伙伴共同推出的新一代开源与人工智能协作平台。平台坚持“开放、中立、公益”的理念,把代码托管、模型共享、数据集托管、智能体开发体验和算力服务整合在一起,为开发者提供从开发、训练到部署的一站式体验。
更多推荐
 9
9 0
0- 0


 已为社区贡献1条内容

所有评论(0)